1
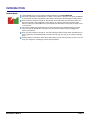
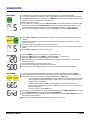
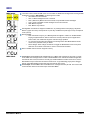
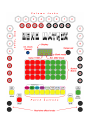
BEND MATRIX USER MANUAL
v2.3
TABLE OF CONTENTS
Introduction..................................................................3
Patches and Banks......................................................4
Sequencer.....................................................................5
Effects...........................................................................7
MIDI...............................................................................9
Layers...........................................................................10
Advanced Features......................................................11
Specifications...............................................................12
BEND MATRIX MANUAL
PAGE 2
INTRODUCTION
Button Matrix
BEND MATRIX MANUAL
The Bend Matrix has 4 rows of 8 buttons, totaling 32 buttons in the BUTTON MATRIX
Each button represents a switch between a "column" jack (columns 1-8) and a "row" jack (rows A/B/C/D
in normal mode, and also rows E/F/G/H in dual mode). See the panel layout diagram for jack locations.
When a switch is activated, a signal can flow between the corresponding row and column jacks. The
signal can be audio, video, digital data, control voltage, etc. Normally, the signal can flow in either
direction, although your Bend Matrix may optionally be wired with buffers to only allow the signal to flow
in one direction.
For example, pressing the third button from the left on the second row (diagram at left) will connect
Column 3 Jack with Row B Jack. A signal can now flow between whatever you have plugged into
Column 3 and Row B.
When you press a button, it will light up. The button will stay lit and the switch will be activated until you
press it again Note: in Momentary Mode, the button will only stay on as long as your finger is holding it
down..
Pressing buttons on the button matrix will not effect what's stored in memory unless you save it. You can
undo your changes by re-loading the current patch (see below)
PAGE 3
PATCHES AND BANKS
Load Patch
Load Bank
+
Clear patch
Clear bank
The patches are access by the yellow PATCH BUTTONS.
There are 8 patches per bank, each patch stores button matrix state into memory.
Press a yellow PATCH BUTTON to load a patch. The patch number is shown on the display (for
example, the picture on the left indicates patch #3)
When you press a PATCH BUTTON, the stored patch will be loaded into the button matrix
The current patch is indicated by a yellow patch button being lit up. You can press the current PATCH
BUTTON to re-load it and undo any changes you've made on the button matrix.
There are 16 banks, each bank stores 8 patches in a sequence.
In PLAY or PAUSE mode, the current bank # is displayed. The picture on the left means “Bank 1”.
You can also see what bank you're in by holding down SHIFT: the current bank will flash on the button
matrix.
The red matrix buttons are the bank buttons. The top row is banks numbers 1-4, the next row is 5-8, etc.
(total of 16 banks)
To change to another bank, hold down SHIFT and press a bank button: the display will indicate which
bank you selected and the button matrix will immediately be loaded with a patch from the new bank.
Press CLEAR to clear the current button matrix. This will not erase the current patch in memory: you
can undo a clear by pressing the current PATCH BUTTON.
Note: Holding down CLEAR and pressing a button on the matrix will add that button to the CLEAR
LAYER (see the Layers chapter)
Press SHIFT+CLEAR to clear all 8 patches in the current bank.
+
Save patch
Save Bank
+
BEND MATRIX MANUAL
Press SAVE to save the current button matrix to a patch
The 8 PATCH BUTTONS will flash, with the current patch flashing rapidly
Press a PATCH BUTTON to save to that patch number.
To cancel, press CLEAR
Hint: press SAVE twice in a row to save to the current patch and step the sequencer ahead. You can
quickly program an entire bank this way: make the first patch, hit SAVE twice, make the second patch,
hit SAVE twice, make the third patch, hit SAVE twice, etc..
Note: saving a patch does not store it into long-term memory. The patch will be saved as long as the
power is on. In order to have it saved after you turn the Bend Matrix off, you must save a whole bank
(see "Save Bank" below).
Hold SHIFT and press SAVE to save the current bank
The 16 BANK BUTTONS will flash on the button matrix, with the current bank flashing rapidly
Press a flashing BANK BUTTON to save into that bank. The bank will be stored in long-term memory
even after the Bend Matrix is turned off. The display should briefly flicker to indicate long-term memory is
being written to.
Press CLEAR to cancel.
Saving a bank will also save the Length settings (see below).
PAGE 4
SEQUENCER
Play mode
Play bank
+
Press PLAY : the 8 patches in the current bank will be played in sequence and repeated.
The method of playback and repeating can be changed with the Path and Length features (see below)
The PLAY button will be lit up continuously, the TEMPO light will flash, and the display will animate while
continuing to show the current Bank # (e.g. Bank #5)
Press PLAY again to pause.
In Play mode, you can press and hold a PATCH BUTTON to force the Bend Matrix to hold at that patch.
As soon as you release the PATCH BUTTON, it will continue playing from that patch. In this way you
can play different patches like a keyboard, and the Bend Matrix will fill when you're not playing.
You also can change banks while playing. Simply hold SHIFT and press a red BANK BUTTON.
Press SHIFT + PLAY to play multiple banks. By default, banks 1 through 16 will be played, and then
repeated.
The direction of playback and range of banks to repeat can be changed with the Path and Length
features (see below)
The right-most dot on the display indicates Play Bank Mode
The current bank number will continue to be shown on the display and will be updated as new banks are
loaded
Press SHIFT + PLAY again to return to Play mode
Tempo/BPM
Turn the TEMPO rotary knob to change the current BPM by +/-50
Hold down SHIFT while turning TEMPO to change the BPM by +/-5 (fine tuning)
Hold down SHIFT for two seconds to display the current BPM
Each patch represents one beat (e.g. 120 BPM means 120 patches will be played in 1 minute, or 2
patches per second)
The minimum BPM is 2 (or 30 seconds per patch)
The maximum is 1995 (about 30 microseconds per patch)
The left-most dot on the display indicates +1000 (e.g. the bottom picture means “1500 BPM”
Set Length
To set the beginning and ending patches or banks for playback, hold SHIFT and press LENGTH
The 8 patch buttons and the 16 bank buttons will flash and the display will say "BEG" (for beginning)
At this point, you can choose between setting the patch length or bank length:
○ To set the beginning/ending patches for the playback: Press a yellow Patch Button to set the
beginning patch. The display will change to "END" and you can press another yellow Patch
Button to set the ending patch.
○ To set the beginning/ending bank for bank playback: Press a Bank Button to set the
beginning bank. The display will change to "END" and you can press another Bank Button to
send the ending bank.
○ To cancel, press the red CLEAR button.
For example, if you want playback to repeat patches 3 through 6, press SHIFT+LENGTH and then press
the 3rd PATCH BUTTON, and then press the 6th PATCH BUTTON.
Or, for example, if you want playback to repeat banks 2 through 14, press SHIFT+LENGTH, and then
press Bank 2 and then Bank 14.
Note: The patch and bank length settings are stored in long-term memory.
+
BEND MATRIX MANUAL
PAGE 5
Set Path
+
BEND MATRIX MANUAL
Press SHIFT+PATH to set the "path" or repeat mode. The display will indicate the current mode:
○ Fwd (default mode): repeats the sequence forwards (counting up).
○ rEv: repeats the sequence in reverse (counting down)
○ onE: plays the sequence forwards once, and then stops
○ rAn: plays random patches. In Play Bank Mode, random banks are also selected
Keep pressing SHIFT+PATH until the display shows the mode you want.
The selected path will always work within the bounds set by Length. For instance, if you set the Patch
Length to be from patch 5 to 7, and Bank Length to be from banks 9 to 12, and Path to be Reverse, the
Bend Matrix will play:
○ Bank 12, Patch 7, then
○ Bank 12, Patch 6, then
○ Bank 12, Patch 5, then
○ Bank 11, Patch 7, then
○ Bank 11, Patch 6,
○ ...etc. until it reaches
○ Bank 9, Patch 5, and then repeats starting at
○ Bank 12, Patch ...
PAGE 6
EFFECTS
You can apply real-time analog-controlled effects to the current button matrix using the knobs.
The effects are typically laid over the current patch or playback. This allows you to let a repeating or
random sequence run while you modulate effects in a separate layer. At any time, the layers can be
"flattened" and the current button matrix (consisting of a loaded patch plus effects) can be saved into a
patch.
You can select one of four effects: Strobe, Arp, Gloob, or Random.
Each of the four effects has four modes numbered 1/2/3/4.
Each of the four knobs modifies the effect for one section of the button matrix.
To select an effect, hold SHIFT and press the appropriate yellow KNOB EFFECT button. The display will
indicate the first letter of the current effect (S/A/G/R), and current effect mode (1/2/3/4)
To cycle through the effect modes, press SHIFT+KNOB EFFECT button again.
The way the button matrix is sectioned up is set by the Knob Layout Mode (see below). In this way, the
effect can be applied in different ways to different parts of the button matrix.
To turn the effects off, press SHIFT+KNOB EFFECT (any effect) to cycle through the effect modes
until the display shows three dashes.
Strobe effect
+
Gloob effect
+
BEND MATRIX MANUAL
Strobe effect flickers, or strobes, the current patch. It only is active in play mode (or play banks mode). In
pause mode, the knobs have no effect.
When a knob is at zero, its corresponding button matrix section is "off" (nothing is lit up)
As the knob is turned up from zero to mid-way, the current patch will flicker or strobe "on" when the
sequencer loads a new patch. The duration of the strobe will become longer and longer as the knob is
turned up.
When the knob is at mid-way, the patch will behave normally (full strobing, or no flicker).
As the knob is turned up from mid-way to full, the patch will strobe between two patches that depend on
the effect mode. The duration of the strobe will become longer and longer as the knob is turned up.
○ Effect mode 1: Start at the current patch, flicker to an overlay of the current patch and next
patch
○ Effect mode 2: Start at an overlay of the current patch and next patch, flicker to the current
patch
○ Effect mode 3: Start at the current patch, flicker to the next patch
○ Effect mode 4: Start at the next patch, flicker to an overlay of the current patch and next
patch.
Strobe effect mode 1 and 2 can be used as a sort of mixer, with each knob being a sort of "level" control.
When the knob is turned down , the section is off. As the knob is turned up, the patch becomes more
and more present (analogous to "louder"), until mid-way when the current patch is fully present and then
starts to "bleedthrough" to the next patch. This is especially useful with 4 audio inputs and 8 speaker
outputs on "row" Knob Layout Mode: each knob controls the "level" of each instrument.
Gloob effect pushes bits and blocks around the button matrix as the knobs are turned. The bits and
blocks are overlayed on top of the current patch.
○ Effect mode 1: A single button is lit up, and moves around the knob's section.
○ Effect mode 2: The knob's section is filled up with bits in a digital counting fashion (0000,
0001, 0010, 0011, 0100, 0101, ...)
○ Effect mode 3: A block moves into the section from the left (or top) until it completely overlays
the section, and then exits to the right (or bottom).
○ Effect mode 4: The knob's section is filled up with bits in a digital counting fashion, and this is
XOR'ed with the current patch. This can be used to "punch out" bits in a patch
Gloob is a useful effect for moving sounds or connections around manually. The knobs can be turned in
real-time until an interesting patch results, and then it can be saved. This can be repeated to fill up a
bank with patches.
PAGE 7
Arp effect
Arp is an arpeggiation effect. Arp will light up, one at a time, the buttons in the current patch.
For instance, if a patch has three buttons lit up, numbers 2,4, and 5, then Arp will first light just button 2,
then just button 4, then just button 5... In this way a "chord" can be defined within a single patch and Arp
will play individual "notes" of the chord.
The knobs set the speed and direction of arpeggiation.
○ At center, the effect is held or frozen at the first "note".
○ When the knob is to the right of center, the arpeggiation goes upwards.
○ When the knob is to the left of center, it goes downwards.
○ As the knob is turned up or down, the arpeggiation plays slowly when it's closer to center and
faster at the extremes (up to 64 times the current tempo BPM).
The effect modes change the way the arpeggiation happens:
○ Effect mode 1: repeat the arpeggiation indefinitely
○ Effect mode 2: play the arpeggiation once, then go blank
○ Effect mode 3: play the arpeggiation once, then hold on the last "note"
○ Effect mode 4: play random "notes" in the arpeggiation. The knob still controls the speed, but
has no effect on direction.
An interesting feature of the Arp Effect is that each section of the button matrix can change at different
rates relative to each other, while the overall rate will always be dependent on the tempo BPM (even
when the sequencer is not playing).
+
Random effect
Random mode turns random bits on and off within the current patch.
The speed at which bits are flipped is determined by the knobs: from 0 (no effect) to 64 times the current
tempo/LED.
The effect modes determine the number of bits that are flipped at a time:
○ Effect mode 1: one bits flipped at a time
○ Effect mode 2: two bits flipped at a time
○ Effect mode 3: three bits flipped at a time
○ Effect mode 4: four bits flipped at a time
+
Knob Layout
+
The Knob Layout Mode chooses how the 32 buttons are split into 4 sections, one for each knob. To
cycle through the knob modes, press Shift+Knobs until the display indicates the mode you want:
Row mode (default):
4 rows of 8
Column mode:
4 double columns
Corner mode:
4 corners
BEND MATRIX MANUAL
PAGE 8
MIDI
MIDI mode
+
The button matrix is linked to MIDI notes. You can enable or disable the sending and/or receiving of MIDI
messages by pressing SHIFT+MIDI to cycle through four modes:
○ ALL: MIDI is sent and received
○ OFF: no MIDI messages are sent or received
○ NOC: (“NO Clock”) MIDI is sent and received, except for MIDI CLOCK messages
○ CLK: (“Clock”) Only MIDI CLOCK messages are sent and received
○ SND: MIDI is only sent
○ RCV: MIDI is only received
Sending MIDI: each button is mapped to a MIDI note, so pressing buttons is like playing a keyboard.
Button 1 (upper left corner) corresponds to C3 (note 48), and Button 32 (lower right corner) corresponds
to G5 (note 79)
Receiving MIDI:
○ Note commands: Every key on a MIDI keyboard is mapped to a button on the Bend Matrix.
Playing a keyboard will turn buttons and and off. C3-G5 (notes 48-79) are mapped to the
button matrix, and outside this range the notes are simply repeated
○ CC: Continuous Controllers are mapped to the analog knobs. Most Bend Matrices will be
custom set to particular CC#'s you desire.
○ Patch changes: Patch change commands 1-8 trigger the Bend Matrix to load a new patch
within the current bank. Commands 9-? cause a new bank to be loaded
Note: The MIDI mode is stored in long-term memory.
MIDI Clock
BEND MATRIX MANUAL
Clock input: The Bend Matrix will automatically sync to MIDI clock messages in play mode. In pause
mode, MIDI clock messages have no effect. The Bend Matrix's own internal clock will be merged with
the external clock source, therefore to normally sync the Bend Matrix to another clock source, set the
Bend Matrix's tempo slower than the external clock source. To get interesting poly-rhythmic swagger
effects, set the Bend Matrix's tempo faster than the external clock source.
Clock output: The Bend Matrix also sends MIDI clock messages 24 times per beat. This can be used
to slave another device to the same tempo as the Bend Matrix
PAGE 9
LAYERS
The Bend Matrix's button matrix uses the concept of layers, and an understanding of this concept is
important for advanced use.
There are five layers:
○ MIDI layer (set by MIDI input)
○ Effect layer (set by real-time effects)
○ Clear layer (set with CLEAR+BUTTON, see below)
○ Save layer (set with SAVE+BUTTON, see below)
○ Button layer (set by pressing buttons on the matrix, and recalling stored patches)
These five layers are combined, and the resulting matrix is used to set the switches between row and
column jacks. The result is alsp displayed on the button matrix's LEDs.
The method of combining these layers is to first turn on the sum of the MIDI, Effect, and Save layers,
and then turn off every button on the Clear layer. Finally, the Button layer is added in. Keeping the button
layer at the end insures that a performing musician can always press a button and have it light up, no
matter the state of the other layers.
Clear Layer
+
Save Layer
+
BEND MATRIX MANUAL
Hold down CLEAR and press one or more buttons on the matrix. Continue to hold down CLEAR and you
will notice these buttons flashing dimly. This indicates they are on the Clear Layer.
Holding down CLEAR and pressing a button on the Clear Layer a second time will take that button off
the Clear Layer. The button will no longer flash dimly when you hold down CLEAR.
Any buttons on the Clear Layer will never light up, unless you press them.
The Clear Layer is useful if you need to insure certain buttons will not light up, for instance a button that
plays a loud sample or resets the power on a circuit-bent device. No matter what patches are played,
MIDI notes are received, or effects are run, the Clear Layer buttons will not light up. The only way to light
one up is to press it manually.
Hold down SAVE and press one or more buttons on the matrix. Continue to hold down SAVE and you
will notice these buttons flashing brightly. This indicates they are on the Save Layer.
Holding down SAVE and pressing a button on the Save Layer a second time will take that button off the
Save Layer. The button will no longer flash brightly when you hold down SAVE.
If you put a button on the Save Layer, and it's already on the Clear Layer, it will be taken off the Clear
Layer.
Any buttons on the Save Layer will always stay lit.
The Save Layer is useful if you need to insure certain buttons stay lit no matter what MIDI, patches or
effects are playing. For instance if a button represents a repeating bass-line, you may want to keep it
active while you improvise with the other buttons, and not have to worry about accidentally turning the
bass-line off.
PAGE 10
ADVANCED FEATURES
4x8 / Dual 4x4
+POWER
Momentary
mode
(optional)
BEND MATRIX MANUAL
The Bend Matrix has two major modes: 4x8 (default) or Dual 4x4.
To change between modes, hold SHIFT when turning the power on. The display will indicate 4-4 or 4-8
to show what mode we're in.
4x8 mode is the default mode: the button matrix acts a single grid
○ There's 4 row jacks (A/B/C/D) and 8 column jacks (1-8).
○ Each row can connect to each column.
○ Row jacks E/F/G/H aren't used.
In Dual 4x4 mode the Bend Matrix functions as two separate 4x4 matrices:
○ The Red matrix connects Row Jacks A/B/C/D and Column Jacks 1/2/3/4.
○ The Green matrix connects Row Jacks E/F/G/H and Column Jacks 5/6/7/8.
○ This is a useful mode for using a single Bend Matrix to control two separate signal paths: for
instance one side routes audio signals and the other side controls circuit bending points (or
video, etc..)
○ Dual 4x4 mode is also useful for re-ordering up to 6 effect pedals in a serial chain. See the
sample patch diagrams.
Normally pressing a button on the button matrix will enable that switch until you press the button again.
This is non-momentary (or latching) mode.
Flip the tap/latch switch down to enter Momentary mode. In this mode a button on the matrix will be
active only as long as you hold the button down. As soon as you release the button, it will go off again.
This is useful for playing the Bend Matrix like a keyboard
Note: playing a blank bank is the same as being in momentary mode.
PAGE 11
SPECIFICATIONS:
●
●
●
●
●
●
●
Dimensions: 10” x 12” x 3” (25cm x 30cm x 7cm)
Weight: 3.2 lb (1.4 kg)
Power supply: 9VDC, negative center 2.1mm barrel plug, 500mA or greater
Signal switching
■ On-state resistance: 60-120ohms typical
■ Off-state feedthrough: -95dB typical (Vin = 2Vp-p 1 kHz sine-wave over 1kohm load)
■ Frequency range: 0Hz (DC) to 45MHz
MIDI:
■ Send/Receive Channel: 1
■ Receive:
● MIDI CLOCK (24 clocks cause a patch change)
● MIDI NOTE ON
● MIDI NOTE OFF (or NOTE ON with velocity 0)
● MIDI CC (default: 20, 21, 22, 23)
■ Send:
● MIDI CLOCK (24 times per patch change)
● MIDI NOTE ON
● MIDI NOTE OFF
Long-term memory (EEPROM)
■ Total size: 1MB
■ Bank/patch storage: 512B
■ Bank/patch “length” storage: 32B
■ Globals (MIDI, optional): 5B
■ Reserved: 475B
■ Maximum writes per bank: 100,000 (typical)
Components
■ Illuminated tactile buttons (44)
■ Three-digit seven-segment LED display
■ Rotary encoder
■ Analog potentiometers (4)
■ Blue LED
■ 1/4” jacks (16) typical
■ Banana jacks (16) typical
■ 1/8” jacks (16) optional to replace 1/4” or banana jacks
■ RCA jacks (16) optional to replace 1/4” or banana jacks
■ Power plug, 2.1mm barrel
■ MIDI jack, standard 5-pin female DIN (2 typical)
■ 2mm aluminum top panel
BEND MATRIX MANUAL
PAGE 12