1
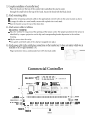
Congratulations!
Your Water Quality System was
designed and manufactured for
optimal performance with
minimal maintenance. We know
you will enjoy its many benefits
for years to come. Thank you for
choosing our system.
Before calling for service,
please check:
Is the power cable
connected to the transformer?
Is the transformer plugged
intb a 120V, continuously
hot electrical outlet?
Ownerluser responsibility
Please read this User's Manual
carefully and familiarize yourself
with your new Water Quality
System. With a little preventative
maintenance, you can reduce the
need for service calls.
Does the unit have a
sufficient supply of approved
salt that has not become
hard or bridged?
rn
Is the unit protected from
excessive heat or dampness
from sweating pipes or
leaks?
Is the water pressure supply
to the unit within the limits
set by the manufacturer or
has the water source been
changed?
Is the unit protected from
freezing, including drain
lines and lines to and from
the brine-tank?
Be sure your dealer fills in the information betow
when your Water Quality System is installed.
Model
Water Analysis
Controller Number
Hardness
GPG
Valve Serial Number
lron
PPM
Date of Installation
PH
Dealer
Other
Address
Service Phone
Installation Checklist
IS Water pressure should be at
least 20 pounds per square
inch. If pressure is over 80
PSI, install a pressure reducer.
L l Flow rate should be at least
4.5 gallons per minute at
20 PSI.
IS Drain availability-floor
drain, washer drain, etc. Run
overhead no more than 5 feet
above the water softener.
Increase the size of the drain
for long runs. All plumbing
codes require a 3-inch air gap
at the end of the drain line.
IS Electricity-continuously
receptacle of 120 volts,
60 cycles.
hot
Q Water quality-if the water
supply contains sulphur, iron,
bacteria, tannins, algae, oils,
acids, salt or other unusual
substances, your system may
require pretreatment.
Do...
Install the system after the
pressure tank. Ask for advice
on any special plumbing
arrangement.
Comply with all local
plumbing and electrical
codes.
Examine inlet piping. If it is
clogged, replace or clean it.
Minimum size should be 314
inch nominal.
Install gravity drain on the
brine tank.
Don't
...
Don't install if inlet water
temperature exceeds
120°F.
Don't allow heat from
torches t o b e transferred t o
plastic o r valve parts.
Installation Procedures
(Multi-Tank Commercial System)
1. Select location for water softener.
The location of a commercial softener is usually dictated by the space available. There are
several additional things that must be considered.
Floor surface must be firm and level.
Near the main water line.
A floor drain or sump must be nearby.
A 120V electrical outlet should be within 10 ft.
2. Open boxes to verify that there is no damage from shipping and all parts are included.
For each valve in the system:
2 - connector bars
2 - 1/4-20 x 1 314 pan head screws
2 - 1/4-20 hex nuts
1 - clevis
2 - 1" in & out nipples
1 - 112" drain nipple
brine harness with fittings
1 - stud
I - black nut
Hood and controller with turbine sensors, power cable, wiring harness attached
1 - small black hood for all other valves
3. Determine the direction the water will flow and provide a
bypass (optional). Connect the two header pipes using a
tee on the top pipe and an elbow on the bottom pipe.
Locate a bypass valve in the center of the connecting pipe.
Cut-off valves are located before and after each tank in
the system. Cap the end of the top header pipe,
if optional bypass is used. (3)
IN
--f
CAP
+ OUT
CAP
OUT
IN
CAP
f--
+
IN
CAP
CAP
--f
--f
OUT
3
4. Install the header.
Measure one of the resin tanks from the floor to the
center of the top 1" inlet port.
Use this measurement to suspend the header from the
ceiling of wall temporarily. Adjust it up or down to fit
the in and out nipples to the control valve.
Grease the female ports of the valve and adapter.
Grease the O-rings on both the 1" in and out nipples
and the 112" drain nipples with silicone grease.
Insert nipples into the tank adapter on the header.
Move a resin tank into position at either end of the header and connect it to the header.
Adjust the height of the header again if necessary and move another tank into position at the opposite
end of the header. (4)
Secure both tanks with the connector bars and pan head bolts. When everything is in place, tighten
114" bolts and nuts securely.
Move the remaining resin tanks into place and secure them in the same manner as the first two.
Check each tank and the position of the header to be sure that none of them is in a bind. Secure the
header permanently.
5. Connect the softener.
Plumb the hard water line into the top header pipe. Water can enter from either end of the header but
must exit from the opposite end of the bottom header pipe. Plumb the soft water line back into the
existing main water line.
Install a pressure gauge in the fittings provided on each end of the header.
NOTE: Prefabricated headers come from the factory with the turbines installed. If water is to be measured through a single tank, turbines will be installed on the first two tanks, beginning of the left end of
the header. If water is to measured by one turbine on the full line, it will come as a separate piece to be
installed on the job. Plumb it into the soft side near the header.
6. Install drain line.
Attach a 112" PVC pipe to the 112" drain opening on each tank.
Connect each pipe to a 314" PVC header at the back of the system.
Run the drain line to drain. Provide a 3" air gap at the end of the line.
7. Install brine tanks.
Remove the safety float from the brine wells.
Check the valve fittings.
Remove the rubberband from the bottom of the float and return float to brine wells.
A. TO REGENERATE ONE TANK AT A TIME.
Connect the 318" brine lines from the control valves of odd numbered resin tanks to the
safety valves in brine tank # l .
Connect the 318" brine lines from the control valves of even numbered resin tanks to the
safety valves in brine tank #2.
Example:
For a 6-tank system with two brine tanks.
Connect Resin tanks 1 - 3 - 5 to brine tank #1.
Connect Resin tanks 2 - 4 - 6 to brine tank #2.
B. TO REGENERATE TWO TANKS AT THE SAME TIME.
Connect the 318" brine lines from the control valves of tanks 1 , 2 and 3 to brine tank #l.
Connect brine lines from resin tanks 4 , 5 and 6 to brine tank #2.
8. Flush cuttings and other debris from the lines and pressurize the system.
= Remove impeller assembly from the turbine housing (replace later) (8).
Loosen the plastic nut on the end of the turbine and union nut. Remove that section of pipe to allow
room to remove both pieces of the impeller assembly.
Replace the short piece of pipe and tighten the nut on the turbine housing hand tight. Be sure the
rubber washer is in place inside the nut. Tighten the nut on the union very tight.
Bypass the system.
Close the inlet and outlet ball valves on each tank.
Close the bypass valve between the two header pipes.
Open the main shut-off valve.
I
I
Open the bypass valve slowly to pressurize the system.
TURBINE
TURBINE
ASSEMBLY
HOUSING
Check for leaks.
Open the inlet ball valve to each resin tank.
When tanks are pressurized, open the outlet ball valve to tank number 1.
Open a cold water faucet.
When air has been removed from the tank, open the outlet valve to the next tank until all valves have
been opened to all tanks.
Close cold water faucet.
Close bypass valve.
Replace impeller assembly using the same procedure as above.
9. Install controller hood.
Remove stud from plastic bag and screw it into the tapped hole in the center of the top lid of the #1
tank. This is the tank on the far left of the header.
10. Attach the solenoid harness to the control valves.
~
Remove acrvlic door from front of hood.
Select the #I harness and attach it to the #1
control valve.
Connect the red and white cable
to the top solenoid coil (brine draw). (a)
Connect the green and white cable
to the middle solenoid coil (backwash). (b)
Connect the black and white cable
to the bottom solenoid coil (refill and purge).(c)
Push connectors on snugly to assure solid contact. (10)
I
~~
-
11. Complete installation of controller hood.
Place the hood over the top of the control valve and allow the stud to come
through the small hole in the top of the hood. Secure the hood with the black knob.
12. Attach remaining cables.
Attach the remaining solenoid cables to the appropriate control valves in the same manner as above.
Arrange the cables in a neat bundle, secure with a plastic tie at each tank.
Run the bundle across the top of the drain line.
13. Attach sensor cables to turbines.
BRASWELL TURBINE.
Place the turbine O-ring around the opening of the sensor cavity. The proper position for the sensor is
identified by a square projection on the clip and corresponding female depression in the turbine
housing.
Slip the sensor into the cavity.
Press gently until both sides of the clip have snapped into place.
14. Attach power cable to the outside two connections on the transformer (it does not matter which wire is
attached to left or right terminal) (14).
Plug transformer into a continuously hot 120V electrical outlet.
m
Commercial Controller
SMALL DISPLAY
TANK SELECT
+
Jr @
f
f
TOTAL lOF TANKS
TANK ENABLE
LOST COMPEHSATION IOAL)
BRINE ORAW IMIN)
PRE-RINSEffIST-RINSE (MINI
REGEN
TURBINE
SIMULATION
+
m
ENABLEIOISABLE
+
rn
+
TEST +
rn
NO. OF TURBINES
CKIn O t I n tltlo ~
t l ontl
o tl[7tl am~ t l o
DRIVERS
+POWER
SOLENOID
• • • • • • ••• • • • • •• •• • • • • • ••
ILIl
rn rn
TURBINE #1
TURBINE #2
I....II....II....II....II....II....I1....1D
A
INDICATOR
LIGHTS
Softener Start Up
Remove the acrylic door from the front of the controller hood.
1. Program the commercial controller.
STEP 1. SET TANK SIZE
Press the scroll button. A red light will appear next to "Tank Size".
Press the up or down button to select tank size.
STEP 2. SET TOTAL NUMBER OF TANKS
Press the scroll button. The red light will move to "Total Number Of Tanks".
Press the up or down button to select the proper number of tanks.
STEP 3. SET TANK ENABLE
Press the scroll button. The red light will move to "Tank Enable". The large display will indicate the
status of the tank that appears on the small 1 digit display.
Press the up button to change the status of the tank - yes for enable - no for disable. All tanks
should read "yes".
Press the tank select button to move to other tanks.
STEP 4. SET THE NUMBER OF TANKS TO REGENERATE TOGETHER
Press the scroll button. The red light will move to "Number Of Tanks Regen Together".
Press the up or down button to set 1 for one tank at a time or 2 for two tanks at a time.
STEP 5. SET PULSE OR NON-PULSE
Press the scroll button. The red light will move to "Pulse Enable".
Press up or down button to select yes for pulse or no for non pulse.
STEP 6. SET COMPENSATED HARDNESS
See chart on page 12 to calculate compensated harness before proceeding.
Press scroll. The red light will move to "Compensated Hardness".
Press up or down button to set the proper compensated hardness.
STEP 7. SET TOTAL GALLON COUNT
Press the scroll button. The red light will move to "Total Gallon Count". The number displayed is the
number of gallons that have passed through the system since the total gallon count was last reset.
Press the regen startlstop button to reset the total gallon count. (Multiply the number displayed
by 100 to get the total gallons.)
STEP 8. SET LOST COMPENSATION (GAL)
Press the scroll button. The red light will move to "Lost Compensation (GAL)".
Press up or down button to enter the correct number of gallons to compensate for water that passes
through the system but is not measured. Lost water can run as much as 10% of total gallon count.
NOTE: This feature will seldom be used and should always be set on zero gallons for the initial setting.
STEP 9. SET BRINE DRAW (MIN)
Press the scroll button. The red light will move to "Brine Draw (MINI".
Press up or down button to set the desired number of minutes. The number displayed is the default
setting for the tank and should be changed only to depart from the default setting. (The default setting
is the standard program for the tank.)
STEP 10. SET PRE-RINSE (MIN)
Press the scroll button. The red light will move to "Pre-RinseIFast Rinse MIN".
Press up or down button to set the desired number of minutes in pre-rinse. The number displayed
is the default setting, change only to depart from the default setting.
STEP 11. SET PULSE CYCLE (MIN)
Press the scroll button. The red light will move to "Pulse Cycle (MIN)".
Press up or down button to set the number of minutes in pulse cycle. The number displayed is the
default setting. Change only to depart from the default setting. (If the board is set for non-pulse, it will
skip this setting.)
STEP 12. SET FAST BACKWASH (MIN)
Press the scroll button. The red light will move to "Fast Backwash".
Press up or down button to set the desired number of minutes in fast backwash. The number displayed
is the default setting. Change only to depart from the default setting.
STEP 13. SET BRINE TANK REFILL (MINI
Press the scroll button. The red light will move to "Brine Tank Refill".
Press up or down button to set the desired number of minutes in brine tank refill. Change only to
depart from the default setting.
STEP 14. SET TURBINE PULSEIGALLON
Press the scroll button. The red light will move to "Turbine PulsesIGallon".
Press up or down button to set the proper number of pulses for the turbine to be used on this system.
Turbine pulses are set at the factory. Call the factory for more information, if needed.
Turbine pulse settings:
Braswell
- 216
1" Erie
- 108
1" Autotrol - 80
2"Autotrol - 15
2. Test the system:
Use the test feature to check the performance of each tank.
Press tank select button to bring up the number one tank. The number 1 will appear on the small
display.
Connect the J4 prongs. Test will appear on the large display.
TEST FOR BRINE DRAW
Press the scroll button to energize the number one solenoid coil on the number one tank. The first
solenoid indicator light will come one. Remove the brine line from the brine tank. Place your finger
over the end to determine if a vacuum is being formed. Replace brine line.
Press scroll again to de-energize the solenoid. The indicator light will disappear.
NOTE: If a vacuum does not occur, it may be because all of the air has not been forced from the tank.
Go to "Test For Backwash to remove any remaining air.
TEST FOR BACKWASH
Both the number one and number two solenoid valves must be open for the system to backwash.
Press the scroll button to energize the number one solenoid.
Press the up button to energize the number two solenoid. The second indicator light will come on.
Water will move up flow through the resin tank and can be heard running to the drain.
Press scroll to de-energize the number one solenoid. Wait at least 10 seconds.
Press the up button again to de-energize the number two solenoid. Both the number one and number
two indicator lights will disappear.
TEST FOR BRINE REFILL AND PURGE
Press the down button to energize the number three solenoid coil. The number three indicator light
will appear. Water can be seen in the brine line running to the brine tank.
Press the down button again to de-energize the number three coil. The indicator light will disappear.
IMPORTANT: When using the test feature to test for backwash, the number one solenoid coil must be
turned off first. Wait at least 10 seconds to turn the number two solenoid off. If this procedure is not
followed, the valve will stay in brine draw and will not perform the remainder of its functions.
TEST THE REMAINING TANKS IN THE SYSTEM
Press tank select to bring up the next tank.
Repeat the test procedures above to test the entire system.
3. Fill the brine tank with salt.
Use a good brand of solar or pellet salt.
Be sure the brine well cover is in place.
Place salt in the brine tank.
Replace brine tank cover.
Additional Features For
Service Technicians
1. J2 Prong -- TURBINE COUNTER
Important: Disconnect the turbine cable before using this feature.
Connect the prongs and maintain the connection.
The system will count down to 0 to determine if the controller will count gallons and initiate a
regeneration automatically. To speed up this process, set the turbine pulses to 5.
2. J3 Prong - - KEY PAD ENABLE-DISABLE
To change the status of the key pad, pull the jumper up and change the position.
To enable key pad, place jumper on 1 and 2 prongs - (Set Up).
To disable key pad, place jumper on 2 and 3 prongs - (Normal).
3. J5 Prong - - NUMBER OF TURBINES
To select the number of turbines for the system pull the jumper up and change position.
To use one turbine, place jumper on 2 and 3 prongs.
To use two turbines, place jumper on 1 and 2 prongs.
4. J4 Prong - - TEST FEATURE
Connect the prongs to activate the test feature. Test will appear on the display. Each solenoid coil can
be energized individually or in combination of two.
Press tank select button to choose the tank to be tested.
Press scroll button to energize the number 1 solenoid. (Brine Draw)
The number 1 solenoid light for the tank selected will appear at the bottom of the controller to verify
that is has been energized.
Press the up button to energize the number 2 solenoid. (Backwash)
Press the down button to energize the number 3 solenoid. (Downflow Purge and Refill)
To de-energize the solenoid, press the appropriate button a second time.
To get out of the test mode, press exit button.
5. MANUAL REGENERATION
Press tank select button to select the proper tank to be regenerated.
To regenerate all tanks, select A for all tanks.
Press Regen StartIStop button to start a manual regeneration.
To stop a regeneration, continue to press the Regen StartIStop button until it moves through all cycles
to the end of regeneration.
Programming the Controller
Calculating
compensated hardness
Compensated
hardness factors
1. Enter grains per gallon
of hardness here.
Result
from step 3
2. Enter PPM of iron here.
3. Add lines 1 and 2 and
enter result here.
1-20
+
Compensation
factor
............................................................ 1.1
21-40 .............................................................
1.2
41-70 .............................................................1.3
-
71-100 ...........................................................1.4
4. Enter the appropriate
compensation factor
from chart at right here.
x
5. Multiply the sum from
line 3 by the
compensation factor
on line 4. Enter result
here.
-
loo+
.............................................................1.5
EXAMPLE
10
+ 3
= 13
x 1.1
= 14.3
Grains
PPM Iron
Total Hardness
Compensation Factor for 13 gr H 2 0
Compensated Hardness
Quick Service Guide
Unit fails t o regenerate
Loss of water pressure
Cause
Solution
Cause
Solution
Electrical service to unit
has been interrupted
Assure constant power
source
Iron buildup in the lines
to the unit
Clean or replace lines
Commercial controller is
defective
Replace commercial
controller
Iron buildup in the unit
Clean unit with acid or
salt additive
Solenoid coils burned out
Replace solenoid coils
Trash in the system
Drain is frozen or plugged
Thaw out, replace or
clean drain
Clean complete control
valve and bypass. Add
pre-filter.
Clogged upper distributor
Remove and clean upper
distributor.
Unit delivers hard water
Cause
Solution
Bypass open
Close bypass
Bypass O-ring damaged
Replace 0-ring(s)
No salt or salt is hard
or bridged
Add salt or break up
bridging
Aspirator plugged
Clean aspirator
Insufficient water
refilling brine tank
Check #3 solenoid coil,
refill flow control and tank
size setting
Cracked riser tube
Replace riser tube
Back pressure o n drain
Loss of resin through house lines
Cause
Solution
Defective lower distributor
Replace lower distributor
Iron in conditioned water
Cause
Solution
Salt dosage too low
Reset controller or
increase size of flow
control
Correct drain
No salt usage
Correct bridging
Broken vacuum breaker
spring
Replace spring
Oxidized or colloidal iron
Install post-filter
( 1 or 2 micron)
#2 solenoid inoperative
Clean solenoid valve
Replace solenoid coil
Unit uses t o o much salt
Cause
Solution
Improper tank size setting
Reset tank size
Excessive water in the
brine tank
Defective # l solenoid.
Trash in the brine
suction line or under the
brine elbow. Trash under
the #3 solenoid diaphragm.
Excessive water in brine tank
Cause
Solution
#3 solenoid valve leaking
Clean #3 solenoid valve
and check for bent
solenoid guide
Purge check leaking
Check for trash
Aspirator plugged
Clean aspirator
# I solenoid coil inoperative
Replace #A solenoid coil
Blue dot elbow leaking
back to brine tank when unit is
not regenerating.
Replace elbow or
rubber ball - if worn.
Quick Service Guide, continued
Unit fails t o draw brine
Vacuum breaker leaks
Cause
Solution
Cause
Solution
Drain line pluggedlfrozen
Clean drain line
Clean or replace
Aspirator plugged
Clean aspirator
Foreign matter in lip
of vacuum breaker
split ball check.
#I solenoid coil inoperative
Replace #1 solenoid coil
Low water pressure
Correct pressure
Trash in the purge check
Clean purge check
Cause
Solution
Brine tube disconnected
Replace or tighten
brine tube
Sulfur or methane
Consult dealer
Clean or replace
solenoid coil
Other organics water
conditions changed
Other equipment
may be needed
lt2 solenoid coil inoperative
Odor
Water runs t o drain continuously
Salty water after regeneration
Cause
Solution
Cause
Solution
Trash under #l or #3
solenoid diaphragm
Clean or replace solenoid
diaphragms
Low water pressure
Increase water pressure
#2 solenoid coil inoperative
Check power or replace
Bent solenoid guide
Replace solenoid guide
Broken solenoid spring
Replace solenoid spring
Too much water
in brine tank
Check brine refill for
continuous flow
Cage O-ring broken
or missing
Replace cage O-ring
Test water for chlorides
or nitrates
Add R.O. for drinking
or find a new source of
Cracked top lid
Replace top lid
Piston return spring
caught
Replace or realign piston
return spring
Brine tank does n o t refill
Cause
Solution
#3 solenoid coil inoperative
Replace solenoid coil
Refill flow control plugged
Clean or replace flow control
Driver on commercial
controller inoperative
Replace commercial
controller
#I solenoid valve not
seating out
Remove trash from under
diaphragm. Check for
swelling - replace
supply
Air leak in brine
tubing harness
Replace or tighten
fittings that leak
Control Valve Assembly
Ref. No.
Part Number
Description
1
1CV41820000**
Control valve body (brass or noryl)
1
2
A1 CMBY 110850*
Control module assy, complete
1
Units per Assy.
Upper distributor mounting screw
4
10RING235000
Valve base O-ring #235
1
5
1CKSTEMGUIDE
Check stem guide
1
6
10RING121000
Riser tube O-ring #I21
1
7
1UD20SEGO 130
Braswell upper distributor
I
8
5RT1050ABSO*
Riser tube
1
9
5LD 10SEG0000
Braswell lower distributor
1
10
3NUTK 1032NPO
Black knob
1
1SCR 103212AA
Top lid mounting screw
''132
X
'12
PL RH MS 18-8 SS
13
1TOPLIDOOOOO
Top lid
1
14
10RING142000
Top lid O-ring #I42
1
15
1PISTONSPGOO
Piston return spring
1
16
1PISTONCAGEO
Piston cage
1
17
10RING 127000
Cage O-ring #I27
3
18
S 1ASPA 100000
Aspirator
1
-
-
1ORINGO 10000
Aspirator O-ring #010
2
20
1PISTONCUPSL
Piston cup seal
1
21
S1PISTONWOO0
Piston
1
22
1PISTONGASTO
Piston gasket
2
23
1STEMCKSEALO
Stem check seal
1
24.
1STEMCHECKOO
Stem check
1
* Specify tank size
** Specify brass or noryl
Control Valve Assembly
Control Module Assembly
Ref. No.
Part Number
Description
1
1CMBDYOOOOOO
Control module body
1
2
1CMSEALOOOOO
Control module seal
1
3
1BWFC 1000000
Backwash flow control
1
4
1BWFCSUPOOOO
Backwash flow control support
1
5
1BDRKEEPEROO
Brine draw and refill keeper
2
6
1RFC00000000*
Refill flow control
I
7
1RFCRETAINOO
Refill flow control retainer
1
8
1516CKBALL00
5/16diameter check balls
2
9
1PURGEGATEOO
Purge gate
1
10
1BRRING 14580
Brass ring
2
11
1PURGECKOOOO
Purge check
1
12
1PURGECKSEAL
Purge check seal
1
13
IVBSPRINGOOO
Vacuum breaker spring
1
14
IVBBALLCKOOO
Vacuum breaker split ball check
1
14B
Units per Assy.
Felt pad
15
1VBCOVEROOOO
Vacuum breaker cover
1
16
1SCR8716SToo
Vacuum breaker mounting screw #8 X 1' 16
2
Control module mounting screw
6
'14-20 X 1' 4 PL PAN HD MS 18-8 SS
18
138BRELB18MP
Brass elbow 3/8OD X '18 MPT
1
19
1INSSTOPOOOO
Ball check stop insert (outlet)
1
20
138BRELB18MP
Brass elbow 3/8OD X
1
21
1INSSEATOOOO
Ball seat insert (inlet)
1
22
lSOLDIAPHRAG
Solenoid diaphragm high lift
3
23
1SOLARMATURE
Solenoid armature
3
24
1SOLSPRINGOO
Solenoid spring
3
25
1SOLGUIDEOOO
Solenoid guide
3
26
1SOLRETAINTER
Solenoid retainer
3
27
1SCR87 16ST00
Solenoid mounting screw #8 x 1' 16 SS
9
28
1SOL11OBOOOO
Solenoid
* Specify tank size
16
'18
MPT
Control Module Assembly
Limited Commercial Warranty
This warranty is extended to the
original owner only and is not
transferable to subsequent
owners of this equipment.
To place the equipment under
warranty, THE WARRANTY
REGISTRATION CARD MUST
BE COMPLETED IN ITS ENTIRETY AND RETURNED TO:
415 E. WASHINGTON ST.,
Jackson, Missouri 63755, within
thirty (30) days of installation by
a factory-authorized dealer.
Terms
The manufacturer warrants its
COMMERCIAL equipment to be
free of defects of workmanship
and materials for the following
terms.
Defective parts will be repaired or
replaced FOB Factory from the
original owner along with the
unit serial number.
2 Years: From date of manufacture of brass or noryl valve
bodies. All electronic controls,
control valve, solenoids, gaskets,
springs and seals. Mineral tank
and brine tank if not exposed to
direct sunlight.
Limitations
Your COMMERCIAL equipment
must be sold to you by an authorized dealer in order to receive
benefits of this warranty.
This warranty does not cover
damage due to:
abuse, misuse or neglect
excessive water pressure
(over 125 PSI)
excessive water temperature
(over 120°F)
freezing
alterations
application or installation not
in accordance with published
factory specifications or the
instructions provided in the
operation manual or not
conforming to local codes
over-chlorinated water
(over 1.5 ppm residual)
or any other act of God not
reasonably within the Dealer's
power to prevent or control.
This warranty does not cover any
labor or service call costs incurred with respect to the removal or replacement of any
defective part or parts.
In the event that the water supply
being processed through this
system contains bacterial iron,
algae, sand, or other unusual
substances, unless the system is
represented as being capable of
handling these substances in
factory published literature, these
substances must be removed
before entering this product.
There are no other warranties,
expressed or implied, other than
stated in this document to the
extent permitted by local state
laws.
The manufacturer shall not be
liable for indirect, special or
consequential damages in connection with the use of this
equipment to the extent allowed
by local state laws.
Authorized Distributor
Rraswell Water Quality Systems, Inc.
415 E. Washington
Jackson, Missouri 63755
573 243-3660
.
573 243-5334 fax
WATER QUALITY
A S S O C I A T I O N
MEMBER