1
Everest edition
USER ’ S M AN UAL
This is a highly sensitive
scientific measurement instrument.
Please handle with care.
CE marking on a product is a manufacturers declaration that the product conforms with the
requirements of European Council Directives 73/23/EE and 89/336/EEC.
UL
®
This symbol designates that this unit is listed by Underwriters Laboratories.
®
C
US
This symbol designates that this unit is listed by the Canadian Standards Association.
Warning! No user-serviceable parts inside.
All components are custom made and must not be altered in any way.
Removing, damaging or altering labels voids all warranties.
This symbol indicates that the unit should not be disposed of
by the consumer. It must be sent back to Pharmanex for disposal.
2
S2 user’s manual
01 :: Warnings
Electrical Warnings . . . . . . . . . . . . . . . . . . . . . . . . . . . . . . . . . . . . . . . . . . . . . . . . . 4
General Warnings . . . . . . . . . . . . . . . . . . . . . . . . . . . . . . . . . . . . . . . . . . . . . . . . . . 5
Servicing . . . . . . . . . . . . . . . . . . . . . . . . . . . . . . . . . . . . . . . . . . . . . . . . . . . . . . . . . . .5
02 :: Important Usage Information
S2 Temperature Management . . . . . . . . . . . . . . . . . . . . . . . . . . . . . . . . . . . . . . 7
Traveling with the Scanner . . . . . . . . . . . . . . . . . . . . . . . . . . . . . . . . . . . . . . . . . 8
03 :: S2 Setup
Introduction . . . . . . . . . . . . . . . . . . . . . . . . . . . . . . . . . . . . . . . . . . . . . . . . . . . . . . . 9
Equipment List . . . . . . . . . . . . . . . . . . . . . . . . . . . . . . . . . . . . . . . . . . . . . . . . . . . . 9
Setup Instructions . . . . . . . . . . . . . . . . . . . . . . . . . . . . . . . . . . . . . . . . . . . . . . . . . . 11
Using the S2 Software . . . . . . . . . . . . . . . . . . . . . . . . . . . . . . . . . . . . . . . . . . . . 12
New Everest Upgrade Features . . . . . . . . . . . . . . . . . . . . . . . . . . . . . . . . . . . 12
Wireless Internet Access . . . . . . . . . . . . . . . . . . . . . . . . . . . . . . . . . . . . . . . . . . 12
Network Manager . . . . . . . . . . . . . . . . . . . . . . . . . . . . . . . . . . . . . . . . . . . . . . . . 13
Internet Browsing . . . . . . . . . . . . . . . . . . . . . . . . . . . . . . . . . . . . . . . . . . . . . . . . . 13
Media Content . . . . . . . . . . . . . . . . . . . . . . . . . . . . . . . . . . . . . . . . . . . . . . . . . . . 13
Shutting Down the S2 . . . . . . . . . . . . . . . . . . . . . . . . . . . . . . . . . . . . . . . . . . . . . 14
04 :: Uploading Scans
Uploading Overview . . . . . . . . . . . . . . . . . . . . . . . . . . . . . . . . . . . . . . . . . . . . . . 16
Uploading S2 Data . . . . . . . . . . . . . . . . . . . . . . . . . . . . . . . . . . . . . . . . . . . . . . . 16
Uploading with Broadband . . . . . . . . . . . . . . . . . . . . . . . . . . . . . . . . . . . . . . . . 17
05 :: Important S2 Tips
Tips . . . . . . . . . . . . . . . . . . . . . . . . . . . . . . . . . . . . . . . . . . . . . . . . . . . . . . . . . . . . . . 18
06 :: Using the Bar Code Reader . . . . . . . . . . . . . . . . . . . . . . . . . . . . . . . . . . . . . 19
07 :: Support
S2 Technical Support Options . . . . . . . . . . . . . . . . . . . . . . . . . . . . . . . . . . . . . 20
Troubleshooting . . . . . . . . . . . . . . . . . . . . . . . . . . . . . . . . . . . . . . . . . . . . . . . . . . 20
3
01
Warnings
Electrical Warnings
Warning: To reduce the risk of fire or electric shock, do not expose the S2
to rain or moisture.
Caution: To reduce the risk of electric shock, do not remove cover or
bottom of the S2. There are NO user-serviceable parts inside. Servicing
should only be performed by a qualified technician at Pharmanex.
FCC Regulations state that unauthorized changes or modifications to this
equipment may void the user’s authority to operate it.
Do not plug any other power cord or power supply into the S2 except the
ones supplied with this unit. Using any other power cord or power supply
can result in a risk of fire or electric shock and will damage the S2. Do not
overload wall outlets or extension cords as this can result in a risk of fire or
electric shock.
A grounding-type power plug will fit only into a grounding-type receptacle
(outlet) with matching openings. This is a safety feature. Do not defeat it. If
you need an extension cord, use only a grounding-type extension cord.
Ventilation slots and openings in the S2 cover are provided for ventilation to
ensure reliable operation of the Scanner and to protect it from overheating.
These openings must not be blocked or covered. Do not block by placing
the S2 on a bed, sofa, rug, or other similar surface that would restrict airflow
through the slots. This S2 should never be placed near or over a radiator, a
heat register, or any other heat source.
Water and Moisture—Do not use the S2 near water. For example, do not
use the S2 near a bathtub, wash bowl, kitchen sink, laundry tub, in a wet
basement, or near a swimming pool and the like. If liquids are spilled on or
near the S2, unplug the Scanner from the electrical outlet immediately and
contact your local market office.
4
S2 user’s manual
General Warnings
Eye Safety: This product utilizes LEDs (Light Emitting Diode) as the
source of light. LEDs are found in household lighting and common flashlights.
While LEDs are not generally thought of as harmful to the eye, it is strongly
recommended to not stare directly into this or any bright light source at
close range or for prolonged periods.
Sensitive Optical Components
The optics of the S2 can be damaged if exposed to excessively bright light.
Do not scan shiny, mirror-like or metallic objects that reflect light back into
the S2. Do not scan any extremely bright objects of any kind. Do not point
the S2 at bright room lights or the sun. Doing so can damage the sensitive
optical components inside the S2.
Warning: This unit must not be used or operated in any manner other
than that specified by Pharmanex. Failure to operate the unit under these
conditions may impair the safety features provided by the unit.
Servicing
Servicing of the S2 is NOT to be performed by the user or any other third
parties. If there are any problems with the S2 or the laptop, contact the support
line first. If a replacement becomes necessary, always return the S2 and laptop
to Pharmanex together as a complete unit.
Caution: Adhere to the instructions specified herein to avoid any harm to
either you or the equipment. Inappropriate use of controls, adjustments, or
performance of procedures other than those specified herein may result in
hazardous exposure.
Neither the laptop nor the S2 should ever be opened or disassembled. The S2
enclosure is designed to be opened only by a qualified technician. DO NOT
ATTEMPT TO REMOVE OR TAMPER WITH THE S2 ENCLOSURE. If
the S2 enclosure ever becomes cracked or broken in any way, do not attempt
to access the internal components or internal electrical circuitry. This could
cause exposure to the internal electrical circuitry. To avoid risk of shock,
disconnect the unit from the electrical power source immediately and return
the S2 to Pharmanex for servicing.
The S2 warranty is void if the enclosure has been tampered with in any way,
if the back of the S2 has been removed, or if there is evidence of attempts to
remove the cover in any way. NOTE: Not only will the warranty be void, but
the Scan Operator will be held responsible for the full cost of the S2.
The S2 has been configured to work only with the laptop computer that was
shipped with it. The S2 will not operate if plugged into another computer
including laptops from another S2.
5
Do not attempt to service the S2 yourself. Opening or removing covers
may expose you to electrical shock or other hazards and will damage the
instrument and void all warranties. Refer all servicing to S2 Technical
Support at your local office.
Conditions requiring service: If any of the following conditions occur, unplug
the S2 from the wall outlet and call S2 Technical Support at your local office.
a. The power supply cord or plug is damaged.
b. Liquid has been spilled on, or objects have fallen on, or into, the product.
c. The product is damp or wet from condensation or exposure to rain or water.
d. The product does not operate normally when following the operating
instructions. Adjust only those controls that are covered by the operating
instructions. Improper adjustment of other controls may result in damage
and will often require extensive work by a qualified technician to restore
the product to its normal operation.
e. The product has been dropped or the cover has been damaged.
f. The product exhibits a distinct change in performance, such as the
inability to perform basic functions.
g. The laptop software instructs you to call Technical Support.
6
S2 user’s manual
02
Important Usage Information
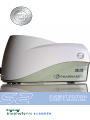
The Pharmanex® BioPhotonic Scanner (S2) is an instrument that measures
carotenoid levels in the skin. The Pharmanex® S2 is not intended to be
used for medical purposes. It is not a medical device or diagnostic tool of
any kind and is not intended to diagnose, treat, mitigate, cure, or prevent
any disease or condition, or affect the structure or function of any part of
the body.
S2 Temperature Management
The S2 is a very sensitive piece of equipment. Advancements in
technology have made it possible to use the S2 in a greater variety of
scanning environments than was possible with the S1. However, it is still
necessary to be aware that the environmental conditions in which the S2
is stored and operated do affect performance.
The operating temperature for the S2 runs from 50° to 95°F (10° to 35°C)
The S2 should not be stored or transported in temperatures greater than
110°F/40°C or lower than 40°F/5°C. Leaving the S2 in a car on a warm day
or a cold night can affect performance and may damage the instrument.
The S2 can be moved from place to place and operated with greater ease
than was possible with the S1. However, when either the S1 or the S2 has
been stored at a temperature different than the operating conditions above
(such as in a car overnight), sufficient time must be given for the S2 to
equilibrate to the operating environment before setup and calibration.
When moving from a very cold environment to room temperature, harmful
condensation may occur which can damage the S2. Please allow enough
time, usually 30 minutes, for the S2 to adjust to the scanning environment
before plugging the S2 into electrical power.
The S2 must be protected from environmental extremes such as heat, cold,
dust, shock, poorly controlled power sources, and general mishandling. It
should be treated as you would treat the highest quality video camera.
7
Traveling with the S2
:: Only travel with the S2 in the provided custom case.
:: Do NOT leave the S2 in a car or in a hot or cold climate.
:: When the S2 is transported by air, it should be brought along as
carry-on luggage. This minimizes the potential for added shock
and jarring associated with checked baggage. Remember that
the S2 is an extremely sensitive scientific device and should
always be treated as such.
8
S2 user’s manual
03
S2 Setup
Introduction
Please read all warnings and informational sections in this manual before
attempting to set up and use your S2. The software requires a short warmup period or equilibration time prior to beginning the calibration process.
It would be wise for the Scan Operator to begin setting up the equipment
at least 30 minutes before the first scan is scheduled and as early as one
hour in advance if the equipment will be brought inside from a hot or
cold environment.
Equipment List
Please review the following equipment list before setting up the S2 to
ensure all components are included. A complete system consists of two
major components—a laptop personal computer and the S2. Together
they comprise the Pharmanex® S2.
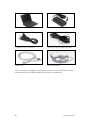
After unpacking the S2, you should confirm that you have everything
listed below.
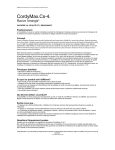
Parts List
A. S2 Scanner
B. Scanner Power Converter ("brick")
C. Scanner Power Cord
(plugs into converter)
D. Dark Scan Cap (two per unit)
9
E. Laptop Computer
F. Laptop Power Converter ("brick")
G. L aptop Power Cord
(plugs into power converter)
H. Telephone Cord (RJ-11) to connect the
laptop to a phone jack (for uploads)
I. USB Cable
J. Bar Code Reader
The S2 should be plugged into electrical power and the USB cable should
be connected to the laptop before the laptop is powered on.
10
S2 user’s manual
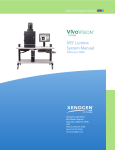
Setup Instructions
1. Plug the S2 power cord into the black
power converter.
2. Plug one end of the S2 power cord into
the back of the S2 and plug the other
end into a grounded electrical outlet.
3. The Pharmanex® logos on each side of
the S2 will illuminate two to three seconds
after the power cord is connected showing
that the S2 is receiving power.
4. Plug the laptop power cord into the black
power converter.
5. Plug the laptop power cord into the back
of the laptop and plug the other end into
a grounded electrical outlet.
6. Connect one end of the USB cable to
the USB port on the back of the S2 and
connect the other end to the USB port
on the back of the laptop. Each end of
the USB cable is designed to fit only in
a matching receptacle. The USB cable
should connect to the S2 and laptop
easily without being forced.
7. Turn on the laptop by pressing the power
button. The S2 software will automatically
load as the laptop boots up.
8. Once the software is running, please
refer to the next section about using
the software to calibrate and scan.
11
using the s2 software
When you are ready to proceed and actually conduct a Scan Session, follow
the steps below using the S2 software.
Click the Scan button. The following three items will occur once the Scan
button has been clicked:
1. The blue LED will begin to emit from the Scanner probe
2. The fan will turn on
3. The Warm-Up Page will appear on the laptop screen
Follow the onscreen instructions to warm up, and scan.
Please allow more than enough time for the S2 warm-up. Also, please allow
time for the S2 unit to acclimate to a given venue before turning it on.
The process will need to be repeated if any one of the following occurs:
:: The S2 is unplugged
:: The laptop is powered off
:: The USB cable is disconnected
:: If you exit the Pharmanex® S2 software
:: If you end a Scan Session by clicking Exit Scan Session
New Everest Upgrade Features
The new Everest upgrade offers a bundle of new features to the scanner
laptop software, making the scanner laptop a better business tool than ever
before. These new features are wireless Internet access, media content,
Internet browsing, and the network manager. This section of the user’s
manual will cover these new features and give brief instructions on how to
use them.
Wireless Internet Access
With the new Everest upgrade features comes the ability to connect to
the Internet through a wireless connection. This wireless connection will
allow you to connect to any of Nu Skin’s online tools or websites. To access
the wireless upload function you will first need to purchase a NETGEAR ®
Wireless USB Adapter from your local market office. Please note that
Nu Skin will only support the NETGEAR ® WG111v2 model for wireless
Internet connections.
12
S2 user’s manual
Network Manager
This option is used to access the windows network connections manager
allowing you to detect and connect to wireless signals. To use the network
manager and establish a wireless internet connection, follow the steps
outlined below.
1. Connect the NETGEAR ® USB Wireless adapter to a
USB port.
2. From the scanner software click on the menu button and
select the Network Manager option.
3. Inside the network manager double–click the icon called
“Wireless Network Connection"
4. A window will pop up displaying all detected wireless signals.
Simply double–click on the signal you wish to connect to.
Internet Browsing
Having access to browse the Internet unlocks all available online tools
Nu Skin offers to help you build your business. These tools include all
scanner reports, V&G, access to Nu Skin’s websites, and the online sign up
tool. To access Internet browsing, simply click on the menu and select the
Internet option from the menu list. Note: the Internet Explorer browser is
locked to allow access only to Nu Skin’s websites and online tools.
Media Content
The Media option allows you to access a number of different scanner
related media such as videos, presentations, clinical study references, and
training materials. To access this media content simply click on the menu
option and mouse over the media options in the menu list to view the
different media content available.
13
Shutting Down the S2
1. Exit the Scan Session by clicking on the End Session button from the
results page after completing a Scan Session. This will take you back to
the Main Page of the software. The S2 will automatically turn off and the
blue light will stop emitting from the S2 probe. The fan will also turn off
automatically.
1. From the S2 software click Shut down laptop
2. The laptop will shut down automatically
3. Remove the power cords from the laptop and S2
4. Remove the S2 USB cable
5. Place the S2, laptop, cables, and caps in the custom carrying case
14
S2 user’s manual
Note: Do not unplug the S2 while performing a scan or at any time while in
use. Always use the software to exit a Scan Session before shutting down
the S2. Disconnecting the S2 during a Scan Session will require that the S2
recalibrate.
15
04
Uploading Scans
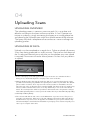
Uploading Overview
The uploading process is necessary to ensure each S2 is up to date and
efficient and contains the latest software available. A Scan Operator can
initiate an upload by simply connecting the laptop to an analog phone line
and selecting the Upload button within the upload section of the software.
The laptop will place a telephone call to connect to a server and begin the
uploading process.
Uploading S2 Data
Uploads must be completed on a regular basis. Failure to upload will prevent
Scans from being processed in a timely manner. The timer on the bottom of
the S2 software indicates how much time you have before your next upload
is required. Pharmanex will not be able to process S2 data until you perform
an upload.
1. Connect the laptop to an analog phone line. If you are unsure as to whether the line is
analog or not, check with the phone company or the owner of the line.
2. Add any dialing prefixes that may be needed to dial out on your line (many hotels require
you dial 9 before dialing out). NOTE: The upload phone number is preloaded. The default
phone number is toll-free. If for any reason the toll-free number is unavailable, the Scan
Operator may select an alternate phone number. NOTE: The alternate phone number may
not be a toll-free number and in some cases may dial directly to our server in the United
States. The Scan Operator will be responsible for all international or long distance charges
made while uploading. Please contact your local market office if you have difficulty uploading.
3. Click Upload Using Dialup.
4. The software will dial out and connect to the Pharmanex corporate servers. This process
may take several minutes. All Scan records and calibration information will be uploaded to
the Pharmanex corporate servers. If upgrades are available for your system software, they
will automatically be downloaded and installed on your laptop. The software may ask you to
reboot your computer at this time.
16
S2 user’s manual
NOTE: After each upload the software is reset to provide 120 hours of Scan
time before the next upload is required. The time does not start counting
down until a Scan is performed. Once a Scan is performed, the time continues
to count down whether the laptop is on or off. Failure to upload before the time
runs out will result in the S2 being disabled. Please perform the following steps
to upload data to obtain another 120 hours of scan time.
Uploading with broadband
Broadband uploading is faster and more reliable than uploading through dialup.
To upload using a broadband connection, please follow the steps outlined
below.
1. In the Upload menu of the Scanner laptop software click the Broadband tab.
2. Connect your network cable to the Ethernet port on the back of the
Scanner laptop.
3. Check the network status traffic light icon located on the left side of
the screen.
:: A red light indicates no connection is found; if you see a red light in
the network status icon make sure the network cable is connected, then
reboot the laptop and check the connection status again. If the light
remains red, please contact your local market office for further support.
:: A yellow light indicates that there may be a problem with the connection.
Often the upload will still work while a yellow light is showing. If the yellow
light turns to a red light, make sure the network cable is connected and
reboot the laptop.
:: A green light means the connection is detected and established. Click
the Upload Using Broadband button to upload the Scanner.
17
05
Important S2 Tips
Tips
1. Many Distributors find that using a UPS (Uninterruptible Power Supply)
is a great help when running the S2. If the power goes out, even for a
few seconds, the S2 will reset and will then need to be recalibrated. We
encourage anyone wanting to use a UPS to do so. The use of a UPS is
not a requirement, but could save your meeting if the power were
interrupted in any way.
2. The Dark Scan Cap is also designed to be a protective cover for the glass
window on the S2 probe. When storing or traveling with the S2, the Dark
Scan Cap will help minimize any possible damage to the unit. Put the Dark
Scan Cap on during warm-up or during any prolonged period when the
S2 is not being used.
3. It is important to keep the front of the S2 clean and free of any oil buildup.
As you know, we all have oils in our skin. Upon repeated scanning, this
oil can build up on the front of the probe and interfere with the reading.
Please remember to clean the probe and front of the unit periodically
for optimal performance. To clean, use a soft cloth and glass cleaner.
It is also a great idea to have individuals use Nu Skin Epoch® Antiseptic
Hand Sanitizer prior to being scanned. This will reduce the amount of
oil being deposited on the S2 and will also reduce germ transfer from
one individual to another.
18
S2 user’s manual
06
Using the Bar Code Reader
The Bar Code Reader comes preconfigured for use with the S2 software.
Make sure the Bar Code Reader is properly plugged into the back of the
laptop via an open USB port. In the S2 software, use the mouse to click
in the Certificate field so the cursor is blinking. Simply hold the Bar Code
Reader head over the bar code of a S2 certificate and pull the trigger on
the Bar Code Reader. The reader will beep and the certificate number will
appear in the certificate field.
19
07
Support
S2 Technical Support Options
S2 technical support is conducted by the local office where your S2 was
leased or rented. Please contact that office for all technical S2 issues.
Troubleshooting
Please follow these troubleshooting steps before contacting S2 Technical
Support at your local office.
Symptom
Laptop will not turn on.
Solution
1. Confirm that the laptop power cord is plugged into the power converter,
the power converter is plugged into the back of the laptop, and the other
end of the power cord is plugged into the wall outlet. The power converter
has an LED on it.
2. Confirm that the wall outlet is working.
3. Press and hold the power button on the laptop for five seconds. Release
the button, and then press the power button again.
Symptom
The software will not load on the laptop.
Solution
1. Confirm that the laptop power cord is plugged into the power converter,
the power converter is plugged into the back of the laptop, and the other
end of the power cord is plugged into the wall outlet. The power converter
has an LED on it.
2. Confirm that the wall outlet is working.
3. Press and hold the power button on the laptop for five seconds. Release
the button, then press the power button again to reboot.
Symptom
A message is displayed saying the S2 has been disabled for technical reasons.
20
S2 user’s manual
Solution
This message indicates Pharmanex has disabled the S2 for technical reasons.
Please call your local office.
Symptom
An error message is displayed saying the certificate number has previously
been used.
Solution
1. Make sure you are typing the certificate in properly without dashes
or spaces.
2. Try entering a different, new certificate number.
Symptom
I am unable to upload Scans.
Solution
1. Confirm that the telephone cord is plugged into an analog telephone jack
and the other end is plugged into the laptop analog telephone jack.
2. Confirm that the telephone line works.
3. Attempt to upload using the broadband function.
4. Call Technical Support at your local office.
Symptom
An error message is displayed saying the laptop could not establish a
connection.
Solution
1. Confirm that the telephone cord is plugged into an analog telephone jack
and the other end is plugged into the laptop analog telephone jack.
2. Make sure the volume is turned up all the way on the laptop so you can
hear any connection tones. To do this, press and hold the FN button and
then press the Page Up button repeatedly.
3. Unplug the phone cord from the laptop and reboot the laptop.
4. If the laptop still cannot make a connection, try uploading from a different
phone line in a different location.
21
Symptom
An error message is displayed saying the server does not answer.
Solution
1. Please wait 10 minutes and try uploading again.
2. If the error message comes up again, please call Technical Support at
your local Pharmanex office.
Symptom
I am unable to continue scanning because the time has expired for the next
upload.
Solution
1. If you are in the scanning process (performing a Scan) at the same moment
that the time allotted for the next upload session expires, the S2 will continue
to function properly even though the time has expired. Continue to scan
until you have completed scanning those waiting to be scanned, and then
upload the data on the laptop as soon as possible.
2. Find an analog phone line or a broadband connection and upload the
current data on the laptop. This will reset the clock back to 120 hours.
3. If an analog phone line or a broadband connection is not available,
please call Technical Support at your local Pharmanex office.
Symptom
S2 will not turn on.
Solution
1. Is the S2 Pharmanex logo lit on the sides of the unit? If not, make sure the
power cord is properly connected to the S2 and a working power outlet. If
the S2 still does not turn on, try setting up and using the S2 in a different
location or plug the S2 into a different grounded power outlet.
2. Confirm that the USB cable is properly connected to the S2 and laptop
and that the software has loaded properly. Note: The blue light will not
emit unless the software is running in a Scan Session.
22
S2 user’s manual
Symptom
My Scan scores do not seem accurate.
Solution
1. Confirm that the Scannee is placing his/her hand in the exact same
location as when they were previously scanned. For proper hand
placement please see the tutorial on the software.
2. Confirm that the S2 is properly calibrated by choosing the Recalibrate
option on the software.
3. Rescan the Scannee.
Symptom
My Bar Code Reader will not turn on or read Scan Certificates.
Solution
1. Confirm that the Bar Code Reader cord is properly connected to the USB
port on the laptop.
2. Confirm that the laptop is properly powered up and the S2 software is
running on the laptop before attempting to operate the Bar Code Reader.
3. Make sure you click in the box on the screen, with the mouse, before pulling
the trigger on the bar code reader.
4. Please call Technical Support at your local Pharmanex office if the
problem persists.
23
© 2009 Nu Skin Easter Europe KFT Warehouse,
Tablas U. 39, 1097 Budapest, Hungary
www.nuskineurope.com
06080046/3 Eng