1
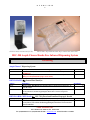
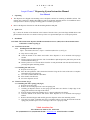
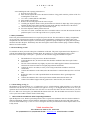
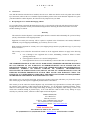
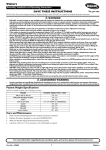
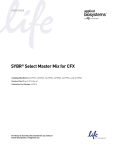
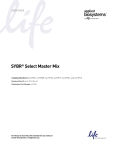
O V E R V I E W
1
Asepti-Cleanse
®
DISPENSING SYSTEM
Hands Free • Auto Eye • Sterile Solution
For Use with Veltek Associates, Inc.’s
DECON-AHOL® WFI Bag
and
DECON-HAND® Bag
Products
Veltek Associates, Inc.
15 Lee Boulevard • Malvern, PA 19355-1234
Tel: (610)644-8335 Fax: (610)644-8336 E-mail: [email protected] ASP-CLS-01 Rev. 12/18/03
O V E R V I E W
2
Asepti-Cleanse Dispensing System
®
For use with VAI’s DECON-AHOL® WFI or DECON-HAND® Bag Alcohol Products
Veltek Associates, Inc. is an EPA and an FDA Registered Manufacturing Operation
Asepti-Cleanse® has been designed by VAI as the most advanced Infrared Sensor Dispensing
System available in the pharmaceutical and biotech industry. The dispensing unit is designed to
meet the requirements of cGMP clean room operations. More importantly, the dispensers utilize a
specially designed package of the premiere brand name DECON-AHOL® WFI Sterile and
DECON-HAND® Sterile.
Features:
The Asepti-Cleanse® Dispensing System is a sealed unit that protects the coated internal
electronics.
The Asepti-Cleanse® Dispensing System is photo-eye operated. Just place your hand underneath
and it dispenses a pre-measured dose to the hand without contact of the person to the unit.
The Asepti-Cleanse® Dispensing System can be adjusted to dispense 1, 3 or 5 ml’s.
The Asepti-Cleanse® Dispensing System is designed in a dual power configuration of power
supply. The Asepti-Cleanse® Dispensing System (DEC-200 unit) can be powered by 4D cell
batteries (4D cell last over 1 year) or connected directly to 110V in the same unit. In the electrically
mounted installation, one has the backup of the battery power if a failure in the power line occurs
due to abnormal situation. Simply, it has it’s own backup system!
The Asepti-Cleanse® Dispensing System mounts directly on glass or walls.
The Asepti-Cleanse® System is water resistant in design.
The Asepti-Cleanse® Dispensing System uses the brand name DECON-AHOL® WFI Sterile and
DECON-HAND® Sterile products that have been used in the pharmaceutical and biotechnology
industry for over 10 years. Bags are removed and replaced in seconds.
The DECON-AHOL® WFI Sterile and DECON-HAND® Sterile products are filtered at 0.2
microns into the Asepti-Cleanse® bag system. Each bag is double bag packaged and subsequently
terminally sterilized via gamma irradiation.
The DECON-AHOL® WFI Sterile and DECON-HAND® Sterile products have been completely
validated for assay and sterility per AAMI, USP and cGMP requirements.
The Asepti-Cleanse® Dispensing System is small measuring 12”L x 5”W x 5”H and has a keyless
opening and closing of the unit.
Veltek Associates, Inc.
15 Lee Boulevard • Malvern, PA 19355-1234
Tel: (610)644-8335 Fax: (610)644-8336 E-mail: [email protected] ASP-CLS-01 Rev. 12/18/03
O V E R V I E W
3
(Stand not available, unit mounts directly to wall)
®
®
DECON-AHOL Bag and DECON-HAND Bag are available sterile and non-sterile
DEC-200 Asepti-Cleanse Hands-Free Infrared Dispensing System
Ordering
Asepti-Cleanse® Dispensing System
Order #
DEC-200
DEC-201
Description
Quan/Case
Asepti-Cleanse Dispensers for DECON-AHOL® or DECON-HAND®. Operates on 4 DCell Batteries.
Asepti-Cleanse Dispensers for DECON-AHOL® or DECON-HAND®. Operates on
Battery or 110V (transformer plug in to an outlet).
1
1
DECON-HAND® Bag Instant Hand Sanitizer
Order #
DH-07
Description
DECON-HAND® Non-Sterile Hand Sanitizer Bags for Asepti-Cleanse Dispenser, 32
ounce fill volume
DH-08
DECON-HAND® Sterile Hand Sanitizer Bags for Asepti-Cleanse Dispenser, 32 ounce
(944 ml.) fill volume, double bag packaged, filtered at 0.2 microns and gamma
irradiated.
Quan/Case
8
8
DECON-AHOL® WFI Sterile Bag USP 70% filtered and Irradiated Isopropyl Alcohol
Order #
Description
Quan/Case
DECWFI-BAG-01 DECON-AHOL Sterile 70% USP IPA Bags for Asepti-Cleanse Dispenser, 32
ounce (944 ml.) fill volume double bag packaged, filtered at 0.2 microns and
gamma irradiated.
Veltek Associates, Inc.
15 Lee Boulevard • Malvern, PA 19355-1234
Tel: (610)644-8335 Fax: (610)644-8336 E-mail: [email protected] ASP-CLS-01 Rev. 12/18/03
8
O V E R V I E W
4
Asepti-Cleanse® Dispensing System Instruction Manual
User Manual
•
1.
Unpacking
The dispensers are shipped with mounting screws and plastic anchors for mounting on drillable surfaces. The
package also contains two double-sided adhesive pads as an alternate mounting means. For installations where
water protection is desired, a sponge-mounting gasket is available upon request.
•
Remove the dispenser from the box with the mounting hardware and pads.
2.
Open cover
Fig. 1 shows the location of the latch-bar at the bottom of the unit. Place your index finger behind the bar and
pull outward to release the cover latch. Lift the top of the cover upward and open cover to full open position.
3.
Installation
CAUTION: The bottom of the dispenser should be mounted at least 12” (30cm) above the horizontal surface
of the sink or counter top (Fig. 2).
3.1. Non-Water-Proof unit
3.1.1. Installing unit with adhesive-pads
Tape 1: 150x75mm (about 6x3”). Tape 2: 130x75mm (about 5x3”) (see Fig.4).
A. Keep the cover fully open.
B. Clean the bottom of the chassis and surface where dispenser is to be mounted with isopropyl
alcohol.
C. Remove protective paper from one side of each adhesive-pad and press the pads in the place at the
locations indicated in Fig. 4.
D. Remove protective covers from the back surface of each pad. Mount unit at the desired location by
pressing unit against mounting surface.
3.1.2. Installing unit with screws
A. Keep the cover fully open.
B. Place the unit against the wall at the desired location. Using the five holes of the unit as a template
and marking the wall with pencil.
C. Use 11/64” (4.4mm) drill bit to drill holes.
D. Insert anchors into the holes.
E. Screw the dispenser on wall
3.2. Water Protection (Fig.3)
3.2.1. Installing unit with a sponge pad (Fig.5).
A. Keep the cover fully open.
B. Remove the front side paper from water-seal sponge pad.
C. Carefully put dispenser chassis on the sponge pad and make sure that the U-shape edge of the
sponge pad conforms to the edge of the chassis
D. Press the sponge pad on unit and make sure it is properly adhered to the chassis.
E. Clean the bottom of the chassis and surface where dispenser is to be mounted with isopropyl
alcohol.
F. Remove the backside paper and carefully press the dispenser on the clean mounting surface.
G. Close the cover (Note: somewhat more force is needed in order to overcome the resistance from the
sponge pad), and then open it to see if the edge of the cover is properly sealed.
Veltek Associates, Inc.
15 Lee Boulevard • Malvern, PA 19355-1234
Tel: (610)644-8335 Fax: (610)644-8336 E-mail: [email protected] ASP-CLS-01 Rev. 12/18/03
O V E R V I E W
5
3.2.2. Installing unit with a sponge pad and screws
A.
B.
C.
D.
E.
F.
G.
H.
I.
Keep the cover fully open.
Place the unit against the wall at the desired location. Using pencil mark the position of the five
mounting holes on the wall.
Use 11/64” (4.4mm) drill bit to drill holes.
Insert anchors into the holes.
Remove the front side paper from the water-seal pad
Carefully put dispenser chassis on the pad and make sure that the U-shape edge of the sponge pad
matches the edge of the chassis and the five holes on the pad align with the holes of the chassis.
Do not remove the protective paper from backside of pad.
Screw the dispenser with the pad onto the wall.
Close the cover (Note: somewhat more force is needed in order to overcome the resistance from the
pad) then open it to see if the edge of the cover is properly sealed.
4. Battery Installation
Four D size professional alkaline batteries are required to power the unit. The unit contains two battery compartments,
one on each side of the dispenser. Install two batteries in each compartment. Load the space toward the back of the
compartment first. Place the flat (negative) end of the battery against the spring and depress the spring until the positive
end can be moved in the place. Each battery must have the negative end in contact with the spring. Load the remaining
batteries in a similar fashion.
5. Electrical Wiring to 110V:
It is advisable to check your local codes prior to installation of this unit. The power requirement for the dispenser is 6
volts DC unregulated with a minimum of 700ma output, the connector is 5.5 mm outer diameter and a 2.5 mm
inner with a 9-10 mm length. Center pin is + (positive) as is the standard. Suggested installation requires:
A.
B.
C.
D.
E.
F.
G.
H.
The installation of 110V power line to the desired location
At the introduction site, an electrical outlet box should be installed to house the Asepti-Cleanse
transformer.
The size of the transformer may slightly vary due to the model supplied. Measure the transformer
and assure the electrical outlet box it slightly larger than the transformer.
Connect the 110V to an outlet (or assure you are using a transformer with direct 110V feed
connections)
Connect the transformer to the outlet (unless the transformer is connected directly to the 110V feed
line)
Replace the outlet cover with a pre-drilled hole for the transformer line to go through to the
dispenser.
Connect the transformer line to the Asepti-Cleanse and then mount the unit to the wall
Contact VAI technical support with any questions at 1-888-478-3745, 610 983-4949.
6. Volume Setting (see Fig. 3)
The dispenser ejects approximately 1c.c. of solution per cycle. A switch with three setting positions (1,2,3) allows the
selection of one, three or five cycles per actuation (see right view of Fig. 3). As shipped the switch is set for one cycle
operation. Do not load solution at this time. Now close the cover to test the unit. Note: the unit will activate as you close
the cover. With cover closed, place your hand under the bottom of the unit. The unit should now activate for one, three
or five cycles in accordance with the volume switch setting.
7. DECON-HAND and DECON-AHOL Liquid Bag Installation
Open the dispenser cover. Remove perforated portion of box to expose hose attachment. Place the solution container in
solution compartment with hose forward. Pull hose attachment out and insert flange at the nozzle end of hose into the
slot of the nozzle holder (Fig. 3). Note: as cover is closing the unit will cycle but solution will not dispense unless cover
is fully closed.
Veltek Associates, Inc.
15 Lee Boulevard • Malvern, PA 19355-1234
Tel: (610)644-8335 Fax: (610)644-8336 E-mail: [email protected] ASP-CLS-01 Rev. 12/18/03
O V E R V I E W
6
8.
Close Cover
Once both the batteries and solution are installed, close the cover. Make sure that the nozzle seal gasket does not block
tip of the nozzle, otherwise the cover should be reopened and the position of the nozzle should be adjusted. Now, place
your hand under the solution dispenser, the solution will be pumped out on your hand.
9.
Re-opening the cover without discharging solution
Use your index finger to approach the latch release bar (Fig. 3) from the side of the unit. Pull down release bar while
keeping hand away from the centrally located hand-sensing elements. Releasing the latch in this manner will avoid
needless discharge of solution.
Warranty
This touch-free solution dispenser is warranted against defective materials and workmanship for a period of ninety
(90) days from the date of the original purchase.
Equipment covered by this warranty will be repaired or replaced in the United States and Canada, WITHOUT
CHARGE, except for shipping and handling, by our Factory Service Center.
When returning equipment for warranty service, the shipping charges must be pre-paid and a copy of your receipt
must be enclosed.
This warranty covers all defects incurred from normal use of the equipment and does not apply in the following
cases:
a. Loss of damage to the equipment due to abuse, mishandling, accident or failure to follow
operating instructions.
b. If the equipment is defective as a result of leaking batteries.
c. If the equipment has been serviced or modified by someone other than our authorized agents.
THE AFOREMENTIONED IS IN LIEU OF ALL WARRANTIES, EXPRESSED OR IMPLIED, INCLUDING
BUT NOT LIMITED TO, ANY WARRANTY OF MERCHANTABILITY OR OF FITNESS FOR ANY
PARTICULAR PURPOSE. IN NO EVENT SHALL THE VENDOR BE LIABLE FOR CONSEQUENTIAL,
INCIDENTAL, INDIRECT OR SPECIAL DAMAGES OR LIABILITY, TRANSPORTATION,
INSTALLATION OR SUBSTITUTION COSTS, DELAYS, OR FOR ANY OTHER DAMAGES, COSTS, OR
EXPENSES INCURRED, IRRESPECTIVE OF HOW THEY OCCUR. THIS WARRANTY SHALL NOT
EXTEND TO ANY OTHER PERSON OTHER THAN THE ORIGINAL PUCHASER OF THIS EQUIPMENT
OR THE PERSON FOR WHOM IT WAS PURCHASED AS A GIFT.
This warranty gives you specific legal rights, and you may also have other rights, which may vary from state to state.
This warranty is given with respect to equipment purchased in the United States.
This warranty is for the touch-free solution dispenser only, and excludes any representation or warranty with regard to
any solution, lotion, solution or other liquid used in the dispenser. Use of improperly formulated solutions, lotions,
solutions or other liquids could result, amongst other things, in damage to the dispenser, and/or leakage, which in turn
could create conditions leading to personal injury. In no event shall the vendor be liable for any damage or injury
caused by any solutions, lotions, solutions or other liquids used in the dispenser.
Veltek Associates, Inc.
15 Lee Boulevard
Malvern, PA 19355
Toll Free: (888) 4-STERILE (888) 478-3745
Tel: (610)644-8335 Fax: (610)644-8336
e-mail [email protected] Website: http://www.sterile.com
Veltek Associates, Inc.
15 Lee Boulevard • Malvern, PA 19355-1234
Tel: (610)644-8335 Fax: (610)644-8336 E-mail: [email protected] ASP-CLS-01 Rev. 12/18/03
O V E R V I E W
7
Veltek Associates, Inc.
15 Lee Boulevard • Malvern, PA 19355-1234
Tel: (610)644-8335 Fax: (610)644-8336 E-mail: [email protected] ASP-CLS-01 Rev. 12/18/03
O V E R V I E W
8
Liquid Bag
Veltek Associates, Inc.
15 Lee Boulevard • Malvern, PA 19355-1234
Tel: (610)644-8335 Fax: (610)644-8336 E-mail: [email protected] ASP-CLS-01 Rev. 12/18/03
O V E R V I E W
9
Veltek Associates, Inc.
15 Lee Boulevard • Malvern, PA 19355-1234
Tel: (610)644-8335 Fax: (610)644-8336 E-mail: [email protected] ASP-CLS-01 Rev. 12/18/03