1
User's monuol
HD/SD DvB_T2 DIGITAL TV RECEIVER
Introduction
1.
1.
.....2
1
Layout of the Main Unit
..----)
2.4.2
............7
...........7
...........7
...................E
2.4.4
..........:........8
9
9
......;.-...........................9
...........,........................9
...............9
...............9
24s
....,...,..... l0
.......,...... I 0
2.4.3
..............1I
.............I I
..............1I
.........
2.4.6
6
..12
.,.t2
...t2
I
..._12
....14
.... I 5
...
l5
.... I 5
.........t 5
........16
.........17
......... I 8
............. I 8
,.......,.... l9
............ l9
............20
.............20
............21
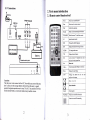
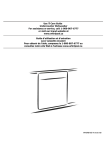
a.{
5.Power
2.USB
6.Remote sensor
3.HDMl output
7. Power
4.AV output
8. Ext Remote sensor
a)Video output(Yellow RCA)
b)RightAudio output (Red RCA)
c)Left Audio output(White RCA)
.........t6
br
.Antenna Input(F connecter)
lndicator I ight
i
1
1.2 Connections
2. Parts menu introduction
2.1 Remote control function brief
P.ess to tum
"@ :@:@
@
@@
on/offthe
mV
sund or remove sund
Mute
Sel@t
Enter
Confim the *lection
Display
Displavs
TV/RADIO
Switch benven TV md Radio modes
0-9
Input chmnel numtro
SUB
Change the subtitle lmguage
EPG
Display the Eletronic Progm Guide
At,DIO
To chage
TTX
Display teletext featuB
FAV
orent dmmypogm infom*io
adio
menu
Add or remove TV.chanels liom one ol
the four l'avorite chmnel
t
ligs
Exit
Menu exil
voL+/-
Volume adjust
Menu
Display the main
CH+/-
Change the channel one
od
lelUright in the menu
Mflu
by one
rrn/down in the menu
Cautions
The red power wire connect to the ACC line which can control the auto,
don't connect to the storage battery directly from the auto, to guard
against long term operation can't stop. The ACC line and the GND line
should install firmly, avoid some unnbcessary machine issues.
{
seloction
Menu seletion
Search
Scan program
Play/Pauw
Press to tum
:iiSi.::::::*is
ll}xt\!:z:l:
2
l\,lcnrr
on/offlhe Time shii
Press to tum on/olTthe
reording
md
2.2 Function brief and ports introduction
The HD tv receiver support H.264, MPEG2, MPEG4, MPEG5 such video decoding
Support PCM, ACC Level2. ACC trvel4 such audio decoding tv receiver solution.
It is available for European md Australia countries.
Input Portr DTV,USB
Output Port: AV.YPbPr,HDMl,Audio
2.4 Main
Menu
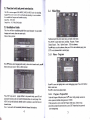
2.3Installation Guide
will show installation guide before search channels,
language and country then enter aulo search.
The tv box
Show as below picture
you
can selecl
:
Traditional style full screen main menu, and matrix style menuPress MENU to open main menu, including : Program. Picture.
Channel Search. Time. Option System. USB six submenu.
Press(/) bufton to select submonu, then press OK to enter submenu page, press
EXIT t6 exit submenu back to current page.
2.4.1
Menu
- Program
Press{/} button select language and country, when select channel search, press}
button enter auto search.. Show as below picture :
Pressall to move the highlight bar to select debugging project- Press EXIT/MENU
backto main menu.
Press</)to select focus adjust project.
Press EXIT stop
search, popup whefter to stop search tooltip, press OK exit
autosearch function, and save search information then exit search page. press
MENU to skip the displayed channel search to continue to search fbr the next
r:lrannel status.
Note : Auto search
will immediately
delete all channel informations.
4
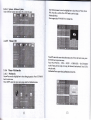
2.4.1.1
Program - Program Edit
Under the Program Edit option press OK/V enter, llrstly prompt customer to
enter a password, detbul setting password : 00000.
lfthe password is correct, enter the Program Edit menu, ifenter wrong
password,it prompt for password error, press EXIT button back to password
error
menuprompt.
5
2.4.1.J Program - Sort
Pree</>to select the way of Sort : By LCN; By
By Service [D: default setting By LCN.
ONID: By Service
name;
2.{.l.4Program - LCN
Pree</> to select whether open LCN, default setting ON.
RED button (Move): Press Red button to select the need to move channel, al
customer's satisfo location. press OL the channel number will move to the
appropriate location.
FAV button (FAV): Alter press F.AV button, the selected channel will add to
FAV List. Press up and down burons to select multiple channels.
Creen bufton (Skip): After press Green button, the selected channel will skip
during channel switch, cant be selected.
Yellow button (Lock): After press Yellow bufton, the selected channels will be
locked. When watch need to enter password fbr viewing.
Blue button (Delete): After press Blue button, popup confirmation fbr customer
whether delete dialog, press ENTER button will delect the channel.
Exit button: back to Program Edit menu;
Note, if-the Program Edit hm been modilled. press EXIT button back to
Programpage,willpopupthesavedisplaybox,keepsavethenexit.
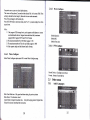
Under the Program Edit option press OKrv button, select EpC, to get more
infbrmation about the program and program news going to play at iur..nt o,
future, or press EPG button to entern electronic p.ogram guid" .eru pag" us
below
:
2.4.1.2 EPG
2.4.2 Menu - Picture
Press^/v to move the highlight bar to select debugging project. Press
EXIT/MENU back to main menu.
Prsss</> to select fbcus adjust project.
16:9 Wide Screen; Auto;4:3 Full;4:3 Pan & scan;
Aspect Ratio select range
4:3 Letter Box, default l6:9 Wide Screen;
Resolutionselectrange, 480P,576P,720P, 10801;default 10801;
TV Format select range: NTSC, PAL, default PAL:
,
Video output select range
:
CVBS ,RGB
2.4.2-l Menu-Channel Search
2.4.2.2 Channel Search -Auto Search
Under Auto Search option press OK/) button popup dialog to confirm whether
enter to search, press ENTER hrttur to confirm auto search rnenu page, the tv
receiver under the
2.4.3 Menu - Time
Pressaiv to move the highlight bar to select. debugging projecl Press EXIT/MENU
back to main menu. The OK button doesn't work in this page.
Pree EXIT to stop auto search,
ifthe processing ofsearching didn't finish, will poprp
the dialog to confirm whether exit search, after confirmation will exit search.
Press MENU to skip the displayed channel search to continue to search for the next
channel status.
Note : Auto search will immediately delete all channel informations.
2.4.2.3
Channel Search -Manual search
Under Manual Search option press OI(/) to enter Manual search channel menu,
press EXIT to quit Manual search menu.
2.4.3.1 Time - Time Offset
Selectrange, Auto, Manual, defaultAuto
2.4.j.2
Time - Country Region
When Time offset is Manual, Country Region option in gray can't be selected
Different country different selection, default, Paris
2.4.3.3 Time - Time Zone
Select range
:
GMT-12-GMT+12, default CMT+I, Select range
:
CMT-
I2-GMT+12, default GMT+I, When Time offset is Auto, Time Zone option in
gray can't be selected.
2.4.3.4
Sleep
This I'unction has been closed.
2.4.1
Menu -Option
The menu show Frequency channel, Frequency, Bandwidth,
euality.
Press OK to entem Channel Search processing.
2.4.2.4 Installation - Country
Press{/} to select country, different country different frequency range and
bandwidth.
Antenna power : open 5V/0V, support one extemal antenna
Press^/v to move the highlight bar to select tlebugging project. Press EXIT/MENU
main menu.
to enter the option menu page under Configuration menu.
back
1o
Press
OK/)
9
2.4.4.1 Option - Language
Under Language option press OK/) button enter language page, press<Dto
select lbcus adjust projecl press EXIT/MENU back to Configuration menu.
t
I
This page is a child lock function, the channel is age limit, can,t watch for child.
Pressl) to select age limit range, press OK to confirm setting, press EXIT/MENU
back to previous page.
OSD Languagerange
:
English, Czcch, Danish,.French, German,
Italian, Portuguese, Spanish
Subtitle Language : in order to take
care
ofhearing disability, will add special
subtitles when program recording,
Audio Language: Audio language selection type
Digital Audio select range: PCM,RAW,Off, default PCM
Audio Description: this option closed.
2.4.5
Menu -System
2.4.5.1
System -Parental Guidance
Under Parental Guide option press OK to enter, first show 6-digit password input
box, enter correct password, enter to Parental Guide msnu page.
l0
T
Input old Password : enter the initial 6-digit password, det'ault password is 000000.
ifenter wrong password will pop-up password error massage box, press EXIT to
exit the prompt box.
lnput new password : enter new 6{igit password.
Confirm password : enter the password again to confirm new password, ifenter
correct again, will pop-up set successfully prompt box. press EXIT to exit prompt
box. password setting successfu lly.
I
2.4.5.2 System- Restore Factory Default
Press OKD then pop-up enter password menu, enter the initial password : 000000,
STB perform reset action, enter engineering default state, restore to default setting.
2.4.53
System
- Information
OKD
show message box : Model. SW Version ( soliware version ). HW
Version ( type of main engine ).
Press
t1
2.4.5.4
System - Software Update
Under Softr.vare Update option press OK to enter
Enter Media press<D to move the highlight bar to select
Music or photo. Movie
PVR. Press OK to conflrm. press EXIT back to previous page.
Multimedia-Music
Music support play WMA/Mp3/AAC fbrmat files.
-t
2.4.5.5 Menu-USB
Pressl/v to move the cursor select play songs. press OK to enter next
menu, press
RETURN back to previous menu.
Press<PLAY/PAUSE>. <pRE>, <NEXT>. <FORWARD>. <UACKWARD>
to play/ Pause, previous song, next song, f'ast forward, last
backward. press
exit play mode.
Multimedia-Photo support play jpg/bmp/png lbrmat files.
2.4.6 Menu-Multimedia
2.1.6.1 lVlultimedia
Pressrivto move the highlight bar to
select debugging project. Press EXIT/MENU
back to main menu.
Press
OI()
to enter the option menu page under the Multimedia menu.
t2
t3
EXlr
t
Pressa/vto move cursor to select display picture.
The cursor will stay about 2 seconds on the selected file ( in the menu Slide Time
setting to decide the time length ), then enter to scan mode automatic.
Press OK can change to full screen play.
Press RETURN back to previous menu, press PLAY : pictures display fiom tiom
top to down.
2.4.63 Movie Configure
NOte:
1
) Only support USB storage device,
can't support mobile phone or camera
such multimedia devices. Support removable hard disk, maximum
support 400G. Support NTFS and FAT32 format.
2) The ma,ximum depth of the USB folder support : 308
3) The maximum numbor offiles for each folder.support : 5000
4) Only support single and dual channel audio formats.
2.1.6.2
Subtitle Specific :
Subtitle BG
Sutrtitle Font color
2.4.6.4 PVR Configure
Photo Configure
Under Photo Configure option press OK to enter Photo Configure page.
Record Device : Checking record device
Format : format of record device
2.5 Other menus
2.5.1
Slide Time Slide time : Play speed and time setting for preview picture
Slide Mode : This function closed.
Aspect Ratio is Images broadcast ratio, Keep for keeping picture Original ratio,
Discard for picture stretching full screen play.
l4
L-
Audio Languages
Audio Languages only show current audio types in code stream.
Press MTS / UII / NICAM button : under DTV, when not Audio Language menu,
show Audio Language.Under Audio Language menu, close Audio Language menu.
Press EXIT button : close Audio Language menu.
Pressl/v button : Fluctuation options, 51yit^t" ",.,'t;^ t^. selected language and audio
type.
Press</>button
2.5.2
:
setsoundclrannel
.
;j
as ;,'.;. i::l!ff
, cycleoptions.
The screen ivill shor.v broadcast time and programme name
programme.
Press
olthe scheduled
EXIT back to previous menu.
Press OK to conlirm whether need to watch the programme scheduled.
2.5.4 Info Menu
EPG Navigation Menu
This page show channel intbrmation
paee.
Pressa/vto move cursor. switch channel.
Press OK button to select the need to reserve watch programme.
Press</> to search channel inlbrmation.
Press YelloilBlue button to execute programme page up and down firnction.
When not INFO menu. press INFO butlon show as above INFO rnenu. press EXIT
to exit the menu.
When have INFO menu. press INFO button show as below, display channel detail
Press INFO button, switch to the details information ofselected scheduled
programme, screen display Schedule.
2.5.3
infbrmations, press EXIT to exit the rrenu.
Schedule Menu
t6
t7
2.5.5
2.5.7
Volume menu
Favorite List Menu
Consist ofthe progress bar and digital, display at the bottom ofthe screen, progress
bar show the percentage ofcurrent volume, the numbers show the size ofthe current
volume. The volume adjustment range is 0-32, default 15.
When not Favorite List menu, press FAV button to pop-up this menu, pressuv
to
move cursor switch channels.
Press
Press VOL+/- to plus/minus volume, and show volume menu. Press MENU button
to close Volume menu, and show main menu.
Press EXIT to close Volume menu.
2.5.6
lVlute Menu
When MUTE display at the left bottom screen means current user mute.
Press MUTE button : if current user under not mute, display Mute icon then mute.
Ifcurrent user under mute. remove user mute, then close mute icon.
Press VOL+/- buttirn : remove user mute, close mute icon, and show Volume menu.
Press Sound button : remove user mute, close mute icon, and show current Sound
Mode.
18
OK to confirm the programme, press EXIT/FAV to exit the menu.
2.5.8 Time shifting
Time shifting means you can stop watching the real-time ongoing program,
to .
answer calls or make calls, when you finish you can continue
to watch liom where
you stopped and not miss any wonderful programs.
I
.
Under full screen ongoing state press I pLAy/pAUsE, the video picture
is
paused. Ifthere is extemar USB device, the tv receiver wiil
start record the
current program automatic as below.
t9
2. Press IPLAY/PAUSEI again, continue to watch the program from where paused
Press EXIT to-exit the record program, means to exit time shifting function. And
retum to current real-time program as below.
Fault problems
No picture and sound
NO signal
Solutions
Check the main power cable and check that it
is plugged into a suitable power outlet.
Check whether Power Switch is On.
Check the antenna position and installation.
Check the area setting whether correct, ifnot
need to reset asain
Check the volume level
No sound
Poor picture
& sound
orralilv
2.5.9 Program Record
Can't search signal
l.
You can record programs when watch tv, press Yellow button pop-up the
recording time setting floating panel, then you can set record time according to thp
USB storage device disk space, press ENTER button to sta.rt record program you're
watching, and save the video file as below.
Poor pictures and sound
quality when car moving
4.
of the TV and
Check the setting
of
country and area
Maybe the weak sigral in the local position,
try in another place.
Specification
Quantity
Remote control
Power line
AV line
From the MENU-USB-Multimedia-PVR, you can find the record program in the
USB device disk, and select to play the record program.
3. Fault problems and solutions
Before contacting your local service, please make sure following instructions. If the
product does not work normally after completing the tbllowing fault problems and
solutions, please contact y.our local product distributor or service center.
20
if
correct, or maybe the weak sisnal
Accessorieslncluded
Name
the
remote control.
Check the Mute status of the TV and nroduct_
Check if the weak reception of antennas, and
install antennas again.
User's manual
I
Antennas
I
IR line
I
2l