1
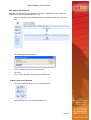
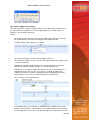
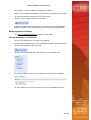
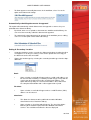
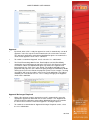
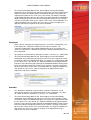
SmartLibrary
User Manual
SMARTLIBRARY USER MANUAL
TABLE OF CONTENTS
SmartLibrary Overview
SmartLibrary: Administration Console
Setting Up SmartLibrary
Defining Automatic Deletion Settings
Defining Notification Service Settings
Enabling Sharepoint Events for Document Libraries
SmartLibrary: Configuration
Enabling a SmartLibrary Team Site
Disabling a SmartLibrary Team Site
SmartLibrary: Upgrading An Existing Document Library
Navigating to the “SmartLibrary Settings” Section
Enabling SmartLibrary functions
Consequences of Enabling SmartLibrary
SmartLibrary: Security
Adding a User to a Site
Inherited Permissions
Assigning site-wide (global) Permissions
Adding a User to a SmartLibrary-enabled Document Library
Assigning Document Library Permissions
SmartLibrary: Workflow Viewer/Document Status
Viewing the Document Library Workflow
Viewing the Folder Workflow
Viewing the Document Workflow
Viewing the Document Workflow Status
Workflow Key
Understanding a Workflow
Creating a Workflow
Edit a Workflow
Viewing User Comments
Force Approve or Reject a Document in the Workflow
Workflow Statistics
SmartLibrary: Workflow Designer
Creating a New Workflow
Editing an Existing Workflow
Building a Workflow
Changing the Workflow Title
Adding a Step to the Workflow
Adding an Approver to a Step in the Workflow
Editing Step Details
Change Step Title
Moving a Step in the Workflow
Deleting a Step from the Workflow
The ‘Choose Approve By’ Property
The ‘On Reject Go to Step..’ Property
Editing Approver Details
Moving an Approver to a Different Step
Deleting an Approver
Changing/Selecting an Approver
Saving a Workflow
Deleting a Workflow
Exporting a Workflow
Importing a Workflow
Modifying Advanced Settings
Viewing Documents in Workflow
SmartLibrary: Advanced Workflow Settings
Navigating to the Advanced Workflow Settings Page
Allowing Approvers to Modify Documents in a Workflow
Automatically Submitting Documents for Approval
Setting a Secondary Location
Saving Advanced Workflow Settings
PAGE NUMBER
4
5
5
6
7
7
8
8
9
11
11
11
12
13
13
14
14
16
16
17
17
18
18
19
19
20
22
22
22
23
23
25
25
25
25
26
26
27
28
28
29
29
30
30
31
31
31
31
32
32
33
33
34
34
35
35
35
36
36
37
2 of 59
SMARTLIBRARY USER MANUAL
TABLE OF CONTENTS (CONTINUED)
PAGE NUMBER
SmartLibrary: Workflow Notification Settings
Navigating to Workflow Notification Settings
Approval
Approval No Longer Required
Completed
Reminder
Escalation
Saving Notification Settings
SmartLibrary: Submit for Approval
Uploading a Document to a Document Library
Creating a New Document in a Document Library
Submitting a Document for Approval
My Submissions
SmartLibrary: Managing Workflows
Navigating to the “Manage Workflows” section
Using “Manage Workflows”
Consequences of using “Manage Workflows”
SmartLibrary: Pending My Approval Web Part
Using the Pending My Approval Web Part
Configuring the Pending My Approval Web Part
SmartLibrary: Approve/ Reject Page
Navigating to the Approve/Reject Page
Approving and Rejecting Documents in a Workflow
Forcing the Approval or Rejection of a Document in the Workflow
SmartLibrary: Deleted Files Page
Displaying the Deleted Files Page
Restoring Deleted Files
Permanently Deleting Deleted Files
Advanced Actions on the Deleted Files Page
Manage Users on the Deleted Files Page
SmartLibrary: Audit Log
Displaying the Audit Log for a Document Library
Displaying the Audit Log for an Individual Document, Form or Image
Navigation in the Audit Log
Ordering by Columns in the Audit Log
Exporting the Audit Log to a Comma-Separated Value (CSV) File Page
SmartLibrary: Contact Us
38
38
39
39
40
40
41
41
42
42
43
43
44
46
46
46
46
48
48
48
50
50
51
52
53
53
53
54
55
55
56
56
57
57
57
58
59
3 of 59
SMARTLIBRARY USER MANUAL
SmartLibrary Overview
Nintex SmartLibrary is a cost-effective solution that extends SharePoint Team Site
libraries to include advanced document management features such as workflow,
document undelete and auditing.
SmartLibrary’s low entry cost and rapid implementation (less than 30 minutes) assures a
quick win and provides a solid, stable and secure product that plugs into Microsoft
SharePoint.
Installation is required only on each server, and that’s it! Standard Operating
Environments are not affected.
4 of 59
SMARTLIBRARY USER MANUAL
SmartLibrary: Administration Console
Thank you for purchasing Nintex SmartLibrary. To get started please read the following
carefully.
SmartLibrary is installed with an Administration Console that facilitates all administrative
tasks for the server. This document will guide you through the steps required to get your
Nintex SmartLibrary setup.
SmartLibrary Administration Console Help
Setting up SmartLibrary
Defining Automatic Deletion Settings
Defining Notification Service Settings
Enabling Sharepoint Events for Document Libraries
Setting up SmartLibrary
When SmartLibrary is successfully installed there are a few initial administration tasks
that need to be completed before the product will work on your Windows Sharepoint
Services server. These tasks include:
•
Supplying administrator credentials for the system to use when performing
background tasks;
•
Supplying your license key.
To enable SmartLibrary to provide features such as Auditing and Undelete of
documents, it requires an account with credentials, to perform these tasks. Click on the
‘Credentials’ button to display the Credentials form. The following screen will display.
Enter the Account Name, Password and Domain of an account with Administrator
privileges on your server. Nintex recommends that this account not be an active user in
Windows Sharepoint Services.
Enter the license key provided by Nintex into the License key box and click the save
button. When prompted to restart IIS, select yes so the changes are saved.
The application will return you to the front page and you will notice at the bottom of the
page are the details of your license code.
5 of 59
SMARTLIBRARY USER MANUAL
Defining Automatic Deletion Settings
This feature, when configured, will allow you to permanently delete old Deleted Items on
an automatic schedule.
On the front page of the SmartLibrary Administration Console you will notice a button
titled ‘Deletion Settings’. Click this button to view the ‘Deletion Settings’ form.
To enable this feature of SmartLibrary check the ‘Enable Auto Deletion’ check box. The
automatic deletion settings will become editable. These settings are described as
follows:
•
Keep deleted items for This setting defines how long a document should
remain in its library’s “Deleted Items” section. For example, if this value is set
to ‘1 Day’ a deleted document deleted from a document library will remain in
the deleted items folder for 1 day. When the auto-delete service runs next, if
the document has been in the deleted items folder on the site for longer than 1
day, it will be automatically and permanently deleted.
•
Run Every This setting defines how often the auto-delete service should run.
It can be configured to run on a daily or weekly basis. The number of days or
weeks between executions of the service is defined by the number property.
•
Time This setting defines at what time the auto-delete service should run.
Nintex recommends setting this value to a time that your Windows Sharepoint
Services server is not expected to be busy. Note: The time property is in 24hr
time format.
•
Advanced Schedule If you wish to set advanced settings on the automatic
deletion service, click the Advanced Schedule button and the scheduled task
properties window will open.
Click ‘Save’ to save the settings or ‘Back to Menu’ to return to the front form without
saving.
6 of 59
SMARTLIBRARY USER MANUAL
Defining Notification Service Settings
SmartLibrary has the ability to send approval Reminder and Escalation emails when
documents are not being approved in a timely fashion. Configuring the Reminder and
Escalation email settings are done via Customizing Notification Settings when creating
workflows.
On the front page of the SmartLibrary Administration Console you will notice a button
titled ‘Notification Settings’. Click on this button to view the ‘Notification Settings’ form.
To enable this feature of SmartLibrary check the ‘Enable Notifications’ check box. The
notification settings will become editable. These settings are described as follows:
•
Run Every This setting defines how often the service should run. It can be
configured to run on a daily or weekly schedule. The number of days or weeks
between executions of the service is defined by the number property.
•
Time This setting defines at what time the service should run. Nintex
recommends setting this value to a time that your Windows Sharepoint
Services server and mail server are not busy. Note: The time property is 24hr
time format.
•
Advanced Schedule If you wish to set advanced settings on the Notification
service, click the Advanced Schedule button and the scheduled task
properties window will open.
Enabling SharePoint Events for Document Libraries
By default, SharePoint does not enable events for document libraries. Follow the
steps below to enable events for document libraries. Events are enabled on a
per virtual server basis. Therefore, when you enable events, you enable them for
all sites created on the specified virtual server.
On the server with Smart Library installed, click ‘Start’, point to
‘Administrative Tools’, and then click ‘SharePoint Central Administration’.
In the ‘Virtual Server Configuration’ section, click ‘Configure virtual server
settings’.
On the ‘Virtual server list’, click the virtual server that you want to enable.
On the Virtual Server Settings page, in the ‘Virtual Server Management’
section, click ‘Virtual server general settings’.
On the ‘Virtual Server General Settings’ page, in the ‘Event Handlers’
section, in the ‘Event handlers are’ box, select ‘On’, and then click ‘OK’.
Installation and configuration of SmartLibrary is now complete.
7 of 59
SMARTLIBRARY USER MANUAL
SmartLibrary: Configuration
To use SmartLibrary in a Windows SharePoint Services (WSS) site, SmartLibrary
functions need to be “switched on”.
Enabling SmartLibrary allows Audit Log, Document Undelete and optionally, Workflow
functions.
Configuration Help
Enabling a SmartLibrary Team Site
Disabling a SmartLibrary Team Site
Enabling a SmartLibrary Team Site
•
Navigate to the team site that is to have SmartLibrary enabled;
•
Create a new document library or open an existing document library;
•
Click '
Modify settings and columns'in the left menu bar:
•
The '
Customize'page will be displayed;
•
Scroll down to “SmartLibrary Settings” (at the bottom of the page):
•
Click on “Change SmartLibrary settings” and the “SmartLibrary Settings” page
will be displayed.
•
In the “Enable SmartLibrary” section enable SmartLibrary by selecting the “Yes”
radio button. This enables the Audit Log and Undelete functionality of
SmartLibrary.
•
To enable the workflow functionality of SmartLibrary check the ‘Require content
approval for submitted items box
•
After creating a new view in a document library (for example, a new column
type), the Smart Actions in the left navigation area of SmartLibrary-enabled team
sites disappear. To make them reappear, the “Reapply Smart Actions” box is
checked. It is a form of “refreshing” the view.
8 of 59
SMARTLIBRARY USER MANUAL
•
Click '
Ok'
;
•
You will return to the ‘customize’ page. Scroll down to SmartLibrary Settings and
confirm that SmartLibrary has been activated by the addition of extra menu
options. If you only chose “Enable SmartLibrary” you will see the option ‘Manage
workflows’ – this lists all the workflows that have been created for this document
library and identifies them by their unique URL. If you applied workflow
functionality through checking ‘Require content approval for submitted items’
you will also see the option ‘Define Workflow’. Clicking this option will display the
default workflow for the document library and allow editing of the workflow.
Click on “Go Back to (document library name)” to return to the document library.
Disabling a SmartLibrary Team Site
•
Navigate to the team site that is to have SmartLibrary disabled;
•
Click '
Modify settings and columns'in the left menu bar:
•
The '
Customize'page will be displayed;
•
Scroll down to “SmartLibrary Settings” (at the bottom of the page):
9 of 59
SMARTLIBRARY USER MANUAL
•
Click on “Change SmartLibrary settings”;
•
The SmartLibrary settings page will be displayed;
•
Select “No” in the “Enable SmartLibrary” section:
•
Note: If content approval has been enabled previously this option will now appear
dull and can not be disabled through check box. Workflow options will disappear
along with the Advanced Actions menu in the document library through the
Enable SmartLibrary “No” radio button being selected.
•
Click '
Ok'
;
•
The “customize page is now displayed, scroll down to “SmartLibrary settings” and
you will see that SmartLibrary is now NOT enabled
10 of 59
SMARTLIBRARY USER MANUAL
SmartLibrary: Upgrading an Existing Document Library
SmartLibrary-enabling an existing Document Library that already contains documents
can cause delays due to the way that the Undelete feature works. Please read below for
details.
Upgrading and Existing Document Library Help
Navigating to the “SmartLibrary Settings” section
Enabling SmartLibrary functions
Consequences of Enabling SmartLibrary
Navigating to the “SmartLibrary Settings” section
•
Navigate to the team site that is to have SmartLibrary enabled.
•
Open the existing, pre-populated document library.
•
Click “Modify settings and columns” in the left menu bar.
•
The '
Customize'page will be displayed.
•
Scroll down to “SmartLibrary Settings” (at the bottom of the page).
Enabling SmartLibrary Functions
•
Click on “Change SmartLibrary settings” and the “SmartLibrary Settings” page
will be displayed.
•
In the “SmartLibrary Active” section enable SmartLibrary by selecting the “Yes”
radio button. This enables the Audit Log and Undelete functionality of
SmartLibrary.
11 of 59
SMARTLIBRARY USER MANUAL
•
After creating a new view in a document library (for example, a new column
type), the Smart Actions in the left navigation area of SmartLibrary-enabled team
sites disappear. To make them reappear, the “Reapply Smart Actions” box is
checked. It is a form of “refreshing” the view.
•
Click '
Ok'
.
Consequences of Enabling SmartLibrary
A notable consequence of Enabling SmartLibrary functions in a pre-populated Document
Library is that the Undelete functionality works by creating a copy of the file into a
“shadow” folder. That way, when a document is erroneously deleted from a
SmartLibrary-enabled Document Library or sub-folder, an up-to-date copy can be used
to restore the file. Consequently, every file in the Document Library has to be copied
before the Document library can be returned to regular service.
Files are copied in blocks of 10 and a progress bar displays the status of the process.
Canceling the enablement during the copying process will prevent further files from
being copied (after “Yes” is clicked in the confirmation box) but will not reverse the
process. Files already copied to the shadow folder will not be deleted.
•
Once the file copying process is complete, you will return to the ‘customize’
page. Scroll down to SmartLibrary Settings and confirm that SmartLibrary has
been activated by the addition of extra menu options. If you only chose “Enable
SmartLibrary” you will see the option ‘Manage workflows’ – this lists all the
workflows that have been created for this document library and identifies them
by their unique URL. If you applied workflow functionality through checking
‘Require content approval for submitted items’ you will also see the option
‘Define Workflow’. Clicking this option will display the default workflow for the
document library and allow the creation of a new workflows.
•
Click on “Go Back to (document library name)” to return to the document library.
12 of 59
SMARTLIBRARY USER MANUAL
SmartLibrary: Security
SmartLibrary allows you to change permissions at both the Team-site level and at the
Document Library Level.
SmartLibrary Security Help
Adding a User to a Site
Inherited Permissions
Assigning site-wide (global) Permissions
Adding a User to a SmartLibrary-enabled Document Library
Assigning Document Library Permissions
Adding a User to a Site
•
Browse to the site to which you wish to add a user as a site Administrator.
•
Click '
Site Settings'in the top menu:
•
Click the '
Manage Users'link under the '
Administration'heading:
•
If “Manage users” does not appear, please go to the Inherited Permissions
section.
•
Click the '
Add Users'link in the menu bar:
•
Enter the details of the new users in the '
Users'textbox under the '
Step
1:Choose Users'heading;
•
Enter the user'
s name in the format DOMAIN\UserName or
[email protected] add multiple users, separate the users with a
semicolon (;).
•
Select the user'
s site group under the heading '
Step 2:Choose Site Groups'
.and
click '
Next'
•
Enter the details on the form and click '
Finish'
.
•
The new user will now be in the user list.
13 of 59
SMARTLIBRARY USER MANUAL
Inherited Permissions
•
If the “Manage Users” link is not displayed in the “Site Administration” section,
the site is using inherited permissions. Those of the parent site.
•
To modify the permissions the site’s inheritance can be removed.
•
To remove the inherited permissions click on “Manage Permission Inheritance”
under “Site Settings” and select “Use unique permissions”.
•
The site’s permissions inheritance has now been removed.
•
All users who had access to the site through inheritance will still have access to
this site.
Assigning site-wide (global) Permissions
User permissions can be assigned to apply across an entire SmartLibrary-enabled site.
•
Browse to the required site.
•
Click '
Site Settings'in the top menu:
•
Click the '
Manage Users'link under the '
Administration'heading:
•
A list of users will be displayed.
•
To edit the permissions of multiple users, select each user with the check boxes
and click the '
Edit Site Groups of Selected Users'link in the menu bar:
•
To edit a single user'
s permissions, click the name link of the user.
•
Under the '
Site Group Membership'heading, select the site groups required:
1.
A Reader has read-only access to the website;
2.
A Contributor can add content to existing document libraries and lists, including
uploading documents and submitting them for approval;
3.
A Web Designer can create lists and document libraries, customize pages in the
Web site, and approve or reject documents in a workflow;
14 of 59
SMARTLIBRARY USER MANUAL
4.
•
An Administrator has full control of the site and can create workflows.
Click '
OK'
: the new permissions are now set for the site.
Adding a User to a SmartLibrary-enabled Document Library
•
Browse to the required site and click on the SmartLibrary-enabled Document
Library to which you wish to add a user.
•
Click the '
Modify settings and columns'link under the '
Actions'heading in the lefthand menu:
•
Click the '
Change permissions for this document library'link under the '
General
Settings'heading:
•
Click the '
Add Users'link in the menu bar:
•
Enter the new user’s details in the '
Users'textbox under the heading '
Step
1:Choose Users'
:
Enter the user'
s name in the format DOMAIN\UserName or
[email protected];
To add multiple users, separate the entries with a semicolon (;).
•
Select the user'
s permissions under the heading '
Step 2:Choose Permissions'
.
•
Click '
Next'
, enter the details on the form and click '
Finish'
.
•
The new user will now be in the user list.
Assigning Document Library Permissions
User permissions can be assigned to uniquely apply to a specific SmartLibrary-enabled
document library.
15 of 59
SMARTLIBRARY USER MANUAL
•
Browse to the site, and click on the SmartLibrary-enabled Document Library to
which you wish to add a user.
•
Click the '
Modify settings and columns'link under the '
Actions'heading in the lefthand menu:
•
Click the '
Change permissions for this document library'link under the '
General
Settings 'heading:
•
A list of users will be displayed.
•
To edit the permissions of multiple user'
s, select each user with the check boxes
and click the '
Edit Site Groups of Selected Users'link in the menu bar:
•
To edit a single user'
s permissions, click the name link of the user.
•
Under the '
Choose Permissions'heading, select the permissions required for the
user:
1.
View items: users can only view items on the site;
2.
View, insert, edit, delete items: users can update items;
3.
View, insert, edit, delete items; change list settings: users can update items
and approve or reject documents, unless their user group has been otherwise
denied permission on this action;
4.
View, insert, edit, delete items; change list settings; change list security:
users can design a workflow.
•
Click '
OK'
: the new permissions have been saved for the user.
16 of 59
SMARTLIBRARY USER MANUAL
SmartLibrary: Workflow Viewer/Document Status
Graphical Representation of the Workflow, or current approval process of a document.
The Workflow Viewer allows for a quick visual representation of the workflow applied to
the current document library, also the Workflow Viewer will display the current status of a
document in an approval process (Workflow).
SmartLibrary Workflow Viewer/Document Status Help Topics
Viewing the Document Library Workflow
Viewing the Folder Workflow
Viewing the Document Workflow
Viewing the Document Workflow Status
Workflow Key
Understanding a Workflow
Creating a Workflow
Edit a Workflow
Viewing User Comments
Force Approve or Reject a Document in the Workflow
Workflow Statistics
Viewing the Document Library Workflow
This can be done two ways. The first is:
•
Navigate to the required document library;
•
On the left navigation bar in Advanced Actions click on “View Workflow”;
•
The screen will look similar to this:
The second is:
•
Navigate to the required document library;
•
On the left navigation bar click on “Modify settings and columns”;
17 of 59
SMARTLIBRARY USER MANUAL
•
Click on “Define Workflow” ;
•
The Workflow Viewer screen is displayed
The workflow Viewer will display current Workflow for the selected document library.
Please note that these can be “different” workflow on child folders applied see Viewing
the Folder Workflow and user’s with web designer approval rights can create and apply
a “different” workflow at document level see Viewing the Document Workflow
Viewing the Folder Workflow
•
Navigate to the required document library;
•
To enable the context menu hover over the name of the folder and click on the
arrow that is displayed on the right hand side of folder name;
•
From the content menu, click on “Defined Workflow” link;
•
The workflow Viewer will display current Workflow for the selected folder. Please
note that these can be “different” to the Document Library workflow see Viewing
the Document Library Workflow and user’s with web designer approval rights
can also create and apply a “different” workflow at document level see Viewing
the Document Workflow
Viewing the Document Workflow
•
Navigate to the required document in the document library or folder level library;
•
To enable the context menu hover over the name of the document and click on
the arrow that is displayed on the right hand side of document name;
•
From the content menu, click on “Defined Workflow” link;
18 of 59
SMARTLIBRARY USER MANUAL
•
The workflow Viewer will display current Workflow for the selected document.
Please note that these can be a “different” Document Library or Folder workflow
see Viewing the Document Library Workflow . There can also be “different”
workflow on child folders applied see Viewing the Folder Workflow
Viewing the Document Workflow Status
The Workflow Document Status viewer shows the current status of a document in an
approval process (Workflow). This can be done in the SmartLibrary Document Library
view, Approve/Reject view or My Submissions view
•
•
•
To enable the context menu hover over the name of the document and click on
the arrow that is displayed on the right hand side of document name;
From the content menu, click on '
View Workflow Status'link:
The Workflow Viewer page will be displayed. Workflow Status can be traced
through the Workflow Key.
Workflow Key
•
Green People/Group
Represents an approver/group of approvers that have approved the document.
19 of 59
SMARTLIBRARY USER MANUAL
•
Yellow People/Group
Represents an approver/group of approvers that the document is currently awaiting
approval from.
•
Red People/Group
Represents an approver/group of approvers that have rejected the document.
•
Grey People/Group
Represents an approver/group of approvers that are future approvers.
Understanding a Workflow
•
A workflow is a representation of the approval path a document will take, before
it will be published to the '
All Documents'View;
•
It ensures that the specified users have approved the document before other
users of the Site can view it;
•
A workflow can be made up of a number of steps;
•
Each step has at least one approver in it;
•
A document cannot progress to the next step in a workflow unless the specified
users have approved it;
•
When a workflow is set to '
pending approval'(i.e. the previous step was
approved) all the approvers in the active workflow step will be sent an email,
informing them of the status of the document;
•
Each step has an '
On Reject go to'property, which specifies either another step
in the workflow, or a complete reject. Where another step is specified and an
approver rejects the document, the workflow will go back to the step and the
approvers in that step must re-approve the document;
•
The '
Approve By'property specifies whether the document must be approved by
all the approvers in a step, only one approver, or by a chosen user before it
moves on to the next step in the workflow:
•
Publish to Other Systems
20 of 59
SMARTLIBRARY USER MANUAL
(View of a document in the workflow)
(View of the workflow)
21 of 59
SMARTLIBRARY USER MANUAL
Creating a Workflow
•
•
•
Navigate to the workflow viewer page.
To create a Workflow use the navigation bar at the top of the page (content
area);
On the Workflow navigation bar select '
Create Workflow'
:
For more information see: Workflow Designer - Building Workflow
Edit a Workflow
Editing a workflow can have implications for documents currently in the workflow.
You can view documents in workflow that may be affected through Manage Workflows
•
Navigate to the workflow viewer page.
•
On the Workflow navigation bar select '
Edit Workflow'
:
•
All parts of the workflow can now be edited. Once all parts have been edited
select ‘Save’
Viewing User Comments
This may be done in the Document Library view, Approve/Reject View or the My
Submissions View for documents that are pending, approved or rejected.
•
To enable the context menu hover over the name of the document and click on
the arrow that is displayed on the right hand side of folder name;
•
Click on ‘View Workflow Status’:
•
Click on ‘View Historical Comments’ in the menu bar:
22 of 59
SMARTLIBRARY USER MANUAL
•
The Audit Log filtered to show comments only will appear. Smart Actions are
available on Left Hand Side menu for Audit Log:
Force Approve or Reject a Document in the Workflow
Circumstances may arise in which the current user required to approve or reject a
document in a workflow cannot do so, for instance they may be on sick leave or
employment ceased with the company.
When this occurs a document cannot progress to the next step. The only way to bypass
this approver is to force approve or reject the document.
This can be done by the web administrator.
•
Log in with a web administration account
•
Browse to the Document Status page of the document.
•
To Approve the document, click the '
Force Approve Current Step'link in the
menu bar:
• To Reject the document, click the '
Force Reject Current Step'link in the menu
bar:
Workflow Statistics
Workflow statistics are available prior, during and after the workflow has been
completed.
This may be done in the Document Library view, Approve/Reject View or the My
Submissions View for documents that are pending, approved or rejected.
•
To enable the context menu hover over the name of the document and click on
the arrow that is displayed on the right hand side of folder name;
•
Click on either ‘View Workflow Status’ or ‘Defined Workflow’;
23 of 59
SMARTLIBRARY USER MANUAL
•
The Workflow Viewer will then be displayed.
•
Click on ‘Show Statistics’ on the menu bar:
•
The Workflow, Step and Approver Statistics will be displayed:
24 of 59
SMARTLIBRARY USER MANUAL
SmartLibrary: Workflow Designer
The Workflow designer tool helps you build a workflow for the approval process of
documents.
Workflow Designer Help
Creating a New Workflow
Editing an Existing Workflow
Building a Workflow
•
Changing the Workflow Title
•
Adding a Step to the Workflow
•
Adding an Approver to a Step in the Workflow
•
Editing Step Details
•
•
Change Step Title
•
Moving a Step in the Workflow
•
Deleting a Step from the Workflow
•
The '
Choose Approve By'Property
•
The '
On Reject go to step...'Property
Editing Approver Details
•
Moving an Approver to a Different Step
•
Deleting an Approver
•
Changing/Selecting an Approver
Saving a Workflow
Deleting a Workflow
Exporting a Workflow
Importing a Workflow
Modifying Advanced Settings
Viewing Documents in Workflow
Creating a New Workflow
See Workflow Viewer: Create a Workflow for details.
Editing an Existing Workflow
See Workflow Viewer: Edit a Workflow for details.
Editing a workflow can have implications for documents currently in the workflow.
You can view documents in workflow that may be affected through Manage Workflows.
Building a Workflow
25 of 59
SMARTLIBRARY USER MANUAL
Changing the Workflow Title
Workflow will default to title New Workflow. The title or a Workflow can be changed to
another name. Do this by following these steps:
•
Click the hyperlinked New Workflow title of the workflow on top of the document
icon.
•
The following prompt will appear:
•
Enter a valid title. The title must not be blank;
•
Click '
OK'
;
•
The new title should be displayed in the workflow title.
Adding a Step to the Workflow
•
Locate the '
Workflow Step’ icon in the left hand menu:
•
Drag and Drop the step onto the workflow area:
26 of 59
SMARTLIBRARY USER MANUAL
•
When you hover your mouse over a valid “drop area” the area will be highlighted
with a border. The new step will be added to the workflow in the position
dropped:
•
To add the step at the end of a workflow, drop the step image below the last
step;
•
To add the step at the start of a workflow, drop the step image above the first
step, and below the document image at the top;
•
To add the step at between two existing steps, drop the step in the middle.
Adding an Approver to a Step in the Workflow
•
Locate the appropriate '
Approver icon'in the left hand menu. You may choose
between the Single Approver, and the Group Approver con;
•
Drag and Drop the '
Approver icon'onto a step in the workflow:
27 of 59
SMARTLIBRARY USER MANUAL
•
The new approver will be added as the first approver in the step:
Editing Step Details
The steps title bar provides a means by which to edit a steps details, and perform
actions;
•
Change Title
•
Moving a Step
•
Delete a Step
•
The ‘Approve By’ Property
•
The On Reject Go To Step
Changing Step Title
•
Click the '
steps title'displayed in the title bar:
28 of 59
SMARTLIBRARY USER MANUAL
•
The following prompt will appear:
•
Enter a valid title. The title must not be blank, or the same as another step title
already in the workflow;
•
Click '
OK'
;
•
The new title should be displayed in the title bar of the step.
Moving a Step in the Workflow
•
On the Left hand side of the steps title bar you will find the ‘Move Up’ and ‘Move
Down’ options:
•
To move step down in the workflow, click on ‘Move Down’
•
To move step up in the workflow, click on ‘Move Up’
Deleting a Step from the Workflow
•
From the displayed steps title bar click the '
Delete'link:
•
Click '
OK'when prompted for confirmation:
29 of 59
SMARTLIBRARY USER MANUAL
•
The step is no longer in the workflow.
The ‘Choose Approve By’ Property
This property specifies whether the document must be approved by all approvers in
the step, by just one approver or if the preceding approver is to choose the next
approver (User to choose approver);
To edit:
•
•
To enable the context menu hover over the ‘Approve By’ link in the steps title
bar and click on the arrow that is displayed on the right hand side;
Available options will be displayed as follows:
•
To change the property, click the desired option in the list.
•
The '
Only One'option means the step has to be approved by one approver only
is selected by default;
•
Enabling the ‘Approve By All’ option means all approvers in the step must
approve the document before it progresses to next workflow step;
•
Enabling the ‘User Choose’ option will mean that in a one step workflow or a
workflow where the first step has ‘User Choose’ enabled, the Document
Submitter will choose when they submit document to workflow between the
listed approvers on the step as to who will approve the document.
•
This is what the screen will look like:
•
In a workflow where ‘User Choose’ is enabled on the second or later step the
Approver of the previous step will choose, in the Approve/Reject view, between
the listed approvers on the step as to who will approve the document next. Note:
30 of 59
SMARTLIBRARY USER MANUAL
This scenario can not exist if the previous step has an ‘Approve By’ type of ‘All
Approve’.
The 'On Reject go to Step...'Property
This property specifies which step the document should take if it is rejected in the
current step;
To edit:
•
To enable the context menu hover over the ‘On Reject Go to’ link in the steps
title bar and click on the arrow that is displayed on the right hand side;
•
Available options will be displayed as follows:
•
This list will contain the title of all steps in the workflow, as well as a '
Reject the
document'option, which is selected by default;
•
The currently selected option is denoted by appearing on the steps title bar next
to ‘On Reject Go To’;
•
To change the property, click the desired option in the list. Choosing from all
steps in the workflow means that a rejected item may be sent backward or
forward in the workflow.
•
If the step is set to '
Only One Approve'the document will not move to the '
On
Reject Step'until all approvers '
Reject'the document.
Editing Approver Details
The approver context menu provides a means by which to edit an approvers details or
delete the approver from the current approval step;
Moving an Approver to a Different Step
•
Drag and Drop the '
Approver icon'from the original step to another step in the
workflow;
•
The approver will be removed from the original step, and added to the selected
step;
•
SmartLibrary will not allow you to move an approver to a step which already has
that approver.
For another method refer to Changing/Selecting An Approver
Deleting an Approver
•
Hover over the name of the approver you wish to delete;
•
The context menu will be enabled by clicking on the arrow that is displayed on
the right hand side of approver name;
•
Click the ‘Delete’ item on the menu
31 of 59
SMARTLIBRARY USER MANUAL
•
The approver is removed from the step.
Changing/Selecting an Approver
•
Hover over the name of the approver you wish to change;
•
The context menu will be enabled by clicking on the arrow that is displayed on
the right hand side of approver name;
•
Click the ‘Change To’ item and enable the context menu of Approver name
choices:
Saving a Workflow
•
To save an edited workflow, click the '
Save'link in the Workflow menu bar:
•
The workflow will not save unless it is valid;
For a workflow to be valid:
- There must be at least one step;
- There must be at least one approver in every step;
- Every approver must have a name selected;
- Every step must have the ‘Approve By’ property set;
Deleting a Workflow
•
To delete a workflow and force inheritance from the parent Library or Folder,
click the '
Delete'link in the menu bar:
•
Click '
OK'when prompted for confirmation:
32 of 59
SMARTLIBRARY USER MANUAL
•
Please note there are implications when deleting a workflow:
Documents in the workflows folder will now inherit the workflow of the folder above, and
will move on to the corresponding step for approval.
You can View documents in workflow that may be affected through Manage Workflows
Exporting a Workflow
•
Navigate to the workflow viewer of the workflow you wish to export.
•
Click the '
Export'link in the menu bar:
•
Your browser may prompt you to '
Open'or '
Save'
; Click '
Save'
:
•
The save dialogue will appear;
•
Save the file to any location on your local computer.
Importing a Workflow
•
You can import a previously-exported workflow for any document library;
•
Navigate to the workflow viewer of the workflow you wish to import into;
•
Click the '
Import'link in the menu bar:
•
The following page will be displayed:
33 of 59
SMARTLIBRARY USER MANUAL
•
Click '
Browse'
, and the '
Choose File'dialogue will appear
•
Browse to the exported Workflow file (.xml) you wish to import, and click '
Open'
•
The file path and name will appear in the '
Name'field
•
Click the ‘Save and Close'link in the menu bar
•
Importing a workflow will automatically save against the current library/folder
location, regardless of the location value of the saved (imported) workflow.
Modifying Advanced Settings
•
See Advanced Workflow Settings section for more details.
Viewing Documents in a Workflow
•
To view a list of documents currently in the workflow,
•
Navigate to the workflow viewer of the workflow that applies to that document.
•
Click on ‘Edit Workflow’ in the menu bar:
•
Click the '
Files in Workflow'link under '
Actions'in the left-hand menu:
•
A new page will open, with a list of all documents currently in the workflow:
•
Click the '
Go Back'link in the menu bar to return to the Workflow Designer.
34 of 59
SMARTLIBRARY USER MANUAL
SmartLibrary: Advanced Workflow Settings
The Advanced Workflow Settings page allows you to specify advanced settings relating
to the workflow currently being edited.
SmartLibrary allows users to set a '
Secondary Location'which publishes a copy of the
approved document to another location.
Secondary locations can be an Email address, a File Share, another Windows
SharePoint Services document library or a Web Service.
Advanced Workflow Settings Help
Navigating to the Advanced Workflow Settings Page
Allowing Approvers To Modify Documents in a Workflow
Automatically Submitting Documents for Approval
Setting a Secondary Location
Saving Advanced Workflow Settings
Navigating to the Advanced Workflow Settings Page
•
Navigate to the workflow viewer that is applicable.
•
Click on ‘Edit Workflow’ in the menu bar.
•
Click the ‘Advanced Settings’ link under '
Actions'in the left-hand menu (if
changes have been made to the workflow, it must be saved to continue).
•
The '
Workflow Settings'page will be displayed:
Allowing Approvers To Modify Documents in a Workflow
•
This option allows the current approver of a document to edit it and have it
remain in the current approval step.
•
By default, approvers can edit documents in a workflow but they are
automatically returned to the first step of the approval process.
35 of 59
SMARTLIBRARY USER MANUAL
•
To allow approvers to modify documents in the workflow, select '
Yes'to the
option under Advanced Settings
Automatically submitting documents for approval
This option will automatically submit all documents for approval as soon as they are
uploaded to the document library.
•
By default, when a user uploads a document to a workflow enabled library, the
user must then manually submit the document for approval.
•
To automatically submit documents for approval in the workflow you are editing,
select '
Yes'to the option under Advanced Settings
Setting A Secondary Location
•
Secondary locations can be set under the '
Advanced Settings'heading for either
‘On Approve’ or ‘On Reject’. Setting a value for this option will send a copy of
the document to the chosen location.
•
Choose the location type by selecting the secondary location type from the dropdown box:
Email:
•
Upon selection, a text field will appear where a valid email address can
be entered. Note: Enabling a secondary location of type ‘Email’ will not
send a copy of the document to the specified email address. This
option will merely notify the selected email address that a document
has completed to workflow and is either approved or rejected.
File Share:
•
Upon selection, a text field will appear where a valid FileShare (UNC)
address can be entered.
SharePoint:
•
This allows the document to be published to another Windows
SharePoint Services Document Library.
•
Upon selection, a site picker tool will appear. The site picker allows
browsing to the location required from the Windows SharePoint
Services sites and document libraries that are displayed.
36 of 59
SMARTLIBRARY USER MANUAL
•
Click the blue arrows to expand or collapse sites, Document Libraries
and sub-folders.
•
Selected the desired folder by clicking on the text link.
•
The '
Secondary Location'text box will be populated with the selected
path.
•
Alternatively if you know the path to the document library you can type
it directly into the ‘Secondary Location’ text box.
Web Service:
•
Upon selection, a choice between publishing to a Custom Web Service
or a SharePoint Web Service is offered.
•
The Service location must then be entered into the text box in the
following format http://servername/servicename/service.asmx.
•
If you are publishing to a Custom Web Service select the ‘Test’ button
to call the Web Service and make sure that the Web Service can
interact with SmartLibrary.
•
Nintex recommends selecting the ‘Supply Credentials’ check box and
entering a Username, Password and Domain combination in the text
boxes that appear. If specific credentials are not entered, the invocation
of the Web Service will use the credentials of the user who last
approved the document in the workflow. The last approver may not
have sufficient permissions to access the web service.
None:
•
The '
Secondary Location'text box value will not display.
Saving Advanced Workflow Settings
To save the Advanced Workflow Settings, click on OK.
37 of 59
SMARTLIBRARY USER MANUAL
SmartLibrary: Workflow Notification Settings
The Workflow Notification Settings page allows you to specify email notification settings
relating to the workflow currently being edited.
Workflow Notification Settings Help
Navigating to Workflow Notification Settings
Approval
Approval No Longer Required
Completed
Reminder
Escalation
Saving Notification Settings
Navigating to Workflow Notification Settings
•
Navigate to the workflow viewer that is applicable.
•
Click on ‘Edit Workflow’ in the menu bar:
•
Click the ‘Notification Settings’ link under '
Actions'in the left-hand menu (if
changes have been made to the workflow, it must be saved to continue).
•
The '
Workflow Notification Settings'page will be displayed:
38 of 59
SMARTLIBRARY USER MANUAL
Approval
•
By default, when a file is ready for approval an email is automatically sent to all
approvers in the first step to let them know that the file needs to be reviewed.
The ‘Approval’ notification setting allows Workflow Designers to customize the
email sent to approvers when a file is submitted.
•
To enable a customized ‘Approval’ email, select the '
Yes'radio button.
•
The Email Format drop-down list box, Email Subject text field, Email Body
composition area and Document properties picker list in the Approval section
can now be edited. The Workflow Designer can choose the required email
format from the list: “Rich Text” is the default. The Subject and Body can be
populated with properties of the document going through the workflow by double
clicking on the item in the Document properties picker list: for example, selecting
‘Created By’ will insert the author’s name in the email notification. The Subject
and Body can also contain free text. These settings will apply to all ‘Approver’
emails for the workflow.
Approval No Longer Required
•
When a file no longer requires approval an email is automatically sent to the
appropriate approver to inform him or her of the situation. The ”Approval No
Longer Required” notification setting allows Workflow Designers to customize
the email sent to reviewers when their approval is no longer required.
•
To enable the customization of ”Approval No Longer Required” emails, select
the '
Yes'radio button.
39 of 59
SMARTLIBRARY USER MANUAL
•
The Email Format drop-down list box, Email Subject text field, Email Body
composition area and Document properties picker list in the Approval No Longer
Required section can now be edited. The Workflow Designer can choose the
required format from the list: “Rich Text” is the default. The Subject and Body
can be populated with properties of the document going through the workflow by
double clicking on the item in the Document properties picker list: for example,
selecting ‘Created By’ will insert the author’s name in the email notification. The
Subject and Body can also contain free text. These settings will apply to all
‘Approval No Longer Required’ emails for the workflow.
Completed
•
When a file has completed the approval process an email is automatically sent
to the document’s submitter to inform him or her of the situation. The
”Completed” notification setting allows Workflow Designers to customize the
email sent a document’s submitter to inform them that the workflow process has
been completed.
•
To enable the customization of ”Completed” emails, select the '
Yes'radio button.
•
The Email Format drop-down list box, Email Subject text field, Email Body
composition area and Document properties picker list in the Completed section
can now be edited. The Workflow Designer can choose the required format from
the list: “Rich Text” is the default. The Subject and Body can be populated with
properties of the document going through the workflow by double clicking on the
item in the Document properties picker list: for example, selecting ‘Created By’
will insert the author’s name in the email notification. The Subject and Body can
also contain free text. These settings will apply to all ‘Approval No Longer
Required’ emails for the workflow.
Reminder
•
The ”Reminder” notification setting enables reminder emails to be sent to
unresponsive approvers at nominated intervals in days (minimum is one day).
To enable ”Reminder” notifications, select the “Yes” radio button.
•
The Email Format drop-down list box, Email Subject text field, Email Body
composition area and Document properties picker list in the Reminder section
can now be edited. The Workflow Designer can choose the required format from
the list: “Rich Text” is the default. The Subject and Body can be populated with
properties of the document going through the workflow by double clicking on the
item in the Document properties picker list: for example, selecting ‘Created By’
will insert the author’s name in the email notification. The Subject and Body can
also contain free text. These settings will apply to all ‘Approval No Longer
Required’ emails for the workflow.
40 of 59
SMARTLIBRARY USER MANUAL
Escalation
•
The ”Escalation” notification setting enables an alert email to be sent to the file’s
submitter if no action has been taken by a required approver after a nominated
amount of reminders have been sent.
•
The ”Reminder” notification must be enabled in order to allow ”Escalation”
notifications. If Reminders are not enabled the Escalation option will not be
available. To enable ”Escalation” notifications, select the “Yes” radio button.
•
The Email Format drop-down list box, Email Subject text field, Email Body
composition area and Document properties picker list in the Escalation section
can now be edited. The Workflow Designer can choose the required format from
the list: “Rich Text” is the default. The Subject and Body can be populated with
properties of the document going through the workflow by double clicking on the
item in the Document properties picker list: for example, selecting ‘Created By’
will insert the author’s name in the email notification. The Subject and Body can
also contain free text. These settings will apply to all ‘Approval No Longer
Required’ emails for the workflow.
Saving Notification Settings
•
To save the Workflow Notification Settings, click “OK” after completion.
41 of 59
SMARTLIBRARY USER MANUAL
SmartLibrary: Submit for Approval
For a document to enter a SmartLibrary Workflow it must be submitted for approval.
This should be done when the author of the document has completed editing it and it is
ready to be made available to users of a SmartLibrary Team Site.
Submitting a document for Approval will notify the Approvers on the first step of the
Workflow that a document is ready for them to approve.
SmartLibrary Submit for Approval Help
Uploading a document to a Document Library
Creating a new document in a Document Library
Submitting a document for Approval
My Submissions
Uploading a document to a Document Library
•
Navigate to SmartLibrary-enabled Document Library or folder.
•
Click the '
Upload Document'link in the menu:
•
Use Windows Explorer to browse for the document or enter the URL directly if
known.
•
Enter values for all required properties and click the '
Save and Close'link in the
menu.
•
You will be redirected to the document library.
•
If “Content Approval” is enabled for the site the document will require it to be
submitted for approval.
•
Click the '
My Submissions'link under the '
Select a View'heading on the left
hand menu:
•
A link to the document will be displayed under the '
Pending'heading.
42 of 59
SMARTLIBRARY USER MANUAL
Creating a new document in a Document Library
•
Navigate to the Document Library folder;
•
Click the '
New Document'link in the menu:
•
A word-processing application will open allowing you to edit;
•
Click '
Save'in the application to save the document; You will return to the
document library;
•
If content approval is enabled for the site, the document will require approval via
a workflow before it will be viewable in the All Documents folder;
•
Click the '
My Submissions'link under the '
Select a View'heading on the left
hand menu:
•
A link to the document will be displayed under the '
Pending'heading.
Submitting a document for approval
•
Navigate to the Document Library or folder in which your document is saved.
•
Click the '
My Submissions'link under the '
Select a View'heading on the left
hand menu.
•
A link to the document will be displayed under the '
Pending'heading.
•
To enable the context menu, hover over the name of the document and click on
the arrow that is displayed on the right hand side of the document’s name.
•
From the context menu, click the '
Submit for Approval'link:
43 of 59
SMARTLIBRARY USER MANUAL
•
For browsers that are not compatible with Windows SharePoint Services
Context menus, the “Submit for Approval” option will be available from the
Document Information Page which is accessed by clicking on the document title.
•
On the “Submit For Approval” page, the workflow approval sequence that
the document will follow is displayed;
•
Click the “Submit for Approval” link in the menu bar:
•
The workflow status will now show the document is awaiting approval from the
approvers in the first step of the workflow;
These approvers will have been notified via email. In addition, your document
will appear in their “Approve Reject Items” view and the Documents Pending
Approval Webpart (if added to a page on the site);
•
To return to the document library, click the '
Go Back to (your Document Library
title)'link in the menu bar:
•
While your document is in the workflow process you can view the document
status to track its progress.
•
You will be notified when the workflow has been completed.
My Submissions
The “My Submissions” area shows the status of all documents that a user has submitted
to the selected document library.
There are 3 states that a document can have while in the “My Submissions” area. These
are:
Pending – the document has either not been submitted for workflow approval
or is currently in the workflow being reviewed.
Rejected – the document has been through the workflow and has been
rejected. An email will have notified the submitter of the document of this
outcome.
44 of 59
SMARTLIBRARY USER MANUAL
Approved - document has been through the workflow and has been
approved. An email would have notified the submitter of the document of this
outcome.
45 of 59
SMARTLIBRARY USER MANUAL
SmartLibrary: Managing Workflows
The “Manage Workflows” option allows a user with sufficient permissions to view and
delete one, some or all of the different workflows in a document library, regardless of
whether they are workflows at the Document Library-level, Sub-folder level or Documentlevel.
Manage Workflows Help
Navigating to the “Manage Workflows” section
Using “Manage Workflows”
Consequences of using “Manage Workflows”
Navigating to the “Manage Workflows” section
•
•
•
Navigate to the Document Library for which you want to Manage Workflows.
Click the link “Modify Settings and Columns” under the heading “Actions” in the
left navigation menu.
Scroll down to the section entitled “SmartLibrary Settings” then click “Manage
Workflows”
Using “Manage Workflows”
•
The “Manage Workflows” page displays all the workflows that a Document
Library contains.
•
Workflows are displayed by the local URL at which they applied:
•
To delete a Workflow, check the box that corresponds to the Workflow URL and
click the link “Permanently Delete Selected Items” in the menu bar above the
list.
•
To delete more than one, check the boxes that correspond to the Workflow
URLs and click the link “Permanently Delete Selected Items” in the menu bar
above the list.
•
To delete all the Workflows, click the icon above the check boxes and all the
boxes will become checked. You can then click the link “Permanently Delete
Selected Items” in the menu bar above the list.
Consequences of using “Manage Workflows”
•
If a Workflow is deleted from a document which has its own specific workflow,
the document will inherit the Workflow from the folder in which it resides.
•
If a Workflow is deleted from a sub-folder, the sub-folder will inherit the Workflow
from the folder in which it resides, which could be the high level Document
Library.
•
If a Workflow is deleted from the root Document Library, the Document Library
will remain SmartLibrary-enabled but will begin using the default workflow. The
46 of 59
SMARTLIBRARY USER MANUAL
default workflow is the very simple, single-step and single-approver Workflow
that is first seen when a Document Library is created.
•
Any documents already in a Workflow that are deleted will remain in that
Workflow and follow the normal Workflow process until it is finally approved.
Any documents uploaded to a location whose customized workflow was deleted
will be submitted to the new, inherited workflow.
47 of 59
SMARTLIBRARY USER MANUAL
SmartLibrary: Pending My Approval Web Part
The Pending My Approval web part is able to be added to any site once SmartLibrary is
installed. Please read below for details on configuring this web part.
Pending My Approval Help
Using the Pending My Approval Web Part
Configuring the Pending My Approval Web Part
Using the Pending My Approval Web Part
The Pending My Approval web part will display documents that are pending approval of
the user whom is currently logged on. Documents in this list include those that are
pending the individual’s approval or pending a group’s approval that the individual is a
member of.
Clicking on the title of the document will take you to the Approve/reject page to approve
or reject the selected document.
The status of the document (configurable by the site administrator, see Configuring the
Pending My Approval web part) will be identified as New when it has just been submitted
and will become more urgent – denoted with an Orange Light and if still no approval
actions taken a Red Light. The lights will appear according to timing schedule set by the
administrator. These statuses refer to how long the document has been pending your
approval. The interval between the New status, the Orange Light status and the Red
Light status is set in the web part properties (see Configuring the Pending My Approval
web part).
Configuring the Pending My Approval Web Part
The Pending My Approval web part has a number of configurable properties. These are
defined as follows:
Property
Type
Description
Show Errors
Check Box
This will allow you to troubleshoot issues with
the web part. Enabling this property will show
any errors that occur during the retrieval of
the list of pending documents.
Status Interval
Number
Number of days between the New, Orange
and Red statuses.
Max Items
Number
Maximum number of documents to display in
the web part.
Start Site
URL
This property allows you to point the web part
at a different site to get its documents
pending approval from.
Include Sub Sites
Check Box
Enabling this property will cause the web part
to iterate through each of the team sites
48 of 59
SMARTLIBRARY USER MANUAL
created below the current site (or start site if
enabled) and include all documents pending
approval from these sites.
This can be a time intensive process and
Nintex recommends not enabling the feature
on a heavy traffic page like a site’s home
page.
To configure the Pending My Approval web part properties, click on the down arrow in
the web part title bar.
49 of 59
SMARTLIBRARY USER MANUAL
SmartLibrary: Approve/Reject Page
The Approve/Reject page is used by approvers to enter comments and either approve or
reject a document at a particular point in a workflow.
Users will only be able to approve or reject documents if they have been included as part
of the workflow (see Workflow Designer).
Approve/Reject Help
Navigating to the Approve/Reject Page
Approving and Rejecting Documents in a Workflow
Forcing the approval or rejection of a Document in the Workflow
Navigating to the Approve/Reject Page
There are three different ways to navigate to the Approve/Reject page:
1.
The 'Pending My Approval'Webpart
•
Navigate to the home page of the site to which the document was
submitted.
•
If the '
Pending My Approval'Webpart is added to this page, it will display
a list of all documents awaiting your approval or rejection.
•
Click on the document name link:
•
2.
The Approve/Reject page will be displayed.
'Approve/Reject Items'from menu
•
Navigate to the SmartLibrary-enabled Document Library in which the
document is located.
•
Click the '
Approve/Reject Items'link from under the '
Select a View'
menu on the left-hand side.
•
A list of documents should be displayed.
•
Reveal the context menu on the desired document by hovering over the
name and clicking the down arrow when the drop down list appears.
•
Click '
Approve/Reject'link in the context menu.
50 of 59
SMARTLIBRARY USER MANUAL
•
3.
The Approve/Reject page will be displayed.
Approve/Reject Email
•
When a document in a workflow requires your approval, you will receive
an email notification.
Click on the document name link to go directly to the '
Approve/Reject'page for that
document.
Approving and rejecting documents in a Workflow
•
Navigate to the Approve/Reject page of the file pending your approval.
•
To view the file, follow the hyperlinked file-name displayed in the File Properties.
•
In the “Approval Status” section you can ‘Approve’ or ’Reject’ using the
appropriate radio button and enter comments into the area provided.
51 of 59
SMARTLIBRARY USER MANUAL
•
Click OK
•
You will be directed to the Workflow Status page.
If the next step of the approval process is set to be of type “User Can Choose Approver”
you will also be required to select this next approver. Select the approver from the
‘Choose Approver’ section of the approve/reject page. You will also be required to select
the approver if the step you are rejecting to (see On Reject Go To) is set to be of type
“User Can Choose Approver”.
Forcing the approval or rejection of a Document in a workflow
Circumstances may arise in which the user currently required to approve or reject a
document in a workflow cannot do so.
When this occurs a document cannot progress to the next step. The only way to bypass
this approver is to force approve or reject the document.
This can be done by a Site Administrator only.
•
Log in with a Site Administrator account.
•
Browse to the Document Status page of the document.
•
To Force Approve/Reject the document, click the '
Force Approve/Reject'button
in the menu bar:
52 of 59
SMARTLIBRARY USER MANUAL
SmartLibrary: Deleted Files Page
The Deleted Files page displays a list of documents that have been deleted. It provides
a means of restoring, or permanently deleting Deleted Files.
Deleted Files Help
Displaying the Deleted Files Page
Restoring Deleted Files
Permanently Deleting Deleted Files
Advanced Actions on the Deleted Files Page
Manage Users on the Deleted Files Page
Displaying the Deleted Files Page
•
Navigate to the SmartLibrary-enabled document library or folder for which you
wish to view the Deleted Files;
•
Click the “Manage Deleted Files” link under “Advanced Actions” in the left hand
menu:
•
The following screen will be displayed:
Restoring Deleted Files
•
In the list of Deleted Files, check the box to the left of the file you wish to restore:
•
To select all documents, click the check box in the heading row
53 of 59
SMARTLIBRARY USER MANUAL
•
Click the “Restore selected Files” link in the menu bar
•
A progress bar will be displayed showing the status of the restoration process:
•
The restoration process can be stopped by clicking the “Cancel” button.
Please note: this will not stop the restoration of documents that have already advanced
through the process as previously indicated by the status bar.
•
The documents selected will be restored to their previous location, however they
will need to be re-submitted and approved through a workflow to appear in the
“All Documents” view;
•
The selected files will no longer appear in the list on the Undelete page.
Permanently Deleting Deleted Files
•
In the list of Deleted Files, check the box to the left of the file you wish to delete:
•
To select all documents, click the check box in the heading row.
•
Click the “Permanently Delete Selected Files” link in the menu bar.
•
Click “OK” when prompted for confirmation
•
This action is not reversible. Clearing Deleted Files means the documents will
be permanently deleted.
•
The selected Files will no longer appear in the list on the Undelete page.
54 of 59
SMARTLIBRARY USER MANUAL
Advanced Actions on the Deleted Files page
•
The “Advanced Actions” menu that appears on the “Deleted Files” page contains
the following:
Show All – If you have entered the “Deleted Files” page from Folder Level, the only
Deleted Files displayed will be those deleted from that folder. To see All Deleted
Files for the entire site, click on “Show All” navigation link.
Audit Log – The Audit Log for the “Deleted Files” page records the actions applied to
files that have been Added, Deleted or Restored from the “Deleted Files” page.
Manage Users on the Deleted Files page
Add Deleted Files Administrators - This page is used to modify the membership of the
site group with permission to both restore and permanently delete files.
Add Deleted Files Managers – This page is used to modify the membership of the site
group with permission to restore Deleted Files.
55 of 59
SMARTLIBRARY USER MANUAL
SmartLibrary: Audit Log
The SmartLibrary Audit Log provides an audit trail of actions performed on documents.
Information can be obtained on single documents or entire folders. Events recorded by
the Audit Log include; the time the action was performed, user information, the action
performed and the location of the document.
Audit Log Help
Displaying the Audit Log for a Document Library
Displaying the Audit Log for an Individual Document, Form or Image
Navigation in the Audit Log
Ordering by Columns in the Audit Log
Exporting the Audit Log to a Comma-Separated Value (CSV) File
Displaying the Audit Log for a Document Library
•
Navigate to the SmartLibrary enabled document folder to view its audit log;
•
Click the '
View Audit Log'link under '
Advance Actions'in the left hand menu:
•
The following screen will be displayed:
56 of 59
SMARTLIBRARY USER MANUAL
Displaying the Audit Log for an individual Document, Form or Image
Navigate to a SmartLibrary enabled document library where the document,
form or image is located.
To enable the context menu hover over the name of the document/form/image
for which you wish to display the audit log for and click on the arrow that is
displayed on the right hand side of document name.
From the content menu, click on “View Audit Information”.
•
The following screen will be displayed:
Navigating the Audit Log
NB Audit logs with more than 25 entries will span multiple pages.
Use the Previous and Next links to navigate through the Audit Log Pages. Links are
found at the bottom of the audited items list on each page;
If the “Prev” & “Next” links are grey then there are no more audit records in the direction
indicated, and the link is not available.
Ordering By Columns in the Audit Log
You can view, order or sort the audit log by any of the columns displayed. By default,
records are displayed in reverse chronological order.
57 of 59
SMARTLIBRARY USER MANUAL
To sort by other columns:
•
Click on the column heading you wish to sort by:
•
A downward pointing arrow is displayed next to the selected column heading.
•
This indicates that the Audit Log is now ordered by the values of the selected
column, in ascending order
•
Click on the column heading again to sort in the opposite direction.
Exporting the Audit Log to a Comma-Separated Value (CSV) File
•
Click the '
Export Audit Log'in the left hand menu, click save and select the
location you wish to save the file to:
•
The Audit Log will be displayed by default in Microsoft Excel
58 of 59
SMARTLIBRARY USER MANUAL
SmartLibrary: Contact Us
Technical Support
Please contact us by emailing [email protected] or telephone +61 3 9606 9222
General Assistance
Please contact us by emailing [email protected] or telephone +61 3 9606 9222
59 of 59