1
Active Notation User Manual
(Prototype Version)
Phil Legard
System Requirements
PC running Windows 95 or later (98 or XP recommended)
Screen resolution set to 1024 x 768, 32 bit colour
55MB free hard-drive space
Preface
The intention of Active Notation is to replace the need for a conventional score
and music stand set-up. While this document focuses on the latter ‘active’ sections
of Continuum with Blues, the final system will also display the three preceding
sections on screen so that the player may solely use the computer display for the
performance.
Active Notation User Manual
Prototype Version
Note also that the sub-section numbers are displayed in the system at the top left
of each sub-section display. This makes for easy reference to the full score, which
may be kept open as a PDF and toggled between using the Alt+TAB shortcut key.
Phil Legard
Installing Active Notation
Active Notation must be run from a local hard-drive or other random-access
storage device – it will not run directly from the CD-ROM. To install the
software, open the CD-ROM folder and copy the folder entitled Active Notation
to a suitable location on your computer.
Running The System
To start the system, browse to the location where you copied the Active Notation
folder. Open this folder and double click the icon ActiveNotation.exe.
1
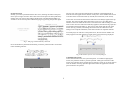
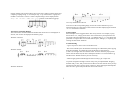
The two grey areas at the top and bottom are windows in which fragments of
musical score will appear for the duration of the piece. In the middle of the screen
is the title of the current movement (to the left) and a timer bar (in the centre).
System Overview
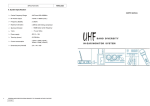
Initially you will be presented with the title screen, showing the name of the piece.
Press space to begin execution. If the first section of the piece has been prefaced by
images, then you will see these images displayed for a predetermined number of
seconds. You can also skip these introductory pages by pressing the spacebar again.
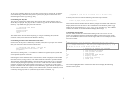
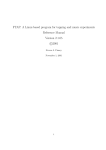
At the start of a section the first musical sub-section will always appear in the top
window. The timer will then begin decreasing in size over a pre-determined
number of seconds. While this occurs the next sub-section will be fading in on the
lower screen. Once this sub-section has fully appeared, the timer having expired, a
new fragment will begin fading in. This process will repeat until the end of the
section (see fig 3, below). The timings for each section are reflections of the
timings in the computer simulation, with some tolerance for repeated material.
To aid the player in reference to the printed score, the sub-section number will
always appear to the left of the first system of the sub-section being displayed.
Fig 1. Title page and introductory material.
Once all introductory material has finished, you will be presented with a screen that
looks something like this:
Fig 3. Illustration of lower sub-section fading in.
Controlling the System
At the start of each section, the system will pause. To commence playing the
section, the performer needs to press the spacebar. During the execution of the
section, the spacebar can be pressed again to pause the screen in its current state in
order to rehearse. Pressing spacebar again will resume the application from the
point at which it was paused.
Fig 2. Default display.
2
At any point, whether paused or not, the timer can be reset by pressing R. As another
aid to rehearsing is that while the system is paused, the player can move back and
forth through sections by pressing [ and ].
playmode 4 (1 8 4 5 6 3 9 10 14 11 2 7 12 15 13 16)
You may also see a line like the following toward the top of the file:
Customising the Play-list
The play-list contains the names of the files used for each section and the order in
which they are played. The play-list file is called an.cfg and can be found in the Files
directory. By default they play-list looks like this:
intro (a,53,b,34,b2,23,blues,101)
This indicates that the module has introductory images associated with it that will
display before the first sub-section. The information in the brackets points to jpg
images in the sound directory e.g. a.jpg, b.jpg, b2.jpg and blues.jpg. The numbers
indicate the number of seconds allowed to display each image.
;; Continuum with Blues
scenario1/b2
scenario1/b2a2
scenario1/a2
!end
Customising Sub-Sections
The rest of the module file contains data relating to the sub-sections. A subsection is a fragment of musical notation that makes up the larger section of the
piece. The definition each new sub-section begins with a #. For example, the first
sub-section of B2:
The names of the sections can be anything, so long as a matching file (with the
extension .anm) can be found in the Modules directory.
Customising Section Name and Sub-Section Order
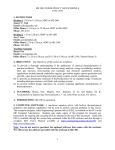
Each section of the piece is defined by a module (.anm) file. If you open one of these
files you will see the first few lines look like this:
#
tempo=070g,32[- fis,16 gis,32] tempo=140|gis'8{ ais' ais''
c''} ||tempo=070fis32,[- fna,16 g,32] tempo=140|e,8[ a, c d]
||
80 80 80 70 70 70 70 80 80 80 80 80 80 80
2.5
;; duration on screen (in seconds)
0
;; free velocity allowed?
0
;; free duration allowed?
0
;; free pitches allowed?
0
;; beam height
-40
;; alternative beam height
60
;; display offset
20
;; horizontal spacing
;; sound file
;; Continuum with Blues – Section B2
name "Continuum with Blues - B2"
playmode 2
The first line, starting with ;; is a comment. Comment are ignored by the system and
can be placed anywhere in the file.
Following this is the definition of the section name, which is displayed in the middle
left of the screen (see fig.3 above). The name should be enclosed in quotation marks.
The final part of the module header is the play-mode. If playmode is set to 1 then the
section will play through sequentially. If it is set to 2 then the order will be shuffled
(with the exception of the first and last sub-sections). A playmode of 3 will create a
playlist in random order with repetitions and redundancy, again with the exception of
the first and last sub-sections. Finally a user-defined order, useful for rehearsal, can be
created by setting playmode to 4, followed by the order in brackets, e.g.:
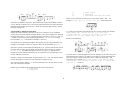
The section highlighted above contains the data used to display the following
notation in the system:
3
||:
:||
:||:
;; start repeat
;; end repeat
;; end repeat and start new repeat
Chords can be created by enclosing two or more notes within < and >. For
example: gis16[- gna < e, a, fis> a32- gis] would display this:
This data is contained in two lines – the notation data (the text and numbers) and the
velocity data (the numbers only). The velocity data controls the size of the note-heads
displayed and generally runs from 50 (v. small) to 100 (larger than average), with 80
being the average size.
A Brief Guide to Editing Notation Data
Editing the notation data is a little more involved. It is based on a very simplified
version of the Lilypond notation standard. Briefly, notes can be displayed by inputting
the name of the note (c, d, e, etc), followed by any accidental (is = sharp, es = flat, na
= natural), and then any octave positioning denoted by , or '. So ais is A-sharp
below middle C, bes' is B-flat above middle C, and so on.
A \ can be used to break up long phrases into two or more systems, for example:
tempo=140b8[ bis' ais e'] |dis''8[ f' b' gis' bis']
||\tempo=070e'32[- f' e'8] |a,16{ ais,32} ||fis32{- fna
<cis'4} e b,> ||c'16.{ <bes32} g d>- <d4 g b> ||
Results in the following:
Note durations are specified by numbers directly following the pitch information, for
example c32 is middle C with a 32nd duration. Dots can also be added, e.g. bes’8..
Selections of notes can be beamed by adding either [ or { directly after the first note in
the group and using the corresponding close-bracket to end the group, for example:
c8[ d’ e’ f’]. The difference between the use of [ ] and { } is that the beam
heights are not calculated automatically, but two alternatives are specified in the subsection definition (see above).
Changes in tempo can be displayed using the format tempo=nnn. Note that the tempo
must be three digits in length (e.g. 070 in the above example for 70)!
|r32 bes,32[- a,16] des32[- c bna,16]- b,32[ b,- bes,16 dna
c32- bna,] || results in:
Ties can be created by adding a – to the end of the first note in the pair, such as in the
first note of the above example.
Barlines may be added using the following at the start of each new bar:
|
||
At present there is a limited support for accents. Suffixing a note with ! will place
an attack below the note head. A suffix of £ will place a staccato mark below the
note head. Agogic accents can be place above or below by appending ~ and _
respectively. For example, ees32[ d16 fis32]-! f16[ ena£ e£ dis£]
;; single bar
;; double bar
4
Finally numbers can be placed above the top line of the staff to indicate triplets and
complex groupings using ^n. For example: c8[ ^3c c] would result in a group of 8
middle C notes with a 3 above it. More complex timings can be displayed thus:
c16[- cis ^6^:ena- ^5dna cna- cis], resulting in the following group:
Or in any combination of above!
To do this set the corresponding flags (see the sub-section definition p.3) to 1.
This means there is a 50% chance of the sub-section either displaying the notation
‘as is’ or with the free elements.
Alternative Notational Displays
The sub-sections contained within the module file do not have to be displayed ‘as
written’, but can also be displayed in following ways:
Sound Samples
Sound samples can be triggered at the start of any section. For example, to play
the file drone.wav, simply put the file in the sound directory and replace the last
line of the sub-section definition (set as - by default) with drone. This allows the
performer to integrate their own sounds with the piece, adding to, or replacing the
existing electroacoustic elements.
With free velocities:
Troubleshooting
- I get a script error when I run ActiveNotation.exe
This can be caused by the file attributes still being set to Read-Only after copying
from the CD-ROM. To remedy this select all the files in each directory
(CTRL+A) and right click one of them. Select Attributes from the pop-up menu
and un-tick the Read-Only tab in the subsequent window. It is critical that an.cfg
and files in the Modules directory are not read-only.
With free pitches:
- While stepping backwards through the section with [ I get a script error
At present navigation through a section with [ and ] is temperamental. Stepping
forward with ] is fine, and you will also be taken to the next section when you step
past the last item in the current section. However, when stepping backward please
take care not to go back beyond the first item in the section.
With free durations:
5
Advice to the player
We suggest during rehearsals that the player first familiarises himself with the core
material, before moving on to the more advanced ‘active’ notational elements of the
system. To this end we have created three ‘scenarios’ that the player might like to
work through as part of their rehearsal process.
To select a scenario you will need to edit the configuration file an.cfg in a text editor.
This is located in the files folder of the active notation directory. The default scenario
is scenario 1, but others can be selected by editing the commented lines in the file. For
example, to switch to scenario 2 the following edits need to occur:
;; Continuum with Blues
scenario1/b2
scenario1/b2a2
scenario1/a2
;;
;;scenario2/b2
becomes
;;scenario2/b2a2
;;scenario2/a2
;;
;;scenario3/b2
;;scenario3/b2a2
;;scenario3/a2
!end
;; Continuum with Blues
;;scenario1/b2
;;scenario1/b2a2
;;scenario1/a2
;;
scenario2/b2
scenario2/b2a2
scenario2/a2
;;
;;scenario3/b2
;;scenario3/b2a2
;;scenario3/a2
!end
The three scenarios present the following approaches to the material in sections B2,
B2>A2 and A2:
Scenario 1 – All material is presented as written in the order written.
Scenario 2 – All material is presented as written, with the order of B2 and A2 shuffled
each time.
Scenario 3 – Material for B2 and A2 is both shuffled and has varying chances of
being displayed in alternative ways (e.g. with free pitches, rhythm or velocity). The
material for B2>A2 remains the same.
6