1
Practical Unit Testing for Embedded Systems
Part One
Table of Contents
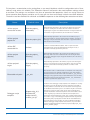
Introduction2
Basics of Unit Testing
2
Benefits2
Critics3
1
Practical Unit Testing in Embedded Development
3
The system under test
3
Importing uVision projects
4
Configure the C++test project for Unit Testing
6
Configure uVision project for Unit Testing
8
Configure results transmission
9
Deal with target limitations
10
Prepare test suite and first exemplary test case
12
Deploy it and collect results
12
Practical Unit Testing for Embedded Systems / White Paper
Introduction
The idea of unit testing has been around for many years. “Test early, test often” is a mantra that concerns unit
testing, but not every software project has the luxury of a decent and up-to-date unit test suite. This may change,
especially for embedded systems, as the demand for delivering quality software continues to grow.
International standards, like IEC-61508-3, ISO/DIS-26262, or DO-178B/C, demand module testing for a given
functional safety level. Unit testing at the module level helps to achieve this requirement. Yet, even if functional
safety is not a concern, the cost of a recall—both in terms of direct expenses and in lost credibility—justifies
spending a little more time and effort to ensure that our released software does not cause any unpleasant
surprises.
In this article, we will show how to prepare, maintain, and benefit from setting up unit tests for a simplified simulated
ASR module. We will use a Keil evaluation board MCBSTM32E with Cortex-M3 MCU, MDK-ARM with the
new ULINK Pro debug and trace adapter, and Parasoft C/C++test. You will see how utilizing tight IDE/Test
Framework integration and the new test-tool-dedicated host communication channel through ULINK Pro
simplifies the initial set up. You will also see how this setup effort pays off in terms of extended testing capabilities.
Basics of Unit Testing
Unit testing is a well-known concept. Essentially, it involves taking a single function or method of a class (a
unit) and invoking it with a given set of parameters. Then, when the execution finishes, an outcome is checked
against the expected result. Code that accomplishes this is called a test case. Checking the outcome is usually
done with a form of assertions. For example, assume you have the following function “foo”:
int foo (int a, int b) {
return b – a -1;
}
A test case might look like this:
void test_foo ()
{
int Ret = foo(1,2);
assertTrue(ret = 0, “Wrong value returned!”);
}
Often, “unit testing” refers not only to test cases invoking a single function or method, but also to test cases
invoking an interface to a module or library. In other words, the terms “module” and “unit” testing are commonly
used interchangeably.
Benefits
There are a number of benefits to unit testing. When creating a unit test case, the developer tests at a very low
level. He is able to drive execution to parts of the code that are normally not covered by high-level functional
tests. That way, he can test “corner cases” and the handling of abnormal situations.
The second important benefit stems from the fact that doing unit testing forces the developer to write “testable”
code. This usually results in code that is better decomposed, not overly complex, and all-around better designed.
Another benefit is that suites of unit test cases establish a great safety net for your application—so you do not
have to be afraid of modifying it. That is especially important if you want to refactor your code, or when you deal
with old, legacy code that you do not know well any more. Typically, in such situations, developers are afraid to
touch anything for fear of introducing errors. With this safety net, you can modify code with the confidence that
if you break something, you will be alerted immediately. That translates to better productivity and better code.
2
Practical Unit Testing for Embedded Systems / White Paper
Last but not least, unit test cases expose errors very early in the development cycle. According to well-known
studies, fixing an error early is much cheaper than fixing that same error late in the integration test phase or in
the system test phase.
The above reasons led to the invention of Test Driven Development (TDD). TDD promotes that the developer is
supposed to create a unit test case for each piece of functionality—before he starts to implement it.
Critics
If unit testing is so great, then why isn’t it done on every project? Probably because it inevitably involves a
certain amount of work—even for simple cases.
Recall the simplistic example from above. First, arguments to the function do not have to be simple types. They
may be complicated structures that need to be initialized properly for the test to make any sense. Second, the
function under test does not have to return a simple type. It can also refer to external variables, which again do
not have to be simple types. Finally, the function “foo” may call another one, “goo”, which for example talks to
a real-world hardware sensor/file/database/network socket/USB port, receives user input from a GUI, etc.—and
thus will not operate properly in separation.
To prepare a useful unit test case for this non-trivial “foo” requires a lot of work: proper initialization of all
variables that the function under test depends on, stubs/drivers for functions that we do not want to call (like
“goo”), intelligent post condition checking, and so on. Then all of this has to be built, run, and recover gracefully
if a problem occurs. The final steps involve preparation of a nice report that shows what the test execution
results were and also which lines / statements or branches were covered during execution. And all of this must
be maintained as the code evolves.
Sound like a lot of work? It is. This is probably the #1 reason why unit testing is so rare in real-world software
projects.
Practical Unit Testing in Embedded Development
In the context of embedded software development, unit testing is an even greater challenge. On the one
hand, it is simpler because often only C code is used—and when C++ is used, it is only a simplified subset of it.
However, on the other hand, unit test cases need to be deployed on a target board, or at least on a simulator.
The code prepared for testing, together with all the test cases and test data, must be transferred to the target
board, then executed. Finally, test outcomes must be collected and transferred back to the host, which is where
they can be analyzed. This adds additional overhead on top of the work described in the previous section. A
thorough discussion of all the challenges of unit testing embedded software would take an entire article, if not
an entire book. Rather than take this route, let’s take a more practical approach: let’s explore how to set up and
develop unit test cases in a concrete situation. This will not explain all the possible details, but it will provide a
sense of what unit testing means in practice.
The system under test
Let’s consider a simplified ASR (Acceleration Slip Regulation) system running on a Keil evaluation board
MVBSTM32E. It must be emphasized that we are presenting this system only to demonstrate a concept; it is
not ASR software for a real-world vehicle.
In the sample system, two speed detectors monitor the front wheels. If one of the wheels starts spinning while
the other slows down, then the system assumes that the wheel is slipping and it engages the brakes on that
wheel so the torque can be directed through the front axle differential to the other wheel (the one slowing
down). For details of how a real ASR system works, please refer to Wikipedia at http://en.wikipedia.org/wiki/
Acceleration_Slip_Regulation.
3
Practical Unit Testing for Embedded Systems / White Paper
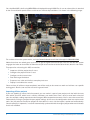
Our simplified ASR is built using MDK-ARM and deployed through ULINK Pro. It runs on a board that is attached
to the car model with speed sensors and that can simulate slip conditions. It is shown in the following image.
For a video of how the system works, see http://www.facebook.com/video/video.php?v=368849244190.
Notice that when one wheel goes up, it loses its grip and gets the entire torque. You can see how the system
engages the brake on that wheel to allow the torque to be transferred to the other wheel, which is not visible.
To prepare for unit testing this ASR, we need to:
» Import our uVision project into C++test
»
»
»
»
»
Configure the project inside C++test
Configure results transmission
Deal with target limitations
Prepare a test suite and the first, exemplary test case
Deploy it and collect the results
Once we have all of these steps completed, we will be ready to do some true work and achieve our specific
testing goals. But first, we need to start on the ground work.
Importing uVision projects
If you use CppUnit or some similar framework, you can make it a part of your project and deal with the tests
from within your IDE, which here is uVision. However, you would then have a lot of manual work ahead of
you—for example, setting separate test build targets. More comprehensive tools, like C++test, take care of this
automatically as long as you provide your project settings. In this case, the configuration does not require much
work. You just point to the uVision project file from within C++test, and the import is performed automatically.
Once the project is imported, C++test will automatically synchronize with the original project whenever it detects
that it was modified.
4
Practical Unit Testing for Embedded Systems / White Paper
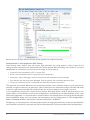
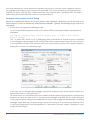
C++test provides a wizard to facilitate the project import process. This wizard allows importing of a single project
or a collection of projects. The wizard is available in both GUI mode and command line mode for automated
project importing. In the simplest case, we will need to provide a path to the uVision project; this is entered in
the first wizard screen, which is shown on the left. Next, the wizard prompts us to specify a few details about
the imported project:
» Where the C++test project should be located
» If variables should be used to reference the original source code location (facilitates sharing)
» What is the name of the uVision project target that should be used to acquire compiler/linker
flags used for C++test analysis.
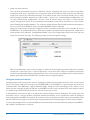
C++test is using the build bat file generated by the uVision IDE to acquire the compiler/linker flag. If the build
bat file generation is not enabled in uVision, then the project import wizard will issue a warning and block the
project import. To enable build bat file generation in uVision, simply mark the check box in the uVision project
properties, as shown on the screenshot below:
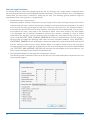
After wizard settings are confirmed, C++test will proceed with the project import: the result will be a new C++test
project that is synchronized with the uVision project. All basic settings are automatically set so it is possible to
start static analysis without any additional configuration. Just select the context for static analysis and run one
of the provided C++test test configurations:
5
Practical Unit Testing for Embedded Systems / White Paper
Results from the analysis confirm that the uVision project was imported correctly.
Configure the C++test project for Unit Testing
Since running static analysis does not require code execution, the setup process is fairly simple: all the
settings that are required can be deduced from the uVision project. With unit testing, the situation is a bit more
complicated. To successfully run unit tests on the target, C++test needs to:
» Prepare the test components (C/C++ source files)
» Build a test executable based on generated test components
» Generate a special debugger script for uVision that will automate the test execution
» Start uVision with the generated debugger script to execute the scheduled portion of tests
» Process the collected results and provide the execution statistics to the users
This looks like a lot of work. Moreover, for non-standard projects, some additional actions may be required; for
example, it might be necessary to generate a special resource for the executable (images included into build)
or convert a generated executable to a different format in order to deploy it to the target, and so on.
C++test significantly reduces the amount of work required. All testing actions, whether standard steps or user
custom actions, are handled by so called “test configurations”: specifically, by a test flow definition that is a part
of the test configuration. C++test ships with a number of built-in test configurations. For testing uVision4 projects
with the ULINKPro debug and trace adapter, the best option is the test configuration at “Test Configurations>
Builtin> Embedded Systems> Keil uVision> Run Keil uVision Tests- ULINKPro.”
Configuring a C++test project for unit testing often requires changing the parameters of the test flow definition
and sometimes introducing new steps into the test flow contained inside the predefined test configurations.
6
Practical Unit Testing for Embedded Systems / White Paper
To introduce a customization to the testing flow, a user would duplicate a built-in configuration to the “Userdefined” node, where it is editable. The “Execution> General” tab contains the most important settings related
to test flow. The settings are available in the form of execution flow properties. Users can assign values to
these execution flow property variables and C++test will use them consistently inside the test flow definition.
The built-in test flow definition for uVision4 and ULINKPro operates on the following flow execution variables:
Name
Description
${uvision:project_
executable}
Automatically expanded to the location of uVision project build
product– usually the executable file. This variable is used for
replacing the original executable with the C++test-generated test
executable. In typical situations, this should not be modified.
uVision project
project file
${uvision:project_file}
Automatically expanded to the location of the uVision project
file. This variable is used for starting uVision with the generated
debugger script to automate test execution. In typical situations,
this should not be modified.
uVision IDE
executable file
Uv4.exe
Location of uVision IDE executable. This is required to start
automated tests. If not automatically detected by C++test, it
should be manually specified by the user.
uVision project
directory
${uvision:project_
directory}
Automatically expanded to the location of the uVision project
directory. This is used as a default location for storing C++testgenerated debugger scripts. In typical situations, this should not
be modified.
uVision project’s
target
${uvision:project_
target}
Automatically expanded to the uVision project’s current target. If
there is a special target created in the uVision project for testing
purposes, it should be manually specified as a value of this
property.
_sys_exit
The function name or address that is considered as an end-point
of test execution. The default configuration of C++test assumes
that the last function called from test executable is _sys_exit. The
debugger script generated by C++test finalizes the test execution
when the running test program will reach the _sys_exit function
(or other specified here by the user).
${cpptest:cfg_dir}/
templates/for_
recipes/uvision_
ulinkPro_itm.tja
Location of the debugger script template. The template is used by
C++test to generate the final form of the debugger script that is
used by uVision to automate the test execution. It is designed to
be modified/customized by users. It contains only the commands
that are necessary to deploy and run the test executable. Any
special initialization of the development environment that is used
in the original project should be added to this template to be
printed into the final debugger script. The recommended practice
is to make a copy of the debugger template file that is by default
denoted by this property (stored inside the C++test distribution)
and put it to the project location for easy modification. Working
with the debugger script template stored in the project location
requires modifying this flow execution property to:${project_loc}/
uvision_ulinkPro_itm.tja
uVision project
executable location
Executable exit point
Debugger script
template
7
Default value
Practical Unit Testing for Embedded Systems / White Paper
As already mentioned, in some nonstandard situations there may be a need to add an additional action to
be executed when preparing or running the test executable. This can be achieved by editing the test flow
definition. To do this, click the “Edit...” button next to the “Test execution flow:” drop down menu. For details
about editing the test flow definition, see the C++test User Manual.
Configure uVision project for Unit Testing
Besides the configuration done in the C++test project, some additional adjustments need to be done in the
uVision project in order to achieve fully automated test execution. Typically, the following things need to be
customized:
» Path to the C++test-generated debugger script.
C++test uses the following command to run the uVision IDE to automatically execute a prepared test
executable:
uv4.exe -d <tested project uVision project file> -t <name of the uVision
project target>
The “-d” option tells uVision to run in Debugging mode and execute all commands that are specified
in the debugger script provided for the <name of the uVision project target> target. To ensure that the
C++test-generated script will be used, the path to this script needs to be set in the Project Properties>
Debug tab, as shown in the following image:
In this case, the C++test-generated debugger script will be expected in the uVision project location—the
default place where C++test generates it.
For convenience, it is recommended to add an additional uVision project target that will be used for testing
purposes and enter the path to the C++test-generated debugger script only for this target. Using the
same project target for testing and development will require you to juggle the development and testing
debugger scripts. Note that if a special target is created for testing, its name needs to be specified in the
C++test test configuration’s test flow properties as described in previous section (“Configure C++test
project for Unit Testing”).
8
Practical Unit Testing for Embedded Systems / White Paper
» Heap and Stack memory
The unit testing framework consumes additional memory, impacting the stack and heap usage. When
the project under test is setup with very a very low margin of free heap or stack memory, test execution
might crash due to the stack/heap shortage. The amount of the stack and heap memory that is taken
by the testing framework depends on various factors , such as the “instrumentation configuration”, the
“C++test runtime library configuration”, and the “code of the test cases and stubs”. C++test provides
several configuration points to limit stack/heap consumption; these will be discussed in a later section
titled “Dealing with target limitations.” For relatively simple projects like the ASR demonstration program,
we may assume that 0x450 for stack and about 0x900 for heap is sufficient.
Heap and stack memory is typically configured via the assembler startup files. In our example, this is the
STM32F10x.s. To modify these values, select the assembler startup file from the project tree, switch to the
editor window, and select the “Configuration Wizard” tab. In the configuration wizard tab, enter the new
values for the stack and heap. The following screen shot shows typical settings:
After this modification, make sure that project is rebuilt so that the object generated from the assembler
startup file is up to date. This is required because C++test will use this object to complete the build of
the final test executable (objects generated from C/C++ source code are produced by C++test but all the
objects generated from assembler files are taken from the original project).
Configure results transmission
Configuring the results transmission requires selecting a suitable communication channel in the C++test runtime
library. The default setting for running tests with MDK-ARM 4.1 and ULINKPro is communication based on the
Instrumentation Trace Macrocell, a part of ARM CoreSight debug and trace technology. In this mode, C++test
writes the test messages directly to ITM port and ULINKPro ensures data transport to the host machine, where
it is captured by uVision IDE and stored into a file for analysis by C++test.
A development environment with a target-to-host communication channel dedicated for quality tools like
Parasoft C++test is a unique solution. It provides excellent bandwidth, and is significantly simpler to configure
than the typically-used UART connections. Also, because this is a dedicated channel, there are no problems with
collisions when accessing this communication link generated by the tested program and the test framework.
C++test is preconfigured for use with the ITM based communication channel for uVision 4 projects and ULINKPro.
No additional configuration is required.
9
Practical Unit Testing for Embedded Systems / White Paper
Deal with target limitations
To reiterate what was stated at the beginning of this text, unit testing is not a simple matter— especially when
we need to handle both tests and development platform limitations. The more limitations are in a development
environment, the more work is involved in setting up unit tests. The following general problems might be
encountered when running tests on a target device:
» Insufficient heap or stack (or both).
Embedded projects are often setup with a very low margin of free stack and heap memory. If end of the
available stack or heap is reached, the testing framework cannot continue the test execution. In the worst
case, we may not even get through the test driver code to the first test case. The simplest solution is
to increase the amount of stack and heap. However, very often this will not be possible. In many cases,
the hardware will state a hard stop on our attempts to obtain some more memory. The other option
is to reconfigure the unit testing framework to consume less memory… probably at a cost of limited
functionality. For example, if you are willing to give up support for using external data sources in test
cases, using DCPPTEST_DATA_SOURCES_ENABLED=0 will limit the heap utilization. Similarly, if you are
willing to give up support for reporting stack traces from tests execution problems, using -DCPPTEST_
STACKTRACE_ENABLED=0, and disabling the “stack traces reporting” instrumentation feature will ensure
that less memory is taken from the heap. Another option is to impose a lower limit on the size of the
message emitted via the single test assertion from a test case. Lowering this limit from the default 1024b
(e.g. -DCPPTEST_MAX_MESSAGE_SIZE=512) will decrease the consumption of the stack memory… but
test assertion messages cannot exceed the specified size.
» Test executable footprint is too large to fit into program memory.
The following factors contribute to the increased size of the test executable when compared to the size
of the original program:
10
Practical Unit Testing for Embedded Systems / White Paper
» C++test runtime library – This is a collection of helper routines used by instrumentation. The runtime
library is designed to be configurable. This means that some functionalities can be excluded, which
usually results in a smaller footprint. In general, to limit the program memory overhead generated by the
runtime library, some non-core functionalities can be disabled. The decision of which functionalities to
disable always belongs to the user and depends on the particular project’s testing requirements. The
list of runtime library macros to be used for enabling/disabling C++test runtime library components is
available in the C++test user’s manual.
» Source code instrumentation – Added by C++test to original source code to collect various information from
testing process and control test execution. To limit the overhead generated by C++test instrumentation,
users can exclude some parts of the project from the instrumentation process or disable some of the
instrumentation features. C++test provides the configuration interfaces for both settings. The screen shot
below shows the UI component for controlling instrumentation features.
» Test cases/stubs source code – These are inherent pieces of the testing process. The amount of test
cases and stubs that are included into the individual unit tests run also affects the footprint of the test
executable. Usually this becomes a problem when a large number of test cases (several hundreds or
even thousands) are scheduled for a single run. Splitting the collection of test cases into the number of
runs can help in achieving a lower footprint at the cost of extra maintenance work.
» Execution time overhead – The execution time overhead is mostly generated by the execution of source
code instrumentation and subsequent calls to the C++test runtime library. The glue code added to
manage the test execution is negligible in this context. The execution time overhead is usually not a
problem when we want to run tests for functions/methods in isolation. In this case, all we need to do is run
a function, wait for the results, and validate the results. There is an overhead—but so what? We will wait
a little bit longer. This is a test session that can eventually be run overnight. The real problem surfaces
if we want to run integration tests. Here, we are interested not only in checking the logic of the function
in isolation, but also how it cooperates with other functions/modules. What kind of issues might arise in
this case? Assume that C++test instrumented the code of an interrupt handler that is supposed to finish
in xxx but—because of the instrumentation— it executes 2*xxx. As a result, some other code is unable
to execute in the designed time and the time dependencies are broken for the entire module, resulting
in failed test. This problem can be solved by applying selective instrumentation. As described in the
previous point, C++test provides a user interface where users can specify which portions of the project
should be instrumented and which instrumentation features should be used.
» Communication channel - The choice of the communication channel for test results emission is mostly
determined by the development platform and the target device. Results can be sent via TCP/IP sockets,
through RS232, or stored in the file system or in flash memory. Each option has both pros and cons.
C++test’s runtime library is open to allow custom implementations of other communication channels.
Users just need to provide an implementation for the following simple functions: initializeCommunicaiton,
sendByte, finalizeCommunication. The most common problems are related to:
» The execution time overhead created by sending test results via a slow communication channel (like serial links with low baud rates).
11
» Collisions when accessing the communication channel (the application under test might also require access to the communication channel; in the case of serial connections, this might be a problem).
The lack of suitable communication for sending results back to the host.
Practical Unit Testing for Embedded Systems / White Paper
In most of these situations, not much can be done with the limits in the communication channel provided
by the development environment. Therefore, it is very important to select a development environment
that provides good support for testing tools. To see what numbers we are talking about, refer to the
following image, which shows a comparison of time consumed by a function sending a byte through
UART and ITM. It is two orders of magnitude greater—and it can be even greater, depending on the
settings.
Prepare test suite and first exemplary test case
Once the configuration of C++test project and uVision project is accomplished and all the development
environment limitations are resolved, we can try to run a simple test case to validate that setup is working
correctly. To avoid problems with complicated initialization of the arguments for a function under test or unknown
dependencies with other parts of the tested project, it is highly recommended to use a very simple function for
the initial test case that is used to validate the setup. In this way, we avoid mixing setup problems with problems
that might rise from improper argument initialization or external function dependencies.
Deploy it and collect results
To start the first test case, select it in the C++test test case explorer and run the customized test configuration.
As a result, you should get the test case outcome and the code coverage reported for the function under test.
In this part of the article, we briefly introduced unit testing, and discussed at length challenges which embedded
developer faces when doing unit testing. We used specific example - a simplified ASR (Acceleration Slip
Regulation) system running on a Keil evaluation board MVBSTM32E. In the second part we will show what
does it mean to obtain particular goals with unit testing, like certain level of code coverage. We will also discuss
safety relevance of unit testing.
USA PARASOFT HEADQUARTERS / 101 E. Huntington Drive, Monrovia, CA 91016
Phone: (888) 305-0041 / Email: [email protected]
© Parasoft Corporation All rights reserved. Parasoft and all Parasoft products and services listed within are trademarks or registered trademarks of Parasoft Corporation.
All other products, services, and companies are trademarks, registered trademarks, or servicemarks of their respective holders in the US and/or other countries.