1
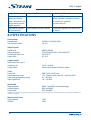
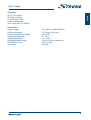
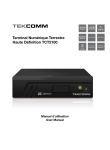
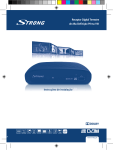
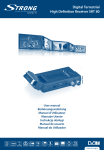
Picture similar Digital Terrestrial Receiver SRT 1189 user Manual 1 1 2 3 4 5 HOTLINE 0820 400 150 AT [email protected] 029 928 FR 0826 [email protected] € 0,12/Min. österr. Festnetz € 0,15 par mn poste fixe en France 32 634451 BG +359 [email protected] 1 445 26 10 CEE +36 [email protected] IT 199 404 032 [email protected] Da rete fissa 24,8 cent. al min. 12,5 cent. scatto alla risposta Da rete mobile max 49 cent. al min. 15,6 cent. scatto alla risposta 501 49 91 DE 0180 [email protected] NL € 0,14/Min. deutsches Festnetz € 0,42/Min. max. Mobilfunknetze 801 702 017 PL [email protected] DK +380(44)228 24 73 UA [email protected] [email protected] [email protected] www.strong.tv Supplied by STRONG & Co, Japan Represented by STRONG Ges.m.b.H. Franz-Josefs-Kai 1 1010 Vienna Austria Email: [email protected] 11 Mar 2015 15:12 PART 1 • English 11 Feb 2015 17:18 2 2 3 4 4 4 2.0 Connection 2.1 Connecting to TV and Terrestrial Antenna 2.2 Connecting to a Digital Audio Amplifier 5 5 5 3.0 Your Receiver 3.1 Front Panel 3.2 Rear Panel 3.3 Remote Control 3.4 Default PIN: 0000 5 5 5 5 6 4.0 First Time Installation 6 5.0 Main Menu 5.1 Channel 5.2 Installation 5.3 Setup 5.4 Tools 5.5 Media+ 6 6 8 9 11 12 6.0 Operation 6.1 Changing Channels 6.2 Accessing the Electronic Programme Guide (EPG) 6.3 Accessing the favourite channels 12 13 13 13 7.0 Trouble Shooting 13 8.0 Specifications 14 STRONG declares that this item complies with the basic requirements and other relevant regulations of directives CE 2004/108/EC and 73/23/EC, RoHS 2002/95/EC Subject to alterations. In consequence of continuous research and development technical specifications, design and appearance of products may change. All product names are trademarks or registered trademarks of their respective owners. © STRONG 2015. All rights reserved. 1 English Table of Contents 1.0 Instruction 1.1 Safety Instructions 1.2 Storage 1.3 Equipment Set-up 1.4 Accessories 1.5 Usage of external USB devices PART 1 • English 1.0 Instruction 1.1 Safety Instructions The lightning flash with arrowhead symbol within an equilateral triangle is intended to alert the user to the presence of not isolated dangerous voltage with the inside of the product that may be of sufficient magnitude to constitute a risk of electric shock to persons. The exclamation point within an equilateral triangle is intended to alert the user to the presence of important operating and servicing instructions in the literature accompanying the appliance. Read All Instructions – Before you use the product, read all operation instructions. For more information on accessories such as the lithium ion battery, refer to the manuals provided with those products. Save These Instructions – Save all safety and operating instructions for future reference. Heat Warnings – Read carefully and follow all warning labels on the product and those described in the instructions. Follow Instructions – Follow all instructions provided with this product. Cleaning – Always unplug this product from the wall outlet before cleaning. Use only a damp cloth for cleaning. Never use any type of liquid or aerosol cleaner, or any type of organic solvent to clean this product. Attachments – For your safety and to avoid damaging the product, use only accessories recommended by STRONG. Water and Moisture – Never use this product around water (near a bathtub, kitchen sink, laundry tub, wet basement, swimming pool or in the rain). Location – To avoid damage to the product and prevent personal injury, never place this product on an unstable stand, tripod or bracket. Follow the instructions that describe how to safely mount the product, and use only the mounting devices recommended by the manufacturer. Power Sources – Connect this product only to the power source described on the product label. If you are not sure about the type of power supply in your home, consult your local power company. Refer to the instruction pages for information on using the product with a battery. Grounding, Polarization – If this product is used with a specified AC adapter, the adapter may be equipped with a polarized alternating current line plug (a plug with one blade wider than the other). This safety feature allows the plug to fit into the power outlet only one way. If you cannot insert the plug into the wall outlet, pull it out, reverse it, and have the receptacle replaced. Protecting the Power Cord – The power supply cord should be placed so it will not be walked on. Never put a heavy object on the power cord or wrap it around the leg of a table or chair. Keep the area around the power cord connection points, at the power outlet, and at the product connection, free of all AC adapter or accessory power cords. 2 GENERAL PRECAUTIONS – SAFETY PRECAUTIONS Lightning – If a lightning storm occurs while using a specified AC adapter, remove it from the wall outlet immediately. To avoid damage from unexpected power surges, always unplug the AC adapter from the power outlet and disconnect it from the receiver when the receiver is not in use. Overloading – Never overload wall outlets, extension cords, power strips, or other power connection points with too many plugs. Foreign Objects, Liquid Spillage – To avoid personal injury caused by fire or electric shock from contact with internal high voltage points, never insert a metal object into the product. Avoid using the product where there is a danger of spillage. Heat – Never use or store this product near any heat source such as a radiator heat register, stove, or any type of equipment or appliance that generates heat, including stereo amplifiers. Servicing – Refer all servicing to qualified personnel. Attempting to remove the covers or disassemble the product, could expose you to dangerous high voltage points. Damage Requiring Service – If you notice any of the conditions described below while using a specified AC adapter, unplug it from the wall outlet and refer servicing to qualified service personnel: 1. Liquid has been spilled onto the product or some other object has fallen into the product. 2. The product has been exposed to water. 3. The product does not operate normally despite following operating instructions. Adjust only the controls described in the operating instructions ad improper adjustment of other controls could damage the product and require extensive repair word by a qualified technician. 4. The product has been dropped or damaged in any way. 5. The product exhibits distinct change in performance. Replacement Parts – When replacement parts are required, make sure that the authorized service centre uses only parts with the same characteristics as the originals, as recommended by the manufacturer. Unauthorized substitution of parts could result in fire, electric shock, or create other hazards. Safety Check – Upon completion of servicing or repairs, ask the service technicians to perform safety checks to determine that the product is in good working order. Apparatus shall not be exposed to dripping or splashing and no objects filled with liquids, such as vases, shall be placed on the apparatus. Where the mains plug or all-pole mains switch is used as the disconnect device, the disconnect device shall remain readily operable. 1.2 Storage Your receiver and its accessories are stored and delivered in a packaging designed to protect against electric shocks and moisture. When unpacking it, make sure that all the parts are included and keep the packaging away from children. When transporting the receiver from one place to another or if you are returning it under warranty conditions, make sure to repack the receiver in its original packaging with its accessories. Failing to comply with such packaging procedures could damage the product and void your warranty. 1.3 Equipment Set-up We recommend you consult a professional installer to set up your equipment. Otherwise, please follow these instructions carefully: 3 English PART 1 • English PART 1 • English Refer to the user manual of your TV and your antenna. Make sure that the SCART cable and outdoor components of the antenna are in a good condition and the SCART connections are well shielded. This manual provides complete instructions for installing and using this receiver. The symbols serve as follows. Warning: Indicates warning information Tips: Indicates any other additional important or helpful information MENU: (Bold characters) Move to: (Italic characters) Represents a button on the remote control or the receiver Represents a menu item within a window 1.4 Accessories 1 user manual 1 remote control 2x batteries (AAA type) Note: The batteries should not be recharged, disassembled, electrically short-circuited or be mixed or used with other types of batteries. If rechargeable accumulators instead of batteries are going to be used, we recommend using (e.g. NiMH) types with low self-discharge to ensure long time operation of remote control. 1.5 Usage of external USB devices It is recommended to use USB 1.1 or 2.0 storage devices. If your device is not compatible to USB 1.1 or 2.0 specifications, playback and other multimedia functions of the receiver would not work properly. STRONG cannot guarantee compatibility with all types of USB storage devices. If you are going to use external USB HDD (Hard Disk Drive) please consider that the power specifications might exceed the supported output of your receiver (5 V/500 mA). If so, please connect your USB HDD to an according external power adapter. It is advised not to store important information on USB storage devices used with the receiver. Always make backups of data on USB storage device before usage with receiver. STRONG will not take responsibility for any loss of information or circumstances caused by loss of information. 2.0 Connection 2.1 Connecting to TV and Terrestrial Antenna Fig. 1 To receive broadcasted signals, the terrestrial antenna cable should be connected to the ANT IN connector at the back of the receiver. 2.2 Connecting to a Digital Audio Amplifier 4 Fig. 1 PART 1 • English Connect your Digital Audio Amplifier with the S/PDIF connector on the back of the receiver. 3.1 Front Panel English 3.0 Your Receiver Fig. 2 1. USB 2. IR sensor 3. Mode indicator Connector for USB storage devices. Point your remote control towards this sensor. RED indicates that the receiver is in STANDBY mode. GREEN indicates that the receiver is in OPERATING mode. 4. Standby/On button Switch receiver ON to running mode or STANDBY mode 3.2 Rear Panel 1. ANT IN 2. 3. 4. 5. ANT OUT S/PDIF Coaxial TV SCART Power cord Fig. 3 To connect an antenna for reception of broadcasting signal. Active antennas can be supported with max. 5 V/50 mA DC. To connect a TV set or to connect an extra receiver. To connect your receiver to digital audio amplifier. To connect your receiver with your TV set using a SCART cable. Your receiver requires a voltage of 220-240 V AC (Auto-selectable), 50/60 Hz +/-5%. Make sure to check the power specification before connecting your receiver to the wall outlet. 3.3 Remote Control 1. 2. 3. 4. 5. 6. 7. 8. 9. q ! PG+/PG- DTV/VCR INFO VOL+/VOL- MENU EXIT pq 10. tu 11. OK 12. 13. 14. 15. 16. 4 TIMESHIFT 0~9 EPG RECALL Fig. 4 Turns the receiver On/Standby Mutes audio output of the receiver Page up/down No function Shows the actual channel information Volume up/down Opens the main menu/In menu you will get one step back Exits from the menu or sub-menu Menu Off: Change channel to next/previous. Menu On: Moves the cursor up/down. Menu Off: Decreases/increases the volume level. Menu On: Change settings for specific Menus Menu On: Activates the highlighted menu item. Menu Off: Displays the current channel list No function No function Channel selection or value input Shows the EPG (Electronic Programme Guide) in TV mode Back to previous shown channel 5 PART 1 • English 17. 18. 19. 20. 21. 22. 23. 24. AUDIO TV/RADIO FAV FILE TTX SUBTITLE 5 6 Coloured buttons Sets the current audio channel to left, right or stereo Toggles between TV or RADIO mode Favourite group selection No function Shows Teletext on OSD (On Screen Display) Shows list of subtitled languages Rewind/Fast forward of video files For Teletext and other functions 3.4 Default PIN: 0000 4.0 First Time Installation When using the receiver for the first time, the “Easy Install” menu appears. Use pq to select Region, OSD Language, Antenna Power and Scan Mode and tu to select options. Then use the pq buttons to move the focus to Search and press OK to proceed with the automatic channel scan. 5.0 Main Menu In viewing mode press MENU at any time to enter the Main Menu. It consists of the following submenus: Channel, Installation, Setup, Tools and Media+. 5.1 Channel 1. Use the pq buttons to select Channel and press OK to enter. 2. Use the pq buttons to highlight the item of choice and press OK to select. 3. Press EXIT to exit. NOTE: You can also press OK in TV mode to enter the channel list. 5.1.1 TV Channel list 1. In the Channel submenu select TV Channel List with the pq buttons and press OK to enter. 2. Use the tu buttons to change channel group (assumed you have already set up favourite groups). 3. With the pq buttons select the channel you wish to watch. Press OK to watch the selected channel in full screen mode. 5.1.1.1 Edit Use this menu to lock, skip, delete or rename channels or add them to a favourite list. Press the numeric button 1 to enter the Edit menu. Highlight a channel with the pq buttons and press OK to select or press the numeric button 0 to select all channels. Selected channels will be marked. This way of selection can be executed for each of the edit functions. Favor:To add a channel or all channels to a favourite group, press the 1 button. Use the pq buttons to select a group and press OK. With tu select Yes in the 6 confirmation window and press OK to save. Selected channels will be marked with a folder symbol. Lock:Press 2 to lock one channel or all channels. Use tu to select Yes in the confirmation window and press OK to save. The selected channel/s will be marked with the symbol. Skip:Press 3 to skip one channel or all channels. Use tu to select Yes in the confirmation window and press OK to save. Selected channel/s will be marked with the symbol and will be skipped during channel zapping in full screen mode. Delete:Press 4 to delete one channel or all channels. Use tu to select Yes in the confirmation window and press OK to save. Rename:To rename a channel press the button 5. When all changes are made, press EXIT to leave the menu. 5.1.1.2 Find Press the button 2 to enter the Find menu. Use the pqtu buttons to highlight letters or numbers and press OK to insert. After each character, the channel list will search the channel according to your input and list the matching channel. Press EXIT to quit the Find mode. 5.1.1.3 Sort Press the button 3 to enter the Sort menu. Use the pq buttons to highlight the sorting option of your choice and press OK to confirm. Default: Sorting by searching order (from lowest to highest frequency). Name (A-Z): o: Sorting in alphabetical order. Name (Z-A): Sorting in alphabetical order. FTA: Free-To-Air channels will be first in the list. Lock: Unlocked channels will be listed first, followed by all locked channels. 5.1.1.4 Move Press the button 4 to activate the Move function. The selected channel will be marked with the symbol. Use the pq buttons to move the selected channel to its new position. Press OK, use tu to select Yes in the confirmation window and press 4 to save. 5.1.2 Radio Channel List The operation of the Radio Channel List is the same as of the TV Channel List. Since there is no video information in radio mode, the radio background will be displayed in the preview window on the right. 5.1.3 Delete all favourites and groups Use this menu to delete all favourite channels. Select Delete All Favourites with the pq buttons and press OK. Use tu to select Yes in the confirmation window and press OK to delete or select No to cancel. 7 English PART 1 • English PART 1 • English 5.1.4 Delete all Use this option to delete all channels. Select Delete All with pq and press OK, then enter the password (Default PIN: 0000). In the confirmation window select Yes with tu and press OK to delete or select No to cancel. 5.1.5 Rename group In this menu you can change the name of favourite groups. Use the pq buttons to select Group Rename and press OK to enter. 1. Select a group with pq and press OK. 2. Use the pqtu buttons to navigate the on screen keyboard. Highlighted characters can be inserted by pressing OK. After entering the new group name, highlight OK at the keyboard to confirm3. Press EXIT to cancel the group rename. 5.2 Installation 5.2.1 Auto Scan 1. Use the pq buttons to select Installation and press OK to enter the menu. 2. Use pq to select Auto Scan and press OK to enter the menu. 3. Change the Scan mode with tu. Use pq to highlight Search and press OK to start auto scan. 5.2.2 Channel Scan 1. 2. 3. 4. Use the pq buttons to select Installation and press OK to enter the menu. Select Channel Scan with pq and press OK to enter. Use the tu buttons to select scan mode – By Channel or By Frequency. When By Channel is selected use the cursor buttons to select Scan Band and Channel No. When By Frequency is selected use the cursor buttons to select Frequency and Bandwidth. Set Network Search to ON or OFF, highlight Search and press OK to start scanning. Found channels will be stored and the receiver will switch to the first channel in the list. 5.2.3 Antenna Setting Press MENU to enter the main menu. Use the pq buttons to select Installation and press OK to enter the menu. Select Antenna Setting with pq and press OK to enter. Use the tu buttons to change the setting. If On is selected, the receiver will provide 5 V antenna power (for active antennas). 5. Press EXIT button to exit. 1. 2. 3. 4. 5.2.4 LCN Mode If LCN (Logical Channel Numbering) is activated and LCN signal is provided by the operator, channels will be stored in the operator defined order. You can activate/deactivate the LCN function by setting the LCN Mode to ON or OFF. 8 PART 1 • English This menu allows you to set OSD Language, Subtitles preference, TV System, Region and Time, Timer Setting, OSD Setting and Parental Lock. 1. Use pq to highlight the menu of choice and press OK to proceed. Select an item with pq. Settings can be changed with the tu buttons. To get a better overview of the possible settings, press OK first. Now you can select settings with pq and confirm with OK. 2. Press the EXIT button to exit. 5.3.1 OSD Language This menu allows you to set the OSD Language. 5.3.2 Subtitles preference This menu allows you to set the preferred Subtitles Language and to switch Subtitles Type between Normal and Hard of Hearing. 5.3.3 TV System This menu allows to setup different settings concerning your TV set. Display Mode: PAL/NTSC/AUTO Aspect Ratio: Use this menu to configure the screen aspect. Possible settings are: 4:3PS (Pan&Scan), 4:3LB (Letter Box), 16:9 (Wide Screen) and AUTO. Use this menu to switch the video output mode between RGB and CVBS. Video Output: 5.3.4 Region and Time Here you can set your region and time zone. Region: This menu is used for changing the region setting. GMT Usage: This setting allows you to switch the usage of GMT time on or off. The options are: Off/User Define/By Region. GMT Offset: This menu is valid only when User Define is selected in GMT Usage menu. The GMT offset range is -11:30 ~ +12:00, increasing by half hours progressively. Date/Time: The Date and Time menus are valid only when Off is selected in GMT Usage menu. Press OK followed by numbers to change the date and time. Time Display: This menu allows to control whether the time is displayed on screen or not. The options are: Off/On. 5.3.5 Timer Setting In this menu you can set a programme timer or sleep timer. Programme timer Timer Number: You can set up to 8 timers Timer Mode: Off/Once/Daily/Weekly/Monthly Timer Service: TV Service/Radio Service Wake-up Channel: You can select any channel as wake-up channel. Month/Date/Day:Use pq to select the start month, date and day. 9 English 5.3 Setup PART 1 • English Time: Duration: Press OK to input the time with the numeric buttons. When you leave the programme timer, a saving window appears. Use tu to select Yes in the confirmation window and press OK to save or select No to cancel. Press OK to input the timer duration with the numeric buttons. Sleep Timer You can set the receiver to power OFF in 10 min, 30min, 60min, 90 min and 120 min automatically. 5.3.6 OSD Setting This menu allows you to change settings for: Subtitle Display, OSD Transparency and Load Default OSD Setting. Subtitle Display: To set the subtitle to Standard or OFF. To set the OSD transparency from Off ~ 50%. OSD Transparency: OSD Timeout: To define how long the information banner is to be shown (5S~10S) Load Default OSD Setting: To clear all OSD settings and reset to default value. 5.3.7 Parental Lock This menu allows you to protect the installation menu or channels with a password. You can also change the password here. When entering the menu you will be asked to input the password (Default PIN: 0000). Menu Lock: Locks the channel scan installation menus. You can set the menu lock to ON/ OFF. Channel Lock: Off/Manual/Age: 4 - Age: 18 New Password: Input your new password here to change the password. Confirm Password: Input your new password again to confirm the new password. 5.3.8 Auto Standby This option allows you to enable or disable Auto Standby. The default setting for Auto Standby is ON. The receiver will switch to standby automatically when it doesn’t receive commands from the remote control for three hours. To avoid the automatic switch off, set Auto Standby to OFF. 5.4 Tools Press MENU to enter the Main Menu. Select Tools with the pq buttons and press OK to enter. 1. Use pq to highlight the menu of choice and press OK to enter. 2. Press EXIT to leave. 5.4.1 Receiver Information This menu displays relevant receiver information like the receiver model, software version, signature, and our website www.strong.tv 1. In the Tools menu, select Receiver Information and press OK to open receiver information. 2. Press EXIT to leave. 10 PART 1 • English This menu allows you to play games (Tetris, Snake and Othello) on this receiver. 1. Select "Game” in the Tools menu and press OK to enter the game menu. 2. Use pq to select a game, and press OK to enter the game. Highlight Start and press OK to start the game. For changing levels highlight Setup and use the tu buttons. 3. Press EXIT to quit the game. NOTE: You can also press OK to pause playing. 5.4.3 Load Factory Default This option allows you to reset the receiver to factory settings, which clears all stored channels and settings. WARNING: This option will permanently delete all your settings and channel lists and set your receiver to factory default! Please use with caution. 1. Enter the Tools menu, select Load Factory Default and press the OK button. You are asked to input your password. 2. Input the correct password using the numeric buttons (Default PIN: 0000). A confirmation window will be displayed. 3. Select Yes to return back to the factory settings and clear all channels. Select No to cancel. 4. Press the EXIT button to exit. 5.4.4 Software Upgrade 1. Enter the Tools menu, select Software Upgrade and press the OK button. The Software Upgrade menu is shown. 2. Use pq to select Upgrade by Storage and press OK. You are asked to input a password. 3. Input the correct password (Default PIN: 0000). The Software Upgrade submenu will be opened. Then select the correct software file and press OK to start. A message will be displayed to confirm the update process. Select Yes to confirm or No to cancel. 4. Press the EXIT button to leave. Warning: After an update the receiver restarts automatically! During this process NEVER disconnect the receiver from the mains or switch OFF the power! This can damage your receiver and will void the warranty. Note: This receiver is equipped with an over the air update function, which might not be operational in your broadcast region. For further details visit our website www.strong.tv or contact your local Service line. 5.5 Media+ Select Media+ and press OK to enter the Media+ menu. 1. Press MENU to enter the main menu. Select Media+ and press OK to enter the menu. 2. Use pq to highlight the menu of choice and press OK to enter. 3. Press EXIT to leave Media+. 11 English 5.4.2 Game PART 1 • English Use the two button rows on the bottom of your remote control for player operation. A help screen showing how to use the buttons will be displayed on screen. 5.5.1 Media Player This function allows you to play MPEG-1 and MPEG-2 video, audio and photo files from a connected USB device. 1. In the Media+ menu, select Media Player and press OK to enter the menu. 2. Use pq to select an item, and press OK or u to play the files. 3. Press EXIT to quit. 5.5.2 Safely Remove Storage Device In the Media+ menu, select Safely Remove Storage Device and press OK to safely remove the USB device. A message indicating that the device can be removed will be displayed. 6.0 Operation We at STRONG understand that you can’t wait to enjoy your new digital terrestrial receiver. To turn your receiver ON or to Standby, use the q button on the remote control or on the front panel. Choose channels with the pq buttons. Alternatively, you can digit the channel number with the 0~9 buttons on the remote control or press OK in viewing mode to display the channel list. The volume can be adjusted with the tu buttons. 6.1 Changing Channels There are 4 ways of channel selection: stepping through the channel list, selection by number, from the on-screen channel list and using the Electronic Programme Guide (EPG). Stepping through the channel list To move through the channel list, use the pq buttons on the remote control. Selection by direct channel number input Enter the channel number directly by using the numeric buttons, and press the OK button to select the channel. Selection by on screen channels list You can also select a channel directly from the on screen channel list. To call up the channel list, press OK in viewing mode. Alternatively, the list can be displayed using the receiver’s main menu. See chapter 5.1.1 TV Channel list in this manual for operation details. Selection via EPG You can also select a channel directly from the Electronic Programme Guide (EPG). To display the EPG, press EPG on the remote control. See chapter 6.2 below for details. 12 PART 1 • English 1. Press EPG to enter the EPG menu. 2. Use the numeric button 2 to switch the highlight between channel list, events schedule of the selected channel and now/next events. 3. In the event schedule, press the numeric button 3 to book a timer for the highlighted event. Press OK to open the Detail menu for the selected event. 4. Press the numeric button 1 to open the booking list menu. 6.3 Accessing the favourite channels 1. In viewing mode, press FAV to enter the favourite group menu. 2. Use pq to select a favourite group. 3. Press OK to enter the favourite channels list and use pq to select a channel. 7.0 Trouble Shooting There may be various reasons for abnormal operation of the receiver. Check the receiver according to the procedures shown below. If the receiver does not work properly after checking it, please contact your local service line or STRONG dealer. Alternatively you can send a support mail via our website: www.strong.tv. DO NOT open the receiver cover. It may cause a dangerous situation and will void the warranty. Problem Possible cause What to do LED indicator not lit Mains lead unplugged Check mains plug No signal found Aerial is disconnected Aerial is damaged/misaligned Out of digital signal area Active antenna requires to switch ON antenna power/ external power Check aerial lead Check aerial Check with dealer Switch receiver’s Antenna Power ON/ connect external power No picture or sound on TV Scart/ AV is not selected on your TV TV is not switched on Switch to correct TV input Switch TV on Scrambled channel message Channel is scrambled Select alternative channel No response to remote Receiver off control Remote not aimed correctly Front panel obstructed Remote batteries exhausted Plug in and turn on plug Aim remote at front panel Check for obstructions Replace remote batteries Forgotten PIN code Contact local Service Hotline or send email to our Support via www.strong.tv 13 English 6.2 Accessing the Electronic Programme Guide (EPG) PART 1 • English Problem Possible cause What to do After moving the receiver to another room / area you are no longer able to receive digital reception Antenna signals are too weak Press the INFO button on remote 3x to call up signal bars and adjust antenna for (maximum) reception or rescan channels The receiver switches off automatically. Auto Standby function enabled. Disable auto standby. See section 5.3.8 for details. 8.0 Specifications Demodulator Demodulator: Transmission mode: COFDM; 16 QAM/64 QAM 2K-8K Video Decoder Profile level: Video resolution: Decoding & Video Out: Aspect ratio: MPEG2 MP@ML 720 x 576 pixels (PAL), 720 x 480 (NTSC) PAL & NTSC 4:3, 16:9 Audio Decoder MPEG MusiCam Layer II Sampling rate: Audio mode: 32, 44.1, 48 KHz Stereo, Joint Stereo, Dual Mono, Mono Tuner Front End: Input frequency range: Loop through frequency range: Input signal level: DVB-T, UHF & VHF Tuner 174 ~ 230 MHz (VHF) and 470 ~ 862 MHz (UHF) 47 ~ 862 MHz -20 ~ -82 dBm Multimedia Video playback: Audio playback: Picture view: MPEG-1 and MPEG-2 encoded (mpg)* MP3 and WMA* JPEG and BMP* Memory and System Flash memory: SDRAM: 1 MB 8 MB *STRONG cannot guarantee the playback of files although extensions are listed, as it depends on codec used, data bit rate and resolution (all MPEG codec formats are supported). 14 PART 1 • English General Data Supply voltage: Power consumption: Power consumption in standby: Operating temperature: Storage temperature: Operating humidity range: Size (WxDxH) in mm: Net-weight: English Connectors ANT IN - IEC Female ANT OUT - IEC Male TV SCART (RGB, CVBS) S/PDIF: coaxial output USB 1.1 port, max. 5 V/ 500 mA 220 - 240 V AC (SMPS), 50/60 Hz 3.13 W (typ.), 8 W (max) max. 0.5 W 0 ~ +40 °C -10 ~ +50 °C 10~85%, RH, Non-condensing 138 x 112 x 40 0.315 kg 15 PART 1 • English 16