Transcript
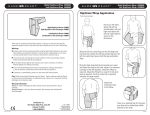
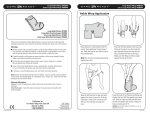
Medium Right #530422 ª Large Right #530432 Medium Left #530424 Medium Right #530422 ª Large Left #530434 Medium Left #530424 Large Right #530432 Large Left #530434 Shoulder Wrap Application (Right Shoulder Wrap illustrated) Medium Right Shoulder Sleeve: #510422 Large Right Shoulder Sleeve: #510432 *Right Shoulder Heat Exchanger: #520422 *fits both sleeve sizes Thank you for choosing the Game Ready System. To assure you have the best possible experience please be sure to read the entire User’s Manual prior to the use of this product. connector armhole Step 1: Attach the elastic strap to make the armhole. Medium Left Shoulder Sleeve: #510424 Large Left Shoulder Sleeve: #510434 *Left Shoulder Heat Exchanger: #520424 *fits both sleeve sizes Warnings Step 2: Next, slide your arm through the armhole. The connector should hang alongside your arm. You may prefer to connect the hose before putting on the Wrap. Always consult with your physician before using the Game Ready System for any injury. Your physician can determine whether or not the System is appropriate for your injury, and can provide advice on how to best use the System to treat your injury. If used incorrectly, cold therapy can cause frostbite or other tissue damage. Always follow the protocol provided by your physician. Do not place directly against open wounds, sores, rashes, infections, or stitches. May be applied over clothing or dressing. If use of the Game Ready System causes increased pain, swelling, discoloration or loss of sensation, discontinue use and consult with your physician. If pressure is uncomfortable, pause unit, and restart with lower pressure. Caution: Federal law restricts this device to sale or dispensing by or on the order of a licensed healthcare practitioner. Care: Gently remove heat exchanger from the sleeve. Hand or machine wash the sleeve in warm water and mild detergent, or antibacterial soap. Hang to dry. Hand wash the heat exchanger, do not machine wash. Periodically run hydrogen peroxide through your Game Ready System to keep the interior of your wrap clean. Cold sterilization only. Step 3: Reach under your arm that is in the Wrap, grab the strap and pull it to the front of the Wrap and fasten near underarm on chest. Note: For maximum cooling, place Wrap against bare skin. Step 4: Grab the large strap hanging down your back and pull it across your chest on the opposite side of the Wrap and fasten securely to the front of the Wrap. (Larger chest may need the built-in chest extension) Warranty Information: Sleeve: In case of manufacturer defect, sleeve may be returned within 7 days of purchase. Heat Exchanger: 1 year from date of purchase. See warranty card included with Heat Exchanger. CoolSystems, Inc. 2201 Dwight Way Berkeley, CA 94704 1.888.GAMEREADY Caution: Do not open zipper while Wrap is in use, or applied to the body. 701193 rev B Game Ready 2006 Shoulder Wrap = Medium Right #530422 ª Medium Left #530424 (Right Shoulder Wrap illustrated) Shoulder Sleeve + Large Right #530432 Large Left #530434 Shoulder Heat Exchanger Arm Sling Attachment (included but optional) fig. 1 Place Sleeve on flat surface with logo side up and open the zipper. You may prefer to drape it over your knee to insert, as the Wrap has a curve to it. For shoulder injuries that require limited mobility during treatment, an optional elastic sling is included for your use. Simply attach the snaps of the sling at the bottom edge of the front of the Sleeve, and attach the fastener end at a comfortable location on the chest area. fig. 2 Insert Heat Exchanger into the Sleeve with blue side of the Heat Exchanger down (Blue side of Heat Exchanger should lay against blue side of Sleeve). Chest Extension (included but optional) For your convenience, the front chest strap of your Shoulder Sleeve has a built-in chest extension for larger chest sizes. This fold-away extension tucks into a pocket when not needed. The additional panel offers an extra 5 inches of length. fig. 3 Make sure the Heat Exchanger is flat inside the Sleeve with no folds or creases. Zip up the Sleeve. After assembly, lay the blue side of the Sleeve up, make sure the Wrap is smooth against the inside of the Sleeve. This drawing embodies a proprietary design originated by COOLSYSTEMS, INC. and all design, manufacuring, reproduction (excepting where the recipient has been given the express right by written agreementto reproduce the drawing), and use sale rights regarding the same are expressly reserved. It is submitted under a confidential relationship for a specific purpose, and the recipient agrees by accepting this drawing not to supply or disclose any information regarding it to any unauthorized person, or to incorporate in other projects any special features peculiar to this design. All rights are expressly reserved by COOLSYSTEMS, INC., Berkeley, California REVISION DCO# A B 564 699 DESCRIPTION DATE EFFECTIVE 03-08-06 04-10-07 INITIAL RELEASE UPDATES/WARNINGS PRINTING INSTRUCTIONS: PAPER QUALITY: 60-90 LB PLAIN WHITE BOND FINISHED PAPER SIZE: 8.5" X 11" PRINTED BOTH SIDES INK: BLACK 1/1 CUT/ FOLD/ BIND: FOLDED I/2 TO FINISH 5.5"X 8.5" ADDITIONAL SPECIFICATIONS: DELIVER IN BOXES OF NO LESS THAN 200 PER BOX INTERPRET DIMENSIONS AND TOLERANCE PER ANSI/ASME Y14.5m-1994 2201 DWIGHT WAY, BERKELEY, CA 94704 (510) 868-2100 See Notes USE GUIDE, SHOULDER WRAP UNLESS OTHERWISE SPECIFIED DIMENSIONS ARE IN INCHES A Printed T. SCHIRRMACHER 1/12/06 701193 1:1 B 3 OF 3