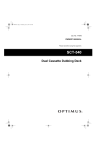
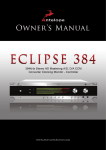
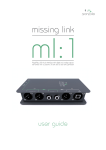
1
AC Signal Analysis Using Models 2015, 2015-P, and 2016 THD Multimeters Quick Reference Guide A GREATER MEASURE OF CONFIDENCE WARRANTY Keithley Instruments, Inc. warrants this product to be free from defects in material and workmanship for a period of 3 years from date of shipment. Keithley Instruments, Inc. warrants the following items for 90 days from the date of shipment: probes, cables, rechargeable batteries, diskettes, and documentation. During the warranty period, we will, at our option, either repair or replace any product that proves to be defective. To exercise this warranty, write or call your local Keithley representative, or contact Keithley headquarters in Cleveland, Ohio. You will be given prompt assistance and return instructions. Send the product, transportation prepaid, to the indicated service facility. Repairs will be made and the product returned, transportation prepaid. Repaired or replaced products are warranted for the balance of the original warranty period, or at least 90 days. LIMITATION OF WARRANTY This warranty does not apply to defects resulting from product modification without Keithley’s express written consent, or misuse of any product or part. This warranty also does not apply to fuses, software, non-rechargeable batteries, damage from battery leakage, or problems arising from normal wear or failure to follow instructions. THIS WARRANTY IS IN LIEU OF ALL OTHER WARRANTIES, EXPRESSED OR IMPLIED, INCLUDING ANY IMPLIED WARRANTY OF MERCHANTABILITY OR FITNESS FOR A PARTICULAR USE. THE REMEDIES PROVIDED HEREIN ARE BUYER’S SOLE AND EXCLUSIVE REMEDIES. NEITHER KEITHLEY INSTRUMENTS, INC. NOR ANY OF ITS EMPLOYEES SHALL BE LIABLE FOR ANY DIRECT, INDIRECT, SPECIAL, INCIDENTAL OR CONSEQUENTIAL DAMAGES ARISING OUT OF THE USE OF ITS INSTRUMENTS AND SOFTWARE EVEN IF KEITHLEY INSTRUMENTS, INC., HAS BEEN ADVISED IN ADVANCE OF THE POSSIBILITY OF SUCH DAMAGES. SUCH EXCLUDED DAMAGES SHALL INCLUDE, BUT ARE NOT LIMITED TO: COSTS OF REMOVAL AND INSTALLATION, LOSSES SUSTAINED AS THE RESULT OF INJURY TO ANY PERSON, OR DAMAGE TO PROPERTY. Keithley Instruments, Inc. 28775 Aurora Road • Cleveland, Ohio 44139 • 440-248-0400 • Fax: 440-248-6168 1-888-KEITHLEY (534-8453) • www.keithley.com Sales Offices: Bergensesteenweg 709 • B-1600 Sint-Pieters-Leeuw • 02-363 00 40 • Fax: 02/363 00 64 Yuan Chen Xin Building, Room 705 • 12 Yumin Road, Dewai, Madian • Beijing 100029 • 8610-6202-2886 • Fax: 8610-6202-2892 Tietäjäntie 2 • 02130 Espoo • Phone: 09-54 75 08 10 • Fax: 09-25 10 51 00 3, allée des Garays • 91127 Palaiseau Cédex • 01-64 53 20 20 • Fax: 01-60 11 77 26 Landsberger Strasse 65 • 82110 Germering • 089/84 93 07-40 • Fax: 089/84 93 07-34 Unit 2 Commerce Park, Brunel Road • Theale • Berkshire RG7 4AB • 0118 929 7500 • Fax: 0118 929 7519 Flat 2B, Willocrissa • 14, Rest House Crescent • Bangalore 560 001 • 91-80-509-1320/21 • Fax: 91-80-509-1322 Viale San Gimignano, 38 • 20146 Milano • 02-48 39 16 01 • Fax: 02-48 30 22 74 New Pier Takeshiba North Tower 13F • 11-1, Kaigan 1-chome • Minato-ku, Tokyo 105-0022 • 81-3-5733-7555 • Fax: 81-3-5733-7556 FL., URI Building • 2-14 Yangjae-Dong • Seocho-Gu, Seoul 137-130 • 82-2-574-7778 • Fax: 82-2-574-7838 Postbus 559 • 4200 AN Gorinchem • 0183-635333 • Fax: 0183-630821 c/o Regus Business Centre • Frosundaviks Allé 15, 4tr • 169 70 Solna • 08-509 04 679 • Fax: 08-655 26 10 Kriesbachstrasse 4 • 8600 Dübendorf • 01-821 94 44 • Fax: 01-820 30 81 1FL., 85 Po Ai Street • Hsinchu, Taiwan, R.O.C. • 886-3-572-9077• Fax: 886-3-572-9031 BELGIUM: CHINA: FINLAND: FRANCE: GERMANY: GREAT BRITAIN: INDIA: ITALY: JAPAN: KOREA: NETHERLANDS: SWEDEN: SWITZERLAND: TAIWAN: 2/02 AC Signal Analysis Using Models 2015, 2015-P, and 2016 THD Multimeters Quick Reference Guide ©2001, Keithley Instruments, Inc. All rights reserved. Cleveland, Ohio, U.S.A. First Printing, December 2001 Document Number: 2015-903-01 Rev. A Manual Print History The print history shown below lists the printing dates of all Revisions and Addenda created for this manual. The Revision Level letter increases alphabetically as the manual undergoes subsequent updates. Addenda, which are released between Revisions, contain important change information that the user should incorporate immediately into the manual. Addenda are numbered sequentially. When a new Revision is created, all Addenda associated with the previous Revision of the manual are incorporated into the new Revision of the manual. Each new Revision includes a revised copy of this print history page. Revision A (Document Number 2015-903-01) ....................................................... December 2001 All Keithley product names are trademarks or registered trademarks of Keithley Instruments, Inc. Other brand names are trademarks or registered trademarks of their respective holders. Safety Precautions The following safety precautions should be observed before using this product and any associated instrumentation. Although some instruments and accessories would normally be used with non-hazardous voltages, there are situations where hazardous conditions may be present. This product is intended for use by qualified personnel who recognize shock hazards and are familiar with the safety precautions required to avoid possible injury. Read and follow all installation, operation, and maintenance information carefully before using the product. Refer to the manual for complete product specifications. If the product is used in a manner not specified, the protection provided by the product may be impaired. The types of product users are: Responsible body is the individual or group responsible for the use and maintenance of equipment, for ensuring that the equipment is operated within its specifications and operating limits, and for ensuring that operators are adequately trained. Operators use the product for its intended function. They must be trained in electrical safety procedures and proper use of the instrument. They must be protected from electric shock and contact with hazardous live circuits. Maintenance personnel perform routine procedures on the product to keep it operating properly, for example, setting the line voltage or replacing consumable materials. Maintenance procedures are described in the manual. The procedures explicitly state if the operator may perform them. Otherwise, they should be performed only by service personnel. Service personnel are trained to work on live circuits, and perform safe installations and repairs of products. Only properly trained service personnel may perform installation and service procedures. Keithley products are designed for use with electrical signals that are rated Installation Category I and Installation Category II, as described in the International Electrotechnical Commission (IEC) Standard IEC 60664. Most measurement, control, and data I/O signals are Installation Category I and must not be directly connected to mains voltage or to voltage sources with high transient over-voltages. Installation Category II connections require protection for high transient over-voltages often associated with local AC mains connections. Assume all measurement, control, and data I/O connections are for connection to Category I sources unless otherwise marked or described in the Manual. Exercise extreme caution when a shock hazard is present. Lethal voltage may be present on cable connector jacks or test fixtures. The American National Standards Institute (ANSI) states that a shock hazard exists when voltage levels greater than 30V RMS, 42.4V peak, or 60VDC are present. A good safety practice is to expect that hazardous voltage is present in any unknown circuit before measuring. Operators of this product must be protected from electric shock at all times. The responsible body must ensure that operators are prevented access and/or insulated from every connection point. In some cases, connections must be exposed to potential human contact. Product operators in these circumstances must be trained to protect themselves from the risk of electric shock. If the circuit is capable of operating at or above 1000 volts, no conductive part of the circuit may be exposed. Do not connect switching cards directly to unlimited power circuits. They are intended to be used with impedance limited sources. NEVER connect switching cards directly to AC mains. When connecting sources to switching cards, install protective devices to limit fault current and voltage to the card. Before operating an instrument, make sure the line cord is connected to a properly grounded power receptacle. Inspect the connecting cables, test leads, and jumpers for possible wear, cracks, or breaks before each use. When installing equipment where access to the main power cord is restricted, such as rack mounting, a separate main input power disconnect device must be provided, in close proximity to the equipment and within easy reach of the operator. For maximum safety, do not touch the product, test cables, or any other instruments while power is applied to the circuit under test. ALWAYS remove power from the entire test system and discharge any capacitors before: connecting or disconnecting cables or jumpers, installing or removing switching cards, or making internal changes, such as installing or removing jumpers. Do not touch any object that could provide a current path to the common side of the circuit under test or power line (earth) ground. Always make measurements with dry hands while standing on a dry, insulated surface capable of withstanding the voltage being measured. The instrument and accessories must be used in accordance with its specifications and operating instructions or the safety of the equipment may be impaired. Do not exceed the maximum signal levels of the instruments and accessories, as defined in the specifications and operating information, and as shown on the instrument or test fixture panels, or switching card. When fuses are used in a product, replace with same type and rating for continued protection against fire hazard. Chassis connections must only be used as shield connections for measuring circuits, NOT as safety earth ground connections. If you are using a test fixture, keep the lid closed while power is applied to the device under test. Safe operation requires the use of a lid interlock. If a The screw is present, connect it to safety earth ground using the wire recommended in the user documentation. ! symbol on an instrument indicates that the user should refer to the operating instructions located in the manual. The symbol on an instrument shows that it can source or measure 1000 volts or more, including the combined effect of normal and common mode voltages. Use standard safety precautions to avoid personal contact with these voltages. The WARNING heading in a manual explains dangers that might result in personal injury or death. Always read the associated information very carefully before performing the indicated procedure. The CAUTION heading in a manual explains hazards that could damage the instrument. Such damage may invalidate the warranty. Instrumentation and accessories shall not be connected to humans. Before performing any maintenance, disconnect the line cord and all test cables. To maintain protection from electric shock and fire, replacement components in mains circuits, including the power transformer, test leads, and input jacks, must be purchased from Keithley Instruments. Standard fuses, with applicable national safety approvals, may be used if the rating and type are the same. Other components that are not safety related may be purchased from other suppliers as long as they are equivalent to the original component. (Note that selected parts should be purchased only through Keithley Instruments to maintain accuracy and functionality of the product.) If you are unsure about the applicability of a replacement component, call a Keithley Instruments office for information. To clean an instrument, use a damp cloth or mild, water based cleaner. Clean the exterior of the instrument only. Do not apply cleaner directly to the instrument or allow liquids to enter or spill on the instrument. Products that consist of a circuit board with no case or chassis (e.g., data acquisition board for installation into a computer) should never require cleaning if handled according to instructions. If the board becomes contaminated and operation is affected, the board should be returned to the factory for proper cleaning/servicing. 11/01 2015-16 GuideTOC.fm Page 1 Thursday, December 6, 2001 8:44 PM Table of Contents About this guide ............................................................................ 1 Measurements overview ................................................................ 2 Harmonic distortion measurement ......................................... 2 AC volts and frequency measurements .................................. 2 Frequency spectrum analysis (Model 2015-P only) .............. 2 Measuring harmonic distortion ..................................................... 3 Harmonic distortion calculations: .......................................... 3 THD — Total harmonic distortion .................................. 3 THD+N — Total harmonic distortion plus noise ........... 3 SINAD ............................................................................ 4 Distortion measurement operations ....................................... 4 Distortion measurement notes ...................................... 10 Distortion measurement examples ....................................... 11 THD measurement example ......................................... 11 Distortion and RMS volts sweep example .................... 12 Measuring AC volts and frequency ............................................. 14 Analyzing frequency spectrum (Model 2015-P only) ................. 15 Frequency spectrum ............................................................. 16 Frequency bins .............................................................. 16 Frequency boundaries ................................................... 16 Basic peak analysis .............................................................. 16 MAX? and NEXT? commands ..................................... 16 SFR <freq> and LOC? commands ............................... 18 LEFT? and RIGHT? commands ................................... 19 Peak analysis example .................................................. 20 Delta function ....................................................................... 22 Acquiring reference frequency and amplitude .............. 22 Move frequency pointer and calculate delta ................. 22 Delta function example ................................................. 23 Frequency list analysis ......................................................... 24 Creating frequency list .................................................. 24 Returning amplitudes for listed frequencies ................. 25 Frequency list example ................................................. 25 Programming examples ............................................................... 26 Programming sine wave source ........................................... 26 Measuring THD, THD+noise, or SINAD. ........................... 27 RMS voltage measurement .................................................. 28 Bandwidth-limited RMS voltage measurement ................... 29 Background noise measurement .......................................... 30 Fast frequency sweep RMS voltage measurements ............. 31 Frequency domain components ........................................... 32 Measurement of individual harmonics ................................. 33 Peak measurements .............................................................. 34 Measuring differences between two peaks .......................... 35 2015-16 GuideLOF.fm Page 1 Thursday, December 6, 2001 8:45 PM List of Illustrations Figure 1 Figure 2 Figure 3 Figure 4 Figure 5 Figure 6 Figure 7 Source connections to input ...................................................... Frequency spectrum example ................................................... Peak analysis example using MAX? and NEXT? commands .. Peak analysis example using SFR and LOC? commands ........ Peak analysis example using RIGHT? command ..................... DELTA? peak analysis example ............................................... Connections to double generator amplitude ............................. 11 16 17 18 19 23 26 AC Signal Analysis Using Models 2015, 2015-P, and 2016 THD Multimeters About this guide This guide is designed to familiarize users with basic Model 2015/2015-P/2016 operations to analyze an AC input signal. Operations include harmonic distortion measurements, standard AC volts and frequency measurements, and frequency spectrum analysis (Model 2015-P only). This guide covers front panel operation and remote operation over the GPIB or RS-232. The SCPI commands provided are generic; actual syntax depends on the test programming language being used. Information in this guide is organized as follows: • • • • Measurements overview – Summarizes the measurements used to analyze an AC input signal. Measuring harmonic distortion: Harmonic distortion calculations – Shows how harmonic distortion is calculated for the three measurement types; THD, THD + noise, and SINAD. Distortion measurement operations – Covers the various operations (front panel and remote commands) used to configure and measure distortion. Distortion measurement examples – Includes an example to measure total harmonic distortion (THD), and an example that uses a source sweep to measure distortion and RMS volts. Measuring AC volts and frequency – Provides the basic procedure to measure AC volts or frequency. Analyzing frequency spectrum (Model 2015-P only): Basic peak analysis – Covers the commands used to measure the peak amplitudes of the frequencies in the spectrum. Includes a remote command sequence example to find and measure the frequencies that have the three highest amplitudes. Delta function – Covers the commands to measure the difference in frequency and amplitude between two frequency pointer positions. Includes a command sequence example. Frequency list analysis – Covers the commands to create a frequency list and return the amplitudes of the listed frequencies. Includes a command sequence example. 2 Using Models 2015, 2015-P, and 2016 THD Multimeters Measurements overview Harmonic distortion measurement The Model 2015/2015-P/2016 uses a DSP (Digital Signal Processor) to perform a Fast Fourier Transform (FFT) on a voltage signal applied to the front or rear voltage inputs. It then analyzes the levels of the harmonics present in the signal to calculate THD, THD+noise, SINAD, or RMS volts. The instrument can measure harmonic distortion from 20Hz to 50kHz. A DDS (Direct Digital Synthesis) module is included in the THD circuitry to provide a programmable sine source. The source has a second output which can be set to provide the inverse of the sine output (shifted 180 degrees), or to put out a 0-5V logic level pulse in phase with the main output. A sweep feature enables the user to program a list of up to 200 sweep frequencies and amplitudes, then have the unit return distortion and/or RMS volts for each frequency. AC volts and frequency measurements The Model 2015/2015-P/2016 can measure true RMS AC voltage from 0.1µV to 750V (1000V peak). It can also measure frequency from 3Hz to 500kHz. Frequency spectrum analysis (Model 2015-P only) Using remote command programming, the Model 2015-P can measure the amplitudes of frequencies in a spectrum. The lower bound for the frequency spectrum can be set as low as 20Hz, while the upper bound can be set as high as 20480Hz. The 20Hz and 20480Hz boundaries are the default settings. The Model 2015-P can perform the following operations: • • • Determine the amplitude for any individual frequency in the spectrum. Values are returned for the frequency (in Hz) and the amplitude (in dBV). Calculate the difference in frequency and amplitude between two different frequencies. The results of the calculation are returned in Hz and dBV. Determine the amplitudes of a specified list of frequencies. Frequency/amplitude pairs are returned for every frequency in the list. Using Models 2015, 2015-P, and 2016 THD Multimeters 3 Measuring harmonic distortion Harmonic distortion calculations: THD — Total harmonic distortion THD is the default type for the THD measurement and is defined as follows: 2 2 2 V2 + V3 + ... + Vi THD% = 100* --------------------------------------------------------V1 Where V2 through Vi represent the RMS levels of the harmonics of the signal, and V1 is the RMS level of the fundamental frequency. THD can also be expressed in dB, as follows: V2 2 + V3 2 + ... + Vi 2 THD ( dB ) = 20*log --------------------------------------------------------- V1 THD+N — Total harmonic distortion plus noise THD+N is what conventional (analog) THD meters display. A conventional THD meter has a notch filter that removes the fundamental frequency from the signal, and measures THD based on what is left. This includes all of the harmonics, but also includes any random noise in the signal. Since the instrument uses a digital signal processor to perform a Fourier transform on the signal, noise can be eliminated from the THD measurement, thus providing a true reading. The THD+noise feature was included to duplicate what a conventional THD meter would read. Mathematically, THD+noise is expressed as follows: V2 2 + V3 2 + ... + Vi 2 + N 2 THD + Noise ( dB ) = 20*log ---------------------------------------------------------------------- V1 Where N is the RMS level of the noise in the signal. THD+noise can also be expressed in percent. 4 Using Models 2015, 2015-P, and 2016 THD Multimeters SINAD This is another way of expressing THD+noise. It is expressed as the ratio of the total signal (fundamental, noise, and harmonics) to the total signal minus the fundamental. This measurement is only expressed in dB. 2 2 2 2 2 V1 + V2 + V3 + ... + Vn + N SINAD ( dB ) = 20*log ---------------------------------------------------------------------------------------- 2 2 2 2 V2 + V3 + ... + Vn + N Distortion measurement operations 1 Selecting distortion mode Front panel: Press SHIFT and then ACV Remote command: :SENS:FUNC "DIST" 2 ' Selects distortion mode. Selecting THD measurement type (THD, THD+Noise or SINAD) Front panel: a. b. c. Press THD-MEAS to display “TYPE:”. Use the right arrow key to highlight the present type selection, then use the up or down range keys to select THD, THD+N or SINAD. Press ENTER, then press EXIT. Remote command: :SENS:DIST:TYPE THD|THDN|SINAD 3 ' Selects THD measurement type. Selecting THD frequency type (Auto, Set, or Acquire) The THD measurement technique used by the Model 2015/2015-P/2016 requires that the unit know the fundamental frequency of the signal exactly. Even a difference of a few hertz will cause large errors. The AUTO setting will cause the Model 2015/2015-P/2016 to measure the frequency of a source every time it makes a THD measurement. This will slow down the reading rate, but is useful if the source frequency is unknown or unstable. SET will prompt the user to manually enter the frequency. ACQUIRE is similar to AUTO, but only measures the frequency once, then uses that frequency for all subsequent THD measurements. The signal source must be applied to the input when ACQUIRE is selected. Using Models 2015, 2015-P, and 2016 THD Multimeters 5 Front panel: a. b. c. d. e. Press THD-MEAS. Press ENTER once. The display will show “FREQ:”. Using the left/right arrow and up/down range keys, select ACQUIRE, AUTO, or SET. (Make sure the signal source is connected and on when ACQUIRE is selected.) Press ENTER. If SET was selected, the instrument will prompt the user for the frequency to be used. Use the left/right arrow and up/down range keys to set the frequency, and press ENTER. Press EXIT. Remote commands: :SENS:DIST:FREQ:AUTO ON|OFF :SENS:DIST:FREQ:ACQ :SENS:DIST:FREQ <NRf> 4 ' ' ' ' ' Turns AUTO on or off. Acquires frequency once. Sets frequency in Hz; disables AUTO frequency (if enabled). <NRf> = 20 to 20000 Setting number of harmonics to use in the THD measurement (2 to 64) The Model 2015/2015-P/2016 can use up to the 64th harmonic of a signal (64 times the fundamental frequency) in the THD measurement, but only recognizes frequencies below 50kHz. Harmonics with frequencies above 50kHz are ignored, therefore acting as an adjustable lowpass filter. Front panel: a. b. c. d. Press THD-MEAS. Press ENTER until the display shows “HARMONICS:”. Set the number of the highest harmonic to use in the measurement using the left/right arrow and up/down range keys. Press ENTER, and then press EXIT. Remote command: :SENS:DIST:HARM <NRf> ' Sets the number of harmonics to ' include in the THD measurement. ' <NRf> = 2 to 64 6 Using Models 2015, 2015-P, and 2016 THD Multimeters 5 Selecting THD measurement units (percent or dB) Front panel: a. b. c. d. Press THD-MEAS. Press ENTER until the display shows “UNITS:”. Select PERCENT or dB using the left/right arrow and up/down range keys. Press ENTER, and then EXIT. Remote command: :UNIT:DIST PERC|DB 6 ' Selects percent or dB units for THD. Selecting the THD shaping filter (None, C-weighting, CCITT, CCIRARM, A-weighting, or CCIR). The Model 2015/2015-P/2016 includes digital shaping filters to simulate having the sample signal pass through various types of telephone lines. The default filter setting is NONE. Front panel: a. b. c. d. Press THD-MEAS. Press ENTER until the display shows “SFIL:”. Select NONE, C, CCITT, CCIRARM, A, or CCIR using the left/right arrow and up/ down range keys. Press ENTER. Remote command: :SENS:DIST:SFIL NONE|C|CCITT|CCIRARM|A|CCIR 7 ' Selects shaping ' filter for THD. Setting the THD voltage input range The Model 2015/2015-P/2016 defaults to autoranging for the voltage input range. If using manual ranging, it is important to use the lowest range possible for the signal level. Not using the appropriate range will cause inaccurate readings, or the display may show “underflow” or “overflow”. Front panel: With the instrument in the THD mode, press the up range or down range key. The display will show the chosen range. Otherwise, press AUTO for autoranging. Remote commands: :SENS:DIST:RANG <n> :SENS:DIST:RANG:AUTO ON|OFF ' ' ' ' Specify expected voltage to set range; turns off autoranging. <n> = 0 to 757.5 Turns autoranging on or off. Using Models 2015, 2015-P, and 2016 THD Multimeters 8 7 Configuring the internal sine source The Model 2015/2015-P provides a 10Hz-20kHz, 0-4V (or 0-2V into a 50Ω or 600Ω load) sine source. The Model 2016 provides a 10Hz-20kHz, 0-9.5V (or 0-2V into a 50Ω or 600Ω load) sine source. This source can be used to evaluate amplifiers, filters, etc., or can be connected directly to the Model 2015/2015-P/2016 input. This source has a selectable 600Ω, 50Ω, or HI-Z output impedance, and is unbalanced (coaxial). A second output provides a selectable inverted sine (opposite in phase to the main output), or a 0-5V logic level pulse in phase with the main output having the same frequency. Front panel: a. b. c. d. e. f. Press SRC-THD. When the display shows “SINE OUT:”, use the left/right arrow and up/down range keys to select ON, then press ENTER. When the display shows “FREQ:”, use the left/right arrow and up/down range keys to select the frequency (.01 to 20 k), then press ENTER. When the display shows “IMPEDANCE:”, use the left/right arrow and up/down range keys to select 50, 600, or HI-Z, then press ENTER. When the display shows “AMPL:”, use the left/right arrow and up/down range keys to set the amplitude (0 to 2V for 50 and 600 ohms, 0 to 4V for 2015/2015-P HI-Z, 0 to 9.5V for 2016 HI-Z), then press ENTER. (Note: for 600 and 50Ω impedances, the actual no-load voltage at the output will be twice the selected value.) When the display shows “CHAN2:”, use the left/right arrow and up/down range keys to select the mode for the second source output. Select either an inverted sine (ISINE) or square wave (PULSE), and press ENTER. Remote commands: :OUTP ON|OFF :OUTP:FREQ <NRf> :OUTP:IMP OHM50|OHM600|HIZ :OUTP:AMPL <NRf> :OUTP:CHAN2:SHAP ISINE|PULSE ' ' ' ' ' ' ' ' ' Turns output on or off. Sets frequency (in Hz) of source. <NRf> = 20 to 20000 Sets output impedance. Sets amplitude (in volts) of source. <NRf> = 0 to 4 (2015/2015-P HI-Z) = 0 to 9.5 (2016 HI-Z) = 0 to 2 (OHM50 or OHM600) Sets the channel 2 mode. 8 Using Models 2015, 2015-P, and 2016 THD Multimeters 9 Retrieving magnitudes of individual harmonics (remote operation only) The Model 2015/2015-P/2016 can return the levels of individual harmonics (relative to the level of the fundamental, in dB) over GPIB or RS-232. The arguments for this command are given as the starting harmonic and ending harmonic. Specifying 2,2 for the start and end harmonics will return the level of the second harmonic (twice the fundamental frequency). The harmonic levels returned correspond to the last triggered reading, and the unit has to be set for one-shot readings (:INIT:CONT off). Remote command: :SENS:DIST:HARM:MAGN? <start>,<end> NOTE ' ' ' ' Queries levels from starting harmonic to ending harmonic. <start> = 2 to 64 <end> = 2 to 64 To query the level of one harmonic, use the same harmonic number for both <start> and <end>. 10 Retrieving RMS volts, THD+N, or THD for an acquired reading (remote operation only) Once a single reading has been triggered, the corresponding RMS volts value, THD+Noise value, or THD value can be read for the same set of data, regardless of what distortion mode the unit is set for. SINAD can be calculated from the THD+noise reading. Remote commands: NOTE These commands only work if the unit is set to trigger one reading at a time (:INIT:CONT OFF). Errors will occur if the unit is continuously updating. :SENS:DIST:RMS? :SENS:DIST:THDN? :SENS:DIST:THD? ' ' ' ' ' ' Returns the calculated RMS volts value for the last triggered reading. Returns the THD+noise reading for the last triggered reading. Returns the THD reading (number of harmonics to use was set in Step 4). 11 Configuring and running internal sweep (remote operation only) The internal source of the Model 2015/2015-P/2016 can be set to sweep through up to 200 frequencies, and then return distortion and/or RMS volts for each frequency. The results of the sweep can be returned using the SREAL data format (fastest), or in ASCII (default). The sweep uses the current distortion measurement settings. The sweep must be allowed to complete before requesting the data, otherwise the data will be incomplete. The sweep end can be detected by reading bit 3 of the operation event register (:stat:oper?), which will set to “1” at the end of a sweep. Likewise, this bit can be used with the SRQ function of the instrument to trigger a service request when the sweep is completed. Using Models 2015, 2015-P, and 2016 THD Multimeters 9 Remote command sequence: :OUTP:MODE FIXED|LIST :OUTP:LIST <ampl1>,<freq1>, <ampl2>,<freq2>,... :OUTP:LIST:ELEM <item list> :OUTP:LIST:DEL <NRf> :TRIG:COUN <n> :OUTP ON :INIT :OUTP:LIST:DATA? :OUTP:LIST:APP <ampl>,<freq> ' LIST selects the sweep list source ' mode. ' ' ' ' ' ' ' ' ' ' ' ' ' ' ' ' ' Creates sweep list (see Note 1). Specify data returned by DATA? (see Note 2). <item list> = DIST = AMPL Sets source delay (see Note 3). <NRf> = 0 to 999999.999 (sec) Specifies number of measurements (see Note 4). <n> = 1 to 9999 Turns output on. It must be on before starting the sweep. Starts the sweep. Returns sweep data (see Note 5). Adds sweep points to sweep list (see Note 6). NOTES 1. 2. 3. 4. 5. The sweep list can have up to 50 sweep points. Each sweep point is made up of an amplitude and a frequency. For example, assume a 3-point sweep list with the following points: Point #1: 0.5V @ 1.0kHz (<ampl1> = 0.5, <freq1> = 1e3) Point #2: 0.5V @ 1.2kHz (<ampl2> = 0.5, <freq2> = 1.2e3) Point #3: 0.5V @ 1.4kHz (<ampl3> = 0.5, <freq3> = 1.4e3) The following command will create the above sweep list: :OUTP:LIST 0.5,1e3,0.5,1.2e3,0.5,1.4e3 You can specify distortion (DIST) readings and/or RMS volts amplitude (AMPL) readings to be returned by the :OUTP:LIST:DATA? command. When specifying both elements, separate them with a comma (i.e., :OUTP:LIST:ELEM DIST, AMPL). The source delay is from the time the instrument outputs the source value to when the measurement starts. This delay occurs for every point in the sweep. Typically, it is used to allow the source output to settle before performing the measurement. The TRIG:COUN value must be equal to the number of points in the sweep list (see OUTP:LIST command). The readings returned depend on the selected data elements (see OUTP:LIST:ELEM command). If both distortion and amplitude elements are selected, readings are returned in the following format: dist1, ampl1, dist2, ampl2, ... 10 Using Models 2015, 2015-P, and 2016 THD Multimeters 6. Each time this command is used, up to 50 points can be appended to the sweep list. For example, assume the original sweep list has 50 points. You can use this command three times to append 150 points to the list to result in a 200-point sweep list. Make sure to change the trigger count (TRIG:COUN) to match the size of the appended sweep list. Example: The following command adds two points to the sweep list (0.5V @1.6kHz and 0.5V @ 1.8kHz). :OUTP:LIST:APP 0.5,1.6e3,0.5,1.8e3 12 Setting high and low cutoff filters (remote operation only) The instrument includes high and low cutoff filters, limiting the range of frequencies used in the distortion measurements. These filters can be set anywhere from 20Hz to 50kHz. When setting the low cutoff, it must be lower than the fundamental frequency of the signal. The low cutoff is used to limit noise frequencies below the fundamental for THD+noise and SINAD measurements (no effect in THD mode). Similarly, the high cutoff limits noise frequencies above the specified frequency for THD+noise and SINAD. In THD mode, the limiting frequency is determined by the high cutoff or the harmonic number, whichever is lower. Remote commands: :SENS:DIST:LCO <NRf> :SENS:DIST:LCO:STATe ON|OFF :SENS:DIST:HCO <NRf> :SENS:DIST:HCO:STATe ON|OFF ' ' ' ' ' ' Sets the low cutoff frequency. <NRf> = 20 to 50000 (Hz) Turns the low cutoff on or off. Sets the high cutoff frequency. <NRf> = 20 to 50000 (Hz) Turns the high cutoff on or off. Distortion measurement notes 1. 2. 3. 4. 5. 6. The digital averaging filter (moving or repeat), and the REL feature can be used for THD. The RATE key has no effect on THD, since there is no NPLC setting. The Auto or Acquire frequency mode is recommended instead of the Set mode, as the programmed frequency of an external source may not be accurate. Querying the RMS volts value in the distortion mode (:sens:dist:rms?) may yield a reading slightly different from a reading in the AC Volts mode. This is because of the differences in how the two modes make the measurement. The output impedance needs to be set prior to setting the amplitude or starting the sweep. The impedance of the second output reflects the impedance of the main output. The output sweep can only be performed in distortion mode. When performing a sweep, use the SET frequency acquisition mode to achieve maximum speed. The remote command is “:sens:dist:freq:auto off”. Using Models 2015, 2015-P, and 2016 THD Multimeters 11 Distortion measurement examples The following examples to measure distortion use the internal sine source of the Model 2015/2015-P/2016. Figure 1 shows how to connect sine SOURCE OUTPUT to INPUT HI and LO. Figure 1 Source connections to input HI BNC to Banana Plug Cable LO SENSE Ω 4W SOURCE OUTPUT INPUT INV/PULSE SOURCE OUTPUT Model 2015/2015-P/2016 (Rear Panel) THD measurement example The following example for both front panel and remote operation measures the THD of the internal sine source. Make sure the internal source of the instrument is connected to the input as shown in Figure 1. Front panel operation Perform the following steps to measure THD: 1. 2. 3. 4. 5. 6. 7. 8. 9. 10. 11. 12. 13. Press SHIFT then ACV to put the instrument into the THD mode. Press the THD-MEAS key. When the display shows “TYPE:”, select THD and press ENTER. When the display shows “FREQ:”, select AUTO and press ENTER. When the display shows “UPPR HARM:”, select 2 and press ENTER. When the display shows “UNITS:”, select PERC and press ENTER. When the display shows “SFIL:”, select NONE and press ENTER. Press the THD-SOURCE key. When the display shows “SINE OUT:”, select ON and press ENTER. When the display shows “FREQ:”, select 1.0000 kHz and press ENTER. When the display shows “IMPEDANCE:”, select HI-Z and press ENTER (setting does not matter in this example). When the display shows “AMPL:”, select 1.000 volts and press ENTER. When the display shows “CHAN2:”, select ISINE and press ENTER. The display should be reading approximately 0.02% THD. 12 Using Models 2015, 2015-P, and 2016 THD Multimeters To illustrate the reason why the instrument needs to know the source frequency exactly, perform the following steps: 1. 2. 3. 4. Press THD-MEAS, and then press ENTER once. Change the frequency mode to SET, and press ENTER. For the frequency, enter 1.002 kHz and press ENTER four times. The display should be reading approximately 0.2% THD, and will be unstable. Note that the settings for the source did not change. Go back into the THD-MEAS menu and select ACQUIRE for the frequency mode. The THD reading will return to approximately 0.02% THD. Remote command sequence Use the following command sequence to measure THD: *RST :SENS:FUNC “DIST” :SENS:DIST:TYPE THD :SENS:DIST:HARM 2 :UNIT:DIST PERC :SENS:DIST:SFIL NONE :SENS:DIST:RANG:AUTO ON :OUTP:FREQ 1000 :OUTP:IMP HIZ :OUTP:AMPL 1 :OUTP:CHAN2 ISINE :OUTP ON :READ? :SENS:DIST:RMS? ' ' ' ' ' ' ' ' ' ' ' ' ' ' ' ' ' ' Restore default settings. Selects distortion function. Selects THD distortion measurement type. Sets the highest harmonic number to be measured. Selects THD measurement units. Selects no shaping filter. Selects auto range for THD voltage input. Sets the frequency of the source. Selects output impedance of source. Sets amplitude of source. Selects inverted sine for second source. Turns output on. Triggers one THD measurement and requests reading. Requests RMS volts reading for the TDH measurement. Distortion and RMS volts sweep example The following remote command sequence configures and runs a 10-point sweep to measure distortion and RMS volts. This example includes the use of the high and low cutoff filters. This command sequence also demonstrates how to program the Model 2015/2015-P/2016 to use SRQ. When SRQ is asserted (to indicate that the sweep is completed), the sweep data points (distortion and AC volts readings) are read from the instrument. Make sure the internal source of the instrument is connected to the input as shown in Figure 1. Using Models 2015, 2015-P, and 2016 THD Multimeters 13 *RST *CLS :STAT:OPER:ENAB 8 ' Restores default conditions. ' Clears status registers. ' Causes the Operation Summary Bit to set ' when the sweep is done. Allows sweep end ' to be detected. *SRE 128 ' Enables Operation Summary Bit mask. ' Causes SRQ line to be asserted when the ' sweep is completed. :SENS:FUNC ‘DIST’ ' Selects distortion mode. :SENS:DIST:FREQ:AUTO OFF ' Turns off the AUTO frequency mode. :SENS:DIST:TYPE THDN ' Selects THD+noise mode. :SENS:DIST:LCO 500 ' Configures low cutoff to filter out ' noise below 500Hz. :SENS:DIST:LCO:STAT ON ' Turns on the low cutoff filter. :SENS:DIST:HCO 10000 ' Configures high cutoff to filter out ' noise above 10kHz. :SENS:DIST:HCO:STAT ON ' Turns on the high cutoff filter. :SENS:DIST:RANG 1 ' Sets the manual range for the sweep, ' since autoranging is not allowed. ' Change the range value as necessary. :OUTP:IMP HIZ ' Sets impedance of the output before ' creating the sweep list, so that the ' output has the correct amplitude. ' Change impedance as necessary. :OUTP:LIST 1,1000,1,1100,1,1200,1,1300,1,1400,1,1500,1,1600, 1,1700,1,1800,1,1900 ' Creates 10-point sweep list; 1kHz to ' 1.9kHz in 100Hz steps, one volt ' amplitude for all points. :OUTP:MODE LIST ' Selects sweep mode. :OUTP:LIST:DEL .1 ' Sets a source delay of 0.1 seconds. :OUTP:LIST:ELEM DIST,AMPL ' Selects distortion and amplitude as the ' data elements to be returned. :TRIG:COUN 10 ' Sets instrument to take 10 triggered ' measurements. :OUTP ON ' Turns the output on. :INIT ' Starts the sweep. ' (Wait for SRQ to be asserted - see NOTE at end of command sequence) :OUTPUT:LIST:DATA? ' Requests the sweep data. ' (Read data from 2015/2015-P - see NOTE that follows) NOTE The actual syntax for these steps depends on the type of GPIB interface used, and the type of software used to control the interface. For example, the WaitSRQ function can be used with a National Instruments interface to wait for the SRQ, and the IBRD function can be used to read the data. Running this same sweep again only requires sending *CLS and INIT over the bus. Sending *CLS again is necessary to reset the Sweep Done bit. 14 Using Models 2015, 2015-P, and 2016 THD Multimeters Measuring AC volts and frequency In addition to measuring distortion, the Model 2015/2015-P/2016 can also be used to make standard AC voltage and frequency measurements. Be sure the correct voltage range is selected before making connections to INPUT HI and LO of the instrument. 1 Selecting AC volts or frequency function Front panel: Press the ACV or FREQ key. Remote commands: :SENS:FUNC “VOLT:AC” :SENS:FUNC “FREQ” 2 ' Selects AC Volts mode. ' Selects Frequency mode. Setting the input voltage range Front panel: Press the up or down RANGE key to select a manual range. The display will briefly show the changed range. Autorange can instead be used for ACV, but not frequency. Remote commands: :SENS:VOLT:AC:RANG <n> :SENS:VOLT:AC:RANG:AUTO ON|OFF :SENS:FREQ:THR:VOLT:RANG <n> 3 ' ' ' ' ' ' Selects appropriate range based on value. <n> = 0 to 757.5 (volts) Turns Autorange on or off. Selects frequency input range. <n> = 0 to 1010 (volts) Setting the integration rate (not used for FREQ) Front panel: Press RATE; display will indicate FAST (.1 NPLC), MED (1 NPLC), or SLOW (10 NPLC). Remote command: :SENS:VOLT:AC:NPLC <n> ' ' ' ' Sets integration rate which is based on the specified number of power line cycles. <n> = 0.01 to 10 Using Models 2015, 2015-P, and 2016 THD Multimeters 4 15 Setting the number of displayed digits Front Panel: Press DIGITS to cycle through the number of digits (4 to 7). Remote commands: Changing the displayed number of digits does not affect bus reading resolution. :SENS:VOLT:AC:DIG <n> :SENS:FREQ:DIG <n> 5 ' ' ' ' Sets number of digits to display for ACV. <n> = 4 to 7 Sets number of digits to display for FREQ. <n> = 4 to 7 Using the digital filter (not used for FREQ) The Model 2015/2015-P/2016 has a digital averaging filter to stabilize readings. The Repeating filter takes the set number of readings, averages them, then updates the display. The Moving filter throws out the oldest reading, takes a new reading, averages them, then updates the display. The Moving filter updates the display faster, but takes longer for readings to stabilize. Front Panel: a. b. c. d. Press FILTER. When the display shows “RDGS”, select the number of readings to average (1 to 100), and then press ENTER. When the display shows “TYPE:” select MOVING AV or REPEAT, and then press ENTER. The FILT annunciator turns on to indicate that the filter is on. Press FILTER again to disable the filter. Remote commands: :SENS:VOLT:AC:AVER:TCON MOV|REP :SENS:VOLT:AC:AVER:COUN <n> :SENS:VOLT:AC:AVER:STAT ON|OFF ' ' ' ' ' Selects moving or repeating filter. Sets number of averaged readings. <n> = 1 to 100 Turns filter on or off. Analyzing frequency spectrum (Model 2015-P only) The Model 2015-P can analyze the frequency spectrum of a signal and return the frequency and amplitude values over the bus. Peak commands are used to search the frequency spectrum and return the frequency and amplitude values. NOTE Frequency spectrum analysis cannot be performed from the front panel (remote command programming only). 16 Using Models 2015, 2015-P, and 2016 THD Multimeters Frequency spectrum Frequency bins In order to get maximum frequency resolution from the FFT calculation, the frequency spectrum must be separated into 20Hz bins. The example frequency spectrum in Figure 2, shows the 51 frequencies that can be analyzed for a spectrum from 1kHz to 2kHz. The following command separates the frequency spectrum into 20Hz bins: :SENS:DIST:FREQ 20 ' Set distortion frequency to 20Hz. Figure 2 Frequency spectrum example Frequency Spectrum (1kHz to 2kHz) Bin #1 Bin #2 Bin #3 Bin #4 Bin #5 Bin #51 1000 1020 1040 1060 1080 2000 Upper Boundary Lower Boundary Frequency boundaries Upper and lower boundaries can be set for the frequency search. Frequencies outside the boundaries are excluded from the search. The example in Figure 2 shows boundaries of 1kHz and 2kHz. The following commands set the lower and upper boundaries: :SENS:DIST:PEAK:LOWER <freq> ' ' ' ' :SENS:DIST:PEAK:UPPER <freq> NOTE Specifies lower frequency boundary. <freq> = 20 to 20480 (Hz) Specify upper frequency boundary. <freq> = 20 to 20480 (Hz) The default boundaries are 20Hz (lower) and 20480Hz (upper). Basic peak analysis Basic peak analysis consists of moving the frequency pointer to the appropriate frequency bin, and reporting the frequency and amplitude values. The commands to do this are explained as follows: MAX? and NEXT? commands :SENS:DIST:PEAK:MAX? :SENS:DIST:PEAK:NEXT? ' ' ' ' ' Finds frequency having max amplitude. Returns frequency and amplitude. Finds frequency having next highest amplitude. Returns frequency and amplitude. Using Models 2015, 2015-P, and 2016 THD Multimeters 17 An example using these commands is provided in Figure 3. When MAX? is sent as shown in Figure 3A, the frequency pointer moves to the frequency that has the highest amplitude and reports the frequency and amplitude (1000Hz, -12dBV). When NEXT? is sent (Figure 3B), the frequency pointer moves to the frequency that has the second highest amplitude and returns those values (1020Hz, -13dBV). When NEXT? is sent again (Figure 3C), the frequency pointer moves to the frequency that has the third highest amplitude and returns those values (1040Hz, -14dBV). When NEXT? is sent again (Figure 3D), the frequency pointer moves to the frequency that has the third highest amplitude and returns those values (1040Hz, -14dBV). Figure 3 Peak analysis example using MAX? and NEXT? commands Amplitude (dBV) -12 Amplitude (dBV) MAX? (returns 1000Hz, -12dBV) -12 -13 -13 -14 -14 -15 -15 1000 1020 1040 1060 Frequency (Hz) NEXT? (returns 1020Hz, -13dBV) 1000 1020 1040 1060 Frequency Pointer Frequency (Hz) Frequency Pointer A) PEAK:MAX? sent B) PEAK:NEXT? sent Amplitude (dBV) Amplitude (dBV) -12 -12 -13 NEXT? (returns 1040Hz, -14dBV) -14 -15 -13 -14 NEXT? (returns 1060Hz, -15dBV) -15 1000 1020 1040 1060 Frequency (Hz) 1000 1020 1040 1060 Frequency Pointer C) PEAK:NEXT? sent Frequency (Hz) Frequency Pointer D) PEAK:NEXT? sent 18 Using Models 2015, 2015-P, and 2016 THD Multimeters SFR <freq> and LOC? commands :SENS:DIST:PEAK:SFR <freq> :SENS:DIST:PEAK:LOC? ' ' ' ' Moves frequency pointer. <freq> = 20 to 20480 (Hz) Returns frequency and amplitude for present frequency pointer position. These two commands are used to acquire the amplitude at a specified frequency. As shown in Figure 4, SFR 1000 moves the frequency pointer to 1000Hz, and LOC? returns the frequency and amplitude values (1000Hz, -12dBV). Figure 4 Peak analysis example using SFR and LOC? commands Amplitude (dBV) -12 SFR 1000 LOC? (returns 1000Hz, -12dBV) -13 -14 -15 1000 1020 1040 1060 Frequency Pointer Frequency (Hz) Using Models 2015, 2015-P, and 2016 THD Multimeters 19 LEFT? and RIGHT? commands :SENS:DIST:PEAK:LEFT? ' ' ' ' :SENS:DIST:PEAK:RIGHT? Moves frequency pointer left. Returns frequency and amplitude. Moves frequency pointer right. Returns frequency and amplitude. The LEFT? and RIGHT? commands move the frequency pointer left or right. In Figure 5A, SFR 1000 moves the pointer to 1000Hz. When RIGHT? is used, the pointer moves right one bin to 1020Hz, and the frequency and amplitude values are returned as shown in Figure 5B. If LEFT? is then sent, the frequency pointer would move left back to 1000Hz and return those frequency/amplitude values. Figure 5 Peak analysis example using RIGHT? command Amplitude (dBV) Amplitude (dBV) -12 -12 -13 -13 SFR 1040 -14 -14 -15 RIGHT? (returns 1060Hz, -15dBV) -15 1000 1020 1040 1060 Frequency (Hz) 1000 1020 1040 1060 Frequency Pointer A) SFR 1040 sent Frequency (Hz) Frequency Pointer B) RIGHT? sent 20 Using Models 2015, 2015-P, and 2016 THD Multimeters Peak analysis example The following example shows how to use the MAX? and NEXT? peak commands to find and measure the frequencies that have the three highest amplitudes. Make sure the sine source is connected to the input as shown in Figure 1. 1 Set trigger model for single reading mode The Model 2015-P must be in the single trigger state for distortion measurements. :INIT:CONT OFF :TRIG:COUN 1 2 Select distortion function :SENS:FUNC “DIST” 3 ' Disables continuous initiation. ' Sets trigger count to 1. ' Selects distortion function. Force analysis into 20Hz frequency bins In order to get maximum frequency resolution from the FFT calculation, the frequency spectrum must be separated into 20Hz bins using the following command: :SENS:DIST:FREQ 20 4 Program output sine wave :OUTP:FREQ 1000 :OUTP:AMPL 0.25 :OUTP ON 5 ' Set distortion frequency to 20Hz. ' Sets sine wave frequency to 1000Hz. ' Sets sine wave amplitude to 0.25VRMS. ' Turns 2015-P source output on. Trigger reading With the instrument in the “one-shot” trigger state, the following command triggers a single measurement of the input sine wave. :INIT 6 ' Trigger a reading. Wait for reading to become available :FETCH? ' Request the reading. After a reading is triggered, the reading must become available before starting peak analysis. When FETCH? is sent, the instrument will wait for the reading to be become available before requesting it. Another method to wait for the reading to become available is to use SRQ. The instrument is programmed such that when bit B5 (Reading Available) of the Measurement Condition Register sets, SRQ is asserted to allow the program to continue. For more information, see Section 4 (Status Structure) of the Model 2015/2015-P/2016 User’s Manual. Using Models 2015, 2015-P, and 2016 THD Multimeters 7 21 Perform peak analysis Since most of the peak commands function is relative to frequency pointer position, an initial position must first be established. Typically, this is done by finding the frequency with the highest peak magnitude with the following command: :SENS:DIST:PEAK:MAX? ' Finds frequency having max amplitude. ' Returns frequency and amplitude. When the above command is sent, the instrument searches for the frequency that has the highest amplitude (in dBV). For this example, this is -12dBV (250mV) @ 1kHz. When the Model 2015-P is addressed to talk, the values 1000, -12 are sent to the computer. Note that the frequency pointer is at 1kHz. Now the buffer can be searched for the frequency that has the second highest amplitude using the following command. :SENS:DIST:PEAK:NEXT? ' Finds frequency having the next highest ' amplitude. Returns frequency and ' amplitude. For this example, values 3000, -14 would be returned (-14dBV @ 3kHz). The frequency pointer is now at 3kHz. Finally, this command can be used again to search for the frequency that has the third highest amplitude: :SENS:DIST:PEAK:NEXT? ' Finds frequency having the next highest ' amplitude. Returns frequency and ' amplitude. For this example, values 600, -20 would be returned (-20dBV @ 600Hz). 22 Using Models 2015, 2015-P, and 2016 THD Multimeters Delta function The delta function returns the difference in frequency and amplitude between two frequency pointer positions. Delta is calculated as follows: delta (frequency) = reference frequency – frequency at present location delta (amplitude) = reference amplitude – amplitude at present location Acquiring reference frequency and amplitude Typically, delta readings are referenced to the frequency that has the highest magnitude. The following commands are used to acquire these reference points: :SENS:DIST:PEAK:MAX? :SENS:DIST:PEAK:SREF ' Move frequency pointer to frequency that ' has the highest magnitude. ' Acquire frequency and amplitude values. The example in Figure 6 shows how to use the delta function. In Figure 6A, the MAX? command moves the frequency pointer to 1000Hz. The SREF command then acquires the max readings (1000Hz, -12dBV) as the reference points for the delta calculation. Move frequency pointer and calculate delta :SENS:DIST:PEAK:SFR <freq> :SENS:DIST:PEAK:DELTA? ' Move frequency pointer. ' <freq> = 20 to 20480 (Hz) ' Perform delta calculation. In Figure 6B, the SFR 1040 command moves the frequency pointer to 1040Hz. The DELTA? command then uses the frequency/amplitude values at this location (600Hz, -20dBV) to calculate delta as follows: delta (frequency) = reference frequency – frequency at present location = 1000Hz – 600Hz = 400Hz delta (amplitude) = reference amplitude – amplitude at present location = –12dBV – (–20dBV) = +8dBV Using Models 2015, 2015-P, and 2016 THD Multimeters 23 Figure 6 DELTA? peak analysis example Amplitude (dBV) Amplitude (dBV) MAX? SREF -12 -12 -14 -14 -20 -20 600 1000 3000 Frequency (Hz) Frequency Pointer A) Establish pointer and acquire reference values SFR 1040 DELTA? 600 1000 3000 Frequency (Hz) Frequency Pointer B) Move pointer and calculate delta Delta function example The following example calculates delta at two frequencies; 600Hz and 3000Hz. The frequency/amplitude values at both these frequencies are referenced to 1000Hz. This example assumes that the internal sine source is connected to the input as shown in Figure 1. 1 Acquire distortion reading Perform steps 1 through 6 of the “Peak analysis example” to acquire a distortion reading. 2 Establish frequency pointer position The following command is typically used to establish the initial position for the frequency pointer: :SENS:DIST:PEAK MAX? 3 ' Sets frequency pointer to 1kHz. Acquire reference points for delta calculation :SENS:DIST:PEAK SREF ' Acquire frequency/amplitude values at ' 1000Hz. For this example, the values 1000Hz, -12dBV are acquired as the reference points for the delta calculations. 24 Using Models 2015, 2015-P, and 2016 THD Multimeters 4 Move frequency pointer to 600Hz :SENS:DIST:PEAK SFR 600 ' Move frequency pointer to 600Hz. Note that the frequency/amplitude values at this frequency are 600Hz, -20dBV. The values will be used in the delta calculations (next step). 5 Send DELTA? command to calculate delta (600Hz referenced to 1KHz) :SENS:DIST:PEAK:DELTA? ' Return results of delta calculations. Delta at 600Hz, which is referenced to 1000Hz, is calculated as follows: delta (frequency) = 1000Hz – 600Hz = 400Hz delta (amplitude) = –12dBV – (–20dBV) = 8dBV 6 Move frequency pointer to 3000Hz :SENS:DIST:PEAK SFR 3e3 ' Move frequency pointer to 3000Hz. Note that the frequency/amplitude values at this frequency are 3000Hz, -14dBV. 7 Send DELTA? command to calculate delta (3kHz referenced to 1kHz) :SENS:DIST:PEAK:DELTA? ' Return results of delta calculations. Delta at 3000Hz, which is also referenced to 1000Hz, is calculated as follows: delta (frequency) = 1000Hz – 3000Hz = –2000Hz delta (amplitude) = –12dBV – (–14dBV) = 2dBV Frequency list analysis A specified list of frequencies (up to 50) can be analyzed using the PEAK:LIST commands. Creating frequency list The following command is used to specify the list frequencies (in Hz) to be analyzed: :SENS:DIST:PEAK:LIST <freqlist> ' Creates frequency list. <freqlist> = Up to 50 frequencies from 20 to 20480 (Hz). Each listed frequency must be separated by a comma (,). Example – The following command creates a 3-point frequency list (1kHz, 2kHz and 3kHz): :SENS:DIST:PEAK:LIST 1e3,2e3,3e3 Using Models 2015, 2015-P, and 2016 THD Multimeters 25 Returning amplitudes for listed frequencies The following command is used to return the amplitudes for the frequencies in the frequency list: :SENS:DIST:PEAK:LIST:DATA? ' Requests frequency list amplitudes. The order of the returned list of amplitude values (in dBV) corresponds to the order that the frequencies are listed in the <freqlist>. For the “Creating frequency list”, assume amplitudes of -8dBV @1kHz, -9dBV @2kHz and -10dBV @3kHz. The LIST:DATA? command will return the following values: -8, -9, -10 The Model 2015-P can only analyze frequencies that are a multiple of 20. If a listed frequency is not a multiple of 20, the frequency that will be analyzed is the next lowest multiple of 20. For example, if 1019Hz is a listed frequency, the amplitude for 1000Hz will be returned by LIST:DATA?. Frequency list example This example creates a 3-point frequency list, and returns their amplitudes. This example assumes that the internal sine source is connected to the input as shown in Figure 1. 1 Acquire distortion reading Perform steps 1 through 6 of the “Peak analysis example” to acquire a distortion reading. 2 Create frequency list Use the following command to create a frequency for 1000Hz, 1100Hz and 1200Hz values: :SENS:DIST:PEAK:LIST 1000,1100,1200 3 ' Creates frequency list. Request frequency list amplitudes Use the following command to request the amplitudes for the three frequencies in the list: :SENS:DIST:PEAK:LIST:DATA? ' Requests amplitudes. After the above command is sent, the amplitude values will be sent to the computer when the Model 2015-P is addressed to talk. 26 Using Models 2015, 2015-P, and 2016 THD Multimeters Programming examples Programming sine wave source Defining frequency, magnitude, and expected load impedance sets up the output signal. The example below outputs a 1000Hz, 1V RMS sine wave to a high impedance load. To achieve twice the output amplitude or a differential output the user can take the high from the source output and the high from the inverted output to create a differential output. Figure 7 below is a diagram illustrating the concept. *rst ' Will reset the instrument to default settings. :outp:freq 1000 ' Sets the output frequency to 1000Hz; can be set from 20Hz to 20000Hz. :outp:imp hiz ' Sets the sine wave’s output impedance. It may be set to 50 ohm or 600 ohm to match the load impedance. The output impedance also can be set to assume the load is high impedance (hiz). :outp:ampl 1 ' Sets the amplitude of the output sine wave; Ranges are from 0V to 4V RMS with hiz impedance and 0V to 2V RMS with the other two impedances (for 2015 models). For 2016 models, the value can be set from 0V to 9.5V RMS with high impedance (hiz). :outp on ' This turns the output sine wave on. Figure 7 Connections to double generator amplitude SOURCE OUTPUT INV/PULSE SOURCE OUTPUT New Double Amplitude Output Using Models 2015, 2015-P, and 2016 THD Multimeters 27 Measuring THD, THD+noise, or SINAD. The user can define one of three distortion measurements, an input voltage range, and a method of measuring the input signal frequency. This code measures the distortion of a 2kHz input signal. *rst ' Will reset the instrument to default settings. (Should be done here unless done above while setting up unit to output sine wave.) :sens:func ‘dist’ ' Sets the measurement function to distortion. :sens:dist:freq:auto on or :sens:dist:freq 2000 or :sens:dist:freq:acq ' By default, the instrument is set to measure the input signal frequency continuously for maximum accuracy. The user may preset the incoming frequency, or program the instrument to measure the frequency once and hold that value. :sens:dist:rang:auto on or :sens:dist:rang .1 ' Sets the input voltage range to auto. The user can also set a manual input voltage range; the example command programs the instrument to the 100mV range. :sens:dist:type THD ' Sets the type of harmonic distortion measurement. The user can select THD, THDN, or SINAD depending upon desired distortion measurement. THD & THDN are measured in dB or % using the :unit:dist:db or :unit:dist:per command. SINAD is measured in dB. (refer to 2015/2015-P User’s Manual, Section 5) :sens:dist:harm 12 ' Defines number of harmonics included in the measurement. The default is 2, with the maximum at 64. :read? ' This queries the distortion measurement from the instrument. 28 Using Models 2015, 2015-P, and 2016 THD Multimeters RMS voltage measurement This is an AC voltage measurement, but it is calculated from data collected in the frequency domain using the DSP, not the time domain that uses the DMM RMS converter to measure a value. (If the fundamental frequency is not known, the instrument can be set to auto or to 20Hz for maximum spectrum resolution.) *rst ' Will reset the instrument to default settings. (Should be done here unless done above while setting up unit to output sine wave.) :sens:func ‘dist’ ' Sets the measurement function to distortion. :sens:dist:freq:auto on or :sens:dist:freq 2000 or :sens:dist:freq:acq ' By default, the instrument is set to measure the input signal frequency continuously for maximum accuracy. The user may preset the incoming frequency, or program the instrument to measure the frequency once and hold that value. :sens:dist:rang:auto on or :sens:dist:rang .1 ' Sets the input voltage range to auto. The user can also set a manual input voltage range; the example command programs the instrument to the 100mV range. :init ' Triggers a reading. *opc? ' Makes sure trigger is complete. :sens:dist:rms? ' Measures RMS Voltage value. Using Models 2015, 2015-P, and 2016 THD Multimeters 29 Bandwidth-limited RMS voltage measurement The user-defined high-frequency cutoff filter and low-frequency cutoff filter will determine the bandwidth of the measurement. For this example, the lower cutoff is set to 50Hz, and the high cutoff is set to 5000Hz. *rst ' Will reset the instrument to default settings. (Should be done here unless done above while setting up unit to output sine wave.) :sens:func ‘dist’ ' Sets the measurement function to distortion. :sens:dist:freq:auto on or :sens:dist:freq 2000 or :sens:dist:freq:acq ' By default, the instrument is set to measure the input signal frequency continuously for maximum accuracy. The user may preset the incoming frequency, or program the instrument to measure the frequency once and hold that value. :sens:dist:rang:auto on or :sens:dist:rang .1 ' Sets the input voltage range to auto. The user can also set a manual input voltage range; the example command programs the instrument to the 100mV range. :sens:dist:HCO 5000 ' Sets the High frequency cutoff, can be set from 20Hz to 50000Hz. :sens:dist:HCO:stat on ' Turns High frequency cutoff, off and on. :sens:dist:LCO 50 ' Sets the Low frequency cutoff, ranges from 20Hz to 50kHz. :sens:dist:LCO:stat on ' Turns Low frequency cutoff, off and on. :init ' Triggers a reading. *opc? ' Makes sure trigger is complete. :sens:dist:rms? ' Measures RMS voltage. 30 Using Models 2015, 2015-P, and 2016 THD Multimeters Background noise measurement Noise can be measured in the presence of a signal with the Background noise command. Background noise is the residual voltage after the input signal’s fundamental and harmonics are removed. The input signal must have a frequency of at least 61Hz. If the frequency is smaller than 61Hz, the instrument will not have enough resolution for a background noise measurement. The measurement is returned in VRMS. *rst ' Will reset the instrument to default settings. (Should be done here unless done above while setting up unit to output sine wave.) :sens:func ‘dist’ ' Sets the measurement function to distortion. :sens:dist:freq:auto on or :sens:dist:freq 2000 or :sens:dist:freq:acq ' By default, the instrument is set to measure the input signal frequency continuously for maximum accuracy. The user may preset the incoming frequency, or program the instrument to measure the frequency once and hold that value. :sens:dist:rang:auto on or :sens:dist:rang .1 ' Sets the input voltage range to auto. The user can also set a manual input voltage range; the example command programs the instrument to the 100mV range. :init ' Triggers readings. *opc? ' Makes sure trigger is complete. :sens:dist:bnois? ' Query Background noise measurement. The measurement is returned in VRMS. Using Models 2015, 2015-P, and 2016 THD Multimeters 31 Fast frequency sweep RMS voltage measurements Below are the commands needed to set up the instrument to sweep three individual output frequencies. For this example, the frequencies are 500, 1000, and 1500HZ. However, the sweep can test up to 50 different points. The instrument will output a frequency, then take a measurement, then change frequency, and take another measurement. This process will continue for all points in the sweep. *rst ' Will reset the instrument to default settings. :sens:func ‘dist’ ' Sets the measurement function to distortion. :sens:dist:rang:auto on ' Sets the input voltage range to auto. or The user can also set a manual input :sens:dist:rang .1 voltage range; the example command programs the instrument to the 100mV range. :outp:imp hiz ' Sets the sine waves output impedance, which can be set to 50 ohms, 600 ohms, or high impedance. :outp:list 1,500,1,1000,1,1500 ' This sets up the output amplitudes and frequencies to be swept. :outp:list:del 0 ' This sets source settling time in seconds. Zero second setting is the fastest sweep capability. :outp:list:elem ampl ' Sets the instrument to measure element of RMS Voltage for each point swept. :outp:mode list ' Sets the output mode to output the frequencies specified. :trig:coun 3 ' This should equal the number of sweep points you have set in your output list. :outp on ' This turns output sine wave on. :init ' Triggers readings. *opc? ' Makes sure trigger is complete. :outp:list:data? ' Returns list of data measured under RMS Voltage. This will return comma-separated data. 32 Using Models 2015, 2015-P, and 2016 THD Multimeters Frequency domain components Below is the command sequence which will output all the components of the Fourier transform of an input signal. Each component of the frequency spectrum is in a frequency bin. This command sequence will return all readings (in dB) in the frequency bins. From this data, the user can observe the frequency spectrum of the input signal. The output is returned in dB, relative to the fundamental. *rst ' Will reset the instrument to default settings. (Should be done here unless done above while setting up unit to output sine wave.) :sens:func ‘dist’ ' Sets the measurement function to distortion. :sens:dist:freq:auto on or :sens:dist:freq 2000 or :sens:dist:freq:acq ' By default, the instrument is set to measure the input signal frequency continuously for maximum accuracy. The user may preset the incoming frequency, or program the instrument to measure the frequency once and hold that value. :sens:dist:rang:auto on or :sens:dist:rang .1 ' Sets the input voltage range to auto. The user can also set a manual input voltage range; the example command programs the instrument to the 100mV range. :init ' Triggers readings. *opc? ' Makes sure trigger is complete. :sens:dist:fft:bins? 1,1023 ' This command returns all the values measured in the spectrum. Using Models 2015, 2015-P, and 2016 THD Multimeters 33 Measurement of individual harmonics The example below sets the instrument to measure the first 21 harmonics and return the values of harmonics 2 through 21. The output is returned in dB, relative to the fundamental. *rst ' Will reset the instrument to default settings. (Should be done here unless done above while setting up unit to output sine wave.) :sens:func ‘dist’ ' Sets the measurement function to distortion. :sens:dist:freq:auto on or :sens:dist:freq 2000 or :sens:dist:freq:acq ' By default, the instrument is set to measure the input signal frequency continuously for maximum accuracy. The user may preset the incoming frequency, or program the instrument to measure the frequency once and hold that value. :sens:dist:rang:auto on or :sens:dist:rang .1 'Sets the input voltage range to auto. The user can also set a manual input voltage range; the example command programs the instrument to the 100mV range. :sens:dist:harm 21 ' Sets up instrument to measure 21 harmonics. Can be set from 2 to 64. :init ' Triggers readings. *opc? ' Makes sure trigger is complete. :sens:dist:harm:magn? 2,21 ' Will return values for harmonics in dB. 34 Using Models 2015, 2015-P, and 2016 THD Multimeters Peak measurements The commands below, for the Model 2015-P, allow the user to find a peak amplitude. The Left and Right commands will go to the next highest spectral component to the right or left of the current peak. The user must set the measurement frequency to 20Hz; otherwise the instrument will not perform the peak search. Setting the instrument to 20Hz gives maximum frequency resolution for the frequency spectrum. The readings are returned in dBV. *rst ' Will reset the instrument to default settings. (Should be done here unless done above while setting up unit to output sine wave.) :init:cont off ' Turns off continuous trigger; this is required for peak measurements. :trig:coun 1 ' Sets a single trigger. :sens:func ‘dist’ ' Sets the measurement function to distortion. :sens:dist:freq 20 ' Sets frequency to 20Hz which is required for peak measurements. :init ' Triggers a reading. *opc? ' Makes sure trigger is complete. :sens:dist:peak:max? ' Returns the frequency and amplitude of the peak. :sens:dist:peak:next? ' Returns the frequency and amplitude of the next highest peak. :sens:dist:peak:right? ' Returns the frequency and amplitude of the highest peak to the right of the current spectral component. :sens:dist:peak:left? ' Returns the frequency and amplitude (dBV) of the highest peak to the left of the current spectral component. Using Models 2015, 2015-P, and 2016 THD Multimeters 35 Measuring differences between two peaks The commands below, for the Model 2015-P, measure a peak spectral component and a delta value between two spectral components. In this example, the peak is found, then it is compared with the magnitude of the spectral component at 1200Hz. The difference in frequency and amplitude between the reference marker and the present location is returned in dBV units. *rst ' Will reset the instrument to default settings. (Should be done here unless done above while setting up unit to output sine wave.) :init:cont off ' Turns off continuous trigger; if you do not do this, peak commands do not work. :trig:coun 1 ' Sets a single trigger. :sens:func ‘dist’ ' Sets the measurement function to distortion. sens:dist:freq 20 ' Sets frequency to 20Hz, which is required for peak measurements. :init ' Triggers a reading. *opc? ' Makes sure trigger is complete. :sens:dist:peak:max? ' Returns the frequency and amplitude of the peak. :sens:dist:peak:sref ' Marks peak as reference frequency and amplitude. :sens:dist:peak:sfr 1200 ' Marks 1200Hz as second reference location. :sens:dist:peak:delta? ' Returns the difference in frequency and amplitude (dBV) between the reference marker and the present location. 36 Using Models 2015, 2015-P, and 2016 THD Multimeters Specifications are subject to change without notice. All Keithley trademarks and trade names are the property of Keithley Instruments, Inc. All other trademarks and trade names are the property of their respective companies. Keithley Instruments, Inc. 28775 Aurora Road • Cleveland, Ohio 44139 • 440-248-0400 • Fax: 440-248-6168 1-888-KEITHLEY (534-8453) www.keithley.com BELGIUM: CHINA: FRANCE: GERMANY: GREAT BRITAIN: INDIA: ITALY: KOREA: NETHERLANDS: SWITZERLAND: TAIWAN: Bergensesteenweg 709 • B-1600 Sint-Pieters-Leeuw • 02/363 00 40 • Fax: 02/363 00 64 Yuan Chen Xin Building, Room 705 • 12 Yumin Road, Dewai, Madian • Beijing 100029 • 8610-6202-2886 • Fax: 8610-6202-2892 3, allée des Garays • 91127 Palaiseau Cédex • 01 64 53 20 20 • Fax: 01 60 11 77 26 Landsberger Strasse 65 • D-82110 Germering • 089/84 93 07-40 • Fax: 089/84 93 07-34 The Minster • 58 Portman Road • Reading, Berkshire RG30 1EA • 0118-9 57 56 66 • Fax: 0118-9 59 64 69 Flat 2B, WILLOCRISSA • 14, Rest House Crescent • Bangalore 560 001 • 91-80-509-1320/21 • Fax: 91-80-509-1322 Viale San Gimignano, 38 • 20146 Milano • 02-48 39 16 01 • Fax: 02-48 30 22 74 2FL., URI Building • 2-14 Yangjae-Dong • Seocho-Gu, Seoul 137-130 • 82-2-574-7778 • Fax: 82-2-574-7838 Postbus 559 • NL-4200 AN Gorinchem • 0183-635333 • Fax: 0183-630821 Kriesbachstrasse 4 • 8600 Dübendorf • 01-821 94 44 • Fax: 01-820 30 81 1FL., 85 Po Ai Street • Hsinchu, Taiwan, R.O.C. • 886-3-572-9077• Fax: 886-3-572-9031 Keithley Instruments B.V. Keithley Instruments China Keithley Instruments Sarl Keithley Instruments GmbH Keithley Instruments Ltd. Keithley Instruments GmbH Keithley Instruments s.r.l. Keithley Instruments Korea Keithley Instruments B.V. Keithley Instruments SA Keithley Instruments Taiwan © Copyright 2000 Keithley Instruments, Inc. Printed in the U.S.A. No. 2193 2/2000