1
iSecurity
WideScope
Displays the Screen Image of Other Terminals
and Runs commands at Remote Terminals
User Manual
Version 10
Updated December 2, 2010
Table of Contents
Chapter 1:
Introduction ................................................................................3
Chapter 2:
Working with WideScope ..........................................................4
Working with WideScope control window......................................................................... 7
Enabling a terminal to be copied ........................................................................................ 8
Introduction................................................................................................................. 8
The WSINIT command ................................................................................................ 8
Implementation ........................................................................................................... 9
Background ............................................................................................................... 10
Support for 132 character screens..................................................................................... 11
Run commands at remote terminals.................................................................................. 12
Introduction............................................................................................................... 12
Prior requirements.................................................................................................... 12
Directing command output ....................................................................................... 12
Executing the command ............................................................................................ 13
Authority for using commands .................................................................................. 13
Message sub-system .................................................................................................. 13
Activity Log ...................................................................................................................... 13
Chapter 3: Remote Debug of Batch and Online Jobs ................................16
Chapter 4: Security Considerations ............................................................17
SOX Regulations .............................................................................................................. 17
Who is able to use WideScope.......................................................................................... 19
Integrated security system......................................................................................... 19
Which active jobs can be the target of WideScope use?........................................... 19
Which commands can be executed?.......................................................................... 20
Informing the remote user that a request was issued to display his screen, and by
whom. ........................................................................................................................ 20
WideScope logs all requests...................................................................................... 20
Appendix A -......................................................................................................21
Technical specifications.................................................................................................... 21
Appendix B -......................................................................................................22
Setting product defaults .................................................................................................... 22
Optional *RMT notify message........................................................................................ 22
Appendix C -......................................................................................................23
Group job support ............................................................................................................. 23
Chapter 1: Introduction
WideScope is a unique system that provides enhanced support to remote workstation
users. With this solution, the user’s screen can be viewed in real-time, as well as his
QTEMP library and his interactive jobs.
Viewing and running commands in the user’s session can only be done when the user
approve it. The product allows controlling the user’s device for 5 minutes at a time.
When a user at a remote site reports a problem, the contents of his
screen can be reproduced on your terminal (including data inserted
after the last ENTER and error messages).
You can enter commands at your terminal which will be executed at the
user's remote terminal, and even use objects from the remote user's
QTEMP library. While entering remote commands you can still enter
commands to your local terminal.
The DEBUG mode can be entered for programs running at a remote
terminal in order to trace and treat problems as they occur. This saves
you from having to duplicate an error in a test environment.
By using WideScope's unique message and reply system, you can communicate with the
user through message windows on the screen.
The term REMOTE used here and later throughout this manual stands for any terminal
connected to our computer.(The one we are working on is called the LOCAL terminal).
WideScope supports terminals connected through local control units, remote lines, passthrough and PC's running emulation.
Chapter 2: Working with WideScope
1. Any workstation wishing to allow other workstations to copy its screen and execute
commands should enter the command WSINIT (This usually takes place from the user's
initial program).
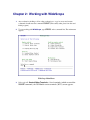
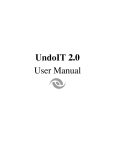
2. To start working with WideScope, type STRWS on the command line. The main menu
appears.
WideScope Main Menu
3. Select option 1. Control Other Terminals, a list
of terminals (which executed the
WSINIT command), the WS Handle remote terminals (WSV) screen appears.
WS Handle remote terminals (WSV)
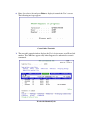
4. Type or press F4 in job field or user name, or leave the default *ANY and press Enter.
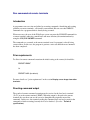
5.
The following screen displays to the Supporter the list of jobs for which Supporter
is authorized.
Select a job from list
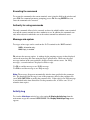
6.
Enter 1 to select a job and press Enter to display & control the User’s screen.
The following message appears
Control Other Terminals
7.
The moveable control window displays the User’s device name, user ID and job
number. The CMD line appears only when Supported is authorized to execute
commands.
Work with Submitted Jobs
Note that the control window contains the User information in order to prevent mistakes
that may caused by the Supporter transferring to a secondary job via the system request
key.
Working with WideScope control window
Move the control window with the PageUp/PageDown keys.
Hidden/restored with the F12 function key.
Refresh
To refresh the contents of the remote terminal, use the F5 function key, or press F17
for Auto-refresh. Whenever the remote user presses the function Key, (including
Enter), or if a specified number of seconds passes, the screen is refreshed.
Press the Attention Key to stop.
To execute a command at the remote terminal
Enter the command (e.g. DSPLIBL) in the appropriate field in the window. Press F10 to
execute the command from the remote terminal. The result will be displayed on the
local terminal.
Change the output device from *LCL to *RMT (at the top of the window). When F10
is pressed, the command will be executed and displayed at the remote terminal. The
result will be displayed at the remote terminal. (The remote terminal user must press
the ENTER key to continue - see remarks).
To write a message to be sent to the remote user, press F10 for an *INQ message. Or
F6 for an *INFO message.
When an *INQ message is sent, the remote user has the possibility of answering it
within a specified time.
Press F15 to display a remote job
Press F16 to display the remote job log
Press F23 for a prompt for immediate cancellation of the remote job.
Press HOME to get the Command Entry Screen, from which you can enter commands
for your local job.
Press HELP to read the online help text.
In order to change the terminal name to another terminal which has entered the
WSINIT command, clear the USER and NUMBER fields, and press ENTER. The
screen contents of the chosen terminal will be displayed.
Press F3 to quit the program.
Remarks:
The system will wait a number of seconds for a copy screen or remote command
execution to be completed. You will then get a message which will allow you either to
wait again or to cancel the command.
You cannot display a screen or execute another command until the previous command
has been completed.
Notice that the USER and JOB NUMBER fields for the remote job are automatically
filled in. This prevents any mistakes that could occur by the remote user transferring to
another job via the system request key.
Enabling a terminal to be copied
Introduction
The screen copy command displays the contents of the remote terminal screen on the
user's screen. This includes data for which the Enter key has not yet been pressed, error
messages, etc.
The user at the remote terminal will receive a message asking for his permission to allow
his data to be viewed and copied, together with the ID of the copier. The data at the
remote terminal is not touched. The remote user can continue with his work immediately
after the copying is completed and the message has disappeared.
The WSINIT command
To prevent invasion of privacy, the system requires permission from users, allowing the
copying of data from their screens. By activating the WSINIT command, the user allows
his work to be recorded, yet in order to access and view the information the user will be
asked for his permission. This status remains until changed or until the job terminates
(SIGNOFF). The statement is given by typing the command:
WSINIT
If required, this command can be included in a user's initial program, allowing his work
to be copied and commands entered by authorized users of the WSV command at any
time.
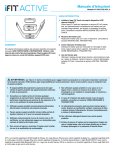
Type WSINIT and press F4 to set the definitions. The supporter will be able to view and
control the user’s work for periods 5 minutes only
WideScope Initiation (WSINIT)
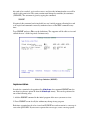
Implementation
In order for a terminal to be monitored by WideScope, the command WSINIT must be
run from it or choose option 71 from the WideScope menu). This can be performed in
one of the following ways:
1. Add the WSINIT command in the initial program of the users you want to view.
2. Force WSINIT to run for all jobs without any change in any program.
Each time a terminal needs to be viewed and WSINIT has not been run in it, a message is
sent to the QSYSOPR. If you want to separate these messages, create a message queue
named WIDESCOPE in library QGPL, and the messages will be directed to it
automatically.
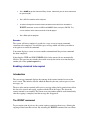
OPTION 1 - Add the WSINIT command in the initial program
In the initial program of the users you want to monitor, add the following commands:
WSINIT
MONMSG CPF0000
These commands should be added so that they will be executed before any screen is
displayed.
OPTION 2 - Force WSINIT to run for all jobs
Use this method to set up all terminals for monitoring. This method does not require any
change in the user program.
Background
When an interactive program terminal signs on, a specific "routing entry" is selected from
an interactive sub-system to execute it. The routing entry specifies which program will
have control. That program is almost always QCMD from QSYS. The following
procedure will change that program name to another program that will initiate WSINIT
and only then call QCMD from QSYS.
The procedure is designed to prevent possible problems even if WideScope
is no longer installed on the system.
The source of the program is included in file WSSOURCE, library SMZ7,
member WS#QCMD.
Use the following procedure:
Duplicate the WS#QCMD program into QGPL: CRTDUPOBJ
WS#QCMD SMZ7
*PGM QGPL
Transfer your job to the controlling subsystem: TFRJOB
Ensure no user is using sub-system QINTER: DSPSBS
Terminate the sub-system: ENDSBS
QINTER
QCTL
QINTER
Print the QINTER sub-system description: DSPSBSD QINTER
OUTPUT(*PRINT)
Look at the note on "routing entries" in the Background section on the previous page.
Enter the following command for each line that contains program
QCMD library QSYS as the program to get control: CHGRTGE
SBSD(QINTER)
SEQNBR(number) PGM(QGPL/WS#QCMD)
Start sub-system QINTER
STRSBS QINTER
Repeat this procedure for all other interactive subsystems.
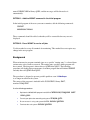
Support for 132 character screens
*RMT terminals that are in 132 character mode can be copied and displayed on any type
of *LCL terminal (24x80 or 27x132).
If the *LCL terminal is capable of displaying data in 132 mode, the screen will be
displayed in 132.
If the *LCL terminal is limited to displaying data in 80 mode, only part ("a corner") of
the copied screen will be displayed. By using the following function keys the user is able
to view other parts of the copied screen:
F19-Upper/Left F20-Upper/Right
F7 -Down/Left F8 -Down/Right
Run commands at remote terminals
Introduction
A programmer can save time and effort by executing commands, identifying and treating
problems at remote terminals - all from his own terminal. He can even enter DEBUG
commands for a program which is already being executed.
When necessary, the user of the WideScope system can enter the SIGNOFF command for
a remote terminal, achieving a much faster and more efficient job termination than by
using the CNLJOB *IMMED command.
The commands are executed at the remote terminal even if a program is already being
executed there. In this case, the program is put into a wait state until the new command
has been completed.
Prior requirements
To allow for remote command execution the initial setting at the remote job should be:
WSINIT *EXEC
Or
WSINIT *ALL (the default).
For more details see "prior requirements" in the section Display screen image from other
terminals.
Directing command output
The results of remote command execution can be received at the local user's terminal
(*LCL) or at the remote terminal (*RMT). When the output is directed to the remote
terminal, the user there can use the screen as though he/she originally entered the
command. In this case, the terminal sending the command does not need to wait for the
command to finish executing, but only for it to be checked. (See also - Technical
specifications).
Executing the command
To execute the command at the remote terminal, enter it into the field in the window and
press F10. For command parameter prompting presses F4. Pressing ENTER does not
cause the command to be executed.
Authority for using commands
The only commands allowed to be executed are those for which both the source terminal
user and the remote terminal user have authority to use. In addition, the commands can
only affect objects for which the user at the remote terminal has authorized access.
Message sub-system
Two types of messages can be sent from the *LCL terminal to the *RMT terminal:
*INFO - Information only.
*INQ -Reply is enabled.
F6 activates the message option. A window for the outgoing message is then displayed
and can be moved up and down using the Page Up/Down keys. When sent, the same
message window in the same position is displayed on the remote screen. On *INQ
messages, a second window is displayed to allow a reply.
Use F6 to send the message as an *INFO message.
Use F10 to send the message as an *INQ message.
Note: The message disappears automatically after the time specified in the parameter
file. The duration of the message is one of the parameters added to the parameter file
(use CALL SMZ7/WSA to modify the parameter file). If the reply for an *INQ message
is not finished in the time allotted for it in the parameters file, it will be sent "as it is"
when the time expires.
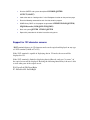
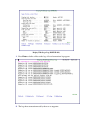
Activity Log
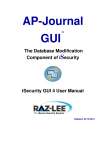
To view the WideScope activity log, select option 9. Display Activity Log from the
main menu or type the command DSPWSLOG. The Display WideScope Log screen
appears.
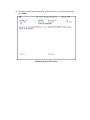
Display WideScope Log (DSPWSLOG)
1. Press Enter or define a filter to the log. A list of transactions log appears
2. The log shows transaction made by the user or supporter.
3. In order to display more information, place the curser on a transaction line and
press Enter
Additional Message Information
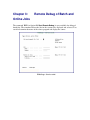
Chapter 3:
Remote Debug of Batch and
Online Jobs
The command WSD (or Option 21. Start Remote Debug) is now available for debug of
batch jobs. The command allows the jobs in the system to be displayed and selected. You
can also determine the name of the source program and display the source.
WideScope - Service assist
Chapter 4:
Security Considerations
WideScope's high standards of security prevent abuse of the product and determine:
Who is able to use WideScope.
Which active jobs can be the target of WideScope use.
Which commands can be executed.
Informs the remote user that a request was issued to display his screen, and by whom.
Logs all requests.
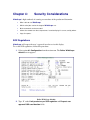
SOX Regulations
WideScope will request the user’s approval in order to view his display.
To set the SOX regulations, follow this procedure:
1. Select option 81. Configuration from the main menu. The Define WideScope
defaults screen appears
Define WideScope defaults
2. Type ‘Y’ at the Limit product as per SOX regulation and Request user
approval SOX consideration fields.
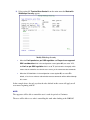
3. Select option 11. Terminal/User Control from the main menu the Work with
WideScope Security appears.
Modify WideScope Security
When the Limit product as per SOX regulation and Request user approval
SOX consideration fields in the configuration screen (option 81) are set to ‘YES’,
the Limit as per SOX regulation field is set to ‘Y’ (and cannot be changed), which
means that the controller can view the user screen, yet he cannot execute commands.
When the SOX definitions in the configuration screen (option 81) are set to ‘D’ =
default, a list of users who are authorized to execute commands will be defined through
this screen.
In the example above, the rule says that the rules defined in this screen will apply on all
user names beginning with W*
NOTE:
The supporter will be able to control the user’s work for periods of 5 minutes
The user will be able to see who is controlling his work when looking at the JOBLOG
Who is able to use WideScope
In order to be able to use WideScope, the user must be granted authority for the WSV
command. Initially, the only user profile authorized to use WideScope is the Security
Officer. The Security Officer is able to grant other users permission to use WideScope by
issuing the following command:
GRTOBJAUT WSV *CMD user-name
Integrated security system
The security system (WRKWSSEC command or option 11 from the WideScope menu)
defines users who are allowed to use WideScope.
By using WideScope security system you can achieve the following:
Defined users who are allowed to use WideScope
For each such user - defined the default authority for all terminals, whether it is
"allowed" or "not allowed".
Define exceptions for the above default.
Generic names are allowed to enhance these definitions and increase the flexibility of the
security system.
To use the WRKWSSEC command you have to be the Security Officer or get specific
authority from him to use it. In addition, a password is used to disable the use of this
command by users who have the QSECOFR authority but are not authorized to modify
the WideScope security definition.
This password is initially set to QSECOFR and can be modified from within the
command by F10-Modify password.
Which active jobs can be the target of WideScope use?
Every job that agrees to be the target of WideScope use must declare it by issuing the
WSINIT command. This declaration remains in effect until the job ends or a WSINIT
*NONE command is issued.
It is easy to achieve a situation in which all users or groups of users are always potential
targets for WideScope use, while other users - such as the DP staff, the management or
the personnel department - are not. To do so, add the following command to the Initial
Program of those users: WSINIT
Which commands can be executed?
The only commands that can be executed are those that both the Local user and the
Remote user have authority to use. Furthermore, the commands executed through
WideScope can only affect objects to which the remote user has authorized access.
Informing the remote user that a request was issued to display
his screen, and by whom.
With WideScope the target job is always:
1.
Informed when a View/Exec. request is being performed.
2.
Given the full details of the job that issued the request.
3.
Given a Log of all requests.
WideScope logs all requests
The job logs of both the *LCL and *RMT terminals clearly reflect all WS operations and
their source.
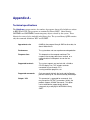
Appendix A Technical specifications
The WideScope system consists of a number of programs, almost all of which are written
in RPG III and CLP. The programs are contained in library SMZ7. Other libraries,
SMZTMPA and SMZTMPB, contain temporary objects created by the system. These
libraries do not need to be included in the library lists. The system library QGPL contains
only the command definitions WSV and WSINIT.
Approximate size
0.9MB for the program library.0.2MB for other data, for
about 100 terminals.
Performance
The system does not cause performance degradation.
Response time
This depends on the computer workload. The
response time to copy data from a terminal on a
communications line depends also on the line
speed.
Supported terminals
The system supports any terminal with a 24x80 or
27x132 display size. This includes terminals
connected via passthrough, PC's
running emulation programs, etc.
Supported commands
Only commands that both the Local and the Remote
job have authority for, can be executed by WideScope.
Output: *LCL
This parameter is supported for commands that
may accept the OUTPUT() parameter. Initially, the
product supports AS/400 commands. This option
can be extended to support locally defined
commands, by modifying file WSPNAM in library
SMZ7.
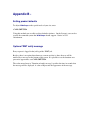
Appendix B Setting product defaults
To adjust WideScope to the special needs of your site, enter
CALL SMZ7/WSA
Using this method you are able to adjust default wait times. On the System i you can also
specify the command syntax that WideScope should support - Native or S/38
environment.
Optional *RMT notify message
Every request is logged in the job log of the *RMT job.
Besides, there is an option that whenever a remote activity is done, the user will be
notified by a message on the bottom of his screen. It is possible to set the duration or to
prevent its appearance, use CALL SMZ7/WSA.
The value entered next to "Duration of notify message" specifies the time in seconds that
the message will be displayed. A value of 0 prevents the appearance of the message.
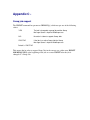
Appendix C Group job support
The WSINIT command has parameter GRPMSGQ( ) which accepts one of the following
values:
*YES
The job is changed to a group job and the Group
Message Queue is kept for WideScope use.
*NO
No action is taken to support Group Jobs.
*IFACTIVE
If the job is an active Group Job the Group
Message Queue is kept for WideScope use.
Default is *IFACTIVE
This means that in order to support Group Jobs in the correct way, either enter WSINIT
GRPMSGQ(*YES) at the beginning of the job or re-enter WSINIT after the job is
changed to a Group Job.