1
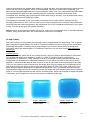
User manual
Make your own glass jewellery, anyone can do it !
INTRODUCTION
With the HotPot you can melt glass in a microwave to create jewellery or glass components for jewellery
and other creative purposes. This technique is also known by the name of glass fusing. This technique is
now available to everyone with the HotPot, since you don’t need to buy a special – expensive – fusing
kiln. Any simple, cheap microwave will do the job. Read this manual carefully before you start working
with the HotPot.
The HotPot comes in 2 sizes: the HotPot Standard has an inner diameter of 8 cm / 3,1 inch (outer
diameter 12 cm / 4,7 inch), the HotPot Maxi has an inner diameter of 12 cm / 4,7 inch (outer diameter 17
cm / 6,7 inch). The HotPot is made of Bio Soluble fibre, a fibre which is ultra light and non-hazardous.
The upper part (the lid) has a special black coating on the inside that makes it possible to obtain
extremely high temperatures inside the pot, causing the glass to melt within several minutes
The HotPot is available as a single pot or as a starter pack called HotBox. The HotBox contains a
collection of glass plates and various glass materials, tools and components for jewellery. All materials
are also available as individual items. After you have successfully created you first pieces, you can
expand your package with glass, tools and jewellery components, just the way you want it. A microwave
is not provided with the HotPot or HotBox.
MICROWAVE
The microwave used for fusing with the HotPot can be of any type, the simplest version will do. In fact,
the simpler, the better, having turnable buttons instead of a fully automatic digital system can be easier
when you need to determine the exact level of watts to use. Most microwaves feature a round glass
base on the bottom. We advise you to use this while firing the HotPot, since turning the HotPot
continuously contributes to a better heat distribution and therefore better, more equally melted glass. The
HotPot should never be put directly on the glass base, since the high temperature of the HotPot may
cause the glass base to crack. Always provide an air vent in between the plate and the HotPot by putting
3 insulating spacers under the HotPot. These spacers are provided with the HotPot.
-1For more informat ion:: www.microwave -hho
ott pot .com
Some microwaves tend to wobble while rotating. If that is the case, your glass pieces may distort and the
HotPot can slip off of its spacers, which is not acceptable. Should you notice this is happening, you
better remove the glass base and the turning mechanism. Note: even if you work without the glass base,
you should place the HotPot on the insulating spacers, to prevent overheating of the base of the
microwave itself. Although your HotPot doesn’t rotate while firing in this way, it will be better than having
your glass moving around inside the HotPot.
Theoretically it is possible to use your kitchen microwave which is also used for making food. We
strongly recommend you NOT to do so, since you will often melt glass which contains metal oxides and
other stuff that can cause toxic gasses. We recommend you to buy a separate microwave for your glass
fusing. This can be any type, the simpler the better.
Hot-tip: even a second-hand microwave will do fine, check your second-hand store or second-hand stuff
website, many people offer their “old” microwaves for little money nowadays.
GLASS FUSING
With your HotPot you will probably have bought a series of glass plates for glass fusing. This is special
glass, selected for glass fusing in the HotPot. To achieve the best results it’s good to have some basic
knowledge about glass. Therefore we will now introduce you to some rather technical background
information about the material glass. For additional information you can also check www.microwavehotpot.com
Surface tension
Like any other liquid, glass has its own surface tension, which for glass is approximately 5 millimetres.
This implies that glass, when heated up to 800 ºC / 1500 ºF will pull or flow to a thickness of
approximately 5 millimetres. This is important to keep in mind when making new glass pieces! Most
fusing glass is manufactured in a standard thickness of 3 mm. When you want to fully fuse 2 pieces
together, it is therefore advisable to stack 2 pieces on top of each other that are exactly the same size.
Then you can expect a result of similar size and shape after firing (the edges will be somewhat round
and nicely fused to one piece). It also means that with 3 layers of each 3 mm glass (total 9 mm), your
glass will flow outwards and flatten to a thickness of maximum 5 mm. The size will increase and the
originally sharp edges will become smoothly curved, the shape will have become more round. Fusing a
piece of 3 mm to high temperatures will result is a smaller piece, which has changed in shape and grown
in thickness. A very small piece can even be fused to a little ball in this way!
1 layer, total 3 mm
The glass was pulled inwards
2 layers, total 6 mm
No loss of shape, nicely
rounded edges
3 layers, total 9 mm
Size has grown and shape
has “blown up”
-2For more informat ion:: www.microwave -hho
ott pot .com
Coefficient of thermal expansion
Glass used for glass fusing must always have the same coefficient of thermal expansion – in short COE.
This means that the degree the glass expands during firing must be equal for all pieces you want to fuse
together. When glass gets heated, it will expand and when cooled, it will shrink. If you fuse 2 pieces of
glass with different COE’s together, the fused piece will break. This means you have to make sure you
always use “compatible” glass. The standard HotPot glass is COE 90.
Increase of size
Because of the expansion of glass during firing, it is important that you carefully choose the size of your
glass pieces The glass should stay away from the inside wall of the HotPot during firing, so keep a space
of at least 1,5 cm / 0,5 inch between the glass and the side wall of the HotPot. In case your glass comes
into contact with that inside wall, your HotPot will be damaged and will probably become useless!
Be extremely cautious when you stack more than 2 layers on top of each other, at high temperatures the
final size will increase dramatically and the shape will be rounder (read the chapter on surface tension)!
Heating and cooling
Some microwaves can go up to 800 watts or more. However, if you live in a country where the standard
power system is 220/230 Volts, we strongly advise you to fuse your glass at a maximum of 500 or 600
watts,. When you live in an area where 110 Volts is the standard, you can easily fire at 800 or 900 watts.
Increasing power will melt the glass quicker. Heating your glass too fast will cause the glass pieces to
break, as a result of thermal shock. If this occurs, glass pieces may even shift to the inner side wall of
the HotPot and damage it. Take into consideration that less watts leads to slower heating of the glass
and is therefore a safer way to work.
Liquid glass cannot break. When you see an orange glow coming out of the hole in the lid of the HotPot,
the temperature will be high enough for the melting process to have started. This means that you can
safely open the HotPot to quickly check the melting process at this point. The glass will also have an
orange glow and will be soft enough not to break by thermal shock. Close the HotPot after 1 or 2
seconds, as the glass will cool quickly and will then again be exposed to thermal shock.
Be careful not to cool your piece too fast. When a piece is finished and you have removed the HotPot
from the microwave, leave it to cool down on a heat-resistant surface until it has reached room
temperature. The time needed for this cooling process of course depends strongly on the size of the
piece, a guideline can be somewhere between 1 and 2 hours. In case of doubt, let it cool down longer.
Remember, forced cooling can always lead to cracks because of thermal shock!
GLASS RELEASE AGENTS
Never put your glass directly on the bottom of the HotPot, as it will stick to this bottom while melting and
this will damage the surface of the bottom. You will need to use a release agent. To fuse a flat piece of
glass we advise you to first put a piece of biosoluble fibre blanket on the bottom (1 mm thickness),
covered by a piece of smooth fusing paper. Both need to be slightly larger than the glass, to prevent the
glass from flowing over the fibre material while melting. This way you can create a nice surface on the
bottom of your glass piece and it will not stick to the HotPot. The fusing paper and fibre are for 1-time
use only.
Note: never use bakery kitchen paper, this is not suitable for melting glass!
* Biosoluble fibre and smooth fusing paper are included in the HotBox starter pack
Hot-tip: You can also create pieces that are not fully flat at the bottom-side. Use cut parts of biosoluble
blanket to make an uneven bottom and “build” a more 3-dimensional piece in that way.
We advise you not to use ceramic release material by other brands. Many of these materials contain
hazardous and toxic particles. The materials from the HotPot family are absolutely safe
-3For more informat ion:: www.microwave -hho
ott pot .com
THE PROCESS OF MAKING GLASS JEWELLERY STEP BY STEP
1. Cut your glass, clean it and decorate it with coloured glass, millefiori etc. Use the special HotPot
glue to hold the layers together. Other brands of glue will most likely leave dirty spots after fusing.
Leave until the glue has dried completely.
2. Cut a piece of biosoluble fibre blanket (1 mm) and a piece of smooth fusing paper. Make sure
these are about 0,5 cm / 0,25 inch larger than the glass pieces.
3. Put the blanket and fusing paper on the bottom of the HotPot and put your glass on top, exactly
in the middle of the HotPot. Make sure to leave a space of 1,5 cm / 0,5 inch from the inside wall
of the HotPot.
4. Place the bottom of the HotPot in the middle of the microwave, on the glass base.
5. Set watt and time, start the microwave and stay near the microwave during the process of firing.
6. When you see a clear yellow/orange light coming out of the hole of the HotPot, you can check the
melting process by lifting the lid of the HotPot (with heat-resistant gloves). If not melted properly
yet, close the lid en continue the firing. Check again after 20 seconds. You can repeat this until
the glass is fused the way you feel is enough. Checking needs to be done quickly, to prevent to
glass from cooling down too much.
7. When your piece is fused, immediately remove the HotPot from the microwave and place it on a
heat-resistant surface to cool. Leave the lid on!
8. After the glass has cooled to room temperature (may take 1 – 2 hours) you can remove the glass
piece from the microwave. Remove the burned fibre paper and blanket, clean your glass piece
with some water and finish your jewellery!
Hot-tip: Place a large ceramic tile next to your microwave, so you never have to look for a place to put
your HotPot after firing.
FIRING TIMES
The optimum wattage and firing time needs to be determined by testing. As you already know, size and
thickness of the glass is of great influence. Furthermore there is a big difference in the firing times
between the HotPot Standard and the HotPot Maxi, the latter can take up to 5 extra minutes to achieve
the same result as the Standard model. Another very important factor is the microwave. The behaviour
varies between each brand and each type, which makes it impossible to provide you with a standard
instruction. You will have to “get to know” your own microwave, by starting some straight forward tests
that you fuse while exactly documenting the settings of the microwave and what results you get. This will
teach you to fuse successfully and safe, to make beautiful jewellery!
It will also teach you what type of fusing will be your goal, since the level of fusing is a personal choice.
When 2 pieces melt together, still showing clearly the 2 separate pieces, we call this “tack-fusing” (see
figure 1). When you can no longer see the 2 different pieces and everything has melted to one level, we
call it “full-fusing” (figure 3). Both are technically okay. And of course there are many levels between
tack- and full fuse, as the figures below show you. Your can decide for yourself what your goals are.
1
2
3
To help you along with your very first test, we suggest you put 2 pieces of 3 x 3 cm ( 1 x 1 inch) on top
of each other and fire it at 550 watt. Proceed until you see a yellow/orange light coming out of the
HotPot. This should happen somewhere between 3 and 10 minutes, depending on your microwave, the
size of your HotPot and your glass. This is an indication that fusing is starting. At this point you can start
checking the level of fusing by opening the microwave and the HotPot. Continue firing and regular until
the result is how you want it to be.
-4For more informat ion:: www.microwave -hho
ott pot .com
Hot-tip: To have a better view on the HotPot light in your microwave, you can remove the lamp of your
microwave, or cover it with some heat-resistant material like fibre blanket and a non-transparent tape.
YOUR WORKING AREA
It may be wise to create a permanent working space for yourself, rather than having to clear everything
up every time. Always make sure that there is enough space around the microwave for heat release.
Think about ventilation options for the room, since hazardous gasses and strange smells can occur, if
you fire other materials besides glass.
Don’t make your working space too small, it is always nice to have all materials at hand. Reserve a fixed
place for the heat-resistant gloves, since you must be able to use them at any given moment. You don’t
want to ruin your glasswork because you couldn’t find your gloves, right?
Prepare a heat-resistant surface, for instance a ceramic tile next to the microwave. It should be large
enough to put both your HotPot bottom and lid next to each other. Never use a wooden or plastic surface
to put a hot HotPot on it will surely cause burning marks!
EXTRA
After having successfully fused some beautiful pieces of jewellery you will probably want to extend the
possibilities. The HotBox starter pack includes several materials to design your own style and colours
with your jewellery and several tools for ease of use and to improve finishing of items, such as dichroic
glass. The top layer of this glass contains precious metals for colourful reflections. Also included is a bag
of Millefiori, small glass pieces to fuse flower-like shapes. Apart form that you can buy numerous articles
to extend your collection such as:
Dichro-slides: masker film that contains precious metals and can easily be fused on glass
Pre-cuts; fusing glass in pre-cut shapes like stars, circles etc.
Gold pencil: for decorating in gold
On www.microwave-hotpot.com you will find many tipsheets, project sheets and other useful information
that explains more about how to use all these materials. Check out the website and learn more about
making glass jewellery!
TIPS & TRICKS
•
•
•
•
•
•
Oil and dirt can leave matt and nasty spots on your glass after fusing. Clean your glass before
fusing with a degreasing fluid such as cleaning-alcohol or a special glass cleaner.
Never use an oil-lubricated glass cutter. Although there are many nice cutters with oil reservoirs,
you should note use this type of cutter, unless you leave the oil out.
In countries where 220 Volts is common: never use the HotPot above 700 watts. If you have 110
Volts, the microwave’s maximum wattage is usually 1000 which is okay as a maximum for the
HotPot. If you fire too high, the glass will be heated up too fast, which can cause a thermal shock
and therefore breaking of the glass and possible damage to your HotPot.
Every time you start fusing, the HotPot must be completely cooled to room temperature. If you
use a warm HotPot, the glass will melt a lot faster which not only makes it more difficult to define
the fusing time, but again this may cause a thermal shock to your glass.
Always make sure to put the HotPot in the middle of the microwave. This will lead to the best
possible heat distributions and therefore the best results.
Make sure your microwave is placed exactly horizontal, to prevent the HotPot from moving to one
side and pieces of glass shifting around in the HotPot.
-5For more informat ion:: www.microwave -hho
ott pot .com
SAFETY PRECAUTIONS
•
•
•
•
•
•
•
•
•
Always use heat-resistant gloves to open the HotPot for checking the fusing process and for
moving the HotPot, when it is not yet completely cooled down.
Do not place the HotPot on a wooden or plastic surface when it is hot. This is bound to leave
burning Marks and may possibly create a fire. Use a heat-resistant surface like for instance a
ceramic tile. Check frequently whether the tile holds away the heat well enough from the under
laying surface and does not leave burning marks. The tile should always be close to your
microwave so that you never have to look for it when you need it.
Should any accidents occur, make sure you have a fire-extinguisher in your working area, in such
a place that you have easy access to it.
Keep any flammable materials away from your working area.
Working with hot glass is not for children, so clean up your working area and lock away all
potentially dangerous materials when children are around, to prevent them form playing with it.
In case you fuse non-glass materials with your glass, hazardous gasses or fumes may occur.
Make sure the working area can be ventilated at all times.
Be careful with hot glass, the temperature of glass can not be seen. Be cautious while handling
the glass if it has not clearly cooled down enough. When In doubt you should wait a bit longer,
rather than having your fingers burned. For emergency situations, keep an ointment for burned
skin at close hand.
Never rinse a glass piece with cold water if it is not fully cooled. If the glass is still warm on the
inside, it may easily crack, so please wait until you are sure it is completely cooled to room
temperature.
Never leave the microwave unattended when you are fusing glass in it.
-6For more informat ion:: www.microwave -hho
ott pot .com