1
Joyfax Server User Manual
TABLE OF CONTENTS
Beginner Guide
6
Install Joyfax
7
System Requirements
9
Introduction
10
System Requirements
11
What's new in Version 6
12
Joyfax Server
16
Configuration wizards
17
Area Code & Dialing Rules
18
Configure Fax Devices
Configure modem manually
20
19
Send fax via specific fax devices
23
Fax to Email Configurations
24
Automatic fax routing
25
22
Routing Rules' Options
26
To Client Users
27
To Email Addresses
29
To Printer
30
CSID Matching Rules
31
Forward incoming fax to client manually
33
Managing faxes
34
Suspend sending fax job
35
Pause outgoing fax job
36
Resume outgoing fax job
37
Resend undelivered fax
38
Cancel receiving fax job
39
Mark fax as removed
40
Fax properties
41
View Fax Message
42
Search Fax History
43
Public Phone Book
44
1
Managing Contact Groups
45
Add New Contact Group
46
Edit Contact Group
47
Delete Contact Group
48
Managing Contacts
49
Add new contact
50
Edit contact
51
Delete contact
52
Exporting contacts
53
Importing contacts
54
User Manager
55
Managing Groups
56
Add new group
57
Edit group
58
Delete group
59
Managing Users
60
Add new user
61
Edit user
62
Delete user
63
User Permissions
64
Run Joyfax Server as Windows Service
65
Joyfax Client
66
Install Joyfax Client
68
Configure Settings
69
login to Joyfax Server
72
User Login
73
Sending faxes
74
Sending a fax from Client
75
Sending a cover page only fax
77
Add your personal digital signature
78
Sending a fax from another application
79
Quickly faxing an existing contact
80
Faxing a document from Windows Explorer
81
Sending a scheduled fax
82
Fax Options
83
Custom fax headers & footers
84
2
Fax Recipients
86
Checking fax status
88
Receiving faxes
89
From Joyfax Client
90
From your email client (Outlook Express, Outlook or Thunderbird)
91
Read Tracking
92
Managing Folders
93
Adding a folder
94
Moving a folder
95
Renaming a folder
96
Deleting a folder
97
Working with faxes
98
Deleting fax
99
E-mail fax message
100
Fax Properties
101
Marking fax as Unread
102
Moving faxes
103
Print a fax message
104
Restoring deleted fax
105
Retrieving fax history
106
Searching fax
107
Phone Book
108
Managing Contact Groups
108
Add a New Contact Group
109
Edit a Contact Group
110
Delete a Contact Group
111
112
Manage Contacts
Add a New Contact
112
Edit a Contact
113
Delete Contact
114
Searching Contacts
115
Exporting Contacts
116
Importing Contacts
117
Joyfax Client Console
118
Cover Page Editor
119
Add, Edit, or Delete Cover Pages
120
Save a Cover Page
121
Insert Cover Page Information Fields
122
3
Add a Picture to a Cover Page
123
Insert Labels, Lines and Shapes Objects
124
Change the Layering of Cover Page Items
125
Grouping Objects
126
Display or Hide Grid Lines
127
Fax Editor
128
Menu bar
129
Drawing Toolbar
131
Using Drawing Tools
132
Text Stamp
133
Image Stamp
135
Tips
137
Flexible Use of Selection Rectangle
137
Password Protects Image Stamp
138
Insert Fax Pages from a Scanner
139
Save the Fax Message as PDF fromat
140
Backup & Restore
141
Joyfax Client files
142
Joyfax Server files
141
Frequently Asked Questions
143
Can I add additional Clients or FAX Line later?
144
Is there a way to prevent stripping the local area code for all numbers of the local area?
145
Does my modem support Caller ID?
146
How can I set up the "Fax to Email" function correctly?
147
Error "…application has encountered a problem and needs to close" when you start
Joyfax Server or Client on Windows XP
148
I got the error message "Create print desktop failed, not enough storage space."
149
In the United States, what sequence of numbers do we need to enter in the Phone book?
150
What are the differences between class 1, 2 and class 2.0 modems?
151
Which modems and fax boards do you recommend for Joyfax Server?
152
How to backup of the Joyfax Chient files?
154
How to access Joyfax Server behind a router/firewall?
155
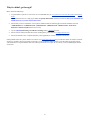
Why fax didn't go through?
157
How can I improve fax reliability?
158
How to install multiple fax modems?
159
What does Ordinal Not Found : The ordinal [xxxx] could not be located in the dynamic link library
LIBEAY32.dll?
161
4
The modem works fine in Windows Fax and Scan, but Joyfax Server/ How to manually correct init
string?
162
Why my modems can not be recognized by the Joyfax server?
163
How to correct the Modem initialization string?
164
How to use Outlook Contacts directly when choosing the recipients?
165
How many recipients can be specified in per fax message?
166
Why have I not received my registration codes?
167
Can I send faxes from the fax server?
168
How to set up area code for Joyfax Server?
169
How do I silence the fax modem / How to turn off modem speaker?
170
Does Joyfax Server support ISDN?
171
Remove the limit concurrent TCP/IP connections for Windows XP/Vista
174
Help us to translate Joyfax Server into your language and earn a free license
175
I am having problems sending faxes with my US Robotics fax modem
176
Does it matter what fax modem I use for faxing?
177
Why are the receiving faxes/pdf attachments not readable?
178
Why my computer restarts after the installation of multiple fax modems?
179
How to increase Resolution/Quality of sent fax?
180
Why the fax can't be sent out due to "Invalid Fax File" When I send a fax from the
Client?
181
No receiving fax in my Client, How to configure automatic fax routing?
182
Why is fax resolution so low?
183
Does my modem support Caller ID?
184
How to change the email subject and body, sent the Joyfax Server?
185
When opening the software, you receive "Runtime error 71: disk not ready."
186
How to enable the Email Notification function when faxes sent?
187
Can Joyfax Server support VOIP?
188
Only the first part of first page is send when sending a fax
189
Registering Software
190
Registering Joyfax Server
191
Registering Joyfax Client
192
License Agreement
193
Technical support
194
5
Beginner Guide
Before using the Joyfax server, please read instructions as below:
1. Determine which computer on your network is best suited to act as the fax server, and make sure it is accessible to
other computers on the network; If you wish to access the Fax Server behind a router/firewall, please refer How to
access Joyfax Server behind a router/firewall?
2. Install at least one fax modem on the fax server and connect it to a telephone line;
3. When you start Joyfax Server or Joyfax Client on Windows XP, if it returns an error messages says "Joyfax
Server/Client has encountered a problem and need to close. We are sorry for the inconvenience", please refer to this
article
4. Joyfax Server will automatically retrieve your Area Codes and calls prefixes from the Windows Regional Settings, but
you have to enter your area codes manually if you never configure them before;
5. The default data folder for the fax server's data files is C:\JoyfaxServer, the fax server will attempt to use this folder to
store its data files;
6. In order to receive faxes from clients, you must specify the Routing rules based upon Calling Number Display
(commonly called Caller ID), CSID and Fax Line. For more help, refer to Automatic Fax Routing
7. By automatically routing incoming faxes to clients based upon the phone number, the Caller ID command must be
configured; For more help, review Does my modem support Caller ID?
8. A SMTP Server must be configured if you wish to receive faxes via an Email Client;
9. It's easy to import contacts from a CSV file into Joyfax Server, please refer to this article .
In summary:
Download the latest version of Joyfax Server installation package from the download section;
Install Joyfax Server at server:
1. Run the installation package at server, select the Server component to install;
2. Launch Joyfax Server, follow the wizards to configure the fax server;
3. Add new users, then set up fax routing rules(Server ->Options-> Fax Routing)
Now, Joyfax Server has been installed and is ready for service.
Install Joyfax Client on the workstations:
1. Run the installation package at server, select the Client component to install;
2. Run and enter the server's address, user name and password to log in to fax server;
3. To receive faxes from an email client, please refer to Joyfax Client Help Document.
6
Install Joyfax
How do I ...
Install Modem
Increase Windows XP/Vista TCP/IP Max Connections
Install and uninstall Joyfax Server
Install Modem
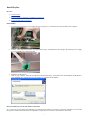
1. To prepare the Joyfax Server for sending and receiving faxes, you should connect the modem to the computer.
2. Connect your computer's modem to your phone line using a standard phone cable. Plug in the modem's power supply
if you are installing an extended modem.
3. Install the modem drivers.
Turn on your computer. After the New Hardware Wizard detecting your modem, insert the Installation CD-ROM into
your CD-ROM drive. Follow the onscreen prompts to complete the installation
Increase Windows XP/Vista TCP/IP Max Connections
As you may have noticed Microsoft still limits your half-open (incomplete/syn packets) connection attempts per second that
the system can make, this limit effects the capability of Joyfax Server. To increase TCP/IP Max Connections:
7
1. Download the TCPIP.SYS patch from our site;
2. Unzip the package file, and follow the introduction.
Note: If you are using a Windows 2000/2003/Vista Server computer, just disregard this step.
Installing Joyfax Server
1. Download the latest version of Joyfax Server installation package from our site;
2. Install Joyfax Server at server:
Run the installation package at server, select the Server component to install;
Launch Joyfax Server, and follow the Wizard to setup the server;
Configure the Fax Modem and Area code;
Add new users, then Set up fax routing rules(Server ->Options-> Fax Routing)
Now, Joyfax Server has been installed on the server, it will allow all Joyfax Clients to send & receive fax.
Uninstalling Joyfax Server
1. There are three ways to uninstall Joyfax Server:
Go to Control Panel -> Add or Remove Programs, find Joyfax Server, and then click the Change/Remove
button;
Click Start -> All Programs -> Joyfax Server, and then select the Uninstall item;
Locate Joyfax Server Installation Directory, and then run the uninst.exe application.
2. Follow the Uninstallation wizard to complete the uninstallation.
8
System Requirements
To guarantee stable operation, the following minimum requirements should be met:
Requirements for Client Installation:
133 MHz or higher Pentium-compatible CPU
Working Memory 64 MB or more
Hard disk with at least 15 MB available
Video display capable of 16-bit color and 800 x 600 resolution
TCP/IP network(LAN or WAN)
Print spooler service enabled
Internet Explorer 5.0 or above
Microsoft Windows 2000/XP/2003/Viata/2008
9
What is Joyfax Server
Joyfax Server allows you to send and receive faxes in a network environment by using a public phone line. Our easy-to-use
Fax software also can offer the ability to manage your group faxing and the fax contact lists.
The Fax server receives incoming faxes, and then prints them or emails them to your mail box automatically. Outgoing fax jobs
are submitted to the server from Joyfax Client running on the workstations or terminal server clients(Windows Remote
Desktop or Citrix Client). Network clients are automatically notified when incoming faxes are received and of the results of
outgoing fax jobs.
Features
User-friendly Interface
Supports sending and receiving faxes on Multiple modems. The theoretical limit is 16 modems.
Supports acquiring images from your scanner for faxing
Automatic fax routing
Fax to Email
Fax sent notification
Adobe PDF to fax without Adobe Reader
Read Tracking
Public Phone book
Scanner Support
Network-wide access from every workplace
Build-in database engine
Simple faxing just as fast printing
Fax broadcasting
Perfect security management
10
System Requirements
To guarantee stable operation, the following minimum requirements should be met:
Requirements for Server Installation:
300 MHz or higher Pentium-compatible CPU
Working Memory 256 MB or more
Hard disk with at least 100 MB available
Video display capable of 16-bit color and 800 x 600 resolution
Fax modems/boards that support fax class 1, 1.0, 2 or 2.0
Phone line, TCP/IP network
Internet Explorer 5.0 or above
Microsoft Windows 2000/XP/2003/Viata/7/2008
11
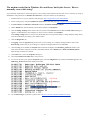
What's new in Version 6.0
Cover Page for fax, powerful Cover Page Editor included;
Fax Editor allows to edit fax message directly;
Password-protected rubby stamp;
Add your personal signature to outgoing fax messages
[C] - Joyfax Client
[S] - Joyfax Server
[B] - Both the Joyfax Client & Server
V6.0 Build 0502 (July 12, 2011)
---------------------------------------------------------------------- - [B] - New installation
- [B] - Improving the output PDF quality
- [B] - New Fax Editor
V5.90 Build 0502 (May 2, 2011)
---------------------------------------------------------------------- - [S] - Allows to choose a specific fax device to an user group for sending fax
V5.83 Build 0412 (April 12, 2011)
---------------------------------------------------------------------- - [S] - Improve performance in data accessing and processing - [C] - Bug fixed
V5.70 Build 0320 (March 20, 2011)
---------------------------------------------------------------------- - [S] - Optimized Fax routing function;
- [S] - Automatically save all incoming fax as PDF file
V5.60 Build 0311 (March 11, 2011)
---------------------------------------------------------------------- - [S] - Allows to set up the mode or matching order of Routing Rules
V5.50 Build 0211 (Feb 11, 2011)
---------------------------------------------------------------------- - [S] - Optimized installation for Windows x64
V5.47 Build 1222 (Jan 26, 2011)
---------------------------------------------------------------------- - [S] - Allows to print incoming fax to multi-printer separately by fax line
V5.45 Build 1222 (Dec 22, 2010)
---------------------------------------------------------------------- - [S] - Allows to send email notification when fax sent
V5.34 Build 1216 (Dec 16, 2010)
---------------------------------------------------------------------- - [B] - Optimized installation
V5.30 Build 1203 (Dec 03, 2010)
---------------------------------------------------------------------- - [C] - Allow client to add/edit/remove public contact in find contact dialog
V5.20 Build 1130 (Nov 30, 2010)
---------------------------------------------------------------------- - [C] - Command line supported.
V5.10 Build 1028 (Oct 28, 2010)
---------------------------------------------------------------------- [C] - Allows to use Microsoft Outlook contacts
V4.99 Build 0917 (Sep 17, 2010)
---------------------------------------------------------------------- [C] - Allows to delete page in fax document
V4.98 Build 0826 (Aug 26, 2010)
12
---------------------------------------------------------------------- [B] - Supports multi-page scanning
Allows adding custom Fax modem
V4.94 Build 0610 (June 10, 2010)
---------------------------------------------------------------------- [C] - Both TWAIN and WIA standard scanner supported now!
- [B] - Optimized fax printing function
V4.93 Build 0530 (May 30, 2010)
---------------------------------------------------------------------- [B] - Optimized installation of Joyfax Server
V4.93 build 0512 (May 12, 2010)
---------------------------------------------------------------------- [C] - Optimized for Windows 7
V4.93 build 0508 (May 08, 2010)
---------------------------------------------------------------------- [B] Optimized the printing function
V4.93 build 0330 (March 31, 2010)
---------------------------------------------------------------------- [B] French language supported
V4.93 build 0320 (March 21, 2010)
---------------------------------------------------------------------- [B] German language supported
- [B] Optimized the printing function
- [C] TWAIN standard scanner supported
V4.90 build 0302 (March 3, 2010)
---------------------------------------------------------------------- [C] Bug fixed.
- [S] Transport Layer Security supported now, allows you to use Gmail/MSN account to send fax.
V4.89 build 0220 (February 20, 2010)
---------------------------------------------------------------------- [B] Bug fixed.
V4.88 build 0122 (January 22, 2010)
---------------------------------------------------------------------- [S] You are allowed to modify the Subject and Body of the Fax to email.
V4.86 build 1207 (December 6, 2009)
---------------------------------------------------------------------- [B] Bug fix compilation on 64 bit Windows
V4.8 build 1116 (November 16, 2009)
---------------------------------------------------------------------- [B] Improved fax routing function
V4.62 build 1020 (October 20, 2009)
---------------------------------------------------------------------- [B] Optimized the printing function
V4.5 build 928 (September 27, 2009)
---------------------------------------------------------------------- [C] Joyfax Cover page editor Multi-language support
- [C] Added Personal Cover Page Manager
- [C] Added Sender Information Manager
- [B] Added Italian Language
V4.1 (September 10, 2009)
---------------------------------------------------------------------- [S] New Fax Engine that supports many more fax modems
- [C] Optimized the Printer Drive which results in a better fax quality for faxes
- [C] Added Fax Report functions
V4.0 beta (August 24, 2009)
---------------------------------------------------------------------- [C] Added Joyfax Cover Page editor
- [C] Cover Page and digital Signature supported
13
- [B] Minor GUI tweaks
- [B] Bug fixed
V3.64 (July 30, 2009)
---------------------------------------------------------------------- [S] Added Joyfax Server Fax Storage Location Tools
V3.63 (July 28, 2009)
---------------------------------------------------------------------- [S] Improved Joyfax Server windows service.
V3.62 (June 30, 2009)
---------------------------------------------------------------------- [B] Bug fixed
- [B] Optimized the installation package
V3.60 (June 9, 2009)
---------------------------------------------------------------------- [B] Added editing public contacts & groups from a client
- [B] Minor GUI tweaks
V3.50 (May 27, 2009)
---------------------------------------------------------------------- [B] Multi-language support
- [B] Improved the import contacts feature
- [B] Minor GUI tweaks
V3.38 (May 8, 2009)
---------------------------------------------------------------------- [B] Improved the printing function
- [S] Optimized login progress
- [B] Minor GUI tweaks
V3.36 (May 4, 2009)
---------------------------------------------------------------------- [S] Fixed bug with adding/removing dialing rulues
V3.35 (April 30, 2009)
---------------------------------------------------------------------- [C] Fixed bug the software crashes sometimes if the address book panel closed
V3.32 (April 21, 2009)
---------------------------------------------------------------------- [B] Optimized login and authentication process
- [C] Improved auto-sending/receiving fax
V3.31 (April 20, 2009)
---------------------------------------------------------------------- [S] Fixed bug when network/cable disconnected in client, user couldn't login again
- [S] Improved interface for shortcut menu.
- [C] Optimized code to improve performance on sending fax
V3.30 (April 18, 2009)
---------------------------------------------------------------------- [B] Updated to be compatible with Windows 2008 Server
- [B] Improved Print function
- [S] Fixed bug the server cann't send/receive fax after redetecting fax devices
- [C] Fixed bug with Popup menus in System Tray when New Fax dialog opened
- [C] Fixed bug with exporting contacts
V3.20 (April 15, 2009)
---------------------------------------------------------------------- [B] Updated to be compatible with 64-bit OS
- [S] Minor GUI tweaks.
- [B] Fax Browser now supports .FMF format
- [C] Optimized code to improve performance on retrieving fax history
- [S] Fixed fax status issues
- [C] Fixed bug when purging deleted fax items
V3.10 (April 10, 2009)
---------------------------------------------------------------------- [S] Added Auto Mail Setup in configuration wizard
14
- [S] Added sending the fax as an Adobe PDF file attachment in e-mail
- [B] Improved error messages
- [B] Lots of minor interface improvements.
- [S] Fixed manually forwarding fax issue.
- [C] Fixed login issues
V3.00 (April 8, 2009)
---------------------------------------------------------------------- [B] Office 2007 style toolbars and menus have been implemented, click for more...
- [S] New Fax Engine supports many more fax modems
- [B] Added for saving fax as Adobe PDF file
- [C] Improved fax browser
- [B] Optimized code to improve the communications performance
- [B] Minor optimizations and bug fixes
V2.90 (February 2, 2009)
V2.55 (November 28, 2008)
V2.00 (November 7, 2008)
V1.50 (July 25, 2009) First Public Release
15
Joyfax Server
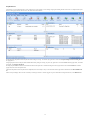
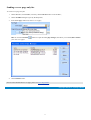
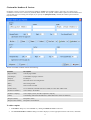
Joyfax Server is a server application that is used to send and receive fax via PSTN, you can manage outgoing and incoming fax and user lists here. A computer where Joyfax
Server is running plays the role of the fax server. The main window looks like this:
Sending/Receiving Fax panel shows the fax jobs which are sending or receving. To cancel the job, right click on it and select Suspend sending fax/Cancel receiving fax from
the popup menu.
Outgoing Fax panel shows the fax jobs which submited from clients queuing for sending. To pause a job, right click on it and select Pause from the popup menu; To resume a
paused job, select Resume outgoing fax.
Incoming Fax panel ONLY shows the received fax items which are not dispensed. To forward Incoming fax to clients, right click on it and select Forward fax to... from the
popup menu, then choose the expected user.
Undelivered Fax panel shows the fax jobs that are completed, but unsuccessfully. To retry to send an undelivered fax, right click on the item and select Resend undelivered
fax.
Online Users panel displays the users who are currently connecting to Fax Server. To kick a logged user, press CTRL button and right click the user, select Kick this user.
16
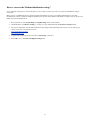
Configuration wizards
The first time you start Joyfax Server, the Configuration Wizard will be launched which will enable you to set up the basic
configurations of Joyfax server.
The description of each wizard step is given below:
Step 1: The brief description of the Configuration Wizard;
Step 2: Select whether to Create a new database, or Choose an existing JoyFax Server database(*.gfd);
Step 3: Set up a password to prevent unauthorized users from setting or shutting down the fax server;
Step 4: Specify a folder on your hard disk where you want to save the faxes;
Step 5: Fax Server automatically detects and configures fax modems for sending & receiving fax, it's recommend that
you specify the Caller ID command(AT+VCID=1 works for most modems); Please make sure that the modem is
connected to a telephone line;
Step 6: Set up the Area code and Calls prefixes so that the fax server will know how to dial a fax number. Please
unselect Specify dial location if you don't know how to set it up;
Step 7: Set up your Fax to Email Configurations so that the fax server will know what mail server to use and how to
authenticate for sending mail;
Step 8. Configuration completed, click Finish button to close the configuration wizard and open the main windows.
17
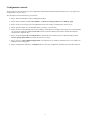
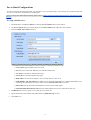
Area Code & Dialing Rules
Dial location
Dial location specifies the country code, area code, and specific dialing requirements for the place you are dialing from. It is used to
analyze telephone numbers and determine the correct sequence of numbers to dial. You can also specify a code for dialing outside the
company or a building, such as an office or hotel room.
Dial location information includes:
Country or region code
Area (or city) code
Area code rules
Dialing rules
Specifying dial location
On the Server menu, click Server Options,
The Server Options dialog box will be displayed. In Area code, select Specif dial loation check box, enter the Country or
region code and Area(or city) code;
Note: If you don't know how to set it up, please unselect Specify dial location checkbox, the Fax Server will dial the fax
number directly as you entered in Joyfax Client.
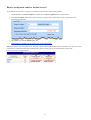
In accordance with the settings above(Ensure the Auto. remove area code for local calls option is checked):
Phone number
Dial as
(311) 234-5678
2345678 (local call)
+1 (311) 234-5678
2345678 (local call)
(312) 345-1234
13123451234 (national call)
+1 (312) 345-1234
13123451234 (national call)
+44 (20) 3456-7890
011442034567890 (international call)
If you need to reach an outside line for local and long-distance calls:
Click Incoming/Outgoing section located on the left side of the window
Enter the numbers required to reach an outside line for local and long-distance calls.
18
Click OK to save configurations
Area code rules
Area code rules enable you to change the dialing patterns for calls to numbers in the same region or city. The default area code rule
for numbers in another area code often requires the Joyfax Server to dial the long distance operator, the area or city code, and then the
phone number. For numbers in the same area code, the Joyfax Server dials only the subscriber's phone number.
Long-distance call prefixes: Phone numbers that starts with these prefixes should be dialed as long distance calls;
Local call prefiexes: Phone numbers that starts with these prefixes should be dialed as local calls;
Dialing rules
Dialing rules specify the long distance operator and international prefix that is dialed before domestic long distance or international
phone numbers. Follow these steps to specify the rules:
On the Server menu, click Server Options;
The Server Options dialog box will be displayed. In Area code, Given the Country or region code: +1; Area (or city) code:
International prefix: 011; Long distance: 1;
Check Auto. remove area code for local calles;
Click Dialing rules... button, in the Dialing rules... dialog box; Given rules set as below:
Phone number
Dial as
(311) 234-5678
13112345678 (long-distance call)
(311) 345-1234
13113451234 (long-distance call)
(311) 345-6789
3456789 (local call)
(312) 234-5678
3122345678 (local call)
(318) 234-5678
3182345678 (local call)
(313) 234-5678
13132345678 (long-distance call)
19
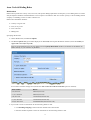
Configure Fax Devices
Before configuring fax devices, you must Stop sending/receiving fax services, and then
1. On Server menu, click Devices Settings
Fax Devices Settings dialog box contains the following items:
Devices: Allows you to choose a modem to configure settings
Detect Devices: Click this button to automatically detect all connected modems
Fax number: Specify the fax number for the selected fax device
TSID String: Specify the transmitting subscriber ID (TSID) sent by the Joyfax Server to a receiving fax machine
Fax Class: Use Class 1 unless your modem does not support it. Class 1 has been in existence much
longer,which is supported by most fax machines and enjoys the most consistent implementation across fax
devices in use today. The selection of fax class does not, in any way, affect the transmission speed.
Caller ID String: Speicfies the caller id command to enable Caller ID reporting; Common caller id commands
are:
1. AT+VCID=1
2. AT#CID=1
3. AT#VCID=1
4. AT+CID=1
Reset String: Specifies the reset command to reset the modem after a fax transmission. Common reset
commands are:
1. ATZ
2. AT&F
3. AT&F0
Answer after n Rings: This option indicates the number of rings that will be detected before the modem is
directed to go off hook and answer the call; Sets of at least Two Rings for retrieving caller ID correctlly.
20
Enable Receiving Faxes: If this options is checked, the modem will be able to receive faxes
Enable Sending Faxes: If this options is checked, the modem will be able to send faxes
2. The Fax Devices Settings dialog box will be displayed, click Detect Modems
3. Make at least ONE fax device selected; Sets the Caller ID string if you would know, answers on 3 rings;
4. To turn off the Modem speker, check whether M0 (0=zero) appears in the Init strings or not. If it already exists, move it
to the end of Init strings, or place the M0 at the end of the init strings;
5. Make other all required changes and click OK to save.
21
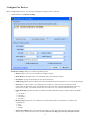
Configure modem manually
For some reason(i.e. the modem name contains a # character), Joyfax Server cann't detect fax devices on your computer
automatically, then you can add it manually by:
1. On Server menu, click Devices Settings;
2. The Fax Devices Settings dialog box will be displayed, click Configure Manually button;
3. In the Add device dialog box, choose a COM port and specify a device name for the adding fax device;
4. Click OK to return to Fax Devices Settings dialog box;
5. Make other all required changes and click OK to save
To remove an existing device:
1. On Server menu, click Devices Settings;
2. The Fax Devices Settings dialog box will be displayed, select the Fax Device would like to remove;
3. Click dropdown allow of Configure Manually button, click Remove Device in the popup menu;
4. You will be asked to confirm the action. If you are sure, click OK.
22
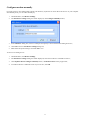
Send fax via specific fax devices
Joyfax server allows you to specify fax devices for user groups, users in the group will only use the specific fax device to send
fax.
To specify fax devices for user groups
1. On Server menu, click Server Options; or click the Server Options button on the toolbar;
2. The Server Options dialog box will be displayed, click Sending Rules on the right side of the window;
3. Choose an item in the list, and then click on the text in Fax Devices column to drop down the combo box, pick up a Fax
device you wish to be used;
4. Click OK to save.
23
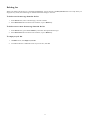
Fax to Email Configurations
To route an incoming faxes through e-mail, you must first set up your email settings so that the fax server will know what mail
server to use and how to authenticate for sending mail.
Note: To change the email subject and body, please refer to: How to change the email subject and body, sent from the Joyfax
Server?
To setup a STMP server
1. On Server menu, click Server Options; or click the Server Options button on the toolbar;
2. The Server Options dialog box will be displayed, click Fax to Email on the right side of the window;
3. Select the Enable Fax to Email check box:
Server Name: Specify SMTP server to be used
Port: Port to be used on the SMTP server, defaults to SMTP (25)
User Name: Username for authentication login
Password: Password for authentication login
Email Address: From a 'From:' address, not necessarily known to the server
Public Mailbox: ALL INCOMING faxes will be sent to the public email addresses, multiple email addresses by
separating the email addresses with a comma. You may LEAVE IT BLANK if you wish.
File Format: Specify the format of attachments. It can be in Tiff or PDF format
Send email notification when fax sent: Send an email notification to the user when the fax was sent
4. In SMTP Server section, type the server name, port, user name, etc.
5. Specify the format of attachments and public mail box in Email Message section;
6. Click OK to save.
24
Automatic fax routing
Joyfax Server is equipped with support for routing incoming faxes to clients based upon Fax Line(COM port of modems),
Calling Number Display (commonly called Caller ID) data and CSID (Called Subscriber Identification). The following incoming
routing methods can be configured:
Route to client users. To route an incoming fax to client users, you must set up the Routing Rules so fax server will
use these rules to determine the destination users.
Route through e-mail. To route an incoming fax through e-mail, you must first set up your email settings so the fax
server will know what mail server to use and how to authenticate for sending mail.
Print. Specify a printer to which incoming faxes will be printed. To route incoming faxes to a network printer,
Anonymous Logon permissions must be enabled for the printer.
25
Routing Rules' Options
To setup Routing Rules' Options
1. On Server menu, click Server Options, or click the Server Options button on the toolbar;
2. The Server Options dialog box will be displayed, click Routing Rules on the left side of the window;
3. Click Advanced... button on the right side, the Routing rules' options dialog will be displayed.
Single condition: To prevent incoming faxes from keeping matching other Routing Rules once it meets A RULE;
Multi-condition: Incoming faxes will keep matching other routing rules even when they have met a rule; Works like
version 5.5 and below.
Routing to online users only: Choose this option If you would like the insant incoming faxes to only be forwarded to
the users who are logging in.
4. Change the Matching Mode and Matching Order if need;
5. Click OK to save. Changes will be applied in the next coming fax.
26
Forwarding incoming fax to Users
To route an incoming fax to client users, you must set up the Routing Rules so fax server will use these rules to determine the
destination user.
You can also set up Matching Mode and Matching Order by clicking Advanced... button.
To setup Routing Rules
1. On Server menu, click Server Options, or click the Server Options button on the toolbar;
2. The Server Options dialog box will be displayed, click Routing Rules on the left side of the window;
3. Add Fax Routing Rules:
a). To automatically forward the fax messages which received from a specific Fax Line(COM port) to users:
Double-click Devices node to expand all available modems, choose a fax device(Modem), click Users... button
on the buttom of the window
In the Choose Users dialog box, specify the users to whom the selected rules will apply
b). To automatically forward the fax messages according to the Calling Number Display Data(Caller ID):
Click New Number button on the bottom of the window, then enter a phone number or the right-most digit of
the integral part of a phone number
Select the new added Phone Number in the treeview, click Users... button
In the Choose users dialog box, specify the users to whom the selected rules will apply
c). To automatically forward the fax messages according to the CSID:
Click New CSID button on the bottom of the window, then enter a CSID string(Please see CSID Matching Rules
for more information)
Select the new added CSID in the treeview, click Users... button
In the Choose users dialog box, specify the users to whom the selected rules will apply
4. Click OK to save. All these configs will be applied in the next coming fax.
To remove a rule
1. On the Server Options dialog box, click Routing Rules on the right side;
27
2. If you wish to remove a particular user from a rule, double-click a rule node to display all users associated with that
rule, select a user, and then click the Remove button;
3. Or click a rule node, click Remove to delete an exiting rule directly.
28
Forwarding incoming fax to email addresses
Joyfax Server routes the incoming faxes to user's email addresses or any other email addresses as a TIFF or PDF attachment.
The user is then able to print, save and forward the fax – similar to what occurs when a regular email with an attachment is
received
Fax messages sent from User A to User B(usually called Inner Fax) will NEVER be forwarded to user's email address.
To forwarding incoming fax to user's email addresses
1. Ensure that you have set up the Fax to Email Configurations;
2. On User menu, click User list...; Or directly click Usre List button on the toolbar;
3. In the User List dialog box, choose an user, then click the Edit... button located on the top side of the window;
4. Specify an Email address, multiple email addresses by separating with a comma;
5. Click Advanced on the right side of the main window, select the Forward to user's email address check box; If this
option is disabled, select the Allow to receive incoming fax option, and try again;
6. Click OK to save.
Note: Routing Rules will be applied while forwarding incoming fax to user's email addresses
To forwarding incoming fax to public email addresses
See the Fax to Email Configurations topic, ensure the Public Mailbox is specified.
Note: Routing Rules will be DIS REGARDED while forwarding incoming fax to a public email address
29
Automatically print incoming fax
Specify a printer to which incoming faxes will be printed. To route incoming faxes to a network printer, Anonymous Logon
permissions must be enabled for the printer.
To automatically print incoming fax
1. On Server menu, click Server Options; or click the Server Options button on the toolbar
2. The Server Options dialog box will be displayed, click Incoming/Outgoing on the right side of the window
3. Select the Automatic Print to: check box, and click Printer Setup button
4. In the Automatic Print dialog box, click on a Fax device, then pick up a Printer in the combo box
5. Click OK to save
Note: All incoming faxes will be automatically printed if that option was selected.
30
CSID Matching Rules
Joyfax Server will use pattern matching against the calling fax machine's CSID(Called Subscriber Identification) to determine
the destination user to which to forward the fax. The following table shows the characters allowed in pattern and what they
match. CSID comparison is case insensitive, see Example below.
Characters in pattern
Matches in string
?
Any single character
*
Zero or more characters
#
Any single digit (0–9)
[ charlist ]
Any single character in charlist
[! charlist ]
Any single character not in charlist
Character Lists
A group of one or more characters (charlist) enclosed in brackets ([ ]) can be used to match any single character in string and
can include almost any character code, including digits.
An exclamation point (!) at the beginning of charlist means that a match is made if any character except the characters in
charlist is found in string. When used outside brackets, the exclamation point matches itself.
Special Characters
To match the special characters left bracket ([), question mark (?), number sign (#), and asterisk (*), enclose them in brackets.
The right bracket (]) cannot be used within a group to match itself, but it can be used outside a group as an individual
character.
The character sequence [] is considered a zero-length string (""). However, it cannot be part of a character list enclosed in
brackets.
Character Ranges
By using a hyphen (–) to separate the lower and upper bounds of the range, charlist can specify a range of characters. For
example, [A–Z] results in a match if the corresponding character position in string contains any character within the range A–
Z, and [!H–L] results in a match if the corresponding character position contains any character outside the range H–L.
When you specify a range of characters, they must appear in ascending sort order, that is, from lowest to highest. Thus, [A–
Z] is a valid pattern, but [Z–A] is not.
Multiple Character Ranges
To specify multiple ranges for the same character position, put them within the same brackets without delimiters. For example,
[A–CX–Z] results in a match if the corresponding character position in string contains any character within either the range
A–C or the range X–Z.
Usage of the Hyphen
A hyphen (–) can appear either at the beginning (after an exclamation point, if any) or at the end of charlist to match itself. In
any other location, the hyphen identifies a range of characters delimited by the characters on either side of the hyphen.
Digraph Characters
In some languages, there are alphabetic characters that represent two separate characters. For example, several languages use
the character æ to represent the characters a and e when they appear together. Joyfax Server recognizes that the single digraph
character and the two individual characters are equivalent.
When a language that uses a digraph character is specified in the system locale settings, an occurrence of the single digraph
character in either pattern or string matches the equivalent two-character sequence in the other string. Similarly, a digraph
character in pattern enclosed in brackets (by itself, in a list, or in a range) matches the equivalent two-character sequence in
string.
Example
CSID
Patterns
Match (True/False)
31
aJoy8FaxA
a*a
True
[a-z]Joy8Fax[a-c]
True
[a-z]Joy8Fax[!a-c]
False
aJoy#FaxA
True
[a-z]joy#Fax[a-z]
True
aJoy?FaxA
True
aBoy?FaxA
False
32
Forward incoming fax to clients manually
Joyfax Server can automatic forward the incoming fax messages to client according to the setting up rules, but you can do this
manually.
To forward a received fax message to users
1. In Incoming Fax pane, right-click on a receiving fax item you want to forward;
2. Click Forward fax to... on the pop-up menu;
3. In he Choose users dialog box, specify the users to whom the selected fax message will be forwarded.
33
Managing faxes
This help section contains the following topics:
Suspend sending fax
Pause outgoing fax
Resume outgoing fax
Resend undelivered fax
Cancel receiving fax
Forward incoming fax to client manually
Mark fax as removed
Fax message properties
View Fax message
Search Fax Histroy
34
Suspend sending fax job
Fax message which is sending can be suspended independently, the suspended fax message will be moved to the Outgoing
fax automatically.
To suspend one sending fax job
1. In Sending Fax, right-click on a fax message you want to suspend;
2. Click Suspend sending fax on the pop-up menu.
To suspend two or more sending fax job
1. In Sending Fax, press Ctrl and select all required fax messages;
2. Right-click on one of the selected fax messages, click Suspend sending fax on the pop-up menu.
35
Pause outgoing fax job
You can pause the outgoing fax job which is queuing to be sent, and resume it anytime.
To pause one outgoing fax job
1. In Outgoing Fax, right-click on a fax message you want to pause;
2. Click Pause on the pop-up menu.
To pause two or more outgoing fax job
1. In Outgoing Fax, press Ctrl and select all required fax messages;
2. Right-click on one of the selected fax messages, click Pause on the pop-up menu.
36
Resume outgoing fax job
To resume one outgoing fax job
1. In Outgoing Fax, right-click on a fax message you want to resume;
2. Click Resume on the pop-up menu.
To pause two or more outgoing fax job
1. In Outgoing Fax, press Ctrl and select all required fax messages;
2. Right-click on one of the selected fax messages, click Resume on the pop-up menu.
37
Resend undelivered fax
The unsuccessfully delivered fax messages will be moved from the Sending Fax to the Undelivered Fax, this allows you to
send them again. If a fax message has more than one recipients, the Joyfax Server will try to send the fax to the undelivered
recipients only.
To resend an undelivered fax
1. In Undelivered Fax, right-click on a fax message you want to resend;
2. Click Resend on the pop-up menu;
To resend two or more undelivered fax
1. In Undelivered Fax, press Ctrl and select all required fax messages;
2. Right-click on one of the selected fax messages, click Resend on the pop-up menu.
38
Cancel receiving fax job
To cancel a receiving fax job
1. In Receiving Fax, right-click on a receiving fax message you want to cancel;
2. Click Cancel receiving fax on the pop-up menu.
39
Mark fax as removed
To mark fax as removed
1. In Undelivered/Received Fax, right-click on a receiving fax message you want to cancel;
2. Click Mark fax as removed on the pop-up menu.
Note: Fax messages which were marked as removed is not deleted directly, you can find it out again by using the Fax hisotry
function
40
Fax properties
The Properties dialog box allows you to control all aspects of the fax message including basic fax properties, priority, subject
and notice.
To View/change fax properties
1. In work area, right-click on a fax message, click Properties... on the pop-up menu;
2. The Fax Properties dialog box will be displayed, make all required changes and click OK to save them.
41
View Fax Message
Open the Joyfax Browser to view the selected fax message.
To View Fax Message
1. In work area, right-click on a fax message you want to suspend;
2. Click View fax... on the pop-up menu.
42
Fax History
To search fax hisotry
1. On Tools menu, click Fax history...
2. The Fax history dialog box will be displayed, set up the filters;
3. Click Search.
43
Public Phone book
This help section contains the following topics:
Managing Contact Groups
Managing Public Contacts
Exporting Contacts
Importing Contacts
44
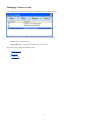
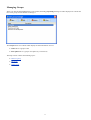
Managing Contact Groups
It is recommended to organize the contacts in individual groups for better overview.
The groups listview has two columns which display main information on groups:
Name: Shows a group's name.
Description: Shows a group's description (if you entered it).
This help section contains the following topics:
Add new group
Edit group
Delete group
45
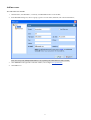
Add New Contact Group
To add a new contact group
1. On the Contact menu, click Contact groups...
2. The Group manager dialog box will be displayed, click New button;
3. In the New Group dialog box, type a group name, description and click OK.
46
Edit Contact Group
To edit an existing contact group
1. On the Contact menu, click Contact groups...
2. The Group manager dialog box will be displayed, select a group you want to edit and click Edit button;
3. In the Edit Group dialog box, make all required changes and click OK to save them.
47
Delete Contact Group
To delete an existing contact group
1. On the Contact menu, click Contact groups...
2. The Group manager dialog box will be displayed, select a group you want to delete and click Delete button;
3. You will be asked to confirm this action, If you are sure, click Yes.
48
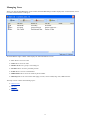
Managing Contacts
When you click the Contact list button on the toolbar, the Publicc Contacts dialog box will is displayed. It contains the list of
user accounts and the buttons to manage it.
The Contact List has serven columns which display the main information on contacts:
Full name: Shows an user account
Group: Shows a group a user belongs to
Fax: Shows a contact's fax number
Phone/Mobile: Shows a contact's mobile or phone number
E-mail: Shows an contact e-mail address
Address: Shows a contact's contact address
This help section contains the following topics:
Add new contact
Edit contact
Delete contact
49
Add new group
To add a group to the list
1. On User menu, click Group manager...; Or directly click User Group button on the toolbar;
2. In the User Group Manager dialog box, click the Add... button located on the top side of the window;
3. In the New Group dialog box, type a group name, description and click OK.
50
Edit contact
To edit an existing user
1. On Contact menu, click Contact list...; Or directly click Contact List button on the toolbar;
2. In the Public Contact dialog box, choose an user you want to edit, then click the Edit... button located on the top side
of the window;
3. The Edit Contact dialog box will be displayed, make all required changes and click OK to save them.
51
Delete contact
To delete an existing user
1. On Contact menu, click Contact list...; Or directly click Contact List button on the toolbar
2. In the Public Contact dialog box, choose an user you want to delete, then preee Delete button located on the top side
of the window
3. You will be asked to confirm the action. If you are sure, click Yes
To delete two or more users
1. On Contact menu, click Contact list...; Or directly click Contact List button on the toolbar
2. In the Public Contact dialog box, press Ctrl and select all required users, then press the Delete button
3. You will be asked to confirm the action. If you are sure, click Yes
52
Exporting contacts
You can export the data of the phone book to a CSV file.
To export contacts
1. On the Contact menu, click Export contacts...
2. In the Export contacts dialog box, specify an output CSV filename, click Save.
53
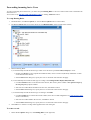
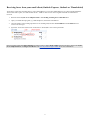
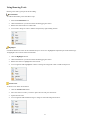
Importing contacts
Importing from a CSV file is a two step process. First, you need to prepare and verify your CSV file. Next, simply choose your
import file to perform the import.
1. Preparing your CSV file
Please ensure that your CSV is a valid CSV format. A good way to check is to import your file into Microsoft Excel and see if
the data is as expected. This is also a good opportunity to do any massaging of the data, if you wish. The CSV file must
contain a heading row. For example, here is a valid file with a single record:
"FullName","Company","Department","Duty","Fax","Phone","Mobile","E-mail","Address","Group"
NAME,COMPANY,DEPA,JOB,555555,MOBILE,444444,EMAIL,ADD,myGroup
Click here to download the sample file(contacts_demo.csv)...
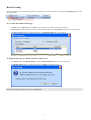
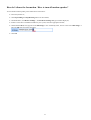
2.Importing the CSV file
On Contact menu, click Import contacts...
Locate the CSV file you want to import, press Enter;
The Import Contacts dialog box will be displayed, and give you statistics on how many contacts were imported;
At last, click Close button to close the dialog box.
54
Users and Groups
Each client must have an account in order to log in the Joyfax Server. This account is used to identify the client. A group is a
number of zero or more users, usually with the same job description or in the same department.
This help section contains the following topics:
Managing Groups
Managing Users
User permissions
Note: An user doesn't have to be a member of some group.
55
Managing Groups
When you click the User-Group button on the toolbar, the User group manager dialog box will is displayed. It contains the
list of user groups and the buttons to manage it.
The Group List has two columns which display the main information on users:
Name: Shows a group's name
Description: Shows a group's description (if you entered it)
This help section contains the following topics:
Add new group
Edit group
Delete group
56
Add new contact
To create a new contact
1. On Contact menu, click Add contact...; Or directly click Add Contact button on the toolbar
2. In the Add contact dialog box, choose a group, type the contact name, fax number and more.
3. Click OK to save
57
Edit Group
To edit an existing group
1. On User menu, click Group manager...; Or directly click User Group button on the toolbar;
2. In the User Group Manager dialog box, click the Edit... button located on the top side of the window;
3. The Edit User dialog box will be displayed, make all required changes and click OK to save them.
58
Delete group
To edit an existing group
1. On User menu, click Group manager...; Or directly click User Group button on the toolbar;
2. In the User Group Manager dialog box, click the Delete button located on the top side of the window;
3. You will be asked to confirm the action. If you are sure, click Yes.
To delete two or more groups
1. On User menu, click Group manager...; Or directly click User Group button on the toolbar;
2. In the User Group Manager dialog box, press Ctrl and select all required groups, then press the Delete button;
3. You will be asked to confirm the action. If you are sure, click Yes.
59
Managing Users
When you click the User list button on the toolbar, the User List dialog box will is displayed. It contains the list of user
accounts and the buttons to manage it.
The User List has eight columns which display the main information on users:
User: Shows an user account
Name: Shows an user's name
Member Of: Shows a group a user belongs to
Job Title: Shows an user's particular position
E-mail: Shows an user's e-mail address
Mobile/Phone: Shows an user's mobile or phone number
MSN/ICQ: Shows an user's instant messaging account, such as: MSN, ICQ, AOL, Gtalk and more
This help section contains the following topics:
Add new user
Edit user
Delete user
60
Add new user
To create a new user account
1. On User menu, click New user...; Or directly click New User button on the toolbar;
2. In the New User dialog box, choose a group, type the account name, full name, and contact informations;
Note: You can specify multiple email addresses by separating the email addresses with a comma.
3. Click Advanced on the right side of the main window, and configure user permissions;
4. Click OK to save.
61
Edit user
To edit an existing user
1. On User menu, click User list...; Or directly click Usre List button on the toolbar;
2. In the User List dialog box, choose an user you want to edit, then click the Edit... button located on the top side of the
window;
3. The Edit User dialog box will be displayed, make all required changes and click OK to save them.
62
Delete user
To delete an existing user
1. On User menu, click User list...; Or directly click Usre List button on the toolbar;
2. In the User List dialog box, choose an user you want to delete, then preee Delete button located on the top side of the
window;
3. You will be asked to confirm the action. If you are sure, click Yes.
To delete two or more users
1. On User menu, click User list...; Or directly click Usre List button on the toolbar;
2. In the User List dialog box, press Ctrl and select all required users, then press the Delete button;
3. You will be asked to confirm the action. If you are sure, click Yes.
63
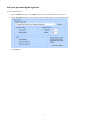
User Permissions
Regular user accounts have all permissions to send & receive faxes unless that permission was granted. This following dialog
box allows you to set the User Permissions for the user selected on the User Manager window:
Allow to send fax: Allows the user to send fax to a fax number.
Allow to send long-distance fax: By default, the user is allowed to send fax to any number; To restrict long distance
calling, Uncheck this option.
Default priority: Sets Default Priority for all new fax message.
Allow to receive incoming fax: Allows the user to receive incoming fax from Joyfax Client; it will affect the routing
decisions.
Forward to user's email address: Incoming fax will be sent to the user's email addresses automatically if this option
checked. In order to successfully forward incoming fax to email, you must first set up your email settings so the fax
server will know what mail server to use and how to authenticate for sending mail.
Allow to send/forward fax messages to inner user: Allows one user to send or forward fax to another user.
Allow to add/edit/delete: Allows one user to add, edit or delete public groups and contacts.
64
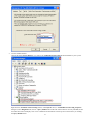
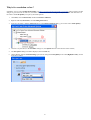
Run Joyfax Server as a Windows Service
To configure Joyfax Server to Run as a Windows Service
1. Click Start menu, point to All Programs;
2. Point to Joyfax Server, select JoyfaxServer Service Setup;
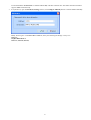
3. In the Windows Service - JoyfaxServer Setup dialog box: press Yes to install the JoyfaxServer service, the service will
be started if it's completed successfully; press No to Stop and Uninstall the JoyfaxServer service.
65
Joyfax Client
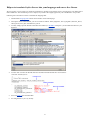
Joyfax Client is an application that allows users to connect to a Joyfax Server, for sending and receiving fax from every workplace.
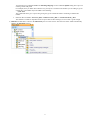
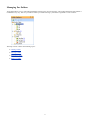
Folder Explorer
Folder Explorer displays the type of fax items in the form of a tree structure and allows you to navigate and organize through it. If the Folder
Explorer is not displayed, click Folder Explorer on the View menu.
Phone Book
Phone Book displays the contacts in the form of a tree structure and allows you to manage through it. If the Phone Book is not displayed, click
Phone Book on the View menu.
Fax List
Fax List displays the fax items of the currently selected folder. The column depends on the type of currently selected folder and helps you to see
the main information about fax message:
Priority: The priority assigned to the fax
Read: Whether you have read the fax or not
Read Tracking: Flags the fax item as read or not from the server
Received: The time when the fax was received
Modified: The time when the fax was modified
Submission Time: The time when the fax was submited to fax server
Completed Time: The time when the fax was sent, either successfully or failed
From(TSID/Caller ID): The Fax number or name(TSID) of the person from whom the fax was received
Recipients: Shows the person to whom the fax is sent
1st Reader: The user who read the fax item FIRST
Subject: Shows the subject or topic of a fax item
Owner: The USER who send the inner fax
Quality: Resolution of the fax; Low(204 X 98) / High(204 X 196)
Pages: Shows the total pages of the fax
Size: Shows the file size of the fax
66
Retries: The number of times the fax server will try to send your fax
Status: The sending result of a fax item. For more detail, see the Fax Properties dialog box
Fax Preview Area
Fax Preview Area shows the contains of currently selected fax item. If the Fax Preview Area Book is not displayed, click Phone Book on the View
menu.
Status Bar
The status bar, which is the horizontal area at the bottom of the main window, provides the information about the current state and any other
contextual information:
Content Status: The description of controls on mouse over
Status: The current communication status; The progress window will be displayed if you click this pane
Today: Displays the current date
Server: Displays the currently logged in server; Double-click this pane to Log In or Log Out Fax Server
Current User: Displays the currently logged in user name
CAP: Displays the Caps Lock state.
NUM: Displays the Num Lock state.
67
Install and Uninstalling Joyfax Client
Installing Joyfax Client at client computer
1. Download the latest version of Joyfax Server installation package from our site;
2. Double-click the download execute file to launch the installation;
3. Select the Client component to install;
4. Launch Joyfax Client and enter the server's address, user name and password to log in to fax server.
Uninstalling Joyfax Client
1. There are three ways to uninstall Joyfax Client:
Go to Control Panel -> Add or Remove Programs, find Joyfax Server, and then click the Change/Remove
button;
Click Start -> All Programs -> Joyfax Server, and then select the Uninstall item;
Locate Joyfax Server Installation Directory, and then run the uninst.exe application.
2. Follow the Uninstallation wizard select the Joyfax Client component to complete the uninstallation.
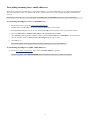
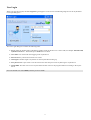
Joyfax Client login
1. Move the mouse to Joyfax Server icon in system tray, the tooltip will display the server IP address and Port;
If you wish to access Joyfax Server behind a router/firewall, please read How to access Joyfax Server behind a
router/firewall?
2. Go to the client PC, and launch Joyfax Client;
3. In the User login dialog box, enter the Joyfax Server IP address, port, user name and password then press Log in.
Note: The first time you install the Joyfax Server, it creates a default demonstration user DEMO with a 1234
password.
68
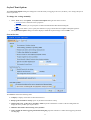
Joyfax Client Options
The Joyfax Client Options dialog box will appears at the first time you logging in fax server, It allows you to change all aspects
of the Joyfax client.
To change the settings manually
1. On the Tools menu, click Options, the Joyfax Client Options dialog box has three sections:
General section contains the basic properties
Fax section allows you to specify the resolution and black/white threshold of faxing file
Page section allows you to specify the default cover page, header & footer template and digital signature
2. The Joyfax Client Options dialog box will be displayed. Make all required changes and click OK to save
General Section
The General contains the following items:
Company: Company name retrieved from the Fax Server
Run program at Windows startup: Opens Joyfax Client at Windows startup
When Joyfax starts, go directly to "Incoming" folder: Specifies whether the contents of the Incoming folder are
displayed when you first open Joyfax Client
Minimize main window when clicking Close(X) button
Always prompt me when triggering the Read Tracking flag: Specifies whether to confirm when triggering the Read
Tracking flag
69
Confirm when deleting fax message(s)
Mark fax read after displaying for N seconds: Marks a fax item as read after you have previewed it for the number of
seconds indicated
Send & Receive fax at startup: Automatically receives and sends fax at joyfax client startup
Check for new fax every [ ] minutes: Checks fax server for new incoming fax items at the specified interval of minutes
Play sound when new fax received: Specifies whether to play a sound when new fax message arrive
Automatically print received fax to: Specifies a printer to automatically print all received fax messages
User folder location: Specifes the storing location of user data
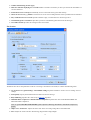
Fax Section
The Fax section shows the parameters used for converting a document to Fax format, it contains the following items:
Use Joyfax Server's global settings / Local manual settings: Specifies whether to use the server's settings or local
settings
Print Quality: Specify the default desired resolution for the fax message
Bayer Dithering: Specifies the value of bayer dithering algorithm
Minimum-Black Comparison / Maximum-White Comparison: Specifies the value of the Minimum-Black and
Maximum-White Comparison
Note: To get the best effect of the facsimile, please adjust the dithering, Min-Black or Max-White Comparison
options
Adjust to n% normal size: Adjust the zoom scale when converting a image file to facsimile format
Fit to: Adjust the zoom scale fit to Whole Page, Page Width or Page Height
70
Orientation: Specifies how the image is positioned on the page. Portrait orients the image vertically; Landscape
orients the image horizontally
Margins: Specifies separate margin values for the top, right, bottom, and left margins, in Inches
Retries: Specifies how many times the fax server try to send the fax if it is undelivered
Intervals: The interval in minute that the Fax Server try to resend the fax
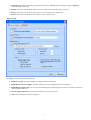
Page Section
The Page section contains the following items:
Default Cover Page: Specifies a default cover page for all new creating fax
Default Header & Footer template: Specifies a Header and Footer template for all new creating fax
Default Digital signature file: If you want to automatically apply a digital signature to faxes, use the browse button to
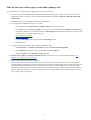
select the graphic file to use
Postion on page & Margins: Set the desired position to use for the signature
Action: Set the default action for the signature.
71
To login to Joyfax Server
1. Double-click on the Joyfax Client icon on desktop, the User Login dialog box appears on the screen;
2. Type the Server address, User name and Password, then click the Login button;
3. At the first time you logging in a fax server, the Joyfax Client Options dialog box will be displayed, change all aspects
if it's necessary, and then click OK to continue;
4. Now, Joyfax Client is ready for you to send & receive fax!
72
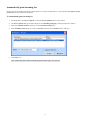
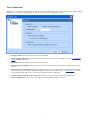
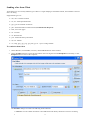
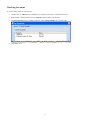
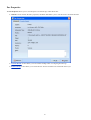
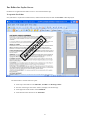
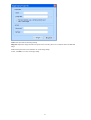
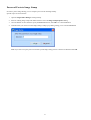
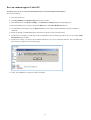
User Login
When you start the program, the User Login dialog box appears on the screen. The following image shows the Joyfax Client
User Login dialog box:
The User Login dialog box contains the following items:
Server: Enter the domain name or IP address and Port of the Joyfax Server to connect with, for example: 192.168.1.100,
JoyfaxServer:8751 etc. The default port is 8750 if leave it blank
User name: User name used when logging in the Joyfax Server
Password: Enter your Password for the server here
Auto login: Automatic login to Joyfax Server when Joyfax Client starting up
Save password: Save password so user doesn't need to enter the password everytime login to Joyfax Server
Work offline: This lets user accesses Joyfax Client and lets user uses the program without connecting to the Joyfax
Server
Note: The default user name: DEMO, with the password: 1234
73
Sending faxes
This help section contains the following topics:
Sending a fax from client
Quickly faxing to an existing contact
Sending a fax from another application
Faxing a document from Windows Explorer
Sending a scheduled fax
Sending a cover page only fax
Add your personal digital signature
Checking fax status
Fax recipients
Custom fax headers & footers
Fax Options
74
Sending a fax from Client
Joyfax Client can convert many different type of files to a single mutil-pages facsimile document, then submit it to the Fax
Server for faxing.
Supported file types are:
.doc, docx - Word documents
.xls , xls x - Excel Spreadsheet files
.ppt, .pptx - PowerPoint documents
.pdf - Adobe Portable Document Format (No Adobe Reader Required)
.html, .htm - Web pages
.txt - Text files
.rtf - Rich text files
.psd - Adobe Photoshop documents
.tif, .tiff - Tiff files
.ico, .bmp, .jpeg, .jpg, .png, .gif, .pbm, .g3, etc. - Up to 21 image formats
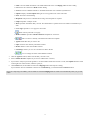
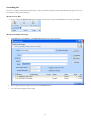
To send a fax from client
1. On the Fax menu, click New fax; or directly click Create fax button on the toolbars;
2. On the Fax Editor dialog box, enter the fax numbers who receiving the fax in the Recipients box manually, or click
Recipients button to choose the recipients;
The Fax Editor dialog box contains the following items & buttons:
Send Now: Converts added documents to facsimile format and directly submit it to Fax Server for faxing
75
Send: Converts added documents to facsimile format and stores it in Outging folder for later sending
Save: Stores the current fax to Draft for later editing
Preview: Converts added documents to facsimile format and views with the Joyfax Browser
Options: Displays the Fax Options dialog box to set up preferences of the currnet fax
Close: Closes the current dialog
Recipients: The person to whom the fax is being sent. Recipients is required
Subject: Specifies a subject for fax
Meno: Specifies information that you want. This information is optional and can be whatever information you
wish
Cover Page: Specifies a cover page for current fax
Edits currectly selected cover page.
Header & Footer: Specifies a Header and Footer template for current fax
: Edits or removes currently selected header and footer template
Append: Adds files that you want to fax
Open: Launches the currently selected document
Remove: Removes the selected files from list
Scan Image: Allows you to scan a document to add to the list
: Uses to arrange the order of the added documents
3. Click the Append... button, then locate the files you want to fax;
4. Select a Header & footer template if you want to add headers or footers;
5. If you wish to add your personal signature or set the number of times the fax tries to send, click Options button located
on the right side of the window, and then specify it;
6. Click Send button, the fax will be stored in the Outgoing folder and ready for sending.
If you wish the fax to be submitted to the fax server immediately, you should click the Send Now button.
If you are composing a fax offline, your fax will be saved in the Outging folder. It will be sent automatically when you go back
online.
76
Sending a cover page only fax
To send a cover page only fax
1. On the Fax menu, click New fax; or directly click Create Fax button on the toolbars;
2. On the Fax Editor dialog box, specify the Recipients;
3. In the Cover page combo box, select a cover page;
TIPS: Or click the Customize
your own cover pages.
button to open the cover page manager, this allows you to Creat, Edit or Delete
4. Click Send Now button.
Note: For more details about cover page, please see Cover Page Editor.
Copyright 2007-2011 Joyhong Software
77
Add your personal digital signature
To add a signature for fax:
1. On the Fax Editor dialog box, click Options button located on the right side of the window
2. On the Fax Options dialog box, change the position or graphic file to be used for signing the fax
3. Click OK button
78
Sending a fax from another application
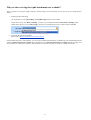
When Joyfax Client is installed, the Joy Fax Printer is automatically installed by the installer.
To send a fax from another application
1. Create a document in software, such as Microsoft Word, Excel, AutoCAD, Phostoshop or KingDee ERP;
2. In the software, click Print on the File menu, or the appropriate command for printing;
3. On the Print dialog box, change the printer to the Joy Fax Printer and click OK;
4. Joyfax Client will be launched automaticly, and the Fax Editor dialog box will be displayed after you logging in;
5. Enter the Fax number or choose a Recipient, make all required changes for the fax;
6. Click Send Now button.
79
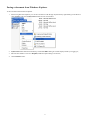
Quickly faxing to an existing contact
To send a fax to the existing contact
1. On the Phone Book pane, type the first several letters of the contact name, or click Expand all button to expend all
available contacts;
2. Locate the contact you want to send a fax, right-click on it, choose New fax... menu, or double-click it directly;
3. The Fax Editor dialog box will be displayed, add files and make all required changes for the fax;
4. Click Send Now button.
80
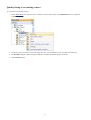
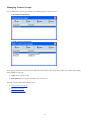
Faxing a document from Windows Explorer
To fax a document from Windows Explorer
1. When using Windows Explorer you can fax a document or file though Joyfax Client by right clicking on the file and
select Send To, and select Joyfax Client form the popup context menu;
2. Joyfax Client will be launched automaticly, and the Fax Editor dialog box will be displayed after you logging in;
3. Enter the Fax number or choose a Recipient, make all required changes for the fax;
4. Click Send Now button.
81
Sending a scheduled fax
To send a scheduled fax
1. On the Fax menu, click New fax; or directly click Create fax button on the toolbars;
2. On the Fax Editor dialog box, specify the Recipients, add files to be sent;
3. Click Options button located on the right side of the window;
4. On the Fax Options dialog box, set the date and time you want to send the fax, and click OK to save;
5. Click Send Now button.
82
Fax Options
To setup fax parameters
1. On the Fax Editor dialog box, click Options button located on the right side of the window
2. The Fax Options dialog box will be displayed, it's much similar to the Fax tab in the Client Options dialog box
Two additional parameters are discussed below:
Sending Time: Specifies the point of time at which the time fax is transmitted
Priority: Specifies fax message priority
3. Make all required changes for the fax, click OK to save
83
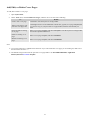
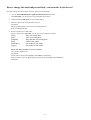
Custom fax headers & footers
Fax header or footer consists of six entries(two Left, two Center and two Right entries), each entry can contain of any
combination of static text as well as a dynamically filled variable. The dynamic variable will be replaced with information from
your fax message at converting. For example, if you specify the {Recipient Name} variable, this will be replaced with the
recipient's names.
The list of available variables includes the following:
Variables
Description
{Page Number}
Current page number
{Total Pages}
Total number of pages in the fax
{Subject}
Fax Subject
{Time Sent}
Date time when converting the fax
{Date}
Date in long format
{Time}
Time in 24 hour format
{Sender Name}
User's full name, if the full name leaves blank, account name will be used.
{Sender Fax Number}
Your comany's fax number
{Sender's Company}
Your company name, NOT the recipients's company
{TSID}
Transmitting Subscriber Identification (called CSID in the remote fax machine)
{Recipient Name}
Recipient's names
{Recipient Fax Number}
Recipient's fax number list
To add a template
1. In Fax Editor dialog box, select Custom... by clicking the Header & Footer combo box
2. The Custom fax headers & footers dialog box will be displayed, set the appropriate headers and footers, click Save
84
3. In the New template dialog box, enter a new name for the template. The new added template will be seleted
automatically
To edit a template
1. In Fax Editor dialog box, selecte a template you want to edit by using the Header & Footer combo box
2. Click the Edit template
button
3. The Custom fax headers & footers dialog box will be displayed, set the appropriate headers and footers, click Save
To remove a template
1. In Fax Editor dialog box, selecte a template you want to remove by using the Header & Footer combo box
2. Click the Remove template
button
3. You will be asked to confirm the action. If you are sure, click Yes.
Note: The system template which has the * prefix cann't be removed
85
Fax Recipients
Once you create a fax, you must specify the fax number of the person who is receiving the fax. The number of recipients can be
up about 2000 and more, each recipient is split by the ; (semicolon) character. In recipients textbox, angle brackets represent
public or user contacts, square brackets represent users.
There are several methods to enter recipients:
Method 1: Click Recipients button, then choose public & private contacts or Joyfax users from the Choose recipients
dialog box.
Private(Local) contacts Public(Remote) contacts Joyfax Users
Method 2: Enter part of the full name in the Recipients textbox, then type semicolon(;), the software will automatically
search and fill in the appropriate contact or user in it. The following dialog box will be displayed if there are more than
one results, just select a contact you want to add.
Method 3: Enter fax number in Recipients textbox directly, the following fax number are legal:
1. Local Phone Number: 321-1234 or 3211234;
2. Domestic Phone Number: (866)-321-1234, 1-866-321-1234, 866-321-1234 or 866 321 1234(separated by
space);
3. International Phone Number: +1(866)346-3654, +1-866-8463654, +1 866 846 3654
In international usage, telephone numbers should always be quoted with the country code preceded by a "+";
4. Outside line calls: 9,,18663211234 or 0,,3211234 (Comma is used to pauses briefly before continuing.)
86
You should set up an Access Code in the Incoming/Outgoing section on Server Options dialog box to prevent
entering ouside calls prefix.
For example, when you dial in from a hotel room, you may have to add 9 to the number you are calling to get an
outside line. Your number may look similar to the following:
9,321-1234
The comma after the 9 gives a pause long enough to get an outside line before continuing to dial the full
number.
5. Extension Phone Number: 321-1234,,,,,802, +1-866-321-1234,,,,,802 or +44-20-1234-5678,,,,, 802
The number of commas is depended on the response time of SPC exchanges, 8-10 seconds is good enough
Method 4: Double-click a contact in the Phone book pane to create new fax. The selected contact will be automatically
added to the Recipients textbox.
87
Checking fax status
To check sending status for a fax message
1. On Fax menu, click Receive(or press F8 directly), this allows the client to refresh the fax status;
2. Right-click an outgoing fax item, choose Properties menu from the content menu;
3. The Fax Properties dialog box will be displayed, select Transfer Details tab, it shown below:
4. Click OK to close.
88
Receiving faxes
This help section contains the following topics:
Receiving faxes from Joyfax Client
Receiving faxes from your email client (Outlook Express, Outlook or Thunderbird)
Read Tracking
Retrieving fax history
Note: A system folder could NOT be moved, renamed and deleted.
89
Receiving faxes From Joyfax Client
Joyfax Client will automatically receive faxes from the fax server in every certain time after you logging in. You can also
manually check new faxes by clicking Receive on the Fax menu.
To immediately check for new faxes
Click Send/Recv Fax on the toolbar, or press F9. Any fax messages in your Outgoing folder will be sent at the same
time
Press F8 if you wish to check for new faxes only
To check faxes in every certain time
1. On the Tools menu, click Options...; or directly press Ctrl + O
2. On the Joyfax Client Options dialog box, select Check for new fax every [ ] minutes, and specify the interval of
minutes
3. Click OK
4. When new faxes arrive, a notice window will popup from right corner of screen and indicate the number of new faxes
5. Click the notice link to open the Incoming foder, or click X to close it directly
90
Receiving faxes from your email client (Outlook Express, Outlook or Thunderbird)
Joyfax Server routes the incoming faxes to user's email addresses or any other email addresses as a TIFF or PDF attachment.
You are then able to print, save and forward the fax – similar to what occurs when a regular email with an attachment is
received.
1. Refer the article: Joyfax Server Help Document -> Forwarding incoming fax to email addresses
2. Open your email client program, e.g. Outlook Express, Outlook or Thunderbird
3. Go to the email account settings/preferences for checking mail, and the click Send/Receive or Get Mail button to
recieve new messages
4. See below, shows the email sent by Joyfax Server, attachments can be tiff or pdf format
Note: You must specify the caller id strings in order to retrieve caller's Phone Number between the rings, please refer Joyfax
Server Help Document -> Configure Fax Devices and Does my modem support Caller ID for more informations
91
Read Tracking
This feature allows you to track the user who has read the received fax and who not yet. Navigate to Incoming folder, the fax
list shown below:
To see who has read a fax message
1. On Fax menu, click Receive(or press F8 directly), this allows the client to refresh the fax status
2. Right-click the fax item which you want to see the tracking detail, choose Properties menu from the content menu
3. The Fax Properties dialog box will be displayed, select Read Tracking tab, it shown below:
To flag a fax message as "Read" from the Joyfax Server
1. On Actions menu, click Read Tracking; or select the Read tracking check box on the select item
2. The Read Tracking dialog box will be displayed, click OK to confirm the action
This feature will be disregarded if you select an Inner Fax
92
Managing Fax Folders
Joyfax Client allows you to create individual folders which can be used for archiving. The number and depth of the folders is
not limited in any way. Thus it is possible to realize a powerful archiving system that is organized as a tree structure.
This help section contains the following topics:
Adding a folder
Moving a folder
Renaming a folder
Remove a folder
93
Adding a folder
To add a sub-folder
1. In Folder Explorer, select the folder in which you want to add a sub-folder
2. On the Folder menu, click Add folder... ; Or press Ctrl+D
94
Moving a folder
To move a folder
1. In Folder Explorer, click the folder and hold down the left mouse button
2. Drag the pointer over the appropriate locations
95
Renaming a folder
To rename a folder
1. In Folder Explorer, select the folder in which you want to rename
2. On the Folder menu, click Rename folder...
3. Enter a folder name, and then press Enter key
96
Deleting a folder
To delete a folder
1. In Folder Explorer, select the folder in which you want to delete
2. On the Folder menu, click Delete folder
3. You will be asked to confirm this action, If you are sure, click Yes.
Note: When you delete a folder, all fax items that belong to it will be moved to its parent folder.
97
Working with faxes
This help section contains the following topics:
Fax Properties
Searching faxes
Print a fax message
Marking fax as Unread
Moving faxes
E-mail fax message
Deleting fax
Restoring deleted fax
98
Deleting fax
When you delete a fax message, it is not deleted immediately, it is just moved to the Recycle bin in that case. Only when you
empty the recycle bin, the fax message is deleted without the change to restore it.
To delete one fax message from the fax list
1. In the Fax list area, select a fax message you want to delete
2. Press Delete Fax button located on the toolbars, or press Delete key
To delete two or more fax message from the fax list
1. In the Fax list area, press Ctrl or Shift key and select all required fax messages
2. Press Delete Fax button located on the toolbars, or press Delete key
To empty recycle bin
1. On Folder menu, click Empty recycle bin
2. You will be asked to confirm the action. If you are sure, click Yes
99
E-mail a fax message
1. In the Fax list area, select the item you want to email
2. On Fax menu, click Mail to...
Note: The fax file will be automatically converted into PDF format while emailing a fax message.
100
Fax Properties
The Fax Properties allows you to view all aspects of a fax message. It has thress tabs:
General section contains the basic properties, the Memo field allows you to write short notes about the fax item.
Transfer Details section allows you to check the sending status of a outgoing fax message
Read Tracking section allows you to track the user who has read the received fax and who not yet
101
Marking fax as Unread
To mark a fax message that has already been read as unread again, please follows:
1. In the Fax list area, select the fax item
2. On Actions menu, click Mark as unread
102
Moving faxes
To move fax messages to another folder:
1. In the Fax list area, select the fax messages you want to move
2. Drag the pointer over the appropriate locations in Folder Explorer pane
103
Print a fax message
To print a fax
1. In the Fax list area, select the fax item you want to print
2. On Fax menu, click Print..., the Print dialog box will be displayed
3. Select the print options you want, then click Print
Note: You may be able to customize the size and orientation of your printed fax message by clicking Page Setup... on Fax
menu.
104
Restoring deleted fax
You can restore a deleted fax message from the Recycle bin.
To restore a deleted fax
1. Click Recycle bin folder;
2. In the Fax list area, press Ctrl or Shift key and select all required fax messages;
3. On Actions menu, click Restore.
105
Retrieving fax history
Joyfax Server provides a capability to store all of your incoming and outgoing faxes in the Fax Server, so you can retrieve
them by using this function if your Windows system crashes and you didn't backup them before or you delete the fax
messages stored in your local computer by mistake.
To retrieve fax history
1. On Tools menu, click Retrieve history fax
2. The Retrieve history fax dialog box will be displayed, sets the appropriate terms
3. Click OK, the results will be displayed in the popup window.
106
Searching fax
If you have to manage a few hundred fax messages, it can be quite time-consuming to find a particular message again. You can use
two methods to find your fax messages:
Method 1: Fax filter
Type a string in the Quick Search combo box which located on the top side of the Fax List area, and then press Enter.
Method 2: Find Fax Messages
1. On Actions menu, click Find fax... , the Find fax message dialog box will be displayed:
2. Set the appropriate filter settings and then press the Find Now button;
3. The results will be displayed in the fax list.
107
Managing Contact Groups
It is recommended to organize the contacts in individual groups for better overview.
1. My Contact Group Manager
2. Public Contact Group Manager
The two group managers showed above has almost the same interface. The groups listview has two columns which display
main information on groups:
Name: Shows a group's name.
Description: Shows a group's description (if you entered it).
This help section contains the following topics:
Add a New Contact Group
Edit a Contact Group
Delete a Contact Group
108
Add a New Contact Group
To add a new My Contact Group
1. On the Contact menu, click Group Manager...
2. The Contact group manager dialog box will be displayed, click New button;
3. In the New Group dialog box, type a group name, description and click OK.
To add a new Public Contact Group
Note: You have this function only when it is enabled for you in the Joyfax Server.
1. On the Contact menu, point to Public contacts, and then select Group Manager...
2. The Public contact group manager dialog box will be displayed, click New button;
3. In the New Group dialog box, type a group name, description and click OK.
109
Edit a Contact Group
To edit an existing My Contact Group
1. On the Contact menu, click Group Manager...
2. The Contact group manager dialog box will be displayed, select a group you want to edit and click Edit button;
3. In the Edit Group dialog box, make all required changes and click OK to save them.
To edit an existing Publick Contact Group
Note: You have this function only when it is enabled for you in the Joyfax Server.
1. On the Contact menu, point to Public contacts, and then select Group Manager...
2. The Public contact group manager dialog box will be displayed, select a group you want to edit and click Edit button;
3. In the Edit Group dialog box, make all required changes and click OK to save them.
110
Delete a Contact Group
To delete an existing My Contact Group
1. On the Contact menu, click Group Manager...
2. The Contact group manager dialog box will be displayed, select a group you want to delete and click Deletebutton;
3. You will be asked to confirm this action, If you are sure, click Yes.
To delete an existing Publick Contact Group
Note: You have this function only when it is enabled for you in the Joyfax Server.
1. On the Contact menu, point to Public contacts, and then select Group Manager...
2. The Public contact group manager dialog box will be displayed, select a group you want to delete and click Delete
button;
3. You will be asked to confirm this action, If you are sure, click Yes.
111
Add a New Contact
To create a new My Contact
1. On Contact menu, click New..., Or directly click New Contact button on the toolbar
2. In the Add contact dialog box, choose a group, type the contact name, fax number and more
3. Click OK to save
To create a new Public Contact
Note: You have this function only when it is enabled for you in the Joyfax Server.
1. On Contact menu, point to Public contacts, and then select Add...
2. In the Add public contact dialog box, choose a group, type the contact name, fax number and more
3. Click OK to save
112
Edit a Contact
To edit an existing My Contact
1. Point to the Phone Book. In My contacts, select an existing contact
2. Right-click it and select the Edit item
3. The Eidit Contact window will popup. Make the modification and click OK to save
To edit an existing Public Contact
Note: You have this function only when it is enabled for you in the Joyfax Server.
1. Point to the Phone Book. In Public contacts, select an existing contact
2. Right-click it and select the Edit item
3. The Eidit Contact window will popup. Make the modification and click OK to save
113
Delete a Contact
To delete an existing My Contact
1. Point to the Phone Book. In My contacts, select an existing contact
2. Right-click it and select the Delete item, or directly click the Delete Contact button on the toolbar
3. You will be asked to confirm the action. If you are sure, click Yes
To delete an existing Public Contact
Note: You have this function only when it is enabled for you in the Joyfax Server.
1. Point to the Phone Book. In Public contacts, select an existing contact
2. Right-click it and select the Delete item, or directly click the Delete Contact button on the toolbar
3. You will be asked to confirm the action. If you are sure, click Yes
114
Searching Contacts
To find a contact to edit or send faxes to quickly
1. On the Contact menu, click Find contacts, or directly click the Find Contact button on the toolbar
2. In the Find Contact dialog, specify the useful information and then click the Search button
3. The search result will be displayed in the buttom of the dialog
4. Select a contact to edit, delete or send fax to
115
Exporting Contacts
You can export the data of the phone book to a CSV file.
To export contacts
1. On the Contact menu, click Export contacts...
2. In the Export contacts dialog box, specify an output CSV filename, click Save.
116
Importing Contacts
Importing from a CSV file is a two step process. First, you need to prepare and verify your CSV file. Next, simply choose your
import file to perform the import.
1. Preparing your CSV file
Please ensure that your CSV is a valid CSV format. A good way to check is to import your file into Microsoft Excel and see if
the data is as expected. This is also a good opportunity to do any massaging of the data, if you wish. The CSV file must
contain a heading row. For example, here is a valid file with a single record:
"FullName","Company","Department","Duty","Fax","Phone","Mobile","E-mail","Address","Group"
NAME,COMPANY,DEPA,JOB,555555,MOBILE,444444,EMAIL,ADD,myGroup
Click here to download the sample file(contacts_demo.csv)...
2.Importing the CSV file
On Contact menu, click Import contacts...
Locate the CSV file you want to import, press Enter;
The Import Contacts dialog box will be displayed, and give you statistics on how many contacts were imported;
At last, click Close button to close the dialog box.
117
Joyfax Client Console 1.0 (beta)
Note: Please lanuch Joyfax Client v5.2 or above before runnig this application.
JoyfaxConsole [Options] -f <file1/folder1>[;...][;FileN] -r "<Recipients>"
-f
-r file or folder
Recipients
Files or files in sub folders to be faxed.
i.e: C:\Test\;C:\MyPDFs\*.pdf
Recipient list. For more see Fax Recipients. Must begin and end with double quotation marks(").
Options:
-a
-s
-m
-c
-d
-k
Synchronous
Subject
Meno
CoverPage
Header
Kill
Wait until fax sent completed;
Subject of fax, i.e.: "Joyfax Sell Sheet";
Memo of fax, i.e.: "Joyfax Server 5-user license";
Cover Page profile to be used;
Header & footer profile to be used,
0 = None; 1 = General; 2 = Compact; 3 = Detailed
Delete input files if fax sent successfully.
Retrun:
0 - Success;
1 - Initialize failed;
2 - Invalid parameter;
3 - Unknown erorr (may unsupported file type).
Example:
JoyfaxClientConsole -d 2 -f "C:\My PDFs\D90.PDF" -r "Samm Kivin<866-6554-564>;Mr. Green<(846)6554-564>"
JoyfaxClientConsole -f C:\MyPDFs\*.pdf;D:\Sell.xls -r "Samm Kivin<866-6554-564>"
JoyfaxClientConsole -s "Joyfax Sell Sheet" -m "Joyfax Server 5-user license" -f D:\Sell.xls -r "Kivin<866-6554-564>"
118
Cover Page Editor
Using Cover Page Editor, you can create and modify cover page templates for the Clients. A cover page provides information
about the recipient and sender, such as names, company names, and fax numbers. A cover page is sent as the first page of a
multiple page document. It can also be sent by itself, and include both cover page information and a brief note.
On all computers, users have a personal cover pages folder, located by default in % ALLUSERSPROFILE% \Application
Data\JoyfaxClient\Fax_UserName\Template. When you create new cover pages with Joyfax Cover Page Editor, the cover
pages will be stored in this folder.
For information on specific topics, see:
Add, Edit, or Delete Cover Pages
Save a Cover Page
Insert Cover Page Information Fields
Add a Picture to a Cover Page
Insert Labels, Lines, Shapes Objects
Change the Layering of Cover Page Items
Grouping Objects
Display or Hide Grid Lines
119
Add, Edit, or Delete Cover Pages
To add, edit or delete a cover page
1. Open Joyfax Client;
2. On the Tools menu, click Personal Cover Pages, and then do one or more of the following:
To
Do this
Create a new cover page
Click New to start the Joyfax Cover Page Editor.
Add a cover page to your
personal cover pages list
Click Copy to browse to the folder that contains the .gcp file (cover page template) that
you want to copy to your personal cover page folder, and then select the file you
want.
Open and edit an existing
cover page
Select a cover page template, and then click Open to start the Joyfax Cover Page Editor
and do the required modification.
Delete an existing cover
page
Select a cover page template, and then click Delete.
Rename an existing cover
page
Select a cover page template, and then click Rename.
Note:
Cover pages must have a .gcp file name extension. If you cannot find the cover page you are looking for, make sure it
has the correct extension.
The default storage location for the personal cover page folder is % ALLUSERSPROFILE% \Application
Data\JoyfaxClient\UserName\Template.
120
Save a Cover Page
To save a cover page
1. In Joyfax Cover Page Editor, click the File menu;
2. To save a cover page with a new name, click Save as, and then specify a name;
3. To save a cover page with the existing name, click Save. If the cover page has not been saved previously, the default
cover page name will appear for you to edit.
Note:
Cover pages must have a .gcp file name extension.
The default storage location for the personal cover page folder is % ALLUSERSPROFILE% \Application
Data\JoyfaxClient\UserName\Template.
121
Insert Cover Page Information Fields
To insert cover page information fields
1. Open Joyfax Client;
2. On the Tools menu, click Personal Cover Pages;
3. Select the cover page template you want to modify, and then click Open;
4. On the Keywords menu, click the information fields you want to insert, such as Recipient Name , Sender Name and so
on.
5. Move the mouse to the position where you want to insert these information fields. Click the mouse, drag the mouse to
adjust the field size and then drop the mouse.
6. Repeat steps 4 and 5 as needed.
Note:
1. At the time you send a fax, all the information fields you inserted are automatically filled in with the
information defined on the Sending Information and Contact Information in Joyfax Client
2. Some information fields about Recipients, if their variable value are severals, will be shown with The First
Value in the Cover Page. They are PONLY the FIRS ONE in the Cover Page. They are Phone Number, E-mail,
Mobile, Company, Andress and Zip Code. For example, if you have five phone numbers for the recipients, it
will only show the first phone number on the cover page.
122
Add a Picture to a Cover Page
To add a picture to a cover page
1. Open Joyfax Client;
2. On the Tools menu, click Personal Cover Pages;
3. Select the cover page template you want to modify, and then click Open;
4. On the Objects menu, click the Add picture; or on the Drawing Toolbar, click Picture tool directly;
5. Click anywhere in the document, and drag the pointer to insert the picture;
6. Double-click the inserted blank picture, in the Picture Properties dialog box, specify a BMP, JPG or PNG file you want
to add, and then press OK button;
7. Repeat steps 4, 5 and 6 as needed.
123
Insert Labels, Lines and Shapes Objects
To insert labels, lines, and shapes objects
1. Open Joyfax Client;
2. On the Tools menu, click Personal Cover Pages;
3. Click the cover page template you want to modify, and then click Open;
4. On the Objects menu, click the object you want to insert; or on the Drawing Toolbar, click any drawing tool;
5. Click anywhere in the document, and drag the pointer to create a line or a shape, and then click outside the shape to
finish;
6. Repeat steps 4 and 5 as needed.
Note: To draw a perfectly horizontal, vertical line, press and hold SHIFT while drawing a line. To draw a perfect circle or
square, press and hold SHIFT while drawing a circle or rectangle.
124
Change the Layering of Cover Page Items
To change the layering of cover page items
1. Open Joyfax Cover Page Editor;
2. Right-click to select the object you want to bring to front or move to back. Small black boxes on the perimeter of the
item indicate that it is selected;
3. Click Bring Forward, Send Backward, Bring to Front or Send to Back in the content menu.
125
Grouping Objects
To group two or more selected objects:
1. Open Joyfax Cover Page Editor;
2. Click the first object, and then press and hold CTRL while you click other objects;
3. Right-click the lastest selected object, click Group in the content menu.
126
Display or Hide Grid Lines
To display or hide grid lines
1. Open Joyfax Cover Page Editor;
2. On the View menu, click Grid Lines.
A check mark next to Grid Lines indicates that grid lines are displayed.
Note:
To change the size of the grid’s cells:
Open Registry editor: Start -> Run -> Regedit
Navigate to HKEY_CURRENT_USER\Software\JoyfaxClient\Joyfax Cover Page Editor\Application, add a new
DWord value, rename it as GridSize, set the Value you desired, such as: 20 (pixels)
To change the grid color:
Open Registry editor: Start -> Run -> Regedit
Navigate to HKEY_CURRENT_USER\Software\JoyfaxClient\Joyfax Cover Page Editor\Application, set the
ColorGrid's value you desired, such as: c0c0c0
127
Fax Editor for Joyfax Server
Fax Editor is an application that allows users to view and edit fax message.
To open the Fax Editor
In Joyfax Client or Joyfax Server main interface, double-click a fax item, and then the Fax Editor will be displayed.
The main window contains four basic parts:
At the top of the window is the Menu Bar, Tool Bars and Drawing Toolbar
View area is the largest area of the window, it displays the fax message
At the right side of the window is the Thumbnail
At the bottom of the windows is the Status Bar
128
Menu bar
The menu bar commands are described in the table below.
Menu
Icon
File
Command
Open
Display the Open file dialog box to open a tiff file
Close the current file
Ctrl+S
Save the current fax message with the changes
Save the current page of the fax message
Save as...
Save the fax message as other formats, such as PDF and
bmp
Print setup
Display the Print Setup dialog box
Ctrl+P
Print current fax message
Exit
Esc
Undo
Cancel the last operation
Redo
Recover the last operation
Cut
Cut the selected area
Copy
Copy the selected area
Paste
Paste the copied content
Select all
Select all the contents
Clear selections
Clear the selected annotation and the selected file area
Thumbnail
Show or hide the Thumbnail of the fax message
Tool bar
Show or hide the Tool bar
Drawing toolbar
Show or hide the Drawing toolbar
Zoom toolbar
Show or hide the Zoom toolbar
Status bar
Show or hide the Status bar
Grayscale image
Show fax image in grayscale mode
New blank page
Add a new blank page to the current fax file or replace the
current page
Import from file
Insert a selected tiff file into current fax file
Scan pages
Add a new scan page
Delete
Delete the current page
First page
Ctrl+Home
Move to the first page
Pre page
PageUp
Next page
PageDown
Move to the next page
Last page
Ctrl+End
Move to the last page
Edit
Pages
Rotate 90 CW
Zoom
Ctrl+O
Save page as
Print
View
Description
Close
Save
Shortcut
Close Fax Editor
Move to the previous page
Ctrl+Right Arrow
Rotate 90 CCW
Ctrl+Left Arrow
Flip Horizontal
Rotate the fax by 90 degrees counter-clockwise
Rotate the fax by 90 degrees clockwise
Flip horizontal current page
Zoom in
Num +
Enlarge the displayed fax message
Zoom out
Num -
Reduce the displayed fax message
Actual size
F4
Display the image without scaling
Fit to width
Ctrl+W
Reduce or enlarge the image to fit into the window's width
129
Fit to height
Ctrl+H
Reduce or enlarge the image to fit into the window's height
Best fit
Ctrl+F
Reduce or enlarge the image to fit into the window's current
size
Zoom selection
Enlarge the selected area
Text Stamp
Add a text stamp
Image Stamp
Add a image stamp
Burn annotations
Burn annotations onto current page, causing them to be
permanently incorporated into the fax
Help
Contents
Tools
F1
Display the help contents
About
Display the information about Fax Editor
130
Drawing Toolbar
You can use these drawing tools to edit the fax message.
Icon
Command
Description
Move
Pan fax page
Selection Rectangle
Select rectangular regions of the fax for functions like copy and cut
Selection
Select a annotation to handle such as,"Freehand Line", "Rectangle" and so on
Freehand Line
Select freehand Line tool
Line
Draw a Line
Highligter
Mark an important part of the fax message
Hollow Rectangle
Select a wanted file area with a hollow rectangle
Filled Rectangle
Select a wanted file area with a filled rectangle
Text
Add text onto the fax document
Attach-a-note
Attach a note which has colourful backgroud
Text from file
Add the content of a file onto the fax document
Image from file
Insert an image stamp to the fax document
Text Stamp
Add a text stamp
Image Stamp
Add a image stamp
Burn annotations
Burn annotations onto current page, causing them to be permanently incorporated into
the fax
131
Using Drawing Tools
Drawing Tools take a great part in the fax editing.
Freehand Line
To add a freehand line, please take these steps:
1. Select the Freehand line tool.
2. Click and hold down your mouse button while dragging the mouse.
3. Release the mouse button to end the line.
4. You can also change its color or make it transparent by right-clicking the line.
Highligher
It is like the Fluorescence Pen in the autual life and you can use it to highlight the important part of the fax message.
To highlight some contents of the fax document
1. Click the Highligher button.
2. Click and hold down your mouse button while dragging the mouse.
3. Release the mouse to highlight the selected area.
4. You can right-click the highlighted content to change its backgroud colour or make it transparent.
Attach-a-note:
To attach a note in the fax document
1. Click the Attach-a-note button.
2. Move the mouse to where you want to place the note and press the mouse.
3. Input text in the note.
4. You can right-click the added message to change its font and background colour.
132
Text Stamp
Text Stamp
1. Adding an exsiting Text Stamp.
1) To add an exsiting Text Stamp, please click the Text Stamp tool and then select an exsiting Text Stamp.
2) After adding a Text Stamp in the fax message, you can right-click the text stamp to change its font and
colour.
2. Customise the Text Stamp
1) Please open the Stamp Manager, and double-click an existing Text Stamp to make the modification.
2) Click the New button to add a new Text Stamp.
Name: Enter the Name for the Text Stamp.
Text: Enter the Text as the content of the Text Stamp.
133
Varible Value: Add varible value such as: Date and Time in the Text Stamp.
Font: Specify the font of the Text Stamp.
Color: Choose the colour for the Text Stamp.
At last, click OK to save the new Text Stamp.
134
Image Stamp
Image Stamp
1. Adding an existing Image Stamp
1) To add an exsiting Image Stamp, please click the Image Stamp tool and then select an exsiting Image Stamp.
2) After adding a Image Stamp in the fax message, you can right-click the image stamp to cut or copy it.
2. Customise the Image Stamp
1) Please open the Signature Manager, and double-click the existing Image Stamp to make the modification.
Note: If a window pops up asking the password, if there is any, just enter the password, if not, leave it as blank
and click OK.
2) Click the New button to add a new Image Stamp.
135
Name: Enter the Name for the Image Stamp.
Image file: Import the image from the local path. For best results, please use a white backclor and 400*400
image.
Access: Setup the Password to limit the use of the Image Stamp.
At last, click OK to save the new Image Stamp.
136
Flexible Use of Selection Rectangle
Selection Rectangle is used to select rectangular regions of the fax for functions like copy and cut. Also, you can make
good use of this Selection Rectangle tool.
1. To change the position of some paragraph of the fax
1) Click the Selection Rectangle tool, and select a rectangular region of the fax message.
2) Press the shortcut key "Ctrl+X".
3) Move the mouse to a position of the fax message where you want to place that selected rectangular region,
and click the mouse.
4) Press the shortcut key "Ctrl+V".
2. To delete some paragraph of the fax
1) Click the Selection Rectangle tool, and select a rectangular region of the fax message.
2) Click the "Delete" button on your keyboard.
137
Password Protects Image Stamp
In order to protect Image Stamp, you can setup the password for the Image Stamp.
Specific steps are showed below:
1. Open the Singarnature Manager of Image Stamp.
2. Select an existing image stamp and double-click it to show the Image Stamp Properties dialog.
3. Go to the Access section and then specify the Password. At last, click OK to save the modification.
4. Next time when you want to use this Image Stamp, it will pop up a dialog asking you to enter the Password.
Note: If you don't set up the password for that specific Image Stamp, just leave the box as blank and click OK.
138
Insert Fax Pages from a Scanner
Fax Editor offers you a direct way to insert fax pages from a scanner.
To run this function, please take these steps:
1. Click the Pages menu, select Scan pages, and then a dialog will pop up for you to select the scanner.
2. Please select a scanner and click OK, and then the pages from the scanner will be inserted at the end of the current
document.
139
Save the Fax Message as PDF format
1.To save the whole file as PDF format
1) Click the File menu, select Save as.
2) In the pop-up window, you can choose the PDF format to save the whole fax file.
2.To save the current page as PDF format
1) Click the File menu, select Save page as.
2) In the pop-up window, you can choose the PDF format to save the current fax page.
140
Backup & Restore Joyfax Server files
This tutorial shows you how to backup and restore Joyfax Server. Follow the instructions given below:
To backup Joyfax Server files
1. Click Start, point to Programs, point to Joyfax Server, point to Tools and then click Backup & Restore Server ;
2. In Joyfax Server Data Backup & Restore Wizard dialog box, choose Backup Joyfax Client fax data , click Next;
3. Follow the step-by-step wizard to complete backing up the Joyfax Server files. You could set a password for protecting
the backup file if you like.
To restore Joyfax Server files
1. Click Start, point to Programs, point to Joyfax Server, point to Tools and then click Backup & Restore Server;
2. In Joyfax Server Data Backup & Restore Wizard dialog box, choose Restore backup data , click Next;
3. Follow the step-by-step wizard to complete restoring the Joyfax Server files.
141
Backup & Restore Joyfax Client files
This tutorial shows you how to backup and restore Joyfax Client. Follow the instructions given below:
To backup Joyfax Client files
1. Click Start, point to Programs, point to Joyfax Server, point to Tools and then click Backup & Restore Client;
2. In Joyfax Client Data Backup & Restore Wizard dialog box, choose Backup Joyfax Server data files , click Next;
3. Follow the step-by-step wizard to complete backing up the Joyfax Client files. You could set a password for protecting
the backup file if you like.
To restore Joyfax Client files
1. Click Start, point to Programs, point to Joyfax Server, point to Tools and then click Backup & Restore Client;
2. In Joyfax Client Data Backup & Restore Wizard dialog box, choose Restore backup data , click Next;
3. Follow the step-by-step wizard to complete restoring the Joyfax Client files.
142
Frequently Asked Questions
The FAQs (Frequently Asked Questions) cover common questions regarding Joyfax Server often asked by people. If you
cannot find an answer to your question here, we recommend to search the Online Help for additional information. If your
question was also not answered in the Online Help, please send us a support request describing the problem.
Error "...application has encountered a problem and needs to close" when you start Joyfax Server or Client on
Windows XP
Does it matter what fax modem I use for faxing?
Which modems and fax boards do you recommend for Joyfax Server?
Why my computer restarts after the installation of multiple fax modems?
Why my modems can not be recognized by the Joyfax server?
How to enable the Email Notification function when faxes sent?
How to change the email subject and body, sent from the Joyfax Server?
Does Joyfax Server support ISDN?
How to install Multiple Fax Modems?
Help us to translate Joyfax Server into your language and earn a free license.
Why I get this error message "Cannot initialize Winsock, please reinstall the Joyfax Client"?
Can Joyfax Server support VOIP?
What does Ordinal Not Found : The ordinal [xxxx] could not be located in the dynamic link library LIBEAY32.dll?
When opening the software, you receive "Runtime error 71: disk not ready."
Joyfax Server only send the first part of first page when sending a fax?
What are the differences between class 1, 2 and class 2.0 modems?
I am having problems sending faxes with my US Robotics fax modem
How to correct the Modem initialization string?
The modem works fine in Windows Fax and Scan, but Joyfax Server?/ How to manually correct init string?
Why are the receiving faxes/pdf attachments not readable?
How do I silence the fax modem / How to turn off modem speaker?
How can I improve fax Reliability?
Does my modem support Caller ID?
How to configure the Area code for Joyfax Server?
In the United States, what sequence of numbers do we need to enter in the Phone book?
Is there a way to prevent stripping the local area code for all numbers of the local area?
I got the error message "Create print desktop failed, not enough storage space."
How to import contacts from a CSV File into Joyfax Server?
No receiving fax in my Client, How to configure automatic fax routing?
Can I send faxes from the fax server?
How to access Joyfax Server behind a router/firewall?
How to backup of the Joyfax Server files?
Remove the limit concurrent TCP/IP connections for Windows XP/Vista
Can I add additional Clients or FAX Line later?
Why have I not received my registration codes?
143
Can I add additional Clients or FAX Line later?
The number of users for an existing Joyfax license can be increased to a higher license type at any time. All you have to do is
to purchase the additional clients for the joyfax server. You will receive a new license code for the Joyfax server to enable the
additional clients and registraction codes for the newly purchased Joyfax Client.
Click here to order directly through the Online Order System...
144
Is there a way to prevent stripping the local area code for all numbers of the local
area?
In the USA and Canada it is often required that numbers of a certain area code need to be dialed as local calls and also as long
distance calls. Since Joyfax Server strips the local area code for all numbers of the local area, a special configuration is required in that
case.
For example: Country or region code: +1; Area (or city) code: 311; International prefix: 011; Long distance: 1:
1. On Server menu, click Server Options...; Or directly click Server Options button on the toolbar;
2. In the Server Options dialog box, specify the Country or region code to +1 and Area(or city) code to 311;
3. click Dialing & Area code rules... button, the Dialing & area code rules... dialog box will be displayed, type the Longdistance and International calls prefix, and given rules set as below:
4. Click OK to save your configurations;
5. Dialing rules:
Phone number
Dial as
(311) 234-5678
13112345678 (long-distance call)
(311) 345-1234
13113451234 (long-distance call)
(311) 345-6789
3456789 (local call)
(312) 234-5678
3122345678 (local call)
(318) 234-5678
3182345678 (local call)
(313) 234-5678
13132345678 (long-distance call)
145
Does my modem support Caller ID?
First make sure you can see the Caller ID information from a normal telephone LED displayer.
Then do the following:
Launch Joyfax Server;
Click Stop-Sending and Stop Receiving buttons on the toolbar;
Select Server menu, click Devices Settings..., the Fax Devices Settings dialog box will be displayed;
Select the Fax Modem you wish to check in the Devices list, click Caller ID Detection button;
In Caller ID detection dialog box, press Detect Now button, the software will automatically check the available AT
command;
Follow the prompt, click Test Now! button, then dial your phone by using another phone;
If Caller ID is not working, you will only see the word RING for each incoming ring. If this is the case try another Caller
ID Command and try it again;
If Caller ID is working, you will see the word RING, followed by one or more additional data lines. The word RING will
then continue to appear for each incoming ring;
At last, press OK button to apply the caller id command.
146
How can I set up the "Fax to Email" function correctly?
To ensure the "Fax to Email" function is set up correctly, please make sure the detials about SMTP are correct.
For Gmail account:
SMTP Server
Server Name: smtp.gmail.com
Port: 587
For Yahoo account:
SMTP Server
Server Name: smtp.mail.yahoo.com
Port: 465
For Hotmail account:
SMTP Server
Server Name: smtp.mail.live.com
Port: 587
For Aol account:
SMTP Server
Server Name: smtp.aol.com
Port: 587
147
Error "...application has encountered a problem and needs to close" when you
start Joyfax Server or Client on Windows XP
When you start Joyfax Server or Client on Windows XP, Joyfax Server or client returns one of the following error messages:
-- "Joyfax Server [version] has encountered a problem and needs to close. We are sorry for the inconvenience."
-- "Joyfax Client [version] has encountered a problem and needs to close. We are sorry for the inconvenience."
-- "This application has created errors and needs to close."
Solution: Change the Compatibility setting for Joyfax Server or Client:
1. Right-click the Joyfax Server or Joyfax Client shortcut on the desktop and choose Properties
2. In the Properties dialog box, select the Compatibility tab
3. Deselect Run This Computer In Compatibility Mode For [any Windows version earlier than XP] and click
OK.
Background information
Windows XP includes a feature to run applications in a previous version's environment to reduce compatibility issues with
older applications. Joyfax Server is unable to start successfully with this option selected.
148
I got the error message "Create print desktop failed, not enough storage space."
This error message can be the result of the non-interactive desktop heap setting in Windows. The default settings for the third
value is 512 kb. The Windows registry must be used to adjust this setting.
To change the desktop heap setting, do the following:
Open the Windows registry, go to Start > Run, type: Regedit or Regedt32
Navigate within the Registry editor to the key: HKeyLocalMachine\SYSTEM\CurrentControlSet\Control\Session
Manager\SubSystems
In the right-hand pane, double-click the value Windows
Look for the area 'SharedSection=xxxx,yyyy,zzzz, aaaa'; where xxxx defines the maximum size of the system-wide heap (in
kilobytes), yyyy defines the size of the per desktop heap, zzzz defines non-interactive desktop heap size and aaaa
defines terminal services.
Change the third value from 512 to 2048 or 1024 . The 512 specifies the desktop heap for desktops associated with noninteractive Windows stations.
Note: For 64 bit machines, the default values are SharedSection=1024,20480,768; only increase the third value to 2048 or
1024 as needed.
149
In the United States, what sequence of numbers do we need to enter in the Phone
book?
For example: You specify the area code as following settings in Joyfax Server(Make sure that you have checked Auto. remove
area code for local calls.)
and your contact phone number is +1(311)2344 5678, the phone number you enter in Phone book:
Phone number
Dial as
+1 (311) 234-5678
2345678 (local call)
1-311-234-5678
2345678 (local call)
311-234-5678
2345678 (local call)
(311) 234-5678
2345678 (local call)
3112345678
2345678 (local call)
2345678
2345678 (local call)
(313) 234-5678
13132345678 (long-distance call)
1-823-456-7890
18234567890 (long-distance call)
823-456-7890
18234567890 (long-distance call)
+44 (20) 664000
0114420664000 (international call)
+44-20-664000
0114420664000 (international call)
Note: The Dialing rules will affect this, for more please see Joyfax Server Help Document.
150
What are the differences between class 1, 2 and class 2.0 modems?
If you are selecting a modem to use with this software you will do better if you use one of the recommended Class 2 or
Class 2.0 modems; rather than a Class 1 modem.
During a fax transmission, data is sent in "frames" (or blocks) of data. On a mechanical fax machine, the print head will have
physical limitations on how fast a line can be printed. Due to the Modified Hufman encoding of faxes, it is possible to send a
single black pixel line in only a few bits. Because the fax machine has to physically move the printer head on the paper, there is
a minimum line sending time required while sending data. Fax modems must send the data frames at a speed and timed to
accommodate the receiving fax machine.
A Class 1 modem only sends frames. The fax software is required to build the frames from the fax data, and then send them
with respect to the timing issues for the remote fax machine. In a multitasking environment, the computer may be busy with
another task, and miss the timing on one of these frames. When this happens, the fax is aborted.
A Class 2 or 2.0 modem handles all the fax framing issues. The software simply gives the modem a command to send the fax
data, and then streams the fax image to the modem. Class 2 modems are much better suited to multitasking environments.
Note to shoppers: Many modem makers are dropping Class 2/2.0 features from their consumer modems. I suspect that this is
due to the fact that most consumers only need Class 1 support for Windows, combined with the push to 56k .90 protocols. (By
providing 56K, the manufacturer consumes eprom space on the modem board that was previously used by class 2
procedures.)
Find out what class my fax modem supports:
Type the following in Windows (Hyper)Terminal, Procomm or Kermit:
AT+FCLASS=?
The modem reply will be of the form:
0,1,1.0,2,2.0
Where 0 is for data, 1 is class 1 fax, 1.0 is for class 1.0 fax, 2 is class 2 fax and 2.0 is class 2.0 fax.
151
Which modems and fax boards do you recommend for Joyfax Server?
In general, we recommend you to avoid using low-cost modems for faxing, since such modems are usually only tested for data
and Internet connections and do not work very reliable in fax mode.
In order to get maximum performance and reliability from your fax server, Joyfax Server recommends fax boards and modems
from these manufacturers (If you are using a fax modem with Joyfax which isn't in this list and are having good results with it,
please email support[at]joyfax.com so that this model can be added to this list):
Digi Acceleport Ras 4/8 Port Modem cards
Dialogic Diva Media Boards 2/4/8 Ports
Mainpine IQ Express 2/4/8 Port Modem
Multi-Tech MultiModem ISI Multiport Analog Modem
Comtrol RocketModem IV
ISDN: AVM-Fritz PCI or -USB (2 channels), click here for help!
ISDN: Primux 2S0 (4 channels) and 4S0 (8 channels)
ISDN: RVS-COM router
Equinox MultiModem
MainPine RockForce
Intel HCF 537EP V9x DF PCI
Eicon Diva 4BRI
Dialogic® Diva® V-PRI/E1-30
Zyxel Omni 56K external
ZYXEL OMNI 56K PLUS
Conexant V90
Sitecom 56k PCI Modem DC-010v2
MRI PCI Card
Sitecom DC-015
Hayes Accura 56K
Zoom V.92 PCI Voice Fax modem
U.S. Robotics V.92 USR5637 56K USB Faxmodem
Dynamode Conexant V92 56K
Sitecom Modem PCI Card (MODEL: DC-010)
Phonic Pro v.92/v.90 PCI Modem (MODEL: 08-11200-A)
Aztech 56K USB modem Model UM3100
Multitech 3334ZDX/5600ZDX/5634ZBA
ECOM EM-56IEV/EM-56HSFI
Elsa Microlink 56k
Zyxel U-90/U-1496/U-336
Conexant Unveils Single-Chip Modem
The best USB modem we have used here are the Zoom model 3090 USB modem and U.S. Robotics V.92 USR5637 56K USB Fax
modems. The Zoom model 3090 USB modems are hard to find, but you may be able to find one here...
Please DO NOT confuse the model 3090 with the 3095, we did not experience good results with the modem 3095, it has a
nasty habit of refusing to be reset from software and will not release the phone line after a period of fax activity.
152
In addition, we DO NOT RECOMMEND using SOFT MODEM modem, such as: Trendnet TFM-560U(Agere System USB 2.0
Soft Modem), PCI Modem with SmartSP, etc.
153
How to backup of the Joyfax Client files?
To backup or restore data from a previously created backup, click Start, point to Programs, point to Joyfax Server, point to
Tools and then click Backup & Restore Server, then follow the step-by-step backup wizards.
For more information please see the Backup & Restore
154
How to access Joyfax Server behind a router/firewall?
For users on an office network with a router installed, Joyfax Server is not accessible from the Internet because of many modern routers' built-in firewall.
Enabling outside Joyfax Client access to an internal Joyfax Server on an Office network requires that you set up NAT - "network address translation," or
port forwarding. Please follow this instruction:
Step 1. Determine your server's internal IP address.
All the computers on your internal network have an IP address which looks something like 192.168.0.XXX. Get on the computer with the server
running open a command window. Then type ipconfig to determine the machine's internal address, like so:
C:\JoyfaxServer>ipconfig
Windows IP Configuration
Ethernet adapter Local Area Connection:
Connection-specific DNS Suffix . :
IP Address . . . . . . . . . . . . : 192.168.0.98
Subnet Mask . . . . . . . . . . . : 255.255.255.0
Default Gateway . . . . . . . . . : 192.168.0.1
In this case, as you can see, the server's internal IP address is 192.168.0.98.
Step 2. Configure your router.
Most routers have an web-based administrative interface that's located at http://192.168.0.1. (This address does depend on your model. Consult
your router user guide for more info.)
Once you've gone to the router administration, entered the password (if one is set up), there should be an area called "Port forwarding". There,
you'll set the port number that requests from the Internet will come in, and the internal computer that should fulfill those requests. Here's a
screenshot of the Netgear router set up to port forward 8750 to the Joyfax Server, which is at 192.168.0.98 (see above). Click on the image to see
a larger version.
Step 3. Determine your server's internet IP address.
In the "Router Status" area, you may see your Internet IP address in the Internet Port section.
155
So, in the Joyfax Client login dialog box, type 24.0.209.243 as server address, then you may access the Joyfax Server all over the world.
156
Why fax didn't go through?
Please check the followings:
1. To perform the Joyfax Server correction, it's recommended that you set up the area code and calls prefixes and Dialing
Rules.
If you don't know how to config it, just make the Specify dial location check box unselected, the server will dial the fax
number directly as you entered in Joyfax Client.
2. Ensure that you have entered the correct phone number format, the following phone numbe should be advised:
+1(886)87654321 / +1(886)8765-4321 / (886)87654321 / (886)8765-4321 / 886-8765-4321 / 8765-4321 /
87654321 / 8765-4321,,,801(extension line: 801)
3. Try the SECOND Init String in Fax Devices Settings dialog, click here for more.
4. Ensure at least ONE fax modem choosed for sending faxes, please refer to Configure Fax Devices
5. Ensure the modem is not occupied/opened by other applications, such as: Windows Fax Service
If the problem still occurs, please feel free to contact us at: [email protected]. We provide free remote assistance technical
support on workdays from 8 p.m. till the second day 12 a.m. US Eastern Time. In order to use this kind of technical support,
you should leave a request with the date, time and way(Teamviewer or Logme In) to contact you for establishing the remote
connection.
157
How can I improve fax reliability?
In order to get maximum performance and reliability from your fax server, try the followings:
Use a direct connection from the PSDN to the fax modem; Remove any splitters and other devices in that line.
DISABLE YOUR SCREENSAVER. Some screensavers can be quite cpu intensive and will starve the communication
threads from receiving required messages;
Avoid running other cpu intensive processes while fax sessions are in progress, they will likely starve the
communication threads.
If you have a cheap winmodem or software modem consider investing in a good quality non-US Robotics controller
based modem, please see this page.
158
How to install multiple fax modems?
Though we recommend you to avoid using multiple low-cost fax modems for faxing, we get asked this question a lot. Here is a
simple step by step guide showing you how to install multiple U.S. Robotics V.92 USR5637 56K USB Fax modems on
Windows XP:
Connect the modems to computer, and install modems drivers;
Open Joyfax Server, click Stop Sending and Stop Receiving buttons on the toolbar. On Server menu, click Devices
Settings, click Detect Devices..., only one U.S. Robotics V.92 USB Modem could be found in the devices list;
On Server menu, click Exit to close Joyfax Server;
Right-click My Computer, click Properties, click the Hardware tab, and then click Device Manager, double-click
Modems:
You should find that modem which name contains a # character that cannot be recognized with Joyfax Server;
In order to fix this problem you have to update the Modem drivers manually. To prepare for updating modem drivers:
Click here to download the lastest release drivers: i.e: USR5637-2kXpVista32-bit.exe;
Extract the drivers to C:\USR\5637, double-click the USR5637_2k_XP_Vista_32bit.inf file to open with
Notepad;
Replace the string Modem2 = "U.S. Robotics V.92 USB Modem" as Modem2 = "U.S. Robotics V.92 USB
Modem II" (The string name may be Modem1PCI, Modem1EXT, Modem1EXTPNP and Modem1USB etc...);
159
On File menu, click Save As..., type "USR5637_II.inf"(Include the inverted commas), click Save, and then close
Notepad.
Right-click U.S. Robotics V.92 USB Modem #2 modem, select Update Driver;
The Hardware Update Wizard will begin: Select No, not this time, click Next; Select Install from a specific location
(Advanced) and click Next; Select Don't search. I will choose the driver to install and click Next;
Windows will show you the current driver that is installed for the modem. Click Have Disk, click on Browse to point to
C:\USR\5637, choose the USR5637_II.inf file, click Open, click OK;
Windows will show the selected driver: U.S. Robotics V.92 USB Modem II, click Next to begin copying the necessary
files to your hard drive, click Finish to move on;
Repeat the above steps to update drivers for the U.S. Robotics V.92 USB Modem #3 modem;
Now, Joyfax Server can recognize all of your modems!
160
What does Ordinal Not Found : The ordinal [xxxx] could not be located in the
dynamic link library LIBEAY32.dll?
If the libeay32.dll and/or ssleay32.dll are conflicting with versions from another program on the computer this error can occur.
There are three ways may resolve the problem:
Method 1: If this problem appears in windows 64bit. Please open C:\Program Files\Joyfax Server folder and right click
the JoyfaxMail.exe application.
In the pop-up window, go to the Compatiblity page. Select the Run this program in compatibility mode for check box.
Then choose Windows XP(Service Pack 2) and click OK to test again.
Method 2: Download the SSL Library: ssllib32.zip, then extract the archives(libeay32.dll and SSLeay32.dll) to
C:\windows\System32 folder on the computer.
Method 3: Download the "No TLS Support" version of JoyfaxMail.exe, and then extract the file to C:\Program
Files\Joyfax Server folder. You won't be able to send email through an SMTP server that requires encryption(like
Gmail, Hotmail), but it won't give you that error message.
161
The modem works fine in Windows Fax and Scan, but Joyfax Server / How to
manually correct init string?
If you found the Joyfax Server cann't work right on your system, but the Windows Fax and Scan service. You may try using an
initialization string which uses in Windows Fax and Scan to correct this. Please try the followings:
1. Install Fax Services on your computer, refer this page: http://support.microsoft.com/kb/306550
2. Send a testing Fax by using the Windows Fax and Scanner. Refer this page: http://support.microsoft.com/kb/306657
3. In Control Panel, click Hardware and Sound, and then click Phone and Modem Options.
4. On the Modems tab, click the modem you installed, and then click Properties.
5. Click the Change Settings button, if the button is present on the General tab. If the User Account Control dialog box
appears, confirm that the action it displays is what you want, and then click Continue.
If the Change settings button is not present, the modem does not support the ability to change modem settings. Refer
to the documentation provided by your modem vendor.
6. Click the Diagnostics tab.
7. In Logging, select the Append to Log check box if you are working on a computer running Windows Vista or the
Record a Log check box if you are working on a computer running Windows Server 2003/2008.
8. Click View Log if it is enabled, the Notepad will be launched and displays the ModemLog_Model.txt (Model is the
name of the modem as it appears in the list of installed modems on the Modems tab of Phone and Modem Options),
delete all logs, and then save the file.
9. Click OK button to close the Properties dialog box.
10. Launch the Windows Fax and Scan to send a test fax.
11. As soon as the fax is sent, open the Properties again, select the Diagnostics tab, and then click View Log button, the
ModemLog_Model.txt file will be displayed as below:
12. Try this Init string in Joyfax Server, please refer to How to correct the Modem initialization string?
162
Why my modems can not be recognized by the Joyfax server?
Usually, there are two reasons that make the modems can not be recognized by Joyfax Server.
One is that the modems are occupied/opened by other applications, such as: Windows Fax Service, please close or turn off the
applications/windows service(Fax Service) and try again.
The other is that the names of the modems contain a # character, you can right-click My Computer, click Properties, click the
Hardware tab, and then click Device Manager, double-click the Modem branch to expand it, if the modems with a name
containing a # character they should not be recognized by Joyfax Server. To fix this problem, try the following steps: Go to
Control Panel and open Phone and Modem Options, click the Modems tab; Select a modem, and then click Remove, repeat the
preceding steps to remove all modems; At last, install your modem drivers again.
If you want to install multiple modems of the same model on the computer, please refer to "How to install multiple fax
modems?"
163
How to correct the Modem initialization string?
If you found the Joyfax Server cann't work right on your system, you may also want to try using an initialization string to
correct this.
Before you try an initialization string, check for updated modem drivers from your computer manufacturer's or modem
manufacturer's website. Check the computer manufacturer's site first if the modem came with the computer as they may have an
OEM version of the modem driver.
1. Run Joyfax Server, click Stop Sending and Stop Receiving button on the toolbar.
2. On Server menu, click Devices Setting..., you may see your modem model in the Fax Device Settings dialog.
3. The owner's manual for your modem should list its init strings in Modem manual. If it doesn't, you can look up init
strings on the web. Two popular sites are:
http://modemhelp.org/inits/
http://www.56k.com/
4. Copy the Init string from the site, and paste in Init strings combo box.
5. Press OK to save, click Start Sending/Receiving button.
164
How to use Outlook Contacts directly when choosing the recipients?
Please try the following steps:
Open Joyfax Client, click the Tools button, select Options.
In the pop-up dialog, go to the General page, and then mark this item: Show Microsoft Outlook Contacts when
choosing recipients.
Now you can use the Outlook Contacts directly when choosing the recipients.
165
How many recipients can be specified in per fax message?
The Recipients textbox is limited to 64K in size such as virtual storage, and approximately 20 bytes is required for each
recipient within the Joyfax Server, so you could specify no more than 50 recipients, it's good enough for Fax broadcasting.
166
Why have I not received my registration codes?
In general, you will receive emails with Registration Name and Code, and other information of registering in 30 minutes after
your purchase. The emails are sent automatically by our registration agent Plimus.
However, sometimes for some reasons, for example, the emails are moved to your Spam/Junk folder, or your Email service
provider rejects Emails from Plimus. If you don't receive your registration information after 30 minutes, please check your Spam
or Junk folder first, or just contact our sales team [email protected] to get assistance.
167
Can I send faxes from the fax server?
The Joyfax Server cannot initiate an outgoing fax job, it only sends fax jobs submitted to it from the Joyfax Client software. It
can receive faxes without the need for any client software.
In order to send faxes from the fax server, you need to install Joyfax Client on the same computer where you have installed
the Joyfax Server software. If you do this, you can submit fax jobs to the fax server from the server machine just as you would
from a network workstation.
168
How to set up area code for Joyfax Server?
To perform the Joy Fax Server correction, you MUST set up the area code and calls prefixes:
1. On Server menu, click Server Options...; Or directly click Server Options button on the toolbar;
2. In the Server Options dialog box, type the Country or region code, your local area code, Long-distance and
International calls prefix:
3. Click OK to close Server Options dialog box
4. What sequence of numbers do we need to enter in the Phone book?
Note: First time you start the Joyfax server, the setup wizards will automaticly fill out above parameters. You also can correct
Long-distance and International calls prefix manually, please see this page if you donn't know the prefix code:
http://www.kropla.com/dialcode.htm
169
How do I silence the fax modem / How to turn off modem speaker?
To turn off the modem speaker, please follow these instructions:
Launch Joyfax Server;
Click Stop Sending and Stop Receiving button on the toolbars;
On Server menu, click Devices Settings..., the Fax Device Settings dialog box will be displayed;
If there is more than one Modem installed in your system, select the appropriate modem;
Check whether M0 (0=zero) appears in the Init strings or not. If it already exists, move it to the end of Init strings, or
place the M0 at the end of the init strings.
Click OK
170
Does Joyfax Server support ISDN?
Joyfax Server supports an ISDN adapter with a T.30-compatible CAPI 2.0 driver. Not every card can be used: Some are only
able to fax with a manufacturer-supplied software. You can check if a given card has a T.30-compatible CAPI by downloading
the free CapiInfo utility. For fax polling, the B3 protocol "T.30 with Extensions" is required.
Cards for one S0/T0 line can typically send and receive on both B channels simultaneously. However, in most cases
(like AVM-Fritz) it is not possible to combine two or more passive cards in one PC since their driver does not support
this.
Multi cards like the Primux-2S0 or -4S0 allow sending and receiving on four resp. eight channels. These adapters are
now also available as PCI-E (PCI Express) cards.
S2M cards like Primux-1S2M or -2S2M can send and receive on all 30 resp. 60 channels of one resp. two primary-rate
lines. They require a PC CPU with 1.5 GHz or faster and at least 512 MB of RAM.
ISDN routers like RVS-COM can be used if they implement a LAN CAPI interface with T.30 support, e.g. with a DSP
module for decoding fax tones. They are an alternative if internal ISDN cards cannot be used e.g. because the server is
running in a virtualized environment.
The following shows you how to configure the AVM ISDN FRITZ USB modem with Joyfax Server:
1. Install AVM ISDN CAPI Port Driver
171
2. Test the installed modem:
Open the Windows Device Manager, you will see the AVM ISDN Custom Config Modem installed on your system:
Right-Click the AVM ISDN Custom Config modem, click Properties menu, in AVM ISDN Custom Config Properties
dialog box, select Diagnostics tab, there's a Query Modem button in this tab. If the modem is correctly installed, the list
box under the button will display a list of AT commands and the modem's actual response to them when you clicking
the Query Modem button.
172
You should find the AT+FCLASS=? command with the 0,2 value line in that list box. That means this kind of modem
supports Class 2 standard only.
3. In Joyfax Server, open the Fax Device Settings window, click Configure Manually button to add the Modem manually:
Finally, don't forget to set the Fax Class to Class 2, and try the following Init Strings one bye one:
ATS31=3
ATQ0V1E0S0=0S31=3
ATS31=3; S49=18; S50=18;
173
Remove the limit concurrent TCP/IP connections for Windows XP/Vista
In Windows XP SP2/SP3 and Vista, Microsoft enforces and hard-limit (hard coded in tcpip.sys) the maximum simultaneous
half-open (incomplete) outbound TCP connection attempts per second that the system can make, in order to protect the
system from being used by malicious programs, such as viruses and worms, to spread to uninfected computers, or to launch
distributed denial of service attack (DDoS).
But this may have affects applications, servers and p2p programs that attemp to open many outbound connections at the
same time. To remove maximum concurrent half-open connection limits in Windows XPSP2/SP3 and Windows Vista, apply the
patched with the following steps:
Go to the Download area, download the appropriate TCPIP patch;
Uncompress the downloaded file
Do as the Readme.txt says
174
Help us to translate Joyfax Server into your language and earn a free license
We now invites you to become our volunteer UI translator to localize our Joyfax Server into your language. You will be able to
make a difference. The translation process is simple, easy and fast. We highly appreciate your contribution to our product.
Following is the instruction on how to translate the language files:
1. Download the Language files which can be found in our download page.
2. Decompress the downloaded file, you can see 6 files as follows: Client_English.rc, Server_English.rc, Browser_Res.rc,
Client_Res.h, Server_Res.h and Browser_Res.h.
3. You may simply open the .RC files with a Resource Editor (i.e. ResEditor, Notepad++), and translate the files into your
language:
4. You also may open the .RC file with Notepad, and then translate the file into your language:
5. Save and email us the translated files.
6. We will get back to you very shortly.
175
I am having problems sending faxes with my US Robotics fax modem
We have heard many reports of problems with sending faxes with U.S. Robotics modems or USB modems. Especially earlier
models. I would recommend upgrading the firmware, or better still, get yourself a different modem.
176
Does it matter what fax modem I use for faxing?
This is a question we get asked a lot, and for some reason most people seem to think that if it is a fax modem, each modem will
perform exactly the same as any other fax modem. Nothing could be further from the truth!! Just like there are quality
differences between fax machines and other products, there are quality differences in fax modems. The quality of your fax
modem will determine transmission speed, amount of failures, ability to deal with bad international lines etc. If faxing is
important to you or your business, invest in a quality modem. Also, follow the advice of the fax server company that are
selecting.
>>Which modems and fax boards do you recommend for Joyfax Server?
177
Why are the receiving faxes/pdf attachments not readable?
This is a question we often get asked. It relates to the Init String you used and there are two ways for you to change the Init
Strings:
1. Selecting another Init String
1)In Joyfax Server, click Stop Sending and Stop Receiving buttons on the toolbar.
2)Click Server menu, click Devices Settings, you may see your modem model in the Fax Devices Settings dialog.
3)Click Detect Devices, point to Init strings, select the second Init Strings in the combo box, then click OK.
2. Correcting the Init String manually
Please refer to How to manually correct the init string?
If the problem still occurs, unfortunately, you can check for updated modem drivers or BIOS from your modem manufacturer's
website or REPLACE with a new modem. We recommend you to avoid using LOW-COST or SOFT modems for faxing, since
such modems are usually only tested for data and Internet connections and do not work very reliable in fax mode
178
Why my computer restarts after the installation of multiple fax modems?
This case exists when there is a hardware conflict of your installed modems. The type of modems you install on your computer
are not allowed to be installed together. Please change the fax modems. For modems recommended, please refer to:
>>Which modems and fax boards do you recommend for Joyfax Server?
179
How to increase Resolution/Quality of sent fax?
In order to increase the quality of a fax message, try the followings:
In Fax Editor dialog box, click Options button on the left side of the window.
The Fax Options dialog box will be displayed, then click Fax tab.
On the Fax tab, click the Custom Settings option.
Click and drag the Bayer Dithering, Min-black Comparison and Max-white comparison sliders to the settings(to the
right) you want.
Click OK button to close the Fax Options dialog box.
In Fax Editor dialog box, click the Preview button to review the fax.
If the result is not satisfactory, then try for different values, and change the Print Quality to High(204 x 196) if it's
necessary.
To set up the global fax parameters:
In Joyfax Server, click Server-Options button on toolbar.
The Server Options dialog box will be displayed, click Fax Parameters on the right side of the window.
Set parameters same as above
Click OK to save, all these configs will be applied in the next time client logging in.
180
Why the fax can't be sent out due to "Invalid Fax File" When I send a fax from the
Client?
Please double-click the "Invalid fax file" fax item to see whether it can be opened.
If it can, there must be an Init string problem.
Please refer to: here to select another init string.
181
No receiving fax in my Client, How to configure automatic fax routing?
Please refer to Joyfax Server Help Document -> Automatic fax routing.
182
Why is fax resolution so low?
Sometimes, we have selected High Print Quality (see How to increase Resolution/Quality of sent fax?) when creating a fax but
still get no good outcome. In such case, we need to check the fax resolution setting in the Joy Fax Printer and make sure it is
the same as the Print Quality set up in Joyfax Client Options:
1. Click Start, select Control Panel, double click Printers and Faxes;
2. Right click the Joy Fax Printer, select Printing Preferences;
3. In the pop-up dialog, click the Advanced button. In the Advanced Options dialog, you see the currect Print Quality:
4. Go back to Joyfax Client, in the Fax Editor dialog box, click Options button on the left side of the window;
5. The Fax Options dialog box will be displayed, then click Fax tab;
6. On the Fax tab, click the Custom Settings option, then change the Print Quality to the value(High(204 x 196) ) shown
in the above image.
183
Does my modem support Caller ID?
First make sure you can see the Caller ID information from a normal telephone LED displayer.
Then do the following:
Launch Joyfax Server;
Click Stop-Sending and Stop Receiving buttons on the toolbar;
Select Server menu, click Devices Settings..., the Fax Devices Settings dialog box will be displayed;
Select the Fax Modem you wish to check in the Devices list, click Caller ID Detection button;
In Caller ID detection dialog box, press Detect Now button, the software will automatically check the available AT
command;
Follow the prompt, click Test Now! button, then dial your phone by using another phone;
If Caller ID is not working, you will only see the word RING for each incoming ring. If this is the case try another Caller
ID Command and try it again;
If Caller ID is working, you will see the word RING, followed by one or more additional data lines. The word RING will
then continue to appear for each incoming ring;
At last, press OK button to apply the caller id command.
184
How to change the email subject and body, sent from the Joyfax Server?
In order to change the email subject and body, please try the followings:
1. Go to % ALLUSERSPROFILE% \application data\JoyFaxServer\ folder:
Click Start>Run, copy and paste (or type) the path shown above.
2. Double-click the Config.ini file to open with NotePad.
3. Add these lines to the end of the file and save it
[Fax2email]
Subject=[TEST] DO NOT use an inverted comma character
Body=YOUR OWN BODY
4. Restar Joyfax Server to make effect.
For the version above 5.45.1222, you can also use the following variables.
[date]
[time]
[datetime]
[csid]
[faxnumber]
[pages]
-
Date of receiving faxes
Time of receiving faxes
Date and time of receiving faxes
CSID of the sender
Fax number of the sender
Fax number of the sender
Please note, these variables are not case-sensitive.
Let's check a sample below:
[Fax2email]
Subject=Received fax from [CSID]([FAXNUMBER]) at [DateTime]
Body=You have recieved a [pages]-page fax message from [CSID]([FAXNUMBER]) at
[DateTime]
185
When opening the software, you receive "Runtime error 71: disk not ready."
Cause
The software cannot write to the set data path. This can be caused several ways:
the set data path does not exist
you do not have read/write access to the data path
Resolution
Reset the data path
Select Defaults > Set Data Path. Reset the path, even if it is already set correctly. Then try again to create a report.
Verify the data path exists
Select Defaults > Set Data Path. Note the path you have set. Then browse to that location on your computer to verify that it
exists.
Verify your access to the data path
Select Defaults > Set Data Path. Note the path you have set. Then browse to that location on your computer. Check the folder
properties to ensure you have read and write access to the folder.
Workaround
If you are unable to open the software, it is possible to modify the data path set in the Config.ini file. Browse to C:\Documents
and Settings\All Users\Application Data\JoyFaxClient\ directory. Use a text editor(NotePad) to open the file "Config.ini". Edit
the "[XXXXX] UserFolder" information to force a new data path (see example below). Then save the file and try to access the
program again.
Sample Config.ini
[demo]
UserFolder=C:\Documents and Settings\All Users\Application Data\JoyFaxClient\demo\
[General]
ServerIP=192.168.0.31
LanguageID=
[UserList]
1=demo
TotalCount=1
186
How to enable the Email Notification function when faxes sent?
Please take the following steps:
1. Open Joyfax Server, click Server Options.
2. In the pop-up dialog, go to the Fax to Email page.
3. Mark the "Enable Fax to Email" item, then click to enable "Send email notification when fax sent" check box.
4. At last, click OK to save the changes.
Also, please make sure these items:
The email address of the user has been specified.
The user has been granted this right.
1. Click the User-List button in the main menu, double-click a user.
2. In the pop-up dialog, go to the Advanced page. In the Outgoing fax section, click to enable "Send email notification
when fax sent" check box.
3. At last, click OK to save the changes.
187
Can Joyfax Server support VOIP?
FAX was designed for analog networks, and does not travel well over a VOIP network. The reason for this is that FAX
communication uses the signal in a different way to regular voice communication. When VOIP technologies digitize and
compress analog voice communication it is optimized for VOICE and not for FAX. Subsequently, there are a number of things
you need to take note of when you move to a VOIP Phone System.
If you want to continue using your old fax machine, and you want to connect to your VOIP Phone System, its best to use a
VOIP Gateway and an ATA that supports T38. T38 is a protocol designed to allow fax to 'travel' over a VOIP network.
Another way to deal with fax when you switch to VOIP is to connect the fax machine directly to the existing analog phone line
and bypass your VOIP system.
188
Only the first part of first page is send when sending a fax?
The problem may occur when using an USB Modem, please try the following:
If you are using a Zoom Model 3095 V.92 USB Mini Externa modem, please just replace it with anothr one. The best
USB modem we have used here is the Zoom model 3090 USB modem, and please DO NOT confuse the model 3090
with the 3095.
Install the latest drivers and update the firmware on the modem;
Try using another initialization string to correct this.
In Joyfax Server, click Stop Sending and Stop Receiving buttons on the toolbar.
Click Server menu, click Devices Settings, you may see your modem model in the Fax Devices Settings dialog.
The owner's manual for your modem should list its Init Strings in Modem manual. If it doesn't, you can look up
init strings on the web. Two popular sites are:
http://modemhelp.org/inits/
http://www.56k.com/
Copy the Init string from the site, and paste in Init Strings textbox.
Press OK to save
Try different modem baud rates in this order: 9600, 12000 and 14400;
In Control Panel, click Hardware and Sound, and then click Phone and Modem Options.
On the Modems tab, click the modem you installed, then click Properties.
Select the Modem tab, set Maximun Port Speed to 9600
If still no luck, replace your modem with another one that supports Class 1, 2 or 2.0 fax modems, and these Fax
Modems are recommend for Joyfax Server
Does it matter what fax modem I use for faxing?
This is a question we get asked a lot, and for some reason most people seem to think that if it is a fax modem, each
modem will perform exactly the same as any other fax modem. Nothing could be further from the truth!! Just like there
are quality differences between fax machines and other products, there are quality differences in fax modems. The
quality of your fax modem will determine transmission speed, amount of failures, ability to deal with bad international
lines etc. If faxing is important to you or your business, invest in a quality modem. Also, follow the advice of the fax
server company that are selecting.
189
Registering Joyfax Server
Joyfax Server is licensed based on the number of fax ports required, the number of users or a mixture of both. To register your
copy of Joyfax Server, you will need 2 registration codes, a client registraction code and a server registraction code, both
these two codes will be sent to you via e-mail after you pay for the corresponding license.
To order online, please visit our order page.
This help section contains the following topic:
Registering Joyfax Server
Note: Before registering Joyfax Server, please ENS URE that you have the Full-funtion version installed
190
Registering Joyfax Server
Joyfax Server License Manager is a tool that allows you to activate purchased licenses (registration codes). The main window
contains the registration code list, buttons to manage it and the status panel.
To register the Joyfax Server, please follow this instruction:
1. Launch Joyfax Server, click Start, point to Programs, point to Joyfax Server, and then click License Manager;
2. Press the Add... button located at the left side of the window;
3. In the Add new license dialog box, type your server's registration name and the code, then press the Continue button;
4. Your registration code will be activated. After that, you can close License Manager and launch Joyfax Server.
191
Registering Joyfax Client
To register the Joyfax Client, please follow this instruction:
1. Launch Joyfax Client, the evaluation notice dialog box will be displayed
2. Type your client's registration name and the code, then press the Register button, your registration code will be
activated
To order online, please visit our order page.
192
SOFTWARE LICENSE AGREEMENT
PLEASE READ THE FOLLOW ING SOFTW ARE LICENSE AGREEMENT CAREFULLY BEFORE YOU PROCEED W ITH THE
INSTALLATION. YOU ARE ONLY AUTHORIZED TO USE THE SOFTWARE WHEN YOU AGREE WITH THE TERMS OF
THE FOLLOW ING LICENSE AGREEMENT. BY USING THE SOFTW ARE YOU PROFESS TO THE TERMS OF THAT
AGREEMENT.
IF YOU DO NOT AGREE W ITH THAT LICENSE AGREEMENT YOU EITHER HAVE TO REMOVE THE SOFTW ARE FROM
YOUR HARD DISK OR YOU HAVE TO RETURN THE COMPLETE SOFTW ARE AND GET BACK THE MONEY.
GRANT OF LICENSE
By paying the license fee the licensee is granted the right to use the software under the following conditions:
USE: It is only allowed to use the software on the number of computers that is named in the license agreement. It is not
allowed to reassemble or recompile the software, except it is explicit allowed by law.
COPIES AND MODIFICATIONS: It is allowed to make copies of the software for archive purposes or when it is necessary to
transfer the software to another computer. It is not allowed to make copies of the software for any other purposes.
OWNERSHIP: You agree that you have no rights on the software except the right for using the programs as defined in that
agreement and the physical media. You know and accept that the software is protected by copyright laws. When you violate
this law you can be made liable by the manufacturer.
ASSIGNMENT OF RIGHTS: You are allowed to transfer the right of using the software to others when the terms of this
agreement are accepted. After you transfer the right for using that software you are no longer allowed to use the software.
SUBLICENSES: You are not allowed to lend the software to others or distribute copies of the software. If you plan to
redistribute or modify the software you need the assent of the manufacturer.
EXPIRATION OF THIS AGREEMENT: When you violate this software license agreement the manufacturer can request the
customer to undo that defamation of the agreement. If the customer is not following that request within 30 days the
manufacturer can revoke the right for using the software.
UPDATES AND ENHANCEMENTS: The customer accepts that there is only six monthes for free updates and enhancements.
SOFTWARE WARRANTY
WARRANTY PERIOD: The manufacturer guaranties for the time of 6 months that the software will work in a manner that the
main use of the software is not impaired. This warranty is only valid if you have installed all of the program files correctly.
From the current position it is not possible to guaranty that the software is absolutely free of errors. If the software does not
work in the desired manner within that warranty period you can ask for replacement or reparation. If it is not possible for the
manufacturer to repair the error within a appropriate time the customer can cancel the contract with full return of the money.
MEDIA: The manufacturer guaranties for the time of 6 months that the enclosed media is free of material faults. If you detect
errors on the media within the warranty period you can order a replacement media from the manufacturer. If it is not possible
for the manufacturer to replace the media within a appropriate time the customer can cancel the contract with full return of the
money.
CLAIM OF WARRANTY: You have to inform the manufacturer at least 30 days after the end of the warranty period to report
your claim of warranty.
LIMITATIONS IN WARRANTY: There is no warranty that exceeds the above listed terms of warranty. There are no other
agreements of any kind. The warranty period is limited to 6 months except otherwise defined by law.
INDEMNIFICATION AND EXCLUSION OF LIABILITY: THERE IS NO RIGHT OF INDEMNIFICATION OF ANY KIND
AGAINST THE MANUFACURER OR ANY OF ITS DISTRIBUTION PARTNERS REGARDLESS OF THE REASONS.
This license agreement and the warranty terms only define the conditions between the manufacturer and the customer. Other
agreements or warranty terms that are part of the package of other distributors are not practicable.
193
Technical support
If you have a problem with Joyfax Server, please take a look at the Help or Frequently Asked Questions in our website first, it
may already contain an answer to your question.
If you still have a problem with this software and nothing else helps, please contact us at: [email protected]
Please inform us about the following:
Version (from About window)
Where did you get this software?
Is there a Firewall or an AntiVirus software installed on your machine?
Operating system, including service packs and the third installed if you know.
Description of your problem (as much information as possible to retrieve the problem). You can email us the error image
(screenshot) to help us address your problems.
Any additional information, which may help.
We'll try to help you as soon as possible, usually within 12-24 hours.
If you have any comment or suggestion for the next releases, please feel free to post them to us. our feedback is important to
us in getting an idea of how to make our software the best product for you.
194