1
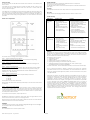
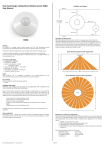
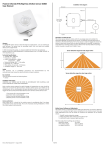
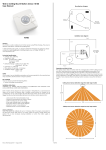
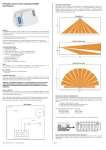
Sensor calibration: Note: Allow up to 1 minute for the motion sensor to recalibrate after it has been connected for the very first time. This is only necessary during installation or when the mains supply is disconnected. Wall Switch Motion Sensor SK901/SK902 Series User Manual Installation wire diagram SK901/SK902 Series General The SK901/902 series Wall Switch Motion Sensor is designed to replace the normal ON/OFF wall switch providing automatic control of lighting. The sensor will detect motion or sound (if microphone is enabled) from any source emitting heat or sound within its surveillance area. It is ideal for use in offices and meeting rooms. Operation and Field of View The motion sensor detects motion within its coverage area and controls the associated lighting connected to the sensor. The passive infra red (PIR) sensor is sensitive to the heat emitted by the human body. In order to trigger the sensor the source of heat must move from one zone of detection to another. The device is most effective in sensing motion across its field of view and less effective sensing motion towards or away from its field of view. Sensor detection range from side: large motion Once the primary detector (PIR) senses motion, the lights will be switched ON – should the motion be insufficient the microphone (if enabled) will continue to keep the lights on when detecting sound. When the area is vacated and the sensor detects either no motion or sound the light/s will remain on until such time as the pre set time delay has lapsed. This sensor has been designed for use on 220 V circuits. Do not use it in areas where a standard voltage of 220 V is not provided. If, after reviewing this guide, you require additional information or assistance please contact Eco Heat Equipment at [email protected], +27 (0)861 999 887, or www.ecoheat.co.za. Sensor detection range from top: large motion Technical Specifications § Voltage: 220 – 240V/AC § Frequency: 50/60Hz § Load: Incandescent: 1 000W Fluorescent: 600W § Detection Range: 1 – 10m § Light level: 10 – 2 000LUX § Time setting: 10 seconds – 30 minutes § Detection: 180 ° Safety Any incorrect use or installation procedure not recommended manufacturer may cause fire, electrical shock or injury to persons. by the Box Contents Your box should contain the following items: § Sensor § Wall plate Installation Instructions WARNING: ALL WIRING MUST BE DONE IN ACCORDANCE WITH NATIONAL AND LOCAL ELECTRICAL CODES AND STANDARDS. Note: motion sensors respond to rapid changes in temperature so care should be taken not to mount the device near a climate control source (i.e. heaters or air conditioners). Hot or cold draughts will seem like body motion to the sensor and will trigger the device. Recommended distance from climate control devices is 2m. 1. 2. 3. 4. 5. 6. 7. 8. Turn power off at circuit breaker or fuse. Remove existing wall plate and light switch. Connect wires as per diagram. Twist strands of each lead tightly and secure with connector block. Position connector block and sensor into the wall box. Customise the motion sensor settings (if required). See ‘Motion Sensors Adjustments’. Place the faceplate over the sensor and secure with screws provided. Restore power at circuit breaker or fuse. © Eco Heat Equipment - August 2015 Motion Sensor Settings and Adjustments The motion sensor is a Passive Infra Red (PIR) type electronic occupancy detector, which in turn switches the lights when connected to the motion sensor. There are four adjustments that can be made to influence the operation of the motion sensor: 1. RANGE: motion detection range 2. TIME: time delay after motion/sound until shut off 3. LUX/LIGHT: level of ambient light sensitivity 4. MICROPHONE: use of sound as backup to motion detection to keep the device on. The four adjustments settings are as follows: Detection range: 1m to 10m Time setting range: 30sec to 30min Lux (light) sensitivity: 10 to 2 000 LUX Microphone: On/Off 1 of 2 Manual Override For manual control, the 901/902 series motion sensor features a convenient push button switch. If the lights are OFF, pressing the button will turn the lights ON for as long as the room is occupied. The lights will turn OFF once the room is vacant, after the delayed OFF time expires. OTHER CAUTIONS: Disconnect power when working on electrical outlets or components. Do not push on the surface of the lens. The 901/902 series motion sensor is intended to replace a standard wall mounted light switch. Cleaning Carefully wipe sensor with a soft damp cloth. Do not apply pressure to the lens. If the lights are ON, pressing the button will turn the lights OFF and keep them OFF even if the room is occupied. This feature is particular useful for presentations or when the automatic motion sensor settings need to be overridden. The lights can be turned back ON by simply pressing the button. The sensor will return to normal operation. Recycling Please recycle all packaging material that came with the motion sensor. Trouble Shooting Motion Sensor Adjustments Malfunction Possible Cause Remedy The unit will not switch “on” a. No mains power b. No movement is detected (in detection zone) c. Wrong LUX/LIGHT level setting d. Electrical circuitry faulty e. Electrical Installation not done correctly f. Unit may be faulty a. Check mains power is on b. Move towards the unit (in detection zone) or increase the detection range settings c. Adjust setting on the LUX/LIGHT (light) settings d. Refer to the ‘Electrical Installation’ section to ensure correct installation e. Have a certified electrician disconnect and test the unit f. Contact Eco Heat Equipment Unit stays “on” permanently g. Continuous movement in detection zone h. The sensor is not mounted correctly for reliable operation i. Wrong LUX/LIGHT level setting j. Time setting control is set too far k. Unit may be faulty g. Check detection range setting and reduce detection range sensitivity h. Check detection range setting and mounting procedure i. Adjust setting on the LUX/LIGHT settings j. Adjust the time setting control The motion sensor’s settings can be adjusted as follows: Step 1 – Adjust the TIME setting to minimum Turn the TIME control fully anti-clockwise to set to the 30sec testing setting. Step 2 – Adjust the LUX/LIGHT setting to maximum Turn the LUX/LIGHT fully clockwise to set to maximum (sensor functioning in all lighting conditions). Step 3 – Adjust the RANGE setting Turn the RANGE control fully anti-clockwise. Move away from the sensor until the LED stops blinking. This will be the maximum detection range for the setting. To lengthen the range, turn the control clockwise until the desired distance is reached. (1m – 10m maximum) Step 4 – Adjust the TIME setting Turn the TIME control clockwise until the required delay is reached. / = 30sec (testing) 1 =10mins 2 = 20mins 3 = 30mins Factory time out is pre set to 30 seconds. NOTE: All the time intervals are within approximately 10 seconds of the stated time out interval. Step 6 – Microphone (audio sensor) To disconnect the microphone, press the Push button once to activate the manual override (sensor will turn OFF). Then hold down the Push button until the LED starts to blink (approximately 5sec). Press the Push button once more to deactivate the manual override (sensor will turn back ON). The PIR will continue to operate when the microphone is disconnected. Warranty The sensor has a three (3) year warranty after the date of the original purchase. Please keep your original receipt, as this will be required for any claims under this warranty. The warranty is a strictly carry in policy. (The sensor/s must be returned to Eco Heat offices for a claim to be processed). The warranty does not cover: § damage from misuse, § neglect or abuse, § products that have been modified in any way, § shipping and handling cost associated with the product, § damage resulting from accidents, lightning, fire, water, power surges, natural disasters and/or incorrect installation For more information, view the Return/Refund Policy at ecoheat.co.za/terms.php. Due to minor improvements in design or otherwise, the product you purchase may differ from the one shown in this leaflet. For more information or advice on this or any other Eco Heat Equipment products, visit www.ecoheat.co.za or phone +27 (0)861 999 887. Indemnity: The Author, and supplier, shall not be held liable for any loss, injury or damage, of whatsoever nature, whether consequential or not, either contractual sustained to, or caused by, or which may arise through the use of any comments, suggestions, circuitry, services or equipment offered for purchase. The User, indemnifies the author and supplier, and agrees not to hold him/her responsible for any damages, losses and/or liabilities (including legal costs on a scale as between attorney and user) arising from, or through the use of circuit diagrams, equipment and services, whether such circuit diagrams, equipment and services were used with the consent of the User or not. All risks attached to the use of circuit diagrams, equipment and the connection thereof to the User’s equipment shall be deemed to have passed onto the User, once having purchased such equipment from the author or supplier. To reconnect the microphone, repeat steps above. Disabling the microphone is ideal for areas where there are high ambient sound levels, such as near a busy road or in a shopping centre. NOTE: Sensor must first detect motion (PIR) to switch the device on. Sensor will NOT switch the device on if no motion is detected. WARNING: Controlling a load in excess of the specified ratings will damage the unit and lights and could pose risk of fire and electric shock. WARNING: Do not install this unit to control a power socket. © Eco Heat Equipment - August 2015 k. Contact Eco Heat Equipment 2 of 2