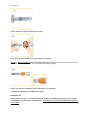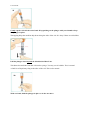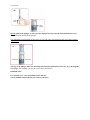
1
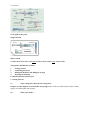
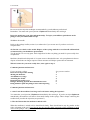
User manual
INSTRUCTIONS FOR THE USER
Your Step by Step Guide
Bydureon 2 mg powder and solvent for prolonged-release suspension for injection
If you have questions about taking Bydureon
•
Refer to the Common Questions and Answers
Helpful Hints
•
•
•
•
Take your time.
Follow these instructions step by step.
You will need enough time to complete all the steps without stopping.
You will probably need less time as you get used to giving yourself injections.
IMPORTANT:
Read and follow each step in these instructions carefully every time you take Bydureon. Do not
skip steps. Also read the Package Leaflet in your carton.
Your guide to the parts
•
Single-dose kit
Lift here for a closer look at the parts
Keep this flap open so you can refer to it as you go through the steps
User manual
Syringe
Liquid
(solvent)inside
Plunger
White Cap
Dose Line
Vial
Vial connector
Green cap
Paper cover
The powder inside
is your medicine
Vial connector
package
Orange connector
Needle (monoject)
Blue cap
Needle Needle Cover
The single-dose kit has a spare needle
(not shown) in case you need it.
Your guide to the parts
Single-dose kit
Syringe
Needles (2)
Vial
Vial connector
(vial connector)
What’s inside
To take the correct dose, read each section so that you do every step in order.
This guide is divided into sections:
1
Getting started
2
Connecting the parts
3
Mixing the medicine and filling the syringe
4
Injecting the medicine
Common Questions and Answers.
1. Getting Started
1a
Take a single-dose kit from the refrigerator.
Prepare to safely dispose of used needles and syringes. Have what you need ready in order to safely
dispose of used needles and syringes.
1b
Wash your hands.
User manual
1c
Peel back the cover to open.
Remove the syringe. The liquid in the syringe should be clear and free of particles. It is okay if there
are air bubbles.
Place the needle, vial connector package, vial, and syringe on a clean, flat surface.
1d
Pick up the needle, and twist off the blue cap.
Put the covered needle down. The needle is now prepared. You will need it later.
There is a spare needle in case you need it.
1e
Tap!
Pick up the vial.
Tap the vial several times against a hard surface to loosen the powder.
User manual
1f
Use your thumb to remove the green cap.
Put the vial down.
2. Connecting the Parts
2a
Pick up the vial connector package and peel off the paper cover. Do not touch the orange
connector inside.
2b
Hold the vial connector package.
In your other hand, hold the vial.
User manual
2c
Press the top of the vial firmly into the orange connector.
2d
Lift the vial with the orange connector now attached out of its package.
2e
This is what the vial should now look like.
Put it down for later.
User manual
2f
Pick up the syringe.
With your other hand, firmly hold the 2 grey squares on the white cap.
2g
Snap!
Break off the cap
Be careful not to push in the plunger.
Just like you might break a stick, you are breaking off the cap.
2h
This is what the broken-off cap looks like.
You will not need the cap and can throw it away.
User manual
2i
This is what the syringe should now look like.
2j
Now, pick up the vial with the orange connector attached.
Twist the orange connector onto the syringe until snug. While twisting, be sure to hold the orange
connector. Do not over tighten. Be careful not to push in the plunger.
2k
This is how the parts should now look when they are connected.
3. Mixing the Medicine and Filling the Syringe
IMPORTANT:
During these next steps, you will be mixing the medicine and filling the syringe. Once you mix
the medicine, you must inject it immediately. You must not save the mixed medicine to inject at
a later time.
User manual
3a
With your thumb, push down the plunger until it stops and hold your thumb in place.
The plunger may feel like it is springing back a little.
3b
Keep pushing down on the plunger with your thumb and shake vigorously. Keep shaking until
the liquid and powder are mixed well.
Do not worry that the vial might come off. The orange connector will keep it attached to the syringe.
Shake vigorously like you would shake a bottle of oil-and-vinegar salad dressing.
User manual
3c
When the medicine is mixed well, it should look cloudy.
If you see clumps of dry powder on the sides or bottom of the vial, the medicine is NOT mixed
well.
Shake vigorously again until well mixed.
Keep pushing on the plunger with your thumb while shaking.
3e
Now, hold the vial so the syringe is pointing up. Keep pushing on the plunger with your thumb
until it stops, and hold it in place.
User manual
3f
Gently tap the vial with the other hand. Keep pushing on the plunger with your thumb to keep
the plunger in place.
The tapping helps the medicine drip down along the sides of the vial. It is okay if there are air bubbles.
3g
Pull the plunger down beyond the black dashed Dose Line.
This draws the medicine from the vial into the syringe. You may see air bubbles. This is normal.
A little bit of liquid may cling to the sides of the vial. This is also normal.
3h
With one hand, hold the plunger in place so it does not move.
User manual
3i
With the other hand, twist the orange connector to remove.
After removing the connector be careful not to push in the plunger.
3j
This is what the syringe should now look like.
4. Injecting the Medicine
IMPORTANT:
Read the next steps carefully and look closely at the pictures.
This helps you get the correct dose of medicine.
4a
Twist the needle onto the syringe until snug. Do not remove the needle cover yet.
Be careful not to push in the plunger.
User manual
4b
Slowly
push
Top of
plunger
Slowly push in the plunger so the top of the plunger lines up with the black dashed Dose Line.
Then, take your thumb off the plunger.
It is important to stop pushing at this point, or you will waste your medicine and you will not get the
correct dose.
4c
The top of the plunger must stay lined up with the black dashed Dose Line as you go through the
next steps. This will help you get the correct dose of medicine.
IMPORTANT:
It is normal to see a few air bubbles in the mixture.
The air bubbles will not harm you or affect your dose.
User manual
4d
Back of
upper arm
Stomach
Thigh
Front
Back
Areas on body for injection
You can inject each dose of the medicine in your stomach area (abdomen), your thigh, or the
back of your upper arm.
Each week you can use the same area of your body. But be sure to choose a different injection site in
that area.
4e
Hold the syringe near the black dashed Dose Line.
4f
Pull
Pull the needle cover straight off.
Do not twist.
Be careful not to push in the plunger.
When you remove the cover, you may see 1 or 2 drops of liquid. This is normal.
User manual
4g
Be sure to use the injection technique recommended by your healthcare professional.
Remember: You must take your injection of Bydureon immediately after mixing it
Insert the needle into your skin (subcutaneously). To inject your full dose, push down on the
plunger with your thumb until it stops.
Withdraw the needle.
Refer to the package leaflet (section 3) on what to do if you are not sure if you have received a
complete dose.
4h. Put the cover back on the needle. Dispose of the syringe with the covered needle still attached
as instructed by your healthcare professional.
You do not have to save any parts. Each single-dose kit has everything you need for your weekly dose
of Bydureon.
Medicines should not be disposed of via waste water or household waste. Ask your pharmacist how to
dispose of medicines no longer required. These measures will help to protect the environment.
When it is time for your next weekly dose, start again at step 1.
Common Questions and Answers
If your question is about:
How soon to inject after mixing
Mixing the medicine
Air bubbles in syringe
Attaching the needle
Removing the needle cover
Plunger not lining up with black dashed Dose Line
Being unable to push the plunger down when injecting
See question number:
1
2
3
4
5
6
7
Common Questions and Answers
1. After I mix the medicine, how long can I wait before taking the injection?
You must take your injection of Bydureon immediately after mixing it. If you do not inject Bydureon
immediately, the medicine will start to form small clumps in the syringe. These clumps could clog the
needle when you take the injection (see question 7).
2. How do I know that the medicine is mixed well?
When the medicine is mixed well, it should look cloudy. There should not be any dry powder on the
sides or bottom of the vial. If you do see any dry powder, shake vigorously while continuing to push
down on the plunger with your thumb. (This question relates to the steps shown in Sections 3a to 3d).
User manual
3. I’m ready to take the injection. What should I do if I see air bubbles in the syringe?
It is normal for air bubbles to be in the syringe. The air bubbles will not harm you or affect your dose.
Bydureon is injected into your skin (subcutaneously). Air bubbles are not a problem with this type of
injection.
4. What should I do if I have trouble attaching the needle?
First, be sure you have removed the blue cap. Then, twist the needle onto the syringe until snug. To
prevent losing medicine, do not push in the plunger while attaching the needle. For more information
on injection techniques talk with your health care professional.
(This question relates to step 4a.)
5. What should I do if I have trouble removing the needle cover?
With one hand, hold the syringe near the black dashed Dose Line. With your other hand, hold the
needle cover. Pull the needle cover straight off. Do not twist it. (This question relates to step 4f.)
6. I am at step 4c. What should I do if the top of the plunger has been pushed past the black
dashed Dose Line?
The black dashed Dose Line shows the correct dose. If the top of the plunger has been pushed past the
line, you should continue from step 4d and take the injection. Before your next injection in 1 week,
carefully review the instructions for steps 3a to 4h.
7. When I inject, what should I do if I cannot push the plunger all the way down?
This means the needle has become clogged. Remove the needle and replace it with the spare needle
from your kit. Then choose a different injection site and finish taking the injection.
To review how to:
•
Remove the blue cap of the needle, see step 1d
•
Attach the needle, see step 4a
•
Remove the needle cover and give the injection, see steps 4e to 4g
If you still cannot push the plunger all the way down, withdraw the needle. Carefully put the needle
cover back on the needle. Refer to the package leaflet (section 3) on what to do if you are not sure if
you have received a complete dose.
To prevent a clogged needle, always mix the medicine very well, and inject immediately after mixing.
Bydureon only needs to be taken once a week.
Make a note that you have taken your Bydureon today and mark your calendar for when you are due
for your next injection.
Where to learn more about Bydureon
•
•
Talk with your healthcare professional
Read the Package Leaflet carefully
Instructions for the User was last approved in 07/2014