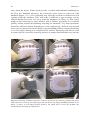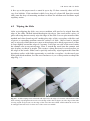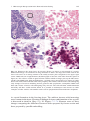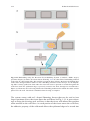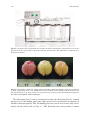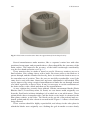
1
A Practical Guide to Frozen Section Technique
Stephen R. Peters
Editor
A Practical Guide to Frozen
Section Technique
Editor
Stephen R. Peters
University of Medicine
and Dentistry of New Jersey
New Jersey Medical School
Newark, NJ
USA
[email protected]
ISBN 978-1-4419-1233-6
e-ISBN 978-1-4419-1234-3
DOI 10.1007/978-1-4419-1234-3
Springer New York Dordrecht Heidelberg London
Library of Congress Control Number: 2009933112
© Springer Science+Business Media, LLC 2010
All rights reserved. This work may not be translated or copied in whole or in part without the written
permission of the publisher (Springer Science+Business Media, LLC, 233 Spring Street, New York, NY
10013, USA), except for brief excerpts in connection with reviews or scholarly analysis. Use in connection
with any form of information storage and retrieval, electronic adaptation, computer software, or by similar
or dissimilar methodology now known or hereafter developed is forbidden.
The use in this publication of trade names, trademarks, service marks, and similar terms, even if they are
not identified as such, is not to be taken as an expression of opinion as to whether or not they are subject
to proprietary rights.
Printed on acid-free paper
Springer is part of Springer Science+Business Media (www.springer.com)
Preface
Frozen section technique is a valuable tool used to rapidly prepare slides from tissue for microscopic interpretation. Frozen section technique is used in a myriad of
clinical and research settings. In surgical pathology, frozen sections are routinely
used for rapid intra-operative diagnosis, providing guidance for our surgical colleagues. In Mohs Micrographic Surgery, the surgeon relies entirely on the frozen
sections to determine the extent of the excision needed to eradicate a skin tumor.
Numerous research applications rely on the frozen section technique to prepare
microscopic slides utilizing a host of sophisticated morphologic, immunohistochemical and molecular methods.
Preparation of frozen section slides is a complex technical process requiring
development of refined technical skills, as well as an understanding of the histology, microanatomy and pathology of the tissues being examined. Whether used for
intra-operative consultation or in research, the results will hinge on our ability to
achieve a high quality preparation.
The training in frozen section can vary considerably among the various subsets
of practitioners. The subject is part of the curriculum in formal histology and
pathologist assistant programs although much of the hands on technique is passed
along at the work bench. Likewise in many pathology residency programs and
research applications, training is accomplished entirely on the job sometimes with
little discussion of the myriad of variables and difficulties the operator will experience along the way.
I like many pathology residents received training on the job with little more than
a brief introduction to the operation of the cryostat, simple face up embedding, and
to cut frozen sections using a brush. My teacher was a resident in his third year of
training. From that point on it seemed that every specimen had its own set of properties. Some cut easily; some with more difficulty; some tissues would fall off the slide;
and the function of our cryostat seemed to change from day to day. It also became
painfully obvious that using the simple embedding methods available, I was unable
to get satisfactory results in a many difficult situations. In the early days I lived in fear
of exhausting precious minute samples. Over the years, through observation, experimentation and trial and error, a variety of parameters and approaches emerged which
have played a significant role in my ability to prepare quality sections.
v
vi
Preface
This book is intended to provide a simple yet comprehensive guide to learning
frozen section technique. The authors hope to share what knowledge they have
gained over years of practicing these techniques so that the newcomers will reach
their goal more quickly than those of us who struggled blindly in the past.
My contributions I have written from the view point of the surgical pathologist
and cover all of the steps in preparing the frozen section slide from grossing to
cover slipping. The information consists of a set of methods and the details of that
have proved valuable in my practice. I have tried to detail the many parameters
which influence the quality of our preparations and examples of many of the aberrations that may arise.
Hoping this book will find its way into the hands of Pathology residents, I have
included a discussion on interpretation of the microscopic slides in Chap. 7. The
chapter discusses an approach to reading microscopic slides through careful examination, concentration and an organized plan for each specimen type. I have shared
key observations about the ability to visually process information and maintaining
focus and concentration. The chapter offers suggestions on dealing with difficult
cases and making the most of what we have learned.
In an attempt to make this text a comprehensive guide to frozen section technique, I enlisted experts in areas outside of my experience. I am grateful for the
contributions of Philip Hyam, who has spent his career in the cryostat industry for
sharing his expertise and helping our readers to better understand the cryostat;
Barbara Beck HT/HTL (ASCP) for sharing her expertise developed over years of
practicing and teaching the histotechnology of Mohs Micrographic surgery; Charles
W. Scouten, Ph.D. a noted expert in the field of neuroscience research for sharing
his knowledge and expertise in frozen section technique as it applies to the animal
research setting; and for the help of Catherine Susan Delia, BS.,HT. ASCP a highly
experienced and knowledgeable histotechnologist for her guidance and in the
preparation of our chapter on fixatives and staining.
The techniques and experiences shared in this book are those used successfully
by the authors in their practice. As most of the information we have to share is
derived from lifelong experience as such there are relatively few references to offer.
In no way can we hope to know and cover the many different approaches used by
our colleagues around the world. As so many of us have arrived at our own individual techniques and observations as a means of survival, I am certain that there
are many with successful methods and ideas that differ from what we can offer. We
all evolved in our own environment, taking what skills we have learned and improving on them where they were suboptimal. There may be some to take exception to
what we have written. So many clever techniques are passed along at the lab bench
but never find their way into our literature. I am hoping this text may encourage
others to share their ideas and techniques. Together we hope to provide a body of
information on frozen section technique to guide for those who find themselves
immersed in this challenging field.
I would like to thank my dear friends Claudia Dorenkamp, Jan Minshew, George
Kennedy and their colleagues at Leica Microsystems for their keen foresight in
recognizing the valuable new technology and their help and supporting my mission
Preface
vii
to bring these techniques to our colleagues. I am grateful to my loving wife and
partner Jeannine for her unwavering support and tolerance in all of my endeavors
and for rolling up her sleeves to share in the arduous task of running our little company Pathology Innovations, LLC; whose sole mission is to share better ways to
help our colleagues and their patients. I would also like to thank the numerous
bright young residents of the University of Medicine and Dentistry of New Jersey
that I have had the privilege to help train. I could not have understood the process
of learning without observing each of their unique examples. Their love and support, is more valuable to me than any reward I have known in my career. I would
also like to acknowledge the dedicated and hard working histotechnologists and
pathologist’s assistants around the world. My pathologist colleagues and I could not
begin to practice our profession without them. They are both scientists and artisans
and are all too often under rewarded for the important job they perform and stresses
we put them through.
I would like to dedicate this book to my late father George J. Peters. He was a
man of limited education but of unlimited ingenuity. He taught me how to use tools;
to make this out of that; and to live outside the box. Without his example, I doubt I
could have gathered the information offered in this book.
Stephen R. Peters, MD
President, Pathology Innovations, LLC
Contents
1 Understanding and Maintaining the Cryostat........................................
Philip Hyam
1
2 Gross Examination of Tissues in the Frozen Section Room...................
Stephen R. Peters
13
3 Embedding of Tissue for Frozen Section.................................................
Stephen R. Peters
37
4 Cutting the Frozen Section........................................................................
Stephen R. Peters
75
5 Variables Affecting the Cutting Properties of Tissues
and the Resulting Artifacts.......................................................................
Stephen R. Peters
97
6 Fixation, Staining and Coverslipping of Frozen Section Slides............. 117
Stephen R. Peters and Catherine Susan Delia
7 Microscopic Interpretation in the Frozen Section Setting..................... 131
Stephen R. Peters
8 Frozen Section Techniques Used in Mohs
Micrographic Surgery............................................................................... 151
Barbara Beck and Stephen R. Peters
9 Frozen Section Technique in the Animal Research Setting................... 171
Charles W. Scouten
Index.................................................................................................................. 191
ix
Contributors
Barbara Beck, HT/HTL (ASCP)
Mohs Technical Consulting, Inc.
Catherine Susan Delia, BS. HT. ASCP
Chief Technologist, Anatomic Pathology, University Hospital,
University of Medicine and Dentistry of New Jersey, NJ, USA
Philip Hyam
Product & Marketing Manager, Sample Preparation, Leica Microsystems, Canada
Stephen R. Peters, MD
President, Pathology Innovations, LLC, Assistant Professor of Pathology,
University of Medicine and Dentistry of New Jersey, NJ, USA
Charles W. Scouten, PhD
Innovation Manager, Biosystems Division, Leica Biosystems St. Louis LLC,
St. Louis, MO, USA
xi
Chapter 1
Understanding and Maintaining the Cryostat
Philip Hyam
Abstract The chapter presents a user-friendly review of the main components of a
routine cryostat and their function in the preparation of frozen sections of mammalian
tissue. Topics covered include sectioning hints and tips and proper methods for
disinfection and cryostat maintenance.
Keywords Cryostat • Microtome • Knife holder • Chamber temperature • Object
temperature • Freezing shelf • Peltier element • Disinfection • Routine maintenance
Frozen sections, quick sections, in clinical terminology, intraoperative consultations, are prepared using a cryostat.
A cryostat is a cooled chamber, or cabinet that houses an instrument to section
frozen samples; a rotary microtome and knife (or blade) holder, and a means to
freeze samples.
Several types of cryostats are commercially available and can be categorized as
follows:
•
•
•
•
Single compressor (chamber cooling only)
Double compressor (chamber and object cooling)
Manual sectioning
Motorized sectioning
These are free-standing instruments that are insulated to very high standards to
ensure that selected temperatures are easily maintained. Access to the chamber is
via a heated sliding window. The normal working chamber temperature is from 0°C
to −35°C, the limiting factor being the type of compressor and refrigerant used.
Cryosectioning at temperatures lower than −35°C requires the use of a cryogen
such as liquid nitrogen.
P. Hyam (*)
Leica Microsystems Canada, 3725 HWY 201, RR 3, Bridgetown, NS, Canada, B0S 1C0
e-mail: [email protected]
S.R. Peters (ed.), A Practical Guide to Frozen Section Technique,
DOI 10.1007/978-1-4419-1234-3_1, © Springer Science + Business Media, LLC 2010
1
2
P. Hyam
Fig. 1.1 This shows the external controls and chamber of the Leica CM1950
The rotary microtome, (Fig. 1.1) controlled by an external handwheel that is
mounted inside the cryostat cabinet, has been specially manufactured and lubricated to work at low temperatures and to provide a mechanism for advancing a
specimen toward a fixed knife (or blade) in precise reproducible increments with a
section thickness range from 1–100 µm or higher.
To the side of the microtome is an area known as the freezing shelf that as the
name suggests is the area where samples are frozen or frozen samples are stored
prior to sectioning. The working temperature of the shelf averages −10°C lower
than the set chamber temperature due to its location close to the compressor system
(Fig. 1.2).
Newer instruments also incorporate a Peltier freezing stage with the freezing
shelf (in the above illustration the Peltier stage is outlined in white). A Peltier stage
is a thermoelectric device that when activated increases the diffusion of heat away
from the sample to the cold stage, resulting in a higher cooling rate and thus faster
freezing of the sample.
Located directly in front of the microtome and fixed either to the microtome
base or the cabinet is the knife (or blade) holder. There are two types of knife holder
that provide a means of clamping either a disposable blade or a reusable steel knife.
Figure 1.3 shows the cryostat stage with the antiroll mechanism in place in front of
the blade holder. The blade holder contains a blade clamped in position in
Fig. 1.8.
Disposable blades, commercially available in either high or low profile, are supported on a ridge on the rear pressure plate of the knife holder and clamped firmly
into place by a spring lever-operated front pressure plate. It is important that the
1
Understanding and Maintaining the Cryostat
3
Fig. 1.2 This shows the freezing shelf on the left side of the cryostat (red arrow). The heat extractor is attached to the hinged arm attached to the left wall
Fig. 1.3 Cryostat stage of the Leica CM1950. The knife holder (black arrow) is directly in front
of the antiroll device (red arrow)
4
P. Hyam
clamping pressure be maintained evenly across the entire length of the disposable
blade. Damage to either the front or rear pressure plate, or section debris trapped
between the pressure plates, will significantly affect the clamping pressure and
thereby sectioning efficiency and quality.
An alternative to disposable blades is a steel reusable blade. Steel blades available in either C profile (steel) or D profile (tungsten carbide) rest on a support bar
between two pillars of the standard knife holder. At the top of each pillar is a securing screw to ensure that the blade is clamped firmly.
Both the disposable and standard knife holders permit adjustment of the clearance
angle for the blade being used. In general, for low-profile disposable blades, the
blade angle is between 3° and 5°: for high-profile blades it is between 5° and 7°,
and for reusable blades it is between 5° and 7°.
Both types of knife holder are fitted with antiroll guides, which as the name suggests help to prevent rolling or curling of sections as they are being prepared. The
antiroll guide consists of a glass plate supported in a metal (aluminum) frame. The
frame provides a gap between the underside of the glass and the upper surface of
the front pressure plate or knife surface allowing the section to slide under. Gap
sizes of 50, 100, and 150 µm are available depending on the section thickness
required. For example, if sections of <5.0 µm were being collected then a gap size
of 50 µm would be suitable.
An alternative to the antiroll guide, is the cooled brush (a fine artist’s brush)
technique to collect and gather sections. With this technique; as the leading edge of
the section starts to come over the blade or knife edge the brush is used to pull/
guide the section onto the pressure plate or down onto the front surface of the blade.
The brush technique is discussed in detail in Chap. 4.
Specimen holders or chucks for cryostats are available in a variety of shapes
and sizes.
The presence of a stem or other specially designed projection on the bottom or
side of the chuck provides a foothold to clamp the chuck and is often specific to the
maker of the cryostat (Fig. 1.4).
Before beginning sectioning it is important to ensure that all operating parameters
have been set properly. A checklist is included at the end of this chapter.
Fig. 1.4 Specimen holders or chucks. Specimen holder of different sizes and shapes are made to
accommodate various embedding tasks
1 Understanding and Maintaining the Cryostat
5
1.1 Operation of the Cryostat
Cryostats must be located in a draught-free, humidity-controlled area, with clearance of 30 cm, on all sides to ensure that there is unrestricted air movement around
the instrument. Failure to provide ample clearance can result in poor cooling performance, as airflow to the compressor(s) is restricted.
All accessories; knife holder, antiroll guide, brush trays, etc. should be placed
into the chamber prior to the instrument being turned on. At start-up the chamber
(and object temperature if applicable) temperature should be set a recommended
setting is −20°C. Allow at least 24 h for a cryostat to come down to selected operating temperature.
Other settings at start-up are; time of day and defrost time. All commercial cryostats use a regular, once every 24 h, automatic defrost cycle to ensure that the
chamber, microtome, and accessories are kept free of frost. During the defrost cycle
the compressor(s) goes into a “hot” gas phase and for a preset period of time circulates warm air into the chamber. Any frost or ice present on the chamber surfaces
is melted and the fluid is drained into a sealed container. For the majority of cryostats the defrost time is usually set to midnight; this ensures that the defrost procedure is completed and the instrument is cooled down to the set operating
temperature outside of normal working hours.
In a busy hospital where frozen sections are commonly performed at all hours,
it is best to have several cryostats to stagger defrost cycles to assure that one cryostat will be functional at all times.
1.2 Specimen Preparation
This section will include a general discussion on use of the cryostat. See Chaps. 4
and 5 for detailed discussions of embedding trimming and cutting. For clinical
users it is assumed that institutional policies such as Body Substance Precautions
(BSP) are in effect and that all operators conform to this method of practice.
Protecting the operator is the prime goal of BSP, and the risk of potential infection
is extremely high when working with unfixed pathological tissue.
Specimens for frozen sectioning can be prepared in a variety of ways. They can
be frozen in a cryogen mixture such as isopentane cooled by dry ice, or placed
onto a thin layer of cryocompound on a specimen holder that is placed on the
freezing shelf, Peltier stage, or a large cooled metal block placed inside the
cryochamber.
The aim is to freeze the specimen as fast as possible to eliminate ice crystal formation (freeze artifact). To achieve fast freezing the size of the specimen must be
carefully controlled, as a guide a suitable specimen would be 2 cm × 2cm × 2mm.
Plunge-freezing into cooled isopentane is a fast, reliable and reproducible
method of freezing tissue. A small beaker (100 ml) of isopentane is placed into a
6
P. Hyam
Fig. 1.5 Heat extractor mechanism
container of dry ice (solid C02), to give a working temperature of ~−70°C.
Specimens frozen in this manner can then be sectioned immediately or stored at
−80°C.
Frozen specimens are mounted onto a specimen holder with cryocompound and
placed on the freezing shelf and allowed to stabilize at chamber temperature.
Fresh specimens can be frozen directly onto a specimen holder that is placed
onto the freezing shelf. A heat extractor can be used to aid freezing and ensure good
adherence and flat front block surface. A heat extractor is a large piece of stainless
steel that is supported on a hinged arm that is usually mounted above the freezing
stage (Fig. 1.5).
As the surface of the specimen starts to freeze the heat extractor is gently lowered
onto the top of the specimen and allowed to remain there for a few minutes.
Before mounting the specimen onto the microtome, ensure that the handwheel
is in the locked position. Never attempt to place or remove a specimen from the
microtome without ensuring that the handwheel is locked. In the unlocked position
the object head can move when inserting the chuck, placing the operator at the risk
(Fig. 1.6).
The specimen holder is clamped firmly onto the object head mounted on the
spindle of the microtome (Fig. 1.7).
The handwheel is unlocked and the specimen is lowered until it is at the same height
as the knife holder. The knife holder can then be unlocked and moved manually toward
the specimen until it is close to the specimen surface. In some instruments a motorized
coarse advance allows the spindle/object head to be moved close to the knife.
1
Understanding and Maintaining the Cryostat
7
Fig. 1.6 Cryostat handwheel. Each turn of the wheel advances the tissue block the precise increment
of section thickness setting. The arrow indicates the locking mechanism
Fig. 1.7 Microtome portion of the cryostat. Letter (A) points to the specimen holder or chuck that
is inserted (arrow) into the object head (B) mounted on the spindle of the microtome
8
P. Hyam
Adjust the micrometer setting of the microtome to “trimming” thickness of
15 µm and begin to turn the microtome handwheel; the specimen will advance by
this set value and will make contact with the knife and the surface of the block will
be sectioned. This process is termed “trimming” or “facing” the block, and the
purpose is to achieve a full face section of the specimen. As soon as this is achieved
stop sectioning and adjust the micrometer setting to the desired section value, e.g.,
5 µm. Brush all trimmings from the blade, or knife edge, carefully lower the antiroll
plate into place and continue sectioning.
Carefully lift the antiroll guide and with a cold brush arrange or move the
sections on the pressure plate or knife surface. Take a glass slide and holding it at
an angle gently lower it onto the section as shown in Fig. 1.8. Retrieving tissue from
the stage is discussed in greater detail in Chap. 4 (p 17).
Sections of fresh frozen tissue will adhere to plain glass slides due to the
presence of free protein and lipid. Sections of fixed frozen tissue will need to be
mounted on coated slides, e.g., poly-l-lysine.
Fig. 1.8 The figure shows a tissue section being retrieved from the cryostat stage. The antiroll
mechanism has been reflected to the left. The red arrow points to the blade clamped in the blade
holder. The operator must be aware of the proximity of their hand to the blade at all times to avoid
injury when retrieving sections
1 Understanding and Maintaining the Cryostat
9
Sections of fresh frozen tissue should be fixed immediately unless they are
going to be stored for future study. A standard histology fixative such as 4% neutral
buffered formalin is the most suitable fixative for frozen sections.
Sections of fresh frozen tissue will rapidly dry if exposed to warm air, and this
will result in cellular artifact.
If sections, mounted on glass slides, are going to be stored for future study
they should be placed immediately into a commercial (plastic) slide box that
has been cooled and kept in the chamber. At the conclusion of section collection
the slide box should be closed and the entire box wrapped in a double layer of
aluminum foil, labeled, and moved immediately into a −80°C freezer. Tissue
sections will not deteriorate as long as they are kept at a temperature of −80°C
or lower.
Any remaining specimen can be stored for future use. The specimen is carefully
removed from the specimen holder either by using a spatula, or by gently warming
the holder so that the still frozen block can be removed. Remove as much cryocompound as possible from around the specimen; wrap it in a double layer of aluminum
foil; label and store at −80°C.
1.3 Specimen Orientation
Many specimens need to be precisely oriented for adequate examination. Chapter
3 offers a detailed discussion of embedding and orientation of tissues using freezing
temperature steel well bars (see p. 9).
1.4 Cryostat Disinfection
For clinical users good hygiene of cryostats is a must. Specimen shavings should
be removed after each use. The waste tray that is underneath the microtome
spindle should be carefully lifted out and the shavings/debris placed into a biohazard bag. Other shavings and specimen debris can be wiped up using either paper
towel or a gauze swab soaked in 70% alcohol. During this procedure it is important to minimize aerosols and to prevent sectioning debris from spilleing onto open
surfaces.
Disinfection systems are now offered by several cryostat manufacturers: A disinfectant spray system (MICROM), formaldehyde vapor (Thermo Fisher), a combination of disinfectant spray and UV light (Leica), and ozone (Sakura). Each of these
systems uses a different method to achieve a safe working environment; users are
encouraged to thoroughly investigate the efficacy of each system prior to purchase.
All users should be responsible to ensure that the cryostat is kept clean, to minimize the risk of infection by inhalation and to reduce the risk of cross-contamination of a section or tissue sample.
10
P. Hyam
1.5 Cryostat Maintenance
Like all well-used instruments the cryostat requires regular maintenance to ensure
optimum performance, and the tasks can be divided into daily, weekly, monthly,
and annual tasks.
1. Daily:
• Lock the microtome handwheel.
• Remove all section debris, using either alcohol-soaked paper towel or a suitable
vacuum system.
• Carefully remove all specimen trimmings.
• Remove all specimens.
• Remove all blades or knives.
• Remove all used specimen holders and soak in warm soapy water to ensure
that all cryocompound is removed; air or oven dry.
2. Weekly:
• Empty fluid container (this fluid is collected during the daily defrost cycles).
For clinical pathology laboratories this fluid must be regarded as potentially
biohazardous and disposed according to institutional policies.
• Thoroughly clean and lubricate all contact surfaces of the knife holders.
3. Monthly:
• Spindle lubrication: ensure that the handwheel of the microtome is locked,
using the coarse advance bring the microtome spindle (object head) forward.
• Using a disposable pipette place a few drops of low-temperature oil (supplied
with the cryostat) onto the rear (close to the microtome housing) upper surface
of the spindle
• Retract the spindle to its home position. This will ensure that the spindle is
kept well lubricated and free of dust debris. Spindle issues can result in poor
sectioning and thick and thin sections.
• Check the side compressor vents to remove all dust etc.
4. Annual:
• Have the instrument serviced by manufacturer trained and approved service
engineers
1.5.1 Checklist
• Prior to starting sectioning check and confirm the following
• Confirm that chamber temperature (and object temperature if applicable) is set;
a recommended starting temperature is −20°C.
1 Understanding and Maintaining the Cryostat
•
•
•
•
•
•
•
•
11
Confirm that the hand wheel is LOCKED.
Check that the knife holder clearance angle has been set correctly.
Insert fresh blade and check that the blade is clamped firmly.
Insert the specimen and ensure that it is clamped firmly into the object holder.
Confirm that the desired section thickness has been set.
Unlock the handwheel and start sectioning.
When sectioning is completedLOCK the handwheel.
Remove the specimen from the object holder process for either low-temperature
storage or fixation for subsequent paraffin embedding.
• Remove the blade.
• Remove ALL trimmings and specimen waste.
• Ensure that the cryostat is left in a clean and safe condition.
Chapter 2
Gross Examination of Tissues in the Frozen
Section Room
Stephen R. Peters
Abstract The chapter discusses gross examination of tissues in the setting of surgical
pathology intraoperative consultation; the frozen section room. The process of gross
examination is discussed in nine important steps from verifying of labeling and review
of clinical information through gross examination, inking, sectioning, and cytologic
preparations. These steps provide a checklist of considerations, as we perform this
detailed and important part of our frozen section room task under the constraints of
time. Emphasis is placed on the importance of understanding and correctly inking
resection margins. The chapter offers a number of technical approaches to inking, and
sectioning, as well as pointing out potential sources of error. The importance of cytology
specimens and techniques for preparations are discussed.
Keywords Cytology preparations • Crush preparation • Scrape preparation • Touch
preparation • Dissecting • Lymph node adipose tissue • Gross examination • Gross
sectioning of tissue • Inking resection margins • Application of ink • Multiple
sections • Perpendicular margin sections • Resection margin false resection margin
• True resection margin • Inking resection margins • Sampling errors • Shave margin
section • The sausage trick
When initiating a new resident to frozen section technique I like to start by
asking the question “What is the most important thing we do in the frozen section
room?” The answer is “The gross.” Possibly a slight over statement, it serves to
emphasize the importance of the gross examination. Our gross diagnostic acumen
will never serve us better than in the frozen section room. A thorough gross
examination and sampling of a wide range of tissues is our best defense against
sampling errors. Recognizing important gross features of a pathologic process
can strongly aid in the differential diagnosis we are considering microscopically.
S.R. Peters ()
Department of Pathology University of Medicine and Dentistry of New Jersey
Pathology Innovations, LLC, 410 Old Mill Lane, Wyckoff, NJ 07481, USA
e-mail: [email protected]
S.R. Peters (ed.), A Practical Guide to Frozen Section Technique,
DOI 10.1007/978-1-4419-1234-3_2, © Springer Science + Business Media, LLC 2010
13
14
S.R. Peters
Anatomic details of complex specimens must be well understood before we can
hope to make educated judgments about the extent of the patient’s condition and
need for further resection.
Unfortunately in our performance of intraoperative consultation there is one true
limitation to the process we will employ. This limitation is time. And with this limitation we may sometimes feel a bit of pressure. We are asked to grossly examine,
dissect, ink, and section a gross specimen, embed the tissue, freeze the tissue,
section and retrieve the tissue, stain and cover slip the slide, and microscopically
interpret the section in a period of 20 min in uncomplicated specimens. We must do
our best to fight our urges to rush through any step of this process, as doing so will
only put us at risk for errors. Rather we should strive to become efficient and technically skilled in all aspects of our complex task. When faced with large complex
specimens or multiple specimens that will take a bit more time to properly examine
I will let the surgeon know that it may take a few minutes longer. I will feel less
pressured and he will find better use of the time. What follows is a detailed discussion of nine important steps in the gross examination process. Let this information serve as a checklist and fund of considerations and technical advice to best
accomplish this task.
2.1 Gross Examination
The process of grossing should be performed in a meticulous and systematic fashion including all of the following steps:
2.1.1 Verify Specimen Labeling and Patient Identification
In a busy operating room situation with multiple specimens being handled at a time
it is not difficult for samples and tissues to become confused both outside and inside
the frozen section lab. It is wise to create and obey strict protocols in the way we
verify, label, and handle multiple samples from multiple patients. Following a
familiar routine is the best way to avoid errors of omission. When we deviate from
routines we are more at risk of leaving out an important step.
2.1.2 Review Clinical Information
Our final diagnosis must be based on a compilation of all clinical, gross, and microscopic findings. When all three point to a common diagnosis we can proceed with
confidence. In contrast, when our clinical picture or gross findings are very unusual
for our suspected microscopic diagnosis it should be a warning that we should take
a step back, reevaluate our possibilities, and proceed with caution.
2
Gross Examination of Tissues in the Frozen Section Room
2.1.3
15
Examine and Palpate All External Surfaces
of the Specimen Carefully
Make sure that you understand the anatomy of the specimen. Check that all organs
described in the specimen labeling are present. Examine and palpate all surfaces
noting the following: color, texture, consistency, nodules, defects, adherent tissues,
marking sutures, anastamotic lines, and any deviations from normal anatomy.
2.1.4
Understand the Resection Margins
The resection margins of a specimen are those surfaces that precisely represent the
final cut surface of the tissue removed at an operation. It is where the specimen ends
and the patient begins. When a resection margin contains tumor under the microscope, it signals the surgeon that the tumor has not been completely excised at that
location and further resection is necessary if possible. The final status of the resection margins is an integral factor in the staging of the patient’s tumor. The accuracy
of the designation of these margins is critical to the patient’s therapeutic outcome
and treatment planning. Similarly our surgical colleagues often need to know if an
inflammatory or infectious process involves a resection margin or simply if tissue
at the margin is viable. Without strict attention to the anatomy involved, misinterpretations can be made by both surgeon and pathologist. Complex multiorgan
resections can sometimes be difficult to orient and may contain subtle bits of
anatomy such as small pieces of adjacent organs or portions of adherent surfaces
that are critical for staging. For example, if a piece of parietal pleura is adherent to
a lung resection, we must determine if the tissue has been infiltrated by tumor and
if tumor extends to the resection margin of the pleural tissue. Both will be critical
to accurate staging. Figure 2.1 shows an example of a colectomy specimen with a
large tumor infiltrating neighboring organs. The illustration highlights all the resection margins that need to be considered to assess adequacy of excision and accurately stage the patient’s disease. One must be aware of what represents a radial
margin where the colon and other organs become retroperitoneal. All such landmarks should be identified prior to inking and dissection of the specimen.
I find that examining the specimen in anatomic position allows me to best maintain
my sense of orientation of the specimen relative to the patient. Specimens such as complex head and neck resections can be quite challenging to orient and have many
complex surfaces that represent resection margins. I try to imagine the patient lying on
his back and visualize the specimen in position in the body. When turning the specimen
to examine all of the sides, continually refer back to anatomical position to keep your
orientation. Left, right, superior, inferior, medial, lateral, anterior, and posterior should
be established. Pay careful attention to any sutures or clips with designations left by the
surgeon to orient the specimen. For example, our surgeons often place a long suture to
designate the lateral margin and a short suture to designate superior. If there is any question of what represents the true margin ask your surgeon to come to the frozen section
S.R. Peters
16
Fig. 2.1 Complex resection margins. The illustration depicts a distal colectomy specimen with a
large tumor (purple), which has infiltrated through the colonic wall into adjacent tissues requiring
the surgeon to resect a loop of small bowel and a portion of tissue from the abdominal wall. The
resection margins of the specimen have been inked in red. An area of radial margin where the
surface is retroperitoneal is indicated by the diagonal red lines
room to help orient the tissue prior to inking the margins. I have suggested to our
surgeons, when inadvertently incising a specimen margin during the surgery, to stitch
together the false margin on removal so that it will not masquerade as a true margin.
2.1.5
Inking Resection Margins
Proper application of marking ink or dye is essential to the pathologist’s role in
recognizing involved resection margins under the microscope. When the pathologist looks at a microscopic section in which resection margins have been inked,
tissue surfaces coated with ink are interpreted as resection margins. When a pathologist sees tumor extending to an inked surface it is reported to the surgeon as a
positive margin and the surgeon is obliged to remove more tissue from that site if
possible to assure a complete excision of the tumor. It is imperative that this ink be
applied with the utmost accuracy.
Traditionally black India ink was used to mark the resection margins. Inking
with one color is best suited for tissue received without orientation. It is very easy
to quickly ink the tissue in one color and interpret the state of the global resection
margin as involved or not. Using a single color ink has its drawbacks in specimens
that are received oriented as commonly encountered in excisional biopsies of skin
2
Gross Examination of Tissues in the Frozen Section Room
17
and breast. Our surgeons are expecting the resection margins examined and
reported specifically for each surface, i.e., anterior, posterior, superior, inferior,
medial, and lateral. Using a single color ink will require that each slide containing
margin tissue slides must be designated by orientation to identify the specific margins. In storing the tissue the gross specimen must be either kept intact and oriented
(risking under examination) or any unused margin tissue must be separately
wrapped and labeled for holding so that the various margin tissues do not become
mixed. Problems arise when a tissue that is not intentionally taken as a margin and
therefore not designated as a specific margin turns up to have tumor involving an
inked surface. There is no way to identify the specific site of involvement.
The practice of applying black India ink to all of the different margins of a specimen is quickly being replaced by use of sets of multiple colored inks, which are
commercially available from a number of manufactures. There is a great convenience in using multiple colors. In a specimen inked in multiple colors the specific
margins will be easily recognized by their color both grossly and microscopically
and tissues margins do not need to be wrapped separately by orientation.
In my experience, no matter which of these media are used, great care must be
used in applying these inks. When over applied, surfaces not intended as margins
become falsely labeled as ink leaks into crevices and tissue planes and colors
become smeared and blended into one another. The instructions supplied with the
inks often call for a drying period. Unfortunately in a frozen section room situation,
few have quite the patience to let a specimen dry for a prolonged period. A quick
application of a 5% acetic acid to the inked surface will act as a mordant to set the
ink to the tissue. The mordant acts by converting the ink into an insoluble compound
with the tissue and will help prevent spread of the ink onto undesired surfaces.
If inking the specimen is done in a less than meticulous application, there are
many possible causes for misinterpretation. For the purpose of this discussion I will
define the terms true margins, false negative margins, and false positive margins.
2.1.5.1
True Positive Margin
Tumor extends to the true surgical resection margin. The microscopic section shows
tumor extending into a correctly identified and inked resection margin (Fig. 2.2).
2.1.5.2
False Negative Margin
Failure to accurately apply dye to a true resection margin creates an opportunity for
false negative interpretation by the pathologist. We may see tumor extending to a
tissue edge but will not recognize it as a margin if ink has not been applied. If we
fail to recognize tumor involvement of a true margin on frozen section we miss an
opportunity to advise the surgeon to take additional tissue from the involved site.
This will increase the likelihood of a future recurrence of the patient’s tumor
(Fig. 2.3).
18
S.R. Peters
Fig. 2.2 True resection margin .The diagram shows a mock-up of a portion of breast tissue (yellow)
with tumor (purple) extending into the inked margin (black). The white slice out of the specimen
represents the section prepared into the slide below. The slide shows the tumor extending to the
inked margin
Fig. 2.3 False negative margin because of failure to apply black ink to the entire margin surface.
The slide below shows that the positive margin will go undetected because it is not covered by ink
where the tumor meets the surface
2
Gross Examination of Tissues in the Frozen Section Room
2.1.5.3
19
False Positive Margins
Surfaces that are falsely interpreted as a positive resection margin under the microscope because of the following causes:
• Non-margin surface falsely dyed due to misinterpretation of the anatomy or
smearing or leakage of dye. If the dye is applied too thick without proper drying
or use of acetic acid mordant it can be easily smeared onto other surfaces with
our gloves, paper towel, or scalpel blade, creating false margins or mislabeled
margins. Dye applied too heavily will allow dye to seep into crevices, along
loosely held interstices and tissue planes creating false margins. One must be
careful to recognize surgical cuts into the true margin of the specimen, which
would create surfaces that can be carelessly dyed creating false margins. Breast
lumpectomy specimens are particularly prone to this error. The surgeon may
find that he is closer to the lump than first predicted and take a wider course
around his target creating a slice in the specimen. Typically being soft and
deformable, the defect in the lumpectomy specimen may be overlooked and
inked as a margin. This is especially problematic when following the dreadful
practice of dunking a specimen into a jar of ink. Similarly at the time of grossing
it is possible to create false margins if the tissue is incised or planes of tissue are
opened up and ink is misapplied (Figs. 2.4 and 2.5).
• Mislabeled true margin. A true margin mislabeled with the wrong color dye due
to misinterpretation of the specimen orientation, smearing or leakage of dye
(Fig. 2.6).
Fig. 2.4 False positive margins. The true margin is inadvertently incised during surgery or at the
grossing bench and covered by ink. The slide below will be falsely interpreted as tumor extending
into the inked resection margin under the microscope. Ink applied to any nonmargin surface will
create potential for false positive interpretation of the margins of the specimen
20
S.R. Peters
Fig. 2.5 Incised resection margin. Breast tissue micrograph showing an inadvertent incision into
the true resection margin (outlined in black) creating a potential false margin (outlined in yellow).
If ink is applied to the lining of the incision it will be falsely interpreted as a resection margin. ×20
magnification
Fig. 2.6 Mislabeled margin. The red ink from the superior margin is smeared onto the medial
margin. The slide below taken from the medial margin shows tumor extending into the red ink and
will be misinterpreted as a positive superior margin
2 Gross Examination of Tissues in the Frozen Section Room
21
2.1.6 Application of Ink
There is a fine line between applying two little and too much ink. This is compounded
by the fact that the thickness of the dye will vary with the age of the bottle and how
well it has been sealed to prevent evaporation between uses. We need to see the inked
surface under the microscope but this can be accomplished with a relatively thin
uniform application. We do not need to be able to see the ink when we hold the slide
up to the light! There should be constant attention to the proper filling and blotting
of the applicator before applying dye to avoid overapplication. A cotton swab
immersed in a bottle of dye should first be wiped on the edge of the bottle or tamped
on the paper towel. If a heavily filled swab of runny ink is applied the ink will run
into any available crevices and penetrate loose tissue planes creating false margins.
A swab filled with ink applied to the surface of a small piece of skin will cover it in
a puddle and will contaminate surfaces you intended to dye another colors. Heavy
application of thick dyes will leave a thick coating that will be easily spread to unintended surfaces during the following cutting and handling. When using multiple
colored inks, neatness and well-controlled application is even more critical. If treated
casually, smearing and mixing colors will invariably ensue.
2.1.6.1 Suggestions for Inking Specimens
First dry the tissue and place the tissue on a dry paper towel. Any blood or liquid on
the surface will cause the ink to run. A wetted towel will encourage the ink to run.
Always blot the surface of a freshly inked color before continuing to the next
color. This should be done very gently in a controlled manner with gauze or other
absorbent material to avoid contaminating adjacent surfaces with the excess ink.
If you have a puddle of ink precisely applied over a defined surface such as a fraction
of a skin ellipse, if quickly blotted it can wash over to contaminate other surfaces
before the liquid is fully absorbed. Rather than grossly blotting the tissue you are
really using the gauze as a vacuum to pull away the excess ink using the capillary
action of the absorbent material. This can be done with very gentle pressure using
a small corner of the gauze or the end of cotton swab. When blotting a multicolored
surface, it must be done with a single gentle press of the gauze. Repeated blotting
can spread the colors and cross contaminate margin surfaces.
When rolling or changing position of the specimen to apply additional colors,
avoid touching and cross contaminating surfaces with previous colors present on
the paper towel. It is best to move to a clean section of towel or new towel whenever
the specimen has to be moved on the towel.
Be very conscious of where dyes have gotten onto your gloves during the dying
process. I suggest a change of gloves between the dying and cutting of the tissue to
avoid contamination. I often change gloves during the inking process when I get
messy, especially when using multiple colors.
S.R. Peters
22
2.1.6.2
Designating Margin Colors
When using multiple colors to dye margins, it is imperative that the specific colors
be designated for each margin in the gross dictation so that the pathologist reading
the slides can recognize a given margin. As a pathologist reading the sections, it can
be cumbersome to constantly refer back to the gross to recall the color of each
designated margin. By initiating a conventional labeling scheme to be used on all
applicable specimens it allows the pathologist to immediately know the meaning of
a dye color under the microscope. A simple scheme used in our department is as
follows: RED is a SUPERIOR color; YELLOW is an INFERIOR color; GREEN
has an E sound like MEDIAL; BLUE has an L and should be opposite green. LATERAL;
BLACK is on the back-POSTERIOR; ORANGE is ANTERIOR. (A pregnant
woman carries her PUMPKIN in front.) Give this convention, when I see a margin
inked red I know it is superior and a margin inked green is medial without repeatedly
referring to the gross dictation. In specimens in with left and right are margin designations then colors must be individually designated in the gross description.
2.1.6.3
Applicators for Inking
Ink is commonly applied with some form of applicator sticks or cotton swabs
(Fig. 2.7a). These work best for many tasks but fall short on very large surfaces and
very fine tasks. For small specimens such as skin biopsies that need to be inked in
multiple colors, a simple cylindrical applicator stick can be imprecise. For detailed
multicolor dying, a more accurate set of application tools can be fashioned by carving
the wooden end of an applicator swab for each color. With a few strokes of the
scalpel, carve a flattened end similar to a fine flathead screwdriver. Next cut the flattened tip at an angle to arrive at the applicator shown in Fig. 2.7b. The swab end
can then be used for blotting after application. A set for each color can be made in
a few minutes and they can be wiped clean and used for an extended period. I suggest
hiding them from your colleagues.
Fig. 2.7 (a) Cotton tipped swab being used to apply black India ink to the margins of a thyroid
lobectomy specimen. (b) Simple home-made carved inking tool for fine applications such as in
inking of smaller skin lesions
2
Gross Examination of Tissues in the Frozen Section Room
23
Fig. 2.8 Inking with a gauze pad. Fold or gather a gauze pad and briefly turn over the ink bottle
to fill the pad. Apply ink in a blotting fashion to cover he specimen
Fig. 2.9 Applying ink with a gauze pad to a large sarcoma resection specimen
For very large areas such as the deep side of a mastectomy specimen, use one or
two 4 × 4 gauze pads gathered or folded to form a pad. Fill the pad by holding the
pad over the mouth and briefly turning over the bottle. This can then be used to
apply dye in a blotting or gentle wiping fashion. This method is particularly valuable when applying dye to irregular surfaces with crevices. By lightly filling the
pad, ink can be lightly applied in a dry brush fashion onto the surface desired without ink running into every crack (Fig. 2.8 and 2.9).
24
2.1.7
S.R. Peters
Dissecting and Sectioning the Specimen
Large complex specimens should be opened completely and carefully examined in
an orderly fashion using standard grossing techniques. Try not to let the constraints
of time lead you to rush through a proper dissection process. On the other hand
there is always the need to preserve the anatomy and relationships for the formal
gross examination and dictation often performed at a later time. In many hospital
settings the formal gross exam and dictation will be performed by a different person
from the one who performed the gross at the time of frozen section. In these settings
we must be do our best to preserve the gross findings in the specimen and convey
any important gross findings that were disturbed in sectioning during the intraoperative consultation.
On opening fresh bowel or stomach there is often considerable luminal contents
and adherent mucus obscuring our examination. In order to properly examine the
mucosal surface some rinsing is often necessary. A gentle approach is to rinse with
saline while gently wiping adherent secretions and debris. On occasion we are called
upon to find some minute biopsy site or tumor on the mucosal surface of the stomach
or bowel. In order to find such minute gross findings as a previous biopsy site or
small superficial lesion, it is necessary to thoroughly clean the mucosal surface.
I was taught it is taboo to run water onto fresh mucosal surfaces because of the
damaging effects of hypotonic water on the cells. Unfortunately, in these situations
the important question needs to be answered during the surgery. Resorting to a thorough cleaning by running the mucosal surface under water in these situations may
be a necessary evil in order to find the gross lesion. I cannot recall an instance where
having done so has affected my ability to interpret the section microscopically on
H&E. I imagine more sophisticated studies might be affected by this practice.
For simple specimens such as breast biopsies and thyroids, the specimen should
be bread-loafed completely at 3-mm intervals. Typically biopsied for a palpable
nodule or radiologic finding, these specimens can harbor small occult lesions
peripheral to the target lesion. A few slices in an intact specimen that remains held
together like a book is not an adequate examination. The process of bread loafing
and lying out of the tissue slices should be considered separate processes, each to
be completed before beginning to examine the cut sections. The 3mm sections
should be laid out on a paper towel so that all cut faces are visible. Take care in
lying out the sections so that consecutive cut surfaces are visible. If two mirror
image surfaces are laid face up, one of the two consecutive faces will be face down
and subject to overlooking.
Dissect off any unessential fat. A typical example here is frozen section of lymph
nodes. When examining lymph nodes it pays to be meticulous about removing all
of the fat from the surface and medulla if present. Figure 2.10 illustrates a simple
scalpel technique for peeling away the remaining fat from a lymph node.
• Start by palpating the node to define its borders and removing the gross fat from
the node by any means of smearing , squashing, cutting, and scraping the gross
fat off of the node using fingers or scalpel.
2
Gross Examination of Tissues in the Frozen Section Room
25
Fig. 2.10 Removing fat from a lymph node capsule. (a) Small lymph node covered in a layer of
fat on a dry paper towel; (b) Smear the fatty tissue to the paper towel while pushing the node to
one side with the finger tip; (c) Simultaneously move the scalpel back and forth (double-headed
arrow), push the lymph node to the side with the blade (single-headed arrow) and press very
lightly down with the scalpel so that it does not cut through the fat. The fat adhering to the towel
will be cut away in the plane that forms between the towel and the rolling node. (d) Lymph node
with most of the fat removed; (e–h) Repeat the process to remove any remaining fat
S.R. Peters
26
• Next slowly roll the node on a dry paper towel. As the remaining fat adheres to
the towel, a plane of cleavage stretches between the adherent fat and the node.
• Cut through this plane by pressing very lightly down with the scalpel so that it
does not cut through the fat while simultaneously moving the scalpel back and
forth and pushing the lymph node to the side with the side of the blade. The fat
adhering to the towel will be cut away in the plane that forms between the towel
and the rolling node.
• Repeat the process to remove any remaining fat.
• With careful dissection one can remove the fat without incising the lymph node
capsule. Some pathologists may criticize this technique suggesting that removing this fatty tissue may cause failure to identify tumor in perinodal fat. It is my
rational that I have a much better chance of finding a positive node with a intact
well-prepared section than in a suboptimal section that is cut with great difficulty due to the presence of fat.
2.1.7.1
The “Sausage Trick”
This technique allows you to take soft, difficult to cut tissue and make it firm and
easy to cut by rolling the tissue in a paper towel or absorbent pad. This technique
also helps prevent the knife blade from dragging ink into the tissue. This works
particularly well with fresh fatty breast specimens received for frozen section. To
roll the tissue, use a dry high-quality paper towel or absorbent pad. Some of the
higher quality folded towels work fine. If you only have low-quality paper towels
use two together and first dry the tissue. If wet, these low-quality towels will not
firm up quite the same and shreds of paper will tear away when you unwrap the
tissue. I find these sturdier absorbent pads to work very best (Fig. 2.11).
2.1.8
Examining the Cut Specimen
The tissue slices should be examined meticulously in the order they are laid out
using both our eyes and palpating with our fingers, slice by slice. Tissues should be
examined as closely as our eyes will allow us to focus. A hand magnifier can be a
useful aid. When examining these cut sections I encourage the examiner to look
away from the pathology. If one jumps quickly to the obvious nodule in one of the
central sections, surely one day they will miss the 3-mm nodule at the edge. If we
focus our attention on the large obvious bowel tumor we can easily overlook other
important findings. Large complex specimens should be examined by anatomic
regions in an orderly and meticulous fashion. An experienced examiner should be
able to recognize the gross architectural elements corresponding to the histological
features seen microscopically. For example, we should be able to recognize the
depth of gross tumor infiltration relative to the layers of the bowel wall or recognize
that our breast tumor is grossly infiltrating into the overlying nipple.
2
Gross Examination of Tissues in the Frozen Section Room
27
Fig. 2.11 The sausage trick. (a) Place the specimen on the diagonal in the center of a strong dry
paper towel or absorbent pad. (b) Fold the towel diagonally across the tissue. (c) Crimp the towel
firmly to the tissue and roll the towel and tissue into a firm sausage. (d) Slice the sausage into
3-mm slices. (e) Unroll the towel by gently pulling the corner backward. (f) The sliced specimen
is still mostly intact. (g) Lay out the specimen entirely in an orderly fashion. (h) Examine each
piece visually and by palpation
28
S.R. Peters
Important information can even be gathered looking carefully at even the tiniest
specimens. In a 1-mm speck of brain tissue, the difference between the opaque tan
white appearance of a normal brain and the translucent gray of a glioblastoma is
quite obvious. The difference in the colors brown vs. gray in a liver core biopsy
immediately helps point the pathologist in the right direction.
2.1.9
Taking the Sections for Frozen Sectioning
Many specimens consist of small pieces of tissue without orientation. These can be
dealt with by simply taking a piece or cutting a slice of the tissue for embedding.
However, in many cases recognizing the pathology in the gross state will require us
to grossly cut our sections in a most specific manner to best demonstrate the findings. Samples cut to demonstrate involvement of margins must be sectioned and
embedded in a precise manner. In many cases there may be several possible
approaches. One must foresee how the tissue will be oriented and displayed after
cutting, embedding, and sectioning. Some tissues can be very challenging to cut in
the fresh state. For example, taking a section of an unfixed polyp attached to its
underlying tissue can be a challenging task. Figure 2.12 illustrates an approach to
precisely section a polyp through its stalk and attachment. This approach can be
applied to many of our difficult sectioning tasks.
• Start with a sharp scalpel. When approaching our most difficult tasks always
start with a new blade. This is most important in cutting friable tissues, which
will crumble easily when assaulted with a dull blade. Scalpels can become dull
more quickly than we sometimes realize. Just because you put on a new blade a
Fig. 2.12 Sectioning a polyp. (a) Using long very gentle strokes of the scalpel blade make the
first cut (arrows) through the head of the polyp while aiming to continue through the stalk and
remaining wall. (b) The remaining cuts will excise the remainder of the section (dotted lines)
2
Gross Examination of Tissues in the Frozen Section Room
29
few minutes ago and only cut a couple of small specimens it does not mean that
the blade is still sharp enough.
• Make the first pass of the scalpel through the plane you wish to see under the
microscope. The initial cut represents the face to be embedded and cut for our
frozen section. The following cuts will excise the remainder of the tissue section
and trim the other five sides. In our example taking a section of an unfixed polyp
attached to its underlying tissue the first cut should be made bisecting the polyp
and preserving its stalk attachment. The split polyp can then be excised from the
specimen and taken to a flat surface for trimming.
• The knife blade should begin its cut at the most difficult and critical aspect of
the tissue. Approach the task by beginning the cut at the critical cutting surface
where it is most difficult to cut across without crumbling. In the example of
bisecting the polyp and preserving its stalk attachment, the knife should begin
on the head of the polyp and continue through aiming for the stalk. In taking a
section of uterus, start by incising the softer more deformable endometrium to
define the thickness of the section and then continue to cut across the underlying
myometrium.
• Use minimal scalpel pressure to cut the most delicate tissues. To split the friable
soft head of a polyp, using very little downward pressure with long continuous
backward or forward motion of the scalpel will result in the cleanest cut with
least crumbling. Using any type of knife or blade we will obtain cleanest, most
uniform cuts by using long continuous backward and forward strokes of the
blade. The more delicate the tissue, the more gently we need to press down with
the blade and rely on the sharpness of the blade to cleave the tissue without
crumbling. It is helpful resting the polyp on a paper towel when cutting a polyp
while attached in an intact organ. It may be easier to first excise a block of tissue
containing the polyp before bisecting it. This may make it easier to get the tissue
into a position to make such a fine controlled cut.
Beware of cysts! It is wise to exert minimal pressure with the fingers and scalpel
when cutting tissue that is grossly cystic or may contain small cysts. When we
squeeze tissues with our hands and press firmly with a scalpel, we raise the pressure
in any cystic components. As the scalpel blade encounters these cysts under
pressure the contents will squirt out of the tissue like a pin hole in a water balloon.
This can put the operator at risk for eye contamination and transmittable disease.
Protective eyewear is common sense in any grossing situation.
Sections can be taken from resection margins either perpendicular to the margin
or parallel to the margin, also called a shave margin. When one sections a margin
perpendicular to the margin, the section will demonstrate how close the tumor is to
the margin (Fig. 2.13a). The disadvantage in sectioning margins perpendicularly is
that you are actually only examining a 5-µm-wide portion of the entire surface.
Even if a 30-mm-wide margin is entirely examined in 10 perpendicular sections of
3-mm thickness, the pathologist will only see ten 5 µm widths of tissue spaced
3 mm apart or a total of 50 µm. This rather exhaustive study of ten margin sections will
only have actually examined 1/600th of the tissue. In tumors such as breast cancer
30
S.R. Peters
Fig. 2.13 Illustration of segment of bowel with a tumor (purple) close to the margin on the right.
The slide made from the tissue section removed is pictured below in each frame. (a) Shows a section taken perpendicular to the margin clearly demonstrating the distance of the tumor from the
inked margin. (b) An example of a section taken as a shave off the margin. The section demonstrates the absence of tumor but offers no information as to the proximity of tumor to the resection
margin. The information gathered varies considerably
and visceral tumors where lymphatic and perineural invasion are commonplace,
a specimen may be considered incompletely excised if it comes to within a specific
distance to the margin. These situations will be better served taking sections perpendicularly despite this fractional sampling. Here again is where out meticulous
attention to the gross pathologic findings will allow us to raise our odds of finding
the positive margin. Perpendicular margin sections should always be taken at points
where the tumor is visibly closest to the margin. In situations where no tumor is
visible I have found that a little common sense can help us raise our odds beyond
that of randomly taking samples. For example, given a re-excision breast biopsy
2
Gross Examination of Tissues in the Frozen Section Room
31
specimen where there is a biopsy cavity and no grossly visible tumor, I will pay
most attention to the areas where the biopsy cavity walls come closest to the margin.
This is where tumor used to be closest to the margin. Taking multiple sections
perpendicularly will help to reduce false negatives due to sampling error.
A shave margin will demonstrate if tumor is present anywhere along the entire
face of the resection margin (Fig. 2.13b). In actuality, the ultimate resection margin
will be trimmed away when surfacing the block prior to sectioning; the distance
from the ultimate margin will depend on how much tissue is needed to be trimmed
away before taking the complete section. In fact, if a thin portion of tissue is embedded anything less than flat and trimmed in much less than perfect x-y orientation it
is very likely that a portion of that margin may be trimmed through and lost for
interpretation before reaching the entire tissue face. With a shave margin examination, if the tumor is not present in the tissue, the microscopist has no way of determining how close the tumor is to the margin microscopically. The goal of therapy
in Mohs surgery is complete local excision of a skin tumor with minimal tissue loss.
This is accomplished by examining shave margins across the entire resection margin of a skin specimen. As we will discuss in Chap. 8, it is critical that Mohs surgery
specimens are embedded in a flat plane with the tissue face parallel to the chuck
face (parallel faces). See Chap. 8 (p. 6).
Take multiple sections to reduce sampling errors. In dealing with very large
tumors such as soft tissue tumors and large ovarian cystic lesions to name a few,
we often rely on specific microscopic criteria to make the diagnosis of malignancy.
The more widely we sample these tissues the better our odds of making a correct
determination. Using the embedding techniques described in the next chapter one
can take multiple tumor samples from areas of diverse gross appearances, prepare
them in one or two large blocks, and raise our odds of finding the necessary features
to make the correct diagnosis (Fig. 2.14).
Fig. 2.14 Examples of frozen section blocks prepared by embedding multiple samples in a single
block. Examining multiple samples will reduce sampling errors in large specimens
S.R. Peters
32
2.1.9.1
Margins on Small Specimens Removed Piecemeal
In cases where surgeons are removing small tumors that are difficult to remove in
a single piece such as a locally excised small malignant laryngeal lesion that is
removed in several fragments, I suggest that the surgeons take what they believe is
the entire lesion and place it in a single container. In a second container I ask them
to remove another thin layer of tissue from the base to be examined as the final
resection margin. If this final margin tissue is free of tumor it can be reported as a
negative final margin. The same applies for tissues submitted intact and oriented
that have a positive margin. If by the nature of the location it is not possible to orient
the new margin, I suggest that they remove what they think is adequate margin tissue and place it in one container and then remove an additional thin layer of tissue
as the final margin. If the first specimen showed tumor in the margin and a single
poorly oriented specimen was removed as additional margin one would expect
tumor to be present somewhere in the tissue even if it was not seen on the frozen
section. Possibly it is on the opposite side of the tissue and was not visualized
because the tumor was buried in the block. By examining an additional thin layer
of tissue we will be more confident that the final margin is negative.
2.1.10
Cytology Preparations
These simple techniques provide extremely useful information to contrast with the findings in the frozen section, particularly when examining neoplastic tissues. Smears
provide a dimension of information that cannot be seen in sectioned tissue either on
frozen section or paraffin-embedded samples. A well-made smear will provide optimal
nuclear detail to compare with any artifacts seen on the frozen section preparation.
Cytoplasmic and cell membrane characteristics are sharply visible. In brain biopsy
cases, crushing and smearing a minute portion of tissue will demonstrate important
clues such as the fibrillary cytoplasm of a glioma, the cohesive groups of a metastatic
carcinoma, the absence of cohesion of a lymphoma, and the histiocytes of demyelinating disorders. By air drying slides and performing the Diff-Quick stain an entire new
compendium of cytoplasmic details appear including nuclear and cytoplasmic vacuoles
and cytoplasmic and extracellular substances such as mucin and thyroid colloid.
Cytologic features are discussed in more detail in Chap. 7.
Cytologic preparations can be either fixed or air dried. Fixation should be carried out
as quickly as possible for optimal cytologic detail. Air-dried slides should be made with
a thin layer of cells and quickly dried for optimal preparation. It is worth waving the slide
in the air for a moment to quickly dry the cells. Bloody slides with too much material
will not dry quickly and result in an unsatisfactory, marginally readable preparation.
The most suitable type of cytologic preparation will vary with the type of tissue.
Touch prep – Suitable for lymph nodes and other very cellular tissues (Fig. 2.15).
Scrape prep – Suitable for firm or hard specimens. It is particularly useful in
yielding cells in hard scirrhous tumors and poorly cellular and fibrous tumors such
as spindle cell tumors (Fig. 2.16).
2
Gross Examination of Tissues in the Frozen Section Room
33
Fig. 2.15 Touch preparation (a) after blotting the excess blood from a freshly cut surface; touch
the tissue to the slide and immediately fix the slide in 95% EtOH or Air dry. (b) The slide with
visible imprint. (c) Stained slide (Diff-Quick stain)
Crush preps – Preparations can be made from tiny soft specimens that cannot
be scraped or manipulated for a touch prep and are particularly valuable in the
interpretation of brain biopsies where cytoplasmic processes and discohesive cells
offer important clues. A small speck of a core biopsy can be sampled for adequacy
using a crush preparation. Crush preps yield very little in hard fibrous tissues.
While crushing the tissue, do it in a controlled manner and observe the ease with
which the tissue crushes. The tissues will exhibit properties ranging from nearly
that of a liquid to pasty to firm, leathery, rubbery, or bony. These properties can
give you insight into the diagnostic categories. For instance, when faced with the
a differential diagnosis of schwannoma vs. menengioma, I have found that most
menengiomas (with the exception of more fibrotic variants) will smear to some
degree where as most schwannomas were like smearing a rubber band. With rubbery tissues you can try crushing it harder but it will often have very low yield
(Fig. 2.17).
34
S.R. Peters
Fig. 2.16 (a) Scrape the edge of the slide on the tissue face. (b) Smearing the scrapings on a
second slide. (c) Stained preparation (Diff-Quick stain)
2
Gross Examination of Tissues in the Frozen Section Room
35
Fig. 2.17 Crush preparation. (a) Place a sample of tissue on the slide. Tissue can be less than a
millimeter in diameter and not larger than 2 mm. (b) Place the second slide in smearing position.
Gently apply slight pressure to the tissue watching the effect of the crushing on the tissue and
being careful not to overcrush the tissue. (c) Smear the tissue and immediately fix the slide in 95%
EtOH. (d) Smeared tissue on the slide. (e) Stained preparation (Diff-Quick stain)
Chapter 3
Embedding of Tissue for Frozen Section
Stephen R. Peters
Abstract Embedding of tissue for frozen sectioning is a vital step in the preparation
of tissue for intra-operative consultation. In many cases, this task needs to be
performed with great precision or risk suboptimal interpretation and loss of precious tissue. Traditional forms of face up and face down embedding techniques are
described along with potential sources of difficulty. The Precision Cryoembedding
System, a series of highly precise face down embedding techniques developed
by the author is discussed in detail. The system capitalizes on the physical property of tissue to adhere to freezing temperature metal. On face, on edge and on
point embedding can be accomplished with ease using a number of approaches.
Advantages include high precision, speed, minimal tissue wastage and reduction of
freeze artifact. Techniques include face down embedding using freezing temperature steel well bars, paper embedding, cut off technique, plastering techniques and
frozen block cryoembedding.
Keywords Boats • Book • Chuck • Chunked out • Dispensing slides •
Embedding • Embedding shelf • Face down cryoembedding in well bars • Face
down embedding • Face up embedding • Filling the well • Freeze artifact • Frozen
block cryoembedding • Cutting board • Freezing griddle • Handle • Launch
pad • Liquids • Multiple specimens • On face embedding • On edge embedding
• On point embedding • Over-chuck freezing block • Paper embedding • Parallel
faces • Membrane rolls • Plastering technique • Pre-freezing tissue • Freezing
time • Snap freezing • Specimen stage • Super flat embedding • Cut off
technique • Gouge technique • Precision cryoembedding system • Well bars •
x–y orientation
S.R. Peters ()
Department of Pathology University of Medicine and Dentistry of New Jersey
Pathology Innovations, LLC, 410 Old Mill Lane, Wyckoff, NJ 07481, USA
e-mail: [email protected]
S.R. Peters (ed.), A Practical Guide to Frozen Section Technique,
DOI 10.1007/978-1-4419-1234-3_3, © Springer Science + Business Media, LLC 2010
37
38
3.1
S.R. Peters
Traditional Embedding Techniques
Now that we have taken our gross sections our next step is to embed the tissue.
As in paraffin embedding, our goal is to embed the tissue in a medium which will
fix the tissue to a chuck (or specimen holder) in the optimal position for microscopic
examination. Unlike paraffin embedding which requires a lengthy processing step
prior to embedding, in preparing slides by frozen section our processing is accomplished simply by freezing the fresh tissue. Traditional processing in paraffin embedding requires sequential infiltrations by formaldehyde, alcohols, xylene and paraffin
so that our resulting tissue cuts with the consistency of solidified paraffin. Hardening
the tissue to this paraffin-like consistency allows the tissue to cleanly shave into
slices in the range of microns. In frozen section, the simple process of freezing the
tissue will allow it to shave into slices as thin as a few microns. Fortunately, this
processing works well with most tissues but as we will see later in Chap. 4, tissues
containing mostly or all fat will remain soft at ideal cutting temperatures creating a
host of difficulties.
Embedding tissue for frozen sectioning consists of freezing the tissue in precise
position within a block of embedding medium which attaches the tissue to a chuck
or specimen stage. Commercially available embedding media are viscous aqueous
solutions of polyvinyl alcohol and polyethylene glycol designed to freeze and easily section at optimal cutting temperature. These media adhere well to most tissues
and provide a frame that adds stability to the section. The specific position in which
the tissue is to be embedded will be dictated by the microanatomy and the optimal
plane to examine that tissue under the microscope.
First, let’s consider typical rectangular section of tissue. Such a piece will have
two broad faces and four narrow edges. In most cases, embedding is carried out on
face or on edge. Figure 3.1 illustrates on face and on edge embedding using face
down embedding technique in well bars.
On face refers to embedding the tissue so that one of the two broad sides of the
section is the face of the prepared block. On edge refers to embedding the tissue so
that one of the four narrow sides or edges of the tissue is the face to be embedded
and sectioned. The resulting slide will show a cross section of the tissue block on
microscopy. On edge embedding often requires standing the tissue on its edge and
can present challenges with small specimens. The orientation will be dictated by
the specific tissue, and questions we are hoping to answer.
3.1.1
Face Up Embedding
All cryostats offer a simple system for face up embedding. Typically, tissue is
placed face up on the chuck and covered with embedding medium. The chuck is
placed on a designated freezing surface or bar in the cryostat. After a period of
partial freezing, a weighted heat extractor can be placed on the top of the chuck to
flatten the tissue surface into a plane and complete the freezing process Fig. 3.2.
Fig. 3.1 (a) On Face embedding. In this example of face down embedding, the tissue is embedded with its broad face down on the well floor of a well bar. Using face up embedding the broad
face is would be up; In both the cases, the broad surface will be visible under the microscope. (b)
On-edge embedding. The illustration show the yellow tissue embedded by standing it on its narrower surface. The cross section of the edge will be visible under the microscope
Fig. 3.2 Face up embedding. (a) Tissue is placed on top of a layer of embedding medium a top a
chuck. (b) Embedding medium is applied liberally over the chuck surface. (c) The cryostat heat
extractor is placed on top of the tissue flattening the surface into a plane. (d) The completed block
40
S.R. Peters
When embedding face up, there are several potential sources of difficulty. If the
tissue is not uniform in thickness, the embedded surface will not be in a uniform
plane parallel to the chuck face. On trimming, one will have to waste considerable
tissue before reaching the desired tissue face in its entirety see Fig. 4.7. If multiple
fragments of tissue of different thicknesses are placed on the chuck, we will have
to trim across the thicker pieces before reaching the thinner pieces again wasting
considerable tissue. The weighted heat extractor can serve to flatten the tissue
closer to a desired plane. Unfortunately, the plane achieved is often not parallel to
the chuck face and may require x–y adjustment to prevent unnecessary loss of
tissue.
Some cryotomists will first prepare the chucks by applying a layer of embedding
medium and placing on the heat extractor to create a flat surface. This serves to
create a more uniformly flat layer than the initial chuck face and allows for a more
uniform working surface. This is particularly helpful when handling small biopsies
such as core biopsies or trying to stand tissue on edge. Unfortunately, in a very busy
practice, it can be hard to keep up with the prepared chucks. It is helpful to have a
good supply of chucks if you use this technique in a busy setting Fig. 3.3.
3.1.2
Pre-freezing Tissue
Before arriving at the system of face down embedding to be discussed later in the
chapter, I found I was able to improve my results with some tissues by first freezing
the specimens as a whole. This was particularly useful in skin specimens. By first
lightly freezing the tissues, I was able to cut more precisely flat pieces that were
easier to position or stand on edge. In fact, it was this practice that lead to the idea
of frozen block cryoembedding.
3.1.3
Face Down Embedding
Face down embedding refers to freezing the tissue face down similar to the way
tissues are embedded in paraffin. The desired tissue face is frozen in position face
down in a mold or on any freezing surface. The great advantage of face down
embedding is that the tissue face which we will be cutting, freezes in a single flat
plane. The surface will require less trimming and wastage of tissue before the entire
tissue face is available for sectioning.
One traditional method of face down embedding of frozen section tissues has
been performed using disposable plastic molds, sometimes referred to as boats.
Tissue is placed on the floor of a mold which is then filled with medium. The chuck
is then placed over the mold and freezing is accomplished by placing the filled well
on the cryobar of the cryostat or by snap freezing in super-cooled liquids such as
3
Embedding of Tissue for Frozen Section
41
Fig. 3.3 Face up embedding on a chuck with a prepared flattened base of frozen embedding medium.
(a) A layer of embedding medium is placed on the chuck. (b) A heat extractor is placed over the embedding medium. (c) The chuck with a flattened layer of embedding medium. (d) Tissue is placed on top
of the prepared block face. (e) Embedding medium is applied to the tissue. (f) The completed block
42
S.R. Peters
Fig. 3.4 Face down embedding in plastic molds. (a) Tissue placed on the floor of the plastic mold
and covered with the embedding medium. (b) A chuck placed on top of the filled mold. (c) The
completed block
isopentane immersed in liquid nitrogen. One manufacturer offers cutouts for these
plastic molds on their cryostat freezing bar to accommodate these molds. The prepared block will be embedded in a flat plane approximating the floor of the mold
Fig. 3.4.
Face down embedding can also be performed on any flat freezing temperature
surface simply by freezing the tissue into position on the flat cold surface covering
the tissue with embedding medium and fixing the tissue to a chuck. There are many
individuals using variations of this technique. Some will freeze the tissue flat by
pressing it against a freezing surface such as a heat extractor and then placing the
pre-frozen flattened tissue face up on a chuck. If you are using freezing cold chucks
with a particularly good gripping surface, you can simply freeze the tissue on a freezing cold surface, cover it with embedding medium and press on a cold chuck. A sharp
tap with a hard object will free the chuck. See Chap. 9 for more on snap freezing.
3.2
Face Down Cryoembedding in Well Bars: The Precision
Cryoembedding System
Over the course of a career all cryotomists are faced with embedding tasks that
require great precision to even approximate the desired information. Many such
cases require accuracy which is simply not possible with conventional methods.
Our results are suboptimal more often than we would like to admit. Repeatedly
frustrated by seemingly impossible tasks, I was inspired to begin experimenting
with techniques to better handle these difficult cases. The result was development
of a system of apparatus and techniques to embed tissue face down in wells precision machined into a bar of stainless steel (Peters 2003a). The well bars are kept at
freezing temperature in the cryostat or freezer. There is a simple physical principal
which gives the well bars nearly unlimited precision. The tissue adheres to the
freezing temperature metal. It is common knowledge that if you touch your tongue
to a metal flag pole at freezing temperature, it will stick to the pole in a most embarrassing way. It is this same physical property that allows the tissue to easily adhere
3
Embedding of Tissue for Frozen Section
43
to the well floor in any position either flat or on edge. Using these methods, tissues
freeze significantly faster than conventional methods and require no monitoring
during the freezing process. Multiple blocks can be prepared rapidly. The blocks
are prepared with the entire tissue face in a precisely flat plane; requiring minimal
trimming and resulting in little tissue wastage. It is my hope that this book will help
disseminated these techniques which have served so well our practice. Apparatus
for the Precision Cryoembedding System can be purchased through Pathology
Innovations LLC, Wyckoff NJ www.pathologyinnovations.com.
3.3
3.3.1
Apparatus
Embedding Well Bars
These 1 inch thick bars of stainless steel have wells machined precisely flat into one
surface. All machining is performed to a precision of 1/1000th of an inch. These bars
are kept at freezing temperature in the cryostat. This substantial piece of steel acts as
a heat sink to rapidly draw heat from the tissue. The colder the bars are kept, the faster
they will freeze. Between temperatures of approximately –5°C and –40°C the tissue
will adhere into place when touched to the well floor. Well bars are available in a
variety in sizes and depths to accommodate a wide variety of sample sizes Fig. 3.5a
3.3.2
Chucks
These chucks are made of stainless steel and are designed to be used cold and act
as a heat extractor for rapid freezing. The faces are designed with a deep waffle
pattern to maximize the gripping power required to hold the embedded tissue block
while allowing for extrusion of excess medium. The stem of the chuck provides the
focal point for a sharp tap resulting in an easy release of the block from the well.
These chucks fit many of the major brand cryostat and can be used in most cryostats
with the use of an adaptor. Chucks can also be used warm with the use of the overchuck freezing block (see below) Fig. 3.5b.
3.3.3
Over-chuck Freezing Blocks
These steel rectangular blocks are tools useful for a number of tasks. They serve as
heat extractors, designed to fit over the stem of the chuck. The freezing block also
serves as a dislodging tool. A sharp tap of the chuck stem cleaves the plane of adhesion holding the formed block to the well floor. These blocks also function as convenient hand held flat freezing surface useful in gently cooling the tissue without the
use of sprays or to rapidly freeze embedding medium during plastering (see Chap. 4).
The flat surfaces can also be used as extra heat extractors when using conventional
cryostat embedding technique or as a stand for stemmed chucks Fig. 3.5c.
44
S.R. Peters
Fig. 3.5 Apparatus of the Precision Cryoembedding System. (a) Well bars (from top to bottom):
30 mm well bar; 24 mm well bar; 18 mm well bar. (b) Chucks or specimen stages. (c) Over-chuck
freezing block. (d) Dispensing slides. (e) The interior of a Leica 1,850 cryostat accessorized for
the use with the Precision Cryoembedding System. The embedding shelf (foreground), well bar
storage platform (left) and chuck bin (right) are labeled
3
Embedding of Tissue for Frozen Section
3.3.4
45
Dispensing Slides
These thin transparent vinyl slides serve as a surface to precisely orient the tissue into
the desired position and accurately transfer the tissue to the embedding well floor.
Tissue is applied face down to the end of the transparent slide, where it can be visualized from below and manipulated into position. The face that is visible will be laid onto
the well floor and will ultimately be the embedded surface to be sectioned Fig. 3.5d.
3.3.5
Embedding Shelf
The removable shelf seen in Fig. 3.5e, can be installed below the opening of the
cryostat in the most convenient and ergonomically comfortable location available.
If the user chooses not to install a shelf, or if the cryostat does not accommodate
a shelf, the embedding well bars can be placed on the brush holder, stage or other
convenient place in the cryostat for the embedding process. Bars can be stacked to
increase their elevation. Well bars can be removed to the work bench for the short
time it takes to embed, but should not be left out for prolonged periods to avoid
warming. If the setting calls for repeated or prolonged removal of well bars from
the cryostat, it would be best to set the cryostat a bit colder in the range of −27°.
Figure 3.5e shows the inside of one of our Leica 1,850 cryostats with additional
accessories which make the cryostat more accommodating. The picture shows the
well bar platform which transforms the left side of the cryostat into an open garage
to accommodate multiple well bars. A chuck bin is designed to fit into the space on
the right side to store and segregate our cold clean chucks.
3.4
Face Down Cryoembedding in Well Bars: Technique
(a) Place a drop of medium at the end of the dispensing slide.
(b) Gently glide the end of the slide over a paper towel.
(c) A thin uniform layer of medium on the end of the slide is our goal.
(d) Place tissue FACE DOWN on the dispensing slide
(e) Look through the underside of the slide while adjusting the tissue so that
the desired surface is visible in position.
(f) Touch the leading edge of the tissue to the well floor. It will adhere. First,
consider the best ositioning of tissue in the well. How will it fit best? How do
I want the tissue to meet the blade?
(g) Pull the dispensing slide out from under the tissue.
(h) Tissue requiring precise positioning can be flattened or manipulated and
guided into the desired position by carrying out this step slowly and carefully.
(i) Fill the well so that a meniscus of medium is bulging above the brim.
(j) Press a COLD chuck over the well as quickly as possible.
(k) An over chuck freezing block can be placed over the chuck to speed
freezing.
(l) After a period of freezing, remove the block with a sharp tap to the chuck
stem using the over-chuck block.
Fig. 3.6 (continued)
3
Embedding of Tissue for Frozen Section
47
(m) The face of the prepared block. The arrow shows retraction of
embedding medium away from the tissue at the block surface which will
require plastering in our next step.
(n) Apply a drop of embedding medium to the block face.
(o) Press the block to the stage (or any freezing bar) of the cryostat for a
second. The block can be released with a tap.
To finish the block, the shallow defects are repaired by a technique I call plastering,
shown in figures n, o, and p and discussed in detail in Chap. 4.
(p) The finished block is skim coated with medium, filling any defects.
(q) The trimmed block with all pieces easily reached in the same plane.
(r) Micrograph (20× magnification)
Fig. 3.6 Face down Cryoembedding in Well Bars Preparing the dispensing slide
Freezing time. It is recommended that well bars be kept at cryostat temperatures
of −24° or colder. The bars should be kept at a convenient low point in the cryostat
where the temperature will reflect the cryostat setting. As one gets more experienced
at estimating freezing times, the freezing time can be shortened by lowering the
temperature. I usually keep our cryostats at −27°C, however on very busy days,
I have functioned nicely at cryostat temperature as low as −31°. The down side of
keeping the cryostat very cold is that we are at the risk of starting with a very cold
48
S.R. Peters
block far out of range if we do not get the block out on time. As we will learn in
Chap. 5, adjusting the block to ideal cutting temperature plays an important role in
achieving our best sections. If faced with a block of −31°, one will have to be very
diligent in re-warming the block with the thumb or suffer a shattering ride through
the tissue.
Approximate freezing times with bars and chucks at −24°C:
18-mm well – 20 s
24-mm well – 35 s
30-mm well – 60 s
When the extruded beads of medium are frozen, the freezing is nearing completion. If the block is removed a bit early, the over-chuck freezing block can be
pressed to the tissue face for intervals of a few seconds until the block cuts optimally just beyond the crumple stage. I consider this as the ideal temperature to cut
most tissues. Tissue sections will lie flat, without curling or shattering just beyond
the temperature of this crumple stage. The cutting behavior of tissues at different
temperatures is discussed in Chap. 5. Freezing will take longer at warmer cryostat
temperatures; if the bar is allowed to warm; if the chuck is warm; or if the tissue is
very thick.
Do not try to trim any block embedded by any technique unless the embedding
medium has turned completely white. If there is a grayish cast to block, the medium
and tissue are not completely frozen. The medium will not firmly hold the tissue,
and when not completely frozen the tissue will not shave. Rather any fibrous elements in the tissue will resist cutting and result in the unfrozen tissue being pulled
from the block. This dilemma is known as having the tissue chunked out. Unless
the cryostat has been cleaned of all shavings prior to starting, there will be little
hope of retrieving the tissue without contamination if at all. This is one situation
where meticulous cryostat hygiene can be a savior.
3.5 Face Down Cryoembedding in Well Bars – The Elements
in Detail
3.5.1 Use of the Dispensing Slide
These simple transparent vinyl slides provide an easy way to precisely place tissues
in the embedding wells. The slides allow precise placement in any orientation to the
desired site on the well floor. They also act as a conveyance to carry tissue to the
cryostat. These are best kept conveniently in a container or jar next to the cutting
board. It is handy to keep an absorbent pad or open paper towel in reach of the
cryostat to place the slides on when loaded with a specimen. I call this a launch pad.
If the cryostat is a distance from the cutting board it would be useful to have a small
tray to place the loaded slides on.
There are two different sized slides. Each with two different sized tips. Use the
tip which best accommodates the tissue and well size.
3
Embedding of Tissue for Frozen Section
3.5.2
49
Application of Embedding Medium and Tissue
A thin layer of embedding medium coats the end of the dispensing slide. This coating of medium is an essential step and must not be overlooked. The film of medium
will create a clean plane of separation between the tissue and the well floor and will
prevent sticking of any tissue residue. We start with a drop of embedding medium
at the end of the slide and then gently glide the drop over a paper towel. This produces a thin uniform layer of medium on the dispensing slide which will give us
the flattest surface when embedded Fig. 3.5a–c.
Place the tissue at the end of the slide. Orient the tissue so that the most important aspect can be addressed optimally. You can first address a critical margin or
particular edge of the tissue by having it touch the well floor first. It may be better
to have the critical area such as the epidermis of a thin strip of skin leave the slide
longitudinally and slowly pressed into position as in the above pictorial Fig. 3.5d.
The dispensing slides also provide a means of transporting the tissue to the cryostat. The embedding medium provides a degree of adhesion of tissue to the slide
and so it will not easily fall off if handled gently. Support the tissue when inverting
heavier pieces more than 3 mm. thick.
3.5.3
Super Flat Embedding
Tissues that are very thin need to be embedded in the flattest possible plane and at
optimal x–y orientation in order to achieve the entire tissue face in a section without
first exhausting any part of the tissue. Examples include thin core biopsy specimens,
very thin sheets of tissue, and multiple tiny specimens. To embed tissues in the flattest
possible plane, use a very thin and uniform layer of embedding medium on the dispensing slide. A thick and irregular coating of medium will end up as an irregular layer
of frozen medium on the face of the tissue. On sectioning the tissue face will be further
from our ideal flat plane. For a random chunk of a tumor this is of no consequence, but
if you want to section four core biopsies and have all four left for permanent sections,
we need to embed the tissues as close to a uniform flat plane as possible. In order to
cut very thin tissues in single plane, the block holder must be in the optimal x–y orientation. Adjustment of x–y orientation is discussed in Chaps. 1 and 4.
3.5.4
Looking Through the Dispensing Slide
While looking through the back of the slide, adjust the tissue into the desired position.
Make sure the desired surface is visible. Particularly, check that an inked margin
surface has not folded under the tissue. If you are doing Mohs surgery, make sure
the epidermis is visible and not folded under Fig. 3.6e.Fig. 3.6 (continued)
S.R. Peters
50
3.5.5
Flimsy Tissues and Friction
When very flimsy loosely adherent membranous tissues are moved along the slide,
friction will create a tendency for the flimsy parts to be dragged out of position or
run beneath the specimen. If the flimsy aspect is a critical part of the tissue such as
a margin of a breast biopsy, position the tissue such that this flimsy aspect is right
at the edge of the slide, or have it come off the slide longitudinally and manipulate
this flimsy aspect into position. With flimsy tissues, precision can be maximized
using paper embedding technique (see below).
3.5.6
Dealing with Multiple Samples
As in all of the complicated multi-step tasks we perform, it is best to create a
specific routine to handle multiple specimens and adhere to it. This will help to
minimize errors. When using multiple slides for multiple specimens, place them
in order on your launch pad so that you will not confuse the specimens. See
Fig. 3.7. The dispensing slides can be labeled with a marker if confusion is a
consideration. If you’re working in a small sub-optimal space (like so many of us)
it is a good idea to have pre-labeled areas on the launch pad or a labeled tray to
place the slides. Always use a separate slide for different specimens to avoid
cross contamination. Multiple samples from a large tumor can be placed together
on a single slide.
Fig. 3.7 Launch Pad. A paper towel with multiple loaded dispensing slides lined up in order prior
to embedding
3
Embedding of Tissue for Frozen Section
3.5.7
51
Use Your Imagination
The dispensing slides allow for a lot of creativity. The thick embedding medium
offers support to fold tissues, stand them on edge, or make membrane rolls that
stand nicely on edge when pulled off the slide. Try experimenting with different
tips on the slides. They can be cut easily with a scissor. You may find it useful to
have one with a finer point for tiny biopsies. Using the narrow tipped slides allows
a great deal of articulation within the larger wells. Tissues can be neatly arranged
or maneuvered in a variety of situations. Figure 3.8 shows how a long strip of tissue
can be rolled on the dispensing slide to make a jelly roll.
3.5.8
Placement of Tissue in the Well
Choose a well that will fit the tissue while leaving space for a rim of embedding
medium surrounding the tissue. I will refer to this rim of embedding medium as the
handle. The handle gives brush users a leading edge to grab with the brush instead
of the tissue. This handle provides a margin of error before the blade meets the tissue so if there is curling and flipping at the beginning of the section it may not
involve the tissue. A good handle will act as a frame of frozen medium to support
tissues with less structural integrity such as necrotic and fatty tissues helping to
prevent the section from smearing or crumbling. Consider how the tissue will fall
when it is placed in the well so that you avoid overlapping the tissue on the edge of
the well. The dispensing slides make this quite easy. Just look through the slide as
it’s placed over the well and you will see if and how it fits Fig. 3.6e.
To begin, touch the leading edge of the tissue to the well floor. It will adhere in
place to the floor. See Fig. 3.6f. Next, we slowly pull the dispensing slide out from
under the adherent tissue much like pulling a spatula out from under a pizza placed
in an oven. We can do this slowly or quickly depending on the precision required. As
the tissue leaves the slide, using a forceps, guide the tissue to adhere in the desired
position. When performing a highly difficult task it may make it easier to use a larger
Fig. 3.8 Jelly Roll on the dispensing slide. (a) A strip of skin about 6 cm long. (b) The skin
wound into a jelly roll to be transferred to the well floor. (c) The completed block
S.R. Peters
52
size well. The extra room in the well allows the dispensing slide to be held at a lower
angle making it easier to manipulate the tissues in precise position.
3.5.9
Using Forceps to Embed
Certain tissues can be embedded using forceps alone. Tiny biopsies can be easily
placed in position on the well floor. A stiff piece of tissue can be held with a forceps
and stood on edge by adhering it to the well floor. If you try to embed flimsy tissues
with a forceps, they will be less manageable than with the dispensing slide. When
placing large pieces of tissue approaching the size of the well with forceps, you will
find the tissue adheres where ever you touch the tissue including places you don’t
want it to. Adherent tissue can be pushed off with the forceps when this happens.
The dispensing slides make these larger pieces much more manageable.
3.5.10
Standing Tissue on Edge and on Point
Due to the cohesive nature of the freezing temperature steel, it is possible to stand thin
tissues on edge or vertically on point. The tissue must be firm enough to support its own
weight when standing. Tissue can be held with a forceps, touched to a drop of embedding
medium and touched to adhere to the well floor. Similarly, a cylindrical or pyramidal
portion of tissue can be dipped in embedding medium and stood vertically by touching
the wetted tip to the well floor and holding it for a second to freeze in place Fig. 3.9.
Fig. 3.9 Embedding on edge and on point (a) Holding the tissue with forceps, the edge of the
tissue which has been wetted with embedding medium is touched and adhered to the well floor.
(b) Tissue frozen into position on edge on the well floor. (c) Trimmed frozen section block of on
edge section showing both epidermis and margin (inked black). (d) Forceps standing a triangular
portion of skin on-point on the well floor. (e) Skin frozen into position. (f) Trimmed block showing a cross section of the skin point
3
Embedding of Tissue for Frozen Section
53
Fig. 3.10 Petals. This still life picture is created by standing flower petals and leaves on edge as
in Fig. 3.8a
This technique can be used to stand cores up to make microarrays and stand up
the pointed “tip margins” in skin biopsies. These tissues must be firm enough to
support its weight. Tissues can be made firmer to stand on point by pre-freezing the
tissue or taking the sections from frozen tissue. This can be accomplished on any
freezing temperature surface.
The still life picture in Fig. 3.10 was created by standing small pieces of flower
petals on edge.
3.5.11
Use of the Flattening Forceps
Our system offers a useful pair of 7 inch angled forceps called flattening forceps.
These forceps have a blunted end bent at a 60° angle that functions as a flattening
iron. In Fig. 3.11, this large flat portion of skin can be ironed flat over its broad
surface with use of this simple tool.
3.5.12
Filling the Well with Medium
The well must be filled to the brim so that the medium bulges above the level of the
surface of the bar. The medium must engages the channels in the chuck face in
54
S.R. Peters
Fig. 3.11 Ironing a large portion of skin with the flattening forceps. Figure (a) shows a 2 × 2 cm
portion of skin at the end of a wide dispensing slide. (b) The leading edge of the tissue is pressed
to the well floor with the flattening forceps. (c) As the dispensing slide is pulled out from under
the tissue, the bottom of the forceps is used like an iron to press the tissue flat to the well floor as
it comes off the dispensing slide. (d) The completed block showing uniformly flat surface
order to solidly bind the chuck. If the well is under filled the chuck will not adhere.
Overfilling the well is not a problem as the excess medium will be extruded out the
grooves in the chuck.
3.5.13
Parallel Faces
The well bar is machined in a such a manner that the base of the well is parallel
to the surface of the bar. When the chuck is placed flush over the well, its surface
is parallel to the well base. Therefore, the surface of a perfectly prepared block
3
Embedding of Tissue for Frozen Section
55
will have its tissue face parallel to the chuck face. I will use the term parallel
faces throughout this text to describe this relationship of tissue face and chuck
face. Figure 8.6 illustrates the problems arising if chucks are prepared deviating
from having parallel faces in a Mohs surgery specimen. In tissues that are very
thin or contain thin structures that can be easily trimmed across, we will be most
successful if we maximize this parallel relationship of chuck and chuck face. This
is accomplished by applying the chuck flush to the well bar surface as quickly as
possible when the well is filled so that the excess medium is extruded before
freezing. We also need to fill the well as precisely as possible. When copious
amounts of embedding medium overflow the well, there is more likely to be a
slight loss of the parallel relationship of the chuck and block face. This parallel
relationship can be maximized by using just enough embedding medium to fill
the well and form a meniscus that bulges above the surface of the bar. In this situation, there will be minimal extrusion of medium and the chuck can be quickly
placed very flush to the surface of the well bar. Using a large chuck on a smaller
well will help accomplish this task. This parallel relationship of the block face
and chuck face is most important if the chuck holder is stationary. As you develop
a sense for filling the wells just right, and have a precisely adjusted cryostat, all
of your chucks will approach the blade at the same angle. Trimming will be minimal and quite fast.
3.5.14
Use of the Over-chuck Freezing Block
If the chucks are used cold, placing an over-chuck freezing block is optional. Well
cooled chucks have the freezing power to freeze the blocks without the over-chucks
blocks. When using the extra large and deep wells the freezing process will be
aided by placement of the over-chuck blocks. If the chucks are used warm, the overchuck block is mandatory to cool the chuck and freeze the block.
3.5.15
Releasing the Block
Holding the top of the over-chuck freezing block, give the chuck stem a sharp quick
tap. This will break the bond holding the block to the well bar Fig. 3.6l. If you try
to pull the blocks up by hand, you will be surprised at how firmly the forces hold
the block. Try to avoid slow week taps as this can hammer off the chuck off of the
block while the block remains fixed to the well floor. If the chuck comes away from
the block it is because the medium has not engaged, adhered to or has been broken
away from the grooves in the chucks. Causes include: The well was under filled and
the medium never made it to the channels; the chuck was used warm without a heat
extractor; the chuck was removed too early; the chuck was covered in oil or alcohol;
or the chuck was hammered off the block with weak taps.
56
S.R. Peters
To fix the separated block, add a generous application of embedding medium
over the frozen filled well and place a new cold chuck over the well. Remove the
block with a sharp tap after a period of freezing.
3.6 Reducing Freezing Artifact
Freeze artifact refers to morphologic variations in the microanatomy that result from
ice crystal formation as water freezes in the tissue. Artifacts will be much more
prominent in tissues having high water content. Rapidly freezing the tissue will
reduce freeze artifact by formation of vitreous ice crystal which result in less artifacts microscopically. Freeze artifact will be discussed in greater detail in Chaps. 7
and 9. For the purpose of this discussion, there are several ways we can reduce freeze
artifact by speeding the freezing process using well bars to freeze the tissue.
3.6.1 Colder Well Bar Temperature
I suggest new users start with well bars at –24°C. At this temperature, there is less
tendency to over cool the block while the user is getting used to estimating the freezing times. As one gains experience, the bars can be used at colder temperatures. At
–27 to −30°C, the freezing is more rapid and artifact is considerably reduced.
3.6.2 Pre-chilling Tissue
The tissues we receive in clinical practice are usually somewhere between body
temperature and room temperature and often quite warm to the touch. We can considerably reduce the time it takes to freeze the tissue if we start the freezing process
with the tissue chilled to 3°C rather than 37°C. Pre-chilling can be easily accomplished on any small piece of metal or ceramic kept in the refrigerator. Place the
tissue on the cold surface for a few seconds on each side to bring the tissue temperature closer to freezing temperature before placing the tissue in the well.
3.6.3 Cold Embedding Medium
Using well bars, the tissue face rapidly begins freezing on touching the well floor.
Small pieces will essentially completely freeze in the first few seconds. However,
the tissue is re-warmed when we fill the well with warm embedding medium. By
using refrigerated embedding medium we will prevent re-warming, complete the
freeze considerably faster and reduce the freeze artifact. If it is possible to locate a
refrigerator next to the cryostat, using cold embedding medium is no inconvenience
at all. When embedding tissue that has been snap frozen always prepare the blocks
using cold embedding medium to prevent melting of the block and introduction of
freeze artifact.
3
Embedding of Tissue for Frozen Section
57
Fig. 3.12 Liquids (a) A few drops of embedding medium being stirred into curettings in a spoon.
The tissue is then scraped from the spoon into an embedding well. (b) Completed block containing
a three dimensional layer of the curettings
3.6.4
Freezing Semi-liquid Samples
Soft, partially liquid specimens such as uterine curettings can be prepared into three
dimensional blocks using well bars to freeze the tissue. Keep a household teaspoon
to scrape up these specimens off of the Telfa pad or whatever surface they are
received on. Very bloody or water density specimens often shatter when cut because
they get icy hard on freezing. We can decrease the shattering considerably by stirring in a small quantity of embedding medium in the spoon before putting tissue
into the well. Tissue can be scraped off of the spoon into the well using the narrow
tip of a dispensing slide Fig. 3.12.
3.6.5
Embedding Snap Frozen Tissue Samples
Embedding of snap frozen samples can be accomplished easily and precisely using
deep well bars designed for research applications. Well bars designed with wells of both
6 mm and 9 mm depth will accommodate most snap frozen samples. The pre-frozen
tissue can be adhered into desired position by applying a drop of embedding medium
to the surface to be embedded down and touching it to the well floor. Fill the well with
cold embedding medium to avoid warming of the tissue and apply a cold chuck.
3.7
The Cut Off Technique
At times, the task of grossly cutting a 3 mm. section for embedding can be quite
difficult due to the softness of the tissue or the irregularities of the anatomy. If possible we do not want to freeze tissues much thicker than 3 mm. if it is not necessary
58
S.R. Peters
because the thicker tissue will slow the freezing time and increase freezing artifact.
The cut off technique begins by placing a thick portion of tissue on the well floor
which will be held fixed by the bond of the freezing temperature steel. By fixing the
tissue to the well bar floor we can easily cut across the tissue in a uniform plane using
the well bar surface as a guide for the scalpel. Figure 3.13 shows the example of taking a section from the margin of a 1 cm segment of ureter. Cutting the margin off
freehand with a scalpel often results in displacement and telescoping of the mucosa.
Using the cut off technique, the margin is placed face down on the well floor as the
segment is stood vertically. The remaining ureter can be cut away at the surface of the
well bar leaving a clean 3.5 mm section; the depth of the well bar. Another useful
application is taking a section of bronchial margin. Cutting a three of four millimeter
Fig. 3.13 Cut off technique using a mock up of a ureter margin. (a) Wet the surface of the tissue
with medium. (b) Holding the tissue with a forceps adhere face of the tissue to the well floor. (c)
While holding the tissue upward with a forceps cut the tissue off with a scalpel blade using the
well bar surface as a guide. (d) Fill the well and apply the chuck
3
Embedding of Tissue for Frozen Section
59
Fig. 3.14 (a) Cut off technique of a quarter of the cervix with attached vaginal margin (arrow). Check
the section by looking through the dispensing slide. (b) The desired margin is placed face down on the
well floor. (c) Cut across the tissue using the surface of the bar as a guide. (d) Trimmed section after
the cut off. (e) The trimmed block showing complete cervical and vaginal margin (arrow)
shave margin off the bronchial margin is not always easy because the various structures at the hilum are in a multitude of planes. By taking all of the hilar structures in
a thicker piece, then pressing it margin down on the well floor the hilar structures will
adhere together in a single plane. The excess tissue can be cut away with a sharp
scalpel at the face of the well bar using the surface of the well bar as a guide.
The tissue being cut away must be held upward with the forceps to avoid tissue
sticking to the well bar surface. Make sure your blade is sharp and use a gentle
slicing motion with the scalpel. This technique will allow easy trimming of a 3 mm
section with very soft tissues. If you find yourself cutting into heavily calcified tissue you can finish the cut with a sturdy scissor Figs. 3.13 and 3.14.
3.8
Plastering Technique
Plastering is a very simple and rapid way to repair defects in the face of the prepared block. When embedding tissues very flat with a very thin film of embedding medium on the dispensing slide, there will be a slight retraction of medium
60
S.R. Peters
away from the tissue. If one needs to take a section with minimal trimming (in
the first few hundred microns), the retraction space must be plastered with
medium. Figure 3.6n–p. If we skip this step, when the section is cut the tissue will
separate from the medium. This will make it difficult to get an intact section
without having the tissue curl away from the medium (see Chap. 4). The actual
depth of this retraction is quite shallow and in thicker specimens it is reached
quickly during superficial trimming requiring no attention. Very thin specimens
should be plastered before trimming to avoid curling away. Defects seen around
tissue pieces prepared by frozen block cryoembedding will also require plastering
so we can begin cutting on a completely flat surface. Plastering can also be used
to repair defects caused by removing sutures or staples that find their way into the
Fig. 3.15 Plastering technique and suture removal. (a) Extract the suture by grasping the suture
with a hemostat or forceps and rolling tip of the instrument. (b) Apply embedding medium to the
defect. (c) Press an over-chuck freezing block to the chuck face to freeze the medium. (d)
Trimmed block showing the filled defect
3
Embedding of Tissue for Frozen Section
61
block. If the block is already in the chuck holder it may be best not to remove it
for plastering in order to avoid unnecessary trimming and tissue wastage. We can
plaster the block while it is still in the chuck holder by applying medium to the
defect using a slide or other flat applicator as one would use a putty knife. Freeze
the medium by pressing an over-chuck freezing block against the block face
Fig. 3.15.
3.9
Paper Embedding
Paper embedding is a face down embedding technique which employs a small piece
of lens paper to transfer tissues to the well bars in precise position. It allows accurate orientation using the most flimsy tissues or complex arrangements of tissues
(Peters, Fitzgerald et al 2003).
The lens paper is wetted with medium on both sides and then placed at the end
of a dispensing slide with a 2 mm tab of paper overlapping the end of the slide.
Excess medium is pressed out of the paper with the back of a forceps so that the
paper is applied flat to the dispensing slide. Tissue is then placed in position on the
paper. The paper and tissue are transferred in position to the well floor by touching
the tab of paper to adhere to the well floor. The tissue is transferred to the well floor
by pulling the slide out from under the paper Fig. 3.16.
(a) A thin strip of skin (epidermis seen up) less than 1 mm thick.
(b) A drop of embedding medium is placed on the dispensing slide. A square
of lens paper is at the lower portion of the photograph.
(c) The lens paper is wetted in the drop of embedding medium, then flipped
over and placed on the drop of medium wetting both sides. Excess medium
is pressed out from under the paper using the back of the forceps (not
shown). Our goal is to have the paper applied flat to the slide like wallpaper,
leaving just enough medium so that the paper will slide unhindered from
the dispensing slide as in Fig. 3.16d.
Fig. 3.16 (continued)
62
S.R. Peters
(d) The lens paper is pulled to the end of the slide so that a tab of 2–3 mm of
paper overhangs the dispensing slide.
(e) Place the tissue in precise position on the paper.
(f) Observe the tissue from below and from the side. Make any adjustments
to the position.
(g) Press the wetted tab of the lens paper to the well floor where it will adhere.
(h) Pull out the dispensing slide from under the paper, letting the paper fall to
the well floor.
(i) Fill the well, freeze and remove the block in the usual fashion.
(j) Untrimmed prepared block looking through the lens paper.
(k) Block trimmed across lens paper to reach tissue.
(l) Photograph of slide (above) and micrograph (below; 20× magnification)
Fig. 3.16 Paper embedding
3
Embedding of Tissue for Frozen Section
3.9.1
63
Paper Embedding Multiple Tissue Sections on Edge:
The Book
This technique is useful for on edge embedding of multiple sections from large flat
surfaces such as cysts walls, synovium and broad margins that require embedding
on edge. Cut a piece of lens paper to fit the tissue sample and the well size as in
Fig. 3.14 leaving a 2–3 mm tab of paper to overlap the edge of the dispensing slide.
The paper should be no larger than 3 mm narrower than the well floor diameter. The
tab should not overlap the wall of the well Fig. 3.17.
3.9.2
Paper Embedding Membrane Roll
This technique allows us to embed a large area of paper-thin membranes on edge
which are too flimsy to stand on edge in a book. Figure 3.16 demonstrated a membrane roll prepared from a 3 cm length of fetal membrane. Start by cutting the
membrane into 3 mm. wide strips and wet them with embedding medium. Prepare
the lens paper as shown above. Start by rolling a strip of membrane to form the
central core on the paper. Add additional layers to the roll by wrapping strips of
membrane around the central core Fig. 3.18a–e.
3.9.3
Paper Embedding very Thin Tissues on Face
Embedding and sectioning paper thin highly delicate tissues such as brain slices and
membranes can be accomplished by placing the tissue on face on a piece of lens paper
and then transferring it to the well floor. Figure 3.19 illustrates this technique using
fetal membrane measuring approximately 0.4 mm in thickness. The entire face is
sectioned within the first 200 microns with ample tissue remaining Fig. 3.19.
Fig. 3.17 Paper embedding: The book (a) Wetted skin strips can be stood on the edge by leaning
the tissues against each other to help them stand up on paper wetted with embedding medium. The
overlapping tab of paper has been touched to the well floor and the dispensing slide is being pulled
away. (b) The trimmed block. (c) The stained slide
64
S.R. Peters
Fig. 3.18 Paper Embedding: Membrane rolls. (a) Start by rolling a strip on the paper to form the
center. (b) Add additional strips by wrapping them around the central core. (c) Touch tab paper to
the well floor and pull the dispensing slide out from under the paper and jelly roll which falls to
the well floor. (d) Trimmed jelly roll block showing numerous layers of tissue. (e) Frozen section
slide showing multiple layers of fetal membrane in this jelly roll preparation. Micrograph 20×
magnification
Fig. 3.19 Paper Embedding membranes on face. (a) Fetal membrane measuring 10 mm across
prepared on lens paper. (b) Trimmed block. (c) Micrograph (20× magnifications)
3.9.4
Further Details on Paper Embedding
• Touch the wetted tab to the well floor along its entire width so it will pull the
paper evenly off the slide.
3
Embedding of Tissue for Frozen Section
65
• For very thin tissues less than a mm. in thickness, the layer of medium under
and on top of the paper should be as thin and uniform as possible to achieve
the most uniformly flat and parallel specimen. It must be nearly wallpapered
to the slide leaving just enough medium so the paper will not stick to the
slide. It is not as critical in thicker specimens which can afford a bit more
trimming. In thick pieces, you can leave a nicely wetted surface for easy
dispensing.
• If the embedding process is complex and will take more than a minute or two,
make sure the medium has not dried to the point that the paper no longer slides
easily from the dispensing slide. If there is drying the paper can be kept moistened with a drop of water or saline so that it is adequately wetted at the time of
dispensing.
• When cutting the section, the lens paper can be trimmed away from the face
of the block without significantly dulling the blade. The lens paper can also be
peeled off by first briefly rubbing the face on a warm surface. Next, peal the
paper away and then quickly refreeze the block face by pressing the block face
to a cold bar or over chuck block. A thin plastering will take care of any
defects Fig. 3.20.
Fig. 3.20 Tulip. This picture of a tulip is a trimmed block made by embedding numerous flower
petals and leaves on the edge using paper cryoembedding
S.R. Peters
66
3.10
Frozen Block Cryoembedding
Frozen Block Cryoembedding (Peters 2003) is a simple two stage embedding technique which will allow precise on-edge embedding of virtually anything. Using the
simple apparatus described below, the tissue is first frozen in a block of embedding
medium. The frozen block containing the tissue is then cut transversely in the
appropriate plane. The resulting slices of the frozen block are firm rectangular and
have flat surfaces and can be easily placed on their side on the floor of the well. The
well is then filled with embedding medium and the chuck is applied to complete the
block. The process transforms tiny specimens into large ones, flimsy soft tissues
into firm easy to cut specimens, straightens out rubbery curled tissues and makes
torn and perforated tissues whole again.
3.11
3.11.1
Apparatus
Cutting Board/Freezing Griddle
The steel Freezing Griddle serves as a flat freezing surface on which to prepare the
frozen block and to keep cut sections cold. The attached cutting board serves as a
cold surface to cut the frozen block while maintaining the freezing temperature.
This simple piece of apparatus is kept at freezing temperature in the cryostat or
freezer and can be briefly taken to the work bench during the process of cutting the
frozen block Fig. 3.21 (left).
Fig. 3.21 Frozen block cryoembedding apparatus. Cutting board freezing griddle (left); elevated
freezing block (right); epoxy coated forceps (bottom)
3
Embedding of Tissue for Frozen Section
3.11.2
67
Elevated Freezing Block
This steel block is kept cold in the cryostat and is used in conjunction with the
freezing griddle. The two broad sides of the block are equipped with feet measuring
3.0 mm on one side and 4.5 mm on the other. The feet create a space between the
two steel bars in which the frozen blocks are prepared Fig. 3.21 (right).
3.12
Frozen Block Cryoembedding Technique
The technique is illustrated using a 3 mm skin ellipse. The ellipse is sectioned and
embedded with margins taken both transversely across the ellipse and longitudinally to include the tips of the ellipse. The cuts correspond to the lines on the frozen
block specimen in Fig. 3.22d.
(a) Place tissue on a thin film of embedding medium face down on the
dispensing slide and place the tissue on the freezing griddle.
(b) Cover the tissue with an ample quantity of embedding medium.
(c) Place the elevated freezing block over the tissue. Allow a freezing time of
1 min.
(d) Frozen block after removal of the elevated freezing block. The lines show
the cuts to be made in numerical order.
(e) Remove the cutting board to the workbench. Trim the edges of the frozen
medium while testing the frozen block for hardness. The block should be
with a very firm fudge like consistency.
(f) If there is any tendency for the cut piece to fly apart it is too hard. Warm
the frozen block for a few seconds between the gloved hands and retest.
68
S.R. Peters
(g) Cut the frozen block into the appropriate sections to achieve the desired
orientation.
(h) When cutting these longitudinal margins push the blade toward the
medium and make sure the tissue surface is well frozen to the medium to
prevent dislodging.
(i) Cut pieces shown face up.
(j) Using cold epoxy coated forceps, the frozen slices are placed face down
on the embedding well floor leaving a 2 mm of space between pieces for
medium to penetrate (not shown). Pieces are shown in position on the
well floor filled with medium.
(k) Trimmed block face.
(l) Photograph of frozen section slide.
(m) Photomicrograph composite showing the tissue embedded on edge with
all margins visible (50× magnification)
Fig. 3.22
Frozen block cryoembedding a small skin ellipse
3.12.1
Bowel on the Griddle
Examining resection margins from bowel and esophagus resections are commonplace in the frozen section lab. It can be quite difficult to get a well embedded cross
section of these flimsy tissues because of the slippery and loosely held submucosal
layer and the retraction of the cut mucosal and muscularis propria tissues. By first
freezing the tissue in a block of embedding medium, the tissue can be cut and
rotated 90° creating a rectangular section that is positioned and embedded precisely
in the cross section Fig. 3.23.
3
Embedding of Tissue for Frozen Section
69
Fig. 3.23 Frozen block cryoembedding of bowel.
(a) Portion of small Intestine covered with medium on the freezing griddle.
(b) Frozen block being cut.
(c) Embedded small intestine, four slices in a block. All four are layers visible.
(d) Photograph of frozen section slide.
(e) Micrograph showing transverse section with all layers of the wall visible and vertical villi in
the mucosa 20× magnification)
3.13
3.13.1
Frozen Block Cryoembedding Details
Making the Frozen Block
Before making the frozen block, we must first ask ourselves; Do we need to visualize the tissue when we are sectioning the frozen block? In a small skin ellipse as
shown in Fig. 3.20, we need to be able to visualize the inked side so that we can
accurately cut the tissue with a scalpel. We must use very little embedding medium
in the side that we have to see. Therefore, we want to use very little embedding
S.R. Peters
70
medium on the dispensing slide beneath the tissue. When the embedding medium
freezes it becomes opaque, and if there is a thick layer over the tissue we will not
be able to see the tissue during cutting. If we are simply looking to cross section
the tissue and three dimensional orientation is not critical, we can start by putting
a thin layer of embedding medium on the griddle, placing the tissue on top and add
more embedding medium before freezing. The resulting frozen block will have
embedding medium on both sides and cut in larger flatter slices which are less delicate and a bit easier to handle.
Another consideration is flattening artifact. If flattening is not acceptable, then
make sure there is enough room under the elevated block for the tissue and apply
an ample layer of embedding medium over the tissue. If we would like to freeze
small intestinal tissue so that the villi are vertical and not flattened, the tissue should
be placed on the griddle mucosa side up, and covered with medium allowing the
tissue time to freeze partially before placing on the elevated freezing block.
3.13.2
How Do I Know When the Block Is Frozen?
Give the tissue about a minute to freeze. Then, very gently try to rotate the elevated
freezing block a degree or so. If there is movement, the block is not fully frozen
yet. If it feels solid it is frozen. If you accidentally separate the blocks too early it
can be easily repaired by removing the embedding medium from the side without
the tissue, applying another squirt of embedding medium to the tissue and replacing
the elevated freezing block.
3.13.3
Removing the Frozen Block
Use a plastic putty knife or similar tool to lift the frozen block from the griddle.
Avoid using a scalpel of other sharp instrument for this purpose.
3.13.4
Cutting the Frozen Block Fig. 3.22g–i
The tissue will cut easily at the right temperature. If the block is too cold the tissue
will fly apart on cutting. Always first test the block by trimming away the excess
medium. This is a necessary task so that the pieces will fit more easily fit in the
well. At the optimal temperature, the tissue cuts with a very firm fudge like consistency. It can be likened to cutting a hard ice cream cake. If the excess medium flies
apart when cut, it is to cold and will require warming between the gloved hands.
This maneuver should be done in short doses and not left between the gloves for
more than a few seconds. Retest the tissue and warm additionally until the tissue
reaches the proper consistency for cutting. The added few seconds it takes to warm
the tissue is a lot less time than trying to find a piece of tissue that grew wings!
3
Embedding of Tissue for Frozen Section
71
After warming, press the tissue face flat to the griddle again for a second or
two to assure that the tissue is held firmly by the frozen medium when cutting
begins. This is particularly important in very thin specimens such as a thin skin
specimen. The tissue is being held by a thin layer of frozen medium on the edge
of the skin. If slightly melted, the tissue can dislodge on when cutting. To prevent
dislodging the tissue on cutting, always push the scalpel toward the medium.
Don’t move the scalpel in a direction away from the medium to avoid of dislodging the tissue from the medium with the scalpel stroke. Use mild scalpel pressure
in an even movement without trying to push it through tissue like your chopping
it. If the frozen block is at the ideal temperature, it will cut without too much
effort. This will also vary with the water content of the tissue. If you find yourself
having to lever through the block like you are using a chef’s knife, the block
should be warmed a bit more. The smoother you cut the tissue, the flatter the
surface of each piece will be and the flatter the final preparation will be. The
completed block will have fewer and shallower defects to plaster over, and the
tissue will be closest to a single plane.
3.13.5
Putting the Tissue Pieces in the Wells Fig. 3.22j
Tissue is placed face down in the well. Use epoxy coated forceps to handle frozen
tissue and keep them cold in the cryostat. If you try to use uncoated warm steel
forceps to handle the pieces of the frozen block, the pieces will stick to the forceps
and make it difficult and frustrating to arrange tissues in the well. If you don’t have
epoxy coated forceps and must use steel forceps, keep a pair in the cryostat and coat
the tips with a bit of paraffin to prevent sticking.
Leave 2 mm of space between each piece for medium to penetrate. This is very
important. If the pieces are very close together there will be deep crevices where
medium cannot penetrate between the pieces. These crevices can only be plastered
superficially. These thin crevices will cause separations in the sections when cut
beyond the depth of the plastering. If the tissue pieces are separated by about 2 mm,
then there will be ample space to fill with medium.
3.13.6
Filling the Well
Gently apply the embedding medium to fill the well taking care not to push the
pieces out of position with the flowing medium. Make sure the bottle of embedding
medium contains enough medium and has been inverted long enough for medium
to fill the nozzle. If the bottle first blows out a puff of air it can blow the pieces out
of position. Apply the chuck quickly with firm pressure to extrude the excess
medium.
72
3.14
S.R. Peters
Orienting the Anatomy of Tissue Relative to the Blade
When we cut our frozen section, the way the anatomy of the tissue is oriented relative to the blade will impact our ability to get our best sections. First, let us consider
the blade as it passes through our tissue. The blade first meets our handle of embedding followed by the beginning, middle and end of the tissue and more handle of
medium. If you master the continuous motion technique I offer in Chap. 4, this will
happen in a smooth uniform motion. If you are cutting from a standstill, inching
along or hesitating, the areas of difficulty will be magnified. Which part of the
anatomy hits the blade first, and how the layers of the anatomy pass through the
blade can often give varying results and difficulties. I will offer suggestions that I
have found successful in my experience.
Always approach the block where there is a handle of embedding medium.
Always prepare your blocks with a handle of medium surrounding the tissue. This
will serve as the handle for the brush to grab on our new section and a frame to
stabilize our less substantial tissues such as fat, necrotic tissues and highly delicate
cystic processes. It also serves as our running start to a section destined to give us
difficulty. The section will start with a solid easy section of only embedding
medium before plunging our problem tissues. The handle is our margin of error
when mischief arises during cutting and retrieving such as tissue sticking to the
brush, and stretching the section on retrieving. A handle on the back side of the
block will also allow for easy retrieving from the block. See Chap. 5 p. 26.
The most critical aspect of the tissue should be perpendicular or diagonal to the
blade and not the first or last aspect of the tissue to hit the blade. The part of the
section where the tissue first meets the blade has more propensities for artifacts
including flipping of the section, thickness issues and wrinkling. Avoid having the
critical aspect of the tissue such as mucosal surfaces or margins, hit first and parallel to the blade. The last part of the section is again at the risk of curling, or problems on retrieval. The middle of the section is where cutting tends to be cleanest is
less at risk for artifacts. This is where I want to see that critical portion of the slide
such as an inked margin. Mucosal lined tissues such as GI, bladder, uterus and
cervix should be oriented with the plane of the epithelium perpendicular to the
blade Fig. 3.24a.
Skin should be oriented with the epidermis perpendicular or diagonal to the
blade (Fig. 3.22b). The epidermis of human skin has a propensity to separate from
the embedding medium. I believe the stratum corneum which desquamates naturally, creates a plane of separation from the medium. As a result, there is always a
propensity for the epidermis to pull away from the embedding medium and curl
over and flip. I refer to this as curling away. Skin cut in a horizontal position with
the epidermis toward the blade will have a strong tendency to flip over the entire
epidermis and is discouraged. When we embed skin perpendicular to the blade the
separation of the epidermis from the medium creates a tendency for the tip closest
to the blade to curl or flip. This can be minimized by warming the tissue to reduce
curling. See Chap. 4 for more on curling away. Figure 3.25 shows an approach to
3
Embedding of Tissue for Frozen Section
73
Fig. 3.24 Illustration of a frozen section block in the cryostat and the suggested orientation of the
tissue relative to the blade. (a) The block shows the bowel tissue oriented with the mucosal surface
perpendicular to the blade. (b) The block shows a piece of skin with the epidermis embedded
perpendicular to the blade
embedding a small skin ellipse, sectioned as in Fig. 3.22d. The skin pieces that have
a margin on only one side, should be oriented so that the margin end or tips are last
to hit the blade to avoid curling (Fig. 3.25 arrow heads). In this case, only the complete transverse sections will be prone to a flipping tip. This arrangement is quite
simple to do using samples prepared by frozen block cryoembedding.
Fat should be the last thing to hit the blade or should hit the blade by itself
whenever possible (Fig. 5.3). Fat does not get hard enough to cut well at temperatures that are best for cutting most other tissues. When fat hits the blade before the
more manageable tissues it may smear and ruin the rest of the section. I find by
74
S.R. Peters
Fig. 3.25 Orienting a skin biopsy to minimize curling of the tips. (a)The trimmed block with five
pieces of skin from Fig. 3.20k.The arrow points to the cryostat blade. The arrowheads point out
the tips of the four longitudinal margin sections. Orienting the block with the tips away from and
last to reach the blade will reduce the problem of tips curling away and flipping. (b) The cut section forming over the blade without flipping of tips. The arrow points to an area of separation of
epidermis from embedding medium visible as a fine cleft
hitting the knife last or by itself fat won’t interfere with the other tissues as much.
The worst possible situation is to have fat meet the blade first without a “handle”
of embedding medium. The handle gives the section a start. Without this handle, the
fat will smear and wipe out the whole section. Sectioning fat will be discussed in
greater detail in Chap. 5. If we are having difficulty getting a good section because
fat appears in the, plane we can rotate the chuck to get the tissues that will easily
cut out of the path of the fat or using a technique I refer to as the gouge. See Chap.
5 Fig. 5.6.
Very tough tissues should be embedded vertically or on a diagonal to reduce the
effective “width” of the tissue and reduce knife stress. Cut tough tissues as warm
as possible. Tissue characteristics are covered in detail in Chap. 5.
References
Peters S (2003a) The art of embedding tissues for Frozen section. Part I – A system of precision
face down cryoembeding of tissues using freezing temperature embedding wells. J Histotechnol
26:11–19
Peters S (2003b) The art of embedding tissues for Frozen section. Part II – Frozen block cryoembedding. J Histotechnol 26:23–28
Peters S, Fitzgerald S, Green K, Nunnciato T (2003) Paper cryoembedding. J Histotechnol
26:173–178
Chapter 4
Cutting the Frozen Section
Stephen R. Peters
Abstract The chapter covers a detailed method of cutting frozen sections on a cryostat
using brush technique in continuous motion. The text covers all steps of the cutting
process including trimming, cutting and retrieving. The goal is to develop great skill
and sensitivity with the brush so that we can cut repeated sections in continuous motion
without hesitation. This original approach presents the cutting process in a simple step
wise fashion and strives to maximize our skill and dexterity through optimal hand and
body positioning. The trimming process is discussed in detail. Potential sources of error
such as malorientation, under trimming, and consequences of rotating the block are
addressed. The chapter includes the techniques for making and cleaning frozen section
brushes. Retrieving tissues form the stage and block are described. A method of teaching and passing continuous motion technique to students is described.
Keywords Antiroll devise • Artifacts • Brush-brush • Cryostat • Blade • Frozen
section • Brush technique • Body position • Hand position • Gouge • Handle •
Mature face • Orientation • Premature face • Rotating the frozen section block •
Frozen section brush • Frozen section of minute specimens • Trimming the frozen
section block • X–Y axis
Now we have embedded our tissue and it is time to cut a frozen section from the
prepared block. In this chapter, I will share a method for cutting the frozen sections
on a cryostat using brush technique in continuous motion. The chapter covers all
steps of the cutting process including trimming, cutting and retrieving. Our goal is
to develop great skill and sensitivity with the brush so that we can cut repeated sections in continuous motion without hesitation. This original approach presents the
cutting process in a simple step wise fashion and strives to maximize our skill and
dexterity through an ergonomic approach to hand and body positioning.
S.R. Peters ()
Department of Pathology University of Medicine and Dentistry of New Jersey
Pathology Innovations, LLC, 410 Old Mill Lane, Wyckoff, NJ 07481, USA
e-mail: [email protected]
S.R. Peters (ed.), A Practical Guide to Frozen Section Technique,
DOI 10.1007/978-1-4419-1234-3_4, © Springer Science + Business Media, LLC 2010
75
76
4.1
S.R. Peters
Taking Sections on the Cryostat: Brush or Antiroll Device?
With each turn of the wheel the clockwork like mechanism of the microtome
advances the block forward an increment equal to the thickness setting on the cryostat. At the same time with each rotation of the cryostat wheel, our block will be
shaved over the blade creating our frozen section. Our task is to guide the newly cut
section onto the cryostat stage while coaxing it into a flat sheet that can be retrieved
from the stage. Working contrary to our best efforts is the natural tendency for the
tissue to curl as it is being cut. Our task can be accomplished in either of two ways.
Using the antiroll device designed into the particular brand of cryostat or by using
brush technique.
Modern cryostats offer a variety of antiroll devises for the sectioning process.
Many consist of a small glass or plastic plate hovering over the blade edge. This
plate is precisely adjusted so the forming section flows under the plate which
guides it into a flat shape onto the stage (Fig. 4.1).
More recently, vacuum anti roll devices have been designed to apply a vacuum
in front of the forming section, pulling the section into position on the stage.
Figure 4.5 shows such a vacuum antiroll devise positioned behind the stage of this
late model Leica 1950 cryostat.
These antiroll devises work well under most circumstances provided the device
is properly adjusted and in a working state. Unfortunately in practices where cryostats are being used by a number of operators, things have a way of being left in
various states of adjustment. The user must understand how to quickly make these
adjustments when they do not work properly.
It is my own feeling that all students must first be trained in brush technique.
A well developed skill with the frozen section brush will serve the cryotomist through
any situation without relying on the mechanical devices. Starting a student with an
antiroll device would be like putting a child on crutches before learning to walk.
Fig. 4.1 Antiroll device. (a) The antiroll device (arrows) is in position precisely overlapping the
blade edge. (b) As the section is cut (arrow) it passes under the antiroll device helping the section
to remain flat as it is deposited on the stage
4 Cutting the Frozen Section
77
This chapter will concentrate on a method of frozen section brush technique that
focuses on developing a high level of skill in the brush hand much like playing a
musical instrument. The brush is no different than the bow of a violin or the fingernails
of the guitarist. Using precise technique, practiced repetitively over time, one can
develop a surprising level of skill and finesse. By optimizing our dexterity through
proper ergonomics, hand positioning and conservation of motion it is possible to
become a virtuoso with the frozen section brush.
Our goal is to be able to cut the tissue in a continuous uniform motion while
appraising the forming sections over multiple revolutions until we visually recognize
a quality section to retrieve. Similar to cutting paraffin blocks, it seems to take
several passes of the knife until an equilibrium of temperature and consistency is
established which allows the sections to become uniform in thickness and quality.
With skilled brush technique, we have the ability to finesse our best sections onto
the stage in the most difficult settings.
Given the wide variety of backgrounds and training of cryotomists, it is not surprising to see a considerable variation in techniques used to prepare frozen sections.
I have seen a variety of different styles of holding and cutting using a brush. Many
cryotomists are stopped or hesitate at the beginning of the section, slowly grabbing
the tissue and then accelerating through the section. Others have developed technique to the point in which they are able to cut with little or no hesitation.
As I became more comfortable with the brush, it became obvious that the quality of my sections was related to the uniformity and the fluidity with which the
tissue was being cut. It also became obvious that not every section that managed
to make it to the stage was optimal. As I said, it seems to take several turns of the
wheel until the quality sections appear. When you are cutting in continuous
motion, you can cut and evaluate the section, discarding the poor ones and take
the first good one to come along. The advantages of cutting without hesitation are
most obvious when dealing with our most difficult tissues. In this section, I will
offer simple method of learning and teaching continuous motion frozen section
brush technique. We will start by learning the elements of basic brush technique.
In Chap. 5 we will learn to recognize the deviations in quality in our sections as
they are being cut and to make the necessary adjustments to correct the problem.
In order to do this, we will learn the many variables which play a role in the
behavior of the tissue.
4.2 Continuous Motion Frozen Section Brush Technique
4.2.1 Insert the Chuck and Check the Cryostat
First, the block must be tightly secured in the chuck holder. Check that all of the
clamping knobs, levers, or screws securing of the knife, knife holder, chuck, chuck
holder and microtome are tight and free of any debris that could cause movement.
78
S.R. Peters
It takes very little movement to affect the thickness of a section cutting as thin as
5 microns. See chatter Chap. 5.
4.2.2
The Frozen Section Brush
The purpose of the brush is to catch the edge of the section as it is being cut and to
maneuver the newly cut section onto the cryostat stage. Unless the temperature is
ideal, a cold section will tend to curl up and pull away from the brush. For this
reason, I find a brush with stiff bristles and a fairly wide gripping surface to be more
functional than the more flimsy camel hair brushes used traditionally. I suggest
3/16 (#1) and 1/4 inch (#2) flat or bright bristle brushes. These can be found at art
supply stores for about $3–$4. Cut the brush at an angle so that when held at an
angle, the brush meets the tissue flat like an angled broom meets the floor. Cut off
any excess brush handle on long artist brushes (Fig. 4.2).
4.2.2.1
Keep the Brush Clean
Sections sticking to the brush can become a nuisance when cutting in continuous
motion, causing us to pause and pick up a gauze pad to wipe the brush. Fatty tissues are
notorious for sticking to the brush. It pays to have several brushes available.
Fig. 4.2 Left – 3/16 inch brush; Right – ¼ inch brush; Brushes made of white bristle provide a
stiff but flexible action. Brushes are cut at approximately 45 degree angle so when the brush is
held at 45 degrees, it will meet the tissue flat like the edge of a broom meets the floor
4
Cutting the Frozen Section
79
Cleaning the brushes will reduce sticking and is essential if one is attempting to
place multiple sections on the slide (cutting ribbons). It is worth taking a minute at
the start of each day to clean the brushes. Using the procedure below, you can clean
several brushes in less than a minute.
4.2.2.2
•
•
•
•
Quick Brush Cleaning Procedure
Soap and water then quick dry with gauze
Dip in ETOH and quick dry with gauze
Dip in xylene and a quick dry with gauze
Cool the brush by pressing it to a cold surface in the cryostat for a few seconds.
4.2.2.3
Make a Brush-Brush
This useful tool can be made by wedging or taping a piece of gauze or small brush
in the cryostat as close as possible to the left of the brush hand. I call this the
“brush-brush”. It allows the operator to quickly wipe the brush clean against the
brush-brush while cutting without hesitation. I have fashioned a rudimentary brush
from a few folded biopsy bags by stapling, trimming and cutting them into a brush
and taping it to the antiroll device in our cryostats. Without losing step, I can
slightly veer my brush to the left to wipe the brush in the brush-brush and be back
in the cycle for the next pass of the block. The brush- brush allows me to cut and
wipe at any speed in continuous motion. One can experiment with a variety of comb
and brush like objects attached to whatever spot is available to the left of the stage
in your particular cryostat (Fig. 4.3).
4.2.3
The Blade
In the surgical pathology setting, I believe every patient deserves a new disposable blade. You will always get the best quality section with a new sharp blade.
The cost of a blade is nominal when compared with the disposables being used
in the operating room. Some tissues such as tough collagenous tissues or calcified tissues can quickly dull the blade. The blade should be changed when the
section quality begins to fall. I have occasionally found myself getting mediocre sections with a brand new blade and changed it to find the tissue cutting
easily with the second blade. Changing the blade on every case is also an
important safety measure. If you cut yourself on a new blade, you will have
minimized your risk of transmittable disease. Investigating an exposure takes
the review of only a single chart. If a blade has been in a cryostat for multiple
cases, investigating any exposure becomes a futile task with little reassurance
for the injured operator.
80
S.R. Peters
Fig. 4.3 (a) A small brush (arrow) fashioned of stapled, cut and trimmed biopsy bags is taped to
the antiroll device in this cryostat. (b) A newly cut frozen section to be discarded is sticking to the
frozen section brush. (c)–(d) The section (arrows) to be discarded is moved to and wiped against
the brush-brush while maintaining continuous motion
4.2.3.1
Listen to the Blade
Get to know the sound of a good section coming off the blade. There is almost no
sound at all. When a block is too cold, there is a distinct sound as the blade
scratches the icy block. The blade will make a variety of grating or vibrating sounds
when it is at the wrong blade angle, showing movement or out of position because
of a bit of medium in the blade holder.
The importance of blade angle is discussed in detail in Chap. 9.
4.2.4
Body Position
I recommend sitting as comfortable as possible when cutting the frozen sections.
Most cryostats are at a height that requires many users to bend at the waist when cutting while standing. I hope you learn to use the brush as an articulate fine instrument.
Why would we want to do this hunched over with our neck hyper extended? When
cutting a frozen section, we need to be relaxed and comfortable in order to have
maximum control of the left hand. I suggest sitting on an adjustable stool, at a height
that allows your arms to most comfortably drape your hands to the stage, best allowing your left hand to assume the hand position discussed below (Figs. 4.4 and 4.5).
4
Cutting the Frozen Section
81
Fig. 4.4 Body position. The cryotomist sits in a comfortable ergonomically correct position with
arms draped to the cryostat stage. This late model Leica1950 cryostat designed for user ergonomics allows the user to sit comfortably with an adjustable foot rest. The sloping front wall seen in
Fig. 4.7 allows the arms to be positioned with minimal interference
4.2.5
Holding the Brush
Hold the brush like a pen in the left hand and stabilize the hand by gently resting
the side of the fifth finger on the stage or where ever is most suitable in your brand
of cryostat. The operator will use the fine motor skills of the fingers much like writing with a pen. Focus on developing your dexterity so you can control the brush like
a fine instrument. Try writing your name across the bottom of the block. These are
the muscles you will use to take a section (Fig. 4.6).
The brush is cut at an angle which approximates the angle in which the brush is
held in the hand. This results in the brush meeting the tissue flat over its 1/4 ‘’
length like an angle cut broom. The brush is held at approximately a 45 degree
angle to the block face and a 45 degree angle to the stage. The ultimate position will
be dictated by what is comfortable for the operator in a particular cryostat.
82
S.R. Peters
Fig. 4.5 Illustrates proper body position. Sitting with arms draped as comfortable as possible to
achieve correct hand position. The arrow shows that there is still a degree of hyperextension at my
wrist in this model cryostat. There are limitations to what positions are achievable in any given
cryostat design. The deeper the cryostat stage below the front of the cryostat the more difficult it
will be to achieve a comfortable position. Adjusting the stage to a higher position may relieve
some hand stress
Fig. 4.6 Illustrates holding the brush. The left hand gently rests the fifth finger where convenient.
The brush is being held like a pen between the thumb and first two fingers. The brush is held at
approximately a 45 degree angle to the stage and a 45 degree angle to the block
4
Cutting the Frozen Section
83
Fig. 4.7 Leica 1950 cryostat; one of several versatile inside views. The black arrow shows a
hand rest for brush users. The white arrow points to the embedding shelf. The tube is connected
to the vacuum antiroll devise on the stage which also doubles as a vacuum cleaning device for
the cryostat
Figure 4.7 shows the inside of a Leica 1950 cryostat. This late model instrument
was designed to maximize the ergonomics of the cutting process. The stage is high
up and slightly to the right and the front slopes toward the box so that the users arm
will drape freely to the stage alleviating the uncomfortable bend at the wrist seen
in Fig. 4.5. There is a padded finger rest to the left of the stage offers a suitable
resting point which will not transfer much less heat than metal so the resting fingers
do not get as cold. As a testimony to the value of embedding in well bars, a movable
embedding shelf was designed into the front wall.
4.2.6
Trimming the Block
We have embedded our tissue with a goal to view the microanatomy in a particular
plane and orientation. Our next task is to trim the block face until we reach the
desired depth and landmarks. When trimming or surfacing the block, our goal is to
first quickly shave away the superficial face of the block with whatever coarse
advance mechanism is offered by the cryostat. Most of the newer cryostats have
electronic controls for coarse and fine advance. Older cryostats may have a wheel
attached to the microtome to coarsely advance the block.
We start by turning the cryostat wheel while operating the coarse advance button
or mechanism and brushing away the shavings until we begin to see the landmarks
that tell us we are close to our desired plane. Landmarks may be appearance of a
84
S.R. Peters
particular part of the microanatomy such as epidermis, mucosal surface or inked
margin or simply evidence that a small speck of tissue is nearing the block surface.
From the point where we are seeing most of the required tissue face the final trimming is done using a finer advance control and/or simply by turning the cryostat
wheel. With each turn of the cryostat wheel our block will advance only the thickness of the section; that is, if we are cutting at a section thickness of 5 microns, the
block will advance 5 microns with each turn of the wheel. In very thin specimens
once we start to see the tissue it is best to advance tissue only by turning the cryostat
wheel. This task must be approached with whatever caution is deemed necessary
by the size of the sample. The cryotomist must understand how the advance mechanisms operate on their individual cryostat and have a clear sense of how much the
tissue advances (and is wasted) with each press of the button or turn of the wheel.
If we do not trim the tissue deep enough, our section will not include some critical
feature. This will require a second section and lost time. If we trim the tissue too
much, there will be unnecessary wastage of tissue and potential loss of irreplaceable specimen.
4.2.6.1
Reading the Block
The cryotomist must learn to grossly recognize the anatomy and landmarks visible
on the block face and have a good idea of how the trimmed tissue face relates to
the anatomy that the pathologist will be focusing on. I refer to this as reading the
block. The trimmed block offers a tiny, highly detailed view of the gross, with
landmarks such as the inked margins, mucosal surfaces, and epidermis recognizable as a very low power view of the histology. One must be acutely aware when
these structures come to the surface of the block. When trimming, as one
approaches the landmark, there is a period where one can be fooled into thinking
you are at the correct depth. At this premature stage, it is like looking at the structure through a slightly frosted glass. One will think a structure is present but it will
not appear in the section. We must be able to distinguish this premature face from
the mature face, where all of the necessary landmarks have been reached. The
mature face will be distinctly visible and lines and colors will be sharp and at their
brightest. Comparing the block face with the section coming off the blade can
sometimes offer a clue that the block is under trimmed. Get in to the habit of
looking at the section as you pick it up on a slide. You will develop an ability to
recognize if the complete section is present (Fig. 4.8).
4.2.6.2
X–Y Axis and Orientation
In order to be able to trim the block to a level where all of the required elements of
the section are present without unnecessary wastage of tissue, two conditions must
be met. The tissue must be embedded in a flat plane and the block must be correctly
oriented in the X–Y axis. Using traditional face up embedding technique, structures
4
Cutting the Frozen Section
85
Fig. 4.8 Reading the block. The pictures illustrate a trimmed frozen section block of skin embedded
as a block face. Figure (a) shows a premature face. The arrows show an area from 7:00 to 2:00
which has not yet been reached by the knife. The haziness of the overlying embedding medium is
clearly visible from 9:00 to 12:00, but much less apparent at the periphery of these zones. Figure
(b) shows the mature face. The block is fully trimmed. All of the tissue is clearly visible and
margins are sharp opaque lines
may be in a variety of planes making it difficult to achieve a section containing all
of the desired landmarks and requiring considerable trimming and tissue wastage.
Using the face down embedding techniques described in Chap. 4, it is simple to
prepare blocks in a flat plane allowing us to achieve the complete desired tissue
face with very little trimming. But to trim the desired face in a single plane, the
plane of the block face must be in the same plane as the blade. Another term for
this orientation is the x–y axis of the block referring to the x–y plane defined by the
block face and its relationship to the plane defined by the plane of the blade. See
Chap. 1. Figure 4.9 is an example of a block which has been partially trimmed in
poor x–y orientation. In this example, the lower right corner of the block was considerably forward and the upper left is backward of the plane of the blade. To correct this, the upper right corner must be tilted forward along the diagonal line
defined by the arrows.
Adjusting the orientation of the block needs to be done in very fine increments.
Unfortunately, the means of adjusting orientation available in many cryostats is
limited if present at all. If the orientation of the block is not in the plane of the
blade, the block will begin to shave away an edge or corner rather than being well
centered. The operator must understand whatever means of orientation your
particular cryostat offers. High end models may have separate adjustment knobs
for each plane allowing a fine controlled adjustment. Some cryostats offer a single
knob for simply loosening the x–y adjustment so that the block can be freely
adjusted to the required plane by hand. This requires a delicate touch and a bit
of trial and error. I approach this by loosening the knob so that the chuck holder
moves with a slight resistance. Adjustments must be made in infinitesimal movements, as grossly visible movements will have drastic results. When making an
x–y adjustment always take the block backward before starting to trim and
approach the tissue very slowly to see where the block will just begin to shave the block.
86
S.R. Peters
Fig. 4.9 Poor x–y axis orientation. The block was trimmed on a cryostat in which the x–y axis of
the block is far from the plane of the blade. This block has been shaved deeply into the lower right
corner without yet reaching the upper left side. To correct this, the upper left corner must be
slightly tilted forward to meet the blade along the axis of the diagonal defined by the arrows
A well oriented block will first meet the blade at the center of the block. If not
in the center, the process must be repeated. When making x–y adjustments, the part
of the block which is being shaved first must be moved backward while the portion
not yet reached the needs to come forward. It is best to practice adjusting orientation on insignificant tissues or blank embedding medium blocks before attempting
this on patient specimens.
4.2.6.3
Rotating the Block
Many cryostats provide a means of rotating the block 360 degrees. This allows the
operator to orient the tissue in any position relative to the blade. Before beginning
to trim the tissue, careful consideration should be given to how the various elements
of the tissue will contact the blade. See Chap. 3. After considering the questions
you are trying to answer and the properties of the tissues you are cutting, begin by
orienting the block relative to the knife to best achieve your goals. In practice,
despite our best intentions, when we begin trimming, unexpected fatty or calcified
elements may appear or we may find our tissue curling away.( See below) In these
situations, we can benefit by rotating the block to a position that will result in the
mischievous elements hitting the blade last. When rotating the block in most cases
you will be changing the x–y orientation of the block relative to the blade to some
4
Cutting the Frozen Section
87
Fig. 4.10 Rotating the block. A block containing lung tissue trimmed before and after 90 degree
rotation in a cryostat that is in poor x–y orientation. (a) A trimmed frozen section block of lung
tissue. (b) The block trimmed again after 90 degree rotation. The lower right side of the block, now
out of orientation has been shaved away before reaching the upper left. The block must be readjusted by slightly tilting the upper left corner forward along the axis defined by the three arrows
degree. Only if the block has been prepared so that the block face is parallel to the
chuck face and the chuck face is in perfect x–y orientation with the blade, will the
block rotate without affecting the x–y orientation. Figure 4.9 shows a block which
has been trimmed, rotated 180 degrees and retrimmed. It is obvious how dramatically the orientation changed with this rotation. Always take the block backward
before starting to trim again. Approach the block slowly and see where the tissue
begins to shave the block. If the section begins to cut away from center specimen,
x–y orientation will need to be adjusted before beginning to trim again or pay the
price of wasted tissue. This is particularly critical when cutting very thin specimens. Figure 4.10b shows that the lower right corner has been shaved away similar
to Fig. 4.9. To re orient this block, the upper left corner of the block at 9 and 12:00
will have to tilt forward along the axis denoted by the arrow heads (Fig. 4.10).
4.2.6.4
Removing and Returning the Block to the Chuck Holder
When removing the block for any reason, it is a good idea to make a small mark at
12:00. When the block is returned to the chuck holder for additional sectioning, it
will be easy to achieve the same position and avoid orientation change and unnecessary tissue wastage. Always, first move the block backward and approach it gently
to assess any orientation change before aggressive trimming.
4.2.6.5
Trimming Minute Specimens
More frequently than we would like, we are called upon to examine the minute biopsies
or the thin core biopsies with diameters of a less than mm. In such cases it is imperative to embed the tissues in our flattest plane and to begin with a well oriented block.
88
S.R. Peters
Whenever possible concentrate the specimen centrally in the block to minimize the
effects of malorientation. If tissue is visible on the surface and not covered in embedding
medium, begin with a layer of plastering. Next trim the block gently until the tissue
becomes visible. At the point that the tissue appears very close to the surface of the
block, look carefully at each cut section until the early signs that the tissue is
becoming uncovered. From this point pick up a section on a slide and look to see if
the tissue is present. If tissue is present, this is your first level to stain. With single
turns of the wheel, observe the increasing amount of tissue available at the surface
and take the sections until the complete tissue face has been reached. By slowly
approaching the tissue and carefully examining the section both on the cryostat
stage and on a slide, we can recognize the moment the tissue is reached, take only
what we need and preserve the tissue for paraffin sections (Fig. 4.11).
4.2.7
Cutting the Final Sections
Now that our block is trimmed to the correct level we will take our final sections
for interpretation.
Fig. 4.11 Cutting minute specimens. (a) A frozen section block with a minute sample just as it
is reached at the surface. (b) A glass slide on which a section has been picked up. The arrow points
to a minute speck of tissue on the slide. (c) Frozen section block trimmed with a small core biopsy
specimen at the surface. (d) A cut section of the block in picture (c) on the cryostat stage. The
arrow points to the tissue visible in the section. (e) A glass slide upon which the section from
picture (d) has been retrieved. A complete section of the tissue is visible
4
Cutting the Frozen Section
4.2.7.1
89
Turning the Wheel
Our goal is to simply turn the wheel or crank of the cryostat in a continuous uniform
motion without hesitation. In fact, we will be trying to imitate the function of an
automated cryostat. With practice, by holding the brush as I described, the operator
is capable of catching and guiding the section while the block continues in motion.
4.2.7.2
Movement of the Brush
The technique will be described in four simple motions. Figure 4.12a shows that
the starting position of the brush is in the center at the bottom two millimeters of
the block. This is home plate.
Ride the Block
As the block begins its descent toward the knife, the brush moves downward
keeping pace with the block. The brush can gently rest on home plate and ride the
block to the blade. It is the downward movement of the brush that allows you to
maintain continuous motion as you grab hold of the section and continue on
(Fig. 4.12a).
Gently Lift Up While Crossing the Blade
As the brush meets the blade, the section will begin to form under the brush. The
brush gently lifts up as it reaches the blade while holding onto the edge of the newly
forming section (Fig. 4.12b).
Hold Onto the Curl
As the first few millimeters of the section passes the knife, there will be some
degree of curling of the section. As the curl begins, the moving brush is in position
on top of this curl of the tissue and is holding onto it. With the curl in hand, the
brush changes to a horizontal motion toward you. The path of the brush is much
like a child coming down a slide in an “elbow” shape down and then toward you in
a continuous motion (Fig. 4.12b)
Glide the Section Across the Stage
The motion continues horizontally as the forming section is drawn across the stage.
Figure 4.12c illustrates that by being extremely delicate with the brush; one can
90
S.R. Peters
Fig. 4.12 Continuous motion brush technique. Figure (a) shows the frozen section brush at
the starting position, home plate, gently resting on edge of the block in its up position. The white
arrows show the elliptical path that the brush will travel in continuous motion. From this point
the brush will ride the block to the blade. (b) The block and brush have now descended to the blade.
Upon reaching the blade, the brush gently lifts up as it crosses the blade while holding onto
the edge of the curl of the forming section. The brush now changes to a horizontal path to carry the
section across the stage. (c) The brush gently glides the section across the stage without pressing
the tissue to the stage. The brush follows the path of the arrows in continuous motion to return to
the block in the up position
4
Cutting the Frozen Section
91
hold onto the edge of the curl and glide the section across the stage. Avoid pressing
tissue to the cryostat stage which can result in adhesion of the tissue to the stage,
especially in fatty tissues. This will result in a smeared section and a need to clean
the stage.
If the section we have cut meets our standards, we will stop to retrieve the tissue on a slide. If not, the brush returns to take the next section completing a cycle.
As the brush returns to take the next section, it completes a continuous elliptical
motion. By repeating this process in a uniform fashion, the movement of the
brush continually traces the path of this ellipse as shown by the arrow in
Fig. 4.12a. The continuous repeated sectioning of a block is like turning the pedals of a bicycle. Both hands are circling in synchrony. As I said earlier, when
taking our final section, it usually takes at least three cycles in continuous motion
until the cutting process reaches equilibrium and the best quality sections begin
to appear.
4.2.7.3
Using the Handle
As I said at the end of the last chapter, there are many advantages to preparing
blocks with a handle of embedding medium completely surrounding the tissue. The
block in Fig. 4.12 has an ample handle of white embedding medium surrounding
the brown tissue. The handle provides margin of error when both cutting and
retrieving the tissue. When cutting the block, we can grasp this handle with the
brush without having to engage the tissue. In sections having a tendency to form
holes such as fatty and necrotic tissues, the handle will hold the section together
and resist crumpling and tearing. It acts like a frame giving strength to the section.
Blocks made with a handle of embedding medium will have fewer tendencies to
smear if this handle is inadvertently pressed to the stage.
4.2.8
Retrieving the Section
Retrieving the section refers to the process of picking up the cut frozen section onto
a glass microscope slide. Tissue can be retrieved from the cryostat stage or from the
block face. When retrieving tissue from the stage, the direction from which you
approach the stage will be dictated by the design of the cryostat. The most ergonomic approach given the anatomy of our wrist is to retrieve the tissue from the side
of the stage. Unfortunately, some cryostats are designed with various levers, knobs
and antiroll devices obstructing the lateral approaches to the stage. In this case, the
operator is forced to approach the stage from the front which is a bit more awkward
due the need to hyperextend and rotate the wrist. Tissue can also be picked up from
the back of the stage but the operator must be acutely aware of the blade at all
times. While our slide will be crossing over the blade to retrieve the tissue, our
hands will be getting dangerously close to the blade.
92
S.R. Peters
This process in which tissue is picked up onto a slide happens in a moment’s
time as tissue is drawn to the slide by static attraction. During that time the tissue
can develop folds or be stretched or torn by erratic motion. The operator must
appreciate the delicacy of the tissue section and the kinetics of this brief process to
avoid artifacts. It is an advantage to have a “handle” of embedding medium surrounding the tissue allowing a margin of error for curling or flipping at both ends
of the section before it involves the tissue.
High levels of static electricity can become a problem in some laboratories particularly in dry climates and during cold weather heating season when air becomes dry.
This can manifest in the form of freshly cut frozen sections jumping as much as an
inch land on our slide in a most haphazard way. In this setting, retrieving the section
from the stage can become an Olympic event and is easier accomplished by retrieving
from the block. Suggestions for dealing with static are described in Chap. 1.
4.2.8.1
Retrieving from the Stage
When the section is complete, the tissue can be up picked from the stage up by
holding the slide just above the section and angle the slide down to touch a portion
of the tissue as in figure a. Static attraction will draw the section to adhere to and
quickly melt on to the warm slide. One can use a fingertip as in figure b to stabilize
the front edge of the slide while levering the slide down to meet the tissue in a very
well controlled way (Fig. 4.13).
If the section is in a position on the stage which is awkward to retrieve, we can
will simply drop the slide onto the tissue from a height of about a quarter inch
above the tissue. Tissue sticking to the brush can also create problems and will be
minimized by keeping brushes clean so there is less sticking and by having several
brushes available. If the sections are at ideal temperature and lying flat, they can be
Fig. 4.13 Retrieving from the stage. Figure (a) shows the slide being levered down on the edge
of the stage to meet the tissue. Figure (b) shows the finger tip being used as a hinge to lever down
the slide onto the tissue. Both techniques allow fine control of the slide as it comes in contact with
the tissue
4
Cutting the Frozen Section
93
moved with the brush into whatever position is easiest to pick up on the slide.
We can also use two brushes to stretch, uncurl, or orient the sections and to move them
into position to retrieve. Our tissue will be the easiest to retrieve and position when
it is cut at the ideal temperature so the sections lie flat on the stage. See Chap. 5.
4.2.8.2
Retrieving from the Block
Occasionally when faced with a difficulty retrieving from the stage, I may have
more success retrieving the section from the block. First cut through the tissue
stopping when the handle of medium on the far side of the tissue has been
reached and leaving the last 1–2 mm or of the section attached to the block. By
rotating the cryostat wheel backward, the block is drawn back up away from the
blade with the tissue still attached to the block. The fixed edge of the section can
now be gently stretched downward with the brush while the slide is placed over
the block picking up the section. I have found this useful in problems arising from
curling, tissue sticking to the brush, fat sticking to the stage, and in high static
conditions. Some operators prefer this technique for the majority of their sections
or are forced to use this technique when cryostat design leaves little access to the
stage (Fig. 4.14).
4.2.9
Teaching Continuous Motion
Teaching a newcomer continuous motion technique is surprisingly easy once you
have comfortably mastered the technique yourself. I recommend the following
exercise which takes about 15–20 min in most cases. It is easiest to start with a
Fig. 4.14 Retrieving from the block. Figure (a) shows the section which has been cut and stopped
in the last two mm. before completely cutting across the entire block. Figure (b) shows the block
with attached section being brought backward and up so the section now rests on the block face.
Figure (c) shows the slide (arrow) retrieving the section off the face of the block while the section
is gently held stretched in position by the brush.
94
S.R. Peters
block made only of embedding medium, frozen to optimal temperature. Have the
student sit in proper position holding the brush as described above making certain
the brush will be meeting the tissue flat like a broom.
Steps One – Ask them to write their name across the bottom of the block using
the brush in the left hand so they can appreciate the fine motor movements they will
be using to maneuver the brush, while performing a task familiar to them.
Step Two – With their hands in position and the teacher standing on the right
beside them, asks the student to go totally limp so there is no resistance; the
teacher, while grasping their hands, begins the process of cutting using their hands.
Carry their hands through multiple cycles of the cutting process for about a minute.
I believe this step lets the student experience what it is like to cut without any
hesitation as they are developing muscle memory for this movement.
Step Three – Give the student the brush in their left hand alone. The teacher now
turns the wheel in a fairly slow continuous motion. The student stumbles a bit at
first but soon finds they are keeping pace with the microtome. Correct any deviations in technique and position of hands and brush. After a minute or two, most are
ready to go on. A few may need another minute at step two.
Step Four – Next start the student cutting again holding and guiding both hands
in continuous motion and then let go to let the student use both hands alone. If they
begin to hesitate, give a gentle touch to the wheel hand to keep them going until
they are cutting without hesitation.
Step Five – Sharpen a point on an applicator stick and have the student use this
pointed object in place of the brush. This will enlighten them to the even finer touch
of the stick and teach them to precisely catch the edge of the section and guide it
gently across the stage without pressing it to the stage. If they try to press down, the
stick will tear the section. At this juncture, they will need to practice on their
own.
If you are learning continuous motion on your own, try having a colleague turn
the wheel continuously at a slow uniform pace for you while you learn to catch the
falling snowflake. Figure 4.15 When turning the wheel for someone else holding
the brush it will help them to sing in a waltz tempo at the speed you are turning the
wheel.
4
Cutting the Frozen Section
95
Fig. 4.15 Illustrates teaching continuous motion technique. Sitting comfortably, the resident is
placed in correct hand position and told to let his hands go completely limp. The aging teacher
moves the resident’s hands while cutting in continuous motion for a minute or more. This exercise
passes along a strong physical sense for the continuous movement
Chapter 5
Variables Affecting the Cutting Properties
of Tissues and the Resulting Artifacts
Stephen R. Peters
Abstract This chapter elucidates the variables effecting the way tissues cut when
preparing frozen sections. Our goal is to recognize artifacts on the sections as they
are being cut and make corrections and adjustments to yield the best sections possible.
The cutting properties of tissue with varying temperature are discussed in detail
with illustrations of artifacts and techniques for adjusting block temperature and
cutting ribbons. The cutting properties of various types of tissues are described
with suggestions for dealing with difficult-to-section tissues such as fatty tissues
and tough or hard tissues. Other parameters, such as the amount of tissue and thickness of the sections being cut, are discussed. Suggestions for dealing with common
problems such as sectioning fatty specimens and cutting tissues that are curling
away, common artifacts and suggested remedies, are described.
Keywords Chatter • Chunked out • Crumple stage • Curling away • Fat gouge
maneuver • Gouge • Handle • Plastering • Temperature of the block • Thin stripes
• Wide stripes • Thick sections of fat
Now as we begin to cut our frozen sections, our next goal is to learn to appraise
the quality of the section as it appears fresh off the blade so that we can assure a
quality preparation to interpret. Artifacts and problems must be recognized as the
section is being cut. This will save considerable time lost when a suboptimal
preparation forces us to prepare additional slides. In this section, I have tried to
cover all of the variables, which I have found to impact the section preparation
and suggestions that I have found useful in dealing with them.
S.R. Peters ()
Department of Pathology University of Medicine and Dentistry of New Jersey
Pathology Innovations, LLC, 410 Old Mill Lane, Wyckoff, NJ 07481, USA
e-mail: [email protected]
S.R. Peters (ed.), A Practical Guide to Frozen Section Technique,
DOI 10.1007/978-1-4419-1234-3_5, © Springer Science + Business Media, LLC 2010
97
98
5.1
S.R. Peters
Temperature of the Block
One of the most important variables to get quality frozen sections is having the
correct temperature of the block you are cutting. There is a consistent pattern of
changing behavior when cutting sections from a frozen section block as the temperature goes from being very warm to very cold. If one attempts to cut fresh
room temperature tissue at 5µ thickness, it results in a soft material that smashes
into a semi-liquid mass. When the frozen block is very warm, such that the
embedding medium still has a slightly grayish tone, the cutting tissue will still
crumple completely because the tissue is not firm enough to sustain a flat paperlike shape. Very warm tissue is at risk of being pulled entirely from the block
because the junction of the freezing tissue and embedding medium has not hardened yet. This is referred to as being chunked out. As the block cools closer to the
ideal temperature, sections harden to where they begin to flow over the blade in
complete sections but will still crumple slightly. The section has not yet become
rigid enough to maintain its true length and shape and the friction of the knife will
cause the slightly soft tissue to bunch up. For the purpose of discussion, I will
refer to this as the crumple stage.
As the temperature continues to fall, the tissue becomes hard enough to maintain
its shape as it is shaved from the block. In my experience, just as the tissue begins
to easily cut complete clean sections, we have reached the ideal temperature to cut
most tissues with the exception of fatty tissues. The tissue will flow over the blade
in a complete section with minimal curling and little or no shattering. At this temperature, the section will lie flat on the cryostat stage, making it possible to take
multiple sections and pick them up in a single movement, effectively creating ribbons. I have measured this temperature and results have shown that the temperature
has to be in the range of −16 to −20°C. The block in Fig. 4.13(d) illustrated tissue
cutting in this temperature range. This is also the best temperature to cut very watery
tissues such as brain and large pieces of tough tissues that will stress the blade.
As the tissue cools further, sections will continue to cut, but the tendency to curl
and shatter will increase as temperature falls. As the temperature falls below about
−25 curling and shattering will increase to a point where curling will create difficulty in obtaining a section and shattering artifact will encumber interpretation.
Figure 5.1 illustrates shattering of frozen sections starting with severe shattering at
about −35°C to more subtle examples as temperature nears ideal.
With falling temperature, tissues become harder, resulting in increased stress on
the blade. Very overcooled blocks may introduce new problems such as thick and
thin sections or chatter (see below). As was mentioned in Chap. 3 very tough tissues in large pieces should be cut on the warmer side and diagonally or vertically
if these artifacts appear.
I have tried to explain the actual cause of shattering by imagining the blade
as a wedge, which is passing through the tissue. In fact, our beveled blade edge
is a wedge shape. The tissue is first approached by the microscopically thin edge
of the blade which starts to cleave the 5 µ section off of the surface of the block.
5
Variables Affecting the Cutting Properties of Tissues and the Resulting Artifacts
99
Fig. 5.1 Shattering. Figures (a–d) Examples of shattering artifact in frozen sections of liver tissue
as temperatures from very cold to warmer and closer to optimal temperature. Figure (a) A frozen
section block of liver cut at approximately −35°C. There is severe shattering. Figure (b) is cut at
approximately 25°C. Shattering is still quite obvious. Figures (c) and (d) More subtle examples of
shattering as the block gets closer to ideal temperature. Such subtle artifacts may go undetected
unless carefully looked for. Figure (e) A 40× photomicrograph of figure d. The shattering artifact
which is so subtle in figure d is visible as the white liner clefts. Figure (f) Illustration of differential shattering within a single section. This 40× micrograph shows a kidney tumor on the left
which is showing a greater tendency to shatter than the neighboring normal kidney on the right.
Presumably this tissue contains higher water content increasing its tendency to shatter
As the blade passes deeper into the tissue, the wider part of the blade follows
behind pushing the newly formed section outward and the beginnings of a tendency
to curl. The section is actually flexing to a degree at this point. If the tissue is too
hard to flex, as the wedge passes under the tissue it will break as the section’s
100
S.R. Peters
limits of flexibility is passed. After each break in the section the blade passes
another similar distance until the limits are reached and the section breaks again.
This explains the periodicity we see. The association of shattering and flexibility
also explain the fact that colder tissues shatter more because they are harder and
less flexible; thicker sections shatter more because they are less flexible and;
tissues with more water content shatter more because they freeze harder and are
less flexible.
5.1.1
Adjusting the Temperature of the Block
Given this pattern of behavior, our goal is to cut most tissues at this ideal temperature of −17–18°C. Given this scenario, it would first seem logical to set the cryostat at a warmer temperature around −20°C. Unfortunately, keeping the cryostat
this warm will further slow the freezing process and lead to worsening freeze
artifact. We are faced with a compromise of keeping our cryostat colder, and using
alternate means of adjusting the temperature if the block emerges overcooled or
undercooled. Warming the face of an overcooled block has traditionally been
accomplished by pressing ones gloved thumb to the tissue face for a few seconds
as illustrated in Fig. 5.2. I will often use the palm of my hand as well. As this will
only temporarily warm the tissue, the operator must act quickly to take the section
before the temperature of the block equilibrates back to the ambient temperature.
After warming, the very first section tends to be thicker as a result of the effect of
warming. We must quickly trim away several sections until we see the appropriate
thickness and the pick up a good quality section. In performing such rapid time
sensitive maneuvers, it becomes clear that the better our cutting skills the easier
these tasks will become.
The process of warming tissue with the thumb brings the thumb dangerously close to the blade. The operator must exercise caution to avoid cutting
oneself. Make sure the block is in its furthest position away from the blade
and lock the wheel. If the cryostat wheel is not locked, downward pressure on
the block can push the block and thumb downward toward the blade and risk
potential injury.
A safer alternative for gently warming a block can be made by covering the end of a
heat extractor or similar object with masking tape. Use it at room temperature to warm the
block face in short moments of pressure similar to the way we would use the thumb.
If the block is too warm such that the tissue is crumpling, it can be cooled by
applying an over-chuck freezing block or heat extractor to the block face for a few
seconds to gently lower the temperature. With this method, one can easily recognize the cutting properties at the ideal temperature as the block comes into range
and the tissue begins to form flat sheets. An alternate way to cool the block is by
using a freezing spray which will rapidly cool the block. These sprays must be used
judiciously or there is a tendency to overcool the block leading to shattering and
curling and a further need to warm the block. The role of freezing sprays is more
5
Variables Affecting the Cutting Properties of Tissues and the Resulting Artifacts
101
Fig. 5.2 Warming the block to the crumple stage. (a) Warm the block with the thumb pressed to
tissue face for a prolonged period. (b) The tissue is slightly overwarmed and is crumpling when
cut. (c) Gently cool the block with the over-chuck block. (d) At the ideal temperature, the tissue
will form a firm sheet and lie flat. This is the ideal temperature to cut most tissues and sometimes
the only temperature to cut tough tissues. If your brush is clean, it is possible to cut consecutive
sections essentially forming ribbons
justifiable when cutting fatty tissues requiring very cold temperature. When using
freezing spray, one must beware of the risk of inhalation of any shavings that may
be aerosolized in the cryostat. Good cryostat hygiene is imperative if you are using
these sprays.
Freezing heads are available in many cryostat models and are designed for the
purpose of quickly cooling blocks to a desired temperature.
To section fatty tissues, the tissue must be taken to very low temperatures to
become hard enough to section. Unfortunately in practice, many specimens
containing fat will also contain non-fatty tissues which will exhibit serious shattering
at a temperature required to optimally section fat. Approaches to sectioning fatty
specimens will be discussed below.
102
5.1.2
S.R. Peters
Starting at the Crumple Stage
Using the Precision Cryoembedding system, I like to start with the blocks a hair on
the warm side. Ideally this is at the very end of the crumple stage. A quick touch of
the over-chuck freezing block or any heat extractor and we will be at ideal temperature. Warming tissue to the crumple stage is also useful if the block is very overcooled or you are getting chattering because tissue is very tough.
5.1.3
Cutting Ribbons
As I mentioned earlier, when tissue is at the temperature that it will lie flat just
beyond the crumple stage, we can essentially cut ribbons of successive sections as
in Fig. 5.2(d). Other requirements to accomplish this are a clean frozen section
brush that will not stick to sections, a clean cryostat stage that will not impede the
flow of sections over the stage and our best continuous motion technique.
5.2
Cutting Behavior of Specific Tissues
Various types of tissue will exhibit different properties when cutting a frozen section. Tissues vary in the amount of fat, water, and collagen and vary in degrees of
toughness, and hardness. Tissues may also contain impenetrable materials such as
metal staples and sutures, calcified materials, and cortical bone. Fortunately, most
tissues can be easily sectioned by frozen section.
5.2.1
Softer Non-fatty Tissues
Soft tissues such as the ones found in most organs, will cut with relative ease given
a sharp blade and good technique. Cutting very large pieces of such tissue is possible, as there is little stress on the blade.
5.2.2
Watery Tissues
Tissues containing a high content of water, such as brain and edematous tissues,
will have a greater tendency to shatter and ideally must be sectioned at the warmest
temperature possible to minimize shattering. Figure 5.5f illustrates this property.
The kidney tumor tissue on the left half of the picture shows considerable shattering
compared to the normal kidney tissue on the right. I suspect the tumor tissue is
considerably higher in water content. With watery tissues, such as brain biopsies,
5 Variables Affecting the Cutting Properties of Tissues and the Resulting Artifacts
103
an approach I find useful is to start with the block slightly on the warm side and
bring it up to cutting temperature with a heat extractor if necessary. If you start out
too cold, it will need to be warmed to nearly the crumple stage for the best sections.
Shattering also tends to increases with increased thickness of the section.
5.2.3 Tough Collagenous Tissues
Tough collagenous tissues, such as scalp and cervix, generally cut well in small pieces.
As we said earlier, large pieces of very tough tissues can stress the blade, particularly
at cold temperatures and with a thinner, low-profile blade. If you are cutting a large
piece of collagenous tissue and experience thick and thin sections or chatter, the block
needs to be warmed. Start by positioning the long axis of tissue at a diagonal or perpendicular to the blade to minimize the effective diameter of the tissue, reducing the
stress on the blade. Next, warm the block for a prolonged period with the thumb until
the tissue is cutting just at the crumple stage. Gently re-cool the block with an overchuck block or heat extractor until sections begin to form. At this ideal temperature,
the tissue will form a firm sheet and lie flat. This is the ideal temperature to cut most
tissues and sometimes the only temperature to cut tough tissues.
5.2.4 Bony Hard Tissues
Bony hard tissues will quickly damage disposable blades. Tissues containing trabecular bone can be sectioned with optimal technique; however, the blade will
become increasingly nicked with each pass of the block. In these cases, first trim
the block and then change to a new section of blade. Take your section with the
least number of turns possible. Multiple blade changes may be required. I have not
been successful sectioning cortical bone using disposable blades. Blocks prepared
containing unexpected fragments of cortical bone can be dealt with by gouging out
the bone and repairing the block by plastering the face. See the gouge below.
5.2.5 Necrotic and Liquifactive Tissues
Necrotic and liquifactive tissues which have lost all structural integrity may leave a
hole on sectioning and have a tendency to fall off the slide during staining. The
tissue samples should be taken grossly to include both viable and necrotic tissues
if available so, at least a portion of the tissue will have the structural integrity to
yield interpretable tissue. A handle of embedding medium will help support the
section. A sharp blade and continuous motion technique will maximize our ability
to get the tissue to remain with the section. Minimize agitation on staining as this
loosely adherent tissue is easily shaken from the slide.
104
S.R. Peters
5.2.6 Fatty Tissues
Fatty tissues are, without question the arch nemesis of the cryotomist. The problem
will become obvious when the fat begins to smear and impedes cutting of any tissue in
its path. Fats are inaqueous materials which simply do not freeze. To make fat hard
enough to section, it must be cooled to very low temperature compared to that at
which more aqueous tissues are sectioned. Unfortunately, these temperatures are
too often cold for obtaining good sections of the non-fatty tissues that are often
present in the same sample.
Another type of fatty problem will arise due to the fact that fat does not adhere well
to the embedding medium. If a piece of more manageable tissue, such as a lymph
node, is surrounded by a layer of fat, the fat will prevent adhesion of the tissue to
the embedding medium. When the tissue in the section does not adhere to the
embedding medium, the tissue will curl away from the medium leaving only a hole
where the tissue was. To best deal with this dilemma, warm the tissue with the
thumb as much as possible to minimize curling (see p. 22 of this chapter).
I have had success answering most of my questions in fat containing tissues
using the following techniques:
• Dissect off any unessential fat. A common example is a portion of fatty covered
tissue submitted for frozen section of a lymph node. A technique for dissecting
the fat of lymph nodes is offered in Chap. 2 (see p. 14). With careful dissection,
one can remove the fat without incising the lymph node capsule. Some pathologists may criticize this technique, suggesting that removing this fatty tissue may
lead to failure a identify a positive node. It is my rationale that I have a much
better chance of finding a positive node with a good clean intact section than a
miserable section that cut with great difficulty due to the presence of fat.
• Start with a sharp blade, a very cold block and a clean stage. It would seem that fat,
the softest tissues, would be the last to require a very sharp blade. On the contrary,
I have found a sharp blade is essential in sectioning fatty tissues. I am guessing that
the smoothest most uniform cut with the least resistance on the blade will best shave
this soft substance. It is easy to imagine how passing a dull chisel-like edge through
this material would cause it to smash rather than cleave. To achieve very cold temperatures to section fat, one can use a rapid freezing spray, a heat extractor kept at ultra
low temperature or the freezing head of your cryostat, if it is equipped with one.
Liquid nitrogen can also be applied to the block face with a swab, specifically to fatty
elements a technique illustrated in Fig. 8.15. If the cold block temperature causes
excessive shattering in the non-fatty tissues, try getting additional sections at a warmer
temperature; so that better sections of the non-fatty issue will be available to examine.
The combination of these two slides will maximize interpretable area of the block.
The stage and blade must be clean. If you smear a section it must be cleaned. It is
wise to remove the blade before cleaning the stage. If you see wide streaks in the tissue
or the section, begins to bunch, there may be tissue stuck to the underside of the blade.
Remove it and wipe it very carefully against a paper tower. Whenever removing
or changing the blade always reverse the block before beginning to trim again. See
wide stripes p. 114.
5
Variables Affecting the Cutting Properties of Tissues and the Resulting Artifacts
105
• Orient the tissue so that fat hits the blade last or by itself and always with a
handle of embedding medium. Figure 5.3 shows an example of a sample of
breast tumor and fatty margin tissue, which has been inked black. Reprinted
from (Peters 2003). The tissue is oriented with the fatty margin perpendicular
to the blade. The tumor will cut fine and the fat will hit the blade by itself and
cut to varying degrees and leave some empty space. Fortunately, a line of ink
usually remains to indicate the position of the margin.
Fig. 5.3 Embedding fatty breast tissue figures (a) A portion of breast tissue being embedded with
the tumor tissue on the left and the fatty inked margin on the right. Figure (b) The block being cut.
The tumor, now on the right, will reach the blade without interference from the fatty tissue on the
right. Figure (c) An intact section with fine holes where pure adipose tissue was present. Figure
(d) A photograph of the stained slide of the section in Fig. (c). The tumor tissue is well sectioned
and easily interpretable. Much of the fatty tissue is present and the inked margin is intact and
interpretable. Holes are seen where pure adipose tissue was present. Sections of this difficulty can
be accomplished with continuous motion technique and a sharp blade
106
S.R. Peters
Fig. 5.4 Cutting a block without a handle. Figure (a) A block with pure fat without a handle of
medium to first hit the blade. Figure (b) That the fat immediately smears upon hitting the blade.
Without the medium completely framing, the section will not maintain its shape and simply smears
If fat hits the blade without a handle, the fat will immediately smear and severely
impede cutting of the more manageable tissues in its path. Having a handle of
embedding medium will lend support and hold the section together. When the knife
hits the fat, it may leave a hole, but the section will remain intact and the more
manageable tissues will section cleanly. To achieve our best results with fatty tissues,
cutting with continuous motion and a sharp blade are essential. Figure 5.4 shows an
example of what happens when fat hits the blade without a handle of medium.
• Thick sections of fat.Taking thicker sections of fat can be a good adjunct to
interpreting the thin-sectioned slide. But first realize if this is precious tissue,
you will be using it up quickly if you make more than one or two attempts. I
would not recommend this for beginners. The thicker the section, the easier it
will be to get this slice of butter. Practice with a piece of fat before trying that
breast margin. Thicker sections can be made in a variety of ways. On my automated
cryostat, a single press of the fine advance button will often yield thickness that
I can get a complete section. If conservation of tissue is not an issue, I may try
a press of the course advance producing a very thick section. You can also take
thicker sections by adjusting the section thickness of the cryostat, or by taking a
double click of the wheel by cranking forward a quarter turn, then backward, and
again forward. This variety of maneuvers will produce a range of section thickness. From a standstill cut, the section with a moderately slow continuous very
deliberate fashion while using your best brush technique. You will end up with
a slice of butter to pick up on the slide Fig. 5.5a. Retrieve the tissue with a very
gentle touch so as not to smash the section on the slide. Follow all the steps in
fixing and staining, but increase the times several fold depending on the
thickness. Use only slight agitation in staining solutions, because the thicker
edge of the section creates more drag for the tissue to be pulled off the slide.
5
Variables Affecting the Cutting Properties of Tissues and the Resulting Artifacts
107
Fig. 5.5 A thick section of fatty tissue. Figure (a) A thick section being cut at approximately 50µ.
Notice the obvious thick appearance of the tissue and the cracking of the thick embedding medium
layer when compared to the examples in Fig. 5.3. Figure (b) The stained section at 40× magnifications. The adipose tissue is intact and the inked margin is visible on the left. Due to the transparency
of the adipose tissue, it is still quite interpretable even at this thickness. Figure (c) A micrograph of
the stained slide at 200× magnifications. Fat cells and small blood vessels are seen coursing in three
dimensions. Figure (d) An area of duct carcinoma in situ found among the fatty tissue. The less
transparent tumor is more obscured by the thick three-dimensional section, yet is still recognizable
as malignant by low-power architectural features and high-power cytological details
The result is an amazing, three-dimensional section, most of which is readable
under the microscope because the fat is so transparent Fig. 5.5b and c. reprinted
from (Peters 2003). One will observe tiny capillaries coursing in all directions.
I have also had luck recognizing structures in the non-fatty portions. This type
of preparation of a margin will contain the entire tissue face and can help interpret
the thin section taken from a fatty margin where some of the tissue has been lost.
Figure 5.5d shows the highly malignant nuclei and necrosis of a high-grade
mammary duct carcinoma is still recognizable in this preparation.
108
S.R. Peters
Fig. 5.6 The gouge and plastering. Figure (a) A portion of skin with a central area of fatty tissue.
Figure (b) The softer fatty tissue being gouged out of the block. Care must be taken to avoid the
cryostat blade if gouging is done with the block in the block holder. Figure (c) A drop of embedding
medium applied to the defect. Figure (d) A freezing block placed over and freezing the filled
defect. Figure (e) The repaired defect which will now cut with ease
• The Fat Gouge Maneuver. Fat can be removed from the block even after you
have started to trim using a plastering technique I playfully call The gouge. Even
at cutting temperature if you touch the fatty tissue in a block you will find that
it is quite soft relative to the more aqueous tissues. The fat can be easily scraped
away with the tip of a forceps or other tool followed by repairing the defects by
plastering (Chap. 3, p. 23) Fig. 5.6.
• Paint it with liquid nitrogen.
5.3
Curling Away
Occasionally one will find that as they are cutting a frozen section block, all or part of
the tissue section separates from the embedding medium. Because there is a tendency
of the two different materials to curl to different degrees, we experience a phenomenon
I refer to as curling away, where the tissue curls out of its embedding medium frame.
This can occur for several reasons. If there is a thin layer of fat surrounding the tissue,
5
Variables Affecting the Cutting Properties of Tissues and the Resulting Artifacts
109
such as is often left attached to the capsules of lymph nodes, the fatty tissue will cause
the tissue to separate from the embedding medium. When the section is cut, the fatty
tissue is not solid enough to form a firm thin sheet between the lymph node and the
medium leaving an empty void. A similar problem can be seen when embedding skin
on edge. In Chap. 3, p. 34, we discussed the tendency for the epidermis to separate
from the embedding medium. I believe this may be explained by the tendency of the
superficial cells of the stratum cornium to desquamate creating a plane of separation.
This separation can be used as a sign that the epidermis has been reached in the trimming process. Very necrotic and liquifactive tissues that have lost all structural integrity also have very little force holding the tissue to the medium can also easily separate
from the medium and create holes Fig. 5.7.
Fig. 5.7 Curling away. (a) A portion of embedded skin folded in half so that epidermis is present
surrounding the entire outer surface (arrows). (b) As the tissue is being cut, there is a natural
tendency for epidermis to separate from the embedding medium. As a result, the tissue portion
curls away from the embedding medium because the different properties of the tissue cause it to
curl to a greater degree than the medium. (c) Warming the block with the thumb reduces curling
of both the medium and tissue. (d) The warmer block now cuts in a complete flat section. If difficulty persists, small scalpel nicks perpendicular to the tissue at the site of the arrows, followed
by plastering will give the tissue points of adhesion to the medium (not shown)
110
S.R. Peters
There are several approaches that can be taken when tissues are curling away.
These sections should be warmed to optimal temperature to minimize the curling
of both tissue and medium. If the separation involves only a portion of the tissue,
rotate the block so that the separation is away from the knife, i.e., last to hit the
knife. If the separation is due to a rim of fatty tissue, the fat can be removed by
using gouge technique followed by plastering. Another approach would be to knick
the epidermal surface or fat covered tissue either in the gross state or by nicking the
tissue at several points in the block face. Use the point of a scalpel point to nick 3,
6, and 9:00 (about the points of the arrows in Fig. 5.7b and follow with plastering.
The nicks will expose the underlying tissues which will better adhere the tissue to
the medium. The sharply cut nicks will be visible under the microscope and should
do little to affect interpretation. Remember, when ever removing the block after
being trimmed try to return the block to the chuck holder in the same position and
bring the block backward before starting to trim again. Again, it is smart to put a
little mark at 12:00 before removing the block so that it can be returned to the chuck
holder in the same position.
As mentioned in Chap. 3 when embedding of skin, I suggest embedding skins
with the epidermis perpendicular to the blade and when possible orient tips away
from the blade to minimize flipping of the poorly attached epidermis.
5.4
How Much Tissue Can be Put in a Single Block?
The amount of tissue that can be cut in a single block depends on two factors:
5.4.1
The Ability of the Cryostat to Cut Through Large Tough
Portions of Tissue
In order to get a smooth evenly cut section, the knife must pass freely through the tissue
with no movement, stretching, loosening, or bending of any part of the mechanism
that holds the chuck, tissue, and blade. This implies that the chuck is tightly secured
and that any shafts or supports that hold the chuck are sound. The blade, the blade
holder, and any structure that holds the blade holder in place must be secured and
tight. This ability will vary with makes and models of cryostat and with the state of
maintenance of a given cryostat.
Stronger less flexible blades, such as steel knives and high-profile blades, will
be better able to manage more strenuous tasks than the thinner low-profile blades.
Consider what you are cutting before overfilling a block and always make sure
everything is screwed and clamped down tight. In addition, make sure there is
nothing between the chuck and the chuck holder so that the chuck is always flush
to the holder. When the system is being stressed by too much tissue resistance, one
can see chatter or thick and thin sections.
5
Variables Affecting the Cutting Properties of Tissues and the Resulting Artifacts
5.4.2
111
The Toughness or Hardness of the Tissue
As we discussed above, tissues vary considerably in toughness or hardness. Tissues
such as liver or kidney can be easily cut even in very large pieces. But very tough
collagenous tissues, such as scalp and cervix, may chatter or cut thick and thin if
too large a section is attempted, especially if the tissue is very cold. The colder
these tough tissues are, the more difficult they are to cut. Thus, before taking a very
large panoramic portion of tissue for a frozen section, consider the consistency of
the tissue. As mentioned earlier, when cutting very tough tissues, keep the tissue
block on the warm side and cut the tissue on a vertical or diagonal to reduce the
relative width seen by the blade.
5.5
Thickness of the Section
Thickness must be confirmed visually. Once one begins focusing visually on the
thickness, one recognizes that not every section is exactly the thickness set on the
microtome. To repeatedly cut sections of uniform thickness, all conditions must be
correct. Sections must be cut repeatedly in a smooth inform motion at the optimum
block temperature, without blade stress, and in a well-functioning cryostat with no
movement in the system.
Figure 5.8 shows examples of tissues cut at 3, 6 and 10 µ. The 3-µ sections
(a and d) will have a more translucent flexible lens paper like quality. A 5-or-6-µ
section (b and e) looks slightly translucent similar to a low-quality printer paper. A
10-µ (c and f) section will look almost opaque and seem stiffer. As thickness
increases, the tissue in the section will take on more of its natural color.
I find sections will cut with the most uniform thickness, when being cut
repeatedly in continuous motion. I suspect that when the block is resting for
more than a few seconds, there is change in the surface temperature of the block,
resulting in some expansion. The first turn often yields a thicker section. This is
often followed by a very thin section. Sections of correct thickness seem to appear
after three turns or more. When warmed with the thumb, the first section will also
often be thicker. As I have said earlier, I believe that it takes several continuous
uniform turns of the wheel before conditions equilibrate and the true 5-µ sections
start to appear. Being skilled with, the brush will allow us to continuously cut
sections until we are satisfied that we have a section of the correct thickness
without other artifacts.
To best interpret morphology in clinical practice, sections need to be cut around
5-µ. For general surgical pathology, I recommend cutting at 6-µ. I find the
extra micron gives me a richer stain, making it easier to interpret at scanning power.
The difference in nuclear overlap at 6-µ does not hinder my interpretation. Other
advantages include reduced drying artifact and less nuclear holes visible from ice
crystal artifact.
112
S.R. Peters
Fig. 5.8 Recognizing thickness of the section. Figures (a–c) Sections of liver at 3, 6 and 10 µ.
With increasing thickness, the tissue will show darkening of the color and will have a less flexible
appearance and demonstrate increased tendency of shattering. Figures (d–f) Sections cut from
empty blocks of embedding medium at 3, 6, and 10 µ. The embedding medium becomes increasingly opaque, and takes on a stiffer edge and appears less flexible
5.5.1
Thick and Thin Sections
When one experiences their cryostat cutting alternating sections of thickness both
thicker than and thinner than the correct setting, it can be a result of overstressing
the blade or of improper blade angle (see Chap. 9, p. 17). If a disposable blade is
5
Variables Affecting the Cutting Properties of Tissues and the Resulting Artifacts
113
being compressed and bowed by the blade holder, it can result in sections that are
simultaneously shaving both edges of the block while missing the center.
5.6
Stripes and Chatter
Thin stripes. Figure 5.9 shows thin stripes perpendicular to the blade. These are
usually a sign of nicks on the blade. This can result from cutting tissues with calcification, suture, or staples, or simply by touching the edge of the blade to any hard
surface while inserting the blade. The edge of a blade is extremely delicate and can
be easily damaged if touched when inserting the chuck.
Wide stripes, tearing or mysterious sudden difficulty cutting the tissue can be a
result of tissue adhering to the underside of the blade. This is common in fatty
tissues. The blade will have to be removed and wiped or replaced when this
happens. Be extremely careful when wiping the blade. I find the safest way is to
wipe the blade against a stationary paper towel at the edge of the bench Fig 5.10.
Wavy lines “Chatter.” The regularly spaced lines on the block shown in Fig. 5.11
are referred to as chatter and are a sign of movement in the system. To achieve a
good clean section, there must be absolutely no extraneous movement in any part
of the mechanism that holds the chuck or the blade. Again, all knobs, screws, and
Fig. 5.9 Thin stripes forming in the section due to nick on the blade. This can be caused by calcified
or foreign materials in the block, or simply by damaging the edge of the blade by touching a metal
surface when inserting
Fig. 5.10 Wide stripes and tearing of the section. This artifact is produced when tissue adheres
to the undersurface of the blade. Most common with fatty tissues, the blade must be removed and
cleaned or replaced
Fig. 5.11 An example of a frozen section block experiencing chatter. These wavy lines are caused by
overstressing the system to a point where there is movement. The result is this rhythmic pattern if regular
grooves formed as the blade vibrates while cutting. This can be due to loose clamps or knobs holding
the block and blade or by cutting tissue too tough, hard, or cold for the cryostat to cut without stress
5 Variables Affecting the Cutting Properties of Tissues and the Resulting Artifacts
115
levers securing of the knife, knife holder, chuck, chuck holder, and microtome must
always be tight and free of any debris that could cause movement. A simple bit of
embedding medium on the back of the chuck, or beneath the blade can cause
considerable instability.
Reference
Peters S (2003) The art of embedding tissues for Frozen section. Part I – A system of precision
face down cryoembeding of tissues using freezing temperature embedding wells. J Histotechnol
26:11–19
Chapter 6
Fixation, Staining and Coverslipping of Frozen
Section Slides
Stephen R. Peters and Catherine Susan Delia
Abstract This chapter covers fixation, staining and coverslipping of frozen section slides. A number of fixatives and fixative cocktails in use are described and
illustrated as well as artifacts resulting from prolonged drying. Several commonly
used staining procedures are described with suggestions on maximizing the quality
and information gathered for interpretation. Adhesion of tissue to glass slides and
causes of poor adhesion is discussed. Problems arising in the coverslipping process
are discussed and method for coverslipping finished slides is offered.
Keywords Acetone • Adhesion • Air bubbles • Air dried • Coverslipping • Ethanol
• Fixation • Formalin • H&E stain • Methanol • Oil red O stain • Staining • Toluidine
blue stain • Wiping slides
6.1
Fixation of Frozen Section Slides
For intraoperative consultation or rapid diagnosis of a pathologic specimen, most
pathologists will want their frozen section slides to resemble the preparations they
are accustomed to reading on their routine paraffin embedded sections. This will
require immediate fixation. There are a number of fixatives in use which include
95% ethanol, methanol, formalin, acetone and various cocktails of ethanol or
methanol with formalin and acetic acid. I have experimented with a number of
these. The various formulations used were obtained from polling the highly experienced technologists on the Histonet list server, an extremely valuable message
board for the Histology profession that is managed as a service to the field of
Histology by Dr. Linda Margraf, Dr. Herb Hagler and the University Of Texas
S.R. Peters ()
Department of Pathology University of Medicine and Dentistry of New Jersey
Pathology Innovations, LLC, 410 Old Mill Lane, Wyckoff, NJ 07481, USA
e-mail: [email protected]
S.R. Peters (ed.), A Practical Guide to Frozen Section Technique,
DOI 10.1007/978-1-4419-1234-3_6, © Springer Science + Business Media, LLC 2010
117
118
S.R. Peters and C.S. Delia
Fig. 6.1 Frozen section fixatives, single agent. The left column shows photomicrographs of renal
tubular cells at 1,000× magnification. The right column shows photomicrographs of a low grade
leiomyosarcoma at 1,000× magnification. The first through forth row tissues were fixed in 95%
ethanol, methanol formalin and acetone respectively and are labeled on individual pictures. Both
the ethanol and methanol show sharp well defined chromatin and nuclear membrane features. The
formalin fixed tissues show a more smudged, less defined chromatin. Acetone showed better
definition than the formalin but les definition than the two alcohols
Southwestern Medical Center Department Of Pathology. The resulting slides were
all quite satisfactory for interpretation. In my experience 95% ethanol gives excellent results after only a few seconds of immersion. The most critical point is to fix
the slides as rapidly as possible once the tissue is placed on the slide. The composite
Figs. 6.1 and 6.2 show examples of renal tubular cells and cells of a low grade
6
Fixation, Staining and Coverslipping of Frozen Section Slides
119
Fig. 6.2 Frozen section fixative cocktails. The left column shows photomicrographs of renal
tubular cells at 1,000× magnification. The right column shows photomicrographs of a low grade
leiomyosarcoma at 1,000× magnification. The first through third row show samples fixed in cocktails
of formalin and ethanol, formalin and methanol, and formalin, ethanol, and acetic acid. All of
these cocktails offer excellent cytologic detail
leiomyosarcoma stained with a variety of fixatives solutions. The examples showing ethanol and methanol alone and in combination with formalin and acetic acid
all show sharp nuclear detail. The formalin and acetone alone yielded a slightly
more smudged and less defined chromatin appearance.
The examples above represent fixative cocktails. Formalin ethanol and methanol
combinations used contained 30% neutral buffered formalin and 70% ethanol or
methanol solution. Formalin ethanol acetic combination contained a solution of
70% ethanol with 5% acetic acid and 4% neutral buffered formalin. If one compares these results to the examples showing air drying in Fig. 6.3, it is clear that the
differences in the various fixatives pale in comparison to the artifactual changes of
air drying.
From the time the tissue section or cytologic specimen touches a warm slide, it
starts to develop a drying artifact. I consider the histological features of fixed preparations and air dried preparations analogous to an egg in its shell and in the frying
120
S.R. Peters and C.S. Delia
pan. Drying causes enlargement of cells and nuclei, smudging of nuclear detail with
loss of contrast, leakage of fluids from the cytoplasm and blurring of cytoplasmic
borders. It is as if the cells were melting and spreading on the slide. To achieve the
best cytological detail, fixation should be carried out immediately. If one delays
fixation for more than a few seconds there will be noticeable drying artifact.
Figure 6.3 compares tissues fixed immediately with the same tissue fixed after 15 s
sitting on a warm slide. The differences are dramatic. As soon as the section is
complete, immediately pick up the tissue on the slide and as quickly as possible
place it into fixative. Have your fixative jar opened and immediately accessible.
Fig. 6.3 Drying artifact. Figures (a) and (b) are micrographs of pulmonary bronchiolo-alveolar adenocarcinoma at 200× magnification. Figure (c) and (d) are micrographs of real tubular tissue at 400×
magnification. The sections on the left were immediately fixed in 95% ethanol. The sections on
the right were fixed after a delay of 15 s after retrieving the tissue onto a room temperature slide.
Examples of the immediately fixed tissue (a) and (c) show sharp cytologic details including distinct nuclear chromatin and nuclear membrane, and well defined cytoplasmic borders. In contrast
the sections with delayed fixation show smudged chromatin and poorly defined nuclear membrane. Cytoplasmic borders are blurred and give the impression that fluids are leaking from the
cells as the tissue appears to melting on the slide
6
Fixation, Staining and Coverslipping of Frozen Section Slides
121
When using a staining rack, I suggest keeping it outside the fixative jar so it does
not impede your swift motion and risk breaking the slide. First fix the slide for a
few seconds in 95% ETOH then put it in the rack.
6.2
Air Dried Preparations
There are many setting where we will want to take advantage of the effects of air
drying slides before fixation. Air drying frozen section slides will allow the sections
to better adhere to the slide and is a requirement for many research applications
where more harsh and complex staining procedures will cause greater tendency for
the tissue to come off the slide during staining.
As discussed in Chap. 2, air dried cytology preparations stained with the diff
quick stain will provide a new set of morphologic features to augment our fixed
H&E stained sections. The expanding fried egg phenomenon offers a level of magnification allowing cells to be visualized at lower magnification. Cytoplasmic features are magnified. The diff quick stain offers specific staining of mucosubstances
and other elements which will be more subtle or not visible on H&E stain.
6.3
Staining of Frozen Section Slides
Slides prepared by frozen section technique can be successfully stained by many of
the staining procedures used for routine paraffin embedded tissues. In research
applications there are a number of settings where frozen section slides are preferred
due to better preservation of cellular elements. For intraoperative consultation we
are limited to rapid staining procedures due to the limitation of time. The stains
most commonly for intraoperative consultation are a rapid H&E (hematoxalin and
eosin) stain and toluidine blue stain.
Many pathologists are most comfortable using an H&E stain for frozen section
slides because it most closely resembles the preparations seen in our routine sections.
Hematoxylin stains are either “regressive” or “progressive.” The slides in a regressive hematoxylin stain are stained in the hematoxylin solution for a set period of time and then
taken back through a solution such as acid–alcohol that removes part of the stain. This
staining method works best for large batches of slides to be stained. The slides in a
progressive stain are dipped in the hematoxylin until the desired intensity of staining
is achieved, such as with the frozen section (Klatt and Edward 2008). Compared to
the toluidine blue stain which takes a few seconds to prepare a rapid H&E will take
a few minutes. Like many others, I am happy to spend the extra time to have a familiar
picture to evaluate during the challenges of intraoperative consultation.
When reading frozen section slides, pathologists make the large part of their
observations at scanning powers i.e., 20× or 40× magnification. At these low magnifications, a poorly stained slide offers only a washed out image, opening up possibilities
122
S.R. Peters and C.S. Delia
for misinterpretation and overlooking minute findings. When looking at lymph
nodes for metastatic disease, it is essential to have deep rich staining, especially the
eosin. If the eosin stain is rich, the pale pink cytoplasm of a sinus histiocyte can be
more easily distinguished from the tumor cell cytoplasm which may be more
eosinophilic or clear. With a poorly stained slide, the shades of pink and blue are
not as clearly differentiated and subtle differences are lost.
6.4 H&E Staining Procedure
Hematoxalin 60 s
Rinse in water
Ammonium hydroxide % 10 s
Rinse in water
Eosin 15 s
95% ETOH 10 s
100% ETOH 10 s
100% ETOH 10 s
Xylene 10 s
Xylene 10 s
Apply cover slip with mounting medium.
When motivated by our surgical colleagues, it is tempting to move quickly
through the staining rack. The extra minute it takes to properly stain a slide will
make the job of reading it far easier. Do not rush any step of the staining process
and to keep all stains and solutions fresh and well maintained. Gentle agitation will
aid the staining process by keeping the staining uniform, but the type of tissue and
its adhesive nature should be considered. Do not over agitate the tissues that are
loosely adherent (see below).
Using H&E stain, one would expect that simply setting a timer for a given time
interval in hematoxalin would yield the same result every time. Unfortunately in a
busy frozen section practice, solutions can become diluted and at times may not
always be perfectly maintained. Get in the habit of looking at the section as it leaves
the bluing agent. Observe the shade of the section and compare it with the result
under the microscope. Eventually you will get a sense for the color and shade of a
well stained slide versus a lightly stained slide. There is a specific navy blue tone
that tells me the section is well stained. Keep in mind; both the thickness of the tissue
and the density of nuclear material will make the color to the tissue appear lighter or
darker. A lymph node densely packed with dark staining nuclei will appear quite
dark after the bluing agent and a piece of muscle which has widely separated nuclei
will appear very light. The actual tone of blue will be similar when optimally
stained. By checking the color after the bluing agent one can return the slide to the
hematoxalin for additional time if necessary. Make your own observations and get in
the habit of grossly checking the slide before continuing on with the staining.
6
Fixation, Staining and Coverslipping of Frozen Section Slides
6.5
123
Toluidine Blue
Toluidine blue stain is a commonly used alternative used for staining the frozen
sections. A metachromatic stain, toluidine blue delineates the architecture in varying
shades and intensities of blue and purple. A significant advantage of the toluidine
blue stain is that it works almost instantly. A drop of stain is applied over the section
and the slide is cover slipped and ready to read. It will stain mucosubstances faint
purple and notably mast cells will have purple granules. A disadvantage of toluidine blue is that there is considerably less differential staining of the tissue. It is my
feeling that we should stain the slides with the stain most familiar to us. As a
pathologist, I am used to recognizing microanatomy in the familiar reds, blues and
purple of an H&E stained slide. Personally, I do not think it is worth using a less
familiar stain with less differential staining to save 2 min of time. I am certain that
many toluidine blue users will argue this point and find that their experience with
toluidine blue has made them equally comfortable recognizing the morphologic
findings under the microscope.
6.6
Special Stains for Intraoperative Consultation
As I mentioned above, there are many special stains which can be applied to the
frozen section slides. Unfortunately due to the time constraints for intraoperative
consultation, we are quite limited to stains that can be completed in a few minutes.
The oil red O stain for fat can be performed quickly although its uses are limited.
Oil red O stain is used effectively in some laboratories to provide information about
the lipid content of parathyroid lesions as an aid to differentiate the hyperfunctioning parathyroid glands which contain minimal intracellular lipid when compared
with the suppressed normal glands which have increased lipid stores. Oil red O
stain can also help recognizing tumors known to have cytoplasmic lipid as in some
renal tumors.
Frequently, we are asked to look for evidence of infection in frozen section
slides. These are often in immunosurpressed patients who are very ill and need the
fastest possible answers. If you suspect an infectious process, take a few extra frozen sections on charged slides if possible. These can be brought to the histology lab
and stained for fungi and acid fast bacilli making the results available in just a few
hours depending on your labs capabilities. Figure 6.4 shows an example of a frozen
section of an open lung biopsy specimen removed on a bone marrow transplant
patient. The H&E section showed a few subtle areas of foamy appearing exudates.
An unstained frozen section was brought to the lab and placed on an automated
stainer. Within 2 h, the methenamine silver stained slide demonstrated conclusively
that the pneumocystis carinii organisms were present.
Protocols for immunoperoxidase staining can also be modified for frozen
section slides, opening additional possibilities for identifying viral infections such
124
S.R. Peters and C.S. Delia
Fig. 6.4 Open lung biopsy frozen section. Picture (a) shows an H& E stained micrograph at
200× magnification with evidence of interstial pneumonia. The arrows point to several small
intra-alveolar exudates with a foamy appearance. Figure (b) shows an additional frozen section
slide taken intraoperatively and stained with methenamine silver stain on an automated stainer in
the routine histology lab. The section demonstrates typical organisms of Pneumocystis carinii
and was available to this critically ill patient after a staining delay of less than 2 h 200× magnifications
as cytomegalovirus, herpes virus, and adenovirus rapidly in the immunocompromised
patient.
If one looks to the literature, there are reported protocols for rapid microwave
staining techniques for PAS (periodic acid shiff) (1) and mucicarmine (2) staining
for intra operative consultation.
6.7
What Holds Our Tissue to the Slide and Why Does
It Fall Off?
Occasionally, one will go through the process staining the slides only to find the
tissue has completely or partially fallen off the slide. In order to combat this
problem it is worth considering the forces that hold the tissue to the slide and the
forces considered that will pull the tissue from the slide.
What holds the tissue to the slide? In an excellent paper by J. A Kiernan,
(Kiernan, IA 1999) it is suggested that the adhesion of tissue placed on a clean glass
slide may be the result of non-ionic forces such as van der Waals forces and hydro-
6 Fixation, Staining and Coverslipping of Frozen Section Slides
125
gen bonds creating an attraction between the glass slide and the section. In addition,
ionic attractions may also exist between the silicate of the glass (negatively charged
ions, especially in an alkaline medium) and basic groups of proteins in the tissue
(positive ions, especially in an acidic medium).
In my experience which consists entirely of handling fresh tissues for intraoperative consultation, I have observed that some tissues will adhere better than others. I like to think of these tissues as having more glue. Using positively charged
slides or slides coated in polymers such as polylysine are alternatives which will
offer better adhesion of tissue.
What is pulling the tissue from the slide? I am quite confident that the forces
applied to the tissue during agitation are pulling the tissue from the slide. This can
be minimized by dipping the slide gently up and down avoiding swirling motions
that put pressure on the face of the slide and edge of the tissue. The perimeter of
the tissue is approximately five microns thick and will catch the forces of the agitation. The tissue is being held to the slide by the forces of adhesion over the face of
the tissue. The larger the ratio of the perimeter forces pulling off the tissue to the
surface area forces holding the tissue to the slide, the easier the tissue will come off
the slide. In other words, skinny strips with a large perimeter and little surface area
will fall off easier than a rectangular round or square piece of tissue that has more
surface holding the tissue to the slide. For this reason, be careful not to over agitate
when staining long strips of tissue. Once the edge begins to peel away the forces on
the edge increase significantly and it will take little agitation to pull it completely
from the slide. Below, I will share some reasons I have found for tissue falling from
the slide.
Tissue is very dry by nature or desiccation. Tissues such as very sclerotic fibroconnective tissues are relatively hypovascular and drier by nature. These dry tissues
can easily be pulled from the slide with over agitation. Using my analogy it would
seem that these tissues have less glue. Tissues such as thin walled ovarian cysts
being both sclerotic and having a large perimeter to surface area ratio can easily be
shaken from the slide. Tissues which have been allowed to desiccate to the prolonged exposure to air also have a tendency to fall off the slide. I guess that in these
tissues our glue has dried out!
Necrotic and liquifactive tissues. Even though we have a large face of tissue
holding the section to the slide, there must be something holding the tissue
together. Tissues which have become completely necrotic and liquifactive have
been reduced to particles of tissue and inflammatory cells no longer having any
architectural forces holding the tissue together. An example of this would be a
lymph node involved with tumor, in which the central tumor has become totally
necrotic. This necrotic tissue can become easily dislodged in the staining process
by over agitation.
A section is placed over embedding medium. When picking up multiple sections
on a slide, if the tissue form one section is overlapped onto the embedding medium
of another section already picked up on the slide, the tissue will not adhere as well
to the embedding medium as it will to the glass slide creating a tendency for the
second section to fall off the slide.
126
S.R. Peters and C.S. Delia
Ammonia bluing agent too strong. I have had the experience of sections
which should adhere nicely, mysteriously falling of the slide in the ammonia water
only to find it smelled much stronger than usual. In my experience, if you can smell
ammonia without putting your nose to it is more concentrated than it should be.
100% ETOH instead of 95%. I have had the experience of sections mysteriously
falling off in what should have been my 95% ETOH only to find that 100% ETOH
was placed in the fixative jar.
Formalin fixed tissue. The cohesive nature of the tissue seems to be dramatically
reduced after formalin fixation. My only explanation for this would be that the glue
in tissue fluid responsible for cohesion to the slide are fixed or washed from the
tissue in the fixation process.
Frozen sections of bone falling off slides. Keeping frozen sections of bone or
cartilage from falling off the slides may be difficult due to the curling affect of cartilaginous tissue. One thing that can be done to keep bone or cartilage on the slide is
fixing the slide in Acetone for 1 min prior to putting the slide in 95% alcohol or
other fixative.
6.8 Coverslipping
When coverslipping a slide there are a variety of problems we can create which will
hinder our interpretation or waste our valuable time. Excessive air bubbles under
the coverglass can be created when dropping a cover glass onto the slide. Using too
much mounting medium without carefully wiping the edge will cause medium to
ooze from beneath the coverslip getting onto the front of the slide and blurring the
image. Medium on the back of the slide will gum up the microscope stage making
it impossible to drive the slide and require cleaning of the stage. I suggest limiting
the mounting medium to a 4 or 5 mm drop. Mounting medium will thicken due to
evaporation making it more difficult to spread on the slide and should be changed
or diluted with xylene when it becomes unmanageable.
Another common problem is mistakenly putting the coverslip on the back of the
slide and then wiping off the tissue from the front. Using slides with only a frosted
end without writing and working in busy situations, it is very easy to pick up a
slide and retrieve the tissue on the back of the slide. When the slide contains a very
tiny piece of tissue, it can be difficult to see which side it is on, especially when it
is still wet with xylene. If the tissue was put on the back side, it might go unnoticed
until it is wiped away with gauze. When retrieving tissue always take an extra moment
to be certain the tissue is going on the front of the slide and take an extra
moment to check that the tissue is not on the surface you are about to wipe. It pays
to label the slide before retrieving the tissue to make it clear which side is front.
A note of caution; beware when prelabeling multiple slides or any container for
that matter. If you pick up the wrong labeled slide, you can easily confuse two
specimens. This can be a problem particularly in very busy settings handling many
specimens at a time. Personally I like to label the slide once I have picked up the
6
Fixation, Staining and Coverslipping of Frozen Section Slides
127
tissue. It will prevent such errors but as a result occasionally I will pick up the tissue
on the wrong side of the slide. Especially, when my slide box has been shuffled by
the gremlins that frequent so many frozen section rooms. As I have mentioned
elsewhere in this book, the best way to avoid mistakes is to develop routines and
stick to the at all times. If you do the same thing every time you be less prone to
such errors.
There are a variety of ways to apply a coverslip to a slide. Figure 6.5 illustrates
a method I have found to work quite quickly and creates few bubbles. Lay out as
many coverslips as needed on a flat paper towel about an inch apart. The typical
trifold towels work well. Place a drop of embedding medium in the center of each
slide. Take the stained frozen section slide still wet with xylene and rest it on the
towel along side of the coverslip. Now hinge the slide down 95% of the way to the
coverslip so the slide contacts the drop of medium on the coverslip. Do not let it
fall all of the way to the coverslip. If the mounting medium begins to spread by
capillary action between the two glass surfaces, reverse the slide backward and lie
Fig. 6.5 Coverslipping method. Lie a cover slip on a flat paper towel and apply a drop of mounting medium as seen in part 1. Rest the slide on the towel next to the coverslip and hinge it down
to the coverslip as in part 2. When the slide engages the drop of medium hinge it backwards as in
#3. The medium will spread by capillary action between the glass slide and coverslip. Turn the
slide face up on the towel or stand it up against a vertical surface to dry
128
S.R. Peters and C.S. Delia
it face up on the paper towel or stand it up to dry. If done correctly, there will be
very few bubbles. If the medium is thick, let a drop of xylene fall from the wetted
slide onto the drop of mounting medium to dilute the medium and facilitate rapid
capillary action.
6.9
Wiping the Slide
After coverslipping the slide, any excess medium will need to be wiped from the
edge of the slide. Skilled histotechnologists develop a fine touch with a piece of
gauze allowing them to neatly wipe the edge of the slide. I never quite mastered this
method and often found myself catching the edge of the coverglass with this wad
of gauze or spreading medium onto the surfaces of slide. I have found a simpler
way to wipe my slides that was to tape an absorbent pad or thick paper towel so that
it wraps tightly around the edge of a counter. I will tape one side of the towel under
the counter next to my microscope. Next, I stretch the towel into the counter and
tape in place so that it is taught. This creates a sharp flat towel covered surface on
the edge of the bench. Slides can be quickly and easily wiped against this firm flat
absorbent surface with little opportunity to catch the coverglass. As the towel gets
filled with dried medium, free the towel and move it, so a clean portion overlaps the
edge Fig. 6.6.
Fig. 6.6 A slide wiping towel stretched and taped over the edge of a counter. The bottom of the
slide is being wiped against the towel covered edge of the desk in figure (a). The edge of the slide
is being wiped in figure (b). As the edge of the towel becomes filled with medium the towel can
be untapped and moved so a clean area of the towel is available
6
Fixation, Staining and Coverslipping of Frozen Section Slides
129
References
Fishman A, Lew S, Altaras M, Beyth Y, Bernheim J (1998) A 30s PAS stain for frozen section
analysis of surgical margins of vulvectomy in Paget’s disease. Eur J Gynaecol Oncol
19(5):482–483
Histonet list server web link http://www.histonet.org/
Kiernan JA (1999) Strategies for preventing detachment of sections from glass slides. Micros
Today 99–96:22–24
Klatt, Edward MD (2008) The Internet Pathology Laboratory for Medical Education. Mercer
University School of Medicine, Savannah http://library.med.utah.edu/WebPath/webpath.
html#MENU
Suchetha Soans MD, Lorenzo M, Galindo MD, Fernando U, Garcia MD (1999) Mucin stain on
Frozen sections a rapid 3-minute method. Arch Pathol Lab Med 123(5):378–380
Chapter 7
Microscopic Interpretation in the Frozen
Section Setting
Stephen R. Peters
Abstract There is no place in a surgical pathology practice that challenges our
diagnostic skills more than the frozen section room. Given only a simple H&E
section, under constraints of time and an anxious surgeon, we are faced with many
diagnostic challenges. Our approach to read the frozen section slides for intra-operative
consultation should be no different than for routine surgical specimens. The chapter
discusses an approach to read the microscopic slides through by thorough examination, concentration and an organized plan for each specimen type. Key observations
about our minds’ ability to visually process information are offered. Maintaining
focus and concentration in uncomfortable settings and dealing with challenging
cases are discussed. Other topics include reading at scanning powers, recognizing
freeze artifacts and reporting of diagnostic findings.
Keywords Compression artifacts • Difficult cases • Freezing artifacts • Ice crystals • Nuclear ice crystals • Operative consultation • Microscopic interpretation •
Scanning objectives
7.1 Microscopic Interpretation and Intra-operative Consultation
There is no place in a surgical pathology practice that challenges our diagnostic
skills more than the frozen section room. Under the limitation of time, using our
most basic morphologic techniques, we are faced with many diagnostic challenges. In
routine surgical pathology, we can take our time, study our slides, and order
up a variety of special stains and studies to guide us to the correct diagnosis.
S.R. Peters ()
Department of Pathology University of Medicine and Dentistry of New Jersey
Pathology Innovations, LLC, 410 Old Mill Lane, Wyckoff, NJ 07481, USA
e-mail: [email protected]
S.R. Peters (ed.), A Practical Guide to Frozen Section Technique,
DOI 10.1007/978-1-4419-1234-3_7, © Springer Science + Business Media, LLC 2010
131
132
S.R. Peters
Intra-operative consultation demands that we perform all of the tasks from grossing
the specimen through reading the slides in a period of time in the range of 20 min
in an uncomplicated specimen.
Our approach to reading frozen section slides for intra-operative consultation
should be no different than when we are read routine surgical specimens. There are
no short cuts to examining our slides. Many familiar entities are recognizable the
moment the slide passes under our eyes. However, when we are trying to find something
as elusive as lobular carcinoma in a sentinel node, the slides must be carefully
screened and can consume considerable time. Despite the more urgent setting, we
should do our best to avoid rushing through cases requiring lengthy screening and
concentration. It is very easy to overlook a small tumor cell cluster on the side of
the road if we are driving at high speed.
7.1.1 The Zen of Reading Slides
One of the most important skills the microscopist can develop is a strong power of
focus and concentration. Loss of concentration, distractions, and interruptions are
responsible for mistakes in all activities from the work place to the athletic fields.
Such lapses in our focus can spell disaster to the pathologist. Those familiar with
the subject of meditation are aware that with practice, we can improve our ability
to focus our minds. When reading our slides we should strive to achieve peaceful,
undisturbed, environment and a state of continuous concentration and focus.
Our visits to the world of microanatomy are much like scuba diving. When we
first dive we enter a world we have never seen before and everything is new to us.
As we gain experience we become familiar with the different types of terrain, and
learn the names of the plants and animals. We observe the behavior of the different
creatures and learn to become wary of those that can be dangerous. We learn to
avoid injuries and pitfalls.
Under the microscope we are looking at a fixed two dimensional image. Like our
underwater adventure, in life our microscopic world is a kinetic, three dimensional
living tissue which has been fixed at a single point in time on our slide. Imagine
yourself a histiocyte wandering about our microscopic world. How does the process
look three dimensionally as it evolves over time? Compare different areas of the
same process on your slide and consider how the process would appear at earlier
and later points in time. Studying the many faces of our disease process will help
us unravel the future challenges.
There will be days when our mind is preoccupied with distant thoughts. When
our concentration is faltering it is best to slow down, take a break and repeat screening the areas covered during lapses of concentration.
Unfortunately when reading slides for intra-operative consultation, the setting in
which we interpret these slides may often be less than blissful. If we find ourselves
running in circles doing five tasks on three different cases, we must be aware of the
potential errors before us and make a conscious effort to remain composed and treat
7 Microscopic Interpretation in the Frozen Section Setting
133
each task with the diligence it requires. Avoid distractions if at all possible. If a
surgeon or resident sets across a multi-headed microscope it is best to complete the
screening with maximum concentration before starting to discuss the findings.
7.2 Observations on Observation
I will share several observations about our natural ability and limitations to visually gather
and process the information before us on a slide. These theories are gathered mainly from
my own experience so those who are intellectually more fortunate may disagree.
7.2.1 You Only See What You Are Looking For
It is quite disarming to realize how many subtle things pass under our microscope
that we do not appreciate. It started becoming more obvious to me when I started
teaching residents. When you concentrate on one process, you can easily overlook
something that is right under your nose. It is similar to a magic trick. We are
focused and distracted by one maneuver when another maneuver goes on right
before our eyes. A good example is a granular cell tumor of the tongue. We can be
so distracted by the malignant appearing pseudepitheliomatous hyperplasia of the
squamous epithelium, that it is easy to overlook the well hidden granular cell tumor
in the submucosa.
7.2.2 You Can Only Look Carefully for One Thing at a Time
When looking for a number of different elements in a tissue, I find it best to focus
on them separately. For example, in a complex task such as examining a breast
specimen removed for microcalcifications, we screen very busy tissues for changes,
hunt for calcifications, and still avoid overlooking a minute focus of invisible cancer.
Whether this is done field by field or by running through the slide several times, it
is safe to focus on the individual elements separately. When I read endometrial
curettings, I never feel quite comfortable unless I take a second pass looking at the
cervical tissues. When concentrating on the endometrial tissues to compile a diagnosis,
I am often passing over the cervical tissues unintentionally with less focus. Much
of the additional passes can be done mostly with a 2× objective which will save
some time. The tiny things that we can miss on any specimen such as involved
lymphatic spaces, minute foci of tumor, viral inclusions, and parasitic organisms
deserve focus of their own or surely will meet you unexpectedly again someday.
Busy streets. When sections are very busy with a densely complicated process,
there is a considerable amount of information to gather, many more opportunities to
134
S.R. Peters
be distracted and many more places for tiny things to hide. We must drive our slide
much more slowly through these tissues. Tissues showing florid proliferative or
inflammatory changes and examining lymph nodes for metastatic tumor are examples
of tissues that need to be examined slowly to capture all that is going on and avoid
missing something hiding in the bushes. It is quite easy to overlook a small area
of goblet cell carcinoid in the one section of inflamed appendix. A focus of vasculitis
or hidden Langhans cells can easily be overlooked in any inflammatory background.
And on busy streets, it is especially important to look for tiny things.
7.2.3 You Can Only Make a Diagnosis if You Think of It
You can be the most well-read, encyclopedic mind in our field but if you are handed a
slide that takes a little thought you will not make a diagnosis unless you think of it. In
our common and most familiar entities, even a small focus of the typical morphology
will immediately flash the correct diagnosis in our mind. As we all know there are
innumerable entities with overlapping morphology. Those we see more rarely and out
of the familiar context, can stay hidden behind the more familiar diagnosis that jumps
out first. If I were to ask you what movie you would like to rent tonight. Off the top of
your head will think of a number of suggestions. But when walking through the video
store, hundreds, of titles will come to mind that you would not have considered.
From the first day I ask our residents to learn the complete classification of diseases
by organ system. I ask them to “Label the files in your head.” As they see cases,
they will add to these files with experience. Having this organized foundation
automatically imparts a level of comfort with the subject. For example even as a
neophyte, if you know the classification of salivary gland tumors and are confronted
with an example you have not seen before, you can go through the files in your
head, exclude the ones you are sure do not fit and read about the ones that are possibilities.
Knowing just the names and a few facts about the entities in the classification
gives you a familiarity with the subject that leaves you with the comfort that you
have considered most of the possibilities. Now consider reading the same slide and
knowing that you only know the names of half of the thirty or more possibilities.
You will never feel secure knowing there are many entities you are not considering,
some of which can have overlapping morphology.
Try throwing up an imaginary chest film with a few vague findings and ask a
group of medical students for their differential diagnosis. Typically, someone will
murmur tumor or pneumonia and not much more. Now open the table of contents
of a general pathology text and read the chapter titles, such as diseases of immunity,
congenital diseases, vascular diseases, and occupational diseases. Suddenly numerous
possibilities will come to mind. They have all learned about diseases such as
Wegoner’s granulomatosis, rheumatoid nodule, asbestosis, silicosis, pulmonary
emboli and numerous others, but unless stimulated, you do not always think of it.
If you think about the pneumonias by class, we will think of bacteria, mycobacterium,
fungi and parasitic pneumonias. If you think about the tumors by classification,
7 Microscopic Interpretation in the Frozen Section Setting
135
numerous possibilities will come into your head, not just the common ones. Simply
by reading the table of contents of a book we will quickly have the broadest outline
of the disease class. Knowing only this will give you an important first step to learning
and feeling comfortable with the subject.
7.2.4 A Simple Plan
When we start looking at slides as a young resident, we find ourselves peering
through the microscope looking at fields of tissue, one after the other, with little more
plan than to try and tell what tissue we are looking at and to match what we are seeing
to one of the perfect examples of the entities in our texts. As we gain more experience,
we have cases to reflect back on. The many variations we have seen, the cases that
mimicked the changes we are considering, and the mistakes we have made or seen
others make. I would like to offer a more structured approach to examining slides
which I have found successful in helping me avoid embarrassment.
The simplest plan for any specimen should start with these two questions:
What am I looking for? Given a specimen and a clinical setting, we are asked to
examine the tissue and arrive at a diagnosis that will explain and confirm the
patient’s condition. We will examine the tissue grossly and microscopically and
form an impression based on the sum of our findings.
What am I going to miss? Before putting the slide back on the tray ask this question,
to make sure you have not overlooked the minute things which can get by us if we are
not focusing on them. Again, signet ring cells, viral inclusions, involved lymphatic
spaces, and parasitic organisms are just a few of the tiny things that will sneak by at
scanning power if we are not alert. This is also the time to remember the pitfalls and
mimics associated with each entity. You must always be your own devil’s advocate.
Develop a routine for each tissue and specimen type. And for each, there will be
a set of pitfalls to avoid. For example, a simple gallbladder submitted for cholecystitis,
I will evaluate the cholecystitis on my first pass. On a second pass I will make sure
I do not miss the blue epithelium (dysplasia), invisible cancer (small infiltrating
tumor cells that can be very easy to miss, particularly in an inflamed background);
and other tiny things.
In many biopsies and resections for inflammatory and organ specific diseases, it
is best to examine all of the histologic elements in an orderly fashion before compiling the findings into a diagnosis. This assures that we have explored all of the
histologic elements and will help avoid overlooking an important finding.
Inflammatory GI and skin biopsies, liver, bone marrow and kidney biopsies and are
examples of specimens requiring such a detailed comprehensive approach. In a
biopsy for colitis, I will first look at the glandular architecture at 2×. Then move to
4× or higher and systematically look at the secretions for organisms, look at the
surface epithelium, basement membrane, glandular epithelium, inflammatory cells
within the lamina propria and epithelium, look at the vasculature, look for granulomata,
and again come back to the lamina propria to make sure that I have not missed an
136
S.R. Peters
occult metastasis to a lymphatic, a few sneaky signet ring cells or a rare parasitic
organism. By looking at all of the histologic elements this way, I reduce my chances
to miss a diagnostic clue. It may seem like a lot of passes through the tissue but it
can be done surprisingly quickly.
In GI biopsies I used the phrase “Look to the mucus” to remind our residents of the
importance of examining the secretions. It is extremely easy to overlook a number of
organisms at every level of the GI tract if the secretions are not examined carefully.
7.2.5 Reading with Scanning Objectives
Low powers 2× and 4× objectives offer a panoramic view of the architecture and
orientation while covering large areas at a time. As we scan, our eyes are familiar with
normal tissues .We must train our eyes to distinguish subtle variations from this normal
field. Learn to recognize as many features as possible at 2× and 4× scanning powers.
Compare the appearance of a field of inflammation rich in neutrophils, versus one in
which there are many plasma cells or mostly lymphocytes. There are fine differences
in the presence of the colors red and purple as well as variations in the size, density
and distribution of the tiny blue dots we recognize as nuclei. You can learn to recognize even large single cells with a 2× objective. An easy way to train your eyes is to
look at the known structures at higher powers and then go to scanning powers and try
to recognize it. Look at the difference in nuclear size of a normal thyroid cell and
compare it to the size of a nucleus of papillary thyroid carcinoma. The papillary carcinoma nucleus is considerably larger and can be recognized at scanning power if
specifically looked for. It is the same with the nuclear enlargement in malignant prostate. Eventually, you will see these differences subliminally. Finding Reed Sternberg
cells, CMV inclusions, minute calcifications and even a rare tumor cell in a lymph
node is possible at 4× and sometimes even 2× if you are looking specifically for a
very tiny but recognizable structure. The better you get at seeing things at scanning
power, the faster you will be able to work and the multiple passes of the slide will go
quickly. Having said that, remember there are many types of tumors with small
nuclei, barely larger than the normal cells such as lobular carcinoma of the breast,
prostate cancer and signet ring carcinomas. In order to catch minute examples of such
tumors we must be specifically focused on looking for them.
7.3 Struggling with the Tough Ones
Types of tough ones. There are many types of “tough ones” Probably the most common
example is a miserable crushed, burned or fragmented example of something that would
be easy if you had a good sample. We may be trying to make a diagnosis as simple
as a colonic adenoma or as difficult as diagnosing dysplasia in a Barrett’s esophagus.
If the sample in uninterruptable due to size or surgical abuse, the best we can do is
cut a few of levels, get the opinion of a colleague and ask for more tissue.
7 Microscopic Interpretation in the Frozen Section Setting
137
The more exiting “tough ones” are examples of things we have never seen before.
This may be a rare tumor type or disease state, or more commonly an uncommon
variation of something more familiar to us. So many tumors can have numerous
variations that overlap with different entities. Just think of the variety and overlap of
histologic patterns that can be seen in melanoma, mesothelioma, thymoma and renal
cell carcinoma, just to name a few. By taking an organized approach and considering
the classifications of the organ system and pathology in general, we can consider all
the possibilities and exclude what is obvious. Unfortunately, such cases often need
to wait for special studies for definitive diagnosis. At the time of frozen section, we
can be most useful by offering our differential diagnosis and letting the surgeon
know what entities we can confidently exclude.
When faced with very poorly differentiated and anaplastic tumors, it pays to
spend time studying the tissue. Sometimes when we spend extra time looking carefully, these tumors will tell us their secrets in the form of subtle differentiation such
as little melanin, bile, lipoblasts, osteoid, mucin, or a rare gland or rosette. If we
think about it and look for it patiently, sometimes we are rewarded.
I can offer one somber observation I have learned about the value of experience.
The more experience we get the more quickly we realize we are out of our league.
In many cases I know from the time I see the tissue at frozen section, that this tissue
will be visiting an expert consultant. In consolation, such experience allows me to
expedite the work up and consultation process to the benefit of the patient.
7.3.1 Don’t Forget to Think About
As a resident I kept a list titled “Don’t forget to think about” and I encourage my residents
to do the same and add to it as they encounter candidates in their practice. On this list
should also be diagnoses you can easily overlook. Include anything which can be so
well hidden under the microscope that it will be overlooked if not considered.
Examples include granular cell tumor, histiocytosis, mastocytosis, and amyloid, invisible carcinomas and all tiny things. All of the mimics which lead us a stray when
encountered out of context. Of course, on the top of this list is the king of the monkeys,
malignant melanoma which can show up anywhere and mimic just about anything. It
is an easy diagnosis to make…if you think about it! Germ cell tumors, myeloma,
renal cell carcinoma, granulocytic sarcoma, thymoma, chordoma, mesothelioma,
neuroendocrine carcinoma, sarcomatoid carcinomas and, epithelioid sarcomas hairy
cell leukemia, demyelinating pseudotumor, are all worthy of this list.
7.3.2 Common Sense
Common sense can be a valuable failsafe mechanism for the diagnostician. Hopefully
we all have some of it. It will prevent us from diagnostic embarrassment.
138
S.R. Peters
Common sense tells us:
•
•
•
•
The clinical picture should fit the final diagnosis
The gross findings should fit the final diagnosis
The microscopic findings should fit the final diagnosis
Common things happen commonly and rare things rarely happen
If your common sense tells you one thing and you are being pulled in another direction,
it is worth taking a step backward or getting another opinion.
7.3.3 Study the Obvious Examples to Learn the Subtleties: Stop
and Smell the Roses
If you want to learn to recognize premalignant changes in the G I tract, take extra
time to study the premalignant changes adjacent to the obvious cancers. Resection
specimens will often have beautiful examples of these early changes which will
offer a wealth of learning material. Say to yourself, what would I call this on a
biopsy? You often see all degrees of dysplasia including subtle examples that you
might equivocate on in a biopsy but are confident is dysplasia in the context of this
large display. Look at the neighboring glands in an endocervical adenocarcinoma.
You will see things you would only consider atypia in a biopsy, but seeing in context may convince you that it is extremely early dysplastic change. Studying the
ducts in a pancreatic cancer will offer a spectrum of early changes. These big resection specimens are often full of examples of early neoplasia which are more valuable learning material than you will see in numerous biopsy specimens and images.
And when faced with that miserable biopsy, you will have good examples of what
is and is not significant tucked away in the files in your mind.
7.4 Cytologic Preparations
As I alluded to in Chap. 2, cytologic preparations can yield valuable information to
support our findings found on the frozen section preparation. If cytology preps are
immediately placed in fixative (95% ETOH), the cytologic detail will be crystal clear;
essentially frozen in life. Details of the nuclear chromatin and cytoplasm will be
distinct and reliable in well preserved cells. These preparations can display findings
in background material which may not be visible on the section such as lymphoglandular bodies of a lymphoma, extracellular substances, fungal and parasitic
organisms. Addition of an air dried smear will supply an expanded view of the nuclear
and cytoplasmic size and shape, chromatin pattern and magnification of details such
as vacuoles, intracellular substances, nuclear inclusions. The diff quick stain will also
highlight the extracellular and intracellular substances such as mucin, and various
forms of thyroid colloid.
7 Microscopic Interpretation in the Frozen Section Setting
139
Cytology preparations can also be used as a first alternative to the frozen section
in known HIV and hepatitis cases. If the smear shows obvious tumor or organisms,
you may be able to avoid contaminating the cryostat.
7.5 The Kinetics of the Smear
In the interpretation of cytologic specimens, there are many known diagnostic
criteria that are unveiled during the process of smearing a slide. In fact, there are
things that cannot be seen in our sections that can only be seen when a slide is
smeared. Cellular cohesion and the lack of it are important criteria distinguishing
benign from malignant mammary lesions and hematopoietic tumors from their
mimics. The molding and crushing of nuclei typical of small cell carcinoma, are an
important diagnostic clue. Presence of naked nuclei is common to carcinoid and
endocrine neoplasms. The finding of tightly cohesive clumps of epitheliod cells
with bland oval to spindled nuclei on an inflammatory or lymphoid background can
be recognized as granulomata. If we consider the effect the smearing process has
on all of the different tissues, we encounter, we can gather insight and valuable information from many of our samples.
First, let’s consider how the physical properties of our tissues and organs evolved
for their specific functions. The most obvious is our skin. Clearly, our integument
is designed to be a protective coating and barrier to fluid loss. Without looking at
the ultra structure, we could guess that these cells would be tightly held together
and have resilient cytoplasm. Cytologically we see very cohesive cells with rigid
hard appearing cytoplasm. In fact, all of our epithelial structures are held by cell
junctions and will exhibit cellular cohesion. As cells progress from dysplasia
through malignancy, cells become progressively more discohesive, yielding single
cells, an important feature of neoplasia.
Keep in mind that the degree of discohesion is also a function of how much pressure is applied to the cells. On occasion, I have been troubled by localized areas of
marked discohesion on an otherwise benign appearing breast aspirate. On holding
the slide to the light it was apparent that the discohesion is localized to a narrow
white stripe on the slide where heavy pressure was applied during the smearing
process.
Cytoplasmic characteristics will vary with cell function. Glandular epithelium
will have softer appearing and more deformable cytoplasm than squamous.
Endocrine organs have cells designed for a very different function, and seem to
have more delicate cytoplasm, which when smeared is easily torn and yields frequent
naked nuclei. Possibly, they are easily torn from their anchor points and nuclei are
spilled during smearing. Just the physiologic change to lactating breast will cause
considerable more naked duct cell nuclei to appear, presumable the result of more
delicate cytoplasm. Our tougher more collagenous stromal tumors will barely
smear at all, while a highly cellular sarcoma bound by little fibrous tissue can often
smear nicely. Our lymphocytes have no cohesion at all and will typically yield
140
S.R. Peters
numerous single cells when smeared. Yet, the clumps of lymphocytes seen in a
benign lymph node and the many uniform clumps of cells in a nodular lymphoma
offer diagnostic information about the amount of reticulin which is known to be
increased in germinal centers and nodules of lymphoma. As we mentioned above,
our primitive small cell neoplasm seem to have extremely delicate nuclei leading to
nuclear molding and smearing. The process of smearing will dissect apart the fibrillary network of glial tumors revealing cell processes that are a helpful clue to the
correct diagnosis Fig. 7.1.
Let’s consider the histology of the breast duct epithelium consisting of a lining
of duct cells attached to a layer of myoepithelium attached to a basement membrane. We know that the function of the myoepithelium is to contract, narrowing
the lumen of the duct. For the myoepithelial cells to perform their contractile function,
they would need to be tightly bound to both the overlying epithelium and underlying
basement membrane. If we imagine this layer being pulled apart in the aspiration
and smearing process, it is easy to imagine how many of the myoepitheilal cells
will be torn apart spilling the numerous naked oval nuclei typically found in benign
breast aspirates. In a fibroadenoma, we can also see how we will be left with some
fragments of fibrous tissue that have smooth or rounded edges where epithelium
has been denuded Fig. 7.2.
From these examples, it is easy to see how considering the behavior of the tissue
being smeared we can find clues to its origin. In our resident conference, I ask my
residents imagine a giant slide upon which I smear a jelly fish, a turtle and a first
year resident. It is easy to imagine what we might find as a result of the kinetics of
the smear.
7.6
The Cytology of the Nucleus
Traditionally, the nucleus tells us if cells are benign, dysplastic or malignant and the
cytoplasmic features tell us the differentiation of the cells i.e., from where the cells are
derived. In many entities, the nucleus can also help us determine the differentiation. For
example we all recognize the coarse clock face like chromatin of plasma cells and the
polymorphic cleaved cell populations seen in follicular lymphoma. Nuclear enlargement, inclusions and grooves are tantamount to the diagnosis of papillary carcinoma.
Fine salt and pepper like chromatin are typical of our neuroendocrine tumors. I
(e) Small cell lung carcinoma smear showing a marked tendency for smearing of nuclei visible as
linear blue streaks. H&E stain 50× magnification. (f) Glioma crush prep smear shows tumor cells
enmeshed in a fibrillary network with processes emanating from recognizable tumor cells, an important clue to the diagnosis. H&E stain 100× magnification. (g) Parotid gland pleomorphic adenoma
smear H&E stain showing bland spindled myoepithelial cells in a background of nearly invisible
slightly bluish secretion (arrow) 50× magnification. (h) Parotid gland pleomorphic adenoma from
figure (g) stained with diff-quick stain. The background mucinous secretion is strikingly apparent as
a magenta colored amorphous material between tumor cells. H&E stain 50× magnification
7
Microscopic Interpretation in the Frozen Section Setting
141
Fig. 7.1 Kenetics of the smear. (a) Pancreatic adenocarcinoma smear showing generally cohesive
three dimensional cell clusters. The arrow points to single cells which separate from the cell clusters.
Malignant epithelial cells have greater tendency for discohesion than their benign counterparts. H&E
stain 100× magnification. (b) Malignant lymphoma smear shows no cohesion of cells. The background shows lymphoglandular bodies. The arrow points to smeared cells, property some lymphocytes can share with small cell carcinoma (see below). H&E stain 100× magnification. (c) Granuloma
recognizable as a tight cluster of epithelioid cells in this lymph node smear. H&E stain 100×
magnification. (d) Seminoma smear shows cells with large nuclei, abundant watery fried egg like
cytoplasm, little cohesive tendency and peppered with lymphocytes. H&E stain 400× magnification.
142
S.R. Peters
Fig. 7.2 Fibroadenoma fine needle aspirations specimen showing myoepithelial cells adherent to
both epithelial and stromal fragments. (a) Large Stromal fragment composed with lobulated
smooth borders typical of fibroadenoma. (b) Close up of stroma with arrows pointing out adherent
myoepithelial cell nuclei. (c) Epitheilial fragment on same slide as figure (a) with arrows pointing
out few adherent myoepithelial cell nuclei
encourage our resident to pay attention to the nuclear features in all tumor types. By
paying attention to the differentiation of the nucleus, there is important diagnostic
information to be uncovered. When dealing with occult metastasis and unknown
primaries, sometimes the nuclear features can aid in our differential diagnosis. Other
examples include the clumped and coarse chromatin of squamous tumors; A picket
fence pattern of coarse nearly squamous like chromatin suggests colonic or endocervical adenocarcinoma; The enlarged round nuclei with prominent nucleoli of liver,
adrenal and kidney tumors; The fine uniform chromatin of a lymphoblast; Nuclear
pseudoinclusions in such entities as melanoma, menengioma, bronchiolo-alveolar
carcinoma and neural tumors. When faced with diagnostic dilemmas, our attention to
nuclear details can provide important clues to the diagnosis Fig. 7.3.
7
Microscopic Interpretation in the Frozen Section Setting
143
Fig. 7.3 Illustrates examples of disease specific nuclear cytologic features. (a) Adrenal cortical
carcinoma H&E stained frozen section shows round vesicular nuclei in cells with granular
eosinophilic cytoplasm reminiscent of liver cells. This hepatoid appearance can be shared with
tumors of liver and kidney among others. (b) High grade sarcoma H&E smear showing coarse
chromatin in pleomorphic spindle cells. (c) Thyroid papillary carcinoma H&E stained smear
showing typical nuclear features of fine chromatin, intranulear inclusions (arrow) and nuclear
grooves (arrowheads). (d) Lymphocytes (red arrow) and plasma cells (blue arrow) showing
typical coarse chromatin pattern seen in the mature lymphoid cells and the coarse clock face
chromatin pattern in plasma cells. The fine chromatin in a nearby benign stromal cell (green
arrow) is visible for comparison. H&E stained smear 400× magnification. (e) This islet cell
tumor represents a well differentiated neuroendocrine neoplasm with typical salt and pepper pattern of mixed fine and coarse chromatin granules in small nuclei with inconspicuous nucleoli.
H&E stained smear 400×. (f) Lung small cell carcinoma smear representing an undifferentiated
neuroendocrine neoplasm. The nuclei share a similar salt and pepper chromatin pattern to the
better differentiated tumor in figure (e). This highly malignant neoplasm shows more pleomorphic and irregular nuclei than the better differentiated example as well as its characteristic feature
of nuclear molding (green arrow), additional evidence for the soft easily deformable and crushable nuclei. H&E stained smear 400×
144
7.7
S.R. Peters
The Many Faces of Necrosis: A Potential Pitfall
None of us have any trouble recognizing the tumor necrosis in most settings.
Figure 7.4a shows an example of a large cell neuroendocrine tumor of the lung
metastatic to the brain. The upper left corner is undergoing typical coagulative type
tumor necrosis, which is seen at high magnification in Fig. 7.4b. In this context,
there is little question that these small pink necrotic cells recognizable only as the
outline of cell ghosts, are the same cells as the much different appearing viable
tumor. We have all seen examples of many tumors in the stages of early necrosis
when the nucleus still stains with hematoxylin. From the time the cell starts to
undergo necrosis, there is increasing degrees of nuclear karyorexis, karyolysis and
pyknosis. During this period, the nucleus gets smaller, often somewhat rounder, and
the chromatin passes through stages of increasing granularity. While this is happening, the overall cell size becomes smaller as the cytoplasm becomes increasingly
eosinophilic, eventually looses the sharpness in outline and overall appears crumbling.
Again, in the context of adjacent viable tumor, these smaller more eosinophilic cells
are easy to recognize as necrotic cells, see Fig. 7.4c.
If the entire specimen consists of these early necrotic cells as in Fig. 7.4d, we
are at risk of misinterpreting the tissue as a viable example of a different tumor.
I have been taunted by such specimens a number of times in the past. This phenomenon can occur in most types of high grade neoplasm undergoing tumor necrosis.
In the very earliest stages where, nuclear membranes are still visible, and chromatin
has only become more coarse these cells can be misinterpreted as a tumors characterized by small more uniform tumor cells such as lymphoma, myeloma, small cell
carcinoma, small blue cell neoplasms, carcinoid tumor, and endocrine neoplasms.
A lymph node in which a large cell carcinoma has undergone total necrosis can
have a rim of viable appearing cells that can give the appearance of lymphoma
undergoing necrosis. Small partially crushed biopsies consisting of early necrotic
cells can easily be misinterpreted as a small cell neoplasm. During intraoperative
consultation, this risk can be magnified by poor preparations, especially if the slide
is weakly stained with eosin so that the eosinophilia is not apparent. The key to
avoid such mistakes is to recognize the cytoplasmic eosinophilia, a granular degenerating
background and any completely necrotic or pyknotic cells among those appearing
more viable. Again, as I said earlier about so many diagnostic challenges, we will
only avoid this mistake if we think about it.
7.8
Freezing Artifacts
In surgical pathology, we are faced with a number types of artifacts in the tissue
including thermal injury, crushing artifact, various artifacts arising in the cutting,
processing and staining of the tissues. Recognizing these artifacts allows us to read
around them so that we can make the correct interpretation. Using conventional
cryostat freezing temperatures, one will see several consistent artifacts caused by
7
Microscopic Interpretation in the Frozen Section Setting
145
Fig. 7.4 Illustrates the many faces of necrosis. Figure (a) shows a micrograph of a poorly
differentiated large cell carcinoma of lung metastatic to brain. The large blue viable cells in the
lower left corner are in sharp contrast to the totally necrotic pink cell ghosts in the upper right
corner. H&E stain 50× magnifications. (b) Micrograph of necrotic cells taken from the square in
figure (a). The cells are visible as ghost nuclear outlines which no longer pick up the blue hematoxalin stain. H&E stain 400× magnifications. (c) High power micrograph of a cluster of viable
tumor cells with scattered smaller cells at the periphery. The smaller cells are tumor cells undergoing
early changes of necrosis including nuclear pyknosis and cytoplasmic eosinophilia. H&E stain
400× (d) a cluster of tumor cells undergoing early necrosis. The cells still stain with hematoxalin
and many still have visible nuclear detail. It is possible to misinterpret such tissues as viable
examples of other entities with smaller nuclei such as lymphoid and neuroendocrine neoplasms
ice crystal formation in the freezing tissue. The artifacts increase with increasing
water content in the tissue. Freezing of biological tissues and formation of ice crystals
is discussed in detail in Chap. 9 p. 20. Figures 7.5–7.8 illustrate some of these
changes comparing the differences between slides prepared by frozen section and
those prepared by paraffin embedding.
Fig. 7.5 Freeze artifacts: Bubbles. Figure (a) shows a frozen section micrograph of edematous
kidney stroma. The bubble like artifact is presumably due to ice crystal formation in this watery
milieu. H&E stain 200× magnification. Figure (b) shows the frozen section control this tissue
block. The bubbles are no longer present but the loose watery stroma is evident. H&E stain 100×
magnification
Fig. 7.6 Freeze artifacts: Compression artifact. Figure (a) is frozen section micrograph of kidney
tissue at 400× magnification. There is scalloping and compression of the renal tubules by the
bubble like crystals forming in the surrounding watery stroma. Figure (b) is the paraffin embedded
section from the tissue used to prepare the slide. The watery stroma is evident but compression is
not present in this paraffin embedded control
Fig. 7.7 Freeze artifacts: Chromatin changes. Renal tubular tissue at 1,000× magnification.
Figure (a) nuclear detail of frozen section preparation. Chromatin is distinct. (b) Paraffin embedded previously frozen tissue from (a) shows smudged less distinct and darker chromatin and less
well defined nuclear membrane when compared to (a). Figure (c) show a paraffin embedded
sample of the tissue which was never used for frozen section for comparison. H&E stain 400×
magnification
7
Microscopic Interpretation in the Frozen Section Setting
147
Fig. 7.8 Freeze artifacts: Nuclear holes. (a) Lung bronchiolo-alveolar carcinoma cut at three
microns. In these thin sections the empty vacuoles seen in the nuclei are far more numerous. These
vacuoles are presumably a form of ice crystal artifact. Cutting thinner sections makes more holes
appear because there are more nuclei in which the crystal is the full thickness of the section and
appears as a hole. H&E stain 400× magnification. (b) The same block as figure (a) cut at 6
microns. Although a serial section from the same block as part a, there are far fewer holes visible.
The nucler membrane due to the thickness of the section fewer nuclei have the membrane cut
away on both sides creating a hole.
7.8.1
Ice Crystals “Bubbles” in Edematous Stroma
Very edematous tissues freeze with an appearance similar to soap bubbles. As the
water gets frozen, the expanding water forms ice crystals which compress the strands
of intervening tissue giving appearance of bubbles as seen in Fig. 7.5a. The frozen
section control (Fig. 7.5b) shows that after processing these crystals get redistributed into the stroma.
7.8.2
Compression Artifacts
Cellular tissues will be compressed by expanding ice crystals. Figure 7.6a illustrates
the effect of expanding ice crystals seen as clear spaces compressing and deforming
the renal tubules. Figure 7.6b shows the same tissue block later prepared as a paraffin
section. The stroma between the tubules is edematous and appears almost clear and
is evidence of a great deal of water in the tissue.
7.8.3
Nuclear Chromatin Changes in Frozen Control
When the frozen section block is processed for paraffin embedding, the chromatin
is somewhat more condensed and hyperchromatic than the same tissue which has
never been frozen. Chromatin is less distinct and appears more smudged than both
the frozen section slide and the tissue processed without being frozen Fig. 7.7.
148
7.8.4
S.R. Peters
Nuclear Ice Crystals
Nuclei will show varying tendency to form ice crystals. From my observations, this
seems to relate to the type of tissue as well as the state of the tissue. I have noticed
more of these crystals in tissues with more vesicular nuclei and in tissues with
thermal injury. The thinner the tissue is sectioned the more of these crystals appear
as holes. I believe the thinner section yields more nuclei cut in a central plane without
nuclear membrane in either front or back side. As a result, one sees a transparent
hole which penetrates the full thickness of the section. Figure 7.8a cut at three
microns and Fig. 7.8b cut at six microns clearly illustrate this point. If your cryostat
is set for five or six micron sections and you are finding nuclear holes that are in
numerous cells, you may be looking at a much thinner section.
7.9
Reporting the Diagnosis
Now that we have completed our task, it is time to report our findings. In many
cases where interpretation is not difficult, this will be a brief definitive diagnosis. I
encourage our residents to speak clearly, at audible volumes, and with confidence.
We act as a guide to our surgeons as they perform their operative tasks. Their
confidence and comfort will be directly affected by the way we present the information.
If you are 100% certain of your diagnosis, present it with confidence in an authoritative voice; and confirm that your surgeon has received the information correctly.
Even if we are absolutely certain but convey it with hesitancy in our voice, our
surgeon will not rest quite as comfortably. By speaking with a confidence and
authority, you will send a message that there is no question of the diagnosis.
More often than we would like, we have faced difficult or impossible interpretations
due to a variety of reasons ranging from unfamiliar entities and variations; diffential
diagnoses consisting of familiar mimics; non-specific inflammatory and reparative
findings; and insufficient or molested tissue, to name a few. In this day and age it
would be cavalier to make a definitive diagnosis of lymphoma without the proper
immuno-histochemical and flow cytometric studies. As a result, it is common place
to offer only a description and differential diagnosis or suspected diagnosis as a
final interpretation. Despite our shortcomings we can still provide valuable information
simply by offering our differential diagnosis, and conveying all that we are certain
about. If we are sure it is a malignant neoplasm the surgeon’s surgical approach
may be similar despite the fact that we cannot fully classify the lesion. The surgeon
may have several considerations in the clinical differential diagnosis which we can easily
exclude that may impact the remainder of the course of surgery. In situations where
we are suspicious of a specific diagnosis but need additional studies for confirmation,
we can still play an important role in guiding the surgeon to his next step.
An important part of our job is to let the surgeon know if we have enough
lesional tissue to establish a final diagnosis by any means. If there is any question,
7 Microscopic Interpretation in the Frozen Section Setting
149
it is best to ask the surgeon for additional tissue if possible without untoward effect
on the patient.
If you are not 100% certain, never come across as though you are and never let
anyone talk you into a diagnosis. Sometimes if you sound fairly sure a surgeon may
subtly coax you a bit to go along with his opinion and operative plans. We must
always resist external pressure and make decisions based on our objective pathological
and clinical findings.
On rare occasions, we may be asked to render a frozen section diagnosis on a
patient whose condition is so critical that if not treated immediately, will be at great
risk of dying before routine studies can be completed. A patient presenting with
large mediastinal mass obstructing the airway is one such example. In such situations, we can only examine the tissue to our best ability by frozen section and
cytologic preparations; get opinions of whatever colleagues are available and offer
our differential diagnosis and which diagnosis we favor. We should let them know
the soonest possible time we may be able to confirm the diagnosis and if we anticipate
a significant delay. At the least, we can assist our colleagues by helping them to
make their therapeutic decisions in a realistic time course and directing them to the
most likely diagnosis to treat if lifesaving therapy needs to be initiated.
Chapter 8
Frozen Section Techniques Used in Mohs
Micrographic Surgery
Barbara Beck and Stephen R. Peters
Abstract The chapter offers a comprehensive discussion of the technical process of
preparing frozen sections in the setting of Mohs dermatographic surgery. In Mohs
surgery procedure, the surgeon removes a skin cancer which is immediately
examined by frozen section to access the resection margin. Most critical to accurate
specimen preparation is the proper on face embedding of tissues such that the epidermal
edge, deep and lateral margins are embedded in a single flat plane. Techniques for
relaxing the tissues are discussed and illustrated in detail. Techniques traditionally
used by Mohs technologists including slide technique, heat extractor technique,
and embedding in plastic molds are described. Technical advances in embedding
using innovative apparatus include, techniques using the Cryo-embedder, the Miami
Special and the Precision Cryoembedding System. The chapter covers aspects
critical to the cutting and staining of tissue sections for Mohs surgery.
Keywords Parallel faces • Cryo-embedder • Fredrick E Mohs • Miami special •
Mohs surgery • Notating the map • Plastic molds • Precision cryoembedding system
• Relaxation • Slide technique
8.1
Mohs Surgery Procedure
Mohs surgery refers to a procedure in which a dermatologic surgeon removes a skin
cancer which is immediately examined by frozen section to assess the resection
margin. This procedure employs on face embedding of the entire resection margin
including the skin edge. As we learned in Chap. 2, when we embed on face, we will
B. Beck
Mohs Technical Consulting, Inc
S.R. Peters ()
Department of Pathology University of Medicine and Dentistry of New Jersey
Pathology Innovations, LLC, 410 Old Mill Lane, Wyckoff, NJ 07481, USA
e-mail: [email protected]
S.R. Peters (ed.), A Practical Guide to Frozen Section Technique,
DOI 10.1007/978-1-4419-1234-3_8, © Springer Science + Business Media, LLC 2010
151
B. Beck and S.R. Peters
152
be examining the entire resection margin. In contrast, skin margins taken perpendicular to the margin in actuality, are examining only a relatively small sample of
the entire margin see Chap. 2 p. 18. The procedure was first performed by Dr.
Fredrick E Mohs in 1953 and reported in (1978). The procedure is performed in one
or more layers or stages. After each stage, the resection margin is examined for
tumor microscopically. The specimen is first oriented and marked with ink, so that
the specific location of the involved margin can be determined. If tumor is present,
an additional layer is removed from the specific location where the tumor was seen.
When the resection margin no longer contains tumor, we have successfully removed
the entire tumor and the patient is ready for repair. At times, this can be performed
in one stage, other times it can take several stages.
The goal of Mohs surgery is to completely remove all tumor tissues with the
minimal amount of tissue loss. By examining complete on face margins, the surgeon can be confident that the tumor is completely excised. By removing the tissue
in multiple, very thin layers, the point at which no tumor remains will become obvious with the least amount of tissue excised.
Mohs surgery is performed as a team consisting of the Mohs surgeon who
removes the tissue working closely in tandem with the Mohs technologist performing the gross and frozen sectioning of the specimens. In many cases, Mohs surgeons
are trained to interpret the sections microscopically. In other settings, a pathologist
will interpret the sections and represent a third member of the team.
First, the surgeon resects the tissue and immediately submits it to the technologist. All tissue submitted to the lab MUST be accompanied with a map or diagram
showing the orientation of the specimen and how it coincides with the patients
anatomy. It is up to the surgeon to decide how they are going to process the tissue.
Depending on both clinical factors such as size and location, as well as the surgeon’s own preferences, the specimen may be processed in one piece, bisected, or
may require examination in several pieces. In either case, the tissues will be embedded on face, with all margins in a flat plane.
To begin a Mohs procedure the cryostat needs to be set at −20°C to −25°C. Adjust
the section thickness setting to 5 or 6 microns which is most suitable for sectioning
and interpreting skin sections. Following these simple procedures, one should be able
to prepare high quality sections for the surgeon to interpret in less than 15 min.
8.2
Relaxing the Specimen
Our goal when embedding specimens for Mohs surgery, is to embed the tissue
with the entire skin edge, deep and lateral resection margins on face in a single
flat plane. In the first stage of the resection, nearly all of the specimens will require
some degree of flattening by a process known as relaxation. Let’s imagine the
resected skin sample as having a shape like a pie. The crust of the pie represents
the epidermis and the resected margin represents the entire bottom and slanting
sides of the pie. The edge of the pie, typically showing the impressions of fork
marks represents the edge of the epidermis. It is critical that the entire bottom, and
8
Frozen Section Techniques Used in Mohs Micrographic Surgery
153
sides of the pie, and the forked edge of the pie crust are flattened into a single
plane Fig. 8.1.
Relaxation of the specimen is accomplished by scoring the skin surface
parallel to the skin edge, very close to the skin edge so the outside edges of the skin
hinge down flat. This skin edge MUST be on the same level as the deep and lateral
margin of the specimen. Thicker, more rigid samples may require additional scoring
of the central portion of the epidermal surface for adequate relaxation. Our goal is
to embed our tissue as in Figs. 8.2 and 8.3, which illustrate the process in three and
Fig. 8.1 A typical pie shaped portion of skin removed in the first stage of Mohs surgery. The pink
surface represents the epidermis. The pink arrow heads indicate the epidermal edge which is
present the entire 360° of the specimen. The green arrow indicates the lateral margin of the
specimen. The blue arrow indicates the deep margin of the specimen. Yellow areas in this and later
illustrations represent underlying dermal and subcutaneous tissues beneath the resection margins.
These colors will be used in all of the illustrations to graphically designate these vital margins and
do not represent dye applied to the tissue or map
Fig. 8.2 The process of relaxing the specimen. Yellow lines represent incisions made partially
into but not through the tissue. In figure (a) a circumferential incision has been made several
millimeters from the epidermal edge to allow the epidermal edge to hinge down. Four lines have
been made cross hatching the center of the tissue to add further relaxation. These incisions are only
as deep as needed to relax the tissue and not through the tissue. Figure (b) illustrates the relaxed
specimen. The epidermal edge is hinged down and the lateral margin (no longer visible) is now in
the plane of the deep margin along with the epidermal edge
154
B. Beck and S.R. Peters
Fig. 8.3 A cross sectional view of the relaxation process in Fig. 8.2. In figure (a) the black arrows
point to incisions (dashed lines) made through the epidermis partially into the yellow underlying
dermis circumferentially near the edge and centrally. Figure (b) illustrates the tissue after it has
been teased into position. The pink epidermal edge has been hinged down with the green lateral
margin so that both are now in a flat plane with the blue deep margin
two dimensional drawings. The red skin edge, the green lateral margins and the
blue deep margin are embedded in a single flat plane.
Figure 8.4 shows an example of a portion of a large specimen which required
embedding in several parts. In this case, a well placed incision allows the tissue to
relax flat as the incision opens up.
Figure 8.5 shows our final preparations in three dimensions and cross section.
Our final preparation will be embedded with our tissue face now flipped over and
face up on the chuck. Both examples show the pink epidermal edge, the green
lateral margin, and the blue deep margin face up in a single flat plane.
In addition, we must embed the tissue so the plane of the face of the tissue is as
parallel as possible to the plane of the chuck face. I refer to this as parallel
faces. The illustration in Fig. 8.6a shows parallel black lines corresponding to these
two planes. This will give us our best possible x–y orientation when cutting the
section with the least amount to tissue wastage or cryostat adjustment. In contrast,
Fig. 8.6b shows an example of a 5° angle between the chuck face and the tissue
face. The dotted red line represents the path the blade would take if it were aligned
with the plane of the chuck. It is clear from this illustration that the entire left side
lateral margin, deep margin and epidermal edge, would be lost to examination
8
Frozen Section Techniques Used in Mohs Micrographic Surgery
155
Fig. 8.4 Relaxation of a portion of a specimen which has been cut into four pieces. Figure (a)
shows what now represents a slice of the pie. Relaxation is accomplished with a single incision
parallel to the epidermal edge. Figure (b) shows the skin in the relaxed position. The yellow skin
incision opens up to give freedom for the epidermal edge to hinge down along with the lateral
margin resulting in all three margin elements in the same plane
before the right epidermal edge was available for examination. This would require
a 5° adjustment of x–y orientation of the block to achieve a complete superficial
section or result in disastrous wastage of the specimen. Figures 4.8 and 4.9 show
additional examples of blocks trimmed in poor x–y orientation.
8.3
Notating the Map
The next step is to mark your map with the dye lines you wish to follow. The tissue
is sectioned and carefully marked with dye to correlate with the map. This must
correspond precisely with the tissue and patients anatomy, so the surgeon can identify where the residual tumor remains. Your surgeon may choose to mark the tissue
with ink or dye. Here are some suggested dye markings:
The dotted blue line ◦◦◦◦◦ designates blue dye; solid red line ———— designates
red dye; the green xxx marking designates green dye; the black ++++ designates
black dye and the yellow ^^^^^ designates the yellow dye.
After the tissue has been scored and marked with the dyes, notations of the
specific ink markings will be added to the map. Figure 8.7 shows several examples
of maps made for various sized tissues.
Fig. 8.5 The finished embedded specimen. Figure (a) shows our relaxed specimen from Fig. 8.2b
now inverted onto a cryostat chuck frozen in position in light blue embedding medium. The pink
epidermal edge, the green lateral margin and the blue deep margin are all in a single flat plane
available to the first section of the cryostat blade. Figure (b) shows a cross sectional view of the
embedded specimen. This is an inverted view of Fig. 8.3b. The pink epidermal edge, the green
lateral margin and the blue deep margin are frozen into position in a flat plane embedded and
frozen into position in the light blue embedding medium
Fig. 8.6 Figure (a) shows a block prepared with parallel faces. The black lines indicated by
arrows represent the parallel planes of the tissue face and chuck face. In figure (b), the tissue has
been embedded with the tissue and chuck face at a 5° angle. The dashed red line indicated by the
red arrow represents the plane the blade will pass if not adjusted for poor x–y orientation. In this
example, the blade would cut across the most of the deep and both lateral margins before reaching
the epidermal edge on the left side
8
Frozen Section Techniques Used in Mohs Micrographic Surgery
157
Fig. 8.7 Four examples of maps notated for specimens of varying size. The various markings
described in the text represent red, blue, green, and yellow ink applied to the tissue to coincide
with the orientation of the specimen in the map oriented and given by the surgeon to the technologist. Specimen (a) will be embedded in one piece; specimen (b) in two pieces; specimen (c)
in four pieces; specimen (d) in 16 pieces
8.4
Embedding the Specimen
Now that our tissue is relaxed to the degree that our tissue can be embedded in a flat
position, our next step is to embed the tissue. The topic of embedding was discussed
in detail in Chap. 3. There are a number of techniques employed to embed Mohs surgery
specimens. Essentially, these are a variety of methods of freezing the relaxed tissue into
the position shown in Fig. 8.3 with the entire epidermal edge, deep and lateral resection
margins in a flat plane. The Precision Cryoembedding system accomplishes this
task in a single step, and easily prepares blocks with parallel faces, minimizing the need
for x–y orientation and tissue wastage. Several of the other methods involve several
steps with the pre-frozen tissue, frozen in place on a chuck as the last step. Extra
care must be taken to achieve parallel faces when using these multistep methods.
We will discuss the glass slide technique, the Miami-special, the Cryo-embedder,
the heat extractor method, the cryostat stage and direct embedding using the Precision
Cryoembedding System and using plastic molds. In well trained hands, all of these
methods will accomplish the desired tasks. Which method is used, is a matter of preference, and what is available to you. First, we will discuss embedding the specimens
removed in the first stage of Mohs Surgery. These are typically elliptical or irregular
portions of skin which contain what the surgeon hopes is the entire tumor Fig. 8.8.
B. Beck and S.R. Peters
158
Fig. 8.8 A large portion of skin which has been relaxed placed on a glass slide with epidermal
edges teased into position flat against the glass slide
8.5
Slide Technique
The relaxed tissue specimen is placed as flat as possible on a glass slide with the
epidermis layer up and our deep and lateral margins flat down on the slide. The
epidermal edge is pulled flat so the epidermal edge is in the same flat plane and
available on the first section off of the block.
After teasing the epidermis out and the tissue is FLAT against the slide, place a
small amount of embedding medium over the tissue on the slide, and dip the slide in LN2
(liquid nitrogen) to fast freeze in liquid nitrogen. This may be done by pouring a small
amount of LN2 in a container and slowly dipping the slide in the container. Be careful
not to leave the slide in the LN2 for more than 10 s, freeze just long enough until all
the media has turned white and only a small center portion has a graying effect.
Freezing sprays can also be used to freeze the tissue if liquid nitrogen is not available.
While the “button” is still freezing on the glass slide, place your room temperature
chuck in the cryostat on the fast freeze bar, and place a small amount of embedding
medium on the chuck, and let it begin to freeze. While the button is frozen on your
slide, slowly warm the bottom of the slide by pressing a gloved finger on the glass
beneath the tissue to remove the button of embedding medium and tissue off the
slide. Flip the button so the flattened deep aspect is up, and place the button on the
partially frozen chuck in the cryostat. Make sure your chuck has enough liquid
embedding medium to adhere the button in place. Make every effort to place the tissue
on the chuck so the face of the tissue is parallel to the face of the chuck. The final step
is to place your cryostat heat extractor over the tissue button on the chuck to flatten
the surface and complete the freezing process Fig. 8.9.
8
Frozen Section Techniques Used in Mohs Micrographic Surgery
159
Fig. 8.9 Embedding using the slide technique. Figure (a) illustrates a specimen which has been
relaxed and teased into position on a glass slide with the epidermal edge, lateral and deep margins
in a flat plane down against the surface of a glass microscope slide. Figure (b) shows embedding
medium being applied to relaxed tissue on a glass slide. Figure (c) shows the specimen on the slide
after being frozen in liquid nitrogen or with a canned freezing spray. The specimen is being
rewarmed with the gloved palm from underneath to remove the tissue from the glass slide. Figure
(d) shows the frozen specimen which has been inverted and is being placed with the tissue face
up onto a chuck with partially frozen embedding medium. Tissue should be frozen into position
with parallel faces as illustrated in Fig. 8.6
8.6
Miami Special
The Miami Special is a hand held clamping device designed to hold a chuck and a
portion of tissue together with parallel faces while being dipped in liquid nitrogen
to rapidly freeze into a block Fig. 8.10.
Again, we start with the relaxed tissue placed as flat as possible with the epidermis
layer up and the deep and lateral margins down on a glass slide. The epidermis is
pulled out so that the epidermal edge, deep and lateral margins are in the same flat
plane. Place a small amount of embedding medium over the tissue on the slide, and
dip the slide in LN2 to fast freeze in liquid nitrogen as with the slide technique
above. Place the Miami Special clamp in the LN2 to get it cold. Place a chuck from
the cryostat on the Miami special and put a small amount of embedding medium on
the chuck. Warm the bottom of the slide with a gloved finger just enough to pop off
the frozen button from the slide. Place the button on the chuck with atop the embedding medium, with the flat tissue face UP. The process must be timed so that the
B. Beck and S.R. Peters
160
Fig. 8.10 Miami Special clamp. One of the two spatula shaped end portions is designed with a
hole and grooves to accept a variety of common cryostat chucks and hold them in position (left
side of illustration). The right side spatula holds the tissue in position atop the chuck. The chuck
is clamped into fixed position like a common hemostat allowing the sandwiched tissue and chuck
to be dipped into liquid nitrogen to complete the freezing process
tissue is placed on the chuck before there is significant freezing of the embedding
medium. Clamp down with the Miami special and place return it to LN2 for
approximately 5 s. Your chuck is now ready for sectioning.
8.7
Cryo-embedder
The cryo-embedder is another innovative device designed to freeze tissue into position on the cryostat chuck while maintaining parallel faces. The relaxed tissue is
placed with the deep and lateral margins down on the cryo-embedder’s flat disc. This
disc has been kept in the cryostat to remain as cold as possible. The epidermal edge
is teased down against the disc so that it will be in the same plane as the deep and
lateral margins, so all are available on the first cut. Next, place a small amount of
embedding medium around the tissue and allow it to freeze. Place a chuck in the
holder in the cryostat and place a small amount of embedding medium on the chuck.
When the embedding medium on the chuck is partially frozen, add a little more
embedding medium to the chuck and insert the chuck into the opposite side of the
cryo-embedder. While holding on to the chuck, flip the cryo-embedder and the chuck
upside down, and put it on top of the other side of the cryo-embedder with the tissue.
8
Frozen Section Techniques Used in Mohs Micrographic Surgery
161
Once placed on top of one another, flip both pieces of the cryo-embedder and
slightly spray them with the cryospray. Place the cryo-embedder inside the cryostat
and allow the button to freeze. Your chuck is now ready for sectioning Fig. 8.11.
Fig. 8.11 Preparation of a specimen using the cryo-embedder. Figure (a) shows the specimen being
teased into position on the freezing disk on the bottom half of the apparatus. Figure (b) shows embedding medium being applied to the surface of the tissue. Figure (c) shows the top half of the apparatus
containing a cold chuck being sandwiched against the tissue to complete the freezing process
B. Beck and S.R. Peters
162
8.8
Heat Extractor/Cryostat Stage Method
Using this common method, the tissue is first frozen into position on a cryostat heat
extractor or the cryostat stage. The relaxed tissue is placed with the deep and lateral
margins down on a free standing heat extractor which has been kept in the cryostat
to remain as cold as possible.
Most cryostats are equipped with some form of heat extractor. The stage of the
cryostat can also be used as a heat extractor, or any substantial flat piece of metal
or freezing temperature surface can be substituted. The epidermal edge is teased
down against the heat extractor so that it will be in the same plane as the deep and
lateral margins making all available on the first cut see Fig. 8.12. An advantage of
this method is that tissue will adhere in place to the cold metal. After teasing the
epidermis out and the tissue is FLAT on the bottom of the heat extractor, place a
small amount of embedding medium around the tissue and allow it to freeze. Place
a chuck in the holder in the cryostat and place a small amount of embedding
medium on the chuck. As the embedding medium begins freezing, place your heat
extractor on top of the chuck in the cryostat. The embedding medium on the heat
sink and the chuck must be only partially frozen when sandwiched together so they
will freeze together in a solid block. Try your best to achieve parallel faces when
freezing the tissue in position on the chuck. The completed block is now ready for
sectioning Fig. 8.13.
Fig. 8.12 A large portion of skin which has been relaxed placed on a heat extractor with epidermal
edges teased into position flat against freezing metal surface
8
Frozen Section Techniques Used in Mohs Micrographic Surgery
163
Fig. 8.13 Heat extractor method. Figure (a) shows the relaxed tissue teased into position on a
cold heat extractor, cryostat stage or any freezing metal surface. Figure (b) shows the freezing
tissue covered with embedding medium. Figure 8.3 illustrated the frozen tissue, now inverted, and
to be placed face up on a layer of embedding medium on a cryostat chuck with faces as close to
parallel as possible. Figure (d) represents the tissue frozen into position on the completed block
with epidermal edge, lateral and deep margins in a flat plane
8.9
The Precision Cryoembedding System
The Precision Cryoembedding System discussed in detail in Chap. 3 allows
precisely flat and rapid embedding of all tissues, and is particularly suitable for
Mohs surgery specimens. It will also easily prepare blocks with parallel faces.
After adequate tissue relaxation, the specimen is placed with the deep and lateral
margins flat and down on the dispensing slide near the tip of the slide. See
Fig. 8.14a. Looking at the tissue from beneath the clear dispensing slide, check that
all of the margins and epidermal edge are visible in the flat plane of the slide.
The leading edge of the tissue is pulled to the edge of the dispensing slide with a
forceps and touched to the well floor. Be careful to guide the leading edge with a
forceps to the floor, so it does not turn or flip on contacting the floor. Next, slowly
pull the dispensing slide out from under the tissue while continuing to address
the epidermal edges, so they are all flat against the well floor as in Fig. 8.14b.
164
B. Beck and S.R. Peters
Fig. 8.14 Embedding using the Precision Cryoembedding System to embed a Mohs surgery
specimen. Figure (a) shows our relaxed tissue from Fig. 8.2b on a thin film of embedding medium
at the edge of a dispensing slide. The well bar is pictured above. Figure (b) shows the leading edge
of the tissue being touched to adhere to the embedding well floor with a forceps. As the dispensing slide is slowly pulled out from under the tissue the tissue is pressed or ironed flat against the
well floor while the epidermal edge is precisely teased to the floor through its circumference.
Figure (c) illustrates the well being filled with embedding medium after which the chuck will be
placed over the well. The block is finished when freezing is complete
The system comes with an L shaped flattening forceps that can be used to iron
larger specimens flat as the tissue meets the well floor see Fig. 3.11. A great advantage to using the freezing steel well bars is that the tissue will adhere into position
when touched to the well floor. As each portion of the tissue meets the well floor,
the adhesive property of the cold metal allows the epidermal edge to be teased into
8
Frozen Section Techniques Used in Mohs Micrographic Surgery
165
position in the plane with the deep and lateral margins. These precisely flat wells
beautifully prepare a perfectly flat face, rapidly, in a single step. Next, simply fill
the well with embedding medium and place on the chuck as in Fig. 8.14c. After a
period of freezing, remove the block with a tap of the over-chuck freezing block.
Complete the block with a thin layer of plastering. This simple one step freezing
technique can be performed very quickly and precisely when compared to other
multistage techniques in use.
Paper embedding technique, also discussed in Chap. 3, is an alternative method
for embedding Mohs surgery specimens. It is particularly suitable for the very thin
and flimsy specimens received in the later stages of the procedure. Using paper
embedding, a dispensing slide is prepared with a piece of lens paper as in Chap. 3
p. 23. Tissue is placed with the desired surface face down on the lens paper. Check
the tissue from under the slide, making sure that the tissue is flat and there is no
flipping of the epidermal edge. The tab of paper overhanging the slide is touched
and adhered to the well floor. As the slide is pulled out from under the paper, the
paper and tissue falls flat to the well floor. Fill the well to complete the block. The
paper will be trimmed away when sectioning the block. An alternative is to remove
the paper by touching the block face to a warm metal surface for a few seconds,
peeling away the paper and refreezing with a touch of plastering.
8.10
Embedding in Plastic Molds
The relaxed tissue is placed with the deep and lateral margins down in the plastic
mold, making sure all of the skin edges are flat against the embedding mold.
Embedding medium is placed in the mold and a chuck is placed on top of the mold.
The specimen is then sprayed with cryo spray for approximately 10–15 s. The mold
and specimen chuck is placed on the quick freeze bar of the cryostat. When the
block is completely frozen, the mold is peeled off. The completed block is now
ready for sectioning in the cryostat. Figure 3.4 shows an example of embedding in
these plastic molds.
8.11
Embedding Samples from Secondary and Latter Stages
of Mohs Surgery
If any portion of the resection margin contains tumor on microscopic interpretation,
the surgeon will need to remove an additional layer or layers of tissue until the
resection margin is negative. When embedding these tissues, we will follow the same
basic principles. Our goal will be to embed these samples on face with the margin
in a flat plane on the face of our prepared block. We will need to see the entire
epidermal edge and margin face in a flat plane. Typically, these samples are taken
in very thin layers, so relaxing the tissue takes less effort to get these thin samples
166
B. Beck and S.R. Peters
to lie flat. If the tissue is thicker or firm by nature, a few well places scalpel cuts
partially through the tissue will relax the tissue as needed.
As these samples can sometimes be very thin, a new potential problem may
arise. In very thin tissues, it is quite easy to cut entirely through the tissue if
approached aggressively. It is imperative that the tissue be embedded in a flat
plane which is in the best x–y orientation achievable. As I said in discussing, trimming the primary stage specimens, if adequate x–y orientation is not possible,
sections should be taken as the tissue is first reached with additional sections
picked up at various levels until the entire face has been reached. If not, the true
margin of much of the sample will be shaved away before the entire face is
reached. If orientation is poor and the specimen is very thin, some of the margin
may be shaved away completely without any available for microscopic interpretation. This will require removal of more tissue, causing the patient to have more
tissue excised unnecessarily.
All of the techniques discussed under embedding of primary stage samples can
be used. When tissues are very thin, our best technique will be mandatory.
8.12 Sectioning the Block
All of the information offered in Chaps. 4 and 5 apply to the sectioning of tissues
for Mohs surgery specimens as well. In this section, we will address sectioning
issues pertinent to the proper sectioning of specimens common to our topic of
Mohs surgery.
As we described earlier in this chapter, our goal is to embed our tissues so that
the deep, lateral and skin edge margins are all in the same plane. Properly embedded, this entire plane should represent the face of our newly prepared block. If we
could take the first 5 micron section directly off of the face of the block, this would
represent the true resection margin of the specimen. It is unrealistic to imagine taking the section produced by the very first turn of the wheel, as all blocks will need
some degree of trimming before our first complete section is produced. Our goal is
to take our first section with the least amount of trimming. The deeper we need to
trim the block, the further we will be from the actual margin, and the closer we will
be to the tumor. What might have been, in reality, a true negative margin can appear
as a false positive involved margin if we trim to deeply into the tissue.
For this reason, we want to approach the tissue very gradually with the least
amount of trimming possible. As we learned in Chap. 4, in order to achieve a section of the full block face with the least amount of trimming, the x–y orientation of
the block must be in the same plane as the blade. As sectioning begins, the blade
should first meets the block in the center. If it begins by trimming any edge or corner, it will require adjustment of x–y orientation (see Chap. 4 p. 11).
Every section is important to be able to determine the depth of the tumor. Start
by trimming just enough to pass any embedding medium covering the tissue and
the first few sections off the block, until you achieve a complete full section which
8 Frozen Section Techniques Used in Mohs Micrographic Surgery
167
include the epidermal edge with our flattened deep and lateral margins. It is helpful
for the technologist to check for the skin edge microscopically, before placing the
slide on the stainer to assure the skin edge is complete. This will save the technologist and the surgeon the time of having to repeat the initial sectioning and staining
because the section is incomplete. If you find yourself in a situation where proper
x–y orientation is not possible because of cryostat issues, it would be better to start
by picking up partial sections to stain. This way, we will not have wasted the true
margin tissue from the sides of the block that were reached first in the maloriented
block. The block can then be further trimmed to the depth of a complete section.
While sectioning the tissue, it will help your surgeon to orient the sections so each
section on the slide can match the map. It will be necessary at this step to check with
your surgeon, how the slide is placed on the stage of the microscope for proper
orientation. Find out when placing the slide on the microscope, if they hold the slide
label in their right hand or left, while looking under the microscope. If your surgeon
holds the slide in the left hand, and your map is showing the first quadrant on the
left, you should pick up your frozen section in quadrant one so the epidermis is to
the right of the slide. In quadrant two, the epidermis is to the left. If the epidermis is
on the top, the epidermis should be picked up so the epidermis is closest to the bottom of the slide. The best way to remember this is whatever your map shows, pick
up your section so the epidermis is opposite the map. If your surgeon holds the slide
in the right hand while looking at sections under the microscope, then pick up just
the opposite keeping in mind that the microscope will invert all objects.
When sectioning your blocks, place the first section closest to the labeled end of the
slide, rotate your cryostat wheel three to four times, take your second section, rotate three
to four times again and take your third section. Place each section evenly distributed on
the slide. When you rotate three to four times between each section, this will give you
15 microns between sections; if there is positivity, your surgeon will be able to track the
direction on the tumor; if it’s clear, the surgeon will know it’s clear all the way.
Normally, I suggest taking two slides per block and three to four sections per slide.
Remember to check your slides microscopically before you stain them. Again, this
will allow you to see if you have the complete epidermal edge, before wasting too
much time in the stainer only to find recuts will be required, because the epidermal
edge is not yet completely available microscopically. All slides should be checked
before beginning to stain them. This procedure will work for all tissue specimens.
8.13 Staining the Sections
Hematoxylin and eosin stain is the stain of choice in most settings; however, some
surgeons prefer to use the Toluidine blue for basal cells. Staining is discussed in
detail in Chap. 6. Upon completion, slides are cover-slipped with permanent
mounting medium. Your sections are now ready for the surgeon’s desk. Place all
slides with the correct map next to the microscope and notify your surgeon this case
is ready for review.
B. Beck and S.R. Peters
168
8.14
8.14.1
Suggestions for Sectioning Specific Difficult to Handle
Tissues
Fatty Specimens
Difficulties associated with fatty specimens are discussed in detail in Chap. 5 p. 9.
In Mohs surgery, it is common to receive fatty subcutaneous tissue at the deep
aspects of the specimen. If you have an extra fatty section, you will need a container
holding a small quantity of liquid nitrogen, a stiff bristle brush (preferably camel
hair) of about ½ inch in width. Align the block with the knife just as you are getting
ready to cut, dip the brush in the liquid nitrogen, press the cold brush directly on
the tissue, and concentrate on getting the liquid nitrogen directly on the fatty part
of the block and away from the skin. Continue to dip the brush in the liquid nitrogen
and press against the block approximately six to eight times. Rotate the wheel two
times, section as usual and repeat as necessary until an adequate section is achieved.
Using this method, one can produce a complete section containing a nice webbing
of the fat and a complete epidermal edge. If liquid nitrogen is not available, an
alternative is to use commercially available cans of freezing sprays Fig. 8.15.
8.14.2
Cartilage
Cartilage usually sections easily due to the consistency of the tissue. The challenge
is keeping the cartilage from coming off the slide in the staining process. The best
way to do this is to use charged slides which augment the adhesion of the tissue
Fig. 8.15 An operator using liquid nitrogen to aid in the cutting of fatty tissues. Figure (a) shows
a metal container with a small amount of liquid nitrogen with a brush being dipped into it. Figure
(b) shows the liquid nitrogen being painted on to the surface of the tissue face, in order to bring
the fatty tissue to the ultra cold temperature required to harden fat enough to section
8 Frozen Section Techniques Used in Mohs Micrographic Surgery
169
section. As discussed in Chap. 6, tissues prone to fall off slides should be stained
with very gentile agitation. The thicker the tissue section, the thicker the section
edge will be present. This thicker edge will offer more edge surface to receive the
forces of the agitation of the solutions pulling the tissue from the slide. For this
reason, by making the section a bit thinner, and using minimal agitation, there will
be fewer forces pulling the tissue from the slide. If you use an auto stainer, lower
the pressure of the water wash. Another hint is to warm the back of the slide after
you place your sections on. Just adding slight heat will help to better adhere the
section to the slide. Another method to help cartilage adhere is to first briefly dip
the slide containing the section into acetone prior to fixing the slide in 95% ethanol
see Chap. 6 p. 11.
8.14.3 Mucosa and Soft Tissues
When you have an eyelid lesion or lip lesion, it is best to embed the tissue in the
same manner. These somewhat more watery tissues section best at a warmer temperature. This does not require lowering the cryostat temperature. Simply warm
your specimen chuck with your thumb prior to sectioning. Just a few seconds of
pressure with your gloved thumb will warm enough to make a nice section. Stain
as usual. Effects of block temperature are discussed in detail in Chap. 5 p. 2.
Reference
Mohs F (1978) Chemosurgery, microscopically controlled surgery for skin cancer. Charles C.
Thomas, Springfield, IL
Chapter 9
Frozen Section Technique in the Animal
Research Setting
Charles W. Scouten
Abstract There are significant differences between the skills required for research
animal and for clinical histology. Researchers normally use sacrifice perfusion to
harvest animal tissue, and need to freeze and section whole organs, sometimes in
a specific orientation. Clinical histologists normally work with small samples or
fragments, immersion fix, and paraffin embed.
Perfusion clears the tissue of red blood cells, which interfere with many common
cell labeling methods and block capillaries to the entrance of fixative. High perfusion pressure clears red blood cells faster and more thoroughly, and achieves faster
fixation. Pre-wash must be isotonic, preferably sucrose, while the fixative solution
should be hypotonic, because the cytosol becomes hypotonic during pre-wash, to
avoid shrinkage of soft tissue.
Tissue that is to be frozen in order to harden for sectioning must be snap frozen
throughout, a greater challenge when large blocks of tissue such as whole organs are
used. Liquid nitrogen will freeze faster and create a shell around the exterior of the
tissue, and then the organ will crack when the interior expands due to slower freezing.
Freezing tissue in a slurry of dry ice and isopentane works better for rodent brains or
similar size blocks of tissue. In setting up the microtome, blade angle should be
adjusted to equal the bevel on the lower edge of the knife, regardless of the method
of hardening or sectioning, and regardless of the tissue being sectioned. Commercial
gelatin encasement (Brain Blockers™) can provide accurate, reproducible orientation
for rodent brains. Tape transfer methods provide accurate transfer from the frozen
block to the slide, with all fragments in original orientation and relative position.
Keywords Perfusion • Freezing artifact • Snap freezing • Organ orientation •
Fixation • Organ shrinkage • Sectioning • Brain blockers • Peltier freezing stage •
Tape transfer system • Cryostat • Sliding microtome • Isopentane • Liquid nitrogen
• Gelatin encasements • Blade angle • Swiss Cheese Artifact
C.W. Scouten (*)
Biosystems Division, Leica Biosystems St. Louis, LLC, 5918 Evergreen Blvd,
St. Louis, MO, 63134, USA
e-mail: [email protected]
S.R. Peters (ed.), A Practical Guide to Frozen Section Technique,
DOI 10.1007/978-1-4419-1234-3_9, © Springer Science + Business Media, LLC 2010
171
C.W. Scouten
172
9.1
Introduction
Oddly enough, histology on research animal tissue is generally quite different from
histology on human biopsy or post mortem tissue. Both are mammalian tissue, and
to be sectioned for observation under a microscope. However, from the beginning,
animal researchers gain the advantage of rapid and reproducible fixation and thus,
better quality tissue preparations by employing sacrifice perfusion. In most cases, tissue
must be hardened for sectioning. To harden, animal tissue is much more likely to
be frozen as whole organs rather than paraffin embedded as pieces, or frozen as
small pieces. Animal research sometimes requires tissue to be cut without hardening by employing a vibrating microtome. For animal research work, brain and other
tissues are usually required to be sectioned accurately in specific orientation. The use
of perfusion fixation rather than immersion, sectioning of whole organs, and freezing or vibrating microtome rather than paraffin sectioning is characteristic of most
research animal tissue histology, but are rarely encountered in the clinical lab. The
end result is a frequently different skill set required for histology on research animal tissue vs. clinical tissue.
The author’s primary experience is in the area of brain research and so will discuss
issues relating to frozen section in animal tissues in the context of brain tissues.
9.2
Sacrif ice Perfusion
Animal researchers commonly sacrifice an animal from which internal tissue
samples will be harvested by the following method:
1.
2.
3.
4.
5.
6.
Heavily anesthetize the animal
Open the chest cavity
Cut a knick in the wall of the left ventricle of the heart
Insert a gavage needle into that ventricle
Flow an isotonic pre-wash solution through the circulatory system
Flow a fixative through the circulatory system
The cardiovascular system provides an open parallel channel to every live cell in
the body in seconds. Washing out the blood through a needle in the heart, and then
running fixative through the vascular channels, enables very rapid fixation of every
part of the whole body (Palay et al. 1962; Scouten et al. 2006; Garman 1990).
Living cells have active, energy-using ion pumps on the cell membranes.
Any challenge in the cellular environment inside a warm blooded mammal,
whether thermal, pressure, chemical, or anoxia, shuts down these pumps. Changes in
cellular contents begin almost immediately as ion distributions change. Cells
begin a process of autolysis (self digestion) almost immediately at the onset of
anoxia, with the ultrastructure breaking down before immersion fixation could
occur (Palay et al. 1962; Cammermeyer 1960). Thus, from first breaking into the
9
Frozen Section Technique in the Animal Research Setting
173
chest cavity, the time until arrival of fixative should be minimized to achieve reproducible tissue quality by beginning fixation as close as possible to the living state.
There are other advantages of perfusion. Red blood cells catalyze the reduction
reaction of DAB (3,3¢ Diamino Benzidine Tetrahydrochloride) even better than
Horseradish Peroxidase (HRP) does. Red blood cells also autofluoresce, sometimes
obscuring or creating background staining in cases where a florescent label or stain
has been used. Red blood cells occasionally block a capillary in living tissue at
resting blood pressure, and eventually break free. Thus, any red blood cells remaining in the tissue after perfusion probably blocked fixative from reaching some areas
as rapidly as otherwise possible at best, and at worst, it may interfere with visualizing a label or stain commonly used by animal researchers and meant to mark
certain cells, cellular ultrastructure, or specific sites in the tissue.
In contrast, biopsy-obtained or other human tissue must be immersion fixed with
the blood still in it. Formaldehyde penetrates intact tissue slowly (about 18 mm in
25 h; diffusion = 3.6 × √time) (Medawar 1941; Baker 1958), so human tissue must
be cut in small pieces, with all parts of the volume within a millimeter of an
exposed surface, to get reasonably uniform fixation and tissue quality throughout a
given volume of tissue. Scientists working with research animal tissue usually prefer to section whole organs, such as whole brain, to see and interpret the track of a
probe insertion, or to determine the anatomical location where cells were stained.
Both paraffin embedding and immersion fixation requires the tissue to be small or
at least thin pieces. Thus, the need to section whole organs is another reason why
animal tissue is most commonly both perfused to fix throughout, and frozen to
harden for sectioning.
A drawback of the perfusion method is that perfused soft tissue is commonly
shrunken by the process. Under an electron microscope, the perfused brain is usually
seen to be devoid of extracellular space (Van Harreveld 1972; Cragg 1980), while
other lines of evidence show that the living brain has about 20% extracellular space
(Van Harreveld and Steiner 1970; Van Harreveld 1972). Correspondingly, the brain
is shrunken in whole organ size by as much as 20%. In some cases, this is not a
problem for the purposes of the project, but shrinkage and anatomical distortion is
frequently a drawback with neural tissue, where the purpose of histology is to
define a location in the brain.
Shrinkage and resulting distortion was and are accepted by most scientists as an
unavoidable consequence of tissue processing, and is described as such in a stereotaxic atlases of the brain “This method needs some comment. It inevitably implies
shrinkage caused by embedding and staining. Shrinkage cannot be equalized by
enlargement because, for physical reasons, the extent of shrinkage differs in the
various constituents of the brain” (König and Klippel 1967). Later sections in
König and Klipple made it clear the formaldehyde was the part of “embedding and
staining” that caused the shrinkage. As a result, König and Klippel (1967), could
not provide accurate stereotaxic coordinates that can be applied to living brain.
Paxinos and Watson (1998) avoided this problem by working only with fresh frozen
tissue, and not fixing. Of course, many histological reactions do not work with
fresh, unfixed tissue.
174
C.W. Scouten
Although perfusion is ubiquitous throughout animal research work, the procedure
varies between laboratories, and little is ever said in the methods section about what
procedure was used. Until recently, there has been no commercial instrument for
perfusion. Each lab cobbles together its own apparatus for this job. This is unfortunate, because how it is done affects tissue quality and reproducibility of immunological and other stains.
The first and a still common method is to use gravity to drive the flow (Palay
et al. 1962). Two bottles with tubing nipples at the bottom are placed on a shelf
above the drain surface where the animal will be placed. Tubing from each bottle
is connected to the arms of a “Y” connector to form a final common flow line, with
clamps on the outlet from the bottles. The experimenter first flows the pre-wash for
a short period whose length is sometimes determined by volume passed, sometimes
a few minutes, and then flows the fixative. Typically there is not even this much
detail in the methods section. Tissue so perfused is seen to have a reddish hue, and
has red blood cells throughout. This means that some capillaries did not clear of red
blood cells, and so must not have gotten fixative flow. The reason can be calculated.
Even in living animals, capillaries stop up, with a cell stuck for a while, then clear.
Even normal blood pressure does not always push blood cells along on every
branch, with every beat. Clearly, at least physiological pressure should be used in
perfusion. A pressure higher than maximum systolic pressure would be needed to
force out all red blood cells. So the water bottles should be positioned to provide a
pressure of at least 150 mmHg, a high systolic pressure most mammals can reach
when exercised. One mmHg equals 13.6 mm H2O. Thus, to achieve even physiological pressure, the source bottles should be over 2 m above the animal, even if no
pressure is lost in the needle. Given ceiling heights above the countertops, this is
not possible in the great majority of labs. This fact accounts for the generally poor
perfusions seen, with blood remaining in the tissue.
A more recent practice is to use a peristaltic pump to drive perfusion fluid.
However, this controls flow rate, not pressure. There are no algorithms to calculate
the correct flow rate to create sufficient pressure, to clear every capillary in a given
animal. Experimenters develop their own flow rate empirically, finding what works
in the animals they commonly use, and typically can get a flow rate that yields better
results than gravity. However, the vascular resistance, and so the correct flow rate,
will vary with growth, age, species, strain, gender, exercise, and health state to
name a few. The same flow rate used on a young and an old rat will get different
results, and create a systematic bias in fixation and tissue quality, and at least in
immunological reactions. Degree of fixation affects antigen binding, enzyme activity, and other relevant functions. If the flow rate chosen creates sufficient perfusion
pressure for small rats, larger rats will be less fully perfused and more slowly fixed,
and perhaps have more background noise in the stain. Consider perfusing a mouse
and a rat at the same flow rate. Whatever rate is chosen, one animal will yield
suboptimal results. However, within limits, all mammals have the same blood
pressure, and a selected pressure can be used in any mammal, even neonates, and
give consistent, reproducible results. A pressure of 170 mmHg would be an above
resting pressure in any mammal. See Table 9.1.
9
Frozen Section Technique in the Animal Research Setting
Table 9.1 Average blood pressure for several
species (systolic/diastolic) (Green 1979;
Short 1987)
175
Animal
Average blood pressure
Mice
113/81
Rats
116/90
Hamster
150/110
Rabbit
110/80
Dog
112/56
Cat
120/75
Baboon
148/100
Rhesus monkey
160/127
Pig
170/108
Table compiled from both sources
Mice 113/81 Rats 116/90 Hamster 150/110
Rabbit 110/80 Dog 112/56 Cat 120/75
Baboon 148/100 Rhesus 160/127 Pig 170/108
Therefore, it is easier to select a pressure that is appropriate across species,
genders, strains, weights and individuals than it is to select a flow rate for each
individual.
Clearly, it makes more sense to control pressure, but it must be much more pressure
than gravity flow from bottles the experimenter can reach by hand.
Many experimenters say that they adjust pressure or flow rate down if they see
clear fluid coming from the nose. Rodents have a pressure release valve that allows
excess cerebrospinal fluid (CSF) to pass through the cribiform plate and out the nose
(Brodbelt and Stoodley 2007). Perfusion is putting excess fluid into the system. Of
course it will activate the overflow system if applied under even physiological pressure
with a continuous inflow. If clear fluid is coming out the nose, it is proof that the CSF
and the extracellular fluid are being replaced by pre-wash or fixative, as you should
hope. There is no reason to back off the pressure on account of this flow. If red blood
were to come out the nose at the beginning of perfusion, that would indicate vascular
rupture, and would be a problem. Clear fluid does not indicate vascular rupture.
9.3
Avoiding Shrinkage
Cragg (1980) devised a complex apparatus to maintain above physiological pressure,
300 mmHg, and found he could get brain tissue for electron microscopy in which
the extracellular space was retained. He did not take a measure of whole organ size.
There was no noticeable damage to tissue, even at the EM level, caused by the short-term
application of pressure even that high above physiological pressure.
A commercial apparatus for sacrifice perfusion has recently been introduced by
Leica’s MyNeuroLab.com (St. Louis) subsidiary (see Fig. 9.1). The project to
develop and test this was supported by Small Business Innovative Research (SBIR)
grant funds from National Institutes of Health/National Institute of General
Medicine (NIH/NIGM).
176
C.W. Scouten
Fig. 9.1 Perfusion Two™ apparatus for sacrifice perfusion. The bottle on the left serves as an air
pressure tank, the next bottle is prewash solution, then fixative. The 4th bottle is optional for a
postwash if desired
Fig. 9.2 Perfusion Comparison. Three brains perfused by different methods. The brain on the left
is fresh, unperfused tissue. The middle brain was perfused at 300 mmHg, and the brain on the
left was perfused by gravity pressure in a typical setup. Tissue preparation and photograph by
Dr. Miles Cunningham, McLean Hospital
The Perfusion One™ and an automated version, the Perfusion Two™, control
pressure up to 300 mmHg, and come with a protocol for reproducible perfusions of
reliable consistent quality. The 300 mmHg pressure (over 4 m of water) fully clears
nearly all red blood cells see Fig. 9.2. The Perfusion One also provides a fourth
9
Frozen Section Technique in the Animal Research Setting
177
perfusion fluid bottle for post wash. Immunological reactions require that the tissue
be fixed, but not for too long. The animal can be perfused; left with fixative inside or
on slow flow for 4–6 h, then the fixative washed out, perhaps with 30% sucrose
or other cryoprotectant solution, and be fully saturated with cryoprotectant and
ready to section immediately after. The tonicity of the perfusion fluids, and the
pressure used, can enable a perfusion without shrinkage (Scouten et al. 2006).
9.4
Tonicity of Perfusion Fluids
Osmolarity is a measure of the number of particles (ions or molecules) in a given
volume of water. Tonicity refers to distribution of particles on either side of a
semi-permeable membrane. Only particles that cannot cross the membrane contribute
to tonicity. For example, the inside of cells is typically about 330 mM in osmolarity.
If fluid outside the cell has a different osmolarity, either water or particles or both
will move to balance tonicity. Particles will move down any concentration gradient,
if they can cross the membrane, like sodium leaking into a cell. Urea moves freely
through a cell membrane, so the osmolarity inside and outside the cell would rise
with urea concentration, but this would have no effect on tonicity, and thus no effect
on water flow. Likewise, a 4% formaldehyde solution, even without buffer, is about
1,400 mM, but formaldehyde is believed to freely cross the cell membrane (Cragg
1980; Thrift 1997; Maser et al. 1967), and so has only transient, if any, effect on
tonicity, and thus no direct tonicity effect on movement of water across a cell membrane.
Formaldehyde does stop energy use, stops all ion pumps, and changes permeability
of the membrane, and so has significant indirect effects on tonicity.
Sucrose at 9.25% concentration, or sodium chloride at 0.9% concentration, are
isotonic solutions, that is, they will not cause significant volumes of water to move
in or out of a living cell bathed in them. However, sodium is constantly leaking into
cells, and being actively pumped out of cells with an energy-using metabolic process,
to maintain a roughly 10:1 ratio of sodium outside to inside the cell. If a cell is
challenged and its energy mechanisms slowed or stopped, as in the anoxia and
thermal shock of perfusion or the arrival of fixative, sodium will flow in and not be
pumped out. The cell will swell as it takes in water from the extracellular space,
down the concentration gradient, to maintain tonicity by diluting the inflow of
sodium. It will take water from the extracellular space and move it into the intracellular space. Possibly this accounts for the loss of extracellular space in perfused
tissue. Although the water and excess sodium move out when fixation has made
the membrane more permeable and particles rebalance, the extracellular space
appears not to reopen. Instead, the fluid moves out the vascular system and the
whole organ shrinks. Sucrose, in contrast, cannot cross the cell membrane.
A hypertonic perfusion fluid would shrivel the tissue by drawing water out of
cells and out of extracellular space, and into the vascular space and hence out of the
animal. Use of hypotonic perfusion solution would cause cells to take on fluid
(from the vascular space, through the extracellular space) and swell. Cellular swelling
178
C.W. Scouten
is commonly reported as challenged cells start to fail metabolically. This is, in part,
due to the influx of sodium when the pumps shut off and water flowing in to balance
tonicity, and may be partly because autolysis, internal breakdown, expands the
number of particles in solution and increases internal tonicity. If swelling eliminates
the extracellular spaces, and is transient, the subsequent outflow of fluid to the
vascular space would result in shrinkage of the whole organ. This author (unpublished)
has seen shrinkage of whole organ in mouse brains in which a 5% sucrose solution
was used for the pre-wash, and the fixative solution was isotonic. Thus, hypotonic
or hypertonic pre-wash may have a final result of shrinking the brain, given an
isotonic fixative solution.
Cragg (1980) reasoned that the loss of extracellular space (and whole organ
shrinkage?) could be prevented by removing sodium from the extracellular space
before fixative arrived, or swelling irreversibly emptied and closed it. He used 10%
sucrose (~isotonic) as the pre-wash solution, rather than the conventional saline or
phosphate buffered saline (PBS). This would be sufficient to wash sodium out of the
extracellular space for most tissues, but due to the blood brain barrier, sucrose does not
leave the vascular compartment in the brain. To force it out, and thereby replace the
extracellular fluid, he applied a pressure of 300 mmHg, shown to force sucrose across
the blood brain barrier (Rappoport 1976). Again, this resulted in no detectable damage
caused to the tissue, even under the electron microscope. He was able to balance tonicities with a complex mixture and prevent the loss of extracellular space (and prevent whole
organ shrinkage?). Sucrose cannot cross the cell membrane, and therefore does not move
down its concentration gradient into cells, and so contributes strongly to tonicity.
Perfusion is complex dynamically. Opposing processes are occurring. The pre-wash
solution of isotonic sucrose should be carrying away any ions that can cross the cell
membrane, including most of the sodium, as they move down the concentration
gradient into the passing fluid. This should act to prevent or delay the early cellular
swelling. Conversely, autolysis (cell internal breakdown) would be increasing the
particle count inside the cell, which would tend to increase fluid inflow and cellular
swelling. Unless these new breakdown particles can leave the cell down a concentration gradient and be carried away, the balance between these two processes in
time would determine if swelling will occur.
The steady flow of sucrose through the vascular and extracellular space would
remove any dissolved particle that can cross the cell membrane, thus the internal
tonicity of the cell should drop as the pre-wash proceeds. Water would then also
leave the cell, maintaining the extracellular space. Formaldehyde in water, no saline
or buffer, following a pressure isotonic sucrose pre-wash, has been seen to swell the
organ size above normal, as measured with a plethysmometer immediately post
perfusion (Scouten and Cunningham, unpublished). Thus, the size change seems to
be purely a tonicity issue if the extracellular space has not been closed by initial
swelling. If shrinkage occurs, it is then due to isotonic fluid on the outside, hypotonic fluid on the inside, by the time the fixative arrives. Water leaves the cell via
the vascular space rather than reopen the extracellular space. The cell had been
previously swollen, so that the cell had displaced the extracellular space, which
does not reopen, and therefore the whole organ shrinks as the water leaves.
9 Frozen Section Technique in the Animal Research Setting
179
In summary, we recommend a pre-wash of isotonic or 10% sucrose forced
through at 300 mmHg, and hypotonic fixative in about 3% sucrose, to avoid shrinkage or expansion. The exact numbers have not been fully resolved. However, these
solutions will give better results than conventional isotonic solutions. The sucrose
will cause the muscles and limbs to move slowly for a few seconds until the sodium
is gone. When the movement stops, it is a good end point to open the fixative clamp
and let it flow. Let it mix with sucrose for a while, about ten seconds, then close the
sucrose pre-wash clamp. Let the pressure remain at 300 mmHg until the fixative
reaches the animal, and this will depend on the internal volume of the tubing to the
animal, and the flow rate through the animal. When some stiffening of the animal’s
muscles is noted, you can drop the pressure to about 100 mmHg to avoid fluid
waste. Fixative does not need to flow fast, just keep the mix inside refreshed, once
the blood is already out.
The tubing internal volume, the diameter times the length from the animal back
to the “Y” connector, is critical. Too thin a diameter and the pressure drop due to
resistance in the tubing will use up the pressure and not force the blood brain
barrier, and may not force out all the blood. Too large, and the volume of fluid in
the tubing will take too long to clear the animal, and thus needlessly delay the
arrival of fixative after the switch. A tube appropriate for the rat would take an
excessively long time to switch fluid to the mouse, given the much slower flow rate.
The animal cardiovascular resistance must be determining the flow rate. A test
would be appropriate to time how long it takes to empty a bottle with or without the
animal, but with everything else (tubing to the needle used). It should take much
longer with an animal involved. If not, the needle or the tubing is the bottleneck,
and needs to be larger. The thinnest tube that meets these criteria is ideal.
9.5 Tissue Orientation
For many tissues, how an organ is oriented for sectioning is not important. For others it is. Frequently, skin or retina may need to be cut in cross section. To cut thin
tissue pieces along an edge, sandwich the tissue between two strips of balsa wood
that has been soaked in media, and then clamp or freeze the wood, tissue and all,
and section the entire assembly. Balsa will cut easily.
Brain nearly always needs to be cut in a specified plane, usually the plane used
in atlases, coronal (defined perpendicular to skull flat), sagittal and horizontal.
This may be accomplished, crudely, by taking a razor blade and cutting a flat
plane through the brain approximately perpendicular to cortex. Then put the cut
surface of the needed block of tissue on a pedestal, and freeze for sectioning.
The cryostat or microtome should have an adjustable pedestal to tilt the tissue.
After a few sections, the user notes the orientation error, adjusts some, and tries
again. Trial and error adjustment by observation before reaching the critical region
from which sections are needed is a commonly used procedure, and is time consuming and error prone.
180
C.W. Scouten
Fig. 9.3 Rat brain coronal matrix. Note the approximately brain shaped cavity
Several manufacturers make matrices, like a carpenter’s miter box with slots
positioned a mm apart, and perpendicular to a floor shaped like the curvature of the
brain surface. This improves the accuracy of the initial cut-through considerably
over the free-hand operation, see Fig. 9.3.
These matrices may be made of metal or acrylic. However, matrices are not a
final solution. Like cutting cheese with a knife, the tissue sticks to the blade as it
passes through, and the chamber fits loosely, there is room for the brain to move or
be somewhat out of position. Thus, the cuts are not fully reproducible, even if the
same slot is used each time. Some trial and error adjustment is still needed. This
can be improved by using a surgical monofilament to make the cut through, instead
of a blade, again like a cheese slicer. It may be necessary to cut the membranes at
the brain surface with a blade and then use the monofilament.
A new solution has recently been offered. Gelatin encasement blocks (Brain
Blocker One™, Leica Biosystems, St. Louis) are cast from a mold, originally cast
from the fixed brain (without shrinkage) of an adult rat or an adult mouse. These
gelatin blocks have rectangular sides, and the brain cavity inside is oriented in the
atlas planes relative to the sides. The block can be put on a flat pedestal and sectioned, gelatin and all, after a brain is encased inside. Figure 9.4 shows a fresh brain
being encased.
These sections should be highly reproducible, and always in the atlas plane in
which the blocks were originally cast. Soaking the gels in media or water slowly
9
Frozen Section Technique in the Animal Research Setting
181
Fig. 9.4 Mouse brain being encased in Brain Blocker One™ (a) Empty mouse brain cavity in
stereotaxic alignment in a half gelatin block (b) Mouse brain, fresh tissue just extracted, settled in
one half of the gelatin block (c) Mouse brain completely encased in gelatin block. Seam just
visible. (d) Placed on back, edge aligned parallel to skull flat, ready to freeze and section gelatin
and brain together
expands them, so that size differences due to age or strain of a group can be
adjusted by soak time.
The Brain Blockers™ can be used one at a time to improve orientation, and
thus save time with trial and error adjusting on the cryostat, or the rectangular
blocks can be placed side to side against each other, and sectioned all at once in
each pass of the knife. Mouse brain sections made in this way can be placed on 1 × 3
slides (up to 12) or 2 × 3 slides (up to 24). If large sheets of several brain sections
are made, it may be necessary to collect them with a tape transfer system
(CryoJane™ or Macro CryoJane, Leica MicroBiosystems, St. Louis). See below.
Blocks of 24 also require greater blade movement range than is common for
research laboratory cryostats, so a large format cryostat with greater movement
range may be needed (Model 8850, Leica Biosystems, St. Louis). Note that in so
doing, you can section once through the critical area on 24 brains at once, and
enjoy a nearly 24:1 reduction in time needed to complete sectioning of all brains in
an experiment. Further, consider the resulting slide layout. The same region from
each brain is on one slide, and all are sectioned in the same atlas plane. Comparison
should be greatly facilitated and the microscope analysis time correspondingly
reduced.
182
9.6
C.W. Scouten
Tape Transfer Technique
When large slices of tissue, or multiple small pieces that should be kept together
in order are to be sectioned, or when the collected sections must be perfect for
pictures, as in an atlas (Watson et al. 2009), a tape transfer instrument is very
effective (CryoJane Tape Transfer System™, Leica Biosystems, St Louis). The
concept is simple. A specially coated piece of tape is applied over the cut surface
of the block with a roller. When the next section is cut, the blade will pass through
the tissue below the tape. The tape will adhere to the section exactly as it was on
the block. The tape is then placed on a specially coated slide, and given a brief
exposure to UV light. The UV light releases the adhesive on the tape, and activates
an adhesive on the slide. Simply pull the tape off, and the section remains on the
slide, exactly as it was on the block, without stretching or distortion, and with
anatomic structures in position and orientation, even if that plane of section has
disconnected parts. Figure 9.5 shows the CryoJane parts to be installed, some
inside and some next to the cryostat.
9.6.1
Choice of Sectioning Method
Animal researches usually want to section whole organs or large sections.
Paraffin penetration would typically be too slow for whole brain sectioning, for
example. Commonly, researchers section either frozen tissue with a cryostat
(Fig. 9.6), or sliding microtome (Fig. 9.7) with freezing stage, or soft tissue with
a vibrating microtome. There are issues to be addressed with either and both
methods.
Fig. 9.5 CyroJane™ Components
9
Frozen Section Technique in the Animal Research Setting
Fig. 9.6 Cryostat for frozen sectioning
Fig. 9.7 Sliding microtome for sectioning tissue
183
184
9.7
C.W. Scouten
Blade Angle
Blade angle is an issue about which there is a lot of unnecessary confusion and
superstitious behavior for both vibrating and frozen microtomy. Incorrect blade
angle is a frequent cause of problems with sectioning tissue. The blade moves forward in a given plane. The blade body is usually tilted at some angle to that plane.
This angle between the plane of motion and the blade sides is the blade angle, as
frequently referred to on histology help pages. In Fig. 9.8, the angle between the
direction of motion and line C–D is the blade angle.
Blades have a common feature in the shape, a final bevel of about a millimeter to
the edge, see Fig. 9.8. The bevel angle is usually unknown to the user, but is critical
information that should be measured or obtained as closely as possible. Manufactures
should laser this information on disposable blades intended for use in histology. At
present, the user can obtain a common protractor, place the blade on a glass or other
flat surface, and push the edge down so the bevel is flat on the surface. Measure this
angle with the glass to the body line of the blade (line C–D).
If the blade shown advances straight to the right into the tissue block, the edge
at B will cut a thin section off the tissue block. If the blade were more horizontal
(point D lowered some), then the edge from B to C, which is the lower bevel, would
forcibly compress the tissue behind the cutting edge. Too low a blade angle leads
to a common problem, alternating thick and thin tissue sections (this can also be
caused if anything is loose and can move even slightly, such as the blade holder or
the pedestal the tissue is on, or if the tissue is flexing away from the blade, as when
a vibrating blade is advancing too rapidly). The softer the tissue, the more it will be
crushed and compressed by too low a blade angle. Hard tissue may force the blade
to deflect upward, and leave the block and skate along the top of the block.
Fig. 9.8 Diagram depicting blade bevel and blade angle. ∠ABC is the total bevel angle. This is
sometimes asymmetrical relative to the midline, the bevel may be only on one side. Lower bevel
angle is the angle of line BC relative to the midline of the knife body. Plane BC is the lower bevel
face. Line BC should be parallel to the direction of motion, except with C slightly higher. Line
CD’s angle to the direction of motion is the Blade Angle
9 Frozen Section Technique in the Animal Research Setting
185
As tissue is cut, the blade bevel forces the tissue to bend sharply up at the cutting
edge of the blade. The upper surface of the section above the blade is compressed.
The lower surface in contact with the blade is stretched. The steeper the blade angle
is set, the more sharply the tissue is forced to bend. The consequences of too much
bend are worse if the tissue is very hard, and it may break (shatter marks parallel to
the blade), curl or deform. A steep blade angle forcing the tissue to bend will be
more damaging to hard tissue (may shatter) than to very soft, flexible tissue, which
can bend easily. Probably because the consequences of incorrect blade angle vary
with direction of error, and with tissue type and hardness, and blades vary in bevel
angle from manufacturer to manufacturer, many histologists believe that the correct
blade angle depends on the tissue being cut, and must be determined by trial and
error. It does not. It is never advantageous in histology to have the bevel trailing a
flat surface compressing the tissue behind the edge (too low a blade angle). And it
is never advantageous in histology to bend the section more sharply than necessary
at the cutting edge. This leads to the conclusion that the correct blade angle,
whether on a vibrating microtome or a cryostat, is always the blade’s lower bevel
angle. Modify this very slightly. So that the bevel face does not slide over the
freshly cut surface with friction abrasion, the blade angle should be above the bevel
angle, but as little as possible. A compromise position is unlikely to ever be warranted because the consequences of too low a blade angle are more damaging than
the slight increase in bend angle needed to rectify.
Blades with high bevel angles are stronger and last longer. Blades with low bevel
angles bend the tissue less and should slice into tissue easier, with less compressive
resistance yielding flatter sections, but the edge is more fragile and less durable. Of
course, sharpness of the blade is a separate and very important issue as well, as is
hardness of the blade material see Chap. 4 page.
9.8 Vibrating Microtome
The advantage and purpose of a vibrating microtome is that it can section a block
of soft tissue under liquid, without previously hardening the tissue. The processes
of freezing tissue and paraffin embedding tissue are alternate means of sufficiently
hardening tissue so that a knife will cut cleanly through the tissue, rather than compress the tissue in front of the blade. Both of these techniques can have significant
drawbacks for animal research. Freezing commonly fractures some cell membranes
(but see below), and lets cell contents in the cytosol leak out. Thus, vibrating
microtome-cut tissue usually has better preservation of cell contents, and labeling
stains such as HRP or fluorescent compounds show up more vividly in vibration cut
sections than in frozen cut sections, and with less background. This advantage is
especially noticeable with HRP reactions or immunochemistry stains, depending
upon whether the antigen is in cytosol or bound to a membrane.
Vibrating microtomes are also the gentlest, most effective way to cut brain slices
for electrophysiology in a tissue chamber, in part, because the tissue can be cut
186
C.W. Scouten
under an oxygenated media. For this application, a disadvantage of vibrating microtomes is that the force applied to move the blade back and forth inevitably creates
a small amount of vertical vibration of the blade (Geiger et al. 2002). This creates
a layer of dead and crushed cells on the slice being cut. Various strategies for minimizing this effect are used by different manufactures. Electromagnet driven oscillation at line frequency (60 Hz) of a mass exactly correct for natural frequency of
oscillation at 60 Hz has been one strategy used to minimize vertical vibration
(Vibratome, Leica Biosystems, St. Louis).
The disadvantages of vibrating microtomes are that cutting is slower compared
to frozen section methods, and there is a limit on how thin the sections may be cut.
Fresh unfixed brain tissue can be sectioned no thinner than about 40 microns. Fixed
brain can be sectioned to about 20–30 micron sections, depending on the fixation
quality and hardness.
Vibrating microtomes allow adjustment of either frequency or amplitude of
oscillation, forward speed of the blade, section thickness, and blade angle.
Softer tissue requires slower forward speed and more oscillation (frequency or
amplitude).
9.9
Freezing of Biological Tissue
In the research setting, optimal preparation and preservation is demanded to preserve morphology, genetic material and antigenicity. The method in which tissue is
frozen for cryotomy can have significant impact on the results. An understanding
of the physical properties of freezing tissue will help to choose the best means to
freeze samples for a specific application.
When liquid water freezes to a solid, it may form either as hexagonal or cubic
crystals, or as vitreous (amorphous) ice. This will depend on the rate, and cold level
of freezing (Jongebloed et al. 1999). If the rate of freezing is very fast, the water
will solidify without crystal formation, as vitreous ice. Freezing in crystal form
expands the volume of liquid water. Water is the only substance known to have this
property of expansion when freezing. Crystal formation is encouraged and larger
crystals are formed by a slow rate of freezing transition from water to ice. Vitreous
ice, without crystals, does not expand upon freezing. This is the basis of the often
stated need to freeze biological tissue very fast, to achieve the solid state as vitreous
ice. If crystals form and expand, they stretch or puncture cell membranes. Later,
after sectioning and thawing the tissue, cell contents leak out into space around the
cells or over the section surface. If staining for something in the cytosol such as
HRP or antigens, the leaked contents may cause weaker staining in the cell and
stronger background staining. If large crystals form, cells are crushed and pushed
aside, and the section on the slide will be seen to have multiple holes of varying
size, the well known “Swiss cheese artifact.” See Figs. 7.1–7.4.
Rapidly freezing tissue is not as uncomplicated as it might sound. Placing tissue
on a pedestal and putting it in a cryostat to freeze will usually result in Swiss
9
Frozen Section Technique in the Animal Research Setting
187
cheese artifact. Therefore, in many research applications, tissue is snap frozen
before being placed in a cryostat or on a freezing microtome stage. There are many
methods to accomplish this. The rate of freezing will depend on several factors:
The area of tissue surface relative to its volume in contact with the cold source; the
intensity of cold, and the size of the tissue block. Biological materials are poor
thermal conductors, so larger blocks are harder to snap freeze throughout the
volume. Researchers needing to freeze whole organs such as a whole brain have a
considerably more difficult task to quickly complete the freezing process, than do
their colleagues in clinical histology, who more typically freeze biopsy samples or
small tissue fragments.
Liquid nitrogen is the coldest fluid widely commercially available (boiling point
at −195.8°C). Full immersion in cold fluid creates the most surface contact, and
should therefore give the fastest freezing. However, liquid nitrogen has a very low
specific heat constant. The state change from liquid to gas requires far fewer calories than for most materials, such as water. Immersion of a warm tissue in liquid
nitrogen, therefore, converts a comparatively large volume of the nitrogen into gas
form. The gas is an excellent insulator (as is the biological tissue) and may cling to
the surface of the tissue in random patterns. Small samples can be very satisfactorily frozen upon initial contact with the nitrogen, and freezing samples this way is
common practice in clinical histology labs. However, whole rodent brain will snap
freeze as vitreous (will not expand) around its outer surface to some depth, but the
combined effect of the gas layer building up, and the thermal resistance of the tissue, will slow the rate of penetration of the cold into the interior of the piece. Inside,
the tissue may freeze slower into a crystalline form, and expand. The result is the
commonly seen cracking or splitting of the tissue block, as its interior expands, and
its exterior does not. If the tissue block cracks, the inside was frozen crystalline, not
vitreous, and cell membranes are damaged and cell contents would have leaked in
the interior, but not in the shell.
Various other liquids can be used, cooling them with liquid nitrogen or by stirring in crushed dry ice. Heat from a rodent brain will not vaporize isopentane, dry
ice will not solidify it, and the specific heat constant is high enough that whole
rodent brain can be reliably immersed in a slurry of dry ice and isopentane, with
good vitreous ice results. The isopentane will not penetrate the tissue on immersion.
Ethanol would similarly work, except that it would penetrate and react with the
tissue. Isopentane is volatile and flammable at room temperature, and must be
handled with care. There are a few thermal transfer fluids such as silicone oil that
would theoretically work with better properties, but have not been reported as being
used for that purpose.
Another effective procedure is to place the tissue on a cold pedestal and immediately bury in finely powdered dry ice. This freezes almost as fast as liquid immersion, and does not crack tissue the size of a rat brain.
The Allen Reference Atlas of C57BL6J Male Mouse by Hong (2008) describes a
procedure of embedding the fresh brain and placing it on an inch thick plate of aluminum, which has been resting on a mix of alcohol and dry ice chunks, long enough
to stabilize its temperature. This yields artifact free tissue that stains very well for
188
C.W. Scouten
cytosol proteins, although completing the freezing takes minutes rather than seconds.
The block can be seen to freeze at the bottom, the line of frozen tissue rises slowly. It
appears that tissue above the rising freeze line is above freezing temperature and so
does not start to freeze until the cold line reaches it.
If slower freezing is necessary or desired, or the tissue must be stored for some
time, and if the tissue is well fixed, use of cryoprotectants may help protect tissues.
Saturating the tissue with cryoprotectants such as 30% sucrose, glycerin, or polyethylene glycol offers some protection from freezing artifact. Cryoprotectants can
be delivered by perfusion to save days of penetration time. Unfixed tissue is not
amenable to cryoprotection because it would shrivel due to the high tonicity of
these compounds. Cryoprotectants disrupt ice crystal formation, and reduce the
likelihood of artifacts from ice crystals. A colder sectioning temperature is required
if cryoprotectants are used. Cryoprotectants are not necessary or helpful if the tissue can be snap frozen successfully, and will be sectioned soon after freezing.
Thus, while a clinical histologist can commonly use liquid nitrogen to achieve
excellent frozen tissue samples, the researcher will probably need another solution,
due to the size of the tissue block to be frozen, and the specific heat constant of
liquid nitrogen.
Regrettably, vitreous ice is not a stable state in nature. At any temperature, it will
very slowly reform to crystalline ice (it may be years at very cold temperature), the
warmer it is, the faster it crystallizes. Even vitreous frozen tissue will not last forever in the freezer, without developing artifact. Colder is better. However, tissue
must be warmed in order to section, to about (−9° to −19°C). Colder cutting will
leave the tissue too hard, and it will shatter when the blade bevel forces the tissue
section to bend. See shattering Chap. 5. To avoid crystallization, cutting should
begin as soon as the tissue reaches an acceptable temperature, not left in the cryostat overnight to stabilize. Once in the cryostat or on the microtome freezing stage,
animal tissue can be sectioned in the same manner as clinical tissue, as described
in other chapters.
References
Baker JR (1958) Principles of biological microtechnique, Methuen & Co Ltd, London, pp 37–40
Brodbelt A, Stoodley M (2007) CSF pathways. A review. Br J Neurosurg 21:510–520
Cammermeyer J (1960) Post mortem origin and mechanism of neuronal hyperchromatosis and
nuclear pyknosis. Exp Neurol 2:379–405
Cragg B (1980) Preservation of extracellular space during fixation of the brain for electronmicroscopy. Tissue Cell 12(1):63–72
Garman RH (1990) Artifacts in routinely immersion fixed nervous tissue. Toxicol Pathol
18:149–153
Geiger JRP, Bischofberger J, Vida I, Fröbe U, Pfitzinger S, Weber HH, Haverkampf K, Jonas P
(2002) Patch clamp recording in brain slices with improved slicer technology. Plugers Arch
– Eur J Physiol 443:491–501
Green CJ (1979) Animal anaesthesia. Laboratory animal handbooks, vol 8. Laboratory Animals
Ltd., London, UK, pp 123–124
9
Frozen Section Technique in the Animal Research Setting
189
Hong WD (2008) The Allen Reference Atlas: A digital color brain Atlas of the C57BL/6J Male
Mouse, Wiley, New York
Jongebloed WL, Stokroos D, Kalicharan D, Van der Want JJL (1999) Is cryopreservation superior
over tannic acid/arginine/osmium tetroxide non-coating preparation in field emission scanning
electron microscopy. Scanning Microsc 13:93–109
König JFR, Klippel RA (1967) The rat brain. A stereotaxic Atlas of the forebrain and lower parts
of the brain stem. Robert E. Kreiger Publishing Co Inc, Huntington, New York
Maser MD, Powell TE, Philpott CW (1967) Relationships among pH, osmolality and concentration of fixative solutions. Stain Technol 42:175–182
Medawar PB (1941) The rate of penetration of fixatives. J R Microsc Soc 61:46
Palay SL, McGee-Russell SM, Gordon S, Grillo M (1962) Fixation of neural tissues for electron
microscopy by perfusion with solutions of osmium tetroxide. J Cell Biol 12:385–410
Paxinos G, Watson C (1998) The rat brain in stereotaxic coordinates, 4th edn. Academic, New
York
Rappoport SI (1976) Blood brain barrier in physiology and medicine. Raven Press, New York
Scouten CW, O’Connor R, Cunningham M (2006) Perfusion fixation of research animals. Micros
Today 14:26–33
Short CE (1987) Principles and practice of veterinary anesthesia. Williams & Wilkins, Baltimore,
p 456
Thrift R (1997) http://www.biotech.ufl.edu/EM/data/osmos.html
Van Harreveld A (1972) The extracellular space in the vertebrate central nervous system. In:
Bourne GH (ed) The structure and function of nervous tissue, vol 4. Academic Press, New
York, pp 447–511
Van Harreveld A, Steiner J (1970) Extracellular space in frozen and ethanol substituted central
nervous tissue. Anat Rec 166:117–130
Watson C, Paxinos G, Kayalioglu G (2009) The spinal cord: A Christopher and Dana Reeve
Foundation Text and Atlas. Academic, San Diego
Reid N, Beesley JE (1991) Sectioning and cryosectioning for electron microscopy. Practical methods in electron microscopy, vol 13. Elsevier, Amsterdam
Index
A
Acetone, 117
Adhesion, 124
Air bubbles, 126
Air dried, 121
Anti-roll devises, 75, 76
Anti-roll guide, 4
B
Blade angle, 4, 184–185
Boats, 40
Book, 61
Brain blockers, 181
Brush-brush, 79
C
Chamber temperature, 1
Chatter, 98, 113–115
Chucks, 4, 38, 43
Chunked out, 48, 98
Common sense, 137–138
Compression artifacts, 146, 147
Compressor, 1
Coverslipping, 126–128
Crumple stage, 48, 98
Cryo-embedder, 160–161
Cryostat, 1, 182–183
blade, 79
maintenance, 10–11
Curling away, 60, 72, 86, 104, 108–110
Cytology preparations, 32–35
crush prep, 33, 35
scrape prep, 32, 34
touch prep, 32, 33
D
Difficult cases, 136–138
Disinfection, 9
Dispensing Slides, 45
Dissecting, 24–26
E
Embedding, 37
Embedding shelf, 45
En face, 38
Ethanol, 117
F
Face down cryoembedding in well bars,
45–48
Face down embedding, 40, 42
Face up embedding, 38–40
Fat gouge maneuver, 108
Fat, removing from lymph nodes, 24–26
Filling the well, 53, 54
Fixation, 117–121, 173, 186
Formalin, 117
Fredrick E Mohs, 152
Freezing artifacts, 5, 56, 144–148, 188
Frozen block cryoembedding, 66
cutting board / freezing griddle, 66
Frozen section brush technique, 78–79
body position, 80–82
holding the brush, 81–83
G
Gelatin encasements, 180
Gouge, 74, 110
Gross examination, 14–35
Gross sectioning of tissue, 28–32
H
Handle, 72, 91, 103, 106
Heat extractor, 6
H & E stain, 123
191
192
I
Ice crystals, 147
Inking resection margins, application of ink,
16–20
Isopentane, 187
K
Knife holders, 2
L
Launch pad, 48
Liquid nitrogen, 187–188
Liquids, 57
Lympho-glandular bodies, 138
M
Mature face, 84
Methanol, 117
Miami special, 159–160
Microtome, 1
Mohs surgery, 151–152
Multiple sections, 31
Multitudes, 50
N
Notating the map, 155, 157
Nuclear ice crystals, 148
O
Observations on observation, 133–136
Oil red O stain, 123
On edge, 52–53
On edge embedding, 38
On point, 52–53
Operative consultation, 131–133
Organ orientation, 179
Organ shrinkage, 177, 178
Orientation, 9, 84–86
Over-chuck freezing blocks, 43–44
P
Paper embedding, 50, 61–65
book, 63
membrane rolls, 63, 64
Parallel faces, 31, 54–55, 154, 157
Peltier freezing stage, 2, 182–183
Perfusion, 172–175
Index
Perpendicular margin sections, 30
Plan for reading slides, 135–136
Plastering, 43, 103, 108
Plastering technique, 59–61
Plastic molds, 165
Poly-l-lysine slides, 8
Precision cryoembedding system, 42–43
163–165
freezing time, 47–48
Pre freezing tissue, 40
Premature face, 84
R
Reading the block, 84
Relaxation, 153
Reporting the diagnosis, 148–149
Resection margin, 15–16
false negative margin, 17–18
inking resection margins, 16–20
true margins, 17, 18
Retrieving from the block, 72
Rotating the block, 86–87
S
Sampling errors, 31
Scanning objectives, 136
Sectioning, 182–183
Shave margin, 29
Slide technique, 158–159
Sliding microtome, 182–183
Snap freezing, 40, 187
Specimen holders, 4
Specimen stage, 38
Staining, 121–122
Super flat embedding, 49
T
Tape transfer system, 182
Temperature of the block, 75, 98–102
The cut off technique, 57–59
The Precision cryoembedding system, 42–43
The “Sausage Trick,” 26
Thick and thin sections, 112–113
Thick sections of fat, 106–107
Thinking of the diagnosis, 134–135
Thin stripes, 113
Toluidine blue stain, 123
Trimming, 8
Trimming minute specimens, 87–88
Trimming the block, 83–88
Index
W
Well bars, 43
193
X
X−Y axis, 84–86
X−Y orientation, 49
We must know what excellence looks like and sounds like in order to
begin to approximate it.
We can only achieve excellence if we are aware of all the ways to
make mistakes and are aware when we are making them.
Stephen Peters MD