1
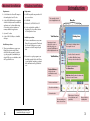
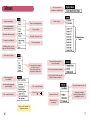
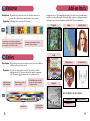
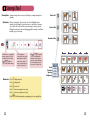
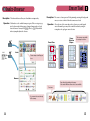
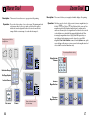
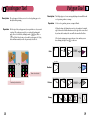
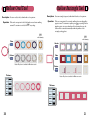
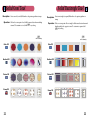
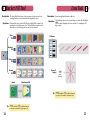
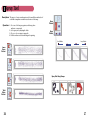
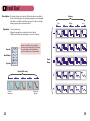
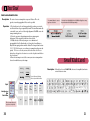
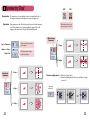
Table of Contents Flying Colors 2 User Manual Jan. 2003 Installation .............................................................................. 2 Screen layout and introduction............................................. 3 Starting a new document ....................................................... 4 Menu bar ................................................................................. 6 Using colors and patterns ...................................................... 8 Add-on packs .......................................................................... 9 Using gradients ....................................................................... 10 Stamp tool ............................................................................... 12 Stamp index and browser....................................................... 14 Eraser tool................................................................................ 15 Mover tool ............................................................................... 16 Zoom tool ................................................................................ 17 Eyedropper tool ...................................................................... 18 Polygon tool ............................................................................ 19 Hollow oval tool ...................................................................... 20 Hollow rectangle tool ............................................................. 21 Solid oval tool.......................................................................... 22 Solid rectangle tool ................................................................. 23 Bucket fill tool ......................................................................... 24 Line tool................................................................................... 25 Spray can tool.......................................................................... 26 Brush tool ................................................................................ 28 Text tool ................................................................................... 30 Symmetry tool......................................................................... 32 Stencil tool............................................................................... 34 Printing ................................................................................... 36 Tutorial 1: A Wizard’s Laboratory........................................... 38 Tutorial 2: A Landscape .......................................................... 40 Tutorial 3: A House ................................................................. 42 Tutorial 4: A Surreal Landscape ............................................. 46 Tutorial 5: A Birthday Card..................................................... 50 Troubleshooting...................................................................... 54 Keyboard Shortcuts ................................................................ 56 © 2003 Magic Mouse Productions 1 Macintosh Installation Install Requirements: Windows Installation Introduction Requirements: 1. A color Macintosh or PowerPC computer Description: that can display at least 256 colors. 2. At least 4Mb of RAM inside your computer, Operation: of which 2200k bytes must be available for application use. See the troubleshooting section for tips on how to make more memory available for applications 3. System 6.0.5 or later. 4. At least 2.5 Mb (2500k bytes) of available disk space. Installation procedure: 1. There is no installation necessary to run Flying Colors; just insert the CD and double click the program. If you wish to copy the program to your hard disk, just drag the CD icon to your hard drive, and it will copy all the files over. 1. An IBM compatible computer with a 486 processor or better. 2. 32 MB RAM The currently selected tool is highlighted in red. Menu Bar 3. Windows 95, 98, NT4, ME, 2000, XP 4. A video card with the capability of displaying 256 colors, with a resolution of 640x480 pixels or better. Tool Selection Painting Area 1. There is no installation necessary to run Flying Colors; just insert the CD and wait five seconds for Windows to recognize the insertion of the CD and spin up the disk. Symmetry tool and stencil tool can be on while other tools are selected. On/Off buttons will be highlighted in red. Last change to painting undone. Press again for redo. 2. If you wish to copy the program to your hard disk, just right click the the CD icon to your hard drive, and drag to your hard disk, and Windows will copy all the files over. Tool Modifiers Installation procedure: Preview Window of selection shows modifications made above. Each tool has its own set of modifiers. Modifiers change when you select another tool. Coordinates shown here in the Status Area Help Line Identifies what is underneath cursor or shows file name Previous row button Selection index button Next row button Shows painting size when cursor is here 2 First time users: start with the first tutorial, which begins on page 38. Other types of selections (colors, patterns, and gradients). Current selection is highlighted 3 New Document Main Window Description: When you launch Flying Colors, you are presented with the new document window below, or you may get to this window by selecting New under the File menu. Choosing Choosing aa Flying Flying Colors Colors canvas canvas takes takes you you directly directly to to the the painting. painting. Choosing Choosing aa white white canvas canvas brings brings up up another another window window asking asking for for aa desired desired canvas canvas size. size. New Document Window Open Existing Document Use Use these these arrow arrow buttons buttons to to see see more more canvases. canvases. If If you you choose choose aa blank blank canvas, canvas, the the painting painting area area will will be be white. white. Otherwise Otherwise the the painting painting area area will will show show aa Flying Flying Colors Colors canvas canvas or or aa previously previously created created painting. painting. Click Click open open to to review review or or add add to to an an existing existing painting. painting. After After selecting selecting aa paper paper size, size, click click ok. ok. You You will will then then go go back back to to the the previous previous window window with with the the correct correct values values entered entered automatically. automatically. Canvas Size Paper Size and orientation Enter Enter the the canvas canvas size size in in pixels pixels or or click click full full page. page. If If you you choose choose full full page, page, you you will will then then see see aa window window asking asking you you to to define define aa page page size. size. 4 5 Menus Menus Begin new painting Begin new painting Close painting without quitting Flying Colors Close painting without quitting Flying Colors Save with a different name Save with a different name Set page size and printer The only menu item available in small kids level The only menu item available in small kids level Open an existing painting Open an existing painting Save your work Zoom in steps Zoom in steps Save your work Go back to last saved copy Go back to last saved copy Magnification levels Magnification levels Print your painting Set page size and printer End Flying Colors session (appears as Exit in Windows) End Flying Colors session (appears as Exit in Windows) Print your painting Undo / redo last change Undo / redo last change To copy, and move images, use the mover tool. To copy, and moveare images, These menu options use the mover tool. only used for editing text These menu options are only used for editing text Only show painting for exhibition Only show painting for exhibition Show how painting would appear if printed Show how painting would appear if printed Turn on and off features Most tools and features available Stencil, opacity control, and other advanced features available Stencil, opacity control, and other advanced features available Turn stencil feature on and off Turn on and off features Choose Turn on and off features Choose Turn on and off features Tip: See end of manual for keyboard shortcuts Tip: See end of manual for keyboard shortcuts 6 Text entered letter at a time, some tools hidden Text entered letter at a time, some tools hidden Most tools and features available or or Create stencil mask Create stencil mask Show stencil area on painting Show stencil area on painting Turn stencil feature on and off Swap protected with unprotected areas without Swap protected modifying the stencilwith unprotected areas without modifying the stencil 7 Add-on Packs Patterns Description: The pattern selector button above the selection bar is used to access patterns. Lines, hollow shapes, and solid shapes can use patterns. Operation: Red highlight shows currently selected pattern. In addition to the over 1000 stamps built into Flying Colors, there are more beautiful images available as accessory add-on packs. Each add-on pack contains more background canvases and stamps. Contact the sales department at (800) 545-7677 for more information. Tropical Use arrows to see another row of pattern choices in the selection bar. Click index button to see patterns a screenful at a time. Maps Fashion Faces Funny Faces 1 Funny Faces 2 Currently selected pattern. Click on another to change selection. Food Colors Description: The color button above the selection bar is used to access colors. All lines and fills as well as text can be colored. Operation: Click on a color in the palette to select it. The selected color will be highlighted in red. The colors near the end of the palette continuously cycle. Pressing the t key will turn the color cycling on and off. Solid White (Mac) Solid Black (Win) Blank colors reserved for future use (Mac) Red highlight shows currently selected color. Click on another to change selection. Animals Also available, but not shown: Dinosaurs Cycling colors 8 Solid Black (Mac) Solid White (Win) Japanese folk art Machinery 9 Gradients Gradients isis aa spread ofof colors. The solid rectangle, solid oval, solid polygon, gradient spread colors. The solid rectangle, solid oval, solid polygon, Description: Description: A Agradient and bucket tools can allall use the gradient fillfill option asas anan alternative toto aa and bucket tools can use the gradient option alternative solid color fill. solid color fill. Linear: Linear: The linear type ofof gradient fillfill runs along parallel lines, atat the angle The linear type gradient runs along parallel lines, the angle specified. Imagine aa box surrounding shape toto bebe filled, atat angle specified box surrounding shape filled, angle specified specified. Imagine slider. Fill the box with the gradient; the shape then cuts the gradient byby slider. Fill the box with the gradient; the shape then cuts the gradient out ofof the box. out the box. The radial type of gradient fill runs from the center point you specify evenly Radial: Radial: The radial type of gradient fill runs from the center point you specify evenly You may reverse the direction ofof inin allall directions toto the limit circle specified. directions the limit circle specified. You may reverse the direction the gradient byby clicking onon the reverse button. the gradient clicking the reverse button. Small Small radius radius 0°0°Angle Angle Centerpoint Centerpoint Angle Angle control control Large Large radius radius 30° 30°Angle Angle The ridges type of gradient fill runs along parallel lines at the angle The ridges type of gradient fill runs along parallel lines at the angle Ridges: Ridges: specified also, but starts and ends at the shape's edges. specified also, but starts and ends at the shape's edges. contour type ofof gradient fillfill runs from the interior toto the edge, following The contour type gradient runs from the interior the edge, following Contour: Contour: The the contour ofof the shape. You may reverse the direction ofof the gradient toto gogo the contour the shape. You may reverse the direction the gradient from the edge toto the interior byby clicking onon the reverse button. from the edge the interior clicking the reverse button. 0°0°Angle Angle Angle Angle control control 10 Radius Radius 30° 30°Angle Angle Forward Forward Reverse Reverse direction direction option option Reverse Reverse 11 Stamp Stamp Tool Tool Description: Description: Stamps Stampsare areimages imagesthat thatcan canbe beused usedto tofill fillshapes shapesor orsimply simplystamped stampedon onaa Rotate Rotate90° 90° painting. painting. Clickon onaastamp stampin inthe theselection selectionbar barto toselect selectit. it.Red Redhighlight highlightshows shows Operation: Operation: Click currently currentlyselected selectedstamp. stamp.Use Usearrow arrowbuttons buttonsto tosee seeanother anotherrow rowof ofstamp stamp choices choicesin inthe theselection selectionbar. bar.Click Clickon onanother anotherstamp stampto tochange changeselection. selection. Holding Holdingdown downthe themouse mousebutton buttonand anddragging draggingwith withthe thestamp stamptool toolwill willdraw draw multiple multiplecopies copiesof ofthe thestamp. stamp. Vertical Verticalflip flip Horizontal Horizontalflip flip Click Clickindex indexto tosee seeavailable available stamp stampcategories. categories.To Toskip skip the thefirst firstlevel levelof ofthe theindex index hold holdo (Mac)or or o(Mac) (Win)while whileclicking. clicking. Ç Ç(Win) The Thefirst firststamp stampisis connected connectedto tothe thesystem system clipboard clipboardand andisiscalled called your yourcustom customstamp. stamp. To To create createaacustom customstamp stamp use usethe theselection selectiontool. tool. key(Mac) (Mac) Hold Holdthe theo okey or orÇ key key (Win) (Win) while while Ç selecting selectingaanew newstamp stampto to preserve preservecurrent currentsettings settingsin in the thetool toolmodifiers, modifiers,such suchas as size, size,angle angleof ofrotation, rotation,etc. etc. Scale Scale Rotation Rotation Spacing Spacing Brightness Brightness Shortcuts: Shortcuts: Press PressX toflip fliphorizontal horizontal Xto Press PressY toflip flipvertical vertical Yto Press PressZ torotate rotate90° 90° Zto Press Press+ toincrease increasestamp stampsize sizeone onestep step +to Press Presstodecrease decreasestamp stampsize sizeone onestep step -to Hold Holdq whiledrawing drawingwith withaastamp stampaligns alignscopies copiesin inaastraight straightline. line. qwhile 12 13 Mover Tool Index-Browser Eraser Tool Polygon Tool Description: The Themover indextool and is browser to find and view easily. Description: used toallow moveyou or copy a portion ofstamps the painting. Operation: Choose Click index to see theshape— available stamp categories. on a category go Operation: the selection lasso, oval or square.Click The painting undertothe selection may either be cut out or copied; you also have the to into the browser which shows pages of stamps. Stamps mayoption be selected Your new selection becomes the first include the canvas background. from the browser. You may hold o (Mac) or Ç (Win) and click stamp, called the custom stamp, to be used with the stamp tool. index to jump directly into the browser. Description:TheThe filledtool polygon irregularly area and fills it with Description: eraser erasestool partcreates or all ofanthe painting shaped by restoring the background a color, stamps. canvas, or pattern, restores gradient, to white iforthe white canvas was selected. Operation:Choose 1. Select color, gradient, stamp to fill theasize of the eraserpattern, and useor the tool just aswith. you would a pencil Operation: eraser. Alternatively, you may delete a variable sized area by using the 2. Define the shape by clicking theselections. mouse for each endpoint of a straight rectangular, oval, or polygon eraser edge. If the mouse is held down and moved, the edge can become curved. As you draw, the boundary of the area will be shown with a black line. This area was erased with Drag for curves, click for straight lines. Eraser Sizes Color Index hold o (Mac) Ç (Win) Eraser 3. Click on the starting point or press the space the bar rectangle to indicate you are selection. to start over. done defining the shape. PressSelection s Shapes Future stamp sets will appear Cut here. press/drag Gradient Selection Shapes Cut/Copy Option Include Canvas Browser press/drag Copy Pattern Fast erase Use arrows to browse through all the stamps. No canvas 14 Canvas release Erase the whole painting in fun ways. Note: under Windows fewer choices are available. Stamp New selection becomes the first stamp. 15 Eyedropper Mover Tool Tool Zoom Tool Eraser Description: tool allows you to color byofpicking up a color Description: The Theeyedropper mover tool is used to move or select copy aaportion the painting. Description: orpainting shrink the of the background painting. Description: The Thezoom erasertool toolallows erasesyou parttoormagnify all of the bydisplay restoring canvas, or restores to white if the white canvas was selected. directly from the painting. Operation: Choose the selection shape— lasso, oval or square. The painting under the selection may either be cut out or copied; you also have the option to include background. Your new becomes first Operation: Click thethe tipcanvas of the eyedropper exactly overselection a pixel whose colorthe you wish stamp, called the custom stamp, to be used with the stamp tool. to pick up. The eyedropper can also be accessed while working with most other tool selections by holding down the o key (Mac) or Ç key (Win). After selecting a color with the eyedropper tool, Flying Colors Drag for curves, click for will automatically revert to the previously selected tool. straight lines. Operation: With the zoom tool selected, click to zoom in (to increase magnification), or Operation: Choose the size of the eraser and use the tool just as you would a pencil hold the o key (Mac) or Ç key (Win) and click to zoom out. Your eraser. Alternatively, you may delete a variable sized area by using the magnification levelorwill be displayed under the pixel coordinates in the rectangular, oval, polygon eraser selections. status area. Alternately, choose a magnification level from the choices in the tool modification area, which will then appear highlighted in red. When increasing the magnification factor, Flying Colors will request that you This wasWhile erased with specify the pixel in the painting youEraser wish to keep as thearea center. the rectangle selection. magnified, if Dual Zoom Windows is turned on in the Options menu, a split Selection Eraser Sizesscreen will appear, allowing you to Shapes view your work at the magnification level selected and the actual size simultaneously. Present magnification setting Cut Magnification Chooser Selection Shapes New color selection Cut/Copy Option Include Canvas Previously selected color Copy Increase Magnification Fast erase No canvas 16 Canvas New selection becomes the first stamp. Erase the whole painting in fun ways. Note: under Windows fewer choices are available. Decrease Magnification 17 Index-Browser Eyedropper Tool Polygon Zoom Tool Description: The The eyedropper index and browser allow you find aand view Description: tool allows you toto select color bystamps pickingeasily. up a color directly from the painting. Operation: Click index to see the available stamp categories. Click on a category to go into the browser which shows pages of stamps. Stamps may be selected from the browser. You may hold o (Mac) or Ç (Win) and click Operation: index Click the tip ofdirectly the eyedropper exactly over a pixel whose color you wish to jump into the browser. to pick up. The eyedropper can also be accessed while working with most other tool selections by holding down the o key (Mac) or Ç key (Win). After selecting a color with the eyedropper tool, Flying Colors will automatically revert to the previously selected tool. hold Operation: With 1. Select a color, stamp to fill with. magnification), or Operation: the zoom toolgradient, selected,pattern, click toor zoom in (to increase hold the o key (Mac) or Ç key (Win) and click to zoom out. Your 2. Define the level shape bybe clicking the mouse for each of ainstraight magnification will displayed under the pixel endpoint coordinates the edge. If the mouse is held down and moved, the edge can become curved. status area. Alternately, choose a magnification level from the choices in the As you draw, the boundary of the area will be shown with a black line. tool modification area, which will then appear highlighted in red. When increasing the magnification factor, Flying Colors will request that you 3. Click onpixel the starting point oryou press thetospace to indicate you are specify the in the painting wish keep bar as the center. While to start over. done defining the shape. Press s magnified, if Dual Zoom Windows is turned on in the Options menu, a split screen will appear, allowing you to view your work at the magnification level selected and the actual size simultaneously. Color Index o (Mac) Ç (Win) Description: The filled polygon tool creates an irregularly shaped area and fills it with Description: The zoompattern, tool allows you toor magnify a color, gradient, stamps.or shrink the display of the painting. Future stamp sets will appear here. Present magnification setting Magnification Chooser press/drag Gradient New color selection Browser press/drag Pattern Increase Magnification Previously selected color Use arrows to browse through all the stamps. 18 release Stamp Decrease Magnification 19 Hollow Oval Tool Hollow Rectangle Tool Description: Create an rectangle (or square) outlined with a border, color or pattern. Description: Create an oval (or circle) outlined with a color or pattern. Operation: Click on the center point of oval, hold down the mouse button and drag outward. To constrain to a circle, hold q as you drag. Operation: Click on a corner point of the rectangle, and drag the mouse diagonally to opposite corner. To constrain to a square, press q as you drag. Borders jump from size to size as you draw them. After releasing the mouse, the border will be recentered automatically within the perimeter of the rectangle you dragged out. q q while drawing while drawing Color Border Pattern Color Pattern fill option not available in Windows version. Pattern Thickness Pattern fill option not available in Windows version. Thickness 20 21 SolidOval OvalTool Tool Solid SolidRectangle RectangleTool Tool Solid Description: Create Create oval (or circle) filled with a color, pattern, gradient stamp. Description: anan oval (or circle) filled with a color, pattern, gradient oror stamp. Operation: Click Click the center point oval, hold the mouse button down and drag Operation: onon the center point ofof oval, hold the mouse button down and drag outward. constrain a circle, hold as you drag. outward. ToTo constrain toto a circle, hold as you drag. q q Create rectangle (or square) filled with a color, pattern, gradient Description: Create anan rectangle (or square) filled with a color, pattern, gradient oror Description: stamp. stamp. Click a corner point the rectangle, hold the mouse button down and Operation: Click onon a corner point ofof the rectangle, hold the mouse button down and Operation: drag diagonally the opposite corner. constrain a square, hold drag diagonally toto the opposite corner. ToTo constrain toto a square, hold as you drag. qas you drag. q q q q q while drawing while drawing while drawing while drawing ColorFill Fill Color ColorFill Fill Color GradientFill Fill Gradient GradientFill Fill Gradient PatternFill Fill Pattern PatternFill Fill Pattern StampFill Fill Stamp StampFill Fill Stamp 22 23 Bucket Bucket Fill Fill Tool Tool Description: Description: The Thebucket bucketfill fillaffects affectsall allareas areasof ofthe theexact exactsame samecolor colorthat thatare arenext nextto tothe the starting startingpoint pointthat thatyou youhave haveindicated indicatedby byclicking clickingwith withthe thecursor. cursor. Operation: Operation: Click Clickinside insidethe thearea areayou youwish wishto tofill. fill.The Theselected selectedfill fillwill willflow flowoutward outwardto toall all touching touchingdots dotsof ofexactly exactlythe thesame samecolor. color. The Thebucket bucketfill filltool toolcannot cannotbe beused used effectively effectivelyon onaacolored coloredbackground, background,use usethe thestencil stenciltool toolinstead. instead. Color Color Fill Fill Line Line Tool Tool Description: Description: Draws Drawsaastraight straightline linefilled filledwith withaasolid solidcolor. color. Click,hold holddown downthe themouse mousebutton buttonand anddrag dragto tocreate createthe theline. line.Holding Holdingthe the Operation: Operation: Click, keywhile whiledrawing drawingthe theline lineforces forcesthe theline lineto tobe beat atmultiples multiplesof of45 45 q qkey degree degreeangles. angles. Thickness Thickness Gradient Gradient Fill Fill Pattern Pattern Fill Fill Force Force45° 45° Angles Angles Stamp Stamp Fill Fill Before Before q q while while drawing drawing After AfterBucket BucketFill Fill Tip: Tip: o key(Mac) (Mac)Ç key(Win) (Win)allows allowsyou you okey Çkey to topick pickup upaacolor colorwith withthe theeyedropper eyedroppertool. tool. Tip: Tip: o key(Mac) (Mac)Ç key(Win) (Win)allows allowsyou you okey Çkey to topick pickup upaacolor colorwith withthe theeyedropper eyedroppertool. tool. 24 25 Spray Tool Spray Tool Description: The spray tool creates a random pattern of dots much like an airbrush, or if used with a stamp draws a random rotated version of the stamp. Description: The spray tool creates a random pattern of dots much like an airbrush, or if used with a stamp draws a random rotated version of the stamp. Operation: 1. Select one of the four spray patterns, which range from uniform to concentrated. Operation: 1. 2.Select onespray of thesize four patterns, which range from Set the byspray adjusting the slider uniform to concentrated. 3. Choose a color or a stamp to spray with 2. 4. SetHold the spray by adjusting the slider down size the mouse button and drag in the painting 3. Choose a color or a stamp to spray with 4. Hold down the mouse button and drag in the painting Spray Pattern Spray Pattern Spray Radius Spray Radius Small Radius Small Radius Large Radius Large Radius Loose Spray Pattern Loose Spray Pattern Spray Tool Using Stamps Spray Tool Using Stamps Tight Spray Pattern Tight Spray Pattern 26 27 Brush Tool Brush Tool Description: The brush tool draws a free form line. The line’s thickness is controlled by the size of the brush shape selected, and the spacing between each imprint of the brush is controlled byform the slider. A spacing of 1 results in a solid line, Description: The brush tool draws a free line. The line’s thickness is controlled by and larger spacing values result in dotted lines. the size of the brush shape selected, and the spacing between each imprint Spacing of the brush is controlled by the slider. A spacing of 1 results in a solid line, and larger spacing values result in dotted lines. Operation: 1. Select a brush shape. 2. Adjust the spacing slider to make the line solid or dotted. mouse button down and drag to create a free form line. Operation: 3. 1. Hold Selectthe a brush shape. Tight Tight Spacing Medium Loose Medium Loose 2. Adjust the spacing slider to make the line solid or dotted. 3. Hold the mouse button down and drag to create a free form line. Opacity Opacity Brush Shape Opacity control (Mac only) is available in most tools at the advanced level. Decreasing the opacity (slider to the left) blends the Opacity control only) is in brush color with(Mac the colors in available the painting. most tools at the advanced level. Decreasing the opacity (slider to the left) blends the brush color with the colors in the painting. Brush Shape Spacing Spacing Brush Shape Brush Shape Opacity (Mac only) Opacity (Mac only) 28 Almost Transparent Completely Opaque Almost Transparent Completely Opaque 29 Text Tool Text Tool BASIC AND ADVANCED LEVEL Description: The text tool creates a stamp that is composed of letters. The color, BASIC AND ADVANCED LEVEL typeface, size, and typographical effects can be specified. Description: The text tool creates a stamp that is composed of letters. The color, Operation: 1. Click on the text tool icon to bring up a dialog box where you enter the typeface, size, and typographical effects can be specified. text. Enter the lines of type separated by returns. The text will automatically center itself or you can choose left or right alignment. Click OK to create the Operation: 1. Click on the text tool icon to bring up a dialog box where you enter the stamp containing text. Enter the linesthe of text. type separated by returns. The text will automatically 2. Move the cursor into the painting view stamp OK to create the center itself or you can choose left or area rightand alignment. Clickagainst background. Click on typeface from font selection below. stamp containing the text. 3. Move Modify the style into of the text by using one or aview combination of 2. the cursor the painting area and stamp against typographicalClick effects underline, etc.) from the tool modifier area. background. on(bold, typeface from font selection below. Adjust the line spacing and size with the sliders. The four quick 3. Modify the style of the text by using one or a combination of size buttons (typographical 10, 12, 18, 24) allow you to access the most commonly used type sizes (in effects (bold, underline, etc.) from the tool modifier area. points) . To choose a color onThe the four blue quick color selector Adjust the line spacing and for sizeyour withtext, the click sliders. size buttons above the typeface selections to access the color palette and click on (button 10, 12, 18, 24) allow you to access the most commonly used type sizes (in the color desired. points) . To choose a color for your text, click on the blue color selector 4. Once the is created, it becomes custom stamp and canon button abovetext thestamp typeface selections to accessyour the color palette and click be used or modified as any other stamp. the color desired. 4. Once the text stamp is created, it becomes your custom stamp and can be used or modified as any other stamp. abcdefg abcdefg abcdefg abcdefg abcdefg abcdefg abcdefg abcdefg abcdefg abcdefg Style Style Line Spacing Size Quick Size Line Spacing Size Quick Size Most commonly used type sizes (in points). Most commonly used type sizes (in points). 30 Note: Outline and Shadow effects only available on Mac Note: Outline and Shadow effects only available on Mac alpha alpha beta beta gamma alpha gamma alpha beta beta gamma gamma alpha beta gamma alpha beta gamma alpha beta gamma alpha alpha alpha alpha alpha alpha alpha alpha alpha alpha alpha beta gamma alpha beta gamma alpha beta gamma Use arrow buttons to access typeface selections. Selected font is highlighted in red. Additional typefaces may be purchased and installed separately. Use arrow buttons to access typeface selections. Selected font is highlighted in red. Additional typefaces may be purchased and installed separately. Small Kids Level Small Kids Level Description: When the level is set to Small Kids, the text tool is simplified, and text is entered a letter at a time. Description: When the level is set to Small Kids, the text tool is simplified, and text is entered a letter at a time. 31 Symmetry Tool Symmetry Tool OFF ON OFF ON Description: The symmetry tool creates multiple copies of a stamp, brush, oval, or rectangle in a symmetrical arrangement, around an origin point. Description: The symmetry tool creates multiple copies of a stamp, brush, oval, or rectangle in a symmetrical arrangement, around an origin point. Operation: Turn symmetry on and off by clicking on the button below the symmetry icon. When symmetry is on, symmetry guidelines appear. These will Operation: Turn symmetry on and off by clicking on the button below the symmetry disappear after symmetry tool is turned off and will not print. icon. When symmetry is on, symmetry guidelines appear. These will disappear after symmetry tool is turned off and will not print. Click button below icon to turn symmetry on and off. Click button below icon to turn symmetry on and off. Mirror Image Symmetry Mirror Image Symmetry Slider controls the number of copies made. Slider controls the number of copies made. Click to change the origin point of symmetry. Click to change the origin point of symmetry. Type of Symmetry Type of Symmetry Number of Copies Number of Copies Origin Point Origin Point 1 Copy 1 Copy 2 Copies 2 Copies Rotational Symmetry Rotational Symmetry 2 Copies To move origin point: 1. Click the set origin button. 2 Copies To move origin point: 1. Click the set origin button. 6 Copies 2. Click in the painting window where you wish the new origin center to be. 2. Click in the painting window where you wish the new origin center to be. Symmetry origin point Symmetry origin point 6 Copies 10 Copies 10 Copies 32 33 Stencil Stencil Description: The stencil tool allows you to modify selected parts of your painting while stencil other tool allows you to modify selected partsyou of your while Description: The protecting parts automatically. For example, can painting work behind protecting otheraffecting parts automatically. For example, you can work images without them, selectively erase, change color inbehind one area images without affecting them, selectively erase, change color in areais only, or switch one color to another throughout the painting. Theone stencil only, or switch one color to another throughout the painting. The stencil is constructed by selecting colors you wish to protect. constructed by selecting colors you wish to protect. Operation: 1. Select the stencil tool. The stencil cursor looks like an eyedropper on the Select the stencil tool. The stencil cursor looks like an eyedropper on the Operation: 1. screen. screen. 2. Select a color in the painting you wish to protect. Click the mouse on a 2. Select a color in the you protect. the mouse on a pixel in the painting ofpainting that color, orwish clickto directly onClick the color in the palette pixel in the painting of that color, or click directly on the color in the palette below. As you protect each color, it will be outlined in the palette. Clicking below. Asthe yousame protect each color, iton willthe bescreen outlined the palette. Clicking again on color anywhere willinundo, or invert the again on the same color anywhere on the screen will undo, or invert the stencil protection like a toggle switch. Drag to include to include or exclude stencil protection like a toggle switch. include or exclude large areas in the stencil. Clicking on aDrag colortotoinclude protecttoand holding down large areas in the stencil. Clicking on a color to protect and holding down the mouse button and dragging will protect all colors touched. Clicking on a the mouse button and will protect all colors touched. Clicking on a color to unprotect anddragging holding down the mouse button and dragging will color to unprotect holdingHolding down the button andworking draggingwill will unprotect all colorsand touched. themouse key while q key unprotect all colors touched. Holding the while working will q ensure that you only add protection and cannot unprotect any colors. ensure only add and key cannot unprotect any colors. Holdingthat theyou key protection (Mac) or Ç (Win) while working will ensure o key Holding the (Mac) or key (Win) while working will ensure that you cano only unprotect colors.Ç that only unprotect 3. Ityou maycan be easier to specifycolors. which colors you do not wish to protect. Specify 3. It may be easier to specify which button colors you do not wish to protect. Specify these colors, then press the INVERT to invert the entire protection these colors, then press the INVERT button to invert the entire protection pattern. pattern. 4. Generate the stencil by clicking on the MAKE button. The painting is 4. Generate bythe clicking on the button. Thecolors painting is scanned, andthe allstencil areas of painting thatMAKE use the outlined in the scanned, and all areas of the painting that use the outlined colors in the palette will now be protected while the stencil is on. palette will preview now be protected while the stencil on. 5. You can your stencil by pressing theisPREVIEW button. All PREVIEW 5. You can preview your stencil by pressing the All protected areas of the painting will appear as gray. Click button. once to continue protected areas of the painting will appear as gray. Click once to continue working. working. 6. After making a stencil, the stencil feature is automatically turned on. The 6. Aftercan making a stencil, the off stencil feature retaining is automatically stencil be turned on and as needed, the lastturned stencil on. youThe stencil can be turned on and off as needed, retaining the last stencil you made. Pressing the CLEAR button will unprotect all colors to begin a new made. the CLEAR unprotect to begincannot a new be stencil.Pressing While the stencil isbutton on the will protected areasallofcolors the painting stencil. While the stencil is on the protected areas of the painting cannot modified. The arrow cursor will flash the letter ‘s’ to warn you the stencil be is modified. The arrow cursor will flash the letter ‘s’ to warn you the stencil is on. on. Off Off Click button below lock icon to turn Click button below stencil on and off. lock icon to turn stencil on and off. 34 Drag the stencil cursor Drag stencil cursor (looksthe like an eyedropper) (looks like an eyedropper) over painting area to be over painting area to be protected. Holding q protected. Holding q adds the colors under the adds the colors under the stencil tool to the protected stencil tool to the protected set. set. The stencil feature allows you to paint The stencil youcolor to paint behind andfeature on top allows of specific behind and on top of specific color areas of your painting. areas of your painting. Previewed Stencil Previewed Stencil Click INVERT and the Click INVERT the protected andand unprotected protected unprotected colors willand switch. Notice colors will switch. Notice that the previewed mask is that the previewed mask is inverted. inverted. Protected Colors Protected Colors Protected Colors Protected Colors Protected Colors Protected Colors On On Add Add Subtract Subtract To only add colors hold q . . To colors hold hold q To only only add subtract colors o (Mac) or Ç (Win). To only subtract colors hold o (Mac) or Ç (Win). 35 Printing To print a document, follow these steps: 1. Select the Page Setup or Print Setup command under the File menu. You will need to select a paper size and orientation. There is an button labeled Caption which if clicked allows you to type in one or more lines of caption text. The caption text will print at the bottom of the page centered. At present there is no way to set the font, size, or position of the text. There is also a button labeled Border, which if clicked allows you to specify the thickness of the border in points (1/72 of an inch). The border will be printed in black around the entire rectangle of the painting. A border thickness of 0, which is the default, will result in no border. After you are done specifying how the page is to be printed, click the OK⇣button. On older Macintosh systems the caption and border feature are not available. 2. Select the Print command under the File menu. 3. Depending on your printer driver software, the amount of memory and speed of your computer it may take anywhere from 5 seconds to 5 minutes to prepare the page before printing begins. Commonly asked questions about printing: Q: What will the cycling colors look like when they are printed? A: The cycling colors will not cycle on the printed page. If you stop the cycling of the colors with the t key, you will see exactly how the cycling colors on the page will print. Q: Printing is awfully slow. A: Printing speed is mostly dependent on the efficiency of another program, called a printer driver. The printer driver software was supplied with your printer, and depending on the options you have selected may take several minutes to prepare the picture before printing the first dot. Printing sideways is always much slower, as the printer must rotate the page. Adding memory to your computer may also speed up printing. Q: I printed a painting on a black and white printer and it came out unrecognizable, even though I had selected the color/grayscale option box. Why? A: Associated with each printer on your computer is a printer driver. Unfortunately some printer drivers do not support a good quality conversion of color images into black and white. The poorer drivers use a very crude thresholding technique, where any pixels in the painting darker than a certain quantity print as black, and all others print as white; this results in a drastic loss of fidelity. Contact your printer manufacturer to find out if you can obtain a more recent version of your printer driver. Q: Why does the painting look so grainy on my high resolution printer? A: The painting you have made has a resolution of approximately 75 dots per inch, which is similar to the resolution of your computer display. When the painting is printed, it is sent to the printer as a series of dots. It is an inherent limitation of digital painting that the image cannot be magnified without either blurring it, or having jagged edges. If you have enough memory on your computer, you can paint on an extra large canvas, such as 1280 x 960 pixels. Then when you print, print at 50% or smaller magnification (this is controlled in the Page Setup or Print Setup), and you will get a better result. The large grain size is most noticeable when you are printing large size text on a white background. Using a colored background for text will help a great deal, as the printer can blend the text with the background color to obtain a smoother edge; when you print solid black text on a white background there is nothing to blend with, and the jaggedness is quite noticeable. Q: I am considering purchasing a color printer. Which one do you recommend? A: For low cost color printing, inkjet printers are currently the best choice. Both Canon and Hewlett-Packard manufacture small, inexpensive printers that work beautifully with Flying Colors. Q: Why are the colors different when I print? A: Some printer drivers and printers are better than others at matching the vibrant colors used in Flying Colors. It will take some experimentation to determine the best brightness and color matching settings. If you are using an inkjet color printer, coated paper will produce the best results. 36 37 A Wizard’s Laboratory 38 1. In the menu bar, click on the File item, drag and release on New and click on the dungeon canvas. In the tool selection, click on the first symbol to access the stamp tool. In the lower left corner of the screen, click on the INDEX button to access stamp selection categories. Click on the architectural category. Click on the right arrow twice to access the door stamps. Click on the second stamp in the fourth row, #710 (left side, broken door). Position this stamp on screen and click. In the stamp selector bar, click on stamp #711 (right side, broken door); position and click. Click on INDEX and click on magical stamp category. Click on tenth stamp in bottom row, #334 (left dark elaborate hinge). Position and click twice to create top and bottom hinges. Repeat on right side with stamp #335. 4. Add stamp #271 (wizard). Click on stamp #445 (magic wand) and in the tool modifiers click on the rotational slider until you have achieved the correct angle for the wand to fit into the wizard’s hand. Position and click. Rotate stamp #383 (glowing bat) to create three bats flying at different angles. Scale down stamp #260 (owl) by going to the tool modifiers and clicking several times on the small ‘s’ on the left side of the scale slider bar; this will shrink the stamp in equal increments until you have the size desired. Add stamp #246 (mouse), #386 (blue fairy) with #388 (magical flame trail). and #377 (gremlin). 2. Repeatedly click on down arrow below INDEX to access rows of stamp selections. One at a time, click on stamps #535-537 (wooden table sections); position and click to assemble a table. Assemble an alchemical apparatus with the following stamps added in this order: #450 (stand), #481 (purple vial), #427 (glow) positioned above the purple vial, #500 (round blue glassware) positioned above the purple vial in the lower part of the glow, #503 (blue condenser tube), #485 (yellow flask), #440 (glow) positioned overtop of the contents of the yellow flask, #452 (stand), #453 (metal stand stem) used twice to create tall stem, #455 (thick metal stand stem), #509 (red bottle), #469 (cork top for bottle) positioned over top of the red flask, #497 (blue flask) reversed using the third flip button in the tool modifiers. 5. On the left side of the table, add the following bottles with magical ingredients: #378 (with green-eyes), #379 (with spider), #358 (large crockery jug) combined with #363 (skull and crossbones label), #357 (round crockery jug), and #361 (with face). Below, strew magical plants and herbs on the floor with stamps #368-373. In the tool modifiers, click on the third flip button to reverse some of these stamps for variety and naturalism; click on the rotational arrows to rotate stamp #367 (garlic bunch) 90 degrees so that it appears to lie on its side. 3. Create two flaming lights on the back walls with stamps #343 (metal sconce) and #351 (large flame). Add to your table a crystal ball, magical goblet and candle with the following stamps: #447 (glowing ball), #449 (silver dish) positioned slightly over the bottom of the crystal ball, #401 (magical goblet), #403 (magical elixir) positioned inside the goblet, #293 (jeweled candlestick), #339 (tall candle), #344 (small flame) and #465 (smoke). 6. Create a treasure hoard on the right side of your composition with the following stamps: #292 (small pile of coins), #288 (large pile of coins) using the flip modifier to vary appearance, #295 (jeweled goblet), #296 (jewel box), #299 (gold dish), and #284-286 (red, green and blue jewel beads). 39 A Landscape 1. In the menu bar, click on the File item, drag and release on New and click on the green meadow canvas. In the menu bar, click on Level, drag and release on Advanced. In the tool selection click on the lock symbol to access the stencil tool. In the tool modifiers area, click on CLEAR to eliminate any previous stencil. Position the cursor in the lightest area of blue sky on the screen (far left corner of horizon). Click and hold down cursor as you drag straight up and off the screen to protect all the blue colors used in the sky while you stamp or draw on top of them. The protected colors will now appear highlighted in the color palette below. However, in this instance we wish to protect all the remaining colors except the sky, so we reverse the protection pattern just created by going to the tool modifier area and clicking on the INVERT button. Click on the MAKE button to complete the stencil. Stamps applied will now appear to float and vanish behind the protected portion of the composition (the mountains). 2. In the tool selection, click on the stamp symbol to access the stamp tool. In the stamp selection, click on stamps #993 and #994 (straight and curved cirrus clouds) to create the illusion of windblown clouds coming from behind the mountain. In the tool modifiers, use the scale slider to scale each successive cloud stamp slightly differently for naturalism. Create cloud masses using stamps #989 and #990 (cumulus clouds). You can also change the appearance of the clouds by using the horizontal flip button in the tool modifiers to reverse some of the stamps. Plan ahead where your sun will be and watch your light and shadow effects. Embellish using stamp series #983-988 (smaller clouds). 3. In the tool selection, click on the stencil tool and click on the MAKE button to include the clouds in the protected area of the stencil you made in step 1. Click on the stamp tool and click on the stamp #991 (sun). Position as if breaking through the clouds. In the tool selection, click on the word ON below the lock symbol to turn the stencil off. 40 4. Click on stamps #968 and #961, #976-979 (jagged rocks) to create rock outcroppings. Overlap slightly for realism. Use the horizontal flip button and the scale slider for variety. Create a tree beginning with stamp series #999-1010 (trunks, limbs, and branches). 5. Add foliage to your tree with stamps #105 and #106 (leaf clusters). In the tool modifiers use the darkness slider to create realistic light effects. Create bushes using stamps #103 and #104 (light and dark ivy clumps). Modify scale, darkness, and flip the stamps for variety. 6. Embellish your composition with additional plants, animals, birds, insects and figures from the stamp selections. 41 A House 1. In the menu bar, click on the File item, drag and release on New and click on the street canvas. In the tool selection, click on the solid rectangle symbol to access the solid rectangle fill tool. In the lower screen, above the selector bar, click on the oval pattern symbol to access pattern selections. As you click on individual selections in the bar, the selection sample will appear in the margin, called the preview window, and the number of that selection will appear directly above it in the status area. Click on pattern #3 (yellow siding). Click the cursor on a point on the screen corresponding to the upper left hand corner of the front of the house you are about to create. Without letting go of the cursor, drag diagonally downwards to where the right bottom corner of the house will be. Let go of the cursor to create a large rectangle of yellow siding forming the lower story front face of the house. Press UNDO button if you wish to erase this last step and start over. Repeat with a smaller rectangular area above to form the second story. 2. In the tool selection, click on the solid triangle symbol to select the irregular polygon fill tool. In the lower screen, above the selection bar, click on the oval pattern selection and click on pattern #143 (Victorian half moon tiles). Begin to create the roof outline by clicking on one of the upper front house corners and releasing the cursor. Move the cursor upwards to find the upper corner location of the roof line and click again. The cursor will automatically draw a straight line between these two points. Proceed until you have clicked on all four corners of your roof outline and enclosed them with lines. Your roof outline will automatically fill with the tile pattern at this time. To stop drawing lines with the cursor at any time you must press the q bar to indicate you are finished. To eliminate your last line or to begin over after your tile pattern has filled in, immediately press UNDO button. 42 3. In the tool selection, click on the stamp tool. In the lower screen, above the selection bar, click on the stamp symbol (the fish) to access stamp selections. Find stamps quickly by clicking on the INDEX button to view the pictorial stamp index. Click on the theme of stamps desired and scan. Clicking on a stamp will automatically return you to a single row of stamp selections in the selection bar with your stamp selection highlighted in the bar and simultaneously appearing in the preview window. Click on stamp #721 (white door). In the tool modifiers, reduce image to smaller scale by clicking on the scale modifier and sliding to the left. Position door three slats above base of house and click to set. To create porch stairs, one at a time click on, position and click onto screen stamp series #724-#726 (white staircase elements), while simultaneously holding down the o key (Mac)or Ç key (Win) on keyboard to retain the same size setting as the previous door stamp. You can always delete the last stamp placed with the UNDO button, so feel free to experiment placing the stamps one by one and viewing each successive addition to your composition. 4. In the tool selection, click on the solid rectangle symbol to access the solid rectangular fill tool. In the lower part of the screen, above the selection bar, click on the oval solid color symbol to access color selection and click on black, color #255 (Mac) or color #0 (Win). In the same way you initially created the house face with the yellow siding pattern, click the cursor on a point on the screen corresponding to the upper left hand corner of the window you are about to create, hold and drag diagonally downwards to create a black rectangular background for your window. 5. In the tool selection, click on the stamp tool and in the lower screen, click on the stamp symbol. One by one, click on, position and click onto screen stamp series 748-757 (white window frames, including corners, t-piece and cross pieces). Remember to reduce the scale of the images as you did with the door by clicking and sliding the scale modifier before positioning each stamp and retaining that scale setting throughout the sequence by continuing to hold down the o key (Mac) or Ç key (Win). 6. Create a smaller window in the upper story by copying the upper and lower sections of the window we have just created, moving them and positioning them together. In the tool selection, click on the top center icon to access the mover tool. In the tool modifier area, click on the COPY option and then click on the CANVAS option. Click on the upper left corner of the window and drag diagonally downwards to the right so that you are taking a little bit more than the two top panes. You have now created a custom stamp of the top section of the window. Position the top of the window stamp in the upper story and click. Click on the mover tool again. This time, click below and left of the completed window, and drag diagonally upwards to the right to select the bottom part of the window. Position the bottom window section and click. 43 44 7. Return to the stamp tool and stamp selection and create accent trim with stamps #759 and #765-766 (white middle and end mouldings for the undersides of the window frames) and stamp #744 (white decorative cap moulding for both the windows and the door). When using a stamp such as a moulding, you can extend the stamp in a straight line by holding down the q key on the keyboard, holding down the cursor and dragging. Remember, you can always UNDO your last change to the painting. Scale down the cap mouldings above the windows so as to be slightly smaller in proportion to the door. 10. Create yellow road dividing lines using stamp #840 (yellow dash). Hold the q key as you drag the cursor to the right to extend a perfect horizontal line of stamps. 8. Create a tree using stamp #999 (tree trunk), scaling it down and use the sliding shade modifier in the same way as the scale modifier to darken the image. Holding o key(Mac) or Ç key (Win) to preserve scale and shade settings, add stamps #1000, #1001 and #1003 (branches). 11. Create a crosswalk by returning to the tool selection and clicking on the eyedropper tool. Click the eyedropper on one of the yellow road lines in order to access that exact color. In the tool selection, click on the solid triangle to access the irregular polygon fill tool, and use this in the same way as you created the outline of the roof to create two long, thin outlines forming the painted crosswalk. 9. Click on stamp #65 (leaf). In the tool selection, click on the spray can and by clicking and dragging the cursor in sweeping motions spray leaves over and above the branches. Alternate with stamps #6466 to achieve depth and realism. You can always UNDO spraying. 12. Use any number of beautiful stamps to embellish your composition with gardens, figures, animals, rainbows etc. When repeating stamps, as in flowers, flying birds, clouds, etc., you can achieve a more natural effect by using the flip function to reverse the images, the rotational function to create a slightly different angle, the scale modifier to vary the size of the images, and the shade modifier to create depth and different light effects. 45 A Surreal Landscape 1. In the menu bar, click on the File item, drag and release on New and click on the white canvas. Specify the size of 640 by 480 pixels (or 512 by 384 pixels if you are using a smaller monitor on the LC). In the menu bar, click on Level and drag cursor down to select the advanced level, which will permit use of the stencil. In the tool selection, click on the solid rectangle icon to access the solid rectangle fill tool. Click on the gradient button above the selection bar if necessary to access gradient selections. Click on gradient #73 (graduated blue) and in the tool modifier area, click on the upper left X to access the linear type of gradient fill. Click on the rotational arrows until the angle measurement reading in the help line in the lower screen above the selection bar reaches 90 degrees and the colors in the gradient sample in the preview window are oriented horizontally with the darker colors on the top. Click on the top left corner of the screen and drag diagonally downwards in the top 3/5 of the screen to create a visionary sky. 2. Create the ground in the remaining area on the screen by clicking on gradient #42 (greenish blue). You are still using the linear type of gradient fill; rotate to 90 degrees to orient the pattern horizontally with light colors at top. In the tool selection, click on the pouring paint bucket symbol to access the bucket fill tool. Move the cursor to the empty canvas area and click to fill. 3. Return gradient #42 to 0 degrees rotation by holding down the o key (Mac), Ç key (Win) and clicking on the rotation slider. In the tool selection, above the rotation slider, click on the gradient reverse button so that the darker color is on the right. In the tool modifiers, click on the upper right X symbol to access the ridges type of gradient fill. In the tool selection, click on the solid triangle symbol to access the irregular polygon fill tool. To create the outline of mountains, move the cursor to a point in approximately the middle of the horizon line, hold the cursor and drag it to the right drawing jagged, sloping outlines against the sky. Continue the outline right off the screen, bringing it back down and ending at a point the same height as the horizon line. Let go of the cursor and press the space bar on the keyboard to return to the starting point, enclosing the space and filling it. 46 4. Now click on the gradient reverse button so that the dark colors are on the left. Repeat the procedure in step 3 to create mountains on the left side of your composition. 5. In the tool selection, click on the windmill symbol to access the symmetry tool. In the tool modifiers, click on the right hand symbol to access the mirror image type of symmetry. The slider bar directly below is for the number of image replications or copies, which reads out in the help line in the lower screen above the selector bar. It is automatically set at six copies which will create a 6 section mandala–type pattern, indicated on the screen by dotted lines which will not be visible in your finished composition. In the tool selection, click on the paintbrush symbol to access the brush tool. In the tool modifiers, the shape and thickness of the brush line is indicated by the red highlighted selection which now appears. Click on the third brush shape in the leftmost column. The slider bar below controls the tightness of the dots comprising the brush line. Make sure it is set all the way to the left. Click on the solid color symbol above the selection bar and click on deep pink color #7 (Mac), color #16 (Win). Moving the cursor to the center intersection of the copy lines, hold it down and begin to draw. Alternate tight scribbles with open areas, becoming looser and larger as you move outwards away from the center. Watch as the pattern replicates itself six–fold, resembling a snowflake. Pause occasionally for the computer to catch up with your drawing so that you can view your design before continuing. When finished, you will have created a lacy, pink six–sectioned symmetrical mandala design. In the tool selection, click on the symmetry ON button again to turn the symmetry tool off. 47 6. In the tool selection, click on the lock symbol to access the stencil tool. In the status area, click on CLEAR to eliminate any previous stencil protection. When using the stencil tool, the cursor will automatically read on the screen as an eyedropper. Click the tip of the eyedropper on any portion of the pink mandala outline to create a stencil protecting only the pink mandala color. In the tool modifiers, click on the INVERT button and access the invert stencil modifier to reverse the pattern of protection; complete the stencil by clicking on the MAKE button. You have now created a stencil protecting the entire composition with the exception of the pink mandala. As long as this stencil remains on, only the unprotected area occupied by the pink mandala outline will be affected by the tool functions. In the tool selection, click on the solid oval symbol to access the solid oval fill tool. In the gradient selection, click on gradient #1 and in the gradient modifiers click on the lower left hand X to access the circular type of gradient fill. Click the gradient reverse button so that green and yellow are at the center of the gradient. With the cursor, go to the center of the mandala. Hold down the q key on the keyboard to constrain the oval shape of the tool to a circular shape. Click on the center of the mandala to establish a center for the oval (now circular) tool, drag to the outer edge of the mandala and release. Return to the center of the mandala and click. Move the cursor to the edge of the mandala and click again to specify how far out the gradient is to extend. The mandala will now be filled with the gradient. However, the stencil will protect the background and only the outlines of the mandala will be replaced with rainbow colors graduating from yellow in the center to blue at the outer boundary of the gradient fill. In the tool selection, click on the ON button below the stencil to turn the stencil off. 7. In the tool selection, click on the windmill symbol to access the symmetry tool and in the tool modifiers, click on the left hand symbol to access the rotational type of symmetry. In the tool selection, click on the solid oval symbol to access the solid oval fill tool. In the selection bar, click on gradient #81 and in the tool modifiers, click on the upper right X to select the ridges type of gradient fill. Create the appearance of floating spheres emanating from the center of the mandala by holding the q key down to constrain the oval tool to a circle and clicking and dragging the cursor at various points on the canvas beginning with the smallest spheres closest to the center. As you place each sphere, go to the tool modifiers and click on the rotational arrows to rotate the gradient fill within the spheres so that the lightest color faces the center of the mandala. In the preview area, watch the gradient selection sample rotate before you position it on your composition. Press the UNDO button if you wish to delete your last addition to the composition. Create perspective by selecting the slightly brighter gradient color #80 for the larger spheres closest to the outer edge of the picture. 48 8. In the tool selection, click on the stamp tool and create a floating picture frame using stamps #787, #793 and #794 (wood window frame elements). Click on the right button on the scale modifier to enlarge elements 300%; the scale factor will appear in help line. Remember to hold q key to preserve your scale setting as you change stamps. Click on the 90 degree rotation modifier or the X or Y flip modifier to position all the frame elements such that light appears to emanate from the center of the mandala and strike the inside edges of the frame. 9. Hold down the q key and drag the frame edge stamps to extend the stamps in a perfectly straight line. 10. To change the color from green to golden white at the center of the mandala (so that it stays bright when the gradient cycles), create a stencil as in step 6. Click on the stencil tool and click CLEAR, then click the eyedropper/cursor on the colors you wish to change at the mandala’s center to select them as protected colors. Now click INVERT to reverse the stencil so that all colors except those at the mandala’s center are protected. Then click on the solid rectangular fill tool to access the color palette and select the golden white color # 36 (Mac)or color #45 (Win). Now, click on a point above and to the left of the area you want to change, and hold down and drag the cursor to a point below and to the right of the area you wish to change. 49 A Birthday Card 50 1. In the menu bar, click on the File item, drag and release on New and click on the white canvas. You will see a dialog box asking for the size of the canvas. Click on the Full Printed Page button to automatically set the dimensions of the canvas in pixels so that it occupies an entire printed page. Click on paper size US letter and click on the upright orientation symbol. Click on OK. The next screen gives you the size, in pixels, of the printable portion of your sheet of paper using your current printer selection (printer selection is accessed by clicking on the colored Macintosh symbol in the menu bar). Click on OK. In the tool selection, click on the magnifying glass symbol to access the magnifier tool. Click on the 1/ 2 magnification tool modifier to achieve 50% magnification factor. In the menu bar, click on Options, drag down and release on the Page Preview option. This will display layout aids in the form of red dashed lines that will show the fold lines for birthday card, and a pink hashed line filled border area where the printer cannot print (this is where the printer grips the paper while printing). These aids will not print onto your finished card. 4. In the tool selection, click on the stamp tool. Click on the INDEX button to access stamp selection categories. Click on the last category of stamps, special occasion stamps and click on stamp #1015 (balloon). Now move stamp to desired position on card and click. You may modify size if desired and create random or symmetrical effects by flipping stamp. Click on stamp #1014 (birthday cake). Position on card and click. 2. In the tool selection, click on the hollow rectangle symbol to access the hollow rectangle fill tool, and in the selection bar click on border #152. Click on the center (intersection of the fold lines), hold down and drag to the lower right corner of the printable area and release. The border will now be centered in the rectangle you have just described, which will become the outside front cover of the card when folded. 5. In the tool selection, click on the hollow rectangle symbol to access the hollow rectangle fill tool, and select border #196 (confetti border). Click on the upper left corner of the printable area, hold down, drag to the center and release. 3. In the tool selection, click on the capital ‘T’ symbol to access the text tool. In the blank area which appears, type “HAPPY”, then press the return key on your keyboard and type “BIRTHDAY” and click on OK. Since the program is automatically set on centered (as opposed to aligned), your text will appear centered. You have now created a custom text stamp which will appear floating on your screen. In the selection bar, click on the Zapf Chancery typeface or another choice if you don’t have this one installed on your computer (additional typefaces can be purchased and installed separately). The first three letters of the alphabet will appear in the typeface selected in the preview area. In the tool modifiers, enlarge the size of the typeface by clicking on the right hand side of the size slider on top of the larger letter ‘A’ symbol. Bring the cursor back to the screen to view each modification to your stamp. The size, in points, will read out in the help line in the lower area above the selection bar. Additionally, you can click on one or a combination of typeface modifiers (example: “italics”). In the selection bar, click on the blue oval color button, and click on the color of your choice for the text. Position your text stamp within the decorative border and click. 6. In the tool selection, click on the solid oval symbol to access the solid oval fill tool. Click on the oval gradient fill button above the index bar if necessary to access the gradient fill selection and click on gradient fill #17 (graduated pink and blue). In the tool modifiers, click on the lower right X to access the contour type gradient fill. Click on the gradient fill reverse button below to reverse the color pattern of the gradient. Click in the middle of the upper left quadrant, hold down and drag to create a large oval and release. 51 52 7. In the tool selection, click on the text tool and type “Best Wishes”, press return on the keyboard and type “From Your Sister”, and then press OK. In the tool modifiers, click on outline (Mac) or bold (Win) and in the selection bar click on color #6 for the text. The upper left quadrant created by the fold lines will be the inside of the card when it is finished. The pattern of folding makes it necessary to rotate elements for this section of the card upside down when positioning for the finished card to read correctly after folding. Click on the stamp tool and click on the first of the three rotational buttons which shows the letter ‘F’ being rotated 90 degrees into a horizontal position. Click again to rotate an additional 90 degrees, for a total of 180 degree rotation. Your custom typeface stamp will now be upside down. Position inside oval gradient and click. 10. In the tool selection, click on the top center symbol to access the mover tool. Click at a point just above and to the left of the flowers, hold down and drag an outline around the flower grouping to create a custom stamp. Click on the rotation 90 degrees button twice to rotate upside down, position at the bottom of oval in upper left quadrant and click. 8. To create flower grouping, click on the stamp tool and select stamp #31 (digitalis flower). Position near center in the upper right quadrant and click. Position a second time overlapping slightly and click. Click on stamp #104 (dark ivy leaves), position below the flowers and click. 11. After printing your card, fold it twice to finish it. (Pictured: inside of card) 9. Click on stamp #33 (profile of morning glory flower), position and click. Position and click again. Rotate the stamp 40 degrees, position and click. The number of degrees will appear in the help line in the lower part of the screen above the selection bar. Click on stamp #32 (forward facing morning glory flower), position and click. (Pictured: front cover of card) 53 Troubleshooting Email: [email protected] Tel: (415) 669-7010 • 10:00 AM to 7:00 PM PST Mail: Magic Mouse Productions, 12615 Sir Francis Drake Blvd, Inverness, CA 94937 Commonly asked questions: Q: What format are my paintings saved in? A: On the Macintosh, paintings are saved in PICT format, and under Windows pictures are saved in BMP format. These formats are usually readable by other programs such as word processors and page layout programs. Q: Flying Colors is crashing. A: Either a bug in Flying Colors, or a conflict with some other program. Cursor changing routines, sound effect gizmos, and other desktop enhancers are notoriously uncooperative, and can cause Flying Colors problems. If possible, turn off other accessory programs temporarily to help isolate the problem. If the problem only occurs during printing, contact your printer manufacturer to see if there is a later version of the printer driver available. Q: When I import my painting into other graphics programs, the color cycling no longer works. A: The color cycling feature of Flying Colors is not available in other graphics programs. Q: (Mac) I have two monitors, and the menu bar is on a different monitor . A: At program startup time Flying Colors determines the best monitor to run on. Due to a limitation in the Apple software, it is not possible to change the monitor on which the menu bar appears without rebooting. If you wish to aim the program to a specific monitor, make sure the target monitor has a 256 color setting; Flying Colors will try to use that monitor first. on your computer, go into the Finder, and on the menu bar, under the apple icon (), select the About this Macintosh command, which will present a graph showing how much is being used by various applications. The memory available on your computer can be increased by removing large system extensions such as QuickTime from your system folder and restarting your computer. A more convenient solution is to use a shareware utility called Extension Manager that allows you to control which extensions get loaded when you start up your computer. If you have more than 8Mb of memory installed in your computer, you should be in 32-bit memory mode to take advantage of it; otherwise it is wasted. The memory mode is controlled by the Memory control panel in your system folder. Flying Colors will work fine with virtual memory turned on, which is another way to increase the effective memory on your computer. Q: (Mac) How can I paint on larger canvases? A: If you have enough memory (technically referred to as RAM) in your computer, you may be able to increase the memory available to the program. Quit Flying Colors, and in the Finder select the Flying Colors icon by clicking on it once. Now go to the File menu and select the Get Info (keyboard shortcut ⌘I). Increase the number in the Preferred Size or Application Size box to as large a number as you can accommodate, and then close the window by clicking in the upper left corner. The larger the memory allocated to the program, the larger the size painting that can be worked on. The program will run slightly faster with more memory. A rule of thumb is that you need to have 4 times the number of pixels allocated to edit a painting of that many pixels, plus 1500k. If you want to edit a painting of 1000 x 1000 pixels, you should set the preferred size to at least 5500k. Q: (Mac) I was working on a painting and the program abruptly said “Out of Memory”. A: It is an intrinsic limitation of the current Macintosh system that applications may eventually run out of memory. If possible, increase the memory available to Flying Colors (see earlier question). Q: (Mac) When I double click Flying Colors it says I don’t have enough memory to run. A: On a machine with 4 Megabytes of memory running Apple’s system 7, you will probably have to quit all other applications before attempting to launch Flying Colors. To determine how much memory is available to applications 54 55 Keyboard Shortcuts Bar shortcuts Stamp modification shortcuts I qI o (Mac) Ç (Win) h u π r or or or or Bring up the stamp category index (or browser if using patterns, gradients or borders) Bring up the browser While selecting a stamp, preserves current settings While selecting a stamp, preserves current settings B C G P S F Jump to Border bar { } [ ] Go to first row Jump to Color palette bar Jump to Gradient bar Jump to Pattern bar Jump to Stamp bar Jump to Font bar Go to last row Bring up the eyedropper tool to pick up a color v (Mac) Bring up the grabber tool to scroll the painting Right Mouse Button (Win) 56 j, l, i, k qj, l, i, k Bring up the eyedropper tool to pick up a color Hold right button and drag to reposition the painting Flip stamp top to bottom Rotate stamp ninety degrees Increase stamp size one step Decrease stamp size one step While drawing with a stamp, aligns stamps in a straight line Scroll painting left, right, up, or down a little bit Scroll painting left, right, up, or down a screen full Slider shortcuts o (Mac) Ç (Win) q Go to next row o (Mac) Flip stamp left to right Scrolling shortcuts Go to previous row Temporary tool activation Ç (Win) X Y Z + q While clicking on a slider restores slider to default value While clicking on a slider restores slider to default value While clicking on side of angle slider forces 45 degree increments Other shortcuts b or e s ¡ - « N t Shortcut for OK button in dialog boxes Shortcut for CANCEL button in dialog boxes or stop symmetry processing Select tools 1-15 (Stamp tool, Custom Brush, Eraser, ...) Center painting on current mouse location Turn color cycling on/off 57 Credits Art by Mark Ferrari using Electronic Arts Deluxe Paint II enhanced. Sound Effects by Joey Edelman using Sound Designer II, Alchemy, Digital Performer, Studio Vision, Sound Edit Pro, Sample Cell, Hollywood Edge Sound Effects Library. Design and Programming by Edward de Jong using the Modula-2 compiler by p1 GmbH from APDA, Adobe Photoshop, DeBabelizer by Equilibrium, MPW Assembler and ResEdit from Apple, Stony Brook Modula-2 for Windows, and MASM 6.1 User manual by Chad Moore, with tutorials by Jean Garrett using Aldus FreeHand, Quark XPress, and Photoshop with the Utopia, Univers, and DavysBigKeyCaps typefaces. Testing by Donna Pierstorff Thanks to Apple and Microsoft Developer Support for answering or at least trying to answer my questions, Johnny Wilson, Michael Bremer, to my Jean of many talents, and of course to the users who provided so many suggestions, and to the many other people who helped me along the way. Dedicated to Grandma Edna Rose Alling, 1890-1993. © 1993-2003 Edward de Jong Inverness, CA PLEASE DO NOT MAKE ILLEGAL COPIES OF THIS SOFTWARE 58