1
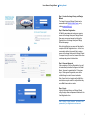
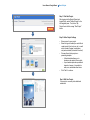
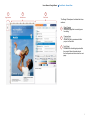
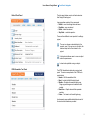
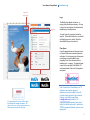
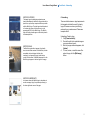
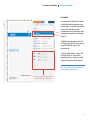
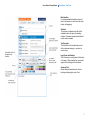
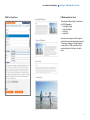
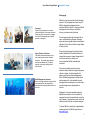
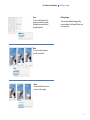
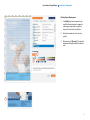
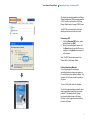
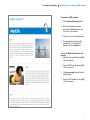
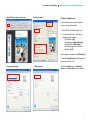
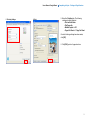
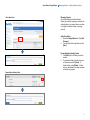
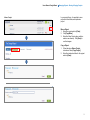
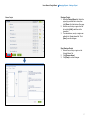
User’s Manual: Design Wizard
Version 1, August 2014. Current.
User’s Manual: Design Wizard
Table of Contents
Section 1: The Design Wizard
Introduction………………………………………...3
Getting Started…...…………………………….….5
Start a Project……………..…………………….…6
Opening an Existing Project ……………………7
Section 2: Tools Panel
General View…………………………………….…9
Navigation………………………………………....10
Logo………………………………………………...11
Cobranding Logo Usage………………………..12
Identity Band……………………………………...13
Text Tools………………………………………....14
Images……………………..……………………….16
Background…………………………………...…..19
Section 3: Completing and Managing Projects
Generating a PDF……………………………..….21
Generating a HTML Newsletter…………..…... 22
Printing a 4-Page Brochure ……..……………. 23
Adding and Naming Projects…….…………….25
Moving and Copying Projects………………….26
Sharing a Project………………………...……….27
2
User’s Manual: Design Wizard
Introduction
MetLife values our reputation as being financially
strong, trustworthy, and easy to do business with.
Here, you will learn how the Design Wizard can
assist with the development of simple marketing
materials that are consistent with MetLife’s visual
identity guidelines.
The Design Wizard is a web-based tool created to
save time and money when designing basic
marketing collateral such as posters, flyers,
brochures, leaflets and newsletters. Final design
files can be exported as PDFs for print materials
and HTML for online materials.
The Design Wizard is integrated with the Image
Library, and allows users to share their projects
with other marketing partners to edit or repurpose.
If you have any questions about the Design
Wizard or Image Library, or feel that you need
additional advice or guidance, please contact
[email protected].
User’s Manual: Design Wizard
Brochure
Single Sided
Formats: A4, A5
Flyer
Single and Double Sided
Formats: A4, A5, 1/3 A4
Introduction
The MetLife Design Wizard is a tool for creating
simple marketing materials. Available in the
Design Wizard are templates for seven different
types of collateral:
Brochure
A small booklet or pamphlet that contains
promotional material or product information.
Leaflet
Double Sided
Format: A4
Newsletter
HTML
Flyer
A single or double-sided page document, usually
printed individually or in a leaflet, intended for
wide distribution.
Leaflet
A printed, usually folded, handbill or flyer.
Poster
Single Sided
Formats: A4, A5, A3, B2
Greeting Card
Double Sided
Formats: A5, A4
Newsletter (HTML)
A print or online publication that is periodically
circulated to members of a specific group to
communicate important information.
Poster
A single-sided document displayed in a public
place.
Greeting Card
A card that can be customized and printed.
E-card (HTML)
Formats: HTML
E-Card (HTML)
A card that can be customized and sent to
recipients via e-mail/online.
4
User’s Manual: Design Wizard
Getting Started
Step 1: Locate the Image Library and Design
Wizard
The Image Library and Design Wizard can be
accessed via the MetLife Brand Center, or by
visiting www.metlife.i-g.pl.
Step 2: New User Registration
All MetLife associates and vendors can receive
access to the Image Library and Design Wizard.
New users can request access by clicking the
Register link on the Image Library and Design
Wizard homepage.
After clicking Register, new users will be asked to
complete the User Registration form. In this form,
users select whether they would like to receive
access to the Image Library and/or Design Wizard.
If a request is only for one tool, access to the other
can always be granted at a later date.
Step 3: Account Approval
Upon completion, the User Registration form will
be automatically submitted for approval to Global
Brand. Approval is granted within 1-2 business
days. Once approval is granted, users will be
notified through e-mail of account activation.
Note: Users that do not register with a MetLife email address may be asked to verify whether they
are a MetLife associate or vendor.
Step 4: Login
Login to the Image Library and Design Wizard
using the login name and password selected in the
User Registration form.
Note: Clicking “Forgot Password” will send a new
password to your registered e-mail account.
5
User’s Manual: Design Wizard
Start A Project
Step 1: Click Start Project
After logging into the Design Wizard and
Image Library, select “Design Wizard” on the
left navigation pane. Then, select “My
Projects” and click the orange “Start Project”
button.
Step 2: Define Project Settings
•
•
•
•
Enter a name for your project.
Select the type of material you would like to
create (poster, flyer, brochure, etc.), as well
as the number of pages, format (paper
size) and orientation (horizontal or vertical).
Choose either a blank project or a
preexisting template.
o A blank template allows you to
develop a new material from scratch.
o A pre-made template has pre-defined
elements, however, it is possible to
add, move, and delete select items.
Click “Next” to continue.
Step 3: Edit Your Project
Your project is now ready to be edited and
customized.
6
User’s Manual: Design Wizard
Opening An Existing Project
Step One: Identify Existing Files
Select “Design Wizard” on the left navigation pane.
Then, select “My Projects” and click the project you
would like to open.
Step Two: Change Editing Status
Click the box next to the project you would like to
edit. Then click [View]. Click [Change status] to
change the project status from unlocked to locked.
Then click [Edit] to continue.
Step 3: Edit Your Project
Your project is now ready to be edited.
Note: If the same project is being worked on by
multiple users, pay attention to the project status.
The project is locked. Only you can edit
and save the file.
The project is unlocked. Before you start
working, you must lock the file.
7
User’s Manual: Design Wizard
Tools Panel
The tools panel in the Design Wizard allows you
to customize collateral for a target audience. In
subsequent pages, you will learn about different
commands in the tools panel.
User’s Manual: Design Wizard
1
2
3
Page Preview
Preview Area
Tools Panel
Tools Panel – General View
The Design Wizard panel is divided into three
sections:
1
2
3
Page Preview
Shows the page that is currently open
for editing
Preview Area
Allows the user to preview what their
project will look like.
Tools Panel
Contains tools for editing objects within
the project. More information about
the tools panel can be found on the next
page.
9
User’s Manual: Design Wizard
Default Tools Panel
Tools Panel - Navigation
The tools panel allows users to edit and customize
their Design Wizard project.
Layer properties consists of four commands:
• Default – revert to settings before last save
• Duplicate – copy an element
• Delete – delete an element
• Step Back – undo last operation
There are three different icons important for editing a
project:
The eye icon shows a selected object in the
preview area. If the eye icon is not visible, the
selected object will not be included in the
project.
Unlocked mode allows users to move an object
inside the preview area.
Locked mode prohibits moving an object.
HTML Newsletter Tool Panel
The HTML Newsletter template has a unique tools
panel. The various components of the HTML tools
panel include:
• Header – Edit the newsletter’s title.
• Band – Include the MetLife identity band.
• Module – Template for newsletter body copy.
Page copy and images can be edited in each
module
• Break Line – Graphic element that separates
modules
• Footer – Text area to edit or add legal copy.
In subsequent pages, additional detail about each of
the icons and commands are provided.
10
User’s Manual: Design Wizard
Tools Panel - Logo
Logo in the
Preview Area
Logo
Logo Tool
The MetLife logo reflects who we are – a
strong, stable, world-class company. Our logo
is one of the most important visual elements in
establishing our brand presence.
To select a logo for your project, select the
logo tool. Ensure that the lock icon is unlocked
and that the eye icon is visible. Select the
desired MetLife logo, color and size.
Clear Space
Using the appropriate amount of space around
our logo will help create a positive impression
and impact. A minimum amount of clear space
must always surround the MetLife logo,
separating it from other elements such as
headlines, text, or imagery. The protected area
is equal to the cap height of the MetLife “M”
and is proportional to the size of the signature
being used.
Select the logo type, color and size.
If the logo is placed too close to another object,
the following alert message will appear: “The
object is too close to the logo type protected area.
Please move it away from the logo type.”
Note: Outside of the US and Mexico, the "®"
registered mark must be used on all
applications to protect the MetLife mark. All
countries should confirm with the Intellectual
Property unit in MetLife Legal Affairs
([email protected]) whether the "®"
(registered trademark symbol) may be used
next to the MetLife logo locally, or whether the
TM/SM unregistered trademark symbol is more
appropriate.
11
User’s Manual: Design Wizard
Tools Panel – Co-branding
METLIFE SUPERIOR
Co-branding
Third-party logos of subsidiaries and partners are
clearly subordinated to the MetLife logo and should be
placed in a way that they compete as little as possible
with the MetLife logo. The other logo should be placed
in the lower right corner of the brochure, in a size
approximately 50% of the MetLife logo. The MetLife
logo with Snoopy should appear in the identity band in
its standard position.
There are often business or legal requirements
that suggest or dictate the use of third party
logos, for reasons such as a joint offering,
partnership, or an endorsement. Please see
examples at left.
METLIFE EQUAL
The MetLife logo should not appear in the identity
band, but should be rendered in MetLife Blue (or other
acceptable color) and aligned with the other
company’s (or companies’) logo(s) at the bottom
corner of the brochure. Preferable placement is for the
MetLife logo to appear in the lower right of the page.
Uploading a Partner’s Logo
1. Click [From hard drive]
2. Provide the path to the selected image on
your computer and open it.
3. After the pop-up window disappears, click
[Upload]
4. To move, resize, or mark the area of the
partner’s logo, click the [Edit image]
button.
METLIFE SUBORDINATE
In instances where the MetLife logo is subordinate to
another company’s logo, the preferred positioning is
the lower right hand corner of the page.
12
User’s Manual: Design Wizard
Tools Panel – Identity Band
Identity Band
Identity
Band Tool
It is important for the identity band to maintain
consistent placement and proportions across
communications. The identity band is primarily
used on brochures, folders and other
multipage documents. It is preferred for use for
single page communications if content space
allows for it.
The MetLife logo always appears on the left
with Snoopy on the right. The identity band can
be used in MetLife blue, black, or as a
transparent band.
To add the identity band to your project, click
the Identity Band Tool. Then, select the
desired logo and color. Snoopy can either be
included or excluded from the identity band.
Note: The use of Snoopy in the identity band is
recommended, but not required.
Select a logo to appear in the identity band,
add/remove Snoopy, and band color
13
User’s Manual: Design Wizard
Tools Panel – Text Tools
Main Headline
It is recommended that headlines consist of
three to five words in an effort to remain short,
simple, and engaging.
Subhead
The purpose of subheads is to offer further
explanation about the piece of marketing
collateral. Subheads are optional and should
only be used as needed.
Top Descriptor
The information in the top descriptor can be
either a business category, or a product or
service name.
Legal Footer and Address
This information is usually placed at the bottom
of the page. When possible, this copy should
appear on the last page of the document.
Advanced Text
Allows editing of individual words, such as
bolding and changing the color of text.
14
User’s Manual: Design Wizard
Tools Panel – HTML Newsletter Text Tools
HTML Newsletter Text Tools
HTML Text Tools Panel
Copy Right Aligned
There are four different types of modules for
the HTML Newsletter:
• Copy Right Aligned
• Copy Left Aligned
• Copy Only
• Image Only
Copy Left Aligned
As shown in the example at left, the type of
module that is used can be selected using the
‘Choose type’ dropdown. Multiple modules
can be used in a HTML newsletter Simply
select ‘add module’ at the top of the tools
panel.
Copy Only
Image Only
15
User’s Manual: Design Wizard
Tools Panel – Images
Photography
Consumers
Dynamic lifestyle images are used when
communicating with our consumer audiences.
People are positive and optimistic, engaging
in an active lifestyle appropriate to specific
products or campaigns.
Agents, Brokers, and Partners
Committed professional images are used
when communicating with our corporate
audiences. They should appear practical,
dedicated and hardworking. People are
captured in action and wearing relaxed
business attire.
Wealth Management Customers
Seek to use bigger worldview images to depict
cityscapes shot from wide angles and to
demonstrate the broader global outlook of our
business.
MetLife is a business involved with what’s deeply
personal. The photographs we choose say that
MetLife understands and appreciates our
customers. Whether still life, or of people, MetLife
photographs have a feeling of comfortable
intimacy, involvement and stylishness.
Cover images should be light and bright with an
open, uncluttered feeling of space. Interesting
crops and dynamic angles reinforce a leading and
agile point of view. Be sure that the subject matter
is crisply in focus.
When choosing photographs of people, look for
realistic interpretations of situations rather than
images that are posed or staged. Images should
connect and involve the viewers, and
communicate that MetLife understands its
customers.
Use careful consideration when choosing
metaphors. Many metaphoric images may appear
obvious or staged. Avoid photographs that
appear very posed or where messages seem
forced. Selected photographs should be natural
and spontaneous. It is also advisable to avoid
photographs that are ambiguous or could contain
mixed messages across demographics or
cultures.
Photography is the recommended imagery for
MetLife communications, but it is important to
recognize that not all communications require the
use of imagery. Typography and color can also be
effectively used to convey core brand messages.
To access MetLife’s royalty-free image database,
request access to the MetLife Image Library at
www.metlife.i-g.pl
16
User’s Manual: Design Wizard
Tools Panel – Images
Inserting Images
Uploading from Hard Drive
1.
2.
3.
Click [From hard drive]
Provide the path to the selected image on
your computer and open it. Only files in either
JPG or PNG formats can be uploaded.
When the pop-up window disappears, click
[Upload]
Note: If you are uploading images from your hard
drive, be sure that they are good quality. The
preferred image resolution is 300 dpi.
Adding Image from Image Library
1.
2.
Click [From library] or [From Snoopy
library]
To select the desired image, click [Add to
project +]
PEANUTS and Snoopy Images
1. Only one PEANUTS image can be uploaded
to each project in Design Wizard.
2. The copyright notice PEANUTS © [Year]
Peanuts Worldwide (font size 6 or less) must
be added to each project that uses a
PEANUTS image.
3. The PEANUTS image cannot overlap text or
other images.
4. The images from the Snoopy and PEANUTS
folder in the Image Library can be used for
Design Wizard creations without further
approval from Peanuts Worldwide.
5. Additional guidelines about how to properly
use PEANUTS and Snoopy can be found on
the Brand Center at metlife.com/brandcenter.
17
User’s Manual: Design Wizard
Crop
To crop, select the area of the
image you would like to appear
by selecting as many boxes on
the grid as required.
Tools Panel – Images
Editing Images
There are three different imaging editing
options available in the Design Wizard: crop,
move, and zoom.
Move
To move an object, drag with
your left mouse button.
Zoom
Use the scroll button to zoom in
or zoom out of an image.
18
User’s Manual: Design Wizard
Tools Panel – Background
Editing Project Background
1.
Click [Edit] and mark the area that you
would like the background to appear by
selecting as many boxes on a grid as
required. Use the left mouse button.
2.
Select the desired color from the color
palette.
3.
When done, click [Accept]. The selected
background will appear with the selected
size.
1
2
3
19
User’s Manual: Design Wizard
Completing and Managing Projects
Now that you understand how to create a project,
you will learn how to finalize project files for
publishing, as well as how you can manage and
share your projects in the Design Wizard
database.
User’s Manual: Design Wizard
Completing a Project – Generating a PDF
All advertising materials created in the Design
Wizard are based on RGB colors and saved to
a PDF file with a high resolution of 300 dpi.
Design Wizard does not support CMYK colors.
The PDF file format is ready for printing on
desktop printers and at most print shops.
Generating a PDF
1. Click the [Generate PDF] button, select
resolution and click [OK].
2. When the download popup opens, click
the [Save] button to save the file on your
computer, or the [Open] button to open it
in the browser.
Note: The PDF files are also saved in the
Project folder in the Design Wizard.
Printing Advertising Materials
To print single-page or double-page
advertising materials, always use a paper in
the same format as the created collateral. For
example, the A4 Poster should be printed on
A4 paper.
To print 1/3 A4 leaflet, also use A4 paper.
To print four-page marketing materials, use a
twice bigger paper format than the created
collateral. For example, the A5 4-page
brochure should be printed on A4 paper.
Similarly, the A4 4-page brochure should be
printed on A3 paper.
21
User’s Manual: Design Wizard
Completing a Project – Generating an HTML Newsletter
To generate an HTML newsletter:
1.
Click the [Generate Newsletter] button.
2.
When the download pop-up window
opens, click the [Save] button and save
the .zip file on your computer.
3.
Right click on the .zip file and select unzip.
4.
The unzipped folder contains all of the
newsletter files. To open the HTML
Newsletter, click the ‘mail.htm’ file.
To insert a HTML Newsletter in the e-mail
message:
1. Select the entire newsletter by using [Ctrl]
+ A on the keyboard.
1.
Copy the HTML Newsletter by using [Ctrl]
+ C on the keyboard.
1.
Click [new message] inside the Microsoft
Outlook program.
1.
Paste the HTML Newsletter by using [Ctrl]
+ V on the keyboard.
22
User’s Manual: Design Wizard
1. Open PDF file and click the printer icon
2. Printing Properties
Completing a Project – Printing a 4-Page Brochure
Printing a 4-Page Brochure
Use the following steps to print a 4-page A5
brochure using a desktop printer:
1. Open PDF file and click the printer icon.
2. A new window will open. The following
settings should be selected:
• Print Range -> [All]
• Page Scaling -> [Booklet Printing]
• Booklet Subset-> [Both Sides]
• Auto-Rotate pages is not selected
• Binding -> [Left]
After making these selections, click [Properties].
3. Select the Paper/Quality tab and choose the
paper size, either A4 or A5.
3. Paper/Quality Settings
4. Effects Settings
4. Select the Effects tab. Under Resizing
Options, item Actual Size should be selected.
23
User’s Manual: Design Wizard
5. Finishing Settings
6. Print
Completing a Project – Printing a 4-Page Brochure
5. Select the Finishing tab. The following
settings should be selected:
• Print on Both Sides.
• Flip Pages Up
• Booklet Layout -> Off
• Pages Per Sheet -> 1 Page Per Sheet
Once the finishing settings have been made,
click [OK].
6. Click [OK] to print a 4-page brochure.
24
User’s Manual: Design Wizard
Add a New Folder
Managing Projects - Adding & Naming Projects
Managing Projects
As you develop projects with the Design
Wizard, you can help organize your projects by
adding folders to your project library, as well as
moving files to another location, or copying
projects.
Add a New Folder
1. Select the Design Wizard tab. Click [Add
Directory].
2. Type the name of the new folder and click
[Save]
Rename/Delete an Existing Folder
1. Click [Edit] next to the folder you wish to
rename.
2. To rename the folder, type the new name
of the directory and click [Save]. To
delete a folder, select [Delete]. A folder
may only be deleted if it is empty and does
not contain any projects.
Rename/Delete Existing Folder
25
User’s Manual: Design Wizard
Move a Project
Managing Projects – Moving & Copying Projects
In your project library, it is possible to move
projects to other folders, and duplicate a
project.
Move a Project
1. Select the project and click [View]
2. Click [Copy/Move]
3. Select the Move Project option and then
select a new directory. Click [Save] to
confirm changes.
Copy a Project
1. Follow the above Move a Project
instructions. Select [Copy Project].
2. Select the destination folder for this project
and click [Save].
26
User’s Manual: Design Wizard
Share a Project
Managing Projects – Sharing a Project
Sharing a Project
1. Select the Design Wizard tab. Select the
project(s) you would like to share, then
click [Share ++] at the bottom of the page.
2. Select a user, country or region from the
list and click [Add] to add them to the
shared list.
3. The selected user, country or region was
added to the ‘Already shared list.’ Click
[Save] to confirm changes.
Stop Sharing a Project
1. Select a user, country or region on the
‘Already Shared’ list.
2. Click [Remove Arrow].
3. Click [Save] to confirm changes.
27
© 2014 METLIFE, INC.
PEANUTS © 2014 Peanuts Worldwide
Metropolitan Life Insurance Company
200 Park Avenue
New York, NY 10166
www.metlife.com