1
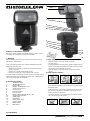
StarFire™ Digital Flash, SKU# AC-STARFIRE
1.
2.
3.
4.
5.
6.
7
8.
9.
10.
11.
12.
13.
14.
15.
StarFire™ Instruction manual
Before use, please read this user manual carefully in order to ensure
your safety. Store it properly for reference in the future.
I. Warning
Always keep this product from rain or damp environment in order to
prevent fire or electric shock.
If any of the following cases occur, please immediately remove the
battery and discontinue use.
1. Install battery
• When this product falls or suffers strong impact and thus its
• When there is caustic liquid leakage inside.
inside is exposed.
• When this product has a strange smell, heat or smoke.
16.
• Slide the battery cover along the arrow direction
and then open it
• Install the batteries according to the direction indicated by the
sticker in the battery compartment and make sure the positive
and negative of the batteries are correct.
• Slide the battery cover along the arrow direction and then
close it.
2. Install Flash to Camera
Do not dismantle or maintain this product. If you touch the high-voltage
circuit inside of this product, electric shock may occur. If this product is
idle for long, please take out all batteries.
II. Product Features
1.
2.
3.
4.
5.
6.
7.
8.
9.
10.
11.
12.
13.
14.
15.
16.
Reflection board
Wide Angle diffuser
Flash head
Battery compartment cover
Optic control sensor
Locking ring
Hot shoe stand
Hot shoe pin
Mode select indicator (M, S1, S2)
Output level indicator
Ready light
Test button
Flash power level
Power switch
Mode select
Mini stand
• In the direction indicated by the arrow, turn the locking ring to
the highest point.
• Push the hot shoe of the flash completely into the hot shoe of
the camera. In the direction indicated by the arrow, turn the
locking ring until it is tightened.
• To remove the flash, loosen the locking ring and then push it
out of the hot shoe of the camera.
III. Installation
For warranty registration and information, please visit www.photoflex.com®
photoflexlightingschool.com™
III. Power-on and Mode Switch
1. Power-on
• Hold the ON/OFF switch for 2
seconds, then the charging indicator
lamp will be red and the flash will start
charging. After several seconds, the
indicator lamp will be green and you
can start to take photos.
• If the charging indicator lamp keeps red for 60seconds, it will indicate low battery. In such case, the power will turn off automatically and you need to replace the batteries.
• You may press the test button to insure proper function.
• After use, hold the ON/OFF switch for 2 seconds to power off.
2. M. Mode
In this mode, you can set flash luminance as per you favorite;
luminance level will be displayed by luminance indicator. When taking
photos, you only require setting the flash luminance, adjust the camera
and press the shutter, the flash light will flash under the camera
synchronously signal.
3. S1/S2 M Mode
Press the MODE key, then the flash will enter S1/S2 mode. These
modes are applicable for slave flash using the StarFires infrared sensor.
• When the flash is in S1 mode, it will work with the master
flash synchronously, with the result consistent with the use of
radio slave. To use this mode correctly, the master flash should
be set at manual flash and the TTL flash system with pre flash
function and the red-reduction function with multiple flashes
should not be used.
• S2 mode is similar to S1 mode, but it can support the master
flash in TTL mode. In particular, if S1 mode does not
synchronize correctly you should use S2 mode.
4. Power Saving Function
In M mode, if idle for 3 minutes, the flash will enter sleep state in order
to save power. Press any button to wake it up. If idle for 30 min, the
flash will automatically power off. In S1/S2 mode, if idle for 60 min, the
flash will power off automatically.
V. Advanced Application
1. Output Power Fine-Tuning Function
StarFire has the output power fine-tuning function. When Level 7
output power control cannot meet your demand, you can have a finetuning to the flash output with such function. To access this function,
first press and hold the MODE button, then press the PILOT button,
then the fourth one among the output power indicator lamps will be
3. Use Wide-Angle Diffuser
Pull out the wide-angle diffusion
board push back the reflection board
and arrange them as per the figure;
in such case, the flash scope will
extend to 18 millimeter and the flash
effect will be softer and more natural.
4. Multi-Flash Lighting Application
• Use built-in flash or top-
mounted flash as the master
flash
• Place StarFire in different
directions
• In outdoor application, radio
signals can be reflected by
walls; therefore the placement of the slave flash should have
more space
• Before placing of the slave flash, test whether S1/S2 can be
synchronized normally.
• Do not place any obstacles between the host flash and the
slave flash, because they may block the transmission of radio
signals.
• In radio flash mode (S1 or S2) if the flash is idle for 30 min, it
will power off automatically in order to save power.
VI. Specifications
Guide number:
USA 114/ 38 ( at 35 millimeter focal length, ISO 100 in
USA/Europemillimeters)
159/53 (at 35 millimeter focal length, ISO 200 in millimeters)
Flash Mode:
M, S1, S2
Flash Power: Control Level 46 light quantity output control with
1/7-stop increment
Circuit Design: Insulated Gate Bipolar Transistor (IGBT)
Vertical
Rotation Angle: -7~90 degrees
Horizontal
Rotation Angle: 0~270 degrees
Power: 4xAA Size batteries (Alkaline or Ni-MH are usable)
Battery Life: 100-5000 times (AA Alkaline cell used)
Recycle Time: Approx 4 second (AA Alkaline cell used)
Color Temperature: 5600 kelvin
Flash Duration: 1/800 second~1/20000 second
Dimensions: 72x135x85 millimeter 2.8x5.31x3.34 inches
Net Weight: 250 grams 8.81 ounces
Accessories: Flash light (1), Protecting bag (1), Mini stand (1), and
User manual (1)
on and flicker, it indicates the flash has entered the output power fine-
VII. Possible Problems During Use and Solutions
the output power of the flash with step length of 1/7 exposure value
Because the light head focus of this product is fixed, be careful not
output, only output power can be reduced. Press the MODE or PILOT
close to the object during use; otherwise, the occurrence of the above
tuning state. In such case, press the “+” and “-“ buttons to fine tune
1. Dark corners appear in photos or the object can only be lit locally?
in order to obtain finer exposure control. Please note: In case of full
to adjust the camera focus below 35 millimeter or make the lens to
button to exit or let the flash idle for several seconds to exit.
phenomena is normal; you can pull out wide-angle diffusion board to
2. Use Reflection Board to take Photos
2. You may feel the flash control panel is dim, because there is one
draw the reflection board and the
effect
from the light head at the same
doors, it may easily be knocked down causing the flash hot shoe foot
extend the flash scope of this product to 18 millimeter
With the reflection board flash,
protective film on the panel; you can tear it away to enjoy a clear visual
wide-angle diffusion board out
3. Please note that if you install the flash on an umbrella on the out-
time and then push the wide-angle
to become damaged.
diffusion board back. In such case,
if this product is being used to take
photos, it will produce a highlighted point on the eyes of the subject
to enhance the color. This result will be a more subtle effect when the
flash head is at 90°
PHOTOFLEX® WARRANTY
• Warranties only cover manufacturer’s defects and workmanship
• We reserve the right to inspect all merchandise returned (end users and dealers) for warranty fulfillment.
• All returns must be accompanied by a receipt showing date of purchase.
• Freight must be paid both ways by the customer or dealer.
• Warranties are valid only from date of Original Purchase.
For warranty registration and information, please visit www.photoflex.com®
photoflexlightingschool.com™