1
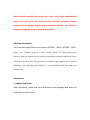
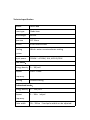
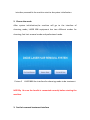
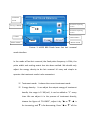
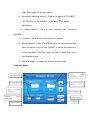
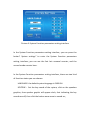
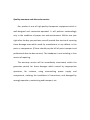
LASER 808 of diode hair removal system
User manual
Content
LASER 808 Therapeutic equipment theory................................................3
Machine description:.................................................................................. 3
Preparation..................................................................................................4
1. Unpack and check............................................................................. 4
2. Add water...........................................................................................4
3. Connect the treatment handle.........................................................4
4. Check the input voltage....................................................................4
5. Connect the power cord................................................................... 4
6. Test running.......................................................................................4
7. Add water before running for the first time....................................4
Name of the components............................................................................5
Technical specification................................................................................. 7
Operating instruction...................................................................................8
1. The initial interface......................................................................... 8
2. Choose the mode............................................................................ 8
3. Fast hair removal treatment interface...........................................9
4. Normal Mode................................................................................ 10
5. Parameters adjustment................................................................ 10
6. System Setting Interface...............................................................11
Simple troubleshooting............................................................................ 12
Accessory list..............................................................................................13
Quality assurance and after-sales service.................................................13
LASER 808 Therapeutic equipment theory
808nm diode hair removal system use the classical technology of diode
laser hair removal. The wavelength of the 808 nm laser has enough
penetration depth to the hair follicle, and effectively be absorbed by
melanin. Nearly 15 years of clinical test and verify, it is known as the gold
standard of the laser hair removal. Its unique long pulse width of 808 nm
can penetrate cutis to the parts of hair follicles. According to the
selective light absorption theory, making Use of melanin cell absorb light
of specific wavelength, hair follicle produce heat, thus it is destroyed
selectively, to avoid the surrounding tissue damaging and get hair
removal at the same time. In the process of treatment, the unique white
jewel dynamic cooling technology in system make cuticle anesthesia in a
short time, then prevent skin from burning, and achieve painless, fast,
and permanent hair removal effect.
Note: trained medical personnel uses only. Any other unauthorized
person can not repair the inside of this machine, including internal
modulation of power supply and treatment handle, etc. because
dangerous high pressure is inside the machine.
Machine description:
There are two specifications to choose: AC220V,50Hz / AC110V,60Hz
Diode hair removal system in fast mode launch 10 laser pulses per
second, and the special pulse model completely beyond traditional laser.
Treatment process can slip quickly, and make target organization heated
effective, until damage hair follicles, it is comfortable and fast, safe and
convenient.
Preparation
1. Unpack and check
After unpacking, make sure the instrument is not damaged and parts are
complete (see parts list).
2. Add water
Connect the water bottle to the inlet and the overflow pipes to overflow
outlet. Then put a basin under the overflow pipes and add the water
until the water overflow from the overflow outlet.
3. Connect the treatment handle
Align the treatment handle to the corresponding socket of the
instrument; a "click" sound indicates normal connection.
4. Check the input voltage
Before you turn on the power, check the power supply voltage whether
it is consistent with the voltage specification of the machine so as to
avoid unnecessary risk.
5. Connect the power cord
Insert one side of the power cord into the socket of the machine, and the
other side into the network power outlet. (Note: The network power
must have a good grounding, grounding of medical grade recommended).
6. Test running
Turn the key switch to the horizontal position, click the treatment mode
for initialization run for 2 minutes, then turn the key switch to a vertical
position to turn off the power.
7. Add water before running for the first time
After the first test running, add water once more. Connect the water
bottle to the inlet and the overflow pipes to overflow outlet. Then put a
basin under the overflow pipes and add the water until the water
overflow from the overflow outlet.
Note: No laser output when test running.
Technical specification
Model
LASER 808
Laser type
Diode laser
Wavelength
810nm
Spot size
10*12mm
Screen
8 inch touch screen
Cooling
Wind + water +semiconductor cooling
system
Input power
2200W(AC220V/ 10A, AC110V/20A)
Fast mode:
Energy density 5~10J/cm2
Repeat
10Hz(fixed)
frequency
Cooling
Contact cooling
Professional mode:
Energy density 5~120J/cm2
Repeat
1~10Hz(adjust)
frequency
Pulse width
30~350ms(fixed pulse width can be adjusted)
Cooling
Contact cooling
Machine size
N.W
Weig
G.W
ht
Size
Package size
Operating instruction
1. The initial interface
Picture 1 LASER 808 initial interface
After start the machine , the screen will show the welcome
interface,meanwhile the machine start to do system initialization.
2. Choose the mode
After system initialization,the machine will go to the interface of
choosing mode, LASER 808 equipment has two different modes for
choosing: fast hair removal mode and professional mode.
Picture 2 LASER 808 the interface for choosing mode to do treatment
NOTICE:Be sure the handle is connected correctly before starting the
machine.
3. Fast hair removal treatment interface
Treatment
mode
Energy density
10
Parameter adjusting
button
Parameter adjusting
button
Counter
Return button
00005
Button remind
Status window
Picture 3 LASER 808 Diode laser fast hair removal
mode interface
In the mode of fast hair removal, the fixed pulse frequency is 10Hz, the
pulse width and cooling extent has also been settled. We should only
adjust the energy density to do hair removal. It’s easy and simple to
operate. the treatment mode is also convenient.
(1)Treatment mode:It shows the current treatment mode
(2)Energy density:It can adjust the output energy of treatment
handle, the range is 5~10J/cm2, it can be added as “1” every
time. We can adjust it in the process of treatment directly,
choose the figure of “FLUENCE”, adjust it by “▲ or ▼”. ▲ is
for increasing, and ▼ is for decreasing. Press “▲ or ▼” all the
time, the energy will be fast output.
(3)Parameter adjusting button:Choose the figure of “FLUENCE”、
“IPL ENERGY” or “RF ENERGY”, press ▲ or ▼ to adjust
parameters.
( 4 ) Return button : Back to main interface from treatment
interface.
(5)Counter:Record the total counters at present.
(6)Button remind:Press “STANDBY”to light the treatment handle,
then the button will turn into “READY”, it means the machine is
in working state. Take the handle on skin to make shot, it’s in
the treatment way.
(7)Status window:It shows the present working state.
4. Normal Mode
Pulse
adjustment
Treatment mode
Energy density
10
30
Pulse
frequency
adjustment
Cooling
adjustment
energy
Status window
width
buttons
Parameter adjusting
button
Button remind
1
5
00005
Return button
Counter
Figure 3 LASER 808 Diode laser hair removal system --normal hair
removal mode
(1)Treatment mode:Used to display the current treatment mode
( 2 ) Energy density : Adjust the output of the treatment handle
energy, the adjusting range from 10 to 120 J/cm2, different
pulse width for different energy density adjustable scope. This
setting can be adjusted directly during treatment. To select the
number of "FLUENCE", then use "▲ or ▼" key to adjust. "▲"
button to increase, "▼" button to reduce, holding "▲ or ▼"
key can regulate the output energy rapidly.
( 3 ) Pulse width adjustment buttons : There are six kinds of fixed
pulse width can be adjusted according to the treatment choice.
(4) parameter adjusting button:Select the numbers of
"FLUENCE",
"PULSE," "FREQUENCY" or "COOLING" column, and then click
"▲" and "▼" for adjusting the parameter.
(5)Pulse frequency adjustment:Pulse frequency from 1Hz to 10 Hz
is adjustable. Different pulse width for different pulse frequency
adjustable scope.
(6)Cooling energy adjustment:Refrigeration strength can be
adjusted from 1 ~ 5 gear.
( 7 ) Button remind : Click "STANDBY" key to start the treatment
handle, it turns to be “READY”, means the machine have been
ready for work, then you can press the button on the handle to
start treatment.
( 8 ) Return button : Exit treatment interface and return to select
interface.
(9)Counter:Record the current numbers of output pulse light.
(10) Status window:To show the current working condition.
4. Parameters adjustment
In the treatment interface, we can do adjustment on the energy
density, press the button "STANDBY" to enter the work state; and press
"RETURN" key to exit the treatment interface.
5. System Setting Interface
00005
00005
Picture 6: System Function parameters setting interface
In the System Function parameters setting interface, you can press the
button” System settings” to enter the System Function parameters
setting interface; you can see the fast hair removal counter, and the
normal mode counter here.
In the System Function parameters setting interface, there are two kind
of function status you can choose:
LANGUAGE: the default system language is ENGLISH.
KEYTONE : Set the key sound of the system, click on the speakers
graphics, then speaker graphic will appear slash, that indicating the key
sounds are off, then click the button once more to sound on;
Simple troubleshooting
If you come up problems when use the instrument, please try to
use the following method to solve
Trouble
After
Possible causes
start
Solution
the 1. Not plug well.;
1.
power supply, the
Checking
if
plug
connection is good
operating panel is 2. Urgent switch is on.
not
working
,
2. Turn
either is air fan
the urgent switch (it
is like a red mushroom) to
the connection between the
switch keys
Machine
is The “STANDBY” button Set
working well but is not pressed
without
correct
parameters
according to specification
energy
output
Water level error!
not filling with water
fill
water
specification
Water flow error ! the
diode
laser
according
to
headpiece
is
not 1.connect the headpiece well
connected well
2.if can not solve, please
contact factory
Temperature too water temperature is Stop treatment, continue the
high!
too high
treatment after the machine
is cooling
Treatment handle headpiece
not found!
is
not connect the headpiece well
connected well
very large noise The machine is not in placed the machine in the
when the machine balance
smooth and steady place
is working
Notice: operating personnel is not allow to adjust the inside of
machine and the headpiece.
Accessory list
1. One machine
2. A pair of protection glasses and eyeshade
3. One add water bottle, water in and water out pipe
4. Key
5. Headpiece
Quality assurance and after-sales service
Our product is one of high quality therapeutic equipment which is
well-designed and convenient-operated. It will perform outstandingly
only in the condition of proper use and maintenance. Within one year
right after the day you purchase, we will provide free service of repairing
those damage ones which made by manufacture or any defects in the
parts or components. (Clients should pay the bill of parts transport and
professional door-to-door service). The headpiece is not including in free
service of repairing.
The warranty service will be immediately terminated, within the
guarantee period, for those damages which caused by inappropriate
operation, for instance, using mismatching power supply and
components, violating the installation of instructions, and damaged by
wrongly operation, maintaining and transport, etc.