1
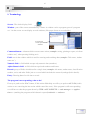
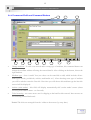
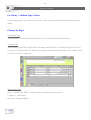
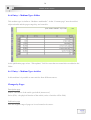
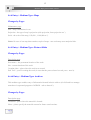
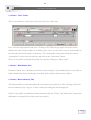
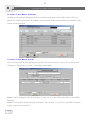
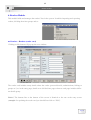
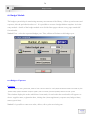
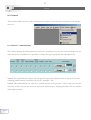
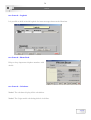
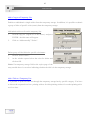
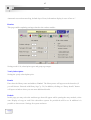
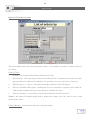
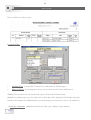
1 Library management software User manual All rights reserved 1990-2007 2 Table of Contents Table of Contents Topic 1 Introduction 1.1 2 3 4 Terminology Fields and Command Buttons Logging into the Program 4.1 5 Main Menu 4 5 6 7 ,8 ,9 10 10 Entry Module 5.1 5.2 5.3 5.4 5.5 6 Minimum Technical Demands Pages Entry Screen 5.1.1 Permanent Fields and Command Buttons 5.1.2 Entry >Medium Type: Books Description Page Classification Page Publication Page Maintenance Page Copies Page Analytical Page 5.1.3 Entry > Medium Type: Periodicals 5.1.4 Entry > Medium Type: Serials 5.1.5 Entry > Medium Type: Multimedia 5.1.6 Entry > Medium Type: Folder 5.1.7 Entry > Medium Type: Articles 5.1.8 Entry > Medium Type: Maps 5.1.9 Entry > Medium Type: Pictures/Slides 5.1.10 Entry > Medium Type: Archives Import Data Export Titles Removed from Collection Unify Volumes Search Module 6.1 6.2 6.3 6.4 6.5 Short Search Fast Search Advanced Search Strings Search Search by Copy No, 11 12,13,14 15 16,17 18,19,20 21 22,23 23,24,25 26 27,28,29,30 30 31 32 32 33 33 33 34 34 34 35,36 37 38 39 40 40,41,42 42 Page 2 3 Table of Contents 7 Topic Loans and Returns Module 7.1 7.2 7.3 7.4 7.5 7.6 8 9 Readers Module 8.1 8.2 8.3 8.4 8.5 Readers (Reader Card) Groups Families / Classes Ages Deleting Readers by Classes 8.6 8.7 Import Readers from MANBAS Clear Duplicates Readers Update Module 9.1 9.2 10 Page 3 Authorizations Log Book Phone Book Calculator Create Barcodes Maintenance Reports Module 12.1 12.2 12.3 12.4 12.5 13 14 15 Expenses Incomes General General 11.1 11.2 11.3 11.4 11.5 11.6 12 Update Tables Tesaurus Budget Module 10.1 10.2 10.3 11 Loans and Returns Class’ Loans Distribution Lists Reservations by Title Loans history by Reader Loans history by Title Reports Loans Titles General Readers Additional Buttons at the Main Menu Epilogue Copyrights Pages 44 44,45 46 46 46 47 47 48 48,49 50 50 50 51 51 51 52 52 53 54 54,55 56 56 57 57 58 58 58 59,60,61,62,63 64,65 66 66 67,68,69,70 70 70 71 71 72 72 4 Introduction 1. Introduction Welcome to - the advanced and friendly windows software for library and infor- mation banks management. Is a ten years old research and development product. Most of the efforts made in order to come out with a user-friendly interface. Excels in: • Central work window which is used for entering data as well as for watching it. • Powerful and user-friendly search engine. • Extensive reports storage includes hundreds of reports in different profiles. Is fully linked to the Microsoft software as well as to the Office package - it • is possible to send search results directly from through the e-mail or through Word after transferring the report to a word document. • Wide type mistakes and other user mistakes correction system which includes also automatic values lists, control systems during data updates and logic link between keywords which create the thesaurus. • Entry (data entering, catalogue) by the medium, when every medium has unique fields. • Extensive purchase module for library budget management, reservations, collection and more. • Barcode module - printing barcodes for titles and readers. • Full support by includes programmers, guides and technicians of hardware and nets. We congratulate you for the wise selection in and wish you long, useful and fertile use in the program. Page 4 5 דרישות חומרה 1.1 Minimum technical demands • PC computer based on Pentium, Celeron or AMD processor, at least 800 MHz. • RAM: 256 MB minimum. • Notice! Libraries who wish to install in the computer additional soft wares must coordinate that with us. • Windows 2000 pro or Xp pro and Office pro operating system. • Notice! In case of using Sql server database - it is a term for installing the program in addition to Sql server license + clients license. • Notice! In libraries which execute little number of operations daily, it is possible to use windows SE98 operating system. • For enjoying a full support service - the library is responsible for an internet link and a free access to the IP address of AGRON. • The support service includes telephone service, remote bags fixing and versions updates. In addition, a service at the costumer site is possible with extra payment. • Libraries which work at the net and hold in their catalogues titles in foreign languages (example: Arabic, Russian etc’) must install Microsoft Sql server + clients license. Before starting… Before reading this manual we recommend you to operate AGRON system and to get to know her. Open windows, close them, try to enter data and to carry out different actions (don't worry - you will not male any damage). Soon, you will notice how friendly is this program. Page 5 6 Termination 2. Terminology Screen– The whole display field. Window– part of the screen surrounded by a frame. A window can be a program, part of a program etc’. On the screen we can display several windows (like paper sheets on a work table). A screen with several open windows Command button- A button which execute some action (example: saving, printing a report, exit from window etc’) when pressing/clicking on it. Field- area in the window which is used for entering and watching data (example: Title name, Author name etc’) Numeric field- A field which accepts only numeric data (numbers). Alpha-Numeric field- A field which accepts both numbers and letters. Record- group of fields which describe a single item (example: title name, author name, classification number, series and other fields join to a record which includes the entered (cataloged) title details). Entry- Entering data of a title into a record. The program is not responding, what to do? First try to push on the “Esc” button, if this action didn't help we will try to push on ALT+F4 (in this action we are canceling the last action which caused the error). If the program is still not responding we will have to shut the program down by CTRL+ALT+DELETE --> task manager --> applications--> (marking the programs which doesn't respond) end task --> end now. Page 6 7 Fields and Command buttons 3. Fields and Command buttons Text Box A field used for display and entering data (example: “Height” - the height of the book, “Title” title name etc’). Combo Box In order to enable fast and easy data entry, several text boxes includes automatic lists with values who already entered to the same text box. By clicking on the push button in the let side of the text box, the list is opening so it is possible to choose one value instead of writing it all again. In a case that a new value is entered a dialog box will appear ask for you permission to include the value in the automatic list in order to make the entry (cataloging) easier next time. Notice! Deleting or correcting a value will be done through “update tables” (see “9.1 update tables”). Notice! Before entering a new value into a “Combo Box”, open the list and check if the value already entered in a slight change (Colors-Colours) in order to prevent duplicates who will interrupt future search attempts. In order to fix such mistakes the program includes “double values correction” mechanism. Radio Buttons These buttons enable to choose one or more options from the options displayed by clicking on the empty circle next to the selected option. Command Buttons • Single click on the button will perform the action that is written on him. • Delete - this button is found beside several fields and enable to delete exiting values (example: author, keyword, analytic title etc’) . Page 7 8 Fields and Command buttons Scroll Bars The scroll bars (horizontal and vertical) enable to scroll long lists which can not be seen on the window in a full display. The square inside the bar indicates the current position relating to the whole list. Scrolling is possible through continuous click on the square and shifting it or through clicking in the empty spaces on the bar (left/right). Notice! The program supports mouse-scrolling. Notice! Sometimes, beside the scroll bars the next bar will appear: Entering the record’s number at the window or clicking on the arrows buttons enables skipping between the records more precisely. Possible modes of buttons and fields In order to produce a friendly interface, the program contains work windows used for entering and displaying data on the same space. Therefore, Fields and buttons may be in several modes: • LockedLocked- The program is in “Display” mode - watching data is possible but not changing it. • EnabledEnabled- Changing data in field is possible by locating the cursor in it and typing to it. While typing the data the field is found in an “Edit” mode. Exit from “Edit” mode is possible by pushing <ESC> button. Notice! Exit from the field by <ESC> will lead to loss of the data entered the previous data will be display (useful in a case of type mistakes). Notice! Shifting to “Edit” mode will made usually by the “Edit” button. • DisabledDisabled- The button is blurred and it is impossible to enter to it in “Edit” mode. (example: If you are at the last title it is impossible to move forward or to move to the last title. Page 8 9 “Hot keys” ”Hot Keys” (on the keyboard) Pushing on several on several combinations of keys will lead to some automatic actions. However, “hot keys” opportunity doesn't cancel mouse activity which can be always used. Notice! Cursor must be located in the relevant field. ”Hot keys” o Tab - move to the next field/button. o Shift +Tab - move to the last field/button. o Enter - apply/ approve changes in field and move to the next field. o Delete (Del) - delete. o Esc - exit from fields and windows (without saving the changes). o Shift + Alt - language transform (between the languages installed in the computer). o Shift + F2 - enlarging field in order to see all data in it. o F4 - opening/closing values lists in “combo” boxes (when cursor located in the field). o Shift + F4 - exit program. o Letters on the keyboard - in some buttons one letter is underlined, pushing on the appropriate letter on the keyboard will apply the action. Page 9 10 Logging in/Main menu 4. Logging into the program On the desktop there are 3 of “Agron” icons: “Agron” icon (for logging into the program), “Backup agron” icon (for backing up the data at the end of every workday) and “Correction-Compaction”. Double click on “Agron” icon will open entering screen: In order to log in user name and password must be entered, then push “Enter”. Notice! Entering without correct user name and password will cause errors in the programs. 4.1 Main Menu After logging in the main menu will appear at the upper side of the screen. The menu includes Entry module, loans module, search, readers, update, budget, barcodes, reports and more. Page 10 11 Entry Module/Entry screen 5. Entry Module The entry (entry - entering data) screen is the main work window of the librarian, the screen includes all data of each title in the library (name of the title, author, publisher etc…) according to the librarian rules. Notice! Data that appears at the entry screen is used for display as well as for other important actions such as searching, making reports, data arrangement and more. The entry quality will effect directly the quality of these actions. Therefore, enter data carefully and precisely according to librarian rules and to the needs of the library. 5.1. Entry Screen Each title holds a lot of details, trying to make an order - a separation was made: A. Between different types of medium: with the “combo” box at the top-right side of the screen you may attribute each title to his type of medium. For each medium, only relevant fields will appear (example: field “cover” is not relevant to “multimedia” medium, field “record length” is not relevant for “pictures” media etc’). B. Between groups of details to each title: display all data fields on one screen is impossible. Therefore, fields were divided into details groups with common denominator. Each group is displayed in a different page (Description, classification, imprint etc’). Entry screen has two zones: A. The upper and the lower zone contain permanent fields and command buttons. B. The center of the screen is combined from several pages, you can watch each page by clicking on the appropriate word (Description, classification, imprint etc’). Page 11 12 Permanent fields and command buttons 5.1.1 Permanent Fields and Command Buttons 3 11 1. 10 9 8 7 6 1 2 5 4 Change medium - if a title was entered under wrong type of medium, this command button can change the medium without effecting the entered details. After clicking on the button, choose the right medium. 2. Medium type - close “combo” box (no values can be cancelled or add) which includes all medium types: books, periodicals, articles, multimedia etc’). After choosing some type of medium you will be asked to enter the first title. Next time you will choose this medium type the last title entered will be displayed. 3. Author (main author) - this field will display automatically title’s main author’s name (about choosing main authors name - see forward). 4. Titles browsing - two outer arrows are for skipping to the last/first title entered. Inner arrows are for browsing forward/backward. Notice! The titles are arranged from the “oldest to the newest (by entry date). Page 12 13 Permanent fields and command buttons 5. Go to - this button enables skipping to a specific title. Clicking on the button will open next window: Filtered medium The title can be searched by copy number (old/new) or by title’s name (a combo box is offered). In addition, by marking the “filtered medium” option the search will be made only on copies that belong to the same medium that was last chosen at the entry screen. By choosing the wanted copy its state of responsibility (see forward) and type of medium will appear. Clicking on “options” will display all titles that suit the title’s name entered. 6. Import - clicking on this button will open a window with Israeli center of libraries (ICL aka MAHAD) titles’ storage and will enable importing titles - with their full data (as it was entered by ICL) - into the program. This action saves the need in manually typing all title’s data. Titles can be searched by their name, part of it (next to the combo box), or by certain field (clicking on the button “filter by field” will enable the combo box next to it). After locating the requested title you will be able to mark the window next it and end by clicking on “import titles”. Now the title with its full details will appear on the entry screen. Page 13 14 Permanent fields and command buttons Notice! Opening this window next time, titles that was already imported will stay marked in order not to be imported again. Notice! Clicking on the right button of the mouse while the cursor is located on the title’s name will open a window with some of the title’s details. 7. New - clicking on this button will open a new record for entering a new title. Please enter the details carefully. 8. Duplicate - this option is useful in order to duplicate a title which its details are very simlar to the next title you are about to enter (a part of a series etc’). Clicking on “Duplicate” will open this window: All title’s fields are automatically marked for duplication - you may choose one field or more that will not be duplicate. In addition, you may set the number of copies for the duplicated title and the number of loan’s days. After clicking “ok” the duplicated record will be open until the end of entry. 9. Edit - in order to protect the details entered, in the entry screen the program is in a “Display” mode (data can be seen but not changed). Clicking on “Edit” button will enable data changes. Notice! At the end of the action you should click “Ok” for saving the changes or “Cancel”, after that the program will return to “Display” mode. 10. Delete - clicking this button will delete the title displayed on the screen. The password requested is log in password. 11. Exit - clicking this button will close the entry screen and return you to the main menu. Page 14 15 Medium: Books > Description page In order to manage data efficiently, the entry screens are divided by the medium types and groups of details to each title: 5.1.2 Entry > Medium Type: Books Description page 1 2 3 4 5 6 7 1. Title’s name - in this field the title’s name should be written in its full an accurate form. 2. Title’s reference - this field purpose is to help in titles search. Clicking this button will open a window in it the title’s name can be written in its possible other forms (full/short way, numeric/ alphabetic, Synonyms etc’) in order that the title will be found by user who doesn't know the accurate name of the title (example:”1984” - “nineteen eighty four”, “the little prince” “le petit prince” etc’). Notice! Synonyms to title’s name should be written only at “title’s ref.” window. At “Title’s name” field the name should be written in its formal form! 3. State of responsibility - in this field should be written names of the people/elements who donate to the title publication: authors, editors, translators etc’. Next to each person his donate to the title should be written. Page 15 16 Medium: Books > Description page 4. Initial- the combo box enable to mark common initials in order to ignore them in the search process and in reports (just imagine how many titles starts with the word “the”). At the combo box choose the appropriate option: Then, by clicking “Title without” button a window with title’s name without initial will appear. 5. Notice! “special” option is for additional initials such as two first letters, two first words etc’. Choosing this option will pop-up “title without initial window” with full title’s name - delete the initial (as you set it) and then click “Ok”. 6. Links - this option is set to link the title into information in the hard disk (article, picture, multimedia etc’). Clicking on the button the links window will appear, click “New” and then “File location” select the requested file (double-click or “open”) then enter a name to the link and save. Clicking on “Links” in display mode will open a window with the links attached to the title (which entered before). Page 16 17 Medium: Books > Description page 6. Authors - this field specifies the authors of the title. If the author’s name already exist at the values list you can use the combo box, if not - a dialog box will pop-up asking “add XXX to the list?” approving this - the name you just entered will be available at the next entry. Notice! There is no limitation for the authors’ number. While entering one name another line will open below for the next name. if the title has several authors main author should be chosen by marking the text box left to the author’s name. In any case, the author written at the first line will be considered as the main author. “Details”- clicking this button will open “Author description” window - there you can add biographic details about the author’s life and art. Here, as well, exist a “references” field - where is possible to add synonyms to the author name - in order to enlarge search results. 7. Series - when entering titles which are part of a series - name of the series and the number at the series should be marked. According to the librarian rules - it is possible to link up to 2 series to one title. Notice! Linking the titles to their appropriate series important for enabling producing series report. Page 17 18 Medium: Books > Classification page Entry > Medium Type: Books Classification . page 1 2 3 4 6 8 5 7 Details in this page are referring to the library classification of the title: 1. Type - in media type: books - the type can be fiction/poetry/plays etc… 2. Sub-type - specifying the type (fiction > novel, advising > dictionary etc’). 3. Target audience - public libraries - children/youth/adults. Schools - elementary/junior high school/high school etc’. 4. Shelf mark - this field will display automatically the first 3 letters of the main author. If no author name exist - 3 first letters of the title’s name. 5. Class. Table + Class. No. - entering a value in one of these fields will pop at the other its equivalent no./subject (example: 800 - litrature, 155.5 - psychology: adolescence etc’). Notice! The link between class. No. and class. Subject is made by a table built by the user. While entering a new value a dialog box will pop-up and you will be asked to add the value to the table. Clicking “Ok” will open the next window: Page 18 19 Medium: Books > Classification page Class. No and Class subject according to the librarian rules. 6. Additional classifications - if the title has additional possible classifications they may be indicated at this field (example: psychological modules in children books) There is no limitation for the number of add. Class. 7. Keyword - in order to improve titles’ search by subject the keyword system was set. A keyword is an expression (alphabetic or numeric etc’) with a connection to the title and its content. The connection may be direct or in-direct while the purpose is gathering titles into theme groups. For creating a new keyword, first turn the program to “Edit” mode, then write the keyword at the right field (a combo box may help you to choose an existing keyword). A reference button enable writing the keyword in a synonymous way. And “Pages” field can indicate specific pages if the keyword is relevant to a specific part of the title. Notice! There is no limitation on the keywords number - the more keywords you will enter, the title will appear in more keyword groups. On the other hand, if you wish to build accurate keyword groups (example: searching titles that linked to the keyword “love” will lead only to ti- tles who deals directly with love) Notice! The keywords are listed alphabetically. Page 19 20 Medium: Books > Classification page 8. Thesaurus The thesaurus is an expressions bank meant to enlarge and improve the keywords system. Clicking on the button “T” will open the next window: Every keyword is linked to additional keywords by different connections, so it is possible to enrich the keywords list. First, choose the requested keyword, then click on “add to a title” - a window will open with all the keywords that linked to the main keyword - you may choose all of them or part of them - and they will be added to the list in the classification page. Notice! Mark only the suitable keywords - after adding the keywords - deleting them from the title will have to be manual. Notice! The thesaurus can be built through the update module (9.2 update > agron (thesaurus) page 53). You can purchase the MAHAD thesaurus system that includes over 15,000 values. Page 20 21 Medium: Books > Publication page Entry > Medium Type: Books Publication page 1 2 3 4 5 6 Details in this page are referring to the publication details of the title: 1. Publisher - in this field you should write the publication name. clicking on the button “D” to the right will open the “Publisher details” window. Notice! Filling up the “Publication place” field links automatically between the publisher and the publication place. 2. Edition - number of edition or remarks (new edition etc’). 3. Language - the language of the title. If the title is translated - please note the original language at “source lang.”. 4. Pub. Year + month - by filling up the “Heb. Year” field - “Pub. Year field” will be updated auto. Please note as well the month of publication. 5. Pub. Place - if the field wasn't filled up automatically - fill the place of title’s publication. If there’s additional publication place - please fill the box text to the right. Notice! Pub. Place should be written in the formal-official way. For synonyms use the reference field (button “F”). 6. Link to the internet - if the title has an internet site - the address may appear in this field. Page 21 22 Medium: Books > Maintenance page Entry > Medium Type: Books Maintenance page 1 3 2 4 5 6 7 8 9 10 Details in this page are referring to some physical details of the title: 1. Pages - number of pages of title. In case of encyclopedias, please note number of volumes. At the combo box to the right - please note the right units (pages/volumes). If there are title pages note them at the text box to the right. 2. Height - the height of the title in cm. 3. Add. Materials - note in this field items attached to the title (example: cd, maps etc’). 4. Illustrations - if there are illustrations/graphs etc’ note their type (Black&white/color). 5. Binding - binding type (soft, hard etc’), if the title is a recorded title please note analogical/ digital. 6. Notes - in this field you can add some bibliographical notes. A combo box is located for repetitious notes (example: “donated by Mr. smith”). 7. Mahad no. - if the title was imported from Mahad storage - note its Mahad no. Page 22 23 Medium: Books > Copies page 8. ISBN - internationally accepted number code used in the cataloging of books. 9. Entry date - this field will be filled automatically by the date that the title was entered in. for changing the date you have a calendar table. 10. Cataloger - the cataloger of the title will be note automatically in this field. For changing the cataloger - a combo box is located. Entry > Medium Type: Books Copies page 1 12 2 9 3 8 4 7 6 5 11 10 9 8 7 10 6 5 4 11 Details in this page are referring to the copies of the title: 1. Copy no. - automatic serial no. will be noted in this field. 2. Old copy no. - if the copy was imported from other program to agron its previous copy no. will be noted. 3. Temp. storage - the details of every new title will be removed to the temporary storage in order to make a barcode. After the barcodes printing and emptying of the temp. storage the mark will be gone. 4. Page 23 Colors - this field enables classification of the barcodes for subjects whereas every subject will 24 Medium: Books > Copies page be printed on stickers from different color. Moreover, by this field, it is possible to sort barcodes of each department in different area at the library (see “11.5 General> Create barcodes> color selection p. 62) 5. Entry day - the date when the copy was created in will be noted automatically. It is possible to change the date to the date of the title’s purchase. 6. Days of loan - in this field fill the maximum loan days (default no - 3 days). 7. Type of loan - this field display the copy’s current status: Available - type of loan default - the copy exist and available for loaning. Loaned - if the copy was loaned, this field will auto. Display the value “loaned”. After returning the copy the value “available” will be displayed. Not for loan - if the title is not for loan - select this option. The days of loan will be displayed as 0. In binding/lost - options for the copy status. Ordered - if the title was ordered from supplier but still hasn't arrive to the library select this value (see also “10.1 Budget>Expenses>Orders”). Removed - for removing a copy out of the stock, first select this value (see next phase at “5.4 removing a copy out of stock” p. 34) Permanent loan - if the copy was loaned for a long/unknown period select this value. Days of loan will be displayed as “999”. Notice! If the copy is loaned, double click on this field will pop-up a window with “loan details” and enable a copy return. Page 24 25 Medium: Books > Copies page 8. Place - location of the copy at the library or at other library (example: adults section, science section etc’). 9. Vol. name - titles with several volumes - at the field will be noted the volume name/num. 10. Enter number of copies - in this field note the number of copies you wish to add to the title. For adding the copies click on “Save” button. 11. Deleting a copy - this button enable deleting extra copies. For permanent delete enter your log in password. Notice! At the bottom of the screen there’s a bar which indicate the copy no. you are located in and the total sum of copies. Moving to other copies can be done through direct click on a copy and through entering the copy no. at the bar. 12. Budget - clicking on the button “R” the window “Order of copies” will pop-up. This is an assist module for ordering copies management. Please note the supplier’s name, invoice no. and no. of copies purchased. Clicking on “add to invoice” button will add all titles’ copies to the current invoice. Moreover, it is possible to print different reports. Notice! Entering the copy no. and pressing on ENTER will automatically display the title’s name. Page 25 26 Entry > import data-export titles-removed from collection 5.2 Entry > Import Data For importing data from an external database - clicking on “import data” will open the “import titles from external database” window - there select whether the imported database is an AGRON database or MAHAD database. After selecting and approving (“OK”) the next window will pop-up: Clicking on “Copy from” will open a window with the hard disk files of your computer. Select the suitable update file and then “Ok”. Notice! It is possible to produce a report includes the imported titles list. 5.3 Entry > Export Titles For exporting data out of the system - clicking on “export titles” button will pop-up the next window: Please select titles’ range for export and the form (AGRON form or other). Following this a window with the hard disk files of your computer will be open - select the suitable target file for which data will be removed. 5.4 Entry > Removed From Collection For removing copies out of the program - the copies which have been removed out of collection will be displayed in “remove out of collection” window for producing reports. Copies that will be deleted from that screen - will be deleted permanently! Page 34 27 Entry > Unify volumes Clicking on “removed from collection” button will pop-up the next window: In this case titles which have already been removed from collection will be displayed. For removing additional copies click on “Present copies which approved to be removed” - in this case the copies which have been marked for removal (by marking at the copies page, see p. 24) will be displayed and the buttons “GO” and “Cancel removal” will be enable. Remember! Approving removal will delete the copies from the program completely. Furthermore, deleting copies of titles which has only one copy - will cause title’s delete. 5.4 Entry > Unify Volumes As said before - at the end of each year of some periodical - its volumes must be gathered to a serial. Clicking on “Unify volumes” button will pop-up the next window: Page 35 28 Medium: Books > Analytical page Entry > Medium Type: Books Analytical page Several titles includes analytical titles. Example: a book that gathers several stories, articles etc’. Details in this page are referring to this analytical titles - it has several files whereas every file is used for entering different group of details. 1a 1 1b 2 3 4 1. Analytical titles - in this file note all names of analytical titles (1a). The number numeration is done automatically. There is also a button for deleting the titles. 2. Details - in this file note the title’s initial and the authors details. 3. Classification - in this file note the suitable keywords. 3. Maintenance/ Publication - in this file please note the publication details and the pages range which the analytical title is located in. Notice! This was the specification about the pages of “Medium type: Books” in the entry module. The pages at the other modules are very similar to the pages which has just been reviewed. Henceforth, we will note the changes innovations at fields and buttons which aren't exist in “Medium type: Books”. Page 26 29 Medium: Periodicals 5.1.3 Entry > Medium Type: Periodicals General Changes The button “Import” (from Mahad) isn't exist because Mahad storage includes only books. Changes by Pages Maintenance page “Author” field has changed and now its called “Editors”. Here as well, the editor that will be marked will be considered as the main editor (hisqher name will appear at the top of the entry screen). Classification page This page has several changes: 1. Because there are many different periodicals, the fields “Type”, “Sub-type” and “Target audience” will not exist. 2. ISBN field exist in this page. Fill it carefully 3. Notice! In the “Shalf mark” field note the first 3 letters of the periodicals name (not of the editor). 4. In “Keyword” field note keywords that are suitable to the periodical generally (specific keywords to each issue note at the “Issues” page). Page 27 30 Medium: Periodicals Publication page Periodicals which are entered to the system are, in fact, a series of issues which arrive permanently to the library by a subscription. At the end of each year of subscription the issues should be unite to a serial (see forward). Nevertheless, it is possible to unite periodicals that doesn't arrive permanently. Henceforth the specification of the new fields at the publication field: 1 2 3 4 5 6 1. Price - the price of subscription. You have also a combo box for indicating the currency. 2. Volume - suitable year of activity. 3. Booklet1 - the number of first issue in the year of activity. 4. Beginning/end of subscription - these fields are relevant if the periodical arrives permanently and enables creating issues automatically. Selecting beginning subscription date will pop-up auto. End of subs. Date (at the year after). Notice! Clicking on the button to the right will open a calendar. 5. Permanently/Irregular - mark the suitable frequency. If the periodical isn't permanent please note number of copies in a year. If it is permanent select the right frequency. Notice! In a case of stopping the subscription, select the value “Not active”. This will affect future search and filter actions. 6. Creating issues - this button is active only at “Edit” mode. Clicking on the button create issues by the beginning/end subs. Date and the frequency - please make sure that the details are written correctly. At the end of the action the issues will appear at “Issues” page. Page 28 31 Medium: Periodicals > Issues page Notice! Creating the issues can be done only for one year of subscription. At the end of subscription year change the “Beginning subs. Date” to the new date. 7. Notes - details about the periodical. Notice! At “entry date” field note the entry date of the first issue. Issues page This page specify the issues of periodical yearly. 4 5 6 1 7 2 8 3 1. Volume - in this field the volume that noted at the publication page will be displayed. 2. Skipping buttons - enables to move between the issues. 3. Add as - creating a copy for issues that arrived to the library. 4. Expected/actual date - these fields helps following the issues arrival. 5. Estimated/arrived (quantity) - these fields helps following the issues arrival. 6. Notes - details and other details on each issue (special edition, add. Material etc’) 7. New/delete - for creating/deleting issues. 8. Keywords - clicking on this button will open a window for connecting keywords for specific issue (in addition to the keywords that describe the periodical at the Class. page). Page 29 32 Medium: Serials Copies page Libraries which are loaning issues can use the copies page like in “Medium: books”. If the issues aren't for loaning - create one copy for each issue and mark him as “Not for loan”. Analytical page Just like in entering books it is possible to note here the analytical titles (articles, subjects in the issues etc’). Remember to note the pages range of each analytical title. 5.1.4 Entry > Medium Type: Serials A serial is a collection of issues published during one year which was gathered for one volume. The serials fields are very similar to the periodicals fields. For more information about serials see “5.5 Uniting issues to a serial” p. 35. Changes by Pages Publication page Most of the fields will be filled automatically by uniting the issues to a serial. Make sure that the opening/closing date of the serial and first/last vol. are written correctly. Page 30 33 Medium: multimedia 5.1.4 Entry > Medium Type: Serials In this medium type it is possible to enter CD’s, video cassettes, DVD’s and additional magnetic mediums. Changes by Pages Description page “CD’s number” - in this field note the number of CD’s/Cassettes that the title includes. Contents page This medium type usually includes titles with many analytical titles - the analytical page is now Contents page”. Clicking on the “Fr” button to the right of each analytical title will open an “Author” field (in a case of a song - composers). Maintenance page ID no. - similar to the ISBN: a number that the production companies gives. Length rec. - total length. Rec. type - analogical/digital. Page 31 34 Medium: Folder-Articles 5.1.6 Entry > Medium Type: Folder This medium type is similar to “Medium: multimedia”. At the “Contents page” note the articles/ subjects details and the pages range they are located in. At the publication page exist a “Title updates” field in a case that new materials were added to the folder. 5.1.7 Entry > Medium Type: Articles In this medium it is possible to enter articles from different sources. Changes by Pages Description page Source - the source of the article (periodical, internet etc’) Series (File) - the physical location of the article (series of articles will be filed) Publication page Note the original range of pages as it was located at its source. Page 32 35 Medium: Maps-pictures/slides-archives 5.1.8 Entry > Medium Type: Maps Changes by Pages Maintenance page Size - map’s dimensions in cm. Projection - the type of map’s projection (side projection, front projection etc’) Scale - the scale of the map (1:50,000 , 1:100,000 etc’). Notice! In case of one map that contains couple of maps - note each map as an analytical title. 5.1.9 Entry > Medium Type: Pictures/Slides Changes by Pages Description page Provenance - the permanent location of the work. Site - current location of the work. Creation place - place where the work was created. Pub. Year - year of creating the work (in case that the process lasted several years - note it). 5.1.10 Entry > Medium Type: Archives This medium type enables entry of information located in basic archives (for full archives management there is separated program of AGRON - ask us about it!). Changes by Pages Description page Card/shelf - place where the material is located. Notes - please specify the material content for future search actions. Page 33 36 Entry > Unify volumes Follow the next phases: 1. Select the requested periodical which its volumes you wish to unify. On the screen all its volumes will be displayed (you may change the arrival date). 2. Select an existing serial you wish to join the volumes to (“choose a serial” + “add to an existing serial”) or create a new serial (“add to a new serial”). 3. Click on “Next”. 4. Update at the next window the volume name, days of loan, type of loan etc’. 5. Select keywords (the buttons “keywords for volumes”, “keywords for periodical” enable automatic removing of the keywords). 6. Approve and finish. Notice! At every step you may click on “back” and move to the last page/phase. Page 36 37 Search > short search 6. Search Module The search module includes 4 search engines: Short search - comfortable search which provides • quickly results list. The search is based on the main fields of the title. Fast search - The search is based on the main fields • of the title. It is possible to access the values list of the title. It is also possible to search by copy#. • Advanced search - search in all of the entry fields within Boolean logic (or, and, and not). • String - an advanced search engine which enable a Boolean logic between several values in unlimited number of fields. Notice! It is possible to go from the line which the title is displayed in to the title in the entry screen. Notice! Search results can be displayed in a report. In addition the report can be delivered by email. 6.1 Search > Short Search 1 2 4 3 5 1. Search by - select the suitable field for search (one field only). 2. Enter value - enter the value for search in the middle text box. Right to the text box there is a combo box for choosing the location of the value. Notice! The author name is displayed “last name, first name”. Thus, for titles of “charles dickens” we shall write “Dickens, ” and set the combo box on “Begins with”. Page 37 38 Search > short search List - left to the text box exist a button. Clicking on it will pop-up the values list of the selected field aforementioned. Includes prefix - mark this option in case the field for search is “Title” - this will includes titles’ prefixes at the search. 3. Search as subtitle - in case of searching subtitles. Phonetic search - this search engine can overcome cases of type mistakes or incorrect entry. 4. Boolean logic - it is possible to engage another rule for the search (example: “Author” = “dickens,” when the “Edition” = “London”. 5. Entry date - it is possible to add as a rule a range of entry dates. Search results screen 1 2 3 4 5 1. search criterions - displayed at the top of the page. Notice that the star at the end of the word indicate that the search was made on titles which their author field start with “Dickens,” (include “Dickens” - *Dickens*, exactly - Dickens). 2. Authors reference - the search is also made on “author reference” field. At the results screen the results that found by authors reference will be displayed after the results of “authors” field. Page 38 39 Search > short search-fast search 3. Title details - title’s details will be displayed between the 2 blue lines. go entry screen by locating the cursor on the requested title and clicking on “Full display” button. 4. Report - clicking on this button will provide a report with the results. Notice! The titles are arranged by author’s name (alphabetically) then by title name. 6.2 Search > Fast Search The fast search is similar to the short search - the search is by one field only (from the main fields of the title) but here it is possible to select a value straight from the existing values lists to every field. After selecting a value all the titles which includes the value in the selected field will appear. Notice! It is also possible to search a title by the copy no. Search Results Screen (see picture at the next page) 1. Display field - within the combo box it is possible to select one of the title’s fields and its content will be displayed at the text box. 2. Title’s details - it is possible to move through the different files in order to get more information about the title (mainly copies status). 3. Titles found - will be displayed at the list with additional details. Notice! Double-click on the title will display it in the entry screen. Page 39 40 Search > fast search 2 1 3 4 5 6 4. A-Z - arrange the titles alphabetically . 5. short/standard report - it is possible to provide 2 kinds of reports: short report (includes author name, title name, class no., shelf mark) or standard report which includes additional details. 6. print - it is possible to print the short report. If you wish to print only the results of some titles use the bottom “filter before”. Page 40 41 Search > advanced search 6.3 Search > Advanced Search 2 1 3 4 5 1. searchable mediums/search in all mediums - it is possible to select the medium for search. 2. Analytic title - it is possible to make the search only on analytic titles. 3. The criterion - at the advanced search it is possible to make a search that includes several rules connected to each other in a Boolean logic (“and/and not” in this case). Notice! Clicking on the blue sign (left to the text fields) will pop-up a values list of the field that selected aforementioned. 4. erase criterion/clear all - in case of new query you can erase one criterion or all of them. Notice! You can only combine up to 5 criterions in one query. 5. search from previous results - this button enable a continuous search: if you like to cut down the results that found. Search Results Screen Advanced search results screen is similar to the fast results screen (see there). Page 41 42 Search > strings-search by copy no. 6.4 Search > Strings This search enable values search with an unlimited number of fields, this search is less accurate than the advanced search but it is enable larger amount of results. 6.5 Search > Search by Copy no. If the copy no. is known it is possible to perform a direct search. It is possible to get the result list (“search”), see all copies of the title which the copy is linked to (“other copies”) or display the linked title in an entry screen. Page 42 43 Loans and returns 7. Loans and Returns Module This module includes all actions of loans and returns for singulars and groups. 7.1 Loans and Returns Clicking on the button “subscribers loans” will open the a window. you have 3 options: “loan”, “return” or “loan for a class”. Click on “Loans”. Copy Loan For loaning a copy of a title you should first select the reader to whom the copy will be loaned. You may select the reader by his ID number, his reader serial number or by his name (a combo box is available). An additional button is “Search reader” which enables reader search by phone no., e-mail or the father’s name. selecting a reader will open the next window: 1 2 3 4 5 6 7 Page 43 44 Loan copy 1. Readers/groups - clicking on “readers” will pop-up a window with details about the reader’s group (if he has a group). Clicking on reader will open the reader’s card (see details forward). 2. reservations for reader - if the reader wishes to loan some title and there are no available copies it is possible to enter the reader into a waiting list: clicking on “reservations for” will pop-up a window there you should click on “new order” and in the next window to choose the requested title (by name or copy number. Notice the yellow cross - clicking on it will open a titles names list) after clicking on “OK” you can see the reader position in the waiting list. Notice! If you selected a title with available copies a dialog box will pop-up with the message “the title is available. Would you like to reserve”? You can create a waiting list to the title (“Yes”) or just loan it (“No” and go into “loaning”). 3. Family/class - in this table it is possible to see the family and the class the reader is linked to (if he is linked). 4. Loan limitation - maximum amount and type of loaning for the reader will be indicated. 5. Notes - notes from reader card will be displayed here. 6. Copies - the copies that the reader holds will be displayed here. For loan a copy you have to enter is number at “Copy no.” field and press ENTER. The title will pop-up with additional details (days of loan etc’). For loaning click on “perform” for canceling use “Cancel” or mark the text box “return/delete”. Notice! The copies names will remain until the return. Page 44 45 Loan copy-return copy Additional buttons: Clicking on “C” will pop-up general details about the copy. Clicking on “A/O” will enable to write the copy number by AGRON (“A”) or by the old copy (“O”). Clicking on “T” will open a window which enable extending of days of loan (to one copy or all of them). Marking the “Return/delete” text box enable fast return of the copy or deleting the copy name (if the loan wasn't performed yet). Clicking on “V” will mark the loan as a a video tape loan (if the reader is permitted to loan such medium. 7. at the bottom of the screen there are several buttons: Loans - clicking on this button will display all previous loans for the reader (it is possible to print this report). Perform/cancel - for performing/canceling loan or return of a copy. Clean form - clicking on this button will delete the details on the screen and enable selecting new reader (notice! The button is not available during loan/return action). Distribution list - enable access to the distribution lists (see forward). Loan form - clicking on this button enable printing a report about the copies loaned for the reader. Return Copy Clicking on “Return” will open a little window at the right side of the screen: Entering the copy no. and clicking ENTER will display on the screen the reader which loan the copy. Next phase will be marking the text box “return/delete” at the suitable line. Notice! The program support bar-codes equipment - libraries which use bar-code stickers can make quick reception of the reader details and the copies for loan. You can purchase a barcode reader through AGRON. Page 45 46 Loan classes - distribution lists 7.2 Loans > Class’ Loans This screen enables to loan copies of the same title for a whole class. First, select the requested title and class. Clicking on ENTER will pop-up the list of the readers linked to the class and the number of available copies. Now, we can select a copy to each member of the class and click on the button “loan/return”. For returning the copies please mark the text box “return/delete” near to each relevant line and click on the “loan/return” button. Notice! It is possible to display the details in a report by clicking on “Show report”. 7.3 Loans > Distribution Lists In libraries which use to distribute periodicals to their employees by distribution lists it is possible to make a distribution list for loaning the periodical, print it and to attach it to the volume. 7.4 Loans > Reservations by Title This button enable to watch and update the reservations by the titles list. After selecting a title from the reservations list (by Copy no. or title’s name) the waiting list will be displayed. Notice! It is possible to add/delete readers from/to the list (by “Delete” and “add reader” button) and add/submit a waiting list (New title/cancel reservation). Page 46 47 Loans history by reader - loans history by item 7.5 Loans > Loans History by Reader Clicking on this button will display all the recent and current loans of the reader. loans will be displayed in a chronological order. In addition - private details of the reader and his reception date at the system will be displayed. 7.6 Loans > Loans History by Title If you wish to check on the popularity of a specific title you can execute a query for “loans by item”. Clicking on “loans history by item” will display next window: Notice! After selecting the title (by title name or copy no) all copies of this title that was lent will be displayed. Notice! You can filter the results by the loan date (“filter by date”). As well, it is possible to print the results (“report of current title”). Page 47 48 Readers module 8. Readers Module This module holds and manages the readers’ lists in the system. It enables importing and exporting readers, dividing them into groups and so. 8.1 Readers > Readers (reader card) Clicking on this button will pop-up the next window: The reader card includes many details about the reader (personal details, authorizations, linking to groups etc’) as in the entry page, details were divided into pages whereas each page includes different details group. Notice! The buttons line at the bottom of the screen is identical to the one at the entry screen (example: for updating the reader card you should first click on “Edit”). Page 48 49 Readers module - readers “Private Data” - private details of the reader. Comments field - this comments will be displayed on “Subscriber’s loan” screen (example: late details, subscriber validity etc’). Marked for barcode printing - the details of every new reader will be removed automatically to the temporary storage for printing a barcode. The mark on the text box will be disappear with emptying the temporary storage (see also “11.5 general > barcode printing > temp. storage” p. 60). Block card - if there is a need for blocking one’s card (exception late, no payment etc’) please click on “block card (after clicking on “Edit”). When the card is blocked it is impossible to loan books. Groups/families/classes - shortening buttons to groups/families/classes screens (see forward). Orders - shortening button to “orders by titles” screen. (see 7.4 “reservations by title” p. 46). “Limitations” - authorizations and linking to groups. Class - in case of school library. This field will be filled. Notice! The classes’ list is imported right from the MANBAS. Department - link the reader to his/her suitable department (soldiers, adults, kids). “Budget” - money movements by the reader and a profile of the reader’s priorities. New payment - clicking on this window will pop-up a window where details should be filled (budget clause, invoice no., details of the paying reader etc’). Notice! It is also possible to collect without actual payment (“not paid yet”) - the debt details will stay at the system (“not paying readers report”). Update - it is possible to update payment details by clicking on the line with the details of payment. Notice! It is possible to watch the details within a report and/or printing them by clicking on the suitable buttons at the payment line. In addition, it is possible to print an invoice which includes all the reader payments (“readers monetary”). Keyword list - add keywords which the reader is interested in, so you will be able to send him/her new titles which might interest them. “Reservations” - details for the reserve. Per title were made by the reader and his “late letters”. Late letters report - clicking on this button will open a report with all the late letters sent from library. Page 49 50 Readers module 8.2 Readers > Groups An additional linking possibility of a reader (example: the reader belongs to the 5th grade and to mathematics group). 8.3 Readers > Families/Classes The primary link of every reader will be a family/class. Clicking on “families” buttom will open the next window: New family - clicking on this button will open a window where you should fill in the family/class details (the reader that is head of the family, id, address etc’). New member - adding new members to the family/class. Put the cursor on the requested family and click “new member” button. In the window select the requested reader. go to - with this button it is possible to go to another family/class on the list. Display loans - clicking on this button will open a window with the copies loaned by the family members. 8.4 Readers > Ages Clicking on this button will open a window with ages range for each age group. Page 50 51 Readers module 8.5 Readers > Deleting Readers by Classes Total delete of a group with all her linked readers (example: graduating class). 8.6 Readers > Import Readers from MANBAS This button enables automatic import of the students list in school (by an export file of the MANBAS program). Import phases step by step: In Agron 1. main menu > update > update tables > classes. 2. New > (entering target class for the list) - “adults 2006” etc’. 3. Clear duplicates > removing all existing classes, including professors to “adults 2006”. In Manbas 1. maintenance > service programs > preparation and batch timing > yellow cross + > entering batch no.: 1711. 2. Parameters > all to drive A > V (green) > “run now” In Agron 1. import from Manbas > students import > select drive A > select file (with or without .DAT suffix) > open. Notice! At the end of the import Agron is updated at the students and professors list. As well, all loans and loans history is saved. 8.7 Readers > Clear Duplicates Readers Sometimes, for importing lists from Manbas there are 2 records for the same reader. Clicking “clear duplicates” --> “names duplicate report” - in the report locate identical id’s or very similar one’s. Deleting record: after checking the reader card for assuring it is the same reader select which of the records will remain and which will be deleted. Notice! Between the records delete the one with less details, don’t forget to move details that doesn’t exist at the target record. Page 51 52 Update module 9. Update Module This module enables update of the different values lists in the program (values lists in the combo boxes). 9.1 Update > Update Tables Clicking on this button will open the next window: Selecting one of the tables (values list) will open the list of the values which you will be able to make changes in (add/submit values, correct mistakes and clear duplicates). Notice! Selecting one of the tables will made by double-click on the table name. Notice! You may print a report including all/part of the values of the table and the number of appearances of each one at the system. By clicking on “Report” you will be asked to determine if the report will be filtered alphabetically and if so - you may display values only between specific letters (“c” to “v” e.g). Adding value clear duplicates Notice! At the end of the action click on “Exit”. Deleting a value will be made by deleting it and exit. Page 52 53 Update module 9.2 Update > Thesaurus As mentioned before the thesaurus is a wide lexicon aim to improve and expend the keywords system (see p. 20). Updating the thesaurus is made by the update module. Clicking on “thesaurus” will open the thesaurus system - you may create new value, delete or edit an existing one and also watch existing values linked to each keyword. Notice! Updating the thesaurus system is deriving from the existing keywords - adding keywords to an existing record is possible only by the existing keywords list (combo box). If you wish to add new keyword - create him first through “updating tables > keywords > new”. Example: if I wish to add to the main value “Football” the narrow term “Ronaldinho” I have to make sure that “ronaldinho” is an existing keyword. Remember! It is possible to purchase the Agron system of Mahad which holds above 15,000 values. Page 53 54 Budget module 10. Budget Module The budget system helps in monitoring monetary movements of the library - follow up on incomes and expenses, titles & periodicals orders etc’. It is possible to execute a budget balance anytime. As in the entry module - details of the budget module were divided into pages whereas every page contain different details. Notice! First - select the requested budget year. Thus, all data will relate to this budget year. 10.1 Budget > Expenses Expenses , תאריך רישום ההזמנה, שם הספק, מס‘ ההזמנה: לגבי כל הזמנה יפורטו,חלון זה מציג את רשימת ההזמנות שנעשו .(פתוח/ הסעיף התקציבי וסטטוס העסקה )סגור, סכום הרכישה,(תאריך סגירת ההזמנה )אספקת הפריט This window display the orders which have been made, for each order the next details will appear: order no. supplier name, registration date, closing date (item supplement), expense sum, budget clause, status (open/close). Notice! It is possible to enter new order, delete, edit or print an existing one. Page 54 55 Budget module Archive - display the close orders (which have been supplied). Filter - enables display specific titles - clicking on the button will pop-up next window: By marking one of the text boxes - only orders which fit for the criterions marked will appear. New - entering new order. Clicking on the button will open a new order. The order no. will appear automatically. You should add the appropriate charge clause and the opening date. The order will be marked as “open” automatically up to her closing (item supplement). In addition, select the supplier name. Clicking on “New” at the new order window will enable entering the title name which is requested. Don’t forget to write the title name, publisher name, the sum, amount of copies ordered and amount that have been supplied. In addition - note the discount (if such was given and if it included V.A.T). Notice! Select the title which you wish to order out of the existing titles list. Meaning - before each order it is necessary to make shorten entry to the titles we would like to order. Remember to mark their status as “ordered” (see also p.36). Other Expenses This window display other expenses of the library which are not for titles or periodicals purchase. it is possible to enter new expense (“New”), edit, delete or print an existing one. As well, it is possible to classify the expenses or search for specific expense by one of the criterions which should be filled about every expense (receiver, invoice no., clause charge, total sum, date). Page 55 56 Budget module 10.2 Budget > Incomes External Funds This table is very similar to “expenses > other expenses” table, and it holds details on incomes from external funds. It is possible here, as well, to enter new expense (“New”), edit, print an existing one but not to delete one. Also, it is possible to classify the incomes or search for a specific one by one of the criterions (invoice no., date, budget clause-authorization, total sum, notes). Redars holds details on incomes from readers. Notice! Note the reader name and the payment type. 10.3 Budget > General Balance In this window there are details about the budget clauses, total incomes, total expenses, balance for each clause and at general. Suppliers This window contains the full suppliers list with their full details. These details will be automatically display while entering their name at the fields. Currency Rates You can update the currency rates and V.A.T for them to be a permanent parameters while calculating bills. Notice! Each change that will be made at the window will be saved by closing the window. As well, you may use the scrolling bar in order to move through the different currencies and add new values. Page 56 57 General 11. General This module enables actions such as authorizations update, create barcodes, telephone book management etc’. 11.1 General > Authorizations this window display the authorizations of each user - marking V in a text box means that the user can make this action. In addition it is possible to change the log-in password and add/submit user. Notice! The authorizations will set in the program setup by the technical team of Agron. After that, changing authorizations is possible only by the “manager” user. Notice! The authorizations are vital for a normal activity of the program - allow each user only the necessary actions for prevent access to protected information or changing delicate data by mistake (the budget module). Page 57 58 General 11.2 General > Logbook It is possible to hold an inside logbook for inner messages between the librarians. 11.3 General > Phone Book Helps to keep important telephone numbers with details. 11.4 General > Calculator Notice! The calculator display all the calculation. Notice! The $ sign enable calculating shekels in dollars. Page 58 59 Create barcodes 11.5 General > Create Barcodes The barcodes are used for quick and unique identification of each copy to title. The barcodes include the main details of each title (title’s name, author name, copy name, shelf mark, class no.) and the barcode line. Clicking on “create barcodes” will open the next window: Print from Temporary Storage The temporary storage is an automatic storage which holds the details of each new copy/reader in the system for printing a barcode for it. At the end of the barcodes printing it is recommended to empty the storage.. Print from Readers Storage The reader barcode is used for making a reader card which helps in the identification and registration of the reader during a loan, return and so. Notice! It is possible to make reader cards through Agron (with/without picture). Page 59 60 Create barcodes Display Storage - before printing the storage will be displayed as a report for assuring there are no mistakes. Notice! If you chose to print the storage a window will appear and you will be able to narrow down the number of pages and copies for print. Clean Storage - after printing the barcodes it is recommended to clean the temporary storage which will be filled soon in new details. Print from Titles Storage The title barcode is used for quick and unique identification of each copy for a title while making actions such as loan, return etc’. Number of Stickers for a Title - the default is 3 stickers for a title: 2 of them will carry copy details and the barcode line (one sticker for the inner cover one for the back cover) and 1 will include only the class. No. and the shelf mark (for the back of the book). If you wish to print only 1 sticker for a title or 1 shelf mark barcode - select the requested option. Page 60 61 Create barcodes Select Color for Printing - the temporary storage holds all the details of the new titles. Sometimes there is a need to print just some of them: 1. Printing Barcodes in Color by Subjects - some of the libraries use barcodes in color for emphasizing the different literary subjects - each subject is identified by a specific color (fiction red etc’) - in this case each titles group should be printed separately Example while entering in the copies page - link all fiction titles to the red color. While printing the barcodes mark the text box “selecting color for printing” and click on “display file” button. “sticker color” window will open: Selecting “number of stickers by colors” and OK will open a dialog box with details on the number of stickers from each color and the number of pages that locate them (for you to know how many stickers pages of this color to put in the printer). Selecting Color select and OK will open a report with the barcodes of the titles in temporary storage which was linked to the red color while entering. Now you can put a red stickers page in the printer and send the report for print. Notice! The color name is used only for identification by the program - he will not appear on the stickers. Notice! For updating the color list go to “update>update tables>colors (see “9.1 update tables” p.52). Page 61 62 Create barcodes 2. Printing Barcodes by Cataloger - if there are several catalogers it is possible to divide the temporary storage so each cataloger will be able to print only the barcode of the titles which he was entering. Example: While entering - link the copies at the copies page to the appropriate cataloger. (Notice! Adding your name to the color list will be made through “update>update tables>colors) While printing the barcodes mark the text box “color select” and click on “display file”. “stickers color” window will open: Selecting “number of stickers by colors” and OK will open a dialog box with details on the number of stickers from each color and the number of pages that locate them (for you to know how many stickers pages of this color to put in the printer). Selecting Color (name) select and OK will open a report with the barcodes of the titles in temporary storage which was linked to the specific cataloger (“sara”, in the example above) while entering. Now you can put a red stickers page in the printer and send the report for print. Page 62 63 Create barcodes Add a Copy to a Temporary List Enables to add/submit a single sticker from the temporary storage. In addition, it is possible to submit a group of titles of specific color (name) from the temporary storage. Add/submit sticker to/from the temporary list: 1. click the copy no. (Agron no. or the old no.) and press ENTER - the title name will appear. 2. Click on “Add manually”/”delete”. Delete group of titles linked to specific color/name: 1. click on “delete colors”. 2. At the window opened select the color for delete and click on OK. Notice! In temporary storage field at the copies page of the entry module there is a text box indicating whether the title is in the temporary storage. Add a Title to a Temporary List It is possible to print barcodes not through the temporary storage but by specific category. You have to choose the requested text box: printing stickers for titles/printing stickers for readers/printing stickers for a class. Page 63 64 General 11.6 General > Maintenance Enables updating of automatic settings in the program. Loans This page enables updating settings related to the loans module: Selecting copies by their old/new numbers or both: Selecting the reader details will be displayed: Page 64 65 General Automatic reservation canceling, default days of loan, information display in case of late etc’. Readers This page enables updating settings related to the readers module: Setting reader’s id, subscription types and group age ranges. Yearly Subscription Setting the yearly subscription price. Details Enter here the library name and address. Notice! The library name will appear on the barcodes (if you will choose “Barcode with library logo” p. 59). In addition, clicking on “library details” button will open a window where you can enter additional details. Default In this page you may select the medium type that will appear while opening the entry module, select auto. Display of copy no. and if the subscribers system for periodicals will be on. In addition it is possible to choose auto. Settings for reports and more. Page 65 66 Reports module 12. Reports Module The program enables you to produce over then 40 main reports which can be displayed in various forms. The reports module gives an access to a vital and useful information which can help you - in library management issues. Notice! Each report can be printed (short or long form), converted into WORD, or to be sent by Email. It is always possible to open the report module and choose one these options. It is also possible to close a report by pressing on <ESC>. 12.1 Reports > Reports First select the requested report. Clicking on “Reports” will open next window: Select the requested report issue - “loans”, “titles”, readers”, “general” (double click or click + “report preparation”). Notice! It is always possible to click on and return to last screen. Page 66 67 Reports module 12.2 Reports > Loans Reports Content 1. Report of Title’s Reservations - detailed list of titles that was reserved by readers. 2. Loans Report by Titles/Classes/Authors/Readers - details about existing loans (it is possible to sort the report by different criterions). Notice! In “loans report by titles” it is possible to see an annual loans report. Notice! In “loans report by readers” it is possible to see an “active/nonactive” report. 3. Loans Report Sorted by Loans Count - enables to see which is the most popular title, which readers do not loan much, which are the popular authors etc’. 4. Loans Report by Days of Loan - which titles are at readers more then X days. Includes information about late. 5. Titles Which have Never Been Loaned - it is possible to sort the report by the medium type, author name title name or type. 6. Late Letters - by setting a range for days of loan it is possible to make a report including the readers names which have these titles and print a late letter for them. Notice! It is possible to sort the results by medium type, target audience and date of loan. Building a Report Most of the reports building is similar. Here are several examples. Page 67 68 Reports module Report of Titles Reservations This report details about titles reservations by readers - it is possible to produce a report by titles or by readers. Filter by Titles: 1. all items - for a report with all items (all items reserved). 2. Specific item - select the requested items out of the left box (a combo box can assist you finding a specific title), add it to the right box. It is possible to fix your selection by “Remove”. 3. Display copy no. - copy no., loan status and target audience of title will appear. 4. Reserved available titles report - marking this text box will make a separate report which includes all titles which have been reserved and are available for loan. 5. Filter by loan date - it is possible to set the dates which the loans was made in. Notice! - the report will include details such as: author, title’s name, class. No., date of reserve. And details of the reader. Filter by Readers: as mentioned. Select the requested readers. Page 68 69 Reports module Reserved titles by readers report Loans by Titles 1. Medium Type - it is possible to narrow the results down by medium type. 2. Filter by Titles - by marking the text box we can select specific items (add/remove). Notice! If the text box won’t be marked the report will include all loaned items. Notice! If a medium type was selected the list of titles that will be displayed will include only titles linked to this medium (for additional titles you may change your selection or select “all mediums”). 3. Filter by Criterions - additional criterions for filter: type, subtype, target audience. Page 69 70 Reports module 4. Dates of loan - it is possible to set range of dates which the loan made in. 5. Loans and returns - marking this text box will display also loans which have been returned. 6. Sort by - it is possible to sort the report by author name, title’s name or date of loan. 7. Annual loans statistics - marking this text box will display an annual statistics about the loans: how many loans in the year of X by specific criterion. Example: annual statistics for the year of 2004 - loans by target audience. 12.3 Reports > Titles Notice! Because this kind of reports contains a lot of details there are 2 form options for each report - the shorten report or the detailed one. Reports Content 1. Alphabetical List of Titles - list of the titles existing in the list + their basic details (author, publisher, shelf mark etc’). It is also possible to select specific titles (Add/Remove). It is also possible to narrow down results by Pub. Year, entry date etc’. Notice! It is possible to sort the report form by title’s or author name - mark the requested text box. 2. Titles Report by Authors/Type/Language/Keywords etc’ - here we will select authors/ keywords/languages out of a list and get all titles linked to them. 12.4 Reports > General Reports Content 1. Library status report - no. of titles, readers and loans. It is possible to narrow down by dates range. 2. Daily activity report - quantity of daily actions (loans, returns etc’) for specific date. 3. New titles from MAHAD - new titles was imported from MAHAD storage. 4. Inventory counting report - no. of titles in the library (by different criterions). Page 70 71 Reports module + additional buttons 12.5 reports >readers Reports content 1. Incomes from readers - quantity and type. Notice! Includes “obliged readers” report with details about the readers which own a debt the library. 2. Blocked readers - details about readers which their card was blocked. It is possible to filter the report by several criterions. 3. Readers by subscription closing date - display readers which their subscription ends in specific month (to your selection). 4. Readers list - list of all readers in groups or singular. Sorted by last name or reader’s cars no. 13. additional buttons at the main menu print Will send a report for a print. If the report includes several pages a dialog box will be opened where you may set the number of copies and pages for print. file Restart - restart the program without exit. Enter username and password. Exit - exit form the program. Help Clicking on this button will open Agron user manual. Page 71 72 Epilogue 14. Epilogue We hope this manual will be useful and comfortable. We will thank you for written notes and suggestions for improving this manual which is used as an aid for quick and fertile use at Agron program. 15. Copyrights This program is protected by copyright. Unauthorized reproduction or distribution of this program or any portion of it may result in severe civil and criminal penalties. Page 72