1
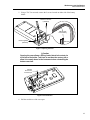
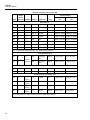
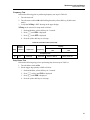
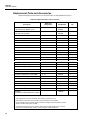
®
183/185
True RMS Multimeter
Calibration Manual
PN 1610436
May 2001 Rev.1, 6/02
© 2001-2002 Fluke Corporation, All rights reserved. Printed in USA
All product names are trademarks of their respective companies.
LIFETIME LIMITED WARRANTY
Each Fluke 20, 70, 80, 170 and 180 Series DMM will be free from defects in material and workmanship for
its lifetime. As used herein, “lifetime” is defined as seven years after Fluke discontinues manufacturing the
product, but the warranty period shall be at least ten years from the date of purchase. This warranty does
not cover fuses, disposable batteries, damage from neglect, misuse, contamination, alteration, accident or
abnormal conditions of operation or handling, including failures caused by use outside of the product’s
specifications, or normal wear and tear of mechanical components. This warranty covers the original
purchaser only and is not transferable.
For ten years from the date of purchase, this warranty also covers the LCD. Thereafter, for the lifetime of
the DMM, Fluke will replace the LCD for a fee based on then current component acquisition costs.
To establish original ownership and prove date of purchase, please complete and return the registration card
accompanying the product, or register your product on http://www.fluke.com. Fluke will, at its option, repair
at no charge, replace or refund the purchase price of a defective product purchased through a Fluke
authorized sales outlet and at the applicable international price. Fluke reserves the right to charge for
importation costs of repair/replacement parts if the product purchased in one country is sent for repair
elsewhere.
If the product is defective, contact your nearest Fluke authorized service center to obtain return authorization
information, then send the product to that service center, with a description of the difficulty, postage and
insurance prepaid (FOB Destination). Fluke assumes no risk for damage in transit. Fluke will pay return
transportation for product repaired or replaced in-warranty. Before making any non-warranty repair, Fluke
will estimate cost and obtain authorization, then invoice you for repair and return transportation.
THIS WARRANTY IS YOUR ONLY REMEDY. NO OTHER WARRANTIES, SUCH AS FITNESS FOR A
PARTICULAR PURPOSE, ARE EXPRESSED OR IMPLIED. FLUKE SHALL NOT BE LIABLE FOR ANY
SPECIAL, INDIRECT, INCIDENTAL OR CONSEQUENTIAL DAMAGES OR LOSSES, INCLUDING LOSS
OF DATA, ARISING FROM ANY CAUSE OR THEORY. AUTHORIZED RESELLERS ARE NOT
AUTHORIZED TO EXTEND ANY DIFFERENT WARRANTY ON FLUKE’S BEHALF. Since some states do
not allow the exclusion or limitation of an implied warranty or of incidental or consequential damages, this
limitation of liability may not apply to you. If any provision of this warranty is held invalid or unenforceable by
a court or other decision-maker of competent jurisdiction, such holding will not affect the validity or
enforceability of any other provision.
Fluke Corporation
P.O. Box 9090
Everett, WA 98206-9090
U.S.A.
2/02
Fluke Europe B.V.
P.O. Box 1186
5602 BD Eindhoven
The Netherlands
Table of Contents
Title
Introduction .......................................................................................................
Contacting Fluke ...............................................................................................
Precautions and Safety Information ..................................................................
Safety Precautions.........................................................................................
International Symbols ...................................................................................
Specifications ....................................................................................................
Basic Maintenance.............................................................................................
Opening the Meter Case................................................................................
Removing and Reinserting the Circuit Board Assembly ..............................
Replacing the LCD........................................................................................
Reassembling the Meter Case .......................................................................
Testing the Fuse ............................................................................................
Replacing the Fuse ........................................................................................
Battery Replacement .........................................................................................
Cleaning.............................................................................................................
Performance Tests .............................................................................................
Required Equipment......................................................................................
Testing the Display .......................................................................................
Backlight Test ...............................................................................................
Keypad Test ..................................................................................................
Testing Meter Accuracy................................................................................
Frequency Test ..............................................................................................
Duty Factor Test............................................................................................
Current Test...................................................................................................
Continuity Test..............................................................................................
IR Port Verification Test ...............................................................................
Calibration Adjustment .....................................................................................
Replacement Parts and Accessories ..................................................................
i
Page
1
1
2
2
3
3
12
12
14
14
16
17
17
17
18
19
19
20
20
20
20
23
23
25
26
26
27
28
183/185
Calibration Manual
ii
List of Tables
Table
1.
2.
3.
4.
5.
6.
7.
8.
9.
10.
11.
12.
13.
14.
15.
16.
17.
18.
19.
20.
21.
22.
23.
24.
25.
Title
International Symbols ............................................................................................
DC Voltage Characteristics....................................................................................
DC Voltage Range, Resolution, and Accuracy......................................................
AC Voltage Characteristics....................................................................................
AC Voltage Range, Resolution, and Accuracy......................................................
DC Current Characteristics ....................................................................................
DC Current Range, Resolution, and Accuracy ......................................................
AC Current Characteristics ....................................................................................
AC Current Range, Resolution, and Accuracy ......................................................
Resistance (Ω) Characteristics...............................................................................
Resistance Range, Resolution, and Accuracy........................................................
Continuity Characteristics......................................................................................
Diode Test Characteristics .....................................................................................
Capacitance Range, Resolution, and Accuracy (5,000 counts only) .....................
Frequency Characteristics, Resolution, and Accuracy...........................................
Frequency Voltage Range......................................................................................
Duty Factor Characteristics....................................................................................
Temperature Characteristics ..................................................................................
FAST MIN MAX (1 ms) Characteristics...............................................................
Physical Characteristics .........................................................................................
Environmental Characteristics ...............................................................................
Certifications and Compliances .............................................................................
Required Performance Test Equipment .................................................................
Verification Table ..................................................................................................
Required Equipment for Calibration Adjustment ..................................................
iii
Page
3
4
4
4
5
5
6
6
6
7
7
7
8
8
9
9
9
9
10
10
10
11
19
21
27
183/185
Calibration Manual
iv
List of Figures
Figure
1.
2.
3.
4.
5.
6.
Title
Opening the Case ...................................................................................................
Connector Pin ........................................................................................................
Removing LCD Mask to Access LCD...................................................................
Reassembling the LCD ..........................................................................................
Replacing the Batteries ..........................................................................................
Display Test ...........................................................................................................
v
Page
13
13
15
16
18
20
183/185
Calibration Manual
vi
183 & 185
Maintenance and Calibration
Introduction
W Warning
To avoid shock or injury, do not perform the verification tests
or calibration adjustment procedures described in this manual
unless you are qualified to do so.
The information provided in this document is for the use of
qualified personnel only.
WCaution
The 183/185 Multimeters contain parts that can be damaged by
static discharge.
Follow the standard practices for handling static sensitive
devices.
The information in this manual deals with the Fluke Models 183 & 185 True RMS
Multimeters, (hereafter referred to as “the meter”). Information provided includes:
•
•
•
•
•
•
Precautions and safety information
Specifications
Basic maintenance (cleaning, replacing the battery and fuse)
Performance test procedures
Calibration adjustment
Accessories and replaceable parts
For complete operating instructions, refer to the Model 183 & 185 Users Manual.
Contacting Fluke
To order accessories, receive assistance, or locate the nearest Fluke distributor or Service
Center, call:
USA: 1-888-99-FLUKE (1-888-993-5853)
Canada: 1-800-36-FLUKE (1-800-363-5853)
Europe: +31 402-678-200
1
183/185
Calibration Manual
Japan: +81-3-3434-0181
Singapore: +65-738-5655
Anywhere in the world: +1-425-446-5500
Address correspondence to:
Fluke Corporation
P.O. Box 9090
Everett, WA 98206-9090
USA
Fluke Europe B.V.
P.O. Box 1186
5602 BD Eindhoven
The Netherlands
Visit us on the World Wide Web at: www.fluke.com
Precautions and Safety Information
WWarning
If the Meter is used in a manner not specified by the
manufacturer, the protection provided by the equipment may be
impaired.
Read the “Safety Information” page before servicing this product.
In this manual, a Warning identifies conditions and actions that pose hazard(s) to the
user; a Caution identifies conditions and actions that may damage the Meter or the test
instruments.
Safety Precautions
WWarning
•
•
•
•
•
•
•
•
•
•
•
2
Only qualified personnel should perform service procedures.
To avoid fire or personal injury:
Connect and disconnect properly. Do not connect or
disconnect probes or test leads while they are connected to a
voltage source.
Observe all ratings and markings on the meter. Consult the
meter user manual for further ratings information before
making connections to the meter.
Do not apply a potential to any terminal, including the common
terminal, that exceeds the maximum rating of that terminal.
If the meter is used in a manner not specified by the
manufacturer, the protection provided by the equipment may
be impaired.
Replace batteries only with the proper type and rating
specified.
Do not operate the meter with covers or panels removed.
Use only the fuse type and rating specified for this meter.
Avoid exposed circuitry. Do not touch exposed connections
and components when power is present.
If you suspect there is damage to the meter, have it inspected
by qualified service personnel.
Do not operate in wet/damp conditions. Do not operate in an
explosive atmosphere. Keep meter surfaces clean and dry.
This meter is sensitive to strong external magnetic fields.
Do not use the meter within 1-inch (2.54 cm) of strong external
magnetic fields such as that produced by the Fluke ToolPak
hanging magnet accessory. Incorrect readings may result. If
erratic behavior is noted, turn meter off to reset.
Maintenance and Calibration
Specifications
International Symbols
International symbols used on the Meter and in this manual are explained in Table 1.
Table 1. International Symbols
Y
W
T
M
Risk of electric shock
Risk of danger. Important Information. See manual
Equipment protected by double or reinforced Insulation
Battery
Conforms to CSA C22.2 No 1010. 2.032-96
P
J
D
;
Conforms to EU directives
Earth
AC or DC
Conforms to relevant Australian standards
N10140
Inspected and licensed by TÜV Product Services
VDE
Conforms to VDE EN61010
Specifications
All specifications are warranted, unless noted as typical, for the rated temperature range
of 23 °C ± 5 °C at less than 80% relative humidity.
Characteristics
Description
LCD display digits
3 4/5 (default) or 4 4/5
Display counts
5,000 (default) or 50,000
Bargraph
20 segment, updated 20 times per second
Memory locations
183: 10, 185: 30
Out of range indicator
OL: overrange
Ur: underrange
Low voltage indicator
Battery symbol shows on LCD at 2.0 V.
Meter powers down at 1.5 V.
Battery life
100 hours continuous use with
backlight off (typical)
Auto-off
Adjustable, 30 minute default
Power source
Two AA 1.5 V alkaline batteries
(NEDA 15 A)
Maximum input voltage between terminals and
between terminals and earth.
1000 V RMS Installation Category III (CAT III)
F1 fuse protection
11 A (1000 V) service-replaceable
Backlight
Green LEDs
1.
1
If the meter is exposed to water have it inspected by qualified service personnel.
3
183/185
Calibration Manual
Table 2. DC Voltage Characteristics
Characteristic
Description
Settling time
3 readings (typical)
Reading rate
5,000 ct.: 4 readings per second
50,000 ct.: 1 reading per second
Rejection ratio
Common mode
120 dB at DC or 50 Hz or 60 Hz
Normal mode
60 dB at 50 Hz or 60 Hz
Input impedance
10 MΩ (typical)
Table 3. DC Voltage Range, Resolution, and Accuracy
1
Resolution
Range
5,000 counts
50,000 counts
0.5 V
100 µV
10 µV
5V
1 mV
100 µV
50 V
10 mV
1 mV
500 V
100 mV
10 mV
1000 V
1V
100 mV
Temperature coefficient
1.
Accuracy
183
185
± (0.07% + 1 count)
± (0.05% + 1 count)
Add (0.005% + 0.1 ct.)/°C to accuracy beyond rated
temperature range.
Accuracy in 50,000-count mode is % + 10 counts.
Table 4. AC Voltage Characteristics
Characteristic
Description
Input impedance
10 MΩ in parallel with 100 pF (typical)
Settling time
4 readings (typical)
Reading rate
5,000 ct.: 4 readings per second
50,000 ct.: 1 reading per second
Common mode rejection ratio
60 dB at DC to 60 Hz
Crest factor, maximum
Full scale: 3
Half scale: 6
1
AC+DC total RMS volts accuracy
1
AC DC dual display accuracy
AC (RMS) accuracy + 0.1% + 1 count
DC Accuracy + 0.05% + 1 count
AC RMS Accuracy + 0.1% + 1 count
Upper display frequency (5,000 counts)
Accuracy
± (0.002% + 1 count) for 20 Hz to 20 kHz
Sensitivity
10% of selected voltage range
dB reference
2
1 VRMS (adjustable)
2
dBm reference
775 mV across 600 Ω (1 mW)
1. 5,000-count mode only.
2. See "dB and dBm Voltage Measurements" in the users manual for dB and dBm calculations.
4
Maintenance and Calibration
Specifications
Table 5. AC Voltage Range, Resolution, and Accuracy
Resolution
Range
5,000 Counts
Accuracy
50,000 Counts
0.5 V
100 µV
10 µV
5V
1 mV
100 µV
50 V
10 mV
1 mV
100 mV
10 mV
1V
100 mV
2
500 V
2
1000 V
Temperature coefficient
1
183
185
40 Hz – 20 kHz
± (0.6% + 2 counts)
40 Hz – 20 kHz:
± (0.4% + 2 counts)
40 Hz – 10 kHz: ±
(0.6% + 2 counts)
40 Hz – 10 kHz: ±
(0.4% + 2 counts)
AC: Add (0.03% + 0.1 ct.)/°C beyond rated temperature range
AC+DC: Add (0.06% + 0.1 ct.)/°C beyond rated temperature
range
1.
Accuracy in 50,000-count mode is % + 20 counts.
2.
For voltages > 100 V, the maximum volts–Hz product < 1 X 10 VHz.
7
Table 6. DC Current Characteristics
Characteristics
Description
Burden voltage
5 mA to 5 A: 0.3 V max.
10 A: 0.5 V max.
Percent 4-20 mA (calculated in 50 mA range)
4 mA = 0%
20 mA = 100%
Settling time
4 readings (typical)
Reading rate
5,000 ct.: 4 readings per second
50,000 ct.: 1 reading per second
5
183/185
Calibration Manual
Table 7. DC Current Range, Resolution, and Accuracy
Resolution
Range
5,000 Counts
Accuracy
50,000 Counts
183
185
500 µA
100 nA
10 nA
± (0.2% + 4 counts)
1
5 mA
1 µA
100 nA
± (0.2% + 2 counts)
2
50 mA
10 µA
1 µA
500 mA
100 µA
10 µA
5A
1 mA
100 µA
± (0.4% + 2 counts)
2
10 A for 3 minutes
10 mA
1 mA
± (0.8% + 2 counts)
2
(15 A for 30 sec.)
Temperature coefficient
1.
2.
Add (0.05% + 0.1 ct.)/°C beyond rated temperature range.
Accuracy in 50,000-count mode is % + 40 counts.
Accuracy in 50,000-count mode is % + 20 counts.
Table 8. AC Current Characteristics
Characteristics
Description
Burden voltage
0.5 mA to 5 A: 0.9 V max.
10 A: 1.0 V max.
1
AC+DC Accuracy
AC RMS amps accuracy + DC amps accuracy
Upper display frequency
Accuracy
± (0.002% + 1 count) for 20 Hz to 5 kHz
Sensitivity
10% of range
Settling time
4 readings (typical)
Reading rate
5,000 ct.: 4 readings per second
50,000 ct.: 1 reading per second
1.
5,000-count mode only
Table 9. AC Current Range, Resolution, and Accuracy
1,2
Resolution
Range
50,000 Counts
0.5 mA
100 nA
10 nA
5 mA
1 µA
100 nA
50 mA
10 µA
1 µA
500 mA
100 µA
10 µA
5A
1 mA
100 µA
10 A (15 A for 30 sec.)
10 mA
1 mA
Temperature coefficient
6
5,000 Counts
Accuracy
183
185
40 Hz – 1 kHz:
± (0.6% + 2 counts)
1 kHz – 5 kHz:
± (7.5% + 2 counts)
Add (0.05% + 0.1 ct.)/°C beyond rated temperature range.
1.
Accuracy in 50,000-count mode is % + 20 counts.
2.
> 5% of range.
Maintenance and Calibration
Specifications
Table 10. Resistance (Ω) Characteristics
Characteristics
Description
Update rate
5,000 ct.: 2 readings per second
50,000 ct.: 1 reading per second
50 MΩ: 1 reading per second
Settling time
50 Ω to 5 MΩ range: 3 readings (typical)
50 MΩ range: 4 readings (typical)
Compliance voltages (typical)
0.6 V (50 Ω and 500 Ω range is 1.3 V)
Common mode rejection ratio
60 dB at DC, 50 Hz, or 60 Hz
Normal mode rejection ratio
20 dB at ≥ 50 Hz
Table 11. Resistance Range, Resolution, and Accuracy
Resolution
Range
5,000 Counts
50 Ω
0.01 Ω
500 Ω
Accuracy
50,000 Counts
183
185
––
± (0.1% + 10 counts)
0.1 Ω
0.01 Ω
± (0.1% + 4 counts)
2
5 kΩ
1Ω
0.1 Ω
± (0.1% + 2 counts)
3
50 kΩ
10 Ω
1Ω
500 kΩ
100 Ω
10 Ω
5 MΩ
1 kΩ
100 Ω
± (0.4% + 4 counts)
2
50 MΩ
10 kΩ
––
± (1.0% + 4 counts)
2
1
Temperature coefficient
50 Ω to 500 kΩ: Add (0.03% + 0.1 ct.)/°C beyond rated
temperature range.
5 MΩ to 50 MΩ: Add (0.2% + 0.1 ct.)/°C beyond rated
temperature range.
1.
5,000 count mode only.
2.
Accuracy in 50,000-count mode is % + 40 counts.
3.
Accuracy in 50,000-count mode is % + 20 counts.
Table 12. Continuity Characteristics
Characteristics
Description
Continuity threshold
Beeper sounds when resistance is 100 Ω or less
(typical)
Response time
< 1 ms
7
183/185
Calibration Manual
Table 13. Diode Test Characteristics
Characteristics
Description
Test current (typical)
0.35 mA
Test voltage
3.3 V maximum, open circuit
Accuracy
± 1.0%
Table 14. Capacitance Range, Resolution, and Accuracy
(5,000 counts only)
Accuracy
1
Range
183
185
1 pF
± (1.0% + 5 counts) (using REL t mode)
50 nF
10 pF
± (1.0% + 3 counts) (using REL t mode)
500 nF
100 pF
± (1.0% + 3 counts)
5 µF
1 nF
50 µF
10 nF
500 µF
100 nF
5 mF
1 µF
50 mF
10 µF
Temperature coefficient
Add (0.05% + 0.1 ct.)/°C beyond rated temperature range.
5 nF
3
1. 5,000 count mode only.
2. >1% of range.
3. ± (1% + 10) below 0.500 nF.
8
Resolution
2
± (3.0% + 3 counts)
Maintenance and Calibration
Specifications
Table 15. Frequency Characteristics, Resolution, and Accuracy
Characteristics
Description
Signal coupling
AC
Minimum frequency
0.5 Hz
Maximum frequency
1 MHz
Accuracy
± (0.002%) + 1 count
Best resolution
10,000 count: 0.01 Hz
100,000 count: 0.001 Hz
Temperature coefficient
Add 0.00004%/°C beyond rated temperature range
Table 16. Frequency Voltage Range
Range
1
Sensitivity, 10 Hz - 100 kHz
Sensitivity, 1 MHz
500 mV
100 mV
––
5V
500 mV
2V
50 V
5V
20 V
500 V
50 V
––
1.
7
For voltages > 100 V, the maximum volts–Hz the meter is < 10 VHz.
Table 17. Duty Factor Characteristics
Characteristics
Description
Range
1 Hz to 100 kHz
Accuracy
± (0.1% + 0.05% per kHz) for 5 V input (logic signals
only)
Signal coupling
DC
Resolution
0.1%
Sensitivity
30% of range
Table 18. Temperature Characteristics
Characteristics
Description
Main display
Range
–50 °C to +980 °C
Accuracy
± 3 °C (typical)
Thermocouple type
K
1
Upper display
Accuracy
1.
± 3 °C of ambient temperature (typical)
Use the water and ice offset calibration adjustment method in the "Temperature Measurements (185
only)" section of the users manual for accuracy to ±1.0 °C.
9
183/185
Calibration Manual
Table 19. FAST MIN MAX (1 ms)Characteristics
Characteristics
1
Accuracy
Description
Specified voltage or current measurement
± 30 counts of the peak value of a single 1ms pulse
1. 5,000-count mode only.
Table 20. Physical Characteristics
Characteristic
Description
Dimensions (H × W × D)
38 mm × 88 mm × 183 mm (without holster)
Weight (with batteries)
383 g (13.5 oz)
With holster
539 g (1 lb 3 oz)
Table 21. Environmental Characteristics
Characteristic
Description
Temperature
Operating
–10 to +50 °C
Non-operating (storage)
–40 to +60 °C
–40 to +35 °C: < 80%
+35 to +40 °C: < 70%
+40 to +60 °C: < 55%
Humidity
Altitude
Operating
2,000m (6,562 ft)
For altitudes from 2,000 m up to
3,000 m (9,843 ft) derate voltage input to 600 VAC CAT III
Non-operating (storage)
12,300 m (40,354 ft)
Vibration
Operating
2.66 gRMS, 5 to 500 Hz, 3 axes
(10 minutes each)
Non-operating
3.48 gRMS, 5 to 500 Hz, 3 axes
(10 minutes each)
W Warning
This meter is sensitive to strong external magnetic fields.
Do not use the meter within 1-inch (2.54 cm) of strong external
magnetic fields such as that produced by the Fluke ToolPak
hanging magnet accessory. Incorrect readings may result. If
erratic behavior is noted, turn meter off to reset.
10
Maintenance and Calibration
Specifications
Table 22. Certifications and Compliances
Category
EC Declaration of Conformity – EMC
Standards or Description
Meets intent of Directive 89/336/EEC for
Electromagnetic Compatibility. Compliance was
demonstrated to the following specifications as listed in
the Official Journal of the European Communities:
EN 61326 Class A 1,2
Australia/New Zealand Declaration of Conformity
– EMC
Complies with EMC provision of Radio communications
Act per the following standard(s):
AS/NZS 2064.1/2 Class A Radiated Emissions
EC Declaration of Conformity – Low Voltage
Compliance was demonstrated to the following
specification as listed in the Official Journal of the
European Communities:
Low Voltage Directive 73/23/EEC as amended by
93/69/EEC.
EN 61010-1/A2:1995
Safety requirements for electrical equipment for
measuring control, and laboratory use
Nationally Recognized Testing Laboratory Listing
)CAN/CSA C22.2 No. 1010.1-92 & Amd 2;
1997, UL 3111-1
Safety requirements for electrical equipment for
measurement, control, and laboratory use
Additional Compliance
IEC61010-1/A2:1995
Safety requirements for electrical equipment for
measurement, control, and laboratory use.
Installation Category
DUAL RATINGS
Complies with IEC 1010-1 to 1000 V Overvoltage
Category III, Pollution Degree 2; and IEC 664-1 to
600 V Overvoltage Category IV, Pollution Degree 2
•
OVERVOLTAGE (Installation) Categories refer to
the level of impulse withstand voltage protection
provided at the specified pollution degree.
•
Overvoltage Category III equipment is designed to
protect against transients in equipment in fixedequipment installations, such as distribution panels,
feeders and short branch circuits, and lighting
systems in large buildings.
•
Overvoltage Category IV equipment is designed to
protect against transients from the primary supply
level, such as an electricity meter or an overhead or
underground utility service.
11
183/185
Calibration Manual
Table 22. Certifications and Compliances (continued)
Category
Standards or Description
Pollution Degree
A measure of the contaminates that could occur in the
environment around and within a meter. Typically the
internal environment inside a meter is considered to be
the same as the external. Meters should be used only in
the environment for which they are tested.
Pollution Degree 2
Normally only dry, nonconductive pollution occurs.
Occasionally a temporary
conductivity that is caused by condensation must be
expected. This location is a typical office/home
environment. Temporary condensation occurs only when
the meter is out of service.
Pollution Degree 3
Conductive pollution, or dry, nonconductive pollution that
becomes conductive due to condensation. These are
sheltered locations where neither temperature nor
humidity is controlled. The area is protected from direct
sunshine, rain, or direct wind.
1. Add 25 counts (250 counts in 50,000 count mode) to the accuracy specifications when in the presence of
an RF field as defined in IEC801–3.
2. Amps DC: Add 60 counts (600 counts in 50,000 count mode) to the amps accuracy specifications when in
the presence of an RF field as defined in IEC801–3.
Basic Maintenance
WWarning
To avoid electrical shock or personal injury, remove the test
leads and any input signals before opening the case or
replacing the battery or fuse. To prevent damage or injury,
install ONLY batteries or the fuse specified for this product.
Opening the Meter Case
WCaution
To avoid unintended circuit shorting, always place the
uncovered Meter assembly on a protective surface. When the
case of the Meter is open, circuit connections are exposed.
To open the Meter case (refer to Figure 1):
1. Disconnect test leads from any live source, turn the rotary switch to OFF, and
remove the test leads from the front terminals.
2. Take the Meter out of the holster.
3. Pull the battery cover off of the Meter.
WCaution
Before performing step 4, note which direction that the rubber
gasket is installed. It is important to reinstall it correctly.
4. Carefully insert a flat-head screwdriver under the rubber gasket and remove it.
12
Maintenance and Calibration
Basic Maintenance
5. Using a T10 Torx wrench, remove the 2 screws located on either side of the battery
holder.
Remove 2 screws
(1566978)
Narrow side
to the battery
Remove gasket
(1567042)
Side view
ahr21f.eps
Figure 1. Opening the Case
WCaution
Opening the case allows a spring loaded electrical contact pin
to fall out of its holder. Take care to not lose the contact pin or
allow it to remain loose in the instrument when reinstalling the
bottom case half.
Caution:
Do not lose
connector pin
ahr22f.eps
Figure 2. Connector Pin
6. Pull the two halves of the case apart.
13
183/185
Calibration Manual
Removing and Reinserting the Circuit Board Assembly
The circuit board assembly must be removed to access and replace the LCD.
WCaution
The circuit board is extremely susceptible to contamination.
Handle it by the input receptacle, fuse clips or edges of the
board only. You can use clean surgical gloves to help avoid
contamination.
1. Open the Meter case and remove the case bottom to access the circuit board.
2. Remove the two Torx-head screws securing the circuit board to the case top.
3. Lift the LCD-end of the circuit board out of the top case taking care to not damage
the battery wires that remain attached to the circuit board.
4. To reinsert the circuit board, simply place it into the case top with the LCD display
showing through the window.
5. Carefully replace the two Torx-head screws that connect the circuit board to the case
top.
WCaution
Do not over-torque the two Phillips-head screws when you
reconnect the circuit board to the case top. Doing so may
create shielding problems and cause the Meter to give incorrect
readings.
6. Reinstall the rubber gasket. It is important to reinstall it in the proper direction.
Replacing the LCD
If the LCD needs to be replaced, it is easier to leave the LCD assembly attached to the
circuit board and access the LCD by removing the LCD bezel from the front of the LCD
assembly.
1. Remove the circuit board as described under “Removing and Reinserting the Circuit
Board Assembly.”
2. Carefully insert the tip of a thin screwdriver under the LCD bezel at the top of the
display as shown in Figure 3. Take care not to crack or scrape the LCD with the
screwdriver.
14
Maintenance and Calibration
Basic Maintenance
Display bezel
Disengage tabs (4)
ako04f.eps
Figure 3. Removing LCD Mask to Access LCD
3. Lift up the LCD bezel gently with the screwdriver blade to loosen the bezel from the
assembly. Be careful to press upward, not inward toward the LCD. Tilt the LCD
bezel upward to release it.
4. Replace the LCD (refer to Figure 4). The LCD must be centered on the platform
between the brackets before you replace the LCD mask. If the LCD is improperly
aligned, the display may show missing segments or meaningless readings.
5. Reattach the LCD bezel by pressing it over the LCD until it snaps into place. Attach
the bottom end of the bezel first. Push the bottom end of the bezel up until the bottom
end snaps into place and then push down the top end. It may be necessary to slightly
slide the LCD towards the bottom end of the bezel.
6. Wipe any fingerprints from the LCD using a soft cloth.
7. Follow steps for reinstalling the circuit board in “Removing and Reinserting the
Circuit Board Assembly.”
15
183/185
Calibration Manual
LCD display
LCD contact
strips
Housing cutout
ako05f.eps
Figure 4. Reassembling the LCD
Reassembling the Meter Case
To reassemble the Meter case:
1. Verify that the rotary switch is in the OFF position.
2. Reinsert the circuit board by placing it into the case top with the LCD showing
through the window. Carefully replace the two Torx-head screws that connect the
circuit board to the case top.
WCaution
Do not over-torque the two Torx-head screws when
reconnecting the circuit board to the case top. Doing so may
create shielding problems and cause the Meter to give incorrect
readings.
3. Hold the Meter face down and place the case bottom on the case top.
4. Reinstall the two screws and the battery cover.
5. Reinstall the rubber gasket. It is important to reinstall it in the proper direction. Refer
to Figure 1.
6. Go to the “Performance Test” section in this document, and perform the procedures
described.
16
Maintenance and Calibration
Battery Replacement
Testing the Fuse
WWarning
To avoid electrical shock or personal injury, remove the test
leads and any input signals before replacing the battery or fuse.
To prevent damage or injury, install ONLY the specified
replacement fuse with the amperage, voltage, and speed ratings
shown in the specifications.
To test the fuse:
1. Set the rotary switch to R e G and press 2 for continuity.
2. Plug a test lead into the V terminal and touch the probe to the A terminal.
The meter indicates "shrt" and the continuity beeper will sound.
3. If the display reads OL, replace the fuse and test again.
4. If the display shows any other value have the Meter serviced. See “Service and Service
Information” earlier in this manual.
Replacing the Fuse
WWarning
To avoid electrical shock, remove the test leads and any input signals
before replacing the battery or the fuse. To prevent damage or injury,
install ONLY the specified fuse and batteries.
To replace the fuse:
1. Turn the rotary switch to OFF and remove the test leads from the terminals
2. Open the case (refer to "Opening the Meter Case").
3. Remove the fuse by gently prying one end loose, then lifting the fuse out of the fuse
contacts.
4. Install ONLY the specified fuse. Refer to the Replacement Parts and Accessories
Table.
5. Reassemble the case. Refer to "Reassembling the Meter Case".
Battery Replacement
When replacing a battery, the Meter calibration is not affected and stored data is not lost.
Refer to Figure 5 to replace the battery.
Remove the battery cover only in a clean, dry environment.
See Table 26 for the descriptions and part numbers of the replaceable batteries.
17
183/185
Calibration Manual
E
RM
S
MU
LT
ER
ET
IM
3
F
4
5
18
U
TR
F
LD
F
2
HO
L
RE
A
RY
MO
F
1
ME
Hz
1
V
E
NG
RA
V
M
CO
F
X
MIN
OF
MA
X
NM
M
ST
A
FA
Hz
T V
CA 00
10
AX
A M ED
10 FUS
2
ahr20f.eps
A
Batteries (2 AA alkaline or rechargeable)
B
Battery Cover
Figure 5. Replacing the Batteries
Cleaning
WWarning
To avoid electrical shock or damage to the Meter, never allow
water inside the case. To avoid damaging the housing, never
apply solvents to the Meter.
Periodically wipe the case with a damp cloth and mild detergent. Do not use abrasives or
solvents.
Clean the terminals as follows:
1. Turn the Meter off and remove all test leads.
2. Shake out any dirt that may be in terminals.
3. Soak a new swab with alcohol. Clean each terminal with the swab.
18
Maintenance and Calibration
Performance Tests
Performance Tests
The following performance tests will ensure that the Meter is in proper operating
condition and will check the accuracy of each function against its specifications.
If the Meter fails any of these tests, it needs calibration adjustment or repair.
Required Equipment
Required equipment is listed in Table 23. If the recommended models are not available,
equipment with equivalent specifications may be used.
Repairs or servicing should be performed only by qualified personnel.
Table 23. Required Performance Test Equipment
Equipment
Calibrator
Required Characteristics
AC Voltage Range: 0-1000 Vac
Recommended Model
Fluke 5520A
Accuracy: + 0.1 %
Frequency Range: 40 Hz - 20 kHz
Accuracy: +3 %
DC Voltage Range: 0 -1000 Vdc
Accuracy: + 0.0125 %
Current Range: 0 -10 A
Accuracy:
AC mA - 40 Hz -1 kHz, +0.15 %
AC A - 1 kHz - 5 kHz, + 1.875 %
Frequency range: 1 kHz - 20 kHz
DC mA - + 0.05 %
DC A - + 0.1 %
Frequency Source: 1 MHz
Accuracy: + 0.0005 %
Amplitude: 2.8 V pp
Accuracy: + 5 %
Ohms Range: 0 Ω - 50 MΩ
Accuracy: 50 Ω - 500 kΩ, + 0.035 %
5 MΩ, + 0.12 %
50 MΩ, + 0.27 %
Capacitance Range: 5 nF - 5 µF =+ 0.275 %
Accuracy: 50 µF - 50 mF =+ 0.765 %
19
183/185
Calibration Manual
Testing the Display
Push down 2 while turning the Meter on. Compare the display with the example in
Figure 6. Check all segments for clarity and contrast.
ako03f.eps
Figure 6. Display Test
Backlight Test
To test the backlight, press T. The light will come on and the unit will beep unless the
beeper was turned off in setup mode.
Keypad Test
To test the keypad, turn the Meter to AC V and push each button separately. Each button
push should cause the Meter to beep unless the beeper has been turned off in setup mode.
Reset the Meter by turning it OFF, and then back on.
Testing Meter Accuracy
To verify the accuracy of Meter functions:
1. Connect the calibrator to the VeG and COM inputs on the Meter to test all but
current functions. When testing current functions, connect the calibrator to the A and
COM inputs.
2. Turn the rotary switch to the function listed in Table 24 for each step and use the blue
softkeys for specific function parameters. For example, turn the meter to volts and
press 2 to access the Volts DC function.
3. Apply the input from the steps listed in Table 24. Refer to any footnotes in the table
for special instructions.
4. Compare the reading on the Meter display with the Display Reading column in
Table 24.
5. If the display reading falls outside of the limits shown, the Meter does not meet
specification and must be adjusted or repaired.
6. Repeat steps 2 through 5 for the all performance steps shown in Table 24.
20
Maintenance and Calibration
Performance Tests
Table 24. Verification Table
Step
Rotary
Switch
Function
Display Reading
Softkey
Range
Input level
Freq.
183
185
AC Volts Test
1
V
1
500 mV
0.0000 V
2
V
1
500 mV
50.00mV
3
V
1
500 mV
4
V
1
5
V
6
000.0 to 000.2
000.0 to 000.2
60 Hz
49.5 to 50.5
49.6 to 50.4
460.0 mV
60 Hz
457.0 to 463.0
458.0 to 462.0
500 mV
460.0 mV
20 kHz
457.0 to 463.0
458.0 to 462.0
1
5V
4.600V
40 Hz
4.570 to 4.630
4.580 to 4.62.0
V
1
5V
4.600V
1 kHz
4.570 to 4.630
4.580 to 4.620
7
V
1
5V
4.600V
10 k Hz
4.570 to 4.630
4.580 to 4.620
8
V
1
5V
4.600V
20 kHz
4.570 to 4.630
4.580 to 4.620
9
V
1
50 V
46.00 V
60 Hz
45.70 to 46.30
45.80 to 46.20
10
V
1
50 V
46.00 V
20 kHz
45.70 to 46.30
45.80 to 46.20
11
V
1
500 V
460.00 V
60 Hz
457.0 to 463.0
458.0 to 462.0
12
V
1
500 V
320.0 V
20 kHz
317.9 to 322.1
318.5 to 321.5
13
V
1
1000 V
1000.0 V
60 Hz
992 to 1008
994 to 1006
14
V
1
1000 V
1000.0 V
10 kHz
992 to 1008
994 to 1006
AC Volts Frequency Test
15
V
1
500 mV
100.0 mV
40 Hz
39.99 to 40.01
39.99 to 40.01
16
V
1
500 mV
100.0 mV
20 kHz
19.99 to 20.01
19.99 to 20.01
17
V
1
1
5V
500.0 mV
40 Hz
39.99 to 40.01
39.99 to 40.01
18
V
1
5V
1
500.0 mV
20 kHz‘
19.99 to 20.01
19.99 to 20.01
1.
Manually set range to 5 V.
21
183/185
Calibration Manual
Table 24. Verification Table (continued)
Step
Rotary
Switch
Function
Display Reading
Softkey
Range
Input level
Freq.
183
185
2
DC Volts Test
19
V
2
500 mV
0.0000V
-0.10 to 0.10
-0.10 to 0.10
20
V
2
500 mV
46.00 mV
45.88 to 46.12
45.88 to 46.12
21
V
2
500 mV
460.00 mV
459.67 to 460.33
459.67 to 460.33
22
V
2
500 mV
- 0.460V
-460.33 to -459.67 -460.33 to -459.67
23
V
2
5V
4.6000V
4.5967 to 4.6033
4.5967 to 4.6033
24
V
2
50V
46V
45.967 to 46.033
45.967 to 46.033
25
V
2
500V
460V
459.67 to 460.33
459.67 to 460.33
26
V
2
1000V
1000V
0998.5 to 1001.5
0998.5 to 1001.5
27
V
2
1000V
-1000V
-1001.5 to -0998.5 -1001.5 to -0998.5
2.
Use the high resolution 50,000 -count mode (Power up option)
Volts Peak Hold Test
28
V
29
V
2
Max
6.4Vpp, Sq
wave
500 Hz
3.167 to 3.233
3.167 to 3.233
Min
6.4Vpp, Sq
wave
500 Hz
-3.233 to -3.167
-3.233 to -3.167
Yellow
Min Max
AC DC Volts Test
30
V
3
500 mV
32.0 mV
DC
31.8 to 32.2
31.8 to 32.2
31
V
3
500 mV
460.0 mV
40 Hz
456.5 to 463.5
457.4 to 462.6
AC+DC Volts and Frequency Test
32
V
3
(twice)
5V
-1.000V
DC
0.990 to 1.010
0.990 to 1.010
33
V
3
(twice)
5V
1.000V
DC
0.990 to 1.010
0.990 to 1.010
34
V
3
(twice)
5V
1.000V
60 Hz
0.990 to 1.010
0.990 to 1.010
V
3
(twice)
5V
500 mV
20 kHz
19.99 to 20.01
9.99 to 20.01
35
3
3. Manually select 5 V range. Frequency shown in upper display readout
22
Maintenance and Calibration
Performance Tests
Frequency Test
Perform the following prior to performing frequency test steps in Table 24:
1. Turn the meter off.
2. Turn the meter switch to Hz while holding down the yellow shift key (50,000 count
mode).
3. Verify that % Duty is NOT showing on the upper display.
% Duty can be removed in setup mode as follows:
1. Push and hold the yellow shift key for 2 seconds.
2. Press 4 until POL is displayed.
3. Press 1 until OFF is displayed.
4. Press the yellow shift key to exit setup.
Table 24. Verification Table (continued)
Step
Rotary
Switch
Function
Display
Input level
Frequency
183
185
Frequency Test
36
Hz
2.828 Vpp
990.0 kHz
989.97 to 990.03
989.97 to 990.03
Duty Factor Test
Perform the following steps prior to performing duty factor steps in Table 24:
1. Turn the Meter switch to Hz.
2. Set the trigger edge polarity to POS as follows:
1. Push and hold the yellow shift key for 2 seconds.
2. Press 4 soft key until POL is displayed.
3. Press 1 until POS is displayed.
4. Press the yellow shift key to exit setup.
23
183/185
Calibration Manual
Table 24. Verification Table (continued)
Step
Rotary
Switch
Function
Display Reading
Input level
Frequency
183
185
Duty Factor Test
37
Hz (duty)
Step
Rotary
Switch
Function
5 Vpp
sq. Wave
100 Hz, 10% duty
9.90 to 10.10
9.90 to 10.10
Display Reading
Softkey
Range
183
Input level
185
Ohms Test
38
Ω
REL
500
0.00 Ω
00.0 to 00.4
00.0 to 00.4
39
Ω
4
50 Ω
40.00 Ω
39.86 to 40.14
39.86 to 40.14
40
Ω
1
500 Ω
400.0 Ω
399.2 to 400.8
399.2 to 400.8
41
Ω
1
5 kΩ
4.000 kΩ
3.994 to 4.006
3.994 to 4.006
42
Ω
1
50 kΩ
40.00 kΩ
39.94 to 40.06
39.94 to 40.06
43
Ω
1
500 kΩ
400.0 kΩ
399.4 to 400.6
399.4 to 400.6
44
Ω
1
5 MΩ
4.000 MΩ
3.980 to 4.020
3.980 to 4.020
45
Ω
1
50 MΩ
40.00 MΩ
39.56 to 40.44
39.56 to 40.44
Diode Test
46
Ω
3
5V
0.5000 V
0.495 to 0.505
0.495 to 0.505
Continuity Test
47
Ω
2
50 Ω
Beeper on
Beeper on
48
Ω
2
150 Ω
Beeper off
Beeper off
Capacitance Test
*49
Cap.
5 nF
4.000 nF
3.955 to 4.045
3.955 to 4.045
*50
Cap.
50 nF
40.00 nF
39.57 to 40.43
39.57 to 40.43
51
Cap.
500 nF
400.0 nF
395.7 to 404.3
395.7 to 404.3
52
Cap.
5 uF
4.000 uF
3.957 to 4.043
3.957 to 4.043
53
Cap.
50 uF
40.00 uF
38.77 to 41.23
38.77 to 41.23
54
Cap.
500 uF
400.0 uF
387.7 to 412.3
387.7 to 412.3
55
Cap.
5 mf
4.000 mF
3.877 to 4.123
3.877 to 4.123
56
Cap.
50 mF
40.00 mF
38.77 to 41.23
38.77 to 41.23
* Use REL ∆ mode to zero test leads/offsets (must disconnect test lead from source when zeroing offset).
24
Maintenance and Calibration
Performance Tests
Current Test
To verify the accuracy of the current functions:
1. Connect the Calibrator to the A and COM inputs of the Meter.
2. Turn the rotary switch to A and use the yellow softkey to select AC or DC.
3. Apply the Input Level from the steps listed in Table 24.
4. Compare the reading on the Meter display with the Display column in Table 24.
Table 24. Verification Table (continued)
Step
Rotary
Switch
Function
Display
Softkey
Range
Input
Level
Frequency
183
183
DC Current Test
57
A
2
500 uA
0.0 µA
-000.4 to 000.4
-000.4 to 000.4
58
A
2
500 uA
460.0 µA
458.7 to 461.3
458.7 to 461.3
59
A
2
500 uA
-460.0 µA
-461.3 to -458.7
-461.3 to -458.7
60
A
2
5 mA
4.600 mA
4.589 to 4.611
4.589 to 4.611
61
A
2
50 mA
46.00 mA
45.89 to 46.11
45.89 to 46.11
62
A
2
500 mA
460.0 mA
458.9 to 461.1
458.9 to 461.1
63
A
2
5A
4.600 A
4.580 to 4.620
4.580 to 4.620
64
A
2
10 A
10.00 A
9.90 to 10.10
9.90 to 10.10
AC Current Test
65
A
1
500 uA
34 µA
1 kHz
33.6 to 34.4
33.6 to 34.4
66
A
1
500 uA
460.0 µA
60 Hz
457.0 to 463.0
457.0 to 463.0
67
A
1
500 uA
460.0 µA
5 kHz
425.3 to 494.7
425.3 to 494.7
68
A
1
5 mA
4.600 mA
60 Hz
4.570 to 4.630
4.570 to 4.630
69
A
1
5 mA
4.600 mA
5 kHz
4.253 to 4.947
4.253 to 4.947
70
A
1
50 mA
46.00 mA
60 Hz
45.70 to 46.30
45.70 to 46.30
71
A
1
50 mA
46.00 mA
5 kHz
42.53 to 49.47
42.53 to 49.47
72
A
1
500 mA
460.0 mA
60 Hz
457.0 to 463.0
457.0 to 463.0
73
A
1
500 mA
460.0 mA
3 kHz
425.3 to 494.7
425.3 to 494.7
74
A
1
500 mA
460.0 mA
5 kHz
425.3 to 494.7
425.3 to 494.7
75
A
1
5A
4.600 A
60 Hz
4.570 to 4.630
4.570 to 4.630
76
A
1
5A
4.600 A
5 kHz
4.253 to 4.947
4.253 to 4.947
77
A
1
10 A
10.00 A
60 Hz
9.92 to 10.08
9.92 to 10.08
78
A
1
10 A
10.00 A
5 kHz
9.23 to 10.77
9.23 to 10.77
25
183/185
Calibration Manual
Continuity Test
To test the Meter continuity:
1. Connect the test leads to the V and COM inputs.
2. Turn the knob to ReG.
3. Press 2.
4. Short the test leads together. The Meter will beep and 5hrt will be displayed.
IR Port Verification Test
Use a PC with Windows Hyperterminal to verify that the 183/185 IR Port is working.
1. Connect the IR cable and adapter to the meter and Com 1 or Com 2 of the PC.
2. Start Windows Hyperterminal from the Start menu.
3. Enter "Meter" as the connection name.
4. Set the Com port to same as IR cable is connected to.
5. Set Com Port properties as follows:
Baud Rate = 9600 bits per second
Data Bits = 7
Parity = Even
Stop Bits = 1
Flow Control = Hardware
6. Turn the meter on to V function.
7. Enter the following command:
!K?(cr) (asks the meter what function the rotary switch is set to)
8. The meter should respond as follows:
9. <OK;1 (Meter responds that it is in the "V" function)
26
Maintenance and Calibration
Calibration Adjustment
Calibration Adjustment
The Fluke 183 and 185 require adjustment only when they fail the performance tests or
have been repaired.
Software adjustment is performed through the meter’s IR port using a semi-automated
Fluke Met/Cal procedure and Fluke 5520A. The meters have no physical adjustments and
cannot be manually adjusted.
The following list of equipment is required to adjust the Fluke 183 and 185:
Table 25. Required Equipment for Calibration Adjustment
Model/Part Number
Description
Vendor
5520A
Calibrator
Fluke
Computer
Desk top PC
IBM Compatible
P/N 1612912
Fluke 185-8023
Capacitance Calibration Cable- 183/185
Fluke
P/N 1590638
IR Cable w/ Adapter
Fluke
183/185 MetCal Procedure
Fluke
27
183/185
Calibration Manual
Replacement Parts and Accessories
Replacement parts and accessories are listed in Table 26 and identified in Figure 7.
Table 26. Replacement Parts and Accessories
Reference
Designators
Description
Part Number
183 Access Door, Battery / Fuse
185 Access Door, Battery / Fuse
MP7
1565237
1565243
1
1
183 Top Case, Pad Xfer
185 Top Case, Pad Xfer
MP9
1581124
1581089
1
1
Bottom Case
MP6
1565228
1
Knob Assembly
MP5
1565471
1
Light Diffuser
MP22
1567039
1
Keypad
MP11
1565225
1
Connector Pin, Spring, Barrel, Gold
J3
1566968
1
Spring
MP21
1567021
1
O-Ring
MP1
1567042
1
Holster
MP12
1556861
1
Bail Stand
-
1556877
1
WFuse, 11 A,1000 V FAST
F1
803293
1
Battery, 1.5 V, 0-15 mA, AA Alkaline
BT1-BT2
376756
2
Screws, Torx-Head, 10 mm
H1-H4
1566979
4
185 AC70A Alligator Clip (Black)
MP19
738047
1
185 AC70A Alligator Clip (Red)
MP20
738120
1
TL75 Test Lead Set
MP14
855742
1
DS700
1565262
1
Connector, Elastomeric, LCD to PWB
J1, J2
1565336
2
Bezel, LCD Assembly
MP2
1567056
1
Chassis, LCD Assembly
MP4
1567063
1
IR Cable Adapter
-
1574462
1
1620265
1
LCD 4.5 Digit Multiplexed
1
MET/CAL-PROC/0008,PROCEDURE
Quick Reference Cards
2
2
3
2
Users Manuals
IR Cable
(Includes IR Cable Adapter PN 1574462)
-
1590638
WTo ensure safety, use exact replacement only.
1. Order replacement connectors separately when ordering a replacement LCD.
2. Quick Reference Card PNs: French=1574641; Danish=1587612; Dutch=1587601;
Italian=1574683; German=1574676; Finnish=1587620; Norwegian=1587635; Swedish=1587647;
Spanish=1574652; Portuguese=1574665
3. Users Manual PNs: English, French, Spanish, Portuguese=1574599; English, French, German,
Italian, Dutch=1574607; English, Danish, Finnish, Norwegian, Swedish=1587740
28
Qty
1
Maintenance and Calibration
Replacement Parts and Accessories
Knob
Top case
Bezel
LCD
Clicker assy
Light diffuser
Elastomeric
connectors
Keypad
LCD chassis
assy
EMI spring
Fuse
Screws
Carrier assy
Connector pin
Batteries
Bottom case
O-ring
Screw
IR cable adapter
Holster assy
Access door
Bail stand
ako16f.eps
Figure 7. Replacement Parts and Accessories
29
183/185
Calibration Manual
30