1
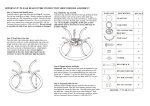
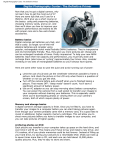
Mailing Address
General Robotics Corporation
1978 South Garrison Street, Unit 6
Lakewood, Colorado 80227-2243
Telephone and Fax
800.422.4265 Toll-Free
303.988-5636 Local
303.988-5303 Fax
Email Addresses
[email protected] General Information
[email protected] Technical Support
Internet Website Addresses
www.generalrobotics.com Products and Corporate Info
www.edurobot.com The RB5X and Education
Warranty and Registration Information
Thank you for your purchase of the RB5X, the RB Junior, or the RobotLab. Please note
that you MUST complete and return this Warranty Registration Form in order for your
Warranty to be activated and valid. Thank you for purchasing a GRC robot.
1) Complete the form below.
2) Make a copy of this entire page for your records.
3) Deliver this page via fax or mail to General Robotics Corporation within 30 days.
We offer a limited 2-year parts and labor warranty for all units sold as new, excluding
the batteries. General Robotics offers a limited 90 day warranty, parts ONLY, for the
Inner Component Kit. No technical support is available for the Inner Component Kit.
GRC Warranty Registration Form
Organization:
First Name:
Address:
City:
Country:
Telephone:
Purchase Date:
Last Name:
State/Province:
Email Address:
Fax:
Zip Code:
Product Serial Number:
Which GRC product did you purchase?
RB5X
Robot Arm
RobotLab™
Inter Component Kit
Please select one of the following, I teach at a:
Day care center
K-6 class
Middle School
High School
Do you own any other robots?
If so, what brand?
Yes:
Vocational/Technical school
University
Museum:
Other
No:
Model?
How did you learn about General Robotics Corporation?
Magazine Ad
Website:
Conference
Associate
General Robotics Corporation Reference Manual
Table of Contents
Unpacking your GRC Robot
Welcome--An Introduction to the GRC Robots
Using the GRC Reference Manual
- Who is this Manual for?
-
Using the Sidebars
-
Updating the Manual
Getting to Know Your RB5X
- Self-Diagnostic
-
What is a Personal Robot?
-
Interface Panel
-
The RB5X’s Case and Components
Functions of the Utility Software Cartridge
- Utility Software Cartridge and Program
-
Auto Roam Mode
-
Charger Finder and Charge Maintenance Mode
-
Programming the Robot through Command Mode
-
Programming without the Utility EPROM
Experimenting with the RB5X
- The Robot Hardware
-
Interacting with the Robot’s Physical Environment
-
Software Packages for Programming your Robot
-
Using the Action Software Cartridge: Pattern Programmer
Included Appendices
- Installing Options on the RB5X Base Unit
-
Action Software Overviews
-
Battery Charge Life
-
Charging the RB5X with the Recharge Cable
-
Setting up the Battery Charger Nest
-
Setting Up the Charger-Finder Guidance Strip
-
Charge-Maintenance Program
-
Charger-Finder Program
-
Phoneme Speech Dictionary
-
Hexa-Decimal Character Set
-
Tiny BASIC Language Summary
-
Curricula Development Guide
Once you have installed your RB5X options, you should put their documentation in
back of this Manual.
Thank you once again for purchasing a General Robotics Corporation product. We hope
that this manual has and will provide quick and easy access to the workings of our
robots. We hope that you enjoy your product.
Unpacking Your GRC Product
Important/Caution:
Do not try to lift the
RB5X by the dome.
Only lift it by
grasping the
cardboard ring fitted
around the bottom of
the RB5X.
Your RB5X, RobotLab, or Inner Component Kit, has been shipped to you as a complete
unit, fully assembled, tested, and ready to operate. When you open the shipping carton,
you will find:
RB5X
•
RB5X Reference Manual.
•
The robot’s battery-charger nest and charge cable.
•
An RS-232 cable in the top foam block.
•
An RB5X hat and poster.
Lift off the foam block, and remove the robot from its carton by grasping it below the
cardboard ring and lifting it out.
1.
Remove the cardboard ring from the robot’s lower skirt.
2.
Save all the packing material and the shipping carton for later use or storage.
3.
Inspect your RB5X for possible shipping damage. If you discover any, please
contact your dealer or call General Robotics Corporation.
General Robotics Corporation reserves all rights to General
Robotics™ , RB5X™, Edurobot™, and RobotLab™.
All contents of this book Copyright 1999.
Welcome--An Introduction to the GRC Robots
Did you Know?
Robot owners engage
their robots in
fascinating team
sport competitions.
By doing this they
can have fun and
refine their
programming skills
at the same time.
They become the
coach, and deliver
plays to their players
via a home computer.
Congratulations on your purchase of the RB5X Educational Robot. Thousands have
learned, taught, and played using this wonderful robot. Your investment in the RB5X
will carry you far into the future. With the ease of use and the flexibility of this robot
you can learn the basics of electronics, computers and robotics. In addition, the RB5X
will assist in the learning and teaching of Mathematics, Geometry, and English as a
Second Language (ESL). Whether you are just beginning to explore the world of
microprocessors and electronics, computers and robots, or have been involved in the
field since its inception, RB5X has a great deal to offer.
As you begin working with RB5X, keep in mind
that the “X” in its name stands for
“experimenters model.” And RB5X’s
open design makes it an
experimentor's dream. Since it is
fully programmable using any
computer with serial
communications capability,
you can write software
programs that are
completely unique.
If, after going through the
various check-lists in the
following sections you
have any problems with
your RB5X or RobotLab,
contact your local dealer or
call our Customer Service
department at 800-4224265, from 9:00 a.m. to
5:00 p.m. Mountain Time,
Monday through Friday. No
customer support is available
for the Inner Component
Kit.
Using the GRC Robot Reference Manual
Caution/Important:
However you choose
to use the GRC
Reference Manual,
we do urge that you
read and follow,
"Getting Started." It
provides some basics
that every user
should have before
starting out.
Caution/Important:
Please read the
“Getting Started”
section for an
important notice on
the unpacking of
your robot.
FAQ
Q: Where do I
download updates to
the user manual?
Who is this Manual for?
This manual has been designed to either be read from beginning to end and then refer to
particular sections as you need them. Or, if preferred, the Table of Contents and the
Index can be referenced to find the sections that interest you.
Like your robot, the GRC Robot Reference Manual is intended for use by people with a
wide range of skill levels:
•
Those who are familiar with computers.
•
Those who are familiar with computers but may have no programming experience.
•
Those who have programming experience but are new to robots.
•
Those with extensive computer programming skills who also have a knowledge
of robotics, either personal or industrial.
Using the Sidebars
The manual itself has also been set up to be structured yet flexible enough to make
using it easy. As you have probably noticed, the GRC Robot Reference Manual is
somewhat unique: we have designed it with you the user, in mind. The left sidebar is
used to encompass 3 different categories of information: Frequently Asked Questions,
(FAQ’s) Caution/Important, and “Did you know?” We have set these up in an easy to
view fashion-using icons to identify the different categories of information. Below is a
brief description of the use of these sidebar notes. As you go through this manual you
will get an even better feel for how these are actually used.
•
Important/Caution
This category is meant to warn, advise, and direct attention to information that
is a “must read” for the successful, problem free, workings of the RB5X.
•
Frequently asked questions (FAQ)
This category is for the “what if”, “how do I”, and the “what do I do when”
questions. These are included in the side column for easy accessibility and
quick reference.
•
Did you Know?
This final category is for the teacher & knowledge seeker in all of us. The
content of these notes will be the pertinent “informative extras” that are meant
to help with the comprehension of the related text.
A: www.edurobot.com
Updating the Manual
The sidebar is extra wide not just for our 3 categories (see above), but more importantly
for your meaningful notes. Please write all of your significant thoughts, ideas, etc. in
the sidebars. In the same way the 3-ring binder system is for your benefit as well. Pages
may be easily replaced with updates from the website (www.edurobot.com) in order that
your manual stay current. Finally we hope that this binder will also be a place for you
to house your own ideas and curricula. Make good use of it! All in all, we hope that
this manual will grow and change with you and your GRC robot far into the future.
Getting to Know Your RB5X
FAQ
Q: RB5X does not go
through the self
diagnostic routine or
sounds one long toot
of its horn while
flashing its LEDS?
In this section we will take a closer look at RB’s systems. Let’s start with the
construction. The RB5X base unit stands just under two feet. It has an aluminum body
and polycarbonate dome, this construction makes the RB5X both sturdy and completely
accessible through RB’s dome. This dome is translucent which allows you to see inside
and you need no tools to remove it. As you peek inside RB you may wonder, “what
exactly is a robot anyway?” Well, keep reading and we will answer that question for you.
A: It is possible that
its battery charge
level is low and the
robot needs
recharging. Switch
the robot OFF and
proceed to the next
section, "Setting Up
the Battery Charger
Nest." Once the robot
is fully charged, run
the self-diagnostic
routine again. If it
still isn't working,
call your local dealer
or the General
Robotics
Corporation.
Running the RB5X’s Self Diagnostic Routine
Your RB5X comes with a utility software cartridge already plugged into the Action
Software (EPROM) socket. This utility cartridge contains several RB5X programs,
including a self-diagnostic routine that allows the robot to check its motor functions,
electronics, battery charge level, light-emitting diodes (LEDs), horn, and voice/sound
synthesis capability. The utility cartridge also contains special programs that will put
RB5X into various modes depending on the combination of bumpers that are pressed.
All of these modes will be described in detail in the “Getting to Know RB5X” chapter
of this manual.
As soon as you remove RB from the crate:
1. Place it on the floor in an open area.
2.
Switch the power ON.
Push in the rocker switch on the back of the robot. RB5X should sound three
short beeps, flash its LEDs, move forward for one second, spin clockwise for
one second, spin counterclockwise one second, and move backward for one
second. The RB5X then says, “Hello, I am the RB5X Intelligent Robot.”
Caution/Important
The RB’s 1-amp fuse
protects the robot’s
electronics, and may,
from time to time,
need to be replaced.
This fuse can be
found on the base
skirt next to the
charge pins.
Did you Know?
Infrared is the
spectrum of light
detected and
amplified by night
vision goggles.
Did you Know?
Bats, like the RB5X
use a sonar system
called echolocation
to navigate in the
dark. Using sonar
bats can detect size,
texture, and even the
direction of moving
insects!
What is a Personal Robot?
One of the easiest ways to think of a personal robot is as an integrated system of:
•
Sensory devices (such as the sonar transducer that allows your robot to detect
obstacles in its path).
•
Affecting devices (devices that allow your robot to affect its environment, such
as its robotic arm or its wheels).
•
Computer power (the computer chips that make your robot programmable).
•
Or just a “Computer on Wheels”.
By integrated, we mean that there is two-way communication among the robot’s
computer sensors, and affecting devices. Using this process RB can be programmed to
perform simple to the most complex tasks. Before we begin thinking about the
programming of tasks, let’s take a closer look at the robot’s various components.
Interface Panel
Take a look at the interface panel on the back of your robot. This “control panel”
contains several elements:
•
Power Switch — This rocker switch controls all power to the RB5X.
•
Power Reset Switch — This round push-button to the right of the power
switch resets the robot’s automatic battery cutoff circuit, which cuts off power
when the battery charge-level drops below 5.4 volts.
•
Software Reset Switch — The square push-button to the left of the power
switch stops the program currently running in the RB5X and either restarts the
software module, if present, or puts the robot into command mode. In
command mode, the robot is ready to receive another command from your
computer, although it retains the last program in memory.
•
RS-232 Ports — There are two RS-232 ports on the interface panel, to allow
you to connect your robot to your computer by cable whenever you wish to
transfer programs to RB5X. Only the standard port is utilized through the
current software packages.
•
RS-232 Switch — When communicating between your computer and RB5X,
this switch should be set on standard (STD). The “option” position will be
used later in conjunction with RS-232 Port 2.
•
Battery Charge Level indicator — This LED bar enables you to visually
check RB5X’s charge level.
•
Action Software socket — This socket, located at the top of the interface
panel, allows you to run preprogrammed action software cartridges. These
cartridges can be purchase from GRC or, if you know how, can be created by
“burning” programs onto PROM (programmable, read-only memory) chips.
This socket should currently hold the utility software cartridge. It is keyed so
that the cartridges only fit one way.
•
Action Software Cartridge Indicator Switch — This switch prepares the
robot to accept either 2K (2716 PROMS) or 4K (2732 PROMS) software
modules, and must be set to match the module in the software socket. The
label attached to each RB Robot module gives the switch setting
The RB5X’s Case and Components
•
Bumpers
The eight white bumpers around the lower skirt of the robot are tactile, or
touch, sensors that allow RB5X to know when it has encountered an obstacle.
They represent “8 bits” and incorporate math 1-10 by using 1 & 2 for 0 and
8+1 for 9.
• Optional Accessories/Experiment panels
The white panels on the upper shell of the RB5X cover cut-outs in the body
that can be used later as you add hardware options of your own invention or
those available through General Robotics Corporation.
•
Brass Charging Pins
Located on the RB5X’s lower skirt directly under the sonar sensor are two
brass cylindrical studs that correspond to brass strips on the robot’s chargernest and allow it to recharge its batteries.
•
Infrared
Next to the power fuse on the motor (wheel) board, you will find the infrared
sensor system, which can be used in conjunction with programs that allow the
robot to seek out its charger nest and to recharge its batteries under its own
power. The Getting a Charge section provides details on how you can use this
sensor system in your RB5X.
•
Sonar
RB5X sonar sensor is located on the front of the robot, attached to a small
transducer. This sensor allows the robot to send out sonar signals and to detect
obstacles directly in front of it before it actually collides with them.
•
Voice
The RB5X may be programmed to speak many languages in the world using a
standard set of international phonemes (see the Phoneme Speech Dictionary).
•
Action Software Cartridges
Many Action Software Cartridges can be purchased though the General
Robotics Cooperation. These Cartridges hold a variety of ready made preprogrammed code. The Utility and Pattern Programmer cartridges are some
examples that will be discussed in-depth later in the manual.
•
RF Transmitter/Receiver
This option allows a user to direct the RB5X using a software package to
transmit data and have it perform tasks. Some software packages are able to
transmit data in real-time allowing the user to direct RB5X with “joy-stick”
like control.
•
Low-Battery Sense Circuit
RB5X contains a low-battery sense circuit that constantly monitors the battery
charge of both the robot’s batteries. If either battery charge drops below 6.0
volts, the sense line is activated. Furthermore it has a built in shutdown circuit
if batteries go below 5.3 volts.
Functions of the Utility Software Cartridge
Caution/Important
Software modules
can be damaged by
static electricity, so
be sure to ground
yourself by touching
an unpainted surface
on the robot before
handling them.
FAQ
Q: Do I have to use
the Utility Cartridge?
A: The RB5X can be
programmed without
the Utility Cartridge
in place, however, the
voice and sonar will
not be active unless
the enabling code is
manually transmitted
to the RB5X’s
memory.
Utility Software Cartridge and Program
Your RB5X comes equipped with a utility software module, pre-programmed to enable
the robot to perform certain tasks and functions without your having to do any
programming yourself. The self-diagnostic routine we had you run when you first
unpacked your robot is an example of these routines. To get familiar with all of these
commands please follow the steps under each heading below.
1.
Make sure the utility software module is in the socket and that the software
switch is in the proper position (2K or 4K).
2.
Now switch the robot on and let it run its self-diagnostic routine again.
After checking its systems, RB5X begins to monitor bumper presses. For software
module purposes, the bumpers are numbered 1 through 8, starting with the bumper
under the sonar as 1 and proceeding clockwise around the robot as you look down upon it.
To signal that RB5X is ready to receive commands through its bumpers it says, “Hello, I
am the RB5X Intelligent Robot” while flashing its LED’s in synch with its voice. Once
the LEDS have stopped flashing, the robot waits for you to press a combination of
bumpers to access the various routines on the utility software module. (If you press just
one bumper, the robot says, “Press bumpers 2 and 4 to return to command mode.” You
may then press any combination of bumpers. For further information, see
experimenting with RB5X or reference the side bar FAQs sections. The following
sections will help you get acquainted with all 3 modes of the utility cartridge and will
put these various modes into practice.
Auto Roam Mode
FAQ
Q: How do I stop
RB from roaming?
A: Switch it off or
press the reset
button. When you
choose this routine,
the robot continues to
access it until you
either switch the
robot off or press the
software reset button.
Bumpers 2 and 5 pressed simultaneously selects RB5X’s sonar programs which allows
the robot to move about using its sonar to detect objects in its Path and using
intelligence to avoid them. When an obstacle comes into the sonar view, RB5X stops,
flashes its LED’s, beeps its horn, turns and moves forward. An RB5X with voice says,
“Excuse me,” “Beg your pardon,” “Oops,” or “May I pass?” At this time feel free to try
out RB5X’s auto roam mode.
1.
Press Bumpers 2 and 5 (The robot will start to roam around.)
2.
Listen to RB’s sonar clicking as it navigates the room.
3.
Try Stepping in front of RB and making it sense you, turn around and proceed.
4.
When you are done watching RB roam around press the square software reset
switch to stop the RB5X from roaming.
5.
Proceed to the next section.
FAQ
Q: What are those 3
modes again?
A: There are 3
important modes that
you will need to
know to successfully
operate the RB5X.
All three will be
discussed in detail
below, but for quick
reference here is a
short synopsis of
each.
Auto Roam:
By pressing bumpers
2 and 5
simultaneously RB5X
will be put into this
mode.
I’m Hungry:
By pressing bumpers
1 and 4
simultaneously, you
select the charger
finder routine.
Command Mode:
By pressing bumpers
2 and 4
simultaneously you
put RB5X into the
command mode, this
mode lets you
program the robot in
a programming
environment of your
choice .
Charger Finder and Charge Maintenance Mode
If you press bumpers 1 and 4 simultaneously, you select the charger finder and charge
maintenance routines discussed in detail in Getting a Charge. When 1 and 4 are pressed
RB5X goes into this routine and begins to roam around in search of a guiding tape
(masking) that leads to its charger nest to recharge its batteries. A robot with voice says,
“Excuse me, I’m hungry” before beginning to look for its nest. Once it finds the
charger, RB5X remains in charge-maintenance mode until you either switch the robot
off or press the software reset button. Once again please try this routine to familiarize
yourself with it.
1.
Press Bumpers 1 and 4 simultaneously.
2.
Watch RB roam around while looking for the guiding tape that leads it to the
charger nest. When RB finds the tape it will move back and forth while
aligning itself on the tape, the RB5X will them snuggle into the charger to
recharge.
3.
Push the software-reset button when the robot is charged or when you would
like to move on to the next section.
Programming the Robot Through Command Mode
Pressing bumpers 2 and 4 simultaneously puts RB5X into command mode and prepares
it to accept programming. After pressing these bumpers you are ready to attach RB5X
with an RS-232 cable to your computer and download programs that you have created
using an RB5X programming environment. If you have the RF transmitter/receiver
installed on RB5X you can send your data though radio waves to your RB. For more
information about programming environments currently available through GRC, please
refer to your software packages manual or users guide.
Programming without the Utility EPROM
The RB5X can be programmed without the Utility Cartridge in place, however, the
voice, sonar, and hypercard graphical controller for Macintosh will not be active unless
the enabling code is manually transmitted to the RB5X’s memory.
Please visit our website in order to learn more about most current software systems
available for your computer.
Experimenting with the RB5X
Here’s the fun part! Experimenting. Your robot is an experimenter’s dream. In the
following pages we will give you ideas and even some various things to try. When
experimenting with your robot remember that, of its greatest assets, is the flexibility to
respond to your imagination. You have an enormous amount of power over what the
robot can do. Experiment in any way that you can imagine. If you are short of ideas
though, here are a few thoughts on how to experiment with the robot.
Here are some different ways to experiment with the robot: by creating hardware
options of your own, by making changes in the robot’s physical environment, through
software packages, and through software modules.
•
The Robot Hardware
If you have knowledge of electronics you may find experimenting with the
RB5X to be an excersise in creativity. The RB’s is based upon a relatively open
architecture with opportunity for you to add, modify, and otherwise experiment
with its components. Some owners have even designed and built vacuum
cleaner or fire extinguisher add-ons. You may also purchase General Robotics
accessories or software modules, as listed in the “Installing Options” Appendix.
•
Interacting with the Robot’s Physical Environment
Make a robot accessible ramp for impassable elevation in RB’s new
environment. Design an obstacle course and have the robot navigate, using its
sonar. Make RB into a personal house-hold assistant, a vacuum cleaner, a
waiter, or even a FEAR (Fire Extinguishing Autonomous Robot.) Use your
imagination to think up anything and everything.
•
Software Packages for Programming your Robot
You can use RB programming environments to instruct the robot using a
computer that allows you to transfer the programs you write yourself into the
robot’s memory. This can be done using the RS232 cable and port, or the
optional RF transmitter/receiver installed in the RB5X.
•
Using the Action Software Cartridges: Pattern Programmer
One simple way of experimenting with the RB5X is to use preprogrammed
software modules. These modules plug into a socket on the back of the robot
in much the same way a cartridge or a diskette plugs into a computer. You
have already used the utility EPROM, but now lets experiment more with the
RB5X by using the Pattern Programmer Module
Caution/Important
Push RB5X’s
bumpers firmly and
deliberately and then
watch for the
flashing LED. This
signifies that the
command has been
put into memory.
FAQ
Q: What if I want
the RB5X to play this
pattern continuously?
A: Press bumpers 1
and 2 instead of 1
and 5.
FAQ
Q: How do I clear
the memory and start
a new pattern?
A: To clear RB’s
memory push
bumpers 1 and 3
simultaneously, then
press 1 and 5 again
to get RB ready to
accept commands.
Pattern Programmer for the RB5X
The pattern programmer cartridge is an exciting way to get to know the RB5X and it
allows you to program your RB5X to execute a series of movements. For example, you
could make RB5X follow a particular path through your room. Each of the RB5X’s
bumpers corresponds to a specific movement command. By pressing the bumpers you
are entering commands into your robot’s memory. You are also using the bumpers to
“play back” your pattern, to start your RB5X moving, dancing, spinning, etc. Follow
the steps below to get familiar with this particular action software.
1.
Carefully insert the Pattern Programmer Cartridge into the software module
socket.
2.
Press this Action Software cartridge right side up and firmly into place.
3.
Make sure the action software indicator switch is in the 4K position.
4.
Turn the RB5X on.
5.
The four corner LEDs go on, then the center light-emitting diodes begin
flashing. If this doesn’t happen, check to be sure that module is installed
correctly, the robot is fully charged and that the switch is set to the proper
position.
6.
Wait until the center LEDs beginning to flash before starting to program your
robot. (This delay can be 10 to 20 seconds.)
7.
Push bumpers 1 and 5 at the same time to initiate the pattern programmer and
make it ready to accept commands. When you push 1 and 5 the corner diodes
will go out
Caution/Important
RB will not
remember the
program once it is
turned off. If you
want to remember the
pattern for later use
please write down
the order of the
bumper presses.
Caution/Important
Always turn RB5X off
before removing a
software module.
8. Push any combination of bumpers to program the robot. Each bumper
corresponds to a particular movement, direction, or action.
Bumper Command Description
Forward — RB moves forward (about 4 inches per press)
.
Pivot on right/forward — RB pivots forward on the right wheel
(each press equals about 1/7th of a turn)
Spin Clockwise — RB rotates right on its axis (each press equals
1/4th turn)
Pivot on right/reverse — RB pivots backwards on right wheel
Reverse — RB moves backward (approximately four inches per
press)
Pivot on left reverse — RB pivots back on left wheel
Spin Counter clockwise — RB rotates º turn left on axis
Pivot on left forward — RB pivots forward on left wheel
9. Play your pattern — When you have finished inputting your pattern push
bumpers 1 and 5 to play it.
10. Expect a 2 second delay before RB plays your pattern.
11. Try to add some more movements to your pattern. To do this, simply push any
combination of bumpers. This will add on to the end of the already stored
program.
12. Clear RB’s memory and start over. Do this by pressing bumpers 1 and 3 at the
same time.
13. Have fun programming RB!
14. Turn RB5X OFF and gently remove the Pattern Programmer Software Module
Appendices
Installing Options on the RB5X Base Unit
Once you have unpacked, tested and become familiar with the RB5X base unit you may
want to install any options you bought for your RB5X or to make some other minor
adjustments. Detailed installation instructions come with each RB5X option, but you
should consider installing them in the following order. This is especially true if you
have several options and wish to use them immediately.
You might also consider using a larger electronics fuse (the robot comes with a 1-amp
fuse on the base skirt) to prevent circuit overload and the frequent blowing of this fuse.
•
Non-Volatile Extended Memory — This option adds 18K of battery-backedup RAM (random access memory), bringing RB5X’s on-board memory to 26K,
and allows you to store data or programs on the 18K board even when the
power to your RB5X is switched off.
•
RB Robot Arm — We recommend that this be the last option installed, since it
is not easily removed and reattached.
•
Action Software — Preprogrammed software modules that require no
programming at all are also available, and we can even put you in touch with
people who will, for a fee, write special, individualized software programs for
your RB5X.
•
Video Camera — Black/white or color video camera that transmits video
signals from the RB5X unit to a base receiver. The video transmission may be
watched on a television, studio monitor, or A/V capable computer.
•
RF Transmitter — Allows you to program or direct the RB5X unit through
“remote control” radio waves, much like a radio controlled car. This enables
the RB5X to explore its surroundings without the
confines of a serial cable.
Appendices
Action Software Overviews
1) PATTERN PROGRAMMER
"Pattern Programmer" software module lets you program any series of movements. You
can instruct your robot to do a funny dance, spin in circles, or to follow a particular path
around the room. Each of RB5X’s eight bumpers corresponds to a specific movement
command: forward,.backward, spin clockwise, etc. You use the bumpers to play back
your pattern,to start RB5X dancing, spinning, or moving around the room!
2) MATH WHIZ
"Math Whiz" allows RB5X to quiz children and adults in the elementary math skills of
addition, subtraction, multiplication, and division. "Math Whiz" is a math quiz in a
game format that may be played by up to eight people at one time. RB5X uses its
random number generator to compose a math problem for each player in turn, tells
players if they have given the right answer to the problem, and gives the correct answer
if the player is in error. Players score one Point for each right answer, and after six
rounds of play, RB5X announces the players’ scores. The competitive challenge of
"Math Whiz" and the lights, sounds, and robot motions that accompany the game
motivate children to learn important math skills with RB5X!
3) HOP TO IT!
"Hop to It!" features an engaging, educational game that allows RB5X to use its sonar
sensor to challenge players to accurately judge distance in feet and inches. When
playing "Hop to It!" RB5X asks each player, in turn, to hop to it - to stand at a particular
distance from the robot’s sonar sensor. RB5X judges how far away the player really is,
tells him or her, and stores the player’s score in memory. The closer the player gets to
the distance RB5X requests, the better his or her score will be. At the end of five rounds
of play, RB5X calculates the players’ scores, and announces the winner! "Hop to It!"
can be played by up to eight people, or even by a single player, and is fun for both
children and adults.
4) SIMON ROBOT
"Simon Robot" is hilarious fun for all ages and may be played by up to eight players.
We recommend that you don’t start to play until you have time to spare - you'll have a
tough time walking away once you start playing!
As a supplemental classroom activity, "Simon Robot" helps strengthen listening skills,
demonstrates concepts of sequence, and rigorously exercises the memorization
abilities of every player.
The object of the game sounds simple enough: to press RB5X’s bumpers according to
the sequence in which the robot speaks their corresponding numbers. If you are
successful in pressing the bumpers in the right order, RB5X adds a new number to the
sequence and asks you to repeat this new combination of numbers, trying to stretch the
limits of your abilities. In addition to the basic game described above, we have added
three variations (games 2, 3, and 4). When you think you have mastered the game, try
the most difficult version, Game 4, and be prepared for the real master, RB5X, to
scramble your brain as you attempt to press bumpers as directed.
Action Software Overviews (continued)
5) DRIVE IT
"Drive It" allows the RB5X robot to be moved from place to place under its own power,
avoiding the necessity for carrying it. Movement is controlled by pressing the various
bumpers; depending on the bumper touched, the robot will execute a forward,
backward, or turning movement, stating "Yes, Master" before performing the function.
6) DAISY, DAISY/INTRUDER ALARM
"Daisy, Daisy/Intruder Alarm" combines two different RB5X programs in a single
module. The "Daisy, Daisy" program allows RB5X to both sing the words to the song
"Daisy, Daisy" ("On a Bicycle Built for Two") and play the tune in two different
octaves. The "Intruder Alarm" program allows RB5X to guard an area, and to teach the
basics of using sonar. In "Intruder Alarm," RB5X uses its sonar system to detect
intruders moving within 35 feet of the front of the robot, RB5X sounds an alarm or
speaks one of three different phrases.
7) VOICE/SOUND DEMO
The "Voice/Sound Demo" demonstration software module shows the versatility of the
RB5X voice/sound synthesis card. The sound card can generate up to three different
sound frequencies at once and has a separate noise channel. The "Voice/Sound Demo"
features speech, music, gunshot sounds, a falling "whistle", an alarm, rising 'bees!',
clock chimes, and a series of musical tones.
8) CARNIVAL BARKER
The "Carnival Barker" demonstration software module provides RB5X dealers who
have shopping mall or other high customer traffic locations with an animated,
awareness-generating display. The robot portrays a charming android carnival barker
and invites passers-by to ask for RB5X information.
9) RECORD TIME
"Record Time" gives new life to a good, old-fashioned foot race. RB5X gets the race off
to a clean start with the sound of a starting pistol, and then times the event and forms
an invisible finish line with its sonar. When a runner returns to the starting line and
crosses the sonar beam, RB5X announces his or her time and prepares for the next racer.
The robot keeps track of each runner's score, announces the time at the end of each race,
and broadcasts any new record set.
Action Software Overviews (continued)
10) SPIN THE ROBOT
"Spin-the-Robot" contains a captivating game for young children. Place your RB5X in a
circle of children , turn it on, and start the software routine by pressing one of the
robot's bumpers. RB5X spins, stops, and points to a child, asking him or her to perform
a simple task. RB5X responds enthusiastically before spinning, stopping, and selecting
the next player. Children are fascinated for hours!
11) BUMPER MUSIC
"Bumper Music" module enables you and RB5X to make beautiful music together. To
compose tunes using "Bumper Music" you press the eight bumpers like keys of a piano;
each of the panels is assigned a musical note value by the software. When you have
keyed in all the notes you want, you press a combination of bumpers, and RB5X plays
back your tune.
12) NURSERY RHYMES
The "Nursery Rhymes" software module allows RB5X to entertain children of all ages
by reciting seven different nursery rhymes at the press of a bumper. This module is not
only entertaining, it also provides children with a fun, friendly introduction to RB5X
Educational Assistant.
Appendices
Caution/Important
The infrared sensor
on the bottom of RB
works best when the
white guiding tape is
placed on a dark
surface. This
provides the contrast
that is needed for RB
to find the charger
nest.
Battery Charge Life
Battery-charge life for the RB5X and, consequently, the amount of time the robot runs
between charges depends on the total load used by all of the robots various systems.
The average run time of a fully charged RB5X is four to eight hours, depending on the
number of peripherals attached to the robot and on the tasks you have asked your robot
to perform since it was last charged. All devices on the robot use current to a greater or
lesser degree;
When new and fully charged, RB5X’s batteries are about 6.6 volts. When half
discharged, the voltage drops to about 6.0 volts. If the robot is programmed to recharge
its batteries on its own, it usually has enough power to seek out its charger-nest when
the voltage has dropped to 6.0 volts. A rough rule to follow is that the robot needs as
much time to find its nest as it used when it left to perform some function.
Your RB5X runs on the power generated by two sealed lead-acid, rechargeable
batteries: one six-volt, 5 or 7 amp-hour battery handles the electronics; one six-volt, 10
amp-hour battery powers the LEDS, the sonar, the relays, and the motors. A battery
charger-nest that operates on any 110 volt, 60 cycle, AC source allows the robot to
charge its batteries when the voltage drops. This is also the same for charger-nests that
require a 220 volt source.
•
Brass charger pins located on the lower skirt of the robot that make contact
with the brass strips on the charger-nest. A low battery sense circuit that
enables the robot to monitor its charge.
•
A charger-finder routine that allows you to program the robot to seek out its
charger-nest.
•
A light/dark infrared sensor system, used when the robot is programmed to find
its nest on its own, which allows it to “see” a white tape on a dark floor and
follow it to its charger-nest.
•
A charge-maintenance routine that allows RB5X to establish and maintain
contact with the nest until its batteries are fully charged.
•
An automatic battery-shutdown circuit that switches the robot off when the
voltage of either battery drops to about 5.4 volts.
•
A battery charge-level LED bar on the interface panel that allows you to
visually monitor the robot’s charge.
The output of the charger-nest is about 7.5 volts at 1.5 amps, which is sufficient for an
overnight charge should you operate your robot for long periods of time. The charger
operates only on 110 volts AC; for any other voltage, you must use a converter. If that
isn’t possible, contact General Robotics Corporation and we will suggest an alternative.
The charger-nest was designed so that it will not overcharge the batteries. In fact, we
suggest that you turn OFF your robot when not in use to ensure that it remains fully
charge
Appendices
FAQ
Q: Can I add more
components to
RB5X?
A: See “Options” for
more information on
currently available
optional components.
Caution/Important
NEVER leave your
robot ON for
extended periods of
time without
checking the voltage
and recharging the
batteries as needed.
If the charge of either
battery is allowed to
drop below 5.4 volts,
the automatic
battery-shutdown
circuit switches the
robot off.
Charging the RB5X with the Recharge Cable
Also included with the RB5X is a recharge cable. This cable gives you the option of
using the telephone jack cable to hook the robot directly into the charger. This cable
enables you to charge the RB5X, without it “snuggling” up to the nest. This method of
charging also allows you to have the RB5X running certain programs at the same time.
(All systems within the RB5X work while the robot is charging, except the sonar.)
To charge the RB5X using the cable follow the steps outlined below:
1.
Carefully move the RB5X within cable reach of the already setup charger-nest.
2.
Insert one end of the telephone jack cable into RB5X. The cable jack is
located on the skirt of the robot approximately 1 inch to the right of the brass
charging pins on the RB5X.
3.
Insert the other end of the cable into the jack in the charger nest. The jack for
the RB5X is located on the bottom right corner of the front of the charger-nest.
As with the normal charging procedure, note that the red LEDs come on
identifying that the robot is charging. See above for details.
Appendices
FAQ
Q: The upper light
does not come on
immediately?
A: Switch the robot
ON and then OFF. If
the robot is making
contact or is plugged
in, the upper LED
should come on.
When it goes out or
pulses at a slow rate,
this indicates that
your RB5X is fully
charged.
FAQ
Q: RB5X's charger
pins are not making
a solid contact with
the brass strips on
the charger-nest?
A: You may want to
use the optional
recharging cable.
Setting Up the Battery Charger Nest
To set up RB5X battery charger nest:
1. Choose a location that will be accessible to your robot.
For example, if your home has two stories and you will be using your robot
mostly on the upper level, don’t situate the charger-nest on the lower level
2.
Plug the nest into a 110-volt AC outlet or international at 220 volts.
3. Place the charger against the wall.
4.
Notice that the lower red LED on the charger nest lights up when the charger is
plugged into the outlet.
5.
Push the robot into the charger and note that the upper red LED lights up when
the charger pins make contact with the brass strips, if the robot’s batteries need
charging.
Whenever you notice the robot’s battery charge dropping, you may push it into its nest,
ensuring that it makes good contact with the charger.
Appendices
FAQ
Q: What if the
shutdown circuit
switches the robot
off?
A: Turn the power
switch OFF, push
RB5X into its charger
nest, and fully
recharge the
batteries. After
recharging, turn the
power switch ON and
press the power-reset
button.
Setting Up RB5X’s Charger-Finder Guidance Strip
Now that you have set up the charger nest in a good location you are ready to lay down
the very sophisticated guiding device. This device, in conjunction with the robots
infrared sensor, will help the RB5X find and “snuggle” itself into the charger nest.
Please follow the steps below very carefully.
1.
Pull a strip of the sophisticated guiding device (the masking tape) off the roll.
Three or four feet is good but you should experiment with the length so that
RB will find the charger in a reasonable amount of time while following a
random walk pattern.
2.
Lay the strip down on the floor so that it is perpendicular to the nest and
centered on the brass contact strips.
3.
Stick the tape firmly to the floor, starting in the cradle of the charger nest and
moving away.
When the charge finder routine is running, the RB5X will wander around, find the strip
of tape and then follow it into the charger nest. This program allows RB5X to keep the
batteries fully charged
Appendices
Charge-Maintenance Program
Low-Battery Sense Circuit
RB5X contains a low-battery sense circuit that constantly monitors the battery charge of
both the robot's batteries. If either battery charge drops below 6.0 volts, the sense line is
active. It might be instructive for you to look at the low-battery sense bit.
Enter the following short program:
NEW #1000
NEW
10 @#7803 = #98:REM INITIALIZE I/O PORT
20 PRINT @#7802 AND #10:REM MASK VALUE AT PORT
30 GO TO 20:REM APPROPRIATE BIT
RUN (PRESS RETURN)
When the battery voltage is 6.0 or above, the number displayed on your computer's
monitor is 16, which is the decimal equivalent of having all bits at location #7802 equal
to 0 (zero), except the battery-sense bit itself, which is 1. If a 0 displays, one of the
batteries is low.
You may adjust the level at which the sense bit changes using the R29 trimmer
potentiometer located on the left side of the CPU board below the horn. The
potentiometer was adjusted at the factory to change at 6.0 volts; you may want to set it
so that the bit changes at 6.1 or 6.2 or 5.9.
NOTE: As the batteries age, the discharge curve may shift and you will need to adjust
R29 slightly anyway.
After you have had your RB5X for a while, check the battery levels. If one is
somewhere near the level you would like recharging to begin, adjust R29 using the
preceding program until the number displayed is 0. Push the software reset button on
the interface panel to stop the program.
Appendices
Charger-Finder Program
Did you Know?
The photodiode
conducts a current if
sufficient light falls
on it, changing the
state of the voltage
comparator LM392.
Potentiometer R30
sets the threshold at
which this state
changes. R30 is
adjustable through a
hole in the card cage,
and is located just
below R29.
Your RB5X utility software module contains a machine-code version of the chargerfinder routine. A Tiny BASIC listing of this routine appears below in case you would
like to include this code in any of the custom programs you write for the robot.
Whether you use the routine we provide or write one of your own, your charger-finder
program should include a look at the low-battery sense bit, as described in the previous
Appendix, to see whether or not the robot's batteries need charging.
One of the first subroutines in your program should also be a step that turns on the
infrared LED on the robot's undercarriage. The light from this LED is directed down to
the floor and is reflected back to the photodiode located near it.
Let's look at this bit.
Assume that your RB5X is on a dark floor and that the tape is white. Enter the
following program:
NEW #1000
NEW
10 @#7803 = #98:REM INITIALIZE I/O PORT
20 @#7801 = #02:REM TURN ON IR LED
30 PRINT @#7802 AND #40:REM MASK VALUE AT PORT
40 GOTO 30:REM APPROPRIATE BIT
RUN (PRESS RETURN)
To check that the photodiode is turning on and off depending on whether it is over light
or dark, place a piece of your tape on a narrow strip of cardboard or on a ruler. Move
the tape back and forth under RB5X, and adjust the R30 potentiometer until bit 6
changes with the movement of the tape. A 0 indicates that the photodiode is
conducting; and a 64 indicates that the light from the LED is not being seen by the
photodiode.
To modify the provided charger-finder routine so that it works using a dark tape on a
liqht floor, you must change the variable B in line 100, 270, and 470, which is the tape
detect byte, to 64 instead of 0.
Once you have adjusted the photodiode system and set up the charger with tape on the
floor, you are ready to test your program. Load your charger-finder routine and run it.
Charger-Finder Program (continued)
If RB5X's batteries are not actually low, adjust potentiometer R29 so that bit 4 at #7802
is low (a 0 displays on your screen), and RB5X will begin searching for its nest. When
the robot detects the tape, it begins to make a left-to-right sweeping motion, rotating offcenter across the tape until it finds the nest. If it happens to follow the tape away from
the nest instead of toward it, it will come to the end of the tape, rotate 180 degrees and
return to the nest.
Check to see that the upper LED is lit, indicating that RB5X has made good contact
with its charger. Another way to determine if contact has been made is to connect your
robot to your computer and to run the following program:
10 @#7803 = #98
20 PRINT @#7802 AND #20
30 GO TO 20
The number 32 is displayed on your monitor until contact is made, at which time 0 is
displayed.
Charger-Finder / Charge-Maintenance Tiny BASIC Program
10 REM CHARGE - FINDER ROUTINE • 1998 DECEMBER 1
20 REM COPYRIGHT 1984-1998 GENERAL ROBOTICS CORPORATION •
All RIGHTS RESERVED
30 REM INITIALIZE I/O AND CHARGE FINDER LED
40 GOSUB 2000
50 REM GO FORWARD AND START LOOKING FOR TAPE
60 @#7802=9
70 REM SET B EQUAL TO TAPE DETECT BYTE
80 B=@#7802 AND #40
90 REM TAPE ?
100 IF B=O GOTO 200
110 GOTO 80
200 REM TAPE FOUND, NOW FOLLOW IT!
210 REM RE-INITIALIZE
220 GOSUB 2000
230 REM TURN LEFT OFF CENTER UNTIL TAPE IS FOUND
Charger-Finder / Charge-Maintenance Tiny BASIC Program (continued)
240 @#7802=8
250 DO
260 B=@#7802 AND #40
270 IF B=O GOTO 370
280 C=@#7802 AND #20
290 IF C=O GOTO 1000
300 DELAY 100
310 T=T+l
320 UNTIL T=200
330 CLEAR
340 REM RE-INITIALIZE
350 GOSUB 2000
360 GOTO 400
370 REM TAPE FOUND, FLASH LEDS AND PAUSE 300 MSEC
380 @#7801=#7C
390 DELAY 300
400 REM RE-INITIALIZE
410 GOSUB 2000
420 CLEAR
430 REM TAPE FOUND GOING LEFT, NOW GO RIGHT OFF CENTER
440 @#7802=1
450 DO
460 B=@#7802 AND #40
470 IF B=O GOTO 560
480 C=@#7802 AND #20
490 IF C=O GOTO 1000
500 DELAY 100
510 UNTIL T=200
520 CLEAR
Charger-Finder / Charge-Maintenance Tiny BASIC Program (continued)
530 REM RE-INITIALIZE
540 GOSUB 2000
550 GOTO 430
560 REM TAPE DETECTED, FLASH LEDS AND PAUSE 300 MSEC
570 @#7801=#7
580 DELAY 300
590 REM RE-INITIALIZE
600 GOSUB 2000
610 CLEAR
620 GOTO 230
1000 REM CHARGE-MAINTENANCE ROUTINE MAINTAINS CONTACT
WITH NEST
1010 REM IF CONTACT LOST, THE ROBOT TRIES ONE OF TWO
STRATEGIES:
1020 REM 1) IT PULSES FORWARD IN 100 MSEC PULSES FOR 5 TRIES
1030 REM 2) IF 1 IS NOT SUCCESSFUL, IT BACKS UP AND TRIES AGAIN
1040 REM INITIALIZE
1050 GOSUB 2000
1060 CLEAR
1070 REM TURN ON LED #2 AND FLASH DURING MAINTENANCE
FUNCTION
1080 CLEAR
1100 @#7801=#04
1110 DELAY 1000
1120 @#7803=#98
1125 C=@#7802 AND #20
1130 REM CHECK TO SEE IF CHARGER IS STILL CONNECTED
1140 IF C=O GOTO 1090
1150 REM C<>O -- CHARGER IS DISCONNECTED
1160 REM INITIALIZE
Charger-Finder / Charge-Maintenance Tiny BASIC Program (continued)
1170 GOSUB 2000
1180 REM PULSE FORWARD 5 TIMES
1190 FOR T=l TO 5
1200 @#7802=9
1210 DELAY 100
1220 @#7802=0
1230 C=@#7802 AND #20
1240 IF C=O GOTO 1090
1250 NEXT T
1260 CLEAR
1270 REM THAT DIDN'T WORK, NOW BACK AND RETRY
1280 REM INITIALIZE
1290 GOSUB 2000
1300 @#7802=6
1310 DELAY 300
1320 @#7802=9
1330 DELAY 200
1340 @#7803=#98
1350 GOTO 1150
2000 REM INITIALIZATION SUBROUTINE
2010 @#7803=#98
2020 @#7801=#02
2030 RETURN
2040 REM END OF PROGRAM