1
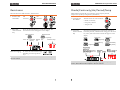
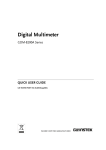
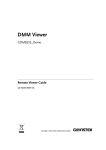
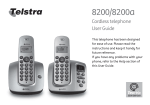
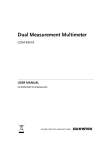
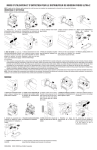
Digital Multimeter
GDM-8200A Series
QUICK USER GUIDE
GW INSTEK PART NO.
This manual contains proprietary information, which is protected by
copyrights. All rights are reserved. No part of this manual may be
photocopied, reproduced or translated to another language without
prior written consent of Good Will company.
The information in this manual was correct at the time of printing.
However, Good Will continues to improve products and reserves
the rights to change specifications, equipment, and maintenance
procedures at any time without notice.
Good Will Instrument Co., Ltd.
No. 7-1, Jhongsing Rd., Tucheng City, Taipei County 236, Taiwan.
ISO-9001 CERTIFIED MANUFACTURER
Table of Contents
Table of Contents
INTRODUCTION ..............................................................4
POWERING UP.................................................................5
BASIC ...............................................................................6
Voltage/Current ................................................. 6
Resistance ......................................................... 7
Diode/Continuity/Hz/Period/Temp.................... 8
GDM-8200A Series Quick User Guide
INTRODUCTION
The GDM-8200A series quick start guide is intended for users who are not
familiar with the instrument and need a tutorial for quickly accessing its major
functionalities. For more details such as parameters, remote control
commands, optional scanner, digital I/O, and specifications, refer to the user
manual.
This manual consists of the following chapters. Power up the instrument
according to the “Powering up” chapter, and then pick up the relevant chapter
according to your needs.
ADVANCED ......................................................................9
•
Powering up
Measurement Combinations ............................ 10
•
Basic (measurement)
•
•
Voltage/Current
•
Resistance
•
Diode/Continuity/Frequency/Period/Temperature
Advanced (measurement)
•
dBm/dB/Max/Min/Relative/Dual display
•
Measurement combinations
Front panel
overview
Shift key
Power Switch
3
4
Measurement
keys
Input
terminals
Display on/off
switch
POWERING UP
POWERING UP
1. Tilt stand
GDM-8200A Series Quick User Guide
BASIC MEASUREMENT
Pull out the handle
sideways and rotate it.
Voltage/Current
Measurement item: DCV, ACV, (DC+AC)V, DCI, ACI, (DC+AC)I
Horizontal position
2. Connect the
power cord
Tilt position
1. Connect the
test leads
Connect the power cord to
the AC Voltage input.
Voltage
measurement
Current
measurement
(>2A)
Current measurement
(≤2A)
2. Press the
measurement
key
3. Press the power Push the main power
switch on the front panel
switch
to turn the instrument on.
Press the measurement keys on the front panel (For
(DC+AC)V or (DC+AC)I, press both keys together).
The measurement result will appear on the display.
DCV ACV (DC+AC)V DCI ACI
AC, DC, or Automatic Refresh Unit
AC+DC
ranging
rate
The display contents appear and you are ready to make
measurements.
Powering up the instrument is completed
Manual ranging
(DC+AC)I
Selected range
To select the measurement range
manually, press the Up/Down keys.
For further details, see the Voltage or Current section, Basic Measurement
chapter in the user manual
5
6
BASIC MEASUREMENT
GDM-8200A Series Quick User Guide
Resistance
Diode/Continuity/Hz/Period/Temp
Measurement item: 2W resistance, 4W resistance
Measurement item: Diode test, Continuity test, Frequency, Period,
Temperature (Celsius), Temperature (Fahrenheit)
1. Connect the
test leads
2. Press the
measurement
key
2W
resistance
4W
resistance
1. Connect the
test leads
Press the measurement keys on the front panel. The
measurement result will appear on the display.
2W resistance
2. Press the
measurement
key
4W resistance
x 2 (twice)
2W or 4W
Automatic Refresh Unit
ranging
rate
All items share the same terminal.
•
Diode/Continuity
•
Frequency/Period
•
Temperature
Press the measurement keys on the front panel (For
Continuity, Period, and Fahrenheit temp, press the same
key twice). The measurement result will appear on the
display.
Diode
Continuity
Selected range
x2(twice)
Temp(Celsius)
Period
x2 (twice)
Manual ranging
Frequency
Temp(Fahrenheit)
x2 (twice)
To select the measurement range
manually, press the Up/Down
keys.
For further details, see the Resistance section, Basic Measurement chapter in
the user manual
For further details, see the Diode/Continuity/Frequency/Period/Temperature
section, Basic Measurement chapter in the user manual
7
8
ADVANCED MEASUREMENT
Measurement Combinations
ADVANCED MEASUREMENT
Basic + Advanced measurement combinations
Advanced
Measurement
Measurement item: dBm, dB, Max, Min, Relative, Dual display
1. Make a basic
measurement
Follow the procedures in the Basic measurement
chapter, page6. For measurement combinations (basic
+ advanced, dual display), see page10.
2. Press the
measurement
key
Press the measurement keys on the front panel. The
measurement result will appear on the display.
Item
GDM-8200A Series Quick User Guide
Basic Measurement
AC/DCV AC/DCI
2/4W
Hz/P
°C/°F
dB
●
—
—
—
—
dBm
●
—
—
—
—
—
Max/Min
●
●
●
●
●
—
Relative
●
●
●
●
●
—
Descriptions
Hold (*)
●
●
●
●
●
—
Shows
10*log10(1000*Vrdg2/Rref)
Compare (*)
●
●
●
●
●
—
Math (*)
●
●
●
●
●
—
dB
Shows (dBm − dBmref)
Dual Display
●
●
●
●
—
—
Max
Shows the maximum reading
(*): For Hold, Compare and Math function details, see the Advanced
Measurement chapter in the user manual.
Keys
dBm
Min
x2
Shows the minimum reading
—
Dual display combinations
Relative
Shows the relative value
compared with the reference
Dual
display
Shows the result of another
measurement item (example:
AC Voltage as the 2nd item)
Combinations
Note
For further details including other measurement items (Hold, Compare, and
Math), see the Advanced Measurement chapter in the user manual.
9
10
Any of the following items can be combined together for
dual display measurements (for example ACV + Hz,
DCV + DCI)
•
ACV
•
DCI
•
DCV
•
Hz/P
•
ACI
Selecting other functions (such as 2W resistance) is
possible but may not be useful, and their accuracies are
not guaranteed.