1
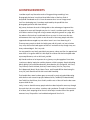
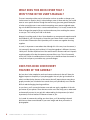
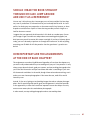
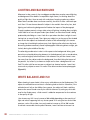
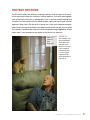
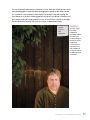
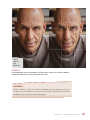
Canon 5D Mark III:
From
Snapshots to
Great Shots
Ibarionex Perello
Canon 5D Mark III: From Snapshots to Great Shots
Ibarionex Perello
Peachpit Press
1249 Eighth Street
Berkeley, CA 94710
510/524-2178
510/524-2221 (fax)
Find us on the Web at: www.peachpit.com
To report errors, please send a note to: [email protected]
Peachpit Press is a division of Pearson Education.
Copyright © 2013 by Peachpit Press
Acquisitions Editor: Rebecca Gulick
Development and Copy Editor: Elizabeth Kuball
Production Coordinator: Myrna Vladic
Compositors: David Van Ness, Myrna Vladic
Proofreader: Patricia Pane
Indexer: Valerie Haynes-Perry
Interior Design: Riezebos Holzbaur Design Group
Cover Design: Aren Straiger
Cover Image: Ibarionex Perello
Back Cover Author Photo: Ted Waitt
Notice of Rights
All rights reserved. No part of this book may be reproduced or transmitted in any form by any
means, electronic, mechanical, photocopying, recording, or otherwise, without the prior written
permission of the publisher. For information on getting permission for reprints and excerpts,
contact [email protected].
Notice of Liability
The information in this book is distributed on an “As Is” basis, without warranty. While every
precaution has been taken in the preparation of the book, neither the author nor Peachpit Press
shall have any liability to any person or entity with respect to any loss or damage caused or alleged
to be caused directly or indirectly by the instructions contained in this book or by the computer
software and hardware products described in it.
Trademarks
Many of the designations used by manufacturers and sellers to distinguish their products are claimed
as trademarks. Where those designations appear in this book, and Peachpit was aware of a trademark
claim, the designations appear as requested by the owner of the trademark. All other product names
and services identified throughout this book are used in editorial fashion only and for the benefit of
such companies with no intention of infringement of the trademark. No such use, or the use of any
trade name, is intended to convey endorsement or other affiliation with this book.
13-digit ISBN: 978-0-321-85685-2
10-digit ISBN:
0-321-85685-6
987654321
Printed and bound in the United States of America
DEDICATION
Para Raquel, Pablo y Margarita. Te quiero con todo mi corazon.
ACKNOWLEDGMENTS
I consider myself very blessed to make a living practicing something I love.
Photography has been in my blood since Mike Cohen of the Boys Club of
Hollywood introduced me to it. From the moment that I saw an image reveal
itself in a developing tray, I have been captivated by the possibilities that
photography promises and often delivers.
My journey has been the result of being able to take advantage of opportunities
as opposed to some well thought-out plan. As I result, I consider myself very lucky
to be able to make a living from using a camera and putting words on a page. But
I’m under no illusion that I’ve achieved this on my own. It’s clear to me that any
achievements that I may lay claim to are the result of the many people who have
supported and encouraged me, even when I wasn’t sure I was deserving of it.
There are many people to thank for helping me walk this path, not least of whom
is my wife, whose continued support and love is invaluable to me, though I may not
always acknowledge it. She is my rock.
I’m very grateful to my family, particularly my parents, whose sacrifices I’ve appreciated
even more as I’ve gotten older. It’s their hope for a better life that has helped make
my accomplishments, such as this book, possible.
My friends continue to be important in my journey as a photographer. From them
I continue to derive inspiration and the pleasure of their company. People including
Martin Bailey, Emilio and Elena Banuelos, Dana Barsuhn, RC Concepcion, Jeff Curto,
Tony DiZinno, Charlie Holland, Seth Joel, Dennis Keeley, Eric Kim, Tony Luna,
Chris Marquardt, Martin Taylor, Marco Torres, and Everard William have been gifts
to my life, and I thank them for their continued friendship.
The Peachpit Press team has been great to me and I’ve truly enjoyed collaborating
with them on each successive project. Rebecca Gulick, Ted Waitt, Elizabeth Kuball,
Sara Todd, Gary-Paul Prince, Scott Cowlin, and the rest of the staff are the best team
anyone could ask for.
Lastly, I want to thank the many people who have been helped in some way through
the work that I do as an author, a teacher, and a podcaster. Though I will never meet
all of them, their accepting what I have to offer helps to make some of the special
moments in my life possible. I am humbled and grateful for all of it.
Contents
INTRODUCTION
ix
CHAPTER 1: THE 5D MARK III TOP TEN LIST
3
Ten Tips to Get You Started
Poring Over the Camera
4
1. Charge Your Battery
7
2. Set Your ISO
8
3. Set Your White Balance
9
4. Set Your Exposure Mode
10
5. Set Your Autofocus Mode and Focus Point
11
6. Set the Image Recording Quality
14
7. Manage Your Memory Cards
16
8. Choose a Color Space and Picture Style
18
9. Choose a Metering Mode
20
10. Set Your Information Display
21
CHAPTER 2: FIRST THINGS FIRST
25
What to Know Before You Begin Taking Pictures
Poring Over the Picture
26
Exposure
30
White Balance
37
Cleaning the Sensor
41
Lenses and Focal Lengths
43
CHAPTER 3: THE EXPOSURE ZONE
49
Exposure Modes and Metering
Poring Over the Picture
+
50
A : Scene Intelligent Auto Mode
54
P: Program Mode
56
Tv: Shutter Priority Mode
58
Av: Aperture Priority Mode
61
M: Manual Mode
64
Exposure Lock
67
CONTENTS
v
Exposure Compensation
69
Metering Modes
72
How I Shoot: A Closer Look at the Camera Settings I Use
75
CHAPTER 4: THAT WONDERFUL FACE
81
Settings and Features to Make Great Portraits
Poring Over the Picture
82
Aperture Priority Mode
86
Lighting and Background
88
White Balance and ISO
88
Portrait Metering
91
The AE Lock Feature
92
Focus: The Eyes Have It
92
Focus Lock
96
How to Build a Composition
98
Classic Black-and-White Portraits
103
CHAPTER 5: MOVING TARGETS
109
Tricks to Capturing Motion
Poring Over the Picture
110
The Three Questions to Ask Yourself When
You’re Photographing Movement
114
What Exposure Modes Can Do for Your Motion Photos
119
Keeping It in Focus
123
Drive-Mode Options
128
Choosing a Lens
130
Creating a Sense of Motion
131
CHAPTER 6: LANDSCAPE PHOTOGRAPHY
137
Getting the Most Out of Your Landscape Photography
vi
Poring Over the Picture
138
Sharp and In Focus: Using Tripods
142
Exposure Modes
144
ISO
144
White Balance
144
Picture Styles
145
The Electronic Level
146
C A N O N 5 D M A R K I I I : F R O M S N A P S H O T S T O G R E AT S H O T S
The Golden Hour
147
Focusing
148
Composition
151
CHAPTER 7: LOW LIGHTING
157
Shooting When the Lights Get Low
Poring Over the Picture
158
Raising the ISO: The Simple Solution
162
Using Fast Glass
164
Stabilizing the Situation
166
Focusing in Low Light
166
Using the Self-Timer for Sharper Photographs
167
Using Flash
167
CHAPTER 8: CREATIVE COMPOSITIONS
179
Improving Your Pictures with Sound Compositional Elements
Poring Over the Picture
180
The Five Visual Draws
184
Working Together
191
Depth of Field
192
Backgrounds
194
Leading Lines
195
CHAPTER 9: AT THE MOVIES
199
Creating Video with the 5D Mark III
Poring Over the Video Camera
200
Getting Started
202
Shooting and Playback
205
Exposure
207
White Balance
208
Picture Style
208
Composing Videos
209
Focusing
210
Recording Quality Audio
211
Recording Good Video
215
Accessorizing
217
Editing Video
219
CONTENTS
vii
CHAPTER 10: ADVANCED TECHNIQUES
223
Discovering the Creative Diversity in Your DSLR
viii
Poring Over the Picture
224
Copyright Information
229
Rating Images
229
Updating Firmware
230
Mirror Lockup
233
Bracketing Exposures
234
HDR Photography
235
Multiple Exposures
238
My Menu
242
INDEX
244
C A N O N 5 D M A R K I I I : F R O M S N A P S H O T S T O G R E AT S H O T S
Introduction
Buying a new camera is always exciting. Of course, you get the thrill of holding a new
piece of photographic equipment and appreciating its styling and functionality. But
the real excitement comes from the promise that it offers to your photography. It’s
how this new tool will help you to fulfill your vision that makes such an investment
truly worthwhile.
This book on the Canon EOS 5D Mark III aims to tell you much more than just how
to set a particular control on your camera. Instead, I share the when, why, and how
to help you make the most of this exciting DSLR. I think there is no better way to
do that than by sharing with you how I use the camera and how it makes a difference in my own photography.
This book is not a comprehensive and exhaustive guide to every feature that the
5D Mark III offers—you have the user’s manual for that. Instead, I focus my attention on those controls and features that I believe make the biggest difference in
my photography and, hopefully, in yours. Regardless of whether you shoot portraits, travel, landscapes, sports, or still life, the words and images that I share in
this book will help you gain confidence in how to make great photographs.
Whether this is your first DSLR or you’re upgrading from a previous model, this
book will provide you a valuable context for the many features found on the
5D Mark III. But before I delve into the meat of things, I want to answer some
common questions that I believe will help you to make the most of what this
book has to offer.
ix
WHAT DOES THIS BOOK COVER THAT I
WON’T FIND IN THE USER’S MANUAL?
The user’s manual provides concise information on how to enable or change a particular control or function, but it’s often lacking a sense of when and why you would
want to use a specific feature. Though the manual may give some general examples
of when you might want to use evaluative metering versus center-weighted metering or Auto White Balance versus a custom white balance, it isn’t really rooted in the
kinds of images that people like you and me make every time we bring the camera
to our eyes. This is what you’ll find in this book.
Because I’m writing much of what I share based on my own personal experience with
the 5D Mark III, you’ll find a point of view that you’d never find in a user’s manual.
It’s the kind of information that I’d provide you if we were out together shooting
together.
As such, it’s important to remember that although this is the way I use the camera, it
isn’t necessarily the way you should use it. Every photographer is different. However,
I think you’ll find that my discussion of the camera and its features and how it impacts
my photography will make the camera more accessible to you. This will eventually
evolve into a level of confidence that will allow you to handle and use the camera in
a way that’s unique to you and the way you make images.
DOES THIS BOOK COVER EVERY
FEATURE OF THE CAMERA?
No, but what it does emphasize are those features and controls that will have the
biggest impact on the quality of your photographs. Not only do I go into detail on
what I consider the key features of the camera that will impact almost every photograph you make, but I also delve into controls that you’ll periodically use to handle
difficult and challenging shooting conditions.
As you shoot, you’ll use certain features over and over again, regardless of the subject matter of your photos. These features are the ones that I help you to understand
and eventually master. As you gain this understanding, the importance (or lack of
importance) of other features will become clearer to you.
So, instead of someone else telling you what’s best, you’ll be making informed
decisions on these controls based on your own images and what you need as a
photographer.
x
C A N O N 5 D M A R K I I I : F R O M S N A P S H O T S T O G R E AT S H O T S
SHOULD I READ THE BOOK STRAIGHT
THROUGH OR CAN I JUMP AROUND
AND USE IT AS A REFERENCE?
You can use it in both ways, but I encourage you to at least read the first few chapters, even if you believe it’s information that you’re already familiar with. As I said
earlier, I’m sharing my own perspective on the camera and its key features, so these
chapters are written from a point of view that may provide you fresh insight to a
familiar feature or control.
I suggest that you approach the information in this book at a modest pace. I know
you’re eager to get out and shoot and produce some amazing photographs, but
don’t pressure yourself to master this camera overnight. If you buy a Steinway piano
today, you won’t be ready to perform at Carnegie Hall tomorrow. As with anything,
mastering your 5D Mark III will take practice—but the good news is, practice can
be fun!
HOW IMPORTANT ARE THE ASSIGNMENTS
AT THE END OF EACH CHAPTER?
The assignments can make a big difference. Regardless of how clear the chapters are,
you won’t really understand what you’re reading until you put it into practice. It’s only
when you put down the book, grab your camera, and start making photographs that
you’ll take the information and tips found here and make it something of your own.
All the manuals and videos in the world, though informative and entertaining, won’t
make you or me a better photographer. If that were the case, we’d all be worldfamous by now.
Instead, it’s the act of going out and making images that makes us better photographers. And it’s practicing with specific goals and assignments in mind that provides
us the opportunity to learn those small but important lessons that help us not only
master a new camera, but also make better photographs.
In other words, we stop taking photographs and we start making them.
INTRODUCTION
xi
HOW CAN I MAKE THE MOST OF
THIS BOOK AND MY CAMERA?
Slow down. Impatience has likely produced more bad photography than any cheap
camera or poorly written instruction manual.
We’re all eager to make better photographs, especially when we hold brand-new
cameras in our hands, but there’s something to be said for practicing patience.
Patience is valuable not only as you’re trying to understand a new tool, such as the
5D Mark III, but especially when it comes time to making photographs.
When I’m patient and thoughtful about what I’m doing with my camera, I’m much
more consistent with the images I produce. When I’m impatient and rushing, the only
thing I do consistently is make lackluster photographs or, worse yet, ruin great photographs with poor technique.
The joy of photography comes from making photographs that complete my vision of
the person, the scene, and the moment. And I can repeatedly do that by knowing my
instrument, practicing, and remembering to have fun.
I hope that this book helps you to discover that joy for yourself.
Share your results with this book’s Flickr group!
Join the group here: www.flickr.com/groups/
Canon5DMarkIIIFromSnapshotstoGreatShots
xii
C A N O N 5 D M A R K I I I : F R O M S N A P S H O T S T O G R E AT S H O T S
This page intentionally left blank
4
ISO 1000
1/320 sec.
f/2.8
24–105mm lens
That Wonderful
Face
SETTINGS AND FEATURES TO MAKE GREAT
PORTRAITS
People are the most-often photographed subject with any camera, and no
less so with the 5D Mark III. This camera offers a range of versatility and
control that you might not have enjoyed with your previous camera,
which should make photographing people easier and more fun. Getting
good portraits is about much more than having the correct settings on
your camera. It’s also about being aware of your subject, the background,
and the lighting. In this chapter, I tell you how to consider all those
factors in order to make great photographs of people—whether they’re
family, friends, or a great subject you meet on the street.
81
PORING OVER THE PICTURE
Choosing an area of
open shade provided
me a soft, diffused
quality of light, which
illuminated my subject
and the background.
Setting the white balance
to the Shade preset
helped ensure accurate
color for the scene.
82
C A N O N 5 D M A R K I I I : F R O M S N A P S H O T S T O G R E AT S H O T S
To emphasize my subject, Lance, I moved in close and used a
ISO 320
1/400 sec.
f/4
24–105mm lens
limited depth of field to blur the foreground and background.
By focusing on his eyes, I was able to ensure critical sharpness
there, in addition to making them the anchor of the image.
By positioning myself at an
angle to the brick wall, I was
able to use the lines of the
surface to help guide the
viewer’s eye to my subject.
C H A P T E R 4 : T H AT W O N D E R F U L FA C E
83
PORING OVER THE PICTURE
The background is often as important to a photograph as the subject. A poor
background, as well as bad lighting, can ruin an image. In this image, I used the
frame within a frame created by the paint on the wall to “contain” my subject.
The contrast between the color of his suit and the light blue background helps
to draw the viewer’s eye to my subject and his expression.
By using Aperture Priority mode,
I was able to control depth of
field. I still paid attention to my
shutter speed in order to ensure
that camera shake didn’t reduce
sharpness.
A moderate telephoto lens
provides a focal length that can
render the subject, well, free of
the distortion that might occur
with wider focal-length lenses,
particularly at close distances.
Making or placing my subject in
the brightest area of the frame
helps to draw the viewer’s eye.
84
C A N O N 5 D M A R K I I I : F R O M S N A P S H O T S T O G R E AT S H O T S
I often look for interesting
backgrounds when scouting
a location even before I
begin posing my subject.
ISO 400
1/1250 sec.
f/2.8
85mm lens
C H A P T E R 4 : T H AT W O N D E R F U L FA C E
85
APERTURE PRIORITY MODE
Of the exposure modes mentioned in the previous chapter, Aperture Priority will
most often be the best choice for creating portraits. Because it provides you complete
control over depth of field, Aperture Priority mode allows you to control the look
of your image, whether it’s a tightly framed headshot or an environmental portrait,
such as this image of a parking attendant (Figure 4.1). The choice of aperture will
either allow you to throw the background dramatically out of focus or render much
of the frame acceptably sharp. The choice of aperture achieves more than simply a
good exposure; it also becomes the means by which you begin to creatively control
the look of your photograph.
Now, don’t think that you have to use a crazy-fast lens (such as an f/1.2 or f/2.8) to
achieve great results and get a blurry background. Often an f-stop of f/4 or f/5.6 will
be sufficient, and you might even find that having an extremely wide-open aperture
gives you too little depth of field for a portrait, since you want most of the face to
appear sharp.
I often shoot my portraits with a working aperture of f/4 or f/5.6 in order to get most
of the face tack sharp. Though I sometimes use lenses with wider apertures for portraits, it’s often only when I’m seeking that unique look provided by such a shallow
depth of field.
GO WIDE FOR ENVIRONMENTAL PORTRAITS
Portraits can be about more than simply creating a headshot. A great portrait can be
as much about the space that a subject inhabits as it is about the subject itself. For such
images, a wide focal length and a moderate aperture such as f/5.6 or smaller can provide
the kind of depth of field needed to reveal the details of the subject and the space that he or
she inhabits.
A wide-angle lens can be any focal length from 35mm or wider. Such lenses not only
include more in the frame, but they also provide a more generous depth of field than
telephoto lenses do. A wide-angle lens can be especially beneficial when you’re working
in a very tight, enclosed environment.
However, be careful about using a wide-angle lens very close to your subject, because it
can lead to some distortion. Keep your subject away from the edge of the frame. This will
reduce the distortion, especially with very wide-angle lenses.
86
C A N O N 5 D M A R K I I I : F R O M S N A P S H O T S T O G R E AT S H O T S
ISO 400
1/1000 sec.
f/5.6
50mm lens
FIGURE 4.1
A 50mm lens and
the choice to place
my subject offcenter allowed
me to include this
personalized
booth of a parking
attendant.
C H A P T E R 4 : T H AT W O N D E R F U L FA C E
87
LIGHTING AND BACKGROUND
Whenever I make a portrait, the two biggest considerations revolve around lighting
and background. Even before I’ve exposed a single frame, I’m thinking about the
quality of light that I have to work with and where I’m going to place my subject.
When I don’t consider these two factors carefully, the result is often a lackluster portrait. Even if I have the most beautiful subject in the world in front of my lens, bad
lighting and a distracting background will reduce the impact of the photograph.
Though I produce portraits using a wide variety of lighting, including direct sunlight,
I often look for an area of open shade. Open shade is an area where shade is being
produced by a building or a tree. I look for a spot where the direct sunlight is transitioning into an area of shade. Then I place my subject just at the cusp of that shaded
area so that the subject has the benefit of some of the reflected light; this creates
an image that is both bright and contrasty. Such lighting often eliminates the harsh,
distracting shadows commonly found in photographs made using direct sunlight, particularly during the middle of the day.
The other big consideration I make is with respect to the background. Many great
portraits are ruined by distracting elements in the background, such as tree branches,
cars, or other brightly colorful elements. Such elements can pull the viewer’s attention away from the subject and to the background, thus diminishing the impact of
the portrait. So, I often try to choose as simple and as clean a background as I can
find. This often calls for me to move my subject into a better location. I won’t hesitate to ask my subject to move if it means I’ll be able to make a better photograph
(Figure 4.2).
WHITE BALANCE AND ISO
When shooting in open shade, I often set my white balance to the Shade preset. This
adjusts the white balance to maintain a flattering look to the skin. Otherwise, if the
white balance is left on the AWB or Sunny preset, the subject will look a tad blue,
because the area of shade naturally has a bluish colorcast. By setting my white balance for the Shade preset, a little warmth is added to compensate for that coolness
in the quality of light.
I also increase my ISO. It may increase to 200 to 400, depending on the quantity of
light and what’s happening with my shutter speed. If I’m using the lens and a wide
aperture, such as f/4 or wider, I may only need to increase my ISO to 200 in order
to achieve a reasonable shutter speed. However, I won’t hesitate to increase it to
88
C A N O N 5 D M A R K I I I : F R O M S N A P S H O T S T O G R E AT S H O T S
ISO 640
1/640 sec.
f/4.0
24–105mm lens
FIGURE 4.2
I moved this subject
from an area of
open shade but
with a cluttered
background. I
repositioned him
against this wall
that served as a
better background,
free of distractions.
C H A P T E R 4 : T H AT W O N D E R F U L FA C E
89
ISO 400 or even higher if it means that I can use a reasonable shutter speed in order
to ensure sharpness. If I fail to increase the ISO, which I unfortunately do forget to do
on occasion, the shutter speed will be too slow and there will be a drop in sharpness.
It may not be immediately evident when I’m shooting the images, but it will be painfully obvious when I enlarge the image on my computer screen.
If I move the subject into an area of direct sunlight, I set the white balance to the
Daylight preset (Figure 4.3) and I may decrease my ISO to 100 or 200. When we move
FIGURE 4.3
By presetting my
white balance for
the Daylight preset,
I was able to
achieve accurate
color using
late afternoon
light when
photographing
these young girls.
indoors where the illumination is primarily tungsten light bulbs, I’ll change my white
balance to the Tungsten light preset and increase my ISO to at least 800. In each situation, I’m evaluating the light that I have to work with, and adjusting the ISO and
the white balance accordingly. From there, I can adjust my aperture, making sure
that my shutter speed isn’t too slow. If it is, I’ll open up my aperture and/or increase
the ISO.
With these considerations made, I’m free to focus on my composition and on building
a rapport with my subject.
ISO 640
1/640 sec.
f/2.8
50mm lens
90
C A N O N 5 D M A R K I I I : F R O M S N A P S H O T S T O G R E AT S H O T S
PORTRAIT METERING
The 5D Mark III offers four different metering modes by which the light of the scene
can be measured to help you achieve an accurate exposure. Evaluative metering does
much of the heavy lifting for my photography. Even in relatively complicated lighting
situations, I’ve found that evaluative metering does a great job in giving me accurate
exposures. When I don’t like the result it’s giving me, I often use the exposure compensation feature to increase or decrease the exposure and achieve the look that I’m going
for. However, I sometimes use the partial, center-weighted average (Figure 4.4), or spot
meter when I want to emphasize my subject for the basis of my exposure.
ISO 1600
1/400 sec.
f/2.8
50mm lens
FIGURE 4.4
This low-light scene
was illuminated by
a few lamps and
called for metering the scene using
center-weighted
average metering
to ensure a good
exposure for this
interaction between
man and cat.
C H A P T E R 4 : T H AT W O N D E R F U L FA C E
91
If I have a severely backlit subject, which means the area behind the subject is considerably brighter, I may use the partial, center-weighted average, or spot mode to
isolate the exposure on my subject. This may result in the background being blown
out or overexposed, but if the background is of little importance, I’ll be okay with
that. I want to make sure that my subject is well exposed in order to retain the
important details of the face.
THE AE LOCK FEATURE
One of the available options is the ability to lock your exposure. You can lock the setting in your camera temporarily if you want to recompose your image—for example,
if you’re in an environment where there is sufficient lighting on your subject, but
the background is significantly brighter or darker (Figure 4.5). The metering in your
camera is continuous, meaning it will change depending on where the center of the
viewfinder is pointed. If you compose the image so the person is off-center, the camera will meter the wrong part of the scene.
To correct this, you can meter for one part of the image (in your subject), lock those
settings down so that they don’t change, and then recompose the scene and take
your photo.
For more on how to use the AE lock feature, turn to Chapter 3.
FOCUS: THE EYES HAVE IT
In a portrait, nothing is more important than the eyes. They eyes are the very first
place we look when looking at an image of a person. As a result, the eyes need to
be one of the sharpest elements in the frame. If the eyes aren’t in focus, the viewer’s
experience of the photograph can be diminished. It’s important to be very much in
control of where the camera is focusing, because despite how sophisticated the autofocus technology of the camera is, it doesn’t guarantee that the eyes of the subject
will always be the sharpest element in the frame.
When it comes to making a portrait, this is a perfect time to control how many of
the AF sensors are used for focus detection. For example, choosing the single-point
AF mode would be a good choice for a portrait because it would allow you to choose
a single focus point that would focus on the eyes of the subject. I did this for this
92
C A N O N 5 D M A R K I I I : F R O M S N A P S H O T S T O G R E AT S H O T S
ISO 320
1/50 sec.
f/10
28–105mm lens
FIGURE 4.5
Because so much of
the scene includes
shadows, it was
important to lock
the exposure based
on the highlights
in order to ensure
that they weren’t
overexposed.
C H A P T E R 4 : T H AT W O N D E R F U L FA C E
93
portrait of a Passion play actress (Figure 4.6). Controlling which AF sensors are used
is particularly important if you’re using a wide aperture that can result in a very narrow depth of field. Otherwise, the camera could focus on the nose or the shirt, which
could result in the eyes being slightly soft, which you always want to avoid.
If you’re making candid portraits or if the subject is moving, you may be best served
by a more moderate aperture, such as f/5.6 or f/8, which will provide you a more generous depth of field. This may require you to increase your ISO in order to maintain a
reasonable shutter speed, but it will help ensure that your subject is sharp.
TIP
As you change the composition of your photograph, the focus point may need to be
changed accordingly. If the subject is slightly turned away from the camera, it’s best to
focus on the eye closest to the camera.
TO SET UP FOR ONE-SHOT FOCUSING MODE, FOLLOW THESE STEPS:
1. Press the AF mode selection/Drive mode selection button.
2. Rotate the Main Dial to change the focusing mode to One Shot.
■
TO SET UP FOR SINGLE-POINT AF MODE, FOLLOW THESE STEPS:
1. Press the AF point selection button.
2. While looking through the viewfinder, repeatedly press the AF area selection
mode/Multi-function button to cycle through the AF area selection modes, and
choose the single-point AF mode.
■
TIP
I typically use the single-point AF for focus selection. I find it easier to place that point
directly on the location where my critical focus should be established and then recompose
the shot. Even though the single point can be selected from any of the focus points, it
typically takes longer to figure out where that point should be in relation to my subject. By
using the center point, I can quickly establish focus and get on with my shooting. If I have
the benefit of a great depth of field, such as when I’m photographing a group, I choose
zone AF or the AF point expansion mode for focus detection.
94
C A N O N 5 D M A R K I I I : F R O M S N A P S H O T S T O G R E AT S H O T S
FIGURE 4.6
The use of a
telephoto lens combined with a wide
aperture resulted
in a shallow depth
of field. So, I made
sure to detect and
lock the focus on
the eyes in order to
produce this portrait of a Passion
play actress.
ISO 100
1/200 sec.
f/3.2
70–200mm lens
C H A P T E R 4 : T H AT W O N D E R F U L FA C E
95
TO SET YOUR FOCUS TO A SINGLE POINT AND SHOOT, FOLLOW THESE STEPS:
1. Press the AF point selection button.
2. Using the multi-controller, choose your active autofocus sensor. You also can use
the Main Dial and Quick Control Dial to move to an active sensor.
3. To shoot using this focus point, place that point on your subject’s eye, and press
the shutter button halfway, until the focus point flashes and you hear the chirp.
4. While still holding down the shutter button halfway, recompose and take
your shot.
■
ORIENTATION-LINKED AF POINT
You can designate separate focus points based on whether you’re holding the camera vertically or horizontally. This helps reduce time having to change the AF point for your subject.
It’s a great help when you’re frequently changing camera orientation during a shoot.
To set up an orientation-linked AF point, follow these steps:
1. Press the Menu button and, using the Main Dial, select the AF 4 menu screen.
2. Using the Quick Control Dial, select Orientation linked to AF Point, and press
the Setting button.
3. Using the Quick Control Dial, select Select Separate AF points, and push the
Setting button.
FOCUS LOCK
Locking focus is one of the most important things to learn with an autofocus camera,
especially when making portraits. Locking focus ensures that your subject remains the
point of focus as you refine your composition, compose with your subject off-center,
or change camera orientation. It’s an important tool to prevent another part of the
subject or the background from being in focus, such as the fence that served as a
background in this portrait (Figure 4.7).
You can lock focus by either holding down the shutter button halfway or pressing
and holding the AF start button. If you’ve been using autofocus DSLRs for years,
you’ll likely be used to holding down the shutter button halfway. If you find it difficult to do without taking a photograph, the AF start button is a welcome alternative.
Not only will it allow you to lock focus, but it also will allow you to engage focus
without unintentionally making a photograph.
96
C A N O N 5 D M A R K I I I : F R O M S N A P S H O T S T O G R E AT S H O T S
You can completely separate any autofocus function from the shutter button, which
many photographers, especially sports photographers, prefer to do. When you do
this, autofocus is activated only when the AF start button is pressed. Locking the
focus becomes as simple as releasing pressure on the AF start button. Autofocus will
only resume when you reapply pressure to the AF start button. You can then assign
the shutter button to meter the scene only when it’s depressed halfway.
ISO 200
1/40 sec.
f/7.1
35mm lens
FIGURE 4.7
To create a more
interesting
composition,
I posed my subject
off-center and
used the foliage to
balance the entire
composition.
I focused on him,
locked the focus,
and recomposed
the shot in order to
keep him as sharp
as possible.
C H A P T E R 4 : T H AT W O N D E R F U L FA C E
97
TO CUSTOMIZE FOCUS ACTIVATION, FOLLOW THESE STEPS:
1. Press the Menu button and, using the Main Dial, select the Customer Function 2:
Display/Operation menu screen.
2. Using the Quick Control Dial, select Custom Controls, and push the Setting
button.
3. Using the Quick Control Dial, select AF-On, and push the Setting button.
4. Select the AF icons on the far left, and press the Setting button.
5. Using the Quick Control Dial, select the shutter button icon, and press the
Setting button.
6. Choose the Metering icon, which appears in the center, and press the Setting
button.
■
TIP
If you aren’t accustomed to working this way, I highly recommend that you practice before
shooting something important. It’s easy to forget that you’ve disabled autofocus from the
shutter button, which can result in a lot of out-of-focus photographs.
HOW TO BUILD A COMPOSITION
Now, that I’ve chosen a location that provides the best lighting and background and
I’ve sent my white balance, ISO, shutter speed, and my focus points appropriately, I
can focus more on my composition. All the technical considerations have been made,
so I don’t have to be distracted by them. The only time I need to reconsider the
technical details is if the lighting changes or I move my subject into a different area.
Otherwise, I can just focus on the subtle differences in my subject’s expression or
body language, which can give me that special something that results in a great
portrait.
Though most of our portraits may simply involve a composition where the subject
is put in the very center of the frame, we actually have a lot of choices. You can put
the subject in the center of the frame, off-center, or sometimes even at the extreme
edges of the frame. The placement of your subject within the frame and the perspective from which you shoot your subject can make or break an image. For example,
when I want to make the environment as important as my subject, I’ll position the
subject off-center to include more of the background in the composition (Figure 4.8).
98
C A N O N 5 D M A R K I I I : F R O M S N A P S H O T S T O G R E AT S H O T S
ISO 160
1/200 sec.
f/16
24–105mm lens
FIGURE 4.8
I wanted to create
a composition that
provided a sense of
place for this portrait of my friend
Paul. By orienting
the camera vertically and including
the vineyard and
sky, I produced a
sense of where
we were during
this great day of
shooting.
C H A P T E R 4 : T H AT W O N D E R F U L FA C E
99
Here are a few tips to help you create some amazing portrait compositions.
THE RULE OF THIRDS
One of the most basic rules of composition, the “rule of thirds,” is a very good principle to work with when photographing people. Imagine a tic-tac-toe board, with two
lines spaced evenly down the center of the frame both horizontally and vertically.
Your goal is to place the subject, or part of your subject, on one of the intersecting
lines. You’re basically trying to keep the person off-center without pushing him or
her too close to the edge of the frame.
This same rule can be used quite effectively when making a tightly framed photograph of the face, where you place each eye at one of those intersecting points in
order to help create a balanced composition, as I did for this portrait of master photographer Joel Meyerowitz (Figure 4.9).
The great thing about the 5D Mark III is that you can add a grid overlay to your viewfinder and LCD (when shooting in Live View) to help you with composition. You’ll
need to set up the appearance of the grid lines for the viewfinder and the LCD monitor separately. The latter is enabled when you’re using the camera in Live View mode
(in which you’re using the LCD monitor to compose your photograph).
TO SET UP THE GRID DISPLAY IN YOUR VIEWFINDER, FOLLOW THESE STEPS:
1. Press the Menu button and turn the Main Dial to access the Set-up 2
menu screen.
2. Use the Quick Control Dial to scroll down to VF grid display. Press the
Setting button.
3. Use the Quick Control Dial to enable the VF grid display. Press the
Setting button.
■
TO SET UP THE GRID DISPLAY FOR LIVE VIEW, FOLLOW THESE STEPS:
1. Press the Menu button and turn the Main Dial to access the Shoot 4:
LV menu screen.
2. Use the Quick Control Dial to scroll down to Grid Display. Press the
Setting button.
3. Use the Quick Control Dial to select the 3x3 or other grid pattern. Press
the Setting button.
■
100
C A N O N 5 D M A R K I I I : F R O M S N A P S H O T S T O G R E AT S H O T S
ISO 400
1/320 sec.
f/3.5
50mm lens
FIGURE 4.9
For my photograph of master photographer Joel Meyerowitz, I used the rule of thirds to build the
composition and placed his eyes in the top third of the frame.
REMEMBER
The rule of thirds is a “rule,” not a “law.” Don’t think that every photograph you make has
to adhere to the rule of thirds. It’s a great tool to use to build a composition, but sometimes
breaking the rules can result in a better photograph.
C H A P T E R 4 : T H AT W O N D E R F U L FA C E
101
PERSPECTIVE
Perspective, the position from which the photographer chooses to make a photograph, is important for any image, but especially when making a portrait. The point
of view from which you choose to make the photograph is the very point of view
that will impact the way the viewer experiences the photograph and the subject.
Photographers often make photographs from their own eye level, but it’s important
when making a portrait to consider the eye level of the subject, especially when
you’re photographing children (Figure 4.10). Try photographing the subject at his or
her own eye level. This creates a sense of equality between the viewer and the subject, which can help create a sense of intimacy. If you want to give the subject a sense
of power and authority, position the camera below the subject’s eye level and shoot
up slightly.
ISO 800
1/1500 sec.
f/3.5
35mm lens
FIGURE 4.10
Getting down to the child’s eye level allowed me to create a photograph that was more intimate
than what would have been created by looking down on him.
102
C A N O N 5 D M A R K I I I : F R O M S N A P S H O T S T O G R E AT S H O T S
BREAK THE RULES
When it comes to portraits, you’ll hear a lot of hard and fast rules in terms of what you
should and shouldn’t do. But I think it’s important to be willing to play and experiment,
even with unusual perspectives. Once I’ve gotten an image that I’m satisfied with, one that
follows all the traditional rules, I begin experimenting with extremes in composition or
even exposure to see what I get. Taking risks sometimes results in pleasant surprises.
CAMERA ORIENTATION
Camera orientation is another consideration to make when making a portrait. It can
dramatically change how the viewer experiences the photograph and the environment the subject is in. A horizontal orientation can be good if you want to include a
good amount of the environment in the scene, even if the background is thrown out
of focus. It not only can provide a sense of place, but also can help to draw the viewers’ attention to the subject.
A vertical composition can help emphasize the subject more by eliminating areas of
the background. This can help emphasize the face and the expression, while eliminating distracting elements in the background that might pull the viewers’ attention
away from the person.
CLASSIC BLACK-AND-WHITE PORTRAITS
There is a certain classic look to black-and-white portraiture (Figure 4.11). By eliminating color in emphasizing dark and light tones, we can experience a portrait
subject in a very different way than we do with a traditional color photograph.
Though I preferred to shoot color images and then later convert the images to black
and white, the 5D Mark III allows you to see the captured image as a black-and-white
image on your camera’s LCD monitor when you shoot in the Monochrome picture
style. If you’re shooting JPEGs, the saved file will be a black-and-white image. If you’re
shooting raw, the original raw file will still be in color, allowing you to convert the
shot into black and white using your favorite photo-editing application.
Whether you shoot and capture raw files or JPEGs, setting the display for black and
white can be a great educational tool to begin to learn to see the world in black
and white.
C H A P T E R 4 : T H AT W O N D E R F U L FA C E
103
FIGURE 4.11
ISO 800
1/400 sec.
f/4.5
50mm lens
Though most of my
images are made in
color, some images
look best rendered
as black and white.
In this image,
I added a slight
sepia tint to provide
a classic look to the
portrait of a fiddler.
TO SET YOUR PICTURE STYLE TO MONOCHROME, FOLLOW THESE STEPS:
1. Press the Creative Photo/Comparative playback (Two-image display)/Direct
print button, and use the Main Dial to select the Picture Style mode. Press
the Setting button.
2. Use the Quick Control Dial to select Monochrome Picture Style. Press the
Setting button.
■
104
C A N O N 5 D M A R K I I I : F R O M S N A P S H O T S T O G R E AT S H O T S
Your camera will continue to shoot with the Monochrome picture style until you
change it to another setting.
TO CUSTOMIZE THE PICTURE STYLE SETTINGS, FOLLOW THESE STEPS:
1. When you’re in the Picture Style section of the menu where you selected
Monochrome, press the Info button located to the left of your viewfinder.
2. Use the multi-controller to highlight the setting you want to change, and
press the Setting button.
3. Use the multi-controller to move the cursor to a new position on the scale
(the default setting will remain marked with a gray arrow) or to select a
different filter, and press the Setting button.
4. Perform the same process for the other options. Then press the Menu button
to return to the regular menu screen. You can now start shooting with your
new settings.
■
TIPS FOR SHOOTING BETTER PORTRAITS
Before we get to the assignments for this chapter, I thought it might be a good idea to leave
you with a few extra pointers on shooting portraits that don’t necessarily have anything
specific to do with your camera. Entire books cover subjects like portrait lighting, posing,
and so on, but here are a few pointers that will make your people pictures look a lot better:
• Choose a good quality of light. I often prefer an area of open shade. However, one way
to determine whether you’re shooting your subject in bad light is simply to pay attention
to what’s happening with the shadows. If you see dark and harsh shadows appearing on
the subject’s face, particularly beneath the brow, chin, or nose, you’re likely working with
high-contrast light, which is rarely flattering for a subject. If you find yourself in such a
lighting situation, move your subject into an area of open shade where the lighting will
be much more flattering and pleasing.
• Find a clean and simple background. A common mistake is to photograph a subject
but not pay attention to what’s happening in the background. Such images can include
huge distractions, which compete with the subject for the viewer’s attention. Look for
clean and simple backgrounds that are free of clutter. This will help the viewer focus
completely on the subject.
Continued ➤
C H A P T E R 4 : T H AT W O N D E R F U L FA C E
105
TIPS FOR SHOOTING BETTER PORTRAITS CONTINUED
• Choose an appropriate focal length. Though you can use virtually any focal length
for a portrait, I often prefer to use a focal length between 50mm and 135mm for most of
the portraits that I make. I find that this focal length range renders the subject well, free
of the distortion that might be found with a wider focal length. With longer telephoto
lenses, I can throw the background out of focus and use the limited depth of field to
emphasize my subject.
• Pay attention to camera orientation. Make images with the camera oriented both vertically and horizontally. Carefully consider what you include in the frame. If you believe
that an element in the background is distracting, find a way to eliminate it. Remember
that if anything in the frame doesn’t serve the subject, you need to get rid of it.
• Keep your eyes on the shutter speed. You must be constantly vigilant with respect to
your shutter speed. Many great portraits are ruined because of camera shake. So, whenever you’re shooting in a lighting situation other than direct sunlight, make it a point to
note your shutter speed and, if necessary, increase your ISO so that you can shoot with a
fast-enough shutter speed to ensure a sharp photograph.
• Don’t ask people to smile. Most people will put on a forced smile when the camera is
pointed at them. Some smiles are very sincere and natural, but others look forced and
uncomfortable. If they’re the latter, don’t hesitate to suggest that the subject not smile;
tell the subject to relax and look directly into the camera’s lens. This can result in a good
portrait, which renders the subject in a very natural and sincere way.
• Get down to the subject’s eye level. When photographing children, I always try to get
down to their eye level. Moving from the adult point of view to a kid’s point of view can
make a remarkable difference in a photograph. Such images provide a level of intimacy
that can’t happen otherwise. So, don’t hesitate to get on the floor with the kids, which
will dramatically change the dynamic between you and them and, consequently, the
photographs.
• Photograph when they aren’t looking. Candid moments can be just as revealing as
images where the subject is looking directly at the camera. Using a photojournalistic
approach, a photographer can reveal the dynamics of relationships between people that
are often missing in more traditional photographs. Being a fly on the wall and capturing
images where people are interacting and reacting with each other can reveal more about
the relationships than any other kind of image.
106
C A N O N 5 D M A R K I I I : F R O M S N A P S H O T S T O G R E AT S H O T S
Chapter 4 Assignments
Experiment with Depth of Field
Using the longest focal length that you have available (for example, a 70mm focal length
or longer), create a portrait. Try to find an area of open shade that has a simple and clean
background. Set your camera to Aperture Priority mode and the white balance to the Shade
preset. Choose the widest aperture available on your lens. Remember to observe your shutter
speed and increase your ISO until you can achieve a shutter speed at which you can reliably
handhold. Make a few photographs, and then shoot at a more moderate aperture, such as
f/5.6, and compare the results. Again, stay aware of your shutter speed so that the image
doesn’t suffer from camera shake.
Observe the Quality of Light
Photograph your subject under a variety of lighting conditions: under direct sunlight, open
shade, indoors using artificial light, and with window light. Observe the differences not only
with respect to your exposure and white balance, but also the presence of shadows and how
they fall on the subject and on the overall scene.
Learn to Handle Exposure Extremes
Position a subject in front of a bright window. Photograph your subject using all four metering modes: evaluative, partial, spot, and center-weighted average. Compare the images to
see which of the metering modes provides you a better exposure under this extreme kind of
lighting situation.
Create Creative Compositions
Create a series of portraits in which you position your subject in different areas of the frame.
Create images with the subject in the very center of the frame, as well as images using the
rule of thirds. Also, experiment with positioning your subject at the extreme edges of the
frame, as well as shooting from different perspectives, both above and below the subject.
Shoot in Black and White
Enable the Monochrome picture style and create a series of black-and-white portraits.
Photograph your subject in a variety of lighting conditions and see how the contrast changes
as a result of your choice of lighting.
Share your results with this book’s Flickr group!
Join the group here: www.flickr.com/groups/Canon5DMarkIIIFromSnapshotstoGreatShots
107
Index
Numbers
10 tips
charging battery, 7
choosing color space and picture
style, 18–19
choosing metering mode, 20
managing memory cards, 16–17
setting autofocus mode and focus
point, 11–14
setting exposure mode, 10–11
setting image recording quality,
14–15
setting information display, 21
setting ISO, 8
setting white balance, 9–10
50mm lenses, using, 44–45
A
(A+) Scene Intelligent Auto mode
explained, 10
using, 54–56
access lamp, locating, 5
action. See also motion; movement
following, 135
freezing, 114
Adobe RGB 1998, explained, 18
AE lock button, locating, 5
AE lock feature
using, 67
using with portraits, 92
AF area selection modes
61-point automatic selection, 13
AF point expansion, 13
locating, 6
setting, 13
Single-point AF, 12
Single-point Spot AF, 12
Zone AF, 13
AF function
customizing, 126–127
One-shot AF Release priority, 127
AF (Autofocus) modes. See also
focus modes
AI Focus, 12, 123
AI Servo, 12
One Shot, 12
setting, 11–13
single-point, 94
AF mode selection, locating, 6
244
AF performance, customizing,
125–126
AF point mode, versus Autofocus
modes, 123
AF point selection button, locating, 5
AF points
9 Points, 128
15 Points, 128
61 Points, 128
Only cross-type AF points, 128
orientation-linked, 96
selecting, 128
AF sensors, using for focus
detection, 92, 94. See also
sensors
AF-start button, locating, 5
AI Focus AF mode, using, 124
AI Servo AF
1st image priority, 127
2nd image priority, 127
drive modes, 129
High-speed continuous drive
mode, 129
Low-speed continuous drive
mode, 129
selecting in, 123–124
shooting in, 123–124
Single shooting drive mode, 129
aperture. See also f-stop
controlling in Manual (M)
mode, 64
maximum, 63
Aperture Priority (Av) mode
controlling depth of field with, 84
depth of field, 63
explained, 11
isolating subjects, 121–122
portraits, 61–62
setting up, 64
shooting in, 64
using, 61–64, 86
assignments
2nd curtain sync, 177
Aperture Priority (Av) mode, 78
audio levels for movies, 220
black-and-white photography, 107
brightness, 196
camera setup, 22
clash of colors, 196
cleaning sensors, 47
compositions, 107
contrast, 196
copyright information, 243
C A N O N 5 D M A R K I I I : F R O M S N A P S H O T S T O G R E AT S H O T S
depth of field, 78, 107
exposure, 47
exposure bracketing, 243
exposure compensation, 78
exposure extremes, 107
feeling movement, 135
firmware update, 243
focus for movies, 220
focus modes, 135
focus under low light, 176
focusing on subject, 22
focusing viewer’s attention, 196
following action, 135
HDR (high dynamic range)
photography, 243
hyperfocal distance, 155
ISO, 176
LCD monitor, 22
lead into frame, 196
lenses, 47
level horizon, 155
light quality, 107
lines and patterns, 196
long exposures, 176
low lighting, 176
Manual (M) mode, 22, 78, 135
metering methods, 79
motion photos, 134
movie recording sizes, 220
multiple exposures, 243
noise, 176
picture styles, 22, 155
picture styles for movies, 220
placing horizons, 155
Program (P) mode, 77
shooting with variety for
movies, 220
Shutter Priority (Tv) mode, 77
steady hands, 176
white balance, 22, 47, 155, 220
wide versus telephoto lenses, 135
audio
monitoring, 212–213
recording, 211–215
audio levels, adjusting, 213–214
audio quality, improving, 211–215
autofocus detection, points for, 12
autofocus functions, separating from
shutter button, 97
Autofocus (AF) modes. See also
focus modes
AI Focus, 12, 123
AI Servo, 12
One Shot, 12
setting, 11–13
single-point, 94
Av (Aperture Priority) mode
controlling depth of field with, 84
depth of field, 63
explained, 11
isolating subjects, 121–122
portraits, 61–62
setting up, 64
shooting in, 64
using, 61–64, 86
AWB (Auto White Balance), 9. See
also white balance
function of, 37–38
landscape photography, 144–145
using, 40
B
B (Bulb) mode, explained, 11
back lighting, portraits, 92
back of camera
access lamp, 5
AE lock button, 5
AF point selection button, 5
AF-start button, 5
card slot cover, 5
Comparative playback button, 5
Creative Photo button, 5
Direct Print button, 5
Erase button, 5
Info button, 5
LCD monitor, 5
Live View shooting, 5
Magnify/Reduce button, 5
Menu button, 5
Movie shooting switch, 5
multi-controller, 5
multi-function lock switch, 5
Playback button, 5
Quick Control button, 5
Quick Control Dial, 5, 69
Rating button, 5
setting button, 5
Two-Image display button, 5
viewfinder eyepiece, 5
back of video camera
Comparative playback
button, 200
Creative Photo button, 200
Direct print button, 200
Erase button, 200
Info button, 200
Live View shooting, 200
Magnify/Reduce button, 200
Menu button, 200
Movie shooting switch, 200
Playback button, 200
Rating button, 200
Two-image display, 200
viewfinder eyepiece, 200
backgrounds
compositions, 194
lighting, 88
portraits, 84, 88–89
ball heads, using, 142
battery
capacity for exposures, 7
charging, 7
checking status of, 7
keeping backup of, 7
black-and-white portraits
monochrome picture style,
104–105
picture style settings, 105
shooting, 103–105
BorrowLenses.com website, 131
bracketing exposures, 234–235
bright scenes, shooting, 63
brightness, 184
buffer, explained, 130
Bulb (B) mode, explained, 11
C
camera back
access lamp, 5
AE lock button, 5
AF point selection button, 5
AF-start button, 5
card slot cover, 5
Comparative playback button, 5
Creative Photo button, 5
Direct Print button, 5
Erase button, 5
Info button, 5
LCD monitor, 5
Live View shooting, 5
Magnify/Reduce button, 5
Menu button, 5
Movie shooting switch, 5
multi-controller, 5
multi-function lock switch, 5
Playback button, 5
Quick Control button, 5
Quick Control Dial, 5, 69
Rating button, 5
Setting button, 5
Two-Image display button, 5
viewfinder eyepiece, 5
camera front
depth-of-field preview button, 4
lens mount, 4
lens release button, 4
microphone, 4
self-timer lamp, 4
shutter button, 4
camera lenses. See lenses
camera orientation, considering for
portraits, 103, 106
camera sensors. See AF sensors;
sensors
camera settings, considering, 75–77
camera shake
reducing possibility of, 185
remedying, 8, 26
camera top
AF area selection mode, 6
AF mode selection, 6
dioptric adjustment knob, 6
Drive mode selection button, 6
flash exposure compensation
button, 6
flash-sync contacts, 6
hot shoe, 6
ISO speed setting, 6
LCD panel, 6
LCD panel illumination button, 6
lens mount, 6
main dial, 6
metering mode selection, 6
mode dial, 6
multi-function button, 6
power switch, 6
shutter button, 6
strap mount, 6
white balance selection button, 6
camera’s software, determining
version of, 231
card slot cover, locating, 5
center-weighted average meter,
using, 73
clouds, impact on landscapes, 148
color, accuracy of, 38, 82
color saturation, 187–188
color space
choosing, 18–19
gamut, 18
setting, 18
sRGB, 18
INDEX
245
Comparative playback button,
locating, 5
compositional elements
backgrounds, 194
brightness, 184
color saturation, 187–188
contrast, 186
depth of field, 192–193
leading lines, 195
repeating patterns, 189–190
sharpness, 185
visual draws, 191
compositions
building, 98–103
elements of contrast, 26
landscape photography, 151–154
perspective, 102
rule of thirds, 100
static subjects, 26
contrast, introducing, 186, 190
copyright information
embedding, 228
setting up, 228–229
Creative Photo button, locating, 5
custom user modes, using, 67
custom white balance, creating, 39
cyclist photo, 132
D
depth of field
adjusting, 92, 94–95
in compositions, 192–193
controlling, 63, 75, 84
increasing, 193
narrowing, 194
preview button, 4, 150
providing with wide-angle lens,
193
sensors for focus detection, 13
setting aperture for, 65
diffused light, using, 82
dioptric adjustment knob, locating, 6
Direct Print button, locating, 5
distance compression, explained, 44
Drive mode selection button,
locating, 6
drive-mode options
High-speed continuous, 129
Low-speed continuous, 129
setting up, 130
shooting in, 130
Single shooting, 129
246
E
F
editing video, 219
electronic level
enabling, 146
setting in LCD monitor, 146
setting in viewfinder display,
146–147
Erase button, locating, 5
E-TTL (evaluative through the lens),
171, 175
evaluative meter, using, 72, 75
exposure compensation
and Highlight Alert, 71
setting up, 71
using, 69–71
exposure indicator, using, 67
exposure lock
setting up, 69
using, 67–69
exposure modes
Aperture Priority (Av), 11, 86
Bulb (B), 11
landscape photography, 144
Manual (M), 11, 75
motion photos, 119–122
Program (P), 11
Scene Intelligent Auto (A+), 10
setting, 10–11
Shutter Priority (Tv), 11
exposure triangle
aperture, 35
ISO, 35
shutter speed, 35
exposures. See also overexposure;
reciprocal exposures
aperture, 33–34
bracketing, 234–235
calculating, 35–36
decreasing, 69
increasing, 69
ISO, 30
locking, 92
multiple, 238–241
shutter speed, 31–32
stop, 33
sunny 16 rule, 36
eyes, focusing on, 92–96
fast glass, using, 164–165
firmware
checking version, 230
updating, 230–232
flash. See also low lighting
E-TTL (evaluative through the
lens), 171, 175
Exposure Compensation, 171–173
using in low light, 167–168
flash exposure compensation button,
locating, 6
flash meter, default setting for, 171
flash output
changing, 172
increasing, 173
refining, 173–174
flash photography
Aperture Priority (Av) mode, 170
controlling shutter speed, 169–170
Program (P) mode, 170
Shutter Priority (Tv) mode, 170
studio strobes, 168
sync speeds, 168, 171
flash sync modes
1st curtain, 174
2nd curtain, 174–175
rear-curtain, 175
flash-sync contacts, locating, 6
focal length
choosing, 26
considering, 43
expense of, 131
wide-angle lenses, 86
focus, selective, 192
focus activation, customizing, 98
focus detection, using AF sensors
for, 92, 94
focus lock, using with portraits,
96–97
focus modes. See also Autofocus
modes (AF)
AI Focus AF, 124
AI Servo AF, 123–124
choosing for motion photos,
123–125
Manual focus, 124–125
prefocusing, 125
focus point, setting, 11–13
focusing modes
one-shot, 94
single point, 96
C A N O N 5 D M A R K I I I : F R O M S N A P S H O T S T O G R E AT S H O T S
gamut, defined, 18
IS (image stabilization)
lenses, 142
using, 166
ISO
appearance of H, 164
Auto (A) setting, 163
automatic feature, 8
bright days, 30
considering for portraits, 88, 90
determining, 36
expansion feature, 164
function of, 30
higher settings, 8
increasing, 8
landscape photography, 144
low numbers, 8
raising in low light, 162–164
setting, 6, 8, 30–31
setting for overcast days, 26
sunny days, 30
ISO 100 reciprocal exposures, 35
H
J
focusing rig, using, 217–218
front of camera
depth-of-field preview button, 4
lens mount, 4
lens release button, 4
microphone, 4
self-timer lamp, 4
shutter button, 4
f-stop. See also aperture
and aperture, 63
changing, 33
choice of, 33
considering, 77
defined, 33
explained, 63
function of, 33
reciprocal exposures, 35
tip, 33
G
HDR (high dynamic range)
photography, 235–238
Art effects, 237
high-contrast scenes, 236
Natural effect, 237
rendering effects, 237
setting up, 237–238
headphone terminal, locating, 212
HFD (hyperfocal distance),
considering, 148
Highlight Alert
enabling, 21
and exposure compensation, 71
horizon, considering in landscapes,
151–152, 155
hot shoe, locating, 6
I
IDC System Zero rig, using, 218
image recording quality
RAW versus JPEG, 14
setting, 15
image stabilization (IS)
lenses, 142
using, 166
images
previewing, 145
rating, 229–230
Info button, locating, 5
information display, setting, 21
internal memory, explained, 130
JPEG
degrees of compression, 15
Picture Style to Landscape
setting, 145
versus RAW, 14, 40
L
landscape images, shooting, 75
landscape photography
auto and manual focus, 150
AWB (Auto White Balance),
144–145
clouds, 148
composition, 151–154
depth-of-field preview, 150
detecting focus, 149
electronic level, 146–147
exposure modes, 144
focusing, 142, 148–149
golden hour, 147
HFD (hyperfocal distance), 148
horizon line, 151–152
ISO, 144
JPEGs, 145
light quality, 147
looking down, 153
picture styles, 145
previewing images, 145
rule of thirds, 151–154
sand dunes, 154–155
sharpness, 142
tripods, 142–143
white balance, 144–145
landscape picture style, setting
up, 145
LCD monitor, locating, 5
LCD panel
illumination button, 6
locating, 6
leading lines, considering in
compositions, 195
lens mount, locating, 4, 6
lens release button, locating, 4
lenses
50mm, 44–45
choosing, 43
choosing for motion photos,
130–131
expense of focal lengths, 131
focal length, 43
function of, 43
IS (image stabilization), 142
maximum aperture, 131
normal, 44–45
pipe analogy, 33
prime, 164
removing, 41
renting, 131
telephoto, 44–45
wide-angle, 43–44, 118
zoom, 46, 64
LensProToGo website, 131
lighting. See also low lighting
and background, 88
portraits, 88
lights
energy-efficient bulbs, 39
evaluating for white balance, 40
sources, 40
Live View shooting, locating, 5
locking focus, 96–97
low lighting. See also flash; lighting
AF points, 166
fast glass, 164–165
focusing in, 166–167
IS (image stabilization), 166
locking focus, 167
manual focus, 167
noise, 163
raising ISO, 162–164
self-timer, 167
shooting in, 217
INDEX
247
low-light scenes
portraits, 91
shooting, 60
LP-E6 battery pack, placing in
charger, 7
M
Magnify/Reduce button, locating,
5, 210
main dial, locating, 6
Manual (M) mode
explained, 11
exposure compensation, 69
setting up, 66
shooting in, 66
using, 64–67, 75
memory cards
Auto switch card mode, 17
choosing for video, 204
Compact Flash (CF), 204
managing, 16–17
Rec separately mode, 17
Rec to multiple mode, 17
Secure Digital (SD), 204
Standard mode, 17
UDMA, 204
using, 17
Menu button, locating, 5. See also
My Menu
metering modes
Center-weighted, 20, 73
choosing, 20
Evaluative, 20, 72, 75
Partial, 20, 73
selecting, 6
setting, 20, 75
Spot, 20, 73
using, 72–75
Metro car photo, 133
Meyerowitz, Joel, 100–101
microphone
locating, 4
terminal, 211
mirror lockup feature, setting, 233
Mode Dial
custom user modes, 67
locating, 6
monochrome picture style, setting,
104–105
motion. See also action; movement
as abstraction, 134
creating sense of, 131–134
rendering, 65
248
stopping with Shutter Priority
(Tv) mode, 119–120
motion blur technique, using, 133
motion photos
AF function, 126–128
AF performance, 125–126
Aperture Priority (Av) mode,
121–122
drive-mode options, 128–130
exposure modes, 119–122
focus modes, 123–125
isolating subjects, 121–122
lenses, 130–131
motion blur, 133
panning, 131–132
Shutter Priority (Tv) mode,
119–120
using to stop motion, 119–120
movement. See also action; motion
direction of subject, 114–115
distance from subject, 117–118
photographing, 114–118
speed of subject, 116
Movie shooting switch, locating, 5
movies. See also video camera
playing back, 206–207
recording, 206
MRAW option, explained, 15
multi-controller, locating, 5
multi-function button, locating, 6
multi-function lock switch,
locating, 5
multiple exposures, 238–241
My Menu, using, 242. See also Menu
button
N
neutral-density filter, using, 219
night, shooting at, 38
noise, noticing, 163
normal lenses, using, 44–45
NTSC and PAL video formats, 204
O
one-shot focusing mode, setting up
for, 94
open shade, shooting in, 88
optical viewfinder, using, 218
orientation-linked AF point, setting
up, 96
overexposure, reducing, 71. See also
exposures
C A N O N 5 D M A R K I I I : F R O M S N A P S H O T S T O G R E AT S H O T S
P
P (Program) mode
explained, 11
exposure compensation, 69
fast shutter speeds, 57
versus Scene Intelligent Auto (A+)
mode, 56
setting up, 58
shooting in, 58
using, 56–58
PAL and NTSC video formats, 204
panning technique
shutter speed, 132
using, 131–132
partial metering, using, 73
Passion play actress, 94–95
patterns, repeating, 189–190
picture styles
Auto, 19
described, 19
Faithful, 19
Landscape, 19
landscape photography, 145
Monochrome, 19
Neutral, 19
Portrait, 19
setting, 19
Standard, 19
User-Defined, 19
Playback button, locating, 5, 210
playing back movies, 206–207
portrait tips. See also tips
backgrounds, 105
camera orientation, 106
candid moments, 106
eye level, 106
focal lengths, 106
light quality, 105
shutter speed, 106
smiles, 106
portraits. See also subjects
AE lock feature, 92
Aperture Priority (Av) mode,
61–62, 86
back lighting, 92
backgrounds, 88–89
black-and-white, 103–106
breaking rules, 103
building compositions, 98–103
camera orientation, 103
environmental, 86
focus lock, 96–98
focus on eyes, 92–96
ISO, 88, 90
lighting, 88
low-light scenes, 91
metering, 91–92
perspective, 102
shooting, 86
white balance, 88, 90
power switch, locating, 6
preparation, importance of, 30
previewing images, 145
prime lenses, using, 164
Program (P) mode
explained, 11
exposure compensation, 69
fast shutter speeds, 57
versus Scene Intelligent Auto (A+)
mode, 56
setting up, 58
shooting in, 58
using, 56–58
Q
Quick Control button, locating, 5
Quick Control Dial
locating, 5
using, 69
R
Rating button, locating, 5
rating images, 229–230
raw files, and white balance, 40
raw image options
MRAW, 15
RAW, 15
SRAW, 15
RAW versus JPEG, 14, 40
reciprocal exposures, ISO 100, 35.
See also exposures
recording movies, 206
reflection, emphasizing, 34–35
renting lenses, 131
resolution for video
640 × 480, 203
1280 × 720, 202
1920 × 1080, 202
RGB 1998, explained, 18
Rode shotgun microphone, using, 211
rule of thirds
adding grid overlay, 100–101
applying, 100–101
landscape photography, 151–154
runner photograph, 115
S
sand dunes photo, 154–155
Scene Intelligent Auto (A+) mode
explained, 10
using, 54–56
self-timer
lamp, 4
using in low lighting, 167
sensors. See also AF sensors
Auto Cleaning feature, 41–42
Clean Manually feature, 41–42
Clean Now feature, 41
cleaning, 41–42
relationship to depth of field, 13
setting button, locating, 5
shade, shooting in, 88
sharpness, affecting, 185, 233
shooting
at night, 38
RAW versus JPEG, 14
shutter button, locating, 4, 6
Shutter Priority (Tv) mode
explained, 11
fast shutter speeds, 58–59
semiautomatic, 60
setting up, 61
shooting in, 61
stopping motion, 119–120
using, 58–61
shutter speeds
considering, 26
controlling, 32, 60, 64
full-stop increments, 31
function of, 10, 31
intermediate, 32
measurement of, 31
range of, 31
reciprocal exposures, 35
reference, 36
setting in Program (P) mode, 57
slow versus fast, 60
Silent Control mode, enabling,
214–215
single-point autofocus (AF),
using, 94
slow-motion videos, creating, 203
spot metering, using, 73
SRAW option, explained, 15
sRGB color space, explained, 18
still image, capturing while recording
video, 206
stop, defined, 33
strap mount, locating, 6
street cleaner photo, 68
studio strobes, non-TTL, 168
subjects, emphasizing, 82, 192. See
also portraits
sunny 16 rule, explained, 36
T
telephoto lenses
distance compression, 44
using, 44–45
test shots, taking, 77
tips. See also portrait tips
apertures, 33
charging battery, 7
choosing color space, 18–19
choosing metering mode, 20
choosing picture style, 18–19
managing memory cards, 16–17
setting autofocus mode, 11–14
setting exposure mode, 10–11
setting focus point, 11–14
setting image recording quality,
14–15
setting information display, 21
setting ISO, 8
setting white balance, 9–10
top of camera
AF area selection mode, 6
AF mode selection, 6
dioptric adjustment knob, 6
Drive mode selection button, 6
flash exposure compensation
button, 6
flash-sync contacts, 6
hot shoe, 6
ISO speed setting, 6
LCD panel, 6
LCD panel illumination button, 6
lens mount, 6
main dial, 6
metering mode selection, 6
mode dial, 6
multi-function button, 6
power switch, 6
shutter button, 6
strap mount, 6
white balance selection button, 6
tripods
benefits, 142
stability, 142
using in landscape photography,
142–143
INDEX
249
Tv (Shutter Priority) mode
explained, 11
fast shutter speeds, 58–59
semiautomatic, 60
setting up, 61
shooting in, 61
stopping motion, 119–120
using, 58–61
Two-Image display button,
locating, 5
U
user modes, custom, 67
V
version of camera’s software,
determining, 231
video
accessorizing, 217–219
autofocus, 210
avoiding overshooting, 216
composing, 209
editing, 219
editing video, 219
exposure, 207
external recording devices, 212
focusing modes, 210
focusing rig, 217–218
grid display, 209
Magnify/Reduce button, 210
manual focus, 210–211
moving camera, 216
neutral-density filter, 219
optical viewfinder, 218
picture style, 208–209
planning shots, 215
Playback button, 210
recording, 206, 215–217
shooting modes, 207
shooting short clips, 215–216
shutter speed, 207
watching light, 217
white balance, 208
video camera. See also movies
AF point, 201
All-I compression, 203
aperture, 201
audio sound levels, 201
battery check, 201
compression methods, 203
Edit, 205
Exit, 205
250
exposure compensation
amount, 201
exposure simulation, 201
First frame, 205
focusing mode, 201
IPB compression, 203
ISO speed, 201
Last frame, 205
LCD monitor, 201
memory cards, 201, 204–205
movie recording size, 201
Next frame, 205
NTSC and PAL, 204
Picture Style, 201
Play, 205
playback, 205–207
Previous frame, 205
Quick Control Dial, 205
recording movie indicator, 201
shooting, 205–207
shots remaining, 201
shutter speed, 201
slow motion, 203, 205
white balance, 201
video camera back
Comparative playback
button, 200
Creative Photo button, 200
Direct print button, 200
Erase button, 200
Info button, 200
Live View shooting, 200
Magnify/Reduce button, 200
Menu button, 200
Movie shooting switch, 200
Playback button, 200
Rating button, 200
Two-image display, 200
viewfinder eyepiece, 200
video focusing
Face-detection live mode, 210
Live mode, 210
Quick mode, 210
video quality
4:3 aspect ratio, 203
640 x 480, 203
1280 x 720, 202
1920 x 1080, 202
resolution, 202
video recording, setting grid display
for, 209, 215–217
C A N O N 5 D M A R K I I I : F R O M S N A P S H O T S T O G R E AT S H O T S
viewfinder eyepiece, locating, 5
visual draws
brightness, 184
color saturation, 187–188
contrast, 186, 190
including in compositions, 191
repeating patterns, 189–190
sharpness, 185
W
websites
BorrowLenses.com, 131
LensProToGo, 131
wedding photo, 169
white balance. See also AWB (Auto
White Balance)
Auto mode, 9
Cloudy mode, 9
considering for portraits, 88, 90
custom mode, 10
Daylight mode, 9
evaluating light, 40
flash use mode, 10
Kelvin mode, 10
landscape photography,
144–145
modes, 9–10
presets, 38
and raw files, 40
setting, 9–10, 40
Shade mode, 9
Sunset mode, 9
Tungsten light mode, 9
Twilight mode, 9
white fluorescent light mode, 9
white balance selection button,
locating, 6
wide focal length, using, 26
wide-angle lenses
distance from subject, 86
focal length, 86
shutter speed, 118
using, 43–44
using for depth of field, 193
Z
Zacuto Z-Finder, using, 218
zoom lenses
fast, 164
and maximum apertures, 64
using, 46