1
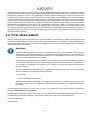
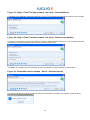
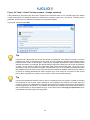
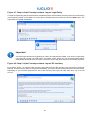
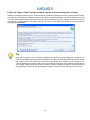
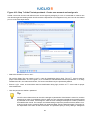
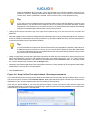
IUCLID 5
Guidance and Support
Installation Guide for IUCLID 5.5
Client-Server Architecture
Linux
March 2013
Legal Notice
Neither the European Chemicals Agency nor any person
acting on behalf of the Agency is responsible for the use which might
be made of the following information.
A wealth of additional information on the European Union is available on the Internet.
It can be accessed at the addresses:
http://iuclid.echa.europa.eu.
http://echa.europa.eu.
http://europa.eu.
©European Chemicals Agency
Reproduction is authorised provided the source is acknowledged.
Table of Contents
1. Introduction ............................................................................................................................................... 1
1.1. Hardware requirements .................................................................................................................. 1
1.2. Software requirements ................................................................................................................... 1
2. Making a fresh installation of IUCLID 5 ...................................................................................................... 3
2.1. Operating system ........................................................................................................................... 3
2.1.1. Opening the network port for IUCLID 5 server ....................................................................... 3
2.2. JAVA Development Kit ................................................................................................................... 3
2.3. PostgreSQL ................................................................................................................................... 3
2.3.1. Creating the iuclid5 database user ....................................................................................... 4
2.3.2. Creating the iuclid5 database ............................................................................................... 4
2.3.3. Set up daily backup of the database .................................................................................... 5
2.4. Tomcat .......................................................................................................................................... 5
2.4.1. Manual installation ............................................................................................................... 5
2.4.2. Memory settings .................................................................................................................. 6
2.5. Deployment ................................................................................................................................... 6
2.5.1. Deployment in Tomcat ......................................................................................................... 6
2.6. Configuring the connection to the database ..................................................................................... 8
2.7. Configuring the security settings for user accounts ........................................................................... 9
2.7.1. User account security settings defined in client.properties ...................................................... 9
2.7.2. User account security settings defined in server.properties ................................................... 10
3. Upgrade ................................................................................................................................................. 12
3.1. Upgrade and migration of data from IUCLID 5.4.x to IUCLID 5.5.0 .................................................. 12
3.2. Upgrading from IUCLID 5.2.x/5.3.x to IUCLID 5.5.0 ........................................................................ 14
3.3. Upgrading from IUCLID 5.0/5.1.x to IUCLID 5.5.0 .......................................................................... 14
4. Initialisation of an installation of IUCLID 5 ................................................................................................ 15
4.1. Starting IUCLID 5 ......................................................................................................................... 15
4.2. First steps wizard ......................................................................................................................... 16
4.3. User management ........................................................................................................................ 24
5. Un-installation of IUCLID 5 ...................................................................................................................... 25
iii
Chapter 1. Introduction
IUCLID 5 has two different installation architectures:
• Standalone installation
The IUCLID 5 application connects directly to the database which usually resides on the same computer. Using
this installation only one user can work simultaneously on the same database.
• Distributed installation
In this architecture, the database and the application server reside on a server computer, and the user works with
another computer, called a client. It is similar to a web based application with the only difference being that the user
interface of the application (buttons, text boxes etc.) is not a series of web pages but a specific Java application
called IUCLID 5 client that is downloaded automatically from the server.
This document describes how to download, install and configure the necessary open source software products and
the IUCLID 5 application itself on a Linux server. Only the distributed installation is described.
The aim of this document is that a user with basic computer skills would be able to install and run IUCLID 5. The
following is a list of items NOT covered in this document:
• Complete and detailed installation and configuration procedure of the operating system (GNU/Linux).
• A detailed configuration of the Database Management System (PostgreSQL) and the Application Server (Tomcat)
If you encounter any problems during the installation that cannot be solved using information in this manual, or the
documentation of third party softwares; before contacting the ECHA Helpdesk, please try the IUCLID FAQ located
at the IUCLID web site http://iuclid.eu.
1.1. Hardware requirements
The server hosting IUCLID 5 must have at least:
• RAM: 2 GB
• Hard disk space: 200 GB
• CPU: 2 GHz, 32 or 64 bit architecture
• Network adapter 100 Mbps (recommended 1Gbps)
The requirements depend in part on the plugins that are in use. For example, using the Query Tool plugin will increase
the resources required to obtain a reasonable running speed; especially on a large database.
1.2. Software requirements
The software prerequisites for the installation are as follows:
• Java Runtime Environment (JRE) or Java Software Development Kit (SDK) version 7. IUCLID 5.5.0 is compatible
with Java 6, but the vendor, Oracle, recommends to uninstall Java SE 6, and then to install the latest update of
Java 7. Various scenarios involving the use of IUCLID 5, Java 6 and Java 7 can be found in the IUCLID FAQ
located at the IUCLID web site http://iuclid.eu.
• PostgreSQL 8.4 and 9.0 are supported, but 9.0 is recommended.
1
• Tomcat 5.5 or 6.0
• The IUCLID 5 manual workstation installation package, version 5.5, can be downloaded without charge from the
IUCLID 5 web site.
• Once you have completed the installation of IUCLID 5, you should test it by starting and configuring it. The configuration requires access to at least a legal entity file (LEOX). The creation of a LEOX is described on the IUCLID
web site where the installation software is published. In addition, it is recommended to upload a set of reference
substances and the EC inventory. These are also available from the web site at which the IUCLID 5 software is
published.
Tip
Time and IT resources can be saved by importing into IUCLID 5 only the Reference substances you
need. Various different sizes of Reference substance inventory can be downloaded from the IUCLID
web site. There is a full set, a reduced list, and a function that allows you to create your own inventory
using common identifiers as selection criteria, such as EC Number, and IUPAC name. Before importing the full set, consider carefully whether it is really necessary. Reference substances that are not
imported during the initialisation process can be imported later. A simple compromise is to start with
the reduced list.
For more information regarding system requirements, see the FAQ on the IUCLID web site located at http://iuclid.eu.
2
Chapter 2. Making a fresh installation of
IUCLID 5
The following chapter contains a brief description of the actions required to make a fresh installation of IUCLID 5 that
runs within a web server on a Linux operating system in combination with open source components.
2.1. Operating system
You are free to run IUCLID 5 on the Linux distribution of your choice. However, only the SUSE Linux distribution
has been explicitly tested. Keep in mind that it is good practice to install only the required software on a server. The
file paths shown in this document are provided as examples, and as such, may differ from the values required in
the actual installation.
2.1.1. Opening the network port for IUCLID 5 server
In order of establish the connection from the workstation computer to the server, the server's firewall must be configured to allow the IUCLID 5 server to accept connections on port 8080.
It is not recommended to completely disable the firewall. In CentOS for example the system-config-securitylevel-tui tool allows you to easily modify the firewall settings. On other Linux distributions please refer to
the documentation of the operating system.
~#system-config-securitylevel-tui
Be cautious! You should not trust any network interface. In the Allow incoming section set SSH (secure shell) and
8080 port. For security reasons do not allow any other traffic such as telnet, http or ftp.
Before you start the installation procedure you have to download the required components for IUCLID 5. In order
to select the correct files, you should know the architecture (platform) of your server computer. Please consult the
user manual of your computer. If the Linux operating system is already installed, write the following command. The
command will write the platform's name on the screen, for example i386.
~#uname -i
i386
~#
2.2. JAVA Development Kit
The simplest way to install Java is using the package manager of your operating system. In this way you do not
need to download Java manually.
In case no appropriate Java runtime environment is available in the package manager, download the JAVA Development Kit (JDK) 7 or JAVA Runtime Environment (JRE) 7 according to the operating system distribution and architecture of your computer from the site http://www.oracle.com. Follow the installation instructions provided by the vendor.
2.3. PostgreSQL
PostgreSQL is the database management system (DBMS) that IUCLID 5 uses to store all data.
PostgreSQL is likely to be included in your Linux distribution. If PostgreSQL is not already installed, it is recommended to install the latest version using the package management system of your Linux distribution. Alternatively, the
installation packages are available free of charge from the following site http://www.postgresql.org.
3
You do not need to download all the installation packages. The required packages have a file name that starts with
postgresql-libs-, postgresql-server or postgresql.
2.3.1. Creating the iuclid5 database user
During installation process, a new Linux user with name postgres is created. The user postgres has no password, so
it is not possible to log in using this user name. Its purpose is to perform database administrative tasks. Commands
can be run as user postgres, only using the command su.
Change the current directory and the current user, as follows.
$cd /
$su postgres
$
Note
By changing the user, the prompt is also changed to the $ sign (and usually bash-3.00$ is displayed).
Now each command you type is executed as the user postgres. The first thing to do is to create a database user
that allows the IUCLID 5 application to connect to the database, as shown below. The name of the user is usually
iuclid5. Enter a password, enter it again, and then answer "no" to all the subsequent questions. To answer "no", enter
"n", and then press the enter key.
Note
Remember the password you give for the user iuclid5, because you will need it later.
$createuser -EP iuclid5
Enter password for new role:
Enter it again:
Shall the new role be a superuser? (y/n) n
Shall the new role be allowed to create databases? (y/n) n
Shall the new role be allowed to create more new roles? (y/n) n
CREATE ROLE
$
2.3.2. Creating the iuclid5 database
Create a new database specifying the owner, encoding and the name of the database.
$createdb --owner=iuclid5 --encoding=UTF-8 iuclid550
CREATE DATABASE
$
Once the database preparation tasks are completed, change back to the root user.
$exit
/#
For security reasons, by default, database users are not allowed to connect to the database, even if they provide the
correct password. However, PostgreSQL can be configured to allow such a connection, as described below.
Open the configuration file using a text editor, for example nano.
4
iuclid5#nano /var/lib/pgsql/data/pg_hba.conf
# PostgreSQL Client Authentication Configuration File
# ===================================================
#
Move the cursor to the end of the file using the down arrow button until the line # IPv4 local connections:.
# IPv4 local connections:
host
all
all
127.0.0.1/32
ident sameuser
Insert a new line just after the IPv4 local connections and type host iuclid5 iuclid5 127.0.0.1/32 md5. This line tells
PostgreSQL that iuclid5 user is allowed to connect to iuclid550 database from the local computer using the encrypted
password authentication.
# IPv4 local connections:
host
iuclid550
iuclid5
host
all
all
127.0.0.1/32
127.0.0.1/32
md5
ident sameuser
Press CONTROL-X to exit from the editor, type y to save the file and confirm the file name by pressing the enter key.
Save modified buffer (ANSWERING "No" WILL DESTROY CHANGES) ? y
Y Yes
N No
^C Cancel
File Name to Write: /var/lib/pgsql/data/pg_hba.conf
^G Get Help
M-D DOS Format
M-A Append
^T To Files
M-O Mac Format
M-P Prepend
M-B Backup File
^C Cancel
Restart PostgreSQL to load the new configuration.
Your iuclid5 database is now ready to serve the IUCLID 5 application.
For more information about installing PostgreSQL and administer the server look for the http://www.postgresql.org/
docs/ documentation page.
2.3.3. Set up daily backup of the database
The data you store into IUCLID 5 might be very important for your organisation. A user may accidentally delete
valuable data or a system failure could cause loss of data. To prevent this situation and prepare a smooth recovery,
it is vital to schedule a daily backup.
2.4. Tomcat
The preferred way to install Tomcat is by using the package manager of your operating system. The required version
is 5.5.x or 6.0.x where x is the highest available number.
2.4.1. Manual installation
Distribution independent packages can be downloaded from the Tomcat website [http://tomcat.apache.org/].
The file to download is for example:
apache-tomcat-5.5.26.tar.gz
5
The installation of Tomcat is extracting a set of files and setting up the starting parameters. Extract the downloaded
archive into the directory /opt (use the version number of your downloaded Tomcat).
iuclid5#tar -xzf apache-tomcat-5.5.26.tar.gz -C /opt
iuclid5#
It is convenient to create a version independent symbolic link pointing to the actual tomcat directory. It will be used
to find the location of Tomcat, whichever version is installed.
iuclid5#ln -s apache-tomcat-5.5.26 /opt/apache-tomcat
iuclid5#
Tip
Tomcat contains some example applications that are not needed. You can delete them in order to save
resources. Do not delete the ROOT directory!
For more information visit the Tomcat website [http://tomcat.apache.org/].
2.4.2. Memory settings
Important
IUCLID 5 requires at least 512 MB RAM to be allocated to Tomcat.
Check the amount of memory allocated on the server status page of the Tomcat Manager application. The parameter
Max Memory under JVM should show a value of at least 512 MB.
Tomcat Manager
Tomcat Manager is a web application, supplied along with Tomcat, that provides a means of dynamically
managing web applications without having to shutdown the Tomcat web application server itself. It provides a convenient way of managing the IUCLID 5 web application in a distributed environment. To gain
access to Tomcat Manager, point a web browser to the address http://localhost:8080/manager/html/.
2.5. Deployment
Deployment is the term used for the process of installing a web application into a web application server.
The web application of IUCLID 5 is published in the form of a web application archive (WAR) which is a
file with extension war. It is available from the IUCLID website [http://iuclid.eu/], packaged into a file named
iuclid5<version>_server_<date>.zip. Download the ZIP file from the web site. Unzip it, and then unzip an
archive within it named server.zip. Inside there is a file named i5server.war. That is the file to be deployed.
2.5.1. Deployment in Tomcat
Deployment of a web application into Tomcat can be done in two ways:
• Statically - the web application is set up whilst the web application server Tomcat is not running.
• Dynamically - one or more web applications can be managed whilst the web application server Tomcat is still
running. This allows IUCLID 5 to be installed on an instance of Tomcat without needing to have a break in service
for any other web applications that are running on the same instance of Tomcat.
6
In this installation manual, only the dynamic deployment is described. However, the static deployment may be used
instead. The deployment of a web application on Tomcat is described in detail on the web page Tomcat deployment
[http://tomcat.apache.org/tomcat-5.5-doc/deployer-howto.html]. In essence, the deployment of IUCLID 5 consists of
copying the archive file i5server.war into a folder within the installation of Tomcat, named webapps. If Tomcat is
running whilst the copying is done, it automatically opens the archive and copies the content into the folder webapps.
In addition, Tomcat automatically starts the IUCLID 5 web application.
When IUCLID 5 is deployed in Tomcat, it is shown in the list of web applications in Tomcat Manager, as shown below.
If you are unfamiliar with Tomcat Manager, see the tip above.
Figure 2.1. IUCLID 5 deployed in Tomcat - application list in Tomcat Manager
Alternatively, deployment can be done using the deploy feature of the Tomcat Manager to upload a war file into
Tomcat from a filesystem. However, before doing that, the configuration of Tomcat Manager should be checked and
possibly adjusted for the following reason.
Warning
By default, Tomcat Manager places an upper limit on the size of the war file that can be uploaded. The
default value of the limit is smaller than the size of the file iuclid.war. If the size limit is exceeded,
the following error is given:
The server encountered an internal error () that prevented it from fulfilling this request. Exception java.lang.IllegalStateException: org.apache.tomcat.util.http.fileupload.FileUploadBase$SizeLimitExceededException: the request was rejected because its size (XXX) exceeds the configured maximum
(52428800)
The solution is to increase the size of the limit, by increasing the values of the parameters max-filesize and max-request-size in the settings file /tomcat7/webapps/manager/WEB-INF/web.xml to
values that are larger than that they exceed the size of the war file. The default values are shown below:
<multipart-config>
<!– 50MB max –>
<max-file-size>52428800</max-file-size>
<max-request-size>52428800</max-request-size>
<file-size-threshold>0</file-size-threshold>
</multipart-config>
7
An example of the new values required, for IUCLID 5.5.0, is shown below.
<max-file-size>100000000</max-file-size>
<max-request-size>100000000</max-request-size>
Once you are sure that the file size limit is large enough, in Tomcat Manager, click on the button Browse, that is under
the lower of the two options deploy options, WAR file to deploy, as shown below:
Figure 2.2. Deploy IUCLID 5 in Tomcat - upload using Tomcat Manager
Browse to the file i5server.war, select it, and then click the button Open. Click on the lower of the buttons labelled
Deploy. Check that IUCLID 5 appears within the list of web applications.
Tomcat Manager can be used to stop and start the IUCLID 5 web application. On the application list page, there
are stop and start buttons for each web application currently deployed. This feature is useful for carrying out any
maintenance that must be done whilst IUCLID 5 is stopped. An example is the editing of settings for the connection
to the database.
2.6. Configuring the connection to the database
The configuration of the connection from the IUCLID web application to its database is defined in the file
server.properties that is located in the folder webapps/i5server/WEB-INF/classes.
The default values are for an instance of the PostgreSQL database running on the same computer as the web
application server with the values of the database name, the database username, and the password of that user all
set to iuclid5. If that configuration is used, on starting the IUCLID 5 web application, it will connect to the database
without the need to make any changes to the configuration file. If other values are required, they must be entered
into the file server.properties. Before editing the configuration file, ensure that no clients are connected to the
IUCLID 5 web application and then stop the application using Tomcat Manager.
The default configuration for PostgreSQL is shown below:
#
# Settings for using PostgreSQL
#
hibernate.connection.url=jdbc:postgresql://localhost:5432/iuclid550
hibernate.connection.username=iuclid5
hibernate.connection.password=iuclid5
hibernate.connection.driver_class=org.postgresql.Driver
hibernate.dialect=org.hibernate.dialect.PostgreSQLDialect
For example, if the PostgreSQL database server's name is dbserver, it is accepting connections on port 12345, the
database name is chemdb with a database user named joe with a password xxxx, the configuration is:
8
hibernate.connection.url=jdbc:postgresql://dbserver:12345/chemdb
hibernate.connection.username=joe
hibernate.connection.password=xxxx
Important
Make sure that there are no spaces after the username and password values in the properties file.
After editing the configuration file, start the IUCLID 5 web application server using Tomcat Manager.
The IUCLID 5 server records its activities in a log file. The configuration file for the logging is
i5server.logging.properties, which is located in the folder WEB-INF/classes. If you encounter any errors
that you cannot explain, consult the content of the log file.
If you are following this manual to perform a fresh installation, all the software has now been installed. What remains,
is some configuration, as described in Section 2.7, “Configuring the security settings for user accounts” and Section 4.1, “Starting IUCLID 5”.
2.7. Configuring the security settings for user accounts
IUCLID 5 has features designed to control the level of security of authentication of user accounts. The level of security
can be tailored to that required for the particular instance of IUCLID 5. For example, when setting passwords for their
user accounts, users can be forced to enter values that have a minimum strength. The values of the parameters that
determine the level of security are defined in two settings files, server.properties and client.properties,
both of which are located in the folder webapps/i5server/WEB-INF/classes/. Changes to values take effect on
restarting the server software of IUCLID 5. The security features are described below, grouped together by settings
file.
2.7.1. User account security settings defined in
client.properties
The settings are shown below as they appear in the settings file that is supplied with the installation of IUCLID 5.
The values are shown set to the hard-coded defaults. If a line is commented out, the default value is used. A value
of zero (0) disables a feature.
# The minimum length for a new password
password.min.length=6
# The minimum number of character sets used in the password
password.min.charsets=2
# If a secure question system is enabled
password.use.secure.question=true
2.7.1.1. Minimum password length
This feature is used to prevent the use of overly weak passwords for user accounts. The password of a user account
must contain at least this number of characters. If an attempt is made to create a password with fewer characters,
an informative error message is given and the user is presented with an opportunity to try again.
The security policy is applied to passwords only when they are created. Therefore, if the minimum length of passwords
is increased, users can still log in using existing passwords, even if they are now considered to be too short. The
9
user-manager can force a user to create a new password by ticking a box for the account in the IUCLID 5 client. The
user is then required to create a new password when they next log in.
2.7.1.2. Minimum number of character sets in passwords
This feature is used to prevent the use of overly weak passwords for user accounts. The password of a user account
must contain at least one character from all the character sets. The value is an integer from 1 to 4. A value of 1 means
only character set 1, a value of 2 means both character sets 1 and 2, etc. The four character sets are: 1 = a lowercase
letter [a-z], 2 = an uppercase letter [A-Z], 3 = a digit [0-9], 4 = a non-alphanumeric symbol [!@#$%^&*-_=+].
For example, if the value is 3, a password of "AdkbScfw" is rejected for being too weak, but "AdkbSc37" is accepted
because it contains at least one character from sets 1, 2 and 3.
If an attempt is made to create a password that does not comply, an informative error message is given, and the
user is presented with an opportunity to try again.
The security policy is applied to passwords only when they are created. Therefore, if the minimum number of character
sets allowed within passwords is increased, users can still log in using existing passwords, even if they are now
considered to contain too few character sets. The user-manager can force a user to create a new password by ticking
a box for the account in the IUCLID 5 client. The user is then required to create a new password when they next log in.
2.7.1.3. Security question
This feature is designed to allow an alternative method of user authentication to the user name/password combination. It can help to reduce the resources required for user management by preventing account blocking due to
forgotten passwords. Each user can define their own security question and a secret answer. This is done from the
graphical user interface of the client, after the user has logged in. A user can log in by answering their question
correctly, instead of supplying the password. The question is answered via a link on the log in page, Forgot your
password?. The feature is turned on or off for the whole instance of IUCLID 5 using a value of true or false.
2.7.2. User account security settings defined in
server.properties
The settings are shown below as they appear in the settings file that is supplied with the installation of IUCLID 5.
The values are shown set to the hard-coded defaults. If a line is commented out, the default value is used. A value
of zero (0) disables a feature. A suspended account can be un-suspended by a user with user-management rights.
# Account expiry in days. A value of zero (0) disables the feature
account.expiry=180
# Password expiry in days. Zero (0) disables the feature.
password.expiry=90
# Max number of attempts before the account is disabled. Zero (0) disables the feature.
max.failed.login.attempts=3
# Max number of attempts to answer the reset question.
max.failed.answer.attempts=3
2.7.2.1. Account expiry period
This feature is used to automatically suspend an account that has not been used for a long time. If the period between
two successive successful log in attempts exceeds the value, the account is suspended.
2.7.2.2. Password expiry period
This feature is used to prevent users from using the same password for long periods. It defines the life-span of a
password. After the password has been in use for the period, the user is prompted to change the password when
10
they next log in. The period is counted from the time of first logging in to the account, then after that, from the time
of changing the password.
2.7.2.3. Maximum number of attempts to log in
This feature is used to prevent the combination of user name and password from being obtained by trial and error.
The value is the maximum number of successive unsuccessful attempts there can be to log in to an account before
it is suspended.
2.7.2.4. Maximum number of attempts to answer the security question
This feature is used to prevent the security question from being answered by trial and error. The value is the maximum
number of successive unsuccessful attempts there can be to answer the security question before the account is
suspended.
11
Chapter 3. Upgrade
This document describes the process of obtaining an installation of IUCLID 5.5.0 that contains all the data from a
previous version. The details of how to proceed depend on the version being upgraded. There is a chapter specific
to each scenario. To see the current version of IUCLID 5, log-in to the application, then click Help and select About.
Before starting the upgrade, it is important to backup the database. Use the built-in Backup functionality of IUCLID 5,
and/or the backup functionality of the database. Making only a copy of the file system on which IUCLID 5 is installed
is not recommended as a means of backing-up.
3.1. Upgrade and migration of data from IUCLID 5.4.x
to IUCLID 5.5.0
Important
The migration process changes the IUCLID 5 database such that it can no longer be used with previous
versions of the IUCLID 5 application. Therefore, if you would like to be able to continue to use a database
with the previous version of IUCLID 5, do not run the migration tool on that particular database. Either
perform a fresh installation of the new version of IUCLID 5 and transfer the data across to it using
Backup/Restore, or perform the upgrade and migration on a duplicate of the old database. If two versions
of IUCLID 5 are to be run on the same computer, appropriate database settings must be used to avoid
conflicts. Do not run two distributed versions of IUCLID 5 at the same time on the same computer.
There are various different ways to manage a Tomcat web application server, as referred to in the section of this
manual Deployment of IUCLID 5. The following instructions are intended to give a representative example of how
the IUCLID 5 software can be upgraded and the data migrated from IUCLID 5.4.x to IUCLID 5.5.
1. Back-up the database. Use the built-in back-up functionality of IUCLID 5, and/or the back-up function of the database software, for example PostgreSQL. The built-in backup feature is accessible by only the user SuperUser,
from the menu File / Administrative tools / Backup.
2. Close all clients for IUCLID 5.
3. Use the application Tomcat Manager to stop the IUCLID 5 web application.
4. Copy the configuration file for IUCLID 5, server.properties, into a backup folder. The existing plugins are
compatible with IUCLID 5.5, so they can be retained for the new installation. Alternatively, obtain the latest versions
from the IUCLID web site.
For example:
copy %TOMCAT%\webapps\i5server\WEB-INF\classes\server.properties
to
e:\backup\server.properties
5. Use the application Tomcat Manager to undeploy the old verion of the IUCLID 5 web application.
6. Use the application Tomcat Manager to deploy the new version of the IUCLID 5 web application.
7. Stop Tomcat.
8. Copy any values that are specific to your system from the previous version of the file server.properties to
that supplied with the new version of IUCLID 5. Ensure that the new values for the database connection are those
for the database of the system to be upgraded. Remember to transfer over any settings that relate to security.
12
9. Note that if the Oracle database is used, the file server.properties must contain the following entry. Add it
or edit the existing entry if required.
hibernate.connection.driver_class=oracle.jdbc.OracleDriver
10.If the database is an Oracle database, please note that the driver for Java is no longer supplied with the IUCLID 5
installation package. The correct driver for the combination of Java and Oracle versions in use must be obtained
from the Oracle web site and installed in the appropriate folder. For example, for Oracle 11g Release 2 (11.2.0.2.0),
the name of the driver is ojdbc6.jar.
11.Copy any required plugins over from the old installation to the new one. Alternatively, obtain the latest versions
from the IUCLID web site.
12.A migration process is required to upgrade to IUCLID 5.5.0. The database and all the data it contains are migrated
from the previous to the new version by running IUCLID 5 in update mode, only once. IUCLID 5 is instructed to
start in update mode by the line shown below in the file server.properties.
database.update.startup=true
The line is supplied, although commented out, in the file server.properties in the installation package for the
new version of IUCLID 5. To run in update mode, the line must be either uncommented or added as shown above.
13.To begin the migration, start Tomcat. This automatically starts the new version of the IUCLID 5 web application.
Dependent on the quantity of data in the database, and the system resources available, the migration process
can take from minutes to many hours. It is essential that the migration process is not interrupted. The progress
of the migration can be monitored from the log files i5server.log and iuclidMT.log . The default location
of these files is on the top level directory of the Tomcat installation. The file i5server.log contains statements
about the start and end of the migration process. The file iuclidMT.log contains full details. If you need to
know what happened during the migration process, check those files first.. At the start of the process the following
entry is shown:
integration.database.scripts.ScriptUtils - Checking Database Status...
(eu/eca/iuclid/server/integration/database/scripts
/migrate_schemav51_to_schemav55.xml)
integration.database.scripts.ScriptUtils - Upgrading table
integration.database.scripts.ScriptUtils **************************************
Database changes are being applied now.
This process might, depending on the size of your database, take some time
(several minutes to perhaps hours). Please do NOT shutdown the system as this
might result in an inconsistent database state.
As the migration proceeds, details of which data are being migrated are written to iuclidMT.log. The end of
a successful migration is indicated by the following entry:
integration.database.scripts.ScriptUtils - Database update successfully finished.
integration.database.scripts.ScriptUtils - Checking Database Status...
(eu/eca/iuclid/server/integration/database/scripts/migrate_schemav51_patch.xml)
integration.database.scripts.ScriptUtils - Upgrading table
integration.database.scripts.ScriptUtils - Database is up to date.
13
If the migration is interrupted, or fails, for whatever reason, the database must be restored from the back-up and
the migration started again.
14.When the migration finishes successfully, stop the new version of the IUCLID 5 web application by stopping
Tomcat.
15.Set IUCLID 5 to start not in its update mode by commenting out the line edited previously:
#database.update.startup=true
16.Start Tomcat.
17.Run the IUCLID 5 client in the same way as before the upgrade. The initialisation process is not required. All of the
data that was present before the upgrade should be present in the new system. Therefore, it should be possible
to log in to any of the user accounts that were present prior to the upgrade.
18.Log in to the IUCLID 5 client as one of the users that was present before the upgrade.
19.Confirm that the version of IUCLID 5 is the new, expected version. This can be seen from the menu Help / About.
20.Confirm that the data from the previous version has been successfully migrated to the new version.
3.2. Upgrading from IUCLID 5.2.x/5.3.x to IUCLID
5.5.0
To upgrade from IUCLID versions 5.2.x or 5.3.x, unless the database contains a very large amount of data, it is
recommended to use the Backup and Restore features of IUCLID 5 to transfer the data from the old installation to a
fresh installation of IUCLID 5.5.0. The Backup and Restore features are described in the IUCLID 5 End-User Manual.
Making a fresh installation is described in this manual.
Warning
The built-in Backup functionality of IUCLID 5.3.1 is known to output files in which the user accounts
cannot be used on restore. If you wish to use the built-in Backup functionality on data in an installation
of IUCLID 5.3.1, first upgrade it to IUCLID 5.3.2. The built-in Backup functionality in IUCLID 5.3.2 does
not suffer from this problem.
As an alternative to using Backup and Restore into a fresh installation, it is possible to perform step-wise upgrades in
which the database is migrated from IUCLID 5.2.x/5.3.x to 5.4.x to 5.5.0. For example, this method might be required
if the amount of data is so large that it makes use of the Backup feature impractical. If you choose the migration
method, obtain the installation packages to perform the required upgrades, and then proceed as per the instructions
included therein.
Note that the plugins for IUCLID 5.2.x/5.3.x are not compatible with IUCLID 5.5. Therefore, they must not be copied
over to the new installation. Compatible versions can be downloaded from the IUCLID web site.
3.3. Upgrading from IUCLID 5.0/5.1.x to IUCLID 5.5.0
To upgrade from 5.0/5.1.x, no migration process is available, and so the method of using Backup then Restore into
a fresh installation must be used. In IUCLID 5.0/5.1.x there is no built-in Backup function. Instead, the functionality is
provided by a plugin, Backup Plug-in 5.0.3 that is available on the IUCLID web site under downloads for IUCLID 5.1.1.
14
Chapter 4. Initialisation of an installation of
IUCLID 5
This chapter describes the configuration that is required to create a working IUCLID 5 system from an installation of
IUCLID 5 that has an empty database. There are two scenarios: either to create a working installation from scratch,
or to load data from a back-up that was made using the built-in back-up function of IUCLID 5. During initialisation
from scratch, reference substance data and a legal entity are uploaded into the database, and the required user
accounts can be created. For initialisation from back-up, make sure that the back-up files are accessible from the
system on which IUCLID 5 will be initialised. What to do in each scenario is described in the rest of this chapter.
4.1. Starting IUCLID 5
Connect to the application with a browser by entering the address http://<address of your server>:8080/i5server. An
example of the page displayed is shown below.
Figure 4.1. Example default page for Java Web Start of IUCLID 5
The page shown above page contains links that use Java Web Start technology to start a client that connects to the
IUCLID 5 server and displays IUCLID 5's graphical user interface (GUI) on the client machine. In the example shown
15
above, the link under the text IUCLID 5 Client (with 1GB RAM) has already been followed. The difference between
the links in the above page is that each link passes different parameters to the IUCLID 5 server. The options included
are for varying amounts of memory to be allocated to IUCLID 5 and for different types of data compression to be
employed in the connection to the server. If IUCLID 5 runs slower than you would like and you have the available
memory, select a link for a larger amount of RAM. The client can be run directly from a browser or by first downloading
a file from one of the links and running that. Depending on your browser settings, when you click on one of the links
above you will see either a dialogue box, or IUCLID 5 will run and you will see the login page. The browser dialogue
asks whether you would like to save a file or run it straight away. The choice is yours. A convenient way to access
IUCLID 5 is to download one of the files from the default page, save it to the desktop of your local machine used
to access IUCLID 5 and give it the IUCLID 5 icon that comes with the installation. Double clicking on the icon then
launches the IUCLID 5 GUI. Once you see the login page, you are ready to go through the First steps wizard, as
described in the next section.
4.2. First steps wizard
When you start IUCLID 5 for the first time, the First steps wizard is run automatically. It guides you through the steps
required to make a working user account and to upload the data required to use IUCLID 5 in a practical setting. The
settings that relate to user accounts can also be changed after having run the wizard, using the features described
in the IUCLID 5 End-user Manual.
Important
This wizard allows a single user account to be created, per run. This user is in addition to the SuperUser
account that comes with the installation. It is essential to have at least one user account in addition to
SuperUser because SuperUser should be used only for the special tasks that only it can carry out. See
the IUCLID 5 End-user Manual for more detail.
As part of the First steps wizard, a legal entity must be uploaded into the IUCLID 5 installation in the form
of a LEOX file. Therefore, before running this wizard, make sure that a LEOX file for the legal entity of
your company or organisation is accessible to your computer. For more information, see the IUCLID 5
End-user Manual.
The First steps wizard provides the option of uploading the following information to your IUCLID 5 installation. For details, see the IUCLID 5 End-user Manual:
• EC Inventory
• Inventory of Reference substances
Although these uploads are optional, it is strongly recommended to do them during the first run of the
First steps wizard. To do so, you will need to have the data accessible to your computer whilst running
this wizard.
The First steps wizard can be run at any time, but only by the SuperUser. This is done from the file menu within
IUCLID 5 Administrative tools / Initialise.
When starting the IUCLID 5 for the first time, the only user available is an administrator named SuperUser. Log in
as SuperUser by entering the following case-sensitive values into the login screen as shown below:
Username: SuperUser
Password: root
16
Note
Do not click on the link Forgot your password? if the First steps wizard is being run for the first time on
this database. This feature can work only after the wizard has been completed. The use of the feature
Forgot your password? is explained later in this wizard, at step 3.
The First steps wizard then proceeds. Each page of the wizard is described in a figure below.
Figure 4.2. Step 1 of the First steps wizard - Introduction
The wizard presents some useful information. There are no actions other than to read the information. Click the
Next button.
17
Figure 4.3. Step 2 of the First steps wizard - Init mode - New installation
To initialise a new database, select the button New Installationas shown below and continue to the next step.
Figure 4.4. Step 2 of the First steps wizard - Init mode - Restore from backup
To restore from a backup of a previous version of IUCLID 5, select the button Restore from backup then enter
the directory containing the backup files as shown in the example below.
Click Next. The wizard jumps to its last step, where the importation of data is started, as shown below.
Figure 4.5. Restoration from a backup - Step 8 - Activate imports
The import may take some time. Click Finish. When the restoration is complete, the following screen is shown.
18
Figure 4.6. Step 3 of the First steps wizard - Change password
If the password for SuperUser has never been changed from its default value of root, the traffic light in the wizard
screen will be yellow. To change the password, check the box Change SuperUser password , enter the current
password, and then the new password, and then the new password again.
To proceed, click the button Next.
Tip
IUCLID 5 has a feature that can check the strength of passwords. If the feature is turned on, and the
password you enter is considered to be too weak, an error message is displayed that explains what a
password must contain. If that happens, read the error message carefully then create a password that
satisfies the criteria. For example, the default settings require the password to be at least 6 characters
in length, and to contain at least one uppercase letter, and one lowercase letter. The policy for the
SuperUser is the same as that for all users. The password policy is set by editing a settings file within
the installation files of IUCLID 5. This is documented in the relevant installation manual for your instance
of IUCLID 5. Existing passwords can still be used to log in, even if they do not conform to the current
policy. When a password is created, it must conform to the current password policy.
Tip
IUCLID 5 has a feature that allows a user to log in by answering a security question, instead of providing
the password for the account. Users define their own questions and answers from within their own
accounts. However, the SuperUser is a special case, because the question and answer can be defined
before logging in for the first time. The question and answer are entered into the fields shown above in
step 3 of the wizard. To use the feature to log in, a user clicks on the link Forgot your password? which
is situated at the bottom right of the login page.
19
Figure 4.7. Step 4 of the First steps wizard - Import Legal Entity
To import a Legal entity (see the IUCLID 5 End-user Manual) select its LEOX file by browsing to the file. The browsing
is accessed by clicking on the folder icon to the right of the field Select the import file. Click the Next button. The
Legal entity is imported immediately.
Important
You must import at least one Legal entity in order to succeed with this wizard. If you have no Legal entity
in the IUCLID 5 system, the traffic light in the wizard screen will be red. The First steps wizard will be
automatically launched when you log in to IUCLID 5 until a Legal entity has been successfully imported.
Figure 4.8. Step 5 of the First steps wizard - Import EC Inventory
EC inventory import - To import the EC inventory, select the file for the EC inventory (see the IUCLID 5 End-user
Manual). The EC Inventory will not be imported immediately. The import will start at the end of the First steps wizard.
Depending on your machine speed and the size of the inventory, this import can take some time, e.g. up to half
an hour.
20
Figure 4.9. Step 6 of the First steps wizard - Import reference substance inventory
Reference substance inventory import - Select the file for the Reference substance inventory (see the IUCLID 5 Enduser Manual). The Reference substance inventory will not be imported immediately. The import will start at the end
of the first steps wizard together with the EC Inventory import. Depending on your machine speed and the size of
the inventory, this bulk operation may take a long time. The import of the Reference substance inventory itself can
take up to several hours.
Tip
Time and IT resources can be saved by importing into IUCLID 5 only the Reference substances you
need. Various different sizes of Reference substance inventory can be downloaded from the IUCLID web
site. There is a full set, a reduced list, and a function that allows you to create your own inventory using
common identifiers as selection criteria, such as EC Number, and IUPAC name. Before importing the full
set, consider carefully whether it is really necessary. Reference substances that are not imported during
the initialisation process can be imported later. A simple compromise is to start with the reduced list.
21
Figure 4.10. Step 7 of the First steps wizard - Create user account and assign role
Create a new user account and define its user access rights by assigning it a role. It is essential to create a new
user because general working within IUCLID 5 with the SuperUser is not supported. Only one user can be created
per run of the First steps wizard.
• Select the checkbox Create user.
Fill in all the fields. The user needs a Login name for identification during login. The Full name is used for
proper user identification. The Assigned role is needed to administrate the access permissions. In a newly
installed IUCLID 5, the roles Administrator, Full access and Read-only are provided by default.
• Enter a Login name, as it should be used for identification during login, and the Full name used for proper
user identification.
• Click Set password to define a password.
Tip
IUCLID 5 has a feature that can check the strength of passwords. If the feature is turned on, and the
password you enter is considered to be too weak, an error message is displayed that explains what
a password must contain. If that happens, read the error message carefully then create a password
that satisfies the criteria. For example, the default settings require the password to be at least 6 characters in length, and to contain at least one uppercase letter, and one lowercase letter. The policy for
the SuperUser is the same as that for all users. The password policy is set by editing a settings file
22
within the installation files of IUCLID 5. This is documented in the relevant installation manual for your
instance of IUCLID 5. Existing passwords can still be used to log in, even if they do not conform to the
current policy. When a password is created, it must conform to the current password policy.
Tip
If you want a use-once password that is reasonably hard to guess and that definitely conforms to the
password policy, you can let IUCLID 5 make one for you, by clicking on the button Generate. It will be
displayed in a new window for you to make a record of it. On closing that window it will be automatically
entered into the fields New password and Confirm new password.
• Ticking the box Expire password upon next login forces whoever logs in to the account first to set their own
password.
• Click and highlight a role in the list of unassigned roles and assign it to the user by clicking the Right arrow. Assigning
a Role is needed to administrate the access permissions (in a newly installed IUCLID 5, the roles Administrator,
Full access and Read-only are provided by default).
Tip
It is recommended to create a user with the Administrator Role regardless of whether a stand alone or
a distributed version of IUCLID 5 is set up. Once a user has been created, the IUCLID 5 administrator
(in case of a distributed version) can define different other user(s) and assign different role(s) to them
(see the IUCLID 5 End-user Manual).
• Assign a Legal entity (normally the Legal entity imported in the third step of this wizard) by clicking the green plus
button and performing a search for the desired Legal entity. In the Query field Legal entity name, enter the
name of the desired Legal entity or an asterisk (*) as wildcard and click the Search button. In the Query results
list, click the desired entry and then click the Assign button.
• Optionally, select default attachment and import/export directories. These settings can be changed at a later stage,
as described in the IUCLID 5 End-user Manual.
• Click the Next button
Figure 4.11. Step 8 of the First steps wizard - Start import procedure
If you have selected an EC Inventory and/or Reference substances inventory file(s) during the wizard steps, you can
now run the imports. Click the button Execute imports. Note again that these imports can take up to several hours,
depending on your machine speed and the amount of data you are importing.
Then click the button Finish. If you have launched any imports, you will now have to wait until the imports are
completed. Afterwards, you should log out and then log in again as a user for the newly defined account. Remember:
general working as SuperUser is not supported.
23
4.3. User management
The installation of IUCLID 5 is now ready for hand-over to whoever will be maintaining the system and whoever will
be managing the user accounts. The management of user accounts and their roles is described in the IUCLID 5 Enduser Manual. Individual users can connect to the IUCLID 5 server using Java Web Start technology, as described in
Section 4.1, “Starting IUCLID 5”. A convenient way to achieve that is for users to save onto their desktop, one of the
files downloaded from the default Java Web Start page. The user would launch IUCLID 5 by simply double-clicking
on the icon on his or her desktop. Alternatively, the users could be supplied with the URL http://<address of your
server>:8080/i5server and instructions on which link to use.
24
Chapter 5. Un-installation of IUCLID 5
The un-installation of IUCLID 5 is a manual process. IUCLID 5 can be un-installed by deleting the files that were
copied to the destination machine, and reversing any changes made during the installation process. For more details
about the actions that might be required, see the IUCLID FAQ located at the IUCLID web site http://iuclid.eu.
25