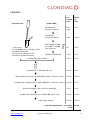
1
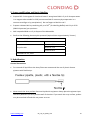
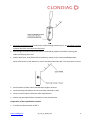
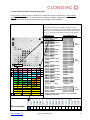
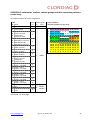
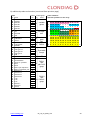
 P. aeruginosa Genotyping Kit Array Hybridisation Kit for DNA‐based assignment of unknown Pseudomonas aeruginosa isolates to known strains. Kit order number: 205200050 50 reactions (ArrayTubes) For Investigational Use Only. Not Intended for Use in Clinical Diagnostics. Content BACKGROUND ............................................................................................................................................................... 3 Literature ....................................................................................................................................................................... 3 GENERAL INSTRUCTIONS FOR USE ................................................................................................................................ 4 KIT COMPONENTS, STORAGE AND STABILITY ............................................................................................................... 6 PROTOCOL..................................................................................................................................................................... 8 1. P. aeruginosa DNA................................................................................................................................................ 9 2. Linear amplification and biotin labelling ........................................................................................................... 10 3. Hybridisation ...................................................................................................................................................... 10 4. Setup of the ArrayMate Reader ......................................................................................................................... 12 5. Washing after Hybridisation .............................................................................................................................. 13 6. Addition of HRP conjugate ................................................................................................................................. 13 7. Data Acquisition ................................................................................................................................................. 14 8. Image analysis (according to Wiehlmann et al. 2007)....................................................................................... 15 TROUBLESHOOTING .................................................................................................................................................... 19 ADDITIONAL INFORMATION ....................................................................................................................................... 20 CONTACT................................................................................................................................................................. 20 APPENDIX 1: form for 1st level of interpretation: the 1/0 string code...................................................................... 21 APPENDIX 2: substances, markers, marker groups and their respective positions on the array ............................ 22 APPENDIX 3: Re‐order numbers of individual components:..................................................................................... 24 www.clondiag.com
05_16_04_0004_V01
2
BACKGROUND CLONDIAG's P.aeruginosa Genotyping Kit allows DNA‐based assignment of unknown P. aeruginosa isolates to known strains. For Investigational Use Only. Not Intended for Use in Clinical Diagnostics. TEST PRINCIPLE. Clonal P. aeruginosa DNA is amplified approximately 50‐fold and labelled with biotin‐dUTP adopting a so called linear PCR protocol. In linear PCR only one primer is used instead of a primer pair, producing single stranded reaction products only, therefore limiting the degree of amplification (limited risk of cross‐contamination). Labelled single stranded DNA is transferred and hybridised to microarrays with 77 probes (in duplicate each), representing different genetic markers. Strain assignment is performed by visual array analysis using the hexadecimal code described by Wiehlmann et al. 2007, PNAS vol. 104 no. 19, p. 8101–8106. A next generation kit with an automated software analysis tool is in progress and will be launched by the end of 2010. It will be based on the same chemistry, on the same markers, and on the same strain assignment strategy using the hexadecimalcode, respectively. Test results will be 100% comparable to the current visual method. THE ASSAY IS DESIGNED to be performed by personnel trained in microbiological and molecular biological laboratory methods. Literature
•
Wiehlmann et al. 2004, JOURNAL OF BACTERIOLOGY Vol. 186, No. 13, p. 4228–4237. •
Wiehlmann et al. 2007, PNAS vol. 104 no. 19, p. 8101–8106. www.clondiag.com
05_16_04_0004_V01
3
GENERAL INSTRUCTIONS FOR USE Intended Use For Investigational Use Only. Not Intended for Use in Clinical Diagnostics. The kit is manufactured for research use only. The kit is intended for use by personnel that are well‐trained in molecular biology. Preparation of DNA from P. aeruginosa colonies (clones) requires expertise in microbiology and the local regulations for handling of potentially infectious organisms are to be obeyed. Specifications Upon receipt the assay components need to be stored at different temperatures as specified on the package insert. The assay is to be performed at an ambient temperature of 18°C to 28°C unless otherwise specified. Technical Support CLONDIAG provides technical assistance. Please contact: Tel.: +49 (0) 3641 3111 116 e‐mail: [email protected] Safety Precautions DNA preparation from P. aeruginosa must be performed under the biosafety conditions as defined by your local authorities for work with P. aeruginosa. In most countries, biosafety Level 2 is obligatory for this kind of work. P. aeruginosa DNA may be processed in laboratories below this biosafety level, if potential contamination by living P. aeruginosa bacteria can be definitively eliminated. Always wear protective clothes as regulated for laboratory work by your local authorities. Material Safety Data Sheets (MSDS) Per OSHA 29CFR1910.1200, Commonwealth of Australia [NOHSC:1005, 1008(1999)] and the latest amendments to the European Union Directives 67/548/EC and 1999/45/EC, the enclosed reagents do not require a Material Safety Data Sheet (MSDS). They do not contain more than 1% of a component classified as hazardous and do not contain more than 0.1% of a component www.clondiag.com
05_16_04_0004_V01
4
classified as carcinogenic. MSDS therefore are not provided. Nevertheless, the buffers may cause irritation if they come into contact with eyes or skin, and may cause harm if swallowed. The regular precautions associated with laboratory work should be obeyed (e.g.: wear protective goggles, gloves and lab coat and avoid contact with the reagents). In case buffers or solutions are spilled, clean with laboratory detergent and water. Clondiag assumes no liability for damage resulting from handling or contact with these products. If you have any questions please contact our Technical Support (see above). Shipping Precautions RID/ADR: Kein Gefahrgut/ No dangerous goods IMDG: No dangerous goods IATA: No dangerous goods www.clondiag.com
05_16_04_0004_V01
5
KIT COMPONENTS, STORAGE AND STABILITY DNA labelling and amplification •
B1Pa: Labelling Buffer. Store at 2‐8°C. Surplus: 40%. •
B2: Labelling Enzyme. Store at 2‐8°C. Surplus: 200%. Hybridisation and Detection •
ArrayTubes (50 samples), protected against light and sealed under inert gas. Store at 18°C to 28°C. After opening to be used within two weeks. Protect them against humidity and dust and store them at a dark place. Avoid ANY touching or scratching the microarray on the bottom of the well. CAUTION: Do not store or handle unused tubes above 60% relative humidity since this may irreversibly corrode the spots. •
C1: Hybridisation Buffer. Store at 18‐28 °C, protect against sunlight. Surplus: 100%. •
C2: Washing Buffer 1. Store at 18 °C ‐ 28 °C, protect against direct sunlight. Surplus: 67%. •
C3: HRP Conjugate 100x. Store at 2‐8 °C, protect against direct sunlight. Surplus: 200%. •
C4: Conjugate Buffer. Store at 18°C to 28°C, protect against direct sunlight. Surplus: 500% •
C5: Washing Buffer 2. Store at 18°C to 28°C, protect against direct sunlight. Surplus: 140%. •
D1: Horseradish Peroxidase Substrate. Store at 2‐8°C, protect against direct sunlight. Surplus: 140%. Expiry date is to be found on each bottle and on the outer package All components have been tested for stability for short term shipment (<1 week) at ambient temperature (< 37 °C). Please note: ArrayTubes, B1Pa and D1, respectively, are by far the most expensive test components and hence they are the limiting components of the kit. Please keep this in mind when using the kit. All components may be ordered separately using the order numbers indicated at the end of this manual. For a price list please contact your local representative or our customer service, respectively. www.clondiag.com
05_16_04_0004_V01
6
Components required but not provided by Clondiag •
DNA preparation kit. The assay has been tested with the DNeasy Blood & Tissue Kit from Qiagen, cat# 69504. Instrumentation provided by Clondiag (to be ordered separately) •
ArrayMate Reader or ATR03 reader, respectively Materials and instruments required but not provided by Clondiag • Equipment, growth media and consumables needed for the cultivation of P. aeruginosa • Equipment needed for DNA isolation, e.g. pipettes, centrifuge • Kit for isolation of DNA (we recommend the Qiagen DNeasy® Blood & Tissue kit, Qiagen order number: 69506) • RNAse (we recommend Qiagen’s RNase A solution, 100 mg/mL, Qiagen order number: 19101) • Thermomixer (we recommend BioShakeIQ from Quantifoil Instruments, www.qinstruments.com) equipped with a platform for the warming of 1.5 mL centrifuge tubes. • Photometer for quality control of DNA. • Equipment for DNA gel electrophoresis for quality control of DNA. • Thermocyler • Pipettes: suitable for 1µL‐5µL volumes, 90µL, 100µL, 200µL, 1000µL • For removal of liquid from the ArrayTubes we recommend the use of plastic Pasteur pipettes with flexible tips. • Reagent tubes suitable for PCR • ultrapure water www.clondiag.com
05_16_04_0004_V01
7
PROTOCOL pro‐
cessing
time
hands‐
on‐
time
grow bacteria
(not part of the kit)
over
night
5 min
isolate DNA
(not part of the kit)
3‐4 h
10 min
label DNA (5 µl DNA + 4.9 µL B1Pa 0.1 µL B2
Thermocycler)
3h
5 min
add 90 µl of Buffer C1
2 min
2 min
transfer DNA to ArrayTube
2 min
2 min
hybridise (60 °C, 550 rpm; 60 min )
60 min
0 min
discard DNA, wash 3x (0.5 ml Buffer C2; 2x 30 °C, 550 rpm, 5 min)
15 min
15 min
incubate with conjugate (0.1 ml Buffer C3/4, 30 °C, 550 rpm, 10 min)
10 min
2 min
discard conjugate, rinse 2x (0.5 ml Buffer C5)
2 min
2 min
incubate with substrate (0.1 ml Buffer D1, RT, 10 min)
10 min
10 min
15 min
15 min
prepare Arrays
prepare DNA
• rinse arrays (0.5 ml water , 60 °C, 550 rpm, 2min)
• incubate in bufer C1
(0.2 ml, 60 °C, 550 rpm, 2min
• discard C1, process promptly
take image, analyse
total time requirement : over night 70 min
+ 7‐8 h
www.clondiag.com
05_16_04_0004_V01
8
1. P. aeruginosa DNA The required specimen for the P. aeruginosa genotyping test is 0.5‐2 µg of intact DNA from a single colony of P. aeruginosa. The DNA specimen needs to be virtually free of RNA as determined by agarose gel electrophoresis. Please note: This assay requires much more DNA than common PCR applications. Most performance problems with the P. aeruginosa Genotyping Kit are due to insufficient amounts of DNA. We therefore strongly recommend to follow the protocol outlined below. From several DNA isolation kits tested so far, only the DNA extraction Kits from Qiagen in combination with the RNA digest yielded sufficient DNA. The following procedure is based on the Qiagen DNeasy® Blood & Tissue kit, Qiagen order number: 69506). CAUTION: P. aeruginosa is a potential pathogen. All procedures prior to complete death of the bacteria need to be performed by properly trained staff in a biosafety Level 2 facility. •
Add bacteria to 180 µL of buffer ATL. Amount of bacteria: an inoculating loop of 1 µL filled with bacteria; this corresponds roughly to 1/8 of a bacterial growth plate (overnight culture of bacterial lawn). Continue with step 2 of the protocol “Purification of Total DNA from Animal Tissues (Spin‐
Column Protocol)”, page 29 of the DNeasy Blood & Tissue Handbook 07/2006. In brief: •
add 20 µL of Proteinase K, incubate at 56 °C until the tissue is completely lysed •
After lysis add 4 µL of Qiagen’s RNase A solution (100 mg/mL, to be ordered separately, order number 19101), mix and incubate for 2 min at room temperature before •
continue with step 3 of the Qiagen protocol (addition of 200 µL of buffer AL). IMPORTANT BEFORE CONTINUING: •
Measure DNA concentration (A260 method) and check for DNA integrity and absence of RNA (agarose gel). www.clondiag.com
05_16_04_0004_V01
9
2. Linear amplification and biotin labelling •
Suspend 0.5‐2 microgram of clonal and intact P. aeruginosa DNA in 5 µL of ultrapure water in a reagent tube suitable for PCR (concentrate DNA if necessary by evaporation in a vacuum centrifuge or by precipitation). Do not forget to label the vial! •
Prepare a Master Mix by combining 4.9 µL of B1Pa (2x Labelling Buffer) and 0.1 µL of B2 (DNA Polymerase) per specimen. •
Add suspended DNA to a 5 µL aliquot of the MasterMix •
Perform the following thermocycler protocol (required time: approximately 3 hours) Pre‐heat cover/lid to 105°C 300 sec at 96°C 20 sec at 62°C 50 cycles with 40 sec at 72°C 60 sec at 96°C Cool down to 4°C, hold 3. Hybridisation General Precautions •
For removal of liquid from the ArrayTubes we recommend the use of plastic Pasteur pipettes with flexible tips. •
Never touch the Array surface. Remove liquid with a pipette: always place the pipette tip at the cavity between the array and the wall of the tube. If you touch the array surface, probes may be scratched off and this may cause an error. www.clondiag.com
05_16_04_0004_V01
10
•
Avoid any complete drying of the array surface during processing (i.e. do not allow it to stay without liquid for more than two minutes) •
We strongly recommend that the liquid is removed by pipettes instead of inverting the tubes and flicking them out. •
Always label your ArrayTubes with a laboratory marker at the recommended position. Never label them on the bottom or across the data matrix barcode. This may cause an error. •
Avoid contact of data matrix barcode with organic solvents •
Avoid touching the bottom of the ArrayTube and keep it clean •
Never rinse the tubes with water after hybridisation •
Always cap the tubes before incubation in the thermomixer Preparation of the hybridisation mixture •
Pre‐heat the thermomixer to 60 °C www.clondiag.com
05_16_04_0004_V01
11
•
Add 90 µL of buffer C1 to each labelling product, mix gently (vigorous mixing results in foaming) and put aside. Pre‐washing of the arrays (2 washing steps) •
Remove the ArrayTube from the bag (open the bag at its predetermined breaking point) •
Add 500 µL of ultrapure water to each tube •
Incubate in the thermomixer at 60 °C, 550 rpm for 2 minutes •
Remove and discard the water WITHOUT TOUCHING THE ARRAY SURFACE •
Add 200 µL buffer C1 to each tube •
Incubate in the thermomixer at 60 °C, 550 rpm for 2 minutes •
Remove and discard buffer C1 •
Proceed promptly (hybridisation mixtures must be ready when buffer C1 is removed) Hybridisation •
Transfer each hybridisation mixture (100 µL) to a prepared ArrayTube (avoid extensive foaming) •
Incubate for one hour at 60°C and 550 rpm on a thermomixer 4. Setup of the ArrayMate Reader In case you use an ArrayMate reader (instead of the ATR03 reader) we recommend to set up the reader after having started the hybridisation; this allows you a restart without time pressure in case of any software problems. This is a short instruction only. For more detailed information please refer to the ArrayMate User Manual. •
Switch on the ArrayMate (main switch on the rear below the electric cable plug, operating switch on the bottom/left corner of the front side). •
Switch on the screen (switch right hand below the screen). •
Login as “User R&D” (password to be defined by the instrument’s administrator on the customer’s site and to be initially implemented by the supplier’s technical service). (The user interface is loaded, ArrayMate performs internal testing for < 1 minute) •
Click on the icon “New Run” (left upper edge of the screen; a suggestion for a run name for the new run appears in the top line of the screen). www.clondiag.com
05_16_04_0004_V01
12
•
You may now modify or change the experiment name at your convenience. •
Type in your operator ID. 5. Washing after Hybridisation Washing after hybridisation (3 washing steps) •
Remove the ArrayTubes from the thermomixer •
Set the thermomixer to 30°C for the following steps (cooling will take some minutes) •
Carefully open the tubes and remove the hybridisation mixture as completely as possible (without touching the array surface) •
1st Washing step after hybridisation: add 500 µL of buffer C2 remove and discard the washing solution WITHOUT TOUCHING THE ARRAY SURFACE •
2nd Washing step after hybridisation: add 500 µL of buffer C2 incubate in the thermomixer for 5 min at 30 °C, 550 rpm remove and discard the washing solution •
3rd Washing step after hybridisation: repeat 2nd Washing step NOTE: a carryover of more than 1% of buffer C1 to the next step will denature the HRP 6. Addition of HRP conjugate NOTE: ‐ Reagent C3 contains Streptavidin‐Horseradish Peroxidase (HRP) that would denature and lose its activity at 60°C. Do NOT incubate above 30°C. •
Combine Reagent C3 (HRP) : Buffer C4 = 1 : 100 => C3/4 ‐ the mixture is stable for 1 day at room temperature ‐ both reagents are delivered with a surplus of more than 100% each •
Add 100µL of C3/4 to each tube •
Incubate for 10 minutes at 30°C and 550 rpm on a thermomixer •
Remove and discard C3/C4 www.clondiag.com
05_16_04_0004_V01
13
•
Washing step after binding of conjugate (2x): add 500 µL of buffer C5 remove and discard the washing solution WITHOUT TOUCHING THE ARRAY SURFACE Repeat this step once. Staining of bound HRP‐conjugate NOTE: ‐ a carryover of more than 3% of buffer C3/4 will cause higher background signals -
do not move ArrayTubes during staining -
Reagent D1 contains a substrate for Horseradish Peroxidase •
Add 100µL of reagent D1 to each tube •
Incubate at room temperature WITHOUT agitation for 10 min •
Read out without removing D1 CAUTION: the tubes MUST be clean underneath the arrays and there MUST NOT be air bubbles in the tubes. Tubes may be cleaned with lint‐free wipes, bubbles may be removed by removing and adding D1 again. PLEASE NOTE: The ArrayTubes as used in this kit do have a different geometry than the 8‐well ArrayStrips that are used in other kits. Therefore, unlike the directive for ArrayStrips, D1 is NOT to be removed from the ArrayTubes before reading. 7. Data Acquisition For image uptake you need an ATR03 reader or an ArrayMate reader, respectively. Please refer to the reader’s manual for image acquisition. With the Iconoclust/ATR03 you would be able to further process the images for spot intensity analysis. Due to the lack of validated threshold values we currently do not support this kind of analysis for the P. aeruginosa test kit, however. Instead, we recommend the data analysis method proposed by Wiehlmann et al. 2007 as outlined below. An automated version of data analysis will be available for the next generation kit by the end of year 2010. www.clondiag.com
05_16_04_0004_V01
14
8. Image analysis (according to Wiehlmann et al. 2007) All images shown below are proprietary of Lutz Wiehlmann, Medical School of Hannover, Germany. The example shown here is the strain P.aeruginosa PAK. Biotin Control Spots The Arrays contain six spots (indicated by arrows in the image) that directly bind to Streptavidin‐
Horseradishperoxidase and which have to be positive. These spots indicate proper test performance after step 5 (Washing after Hybridisation). Further, the Biotin spots help with the orientation of the image for analysis. Spots, DNA probes and markers on the image Each DNA molecule (probe) is represented by two spots on the array. A marker may be represented by one or more probes. An example (P. aeruginosa PAK) is seen here: Image Marker names
Biotin
C-45
C-46
C-47
PAGI-3-1
PAGI-2/3-1
PAGI-2/3-4
PAGI-2/3-5
PAGI-2/3-6
Biotin
pKL-1
pKL-3
TB-C47-1
TB-C47-2
Biotin
pKLC
unknown
pKLC
adhesin
fpvA type
II a
pKLC f.a.
synthase
fpvA type
II b
fpvA type I
PAGI-3-8
PAGI-2-1
PAPI-1 pili
PAPI-1
Biotin
chaperone luminal bp.
Biotin
fpvA type III
fpvB
LES
PA0636
PA0722
PAGI-1
PA0980
PA0728
PA2185
fla-island
orfA
47D7-Isld-1
acetyltransf.
PA2221
PA3835
orfI
orfJ
47D7-Isld-2
XF1753
fliC b
exoS
exoU
ampC_7
Biotin
Biotin
fliC a
ampC_4
ampC_5
ampC_6
oprI
ampC_1
ampC_3
citS-1
citS-2
oprI (1)
fliCa -SNP(1)
fliCa-SNP (2)
alkB2
oriC
oprL (1)
oprL (2)
Biotin
www.clondiag.com
05_16_04_0004_V01
15
Probe positions on the array, groups of markers As outlined above, each DNA probe is represented by two spots on the array. The array contains 77 different DNA probes (no 2‐78 in the image below). Additionally, there is a control probe that contains Biotin (number 1) that is printed in hexaplicate: position of probes on the array 1 71 71 72 72 73 73 74 74 75 75 76 76 1
A complete list of probe names is to 67 67 68 68 69 69 70 70 0 0 0 0
be found in appendix 2 at the end of 1 63 63 64 64 0 0 0 0 65 65 66 66
this document. 1 60 60 61 61 62 62 0 0 0 0 0 0
54 54 55 55 56 56 57 57 58 58 59 59
50 50 51 51 0 0 0 0 52 52 53 53
44 44 45 45 46 46 47 47 48 48 49 49
38 38 39 39 40 40 41 41 42 42 43 43
32
26
20
14
8
1 2
32
26
20
14
8
2
33
27
21
15
9
3
33
27
21
15
9
3
34
28
22
16
10
4
34
28
22
16
10
4
35
29
23
17
11
5
35
29
23
17
11
5
36
30
24
18
12
6
36
30
24
18
12
6
37
31
25
19
13
7
37
31
25
19
13
7 1
Several probes may contribute to a single marker (e.g. probe oriC‐PAO and oriC‐non‐PAO contribute to marker oriC). The markers in turn are grouped into ten different marker groups: position of markers on the array legend Biotin
C-45
C-46
C-47
PAGI-3-1
PAGI-2/3-1
PAGI-2/3-4
PAGI-2/3-5
PAGI-2/3-6
Biotin
pKL-1
pKL-3
Biotin
pKLC
unknown
pKLC
adhesin
fpvA type
II a
fpvA type I
fpvA type III
PAGI-2-1
Biotin
0
Biotin
empty position
Biotin spot
PAPI-1 pili
PAPI-1
Biotin
chaperone luminal bp.
group 1
Biotin
group 2
fpvB
LES
group 3
PAGI-1
PA0980
group 4
PA0636
PA0722
PA0728
PA2185
fla-island
orfA
47D7-Isld-1
acetyltransf.
group 5
PA2221
PA3835
orfI
orfJ
47D7-Isld-2
XF1753
group 6
fliC a
fliC b
exoS
exoU
group 7
ampC_7
Biotin
pKLC f.a.
synthase
fpvA type
II b
PAGI-3-8
ampC_4
ampC_5
ampC_6
group 8
oprI
ampC_1
ampC_3
group 9
citS-1
citS-2
oprI (1)
group 10
fliCa -SNP(1)
fliCa-SNP (2)
alkB2
oriC
oprL (1)
oprL (2)
Biotin
For strain identification only marker group 1 (probes 2‐33) and marker group 2 (probes 34‐37) are relevant. The other marker groups may be used for the analysis of microevolution within an institution or even within a single patient as outlined by Wiehlmann et al. 2007. www.clondiag.com
05_16_04_0004_V01
16
1st level of interpretation: the 1/0 string code Each group 1 marker exists in a PAO OR in a non‐PAO version, respectively. Each group 2 marker (like fliC a) exists in a positive OR in a negative version, respectively. This image information is now to be converted into a 0/1 string as outlined below. version of the marker
Image and markers In this figure there are four image examples for each marker. Find out whether your image better resembles the PAO version or the non‐PAO version, respectively and type “0” or “1” into the string code mask (see also appendix 1). PAO‐type = 0 non‐PAO‐type = 1 oriC
oprL(1)
one
marker
oprL(2)
alkB2
citS-1
citS-2
oprl(1)
one
marker
oprl(2)
ampC-1
PAGI-3-1
PAGI-2/3-5
PAGI-2/3-6
PAGI-2/3-1
PAGI-2/3-4
Biotin
pKL-1
pKL-3
Biotin
pKLC
unknown
pKLC
adhesin
fpvA type
II a
fpvA type I
PAGI-2-1
ampC-3
Biotin
ampC-4
PAPI-1 pili
PAPI-1
Biotin
chaperone luminal bp.
pKLC f.a.
synthase
fpvA type
II b
fpvB
LES
PA0980
orfA
47D7-Isld-1
acetyltransf.
orfI
orfJ
47D7-Isld-2
XF1753
fliC a
fliC b
exoS
exoU
PA0722
PA0728
PA2185
fla-island
PA2221
PA3835
ampC-5
Biotin
PAGI-1
PA0636
ampC_7
Biotin
PAGI-3-8
fpvA type III
ampC_4
ampC_5
ampC_6
oprI
ampC_1
ampC_3
citS-1
citS-2
oprI (1)
fliCa -SNP(1)
fliCa-SNP (2)
alkB2
oriC
oprL (1)
oprL (2)
ampC-6
ampC-7
positive
negative
fliCa
fliCa SNP (1)
one
marker
fliCa SNP (2)
Biotin
fliCb, ExoS, ExoU may be positive (1) or negative (0),
respectively, (like fliCa)
fliC a
ampC_7
ampC_6
ampC_5
ampC_4
ampC_3
ampC_1
oprI
citS-2
citS-1
alkB2
oprL
oriC
exoU
C-47
exoS
C-46
fliC b
C-45
fliCa-SNP
Biotin
0/1 string code: 0
www.clondiag.com
05_16_04_0004_V01
17
2nd level of interpretation: the hexadecimal code As a second step, convert the 0/1 string code into the Hexadecimal code as outlined below: oriC
oprL
alkB2
citS-1
citS-2
oprI
ampC_1
ampC_3
ampC_4
ampC_5
ampC_6
ampC_7
fliC a
fliCa-SNP
fliC b
exoS
exoU
0/1 string from 1st level analysis:
0
1
0
1
0
1
0
1
1
0
1
0
1
0
0
1
0
fliC a
fliCa-SNP
fliC b
exoS
exoU
Hex-Code
fliC a
fliCa-SNP
fliC b
exoS
exoU
If fliCa=1, then fliCb=0 and vice versa => fliCa is sufficient for typing
0
0
1
1
0
0
1
1
0
0
1
1
0
0
1
1
0 0
1 1
0 2
1 3
0 4
1 5
0 6
1 7
0 8
1 9
0 A
1 B
0 C
1 D
0 E
1 F
0 0
1 1
0 2
1 3
0 4
1 5
0 6
1 7
0 8
1 9
0 A
1 B
0 C
1 D
0 E
1 F
0
0
0
0
0
0
0
0
1
1
1
1
1
1
1
1
0
0
0
0
1
1
1
1
0
0
0
0
1
1
1
1
0
0
1
1
0
0
1
1
0
0
1
1
0
0
1
1
5
A
Hex-Code
ampC_7
0
0
0
0
1
1
1
1
0
0
0
0
1
1
1
1
ampC_7
0
0
0
0
0
0
0
0
1
1
1
1
1
1
1
1
ampC_6
0 0
1 1
0 2
1 3
0 4
1 5
0 6
1 7
0 8
1 9
0 A
1 B
0 C
1 D
0 E
1 F
ampC_5
0
1
ampC_6
1
0
ampC_5
ampC_3
5
0
ampC_4
ampC_1
0
0
1
1
0
0
1
1
0
0
1
1
0
0
1
1
0
1
ampC_4
ampC_1
oprI
0
0
0
0
1
1
1
1
0
0
0
0
1
1
1
1
1
1
Hex-Code
oprI
citS-2
0
0
1
1
0
0
1
1
0
0
1
1
0
0
1
1
0
0
0
0
0
0
0
0
1
1
1
1
1
1
1
1
0
ampC_3
citS-2
Hex-Code
0
0
0
0
1
1
1
1
0
0
0
0
1
1
1
1
citS-1
0
0
0
0
0
0
0
0
1
1
1
1
1
1
1
1
alkB2
0 0
1 1
0 2
1 3
0 4
1 5
0 6
1 7
0 8
1 9
0 A
1 B
0 C
1 D
0 E
1 F
oprL
0
0
alkB2
1
1
oprL
0
oriC
1
0
oriC
citS-1
separate it into four subsequent parts and find the four corresponding code digits:
A
The Hexadecimal code for the SNP pattern of the strain P. aeruginosa PAK therefore is “55AA”. This code may be used for comparison of different strains and it is portable between different laboratories. www.clondiag.com
05_16_04_0004_V01
18
TROUBLESHOOTING Data Quality In case of poor data quality we recommend to re‐check DNA quantity and quality first by loading leftover DNA on an agarose gel. •
The amount of DNA is crucial. A260 readings will cover RNA and other contaminants as well. Therefore pure DNA preparation without bulk amounts of RNA are a prerequisite for proper DNA concentration measurement. •
DNA must be unfragmented, as fragmentation reduces the efficiency of amplification and labelling due to the distance between primer and probe binding sites. •
DNA should be free of RNA, as free RNA reduces the efficiency of amplification and labelling by effectively removing primer from the reaction mix due to competitive hybridisation. •
DNA must be free of any traces of ethanol, as ethanol strongly influences the amplification. This is an important issue as, e.g., in the top of QIAGEN tubes a drop of ethanol‐containing washing buffer might get trapped. The tubes really need to be centrifuged on high speed. Alternatively, it is possible to heat the sample prior to adding it to the labelling mix (some 5 minutes at 70°C). Some problems with samples from the Qiagen EZ1 device for example were resolved after heating the samples. •
All reagents need to be within the recommended shelf‐life and stored in the appropriate way. We have good experience with the manual QIAGEN DNeasy kit and the automated device EZ1. Contrarily, alkaline lysis, mechanical bead‐beater extraction or ultrasonication in our hands resulted in poor DNA recovery, poor DNA quality or both. Staining Control/ Biotin spots In case that the Biotin spots as described in chapter 8 are negative, proceed as follows: •
Horseradish Peroxidase Conjugate may have degraded during storage. Add 1µL buffer C3/4 to 9 µL D1 (substrate). If the solution turns green within 3‐5 seconds, the Horseradish Peroxidase still has sufficient enzymatic activity. www.clondiag.com
05_16_04_0004_V01
19
•
Enzymatic reaction is inhibited by carryover of buffer C1. Ensure proper washing of the tubes to remove all of Buffer C1 prior to adding Horseradish Peroxidase Conjugate. Physical damage of the array Scratching of the array surface with a pipette tip can lead to the damage of array spots. We recommend to review Section 3 for General Precautions in array handling. Weak marker signals but strong Biotin spots Something went wrong with the preparation and/or with the labelling of DNA. Please check the quality of your DNA preparation with via gel electrophoresis. ADDITIONAL INFORMATION Warranty CLONDIAG guarantees the performance as described in this manual. Usage of the Kit was successfully tested at ambient temperatures up to 37°C, a guarantee is limited to ambient temperatures in the laboratory between 18°C and 28°C. Kit components comprise the arrays, the reagents for DNA labelling and for detection of labelled DNA products on the array, the ArrayMate reader and its software. In case one of these components fails within the expiry date due to other reason than misuse, contact CLONDIAG for replacement or refund. Terms and conditions apply (www.clondiag.com). If you have any problem or question, please contact CLONDIAG technical service. Quality Control Each batch is stringently tested with the use of standard DNA control material for good performance and correctness of results. CONTACT CLONDIAG GmbH Löbstedter Str. 103‐104 D ‐ 07749 Jena Tel: +49(0)3641 3111 116 Fax: +49(0)3641 3111 120 email: [email protected] www.clondiag.com
05_16_04_0004_V01
20
APPENDIX 1: form for 1st level of interpretation: the 1/0 string code Each group 1 marker exists in a PAO (0) OR in a non‐PAO (1) version, respectively. Each group 2 marker (like fliC a) exists in a positive (1) OR in a negative (0) version, respectively. This image information is now to be converted into a 0/1 string as outlined below. version of the marker
Image and markers In this figure there are four image examples for each marker. Find out whether your image better resembles the PAO version or the non‐PAO version, respectively and type “0” or “1” into the string code mask. PAO‐type = 0 non‐PAO‐type = 1 oriC
oprL(1)
one
marker
oprL(2)
alkB2
citS-1
citS-2
oprl(1)
one
marker
oprl(2)
ampC-1
PAGI-3-1
PAGI-2/3-1
PAGI-2/3-4
PAGI-2/3-5
PAGI-2/3-6
Biotin
pKL-1
pKL-3
Biotin
pKLC
unknown
pKLC
adhesin
fpvA type
II a
fpvA type I
PAGI-2-1
ampC-3
Biotin
ampC-4
PAPI-1 pili
PAPI-1
Biotin
chaperone luminal bp.
pKLC f.a.
synthase
fpvA type
II b
ampC-5
Biotin
fpvA type III
fpvB
LES
PAGI-1
PA0980
PA0636
PA0722
PA0728
PA2185
fla-island
orfA
47D7-Isld-1
acetyltransf.
PA2221
PA3835
orfI
orfJ
47D7-Isld-2
XF1753
fliC a
fliC b
exoS
exoU
ampC_7
Biotin
PAGI-3-8
ampC_4
ampC_5
ampC_6
oprI
ampC_1
ampC_3
citS-1
citS-2
oprI (1)
fliCa -SNP(1)
fliCa-SNP (2)
alkB2
oriC
oprL (1)
oprL (2)
ampC-6
ampC-7
positive
negative
fliCa
fliCa SNP (1)
one
marker
fliCa SNP (2)
fliCb, ExoS, ExoU may be positive (1) or negative (0),
respectively, (like fliCa)
Biotin
fliC a
ampC_7
ampC_6
ampC_5
ampC_4
ampC_3
ampC_1
oprI
citS-2
citS-1
alkB2
oprL
oriC
exoU
C-47
exoS
C-46
fliC b
C-45
fliCa-SNP
Biotin
0/1 string code: www.clondiag.com
05_16_04_0004_V01
21
APPENDIX 2: substances, markers, marker groups and their respective positions on the array a) probes markers for strain assignment probe
no name
1 Biotin
2 oriC PAO
3 oriC non-PAO
4 oprL(1) PAO
5 oprL(1) non-PAO
6 oprL(2) PAO
7 oprL(2) non-PAO
8 fliCa-SNP(1) PAO
9 fliCa-SNP(1) non-PAO
10 fliCa-SNP(2) PAO
11 fliCa-SNP(2) non-PAO
12 alkB2 PAO
13 alkB2 non-PAO
14 citS-1 PAO
15 citS-1 non-PAO
16 citS-2 PAO
17 citS-2 non-PAO
18 oprl(1) PAO
19 oprl(1) non-PAO
20 oprl(2) PAO
21 oprl(2) non-PAO
22 ampC-1 PAO
23 ampC-1 non-PAO
24 ampC-3 PAO
25 ampC-3 non-PAO
26 ampC-4 PAO
27 ampC-4 non-PAO
28 ampC-5 PAO
29 ampC-5 non-PAO
30 ampC-6 PAO
31 ampC-6 non-PAO
32 ampC-7 PAO
33 ampC-7 non-PAO
34 fliC a
35 fliC b
36 exoS
37 exoU
marker marker group
no
no
name
Biotin
probe numbers
and their positions on the array
1 71
67
1 63
1 60
54
50
44
38
32
26
20
14
8
1 2
1
2
3
4
5
72
68
64
61
55
51
45
39
33
27
21
15
9
3
72
68
64
61
55
51
45
39
33
27
21
15
9
3
73
69
0
62
56
0
46
40
34
28
22
16
10
4
73
69
0
62
56
0
46
40
34
28
22
16
10
4
74
70
0
0
57
0
47
41
35
29
23
17
11
5
74
70
0
0
57
0
47
41
35
29
23
17
11
5
75
0
65
0
58
52
48
42
36
30
24
18
12
6
75
0
65
0
58
52
48
42
36
30
24
18
12
6
76
0
66
0
59
53
49
43
37
31
25
19
13
7
76 1
0
66
0
59
53
49
43
37
31
25
19
13
7 1
6
1
SNPs
2
fliCa/b,
exoS/U
7
8
9
10
11
12
13
14
15
continued: see next page www.clondiag.com
71
67
63
60
54
50
44
38
32
26
20
14
8
2
05_16_04_0004_V01
22
b) additional probes and markers (continued from previous page) marker marker group
probe
no
no
name
no name
16
38 PA2221
17
39 PA3835
variable
PA0728
18
44
3
19
45 PA2185
genes
20
50 PA0636
21
51 PA0722
22
40 orfI
Fla-Glyk.23
41 orfJ
4
24
46 fla-island
Isld.
25
47 orfA
26
42 47D7-Isld-2
other
27
48 47D7-Isld-1
5
gene
28
52 PAGI-1
Isld
29
43 XF1753
30
49 acetyl-transf.
6 PAPI-2
31
53 PA0980
32
54 fpvA type I
33
55 fpvA type II a
Pyoverdin34
56 fpvA type II b
7
recept.
35
57 fpvA type III
36
58 fpvB
37
59 LES
8
LES
38
60 pKLC-unknown
39
61 pKLC-adhesin
PAPI-1
40
62 pKLC f.a. synthase
and
41
63 pKL-1
9
pkLC10242
64 pKL-3
group
PAPI-1
pili
chaperone
45
65
46
66 PAPI-1 luminal bd. prot.
47
67 PAGI-2/3-1
48
68 PAGI-2/3-4
49
69 PAGI-2/3-5
PAGI-2
50
70 PAGI-2/3-6
and
51
71 C-45
10
52
72 C-46
PAGI-353
73 C-47
group
54
74 PAGI-3-1
55
75 PAGI-3-8
56
76 PAGI-2
www.clondiag.com
probe numbers
and their positions on the array
1 71
67
1 63
1 60
54
50
44
38
32
26
20
14
8
1 2
05_16_04_0004_V01
71
67
63
60
54
50
44
38
32
26
20
14
8
2
72
68
64
61
55
51
45
39
33
27
21
15
9
3
72
68
64
61
55
51
45
39
33
27
21
15
9
3
73
69
0
62
56
0
46
40
34
28
22
16
10
4
73
69
0
62
56
0
46
40
34
28
22
16
10
4
74
70
0
0
57
0
47
41
35
29
23
17
11
5
74
70
0
0
57
0
47
41
35
29
23
17
11
5
75
0
65
0
58
52
48
42
36
30
24
18
12
6
75
0
65
0
58
52
48
42
36
30
24
18
12
6
76
0
66
0
59
53
49
43
37
31
25
19
13
7
76 1
0
66
0
59
53
49
43
37
31
25
19
13
7 1
23
APPENDIX 3: Re‐order numbers of individual components: component B1Pa B2 C1 C2 C3 C4 C5 D1 ArrayTube P.a name amount Labelling Buffer 350 µL Labelling Enzyme 15 µL Hybridisation Buffer 60 mL Washing Buffer 1 120 mL HRP Conjugate 100x 150 µL Conjugate Buffer 30 mL Washing Buffer 2 120 mL HRP Substrate 12 mL Array P. aeruginosa 50 St order no 245103001 245104000 245105000 245106000 245107000 245108000 245109000 245110000 201007162 Order number of the P. aeruginosa kit (50 reactions): 205200050 www.clondiag.com
05_16_04_0004_V01
24