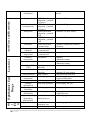
1
Eatonia Oasis Living “the Oasis of the Prairies” Health Care Aide Manual By: Mandy Paziuk Pharmacy Intern Stueck Pharmacy Leader, SK April 2012 1 | P a g e Table of Contents Section Title 1. Introduction 2. The “Rights” of Medication Administration 3. Medication Administration i. MAR ii. Administration of Scheduled Medications iii. Administration of PRN Medications iv. Documentation a) MAR b) PRN Worksheets c) Narcotic/Targeted Drug Count Sheets d) Progress Notes 4. Routes of Administration 5. Medication Administration Errors 6. Medication Disposal 7. Appendices A. Commonly Administered Medications B. Common Medical Abbreviations C. Measuring Vital Signs D. Blood Pressure Monitoring E. Importance of Potassium F. Fall Prevention and Management G. Signs of a Heart Attack H. Signs of a Stroke I. Signs of an Allergic Reaction J. Importance of Hand washing K. References L. Additional Resources -Incident report form -Examples of proper documentation -Extra Presentations/Handouts Page # 2 | P a g e 3 4 7 8 10 13 13 13 14 15 16 26 27 28 37 38 44 47 49 52 53 54 55 56 Introduction Objectives: 1) To maximize the resident’s quality of life whenever possible. 2) To safely and accurately administer medications according to prescriber orders via the MAR. 3) To maintain proper documentation of the administration of both prescription and nonprescription medications. 4) To use proper techniques when administering medications by various routes. 5) To identify, document, and resolve medication administration errors through proper communication with the pharmacy/prescriber as appropriate. 6) To recognize and understand instances requiring communication/clarification with the pharmacy and/or prescriber and to do so in an effective, timely, and appropriate manner. 7) To maintain resident privacy and confidentiality at all times. This manual is to serve as a training aid and reference tool for the standard operating procedures of medication administration within the Eatonia Oasis Living care home. The core focus of this manual is to ensure that all medication administration duties of the EOL Care Aide are performed safely, appropriately, and consistently to ensure the residents’ continued wellbeing while minimizing the occurrence of medication administration errors and their consequences. If there are ever any questions, concerns, or uncertainties requiring a resident’s medication, contact the pharmacy or the hospital (only if the pharmacy is closed). For the purposes of this manual: o “The pharmacy” – refers to Stueck Pharmacy in Leader, SK. They can be contacted Monday-Saturday 8:30am – 5:30pm. Any medication deliveries from the pharmacy to EOL are generally limited to weekdays. Phone: (306) 628-3744 (306) 967-2511 Fax: (306) 628-4378 o “The clinic” – refers to the medical clinic in Leader, SK Phone: (306) 628-4584 Fax: (306) 628-3998 o “The hospital” – refers to the Leader Hospital in Leader, SK Phone: (306) 628-3845 3 | P a g e Rights of Medication Administration 1) Right Resident 2) Right Medication 3) Right Dose 4) Right Route 5) Right Time 6) Right Reason 7) Right Documentation In addition to the traditional “Rights” listed above, residents have the additional right to refuse a medication, if they are able. 1. Right Resident – Always check by looking for an identification source. Examples include a photograph of the resident on the MAR, and asking the person to tell you her/his name if you are not sure. It could prevent you from making an error. Avoid distractions. A lot of activity can cause you to make a mistake, even when you know everyone well. o Know the residents o Check with other staff if you are not familiar with resident o Check resident identification source when available (i.e., picture or nametag) o Check for latex and medication allergies 2. Right Medication • • • Compare MAR and pharmacy label on pill card Compare the appearance and number of pills punched out of pill card with the attached pharmacy label Double check to make sure the pills, MAR, and pharmacy label agree; if not, contact the pharmacy 3. Right Dose – Compare pills, MAR, and pharmacy label to make sure they match. 4 | P a g e 4. Right Time – The pharmacy label and MAR will provide directions as to when and/or how often a medication should be given. Most medications are administered at one of four scheduled times of the day at EOL. o Medications must be administered no more than thirty (30) minutes before the scheduled administration time and no more than thirty (30) minutes after the scheduled time. o Adhere to specific administration instructions on the MAR if different from the “normal” schedule. (i.e. when a particular medication is to be given at 0730 without food instead of at 0800 with breakfast) o Observe any cautionary warnings on the medication container and on the MAR General Time Schedule for Administering Medications at EOL: Morning/Breakfast: 0800 Lunch: 1130 Supper: 1700 Bedtime: 2000 PRN Medications - These medications are ordered to be given “as needed.” Many pain relievers, laxatives and "sleeping" pills fall into this category. These medications are to be given when needed and/or by request of the resident following the specific instructions on the “PRN Worksheet.” 5. Right Route Double check the MAR to determine medication is in form ordered by the prescriber. Review the MAR and pharmacy label for any special administration directions. If doubt exists as to whether a medication is in the correct form or can be administered as ordered, contact the pharmacy Routes of Administration - Each medication is prescribed to be taken in a certain form and by a certain route. The oral route (by mouth) is the most common method of medication administration, but there are a number of other routes. In some cases, the same medication can be given in several different forms (liquid, capsule and suppository) by several different routes (oral, topical, rectal). The MAR and pharmacy label will indicate which route to use for administration. • • • ROUTE Oral (by Mouth) Sublingual (under the Tongue) Buccal (in the Cheek) Topical (on the Skin) 5 | P a g e USUAL DOSAGE FORMS Capsule, Tablet, Liquid, Spray, Lozenge, Inhaler Tablet, Liquid, Spray Tablet, Liquid Cream, Ointment, Liquid, Powder, Spray, Gel, Ophthalmic (in the Eyes) Otic (in the Ears) Nasal (in the Nose) Rectal (in the Rectum) Vaginal (in the Vagina) Patch (Transdermal) Liquid (Drops), Ointment Liquid (Drops), Ointment Spray, Liquid (Drops), Ointment, Nebulizer Suppository, Ointment, Cream, Liquid (enemas) Aerosol Foam, Ointment, Cream, Liquid (Douche), Jelly, Gel, Suppository 6. Right Reason – this “right” applies particularly to prn medications. Each prn medication has a worksheet that specifies the dose, route, and time interval of when a medication can be given. It also outlines the acceptable reasons and conditions for which a prn medication may be given. For example, a worksheet for a prn hydromorphone medication may specify that it is to be given as needed when the resident is in pain. Therefore, an appropriate reason to give this medication would be when the resident complains of pain. However, an inappropriate use would be to give this medication in an attempt to “settle” a resident down if they become agitated. It is vital that prn medications only be given when appropriately indicated as stated on the PRN Worksheet. 7. Right Documentation – Appropriate documentation is vital. It allows efficient communication between staff, prevents medication errors, and provides evidence of actions taken. The resident’s medical record is a legal document. There are legal aspects to the healthcare members’ documentation. Careful charting is important for the following: • It is the only way to guarantee clear and complete communication between all members of the health care team. • It is the legal record of every resident’s treatment. Medical charts can be used in court as legal evidence. • Documentation protects the healthcare member and the facility from liability proving what the healthcare member did or did not do. • Documentation gives an up-to-date record of the status and care of each resident. Documentation Rule of Thumb: If you did not document it, you did not do it. 6 | P a g e Medication Administration Record (MAR) Sheets Also known as ‘Patient Medication Profile and Charting Record’ Located within the “Med Book,” MAR sheets serve as a means to organize the medications a resident is taking and record exactly what medications have been administered and when. Each MAR Sheet contains the following information: • Name of the resident • Number Code (located at top of sheet) to be used whenever a resident does not receive a medication as scheduled • Allergies • Place for signature / initials of person administering medication • Place for noting reason medication not administered with date and time (using the “Number Code”) • Place for noting medication error (Indicated by a “7” and specified at bottom of page with initials) • List of Scheduled Medications and Active PRN Medication Orders (in addition to the usual “standing orders”) including: o Name of the medication and strength o Amount of medication ordered (dose) o Time of administration o Route of administration (if different from “oral”) o Special instructions for storage or administration (i.e. if a vital sign needs measurement or if an antibiotic is only to be given for 7 days) Example: Patient Medication Profile and Charting Record 1. Drug Refused 2. Nausea or Vomiting 3. Hospitalized 4. Social Leave 5. Drug Ordered 6. Pulse Below 60 bpm 7. Other 8. Social Leave With Meds Eatonia Oasis Living January 27, 2012 (date printed off) Patient 222 333 444 (health number) Smith, Sally ClCR = 50mL/min Allergies: Erythromycin Stueck Pharmacy Month/Year: Feb 12 Sex: F DOB: 17Jun1923 Hour Given Medication 1 2 3 4 5 6 7 Metoprolol 25mg 0800 MP GR 7 GR 2 3 3 Take 1 Tablet Twice Daily *0800 and 1700 1700 HT LM LM HT LM 3 3 Digoxin 1.25mcg Take 1 Tablet Once Daily *0800 *Measure Pulse 7 | P a g e 0800 P MP 65 GR 63 1 - GR 75 2 77 3 3 Feb 3 – Rt given wrong meds; see progress notes (MP) Certified Correct Date Administration of Scheduled Medications 1. Wash your hands 2. For each resident who needs medication according to the MAR, prepare medications using the seven rights a. Confirm that pill card belongs to the right resident and that the information on the pill card matches the MAR b. Check medication allergies on each resident prior to administering medications c. After pills are popped out of pill card and placed in the appropriate labeled vial, compare them to the pharmacy label on the card (i.e. number of pills, size, shape, color, markings) to ensure that the right medication is being given for the right time of day. d. Keep medication within sight until it is administered e. Check the “Cheat Sheets” for any special additional information/instructions 3. Identify the resident and perform any required vital signs measurement (i.e. temperature, BP, pulse) as indicated on the MAR sheet. 4. Administer the medication as prescribed according to the appropriate route a. For oral medication, ensure that the resident is observed swallowing the pills b. If a medication is dropped or contaminated (i.e. resident spits it out and refuses to take it). i. Administer a replacement dose to resident. ii. Document the occurrence (in the resident’s chart notes and in the MAR in the Med Book). iii. Dispose of the contaminated medication properly (See Medication Disposal section of this manual). 5. Document medication administration on the MAR after the resident has received the medication by signing your initials in the appropriate space. If any vital signs were needed to be taken, their values should be written below your initials. • For whatever reason, if the resident does not receive the medication, document appropriately using the number code along the top of the MAR sheet. • Initialing a MAR indicates that the individual administering the medication confirmed the resident’s identity, verified that the pill, label, and MAR match, and that the medication was successfully administered to the resident within 30 minutes of the dose’s scheduled time. If this was not the case, an error has occurred and the appropriate number code should be used and details documented and initialed on MAR and in chart notes. • When replacing a patch, document the removal of the old patch (if there was one) as well as the application site of the new one (this may be noted in the chart notes). 8 | P a g e If there is any difference between the meds in a resident’s pill card and what is written on the MAR, do NOT give meds and call the pharmacy to confirm the resident’s medication regimen. When to NOT give a medication until further clarification (ensure proper documentation): 1. Missing items a. Medication record or administration sheet b. Illegible pharmacy label c. Confusing directions d. No doctor’s order/prescription: even over-the-counter medications require one 2. Resident exhibits significant change in status (i.e. resident is vomiting) 3. Any doubts about the seven rights Whenever in doubt, call the pharmacy to confirm. If resident has trouble swallowing pills: Have the resident in a sitting position for easier swallowing. Removing dentures first may help further. Offer tablets/capsules one at a time. If necessary, place medication in the resident’s mouth toward the back of the tongue. Offer a drink of liquid after each medication. Use a straw if necessary. Allow the resident to rest a short time after each medication is taken. Allow enough time for the resident to swallow each medication. Tablets or capsules may be easier to swallow if given in a teaspoon of jelly or applesauce, if permitted on the resident’s diet. Be sure to tell the resident that there is medication in the jelly or applesauce. Do not trick the resident with disguising the medications. Check with pharmacy before mixing a medication into any other food (particularly heated food). Some residents request their medication to be crushed. Do not crush enteric coated tablets or open capsules without first contacting the pharmacy. If the resident has continued difficulty taking oral medications, report this to the attending physician/nurse practitioner. Many medications are available in another form and can be switched to an easier-to-swallow form. 9 | P a g e Administration of PRN Medications PRN medications are those that have been ordered on an “as needed” basis. These medications are usually one of the following: pain relievers, laxatives, “sleeping” pills, nitroglycerin tablets or spray, or a bronchodilator inhaler. Since these medications are only given when needed, they are usually administered outside of the normal scheduled medication administration times. PRN Worksheet Components: The instructions on how to give a particular prn medication are included on the PRN Worksheet located within each resident’s section of the Med Book. Any prn orders in addition to the routine “standing orders” will also be included on the MAR to allow comparison of instructions on the PRN Worksheet to ensure accuracy. The following details must be included on the instructions of the worksheet (if any are missing or unknown, contact the pharmacy to confirm orders): Name of the medication Dose to be administered (this may be a range of doses) Route of administration Time interval that must separate different prn doses or the time-of-day the medication may be given (i.e. some pain medications can only be given every 4-6 hours whereas sleeping pills can only be given at bedtime) Max doses that resident may receive per day (i.e. a resident may only receive a maximum of three prn doses of a pain medication if the order specifies “TID” or “three times daily” regardless of whether the appropriate length of time has passed since the last dose. However, a resident may receive less than three doses per day in the above example if they have no need for the prn medication. Note: some prn orders may not indicate a max number of daily doses) Reasons for which the medication may be given (i.e. the instructions for prn acetaminophen may indicate that it can be given for pain and/or fever) Documentation: It is essential to appropriately document the administration of a prn medication. While the MAR will include the directions for prn medications, their documentation should still be made in the appropriate worksheet. This should include the following information: a) What dose was given? (especially if the instructions include a dose range: i.e. 1-2 pills) b) When was the medication given? c) Why was the medication given? (it is only appropriate to give a prn medication for one of the reasons specified in the order) d) What was the result? (This may be documented in the resident’s chart notes. It explains the effect of the medication on the reason it was administered. For instance, did the 10 | P a g e inhaler improve the resident’s shortness of breath? Did the nitro-spray resolve chest pain? Did the acetaminophen improve pain?) e) If a prn medication has been discontinued, it must be appropriately documented on the worksheet. This should be done by highlighting the medication information at the top of the worksheet. At the bottom of the list of previous documentations, it should be recorded that the medication has been discontinued along with the date and initials. PRN medications will only be considered “active” if they are included in the MAR sheets. The pharmacy will remove the prn order from future MAR sheets as well as contact EOL directly if a prn medication has been stopped. This does not refer to “standing prn orders,” which will not be included on the MAR but will be assumed to always be active unless specifically instructed elsewise (i.e. resident cannot have any more acetaminophen due to liver function would imply discontinuing a standing acetaminophen order). If there is any confusion of whether a PRN order is still active, please call the pharmacy for confirmation. Note: if it is unclear whether a resident’s complaints or symptoms matches the accepted reason for using a prn medication, contact the pharmacy Administration Procedure: 1. Wash your hands. 2. Confirm that the resident meets the criteria for receiving the prn medication (i.e. appropriate reason, acceptable time has passed since last dose, has not reached any stated maximum limit of doses per day) 3. Prepare medications using the seven rights a. Confirm that pill card or medication container (i.e. nasal spray or cream) belongs to the right resident and that the information on the label matches the PRN Worksheet b. After pills are popped out of pill card and into the resident’s vial, compare them to the pharmacy label on the card (i.e. number of pills, size, shape, color, markings) to confirm it is the right medication. c. Keep medication within sight until it is administered 4. Identify the resident and perform any required vital signs measurement (i.e. temperature, BP, pulse) as indicated on the PRN Worksheet. 5. Administer the medication as prescribed according to the appropriate route a. For oral medication, ensure that the resident is observed swallowing the pills b. If a medication is dropped or contaminated (i.e. resident spits it out and refuses to take it). i. Administer a replacement dose to resident. ii. Document the occurrence (in the resident’s chart notes and on the PRN Worksheet in the Med Book). 11 | P a g e iii. Dispose of the contaminated medication properly (See Medication Disposal section of this manual). 6. Return stock bottle/container to resident’s basket if necessary (i.e. creams) 7. Document the medication’s administration on the PRN Worksheet after the resident has received the medication. (Remember, documentation must include date, time, dose, reason, and your initials. The results of giving the medication should be documented either on the worksheet or in the resident’s chart notes.) 8. Update the Narcotic/Targeted Drug Count Sheet (if necessary for the specific medication) including the time, date, quantity used, quantity remaining on hand, and signature of the Care Aide who administered the medication. Standing Orders for PRN “Over the Counter” Medications for Residents Each resident is authorized to receive any of the following medications as needed. If any of these medications are required, contact the pharmacy to send the necessary medications over. These prn medications are always assumed to be “active” unless explicitly stated otherwise: For pain and elevated temperature (over 38oC) (choose one) ***Check if resident takes Tylenol regularly before giving more. ***Resident’s may only receive a max daily dose of 3-4g of acetaminophen per 24h from all sources (i.e. Tylenol extra strength; Tylenol Cold; etc.). • Tylenol regular (Acetaminophen) 325mg – 1-2 tabs q4-6h prn • Tylenol ES (Acetaminophen) 500mg – 1-2 tabs q4-6h prn For cold and flu symptoms (choose one) ***Check if resident takes Tylenol regularly before giving more. ***Resident’s may only receive a max daily dose of 3-4g of acetaminophen per 24h from all sources (i.e. Tylenol extra strength; Tylenol Cold; etc.). • Tylenol regular (Acetaminophen) 325mg – 1-2 tabs q4-6h prn • Tylenol Cold and Flu (regular strength) – 1-2 tabs q4-6h prn • Throat lozenges prn • Coricidin tablets – 2 tabs q4h prn for 3 days For cough associated with cold and flu (choose one) • Robitussin – 10mL q6h prn • Benylin – 10mL q6h prn For nausea and vomiting (choose one) • Gravol 50mg – 1 tab q6h prn • Gravol supp. – 50mg rectally q8h prn For diarrhea • Immodium – 2 tabs after first loose BM and 1 tab after each subsequent loose BM. Maximum 5 tabs total in a 24 hour period. DO NOT GIVE IF BLOOD IN STOOLS. For constipation • Senokot S – 1-4 tabs hs prn • Ducolax tabs – 1-3 tabs hs prn • Ducolax supp – 1 rectally prn • Colace (Docusate sodium) – 1-2 tabs OD-TID 12 | P a g e For indigestion • Maalox – 10-20mL q2h prn 13 | P a g e Documentation Rule of Thumb: if you did not document it, you did not do it. Guidelines for Documentation • Chart administration of medication after you give the medication, never before. • When charting a reason for administering a PRN medication, the record should reflect direct observations or resident specific complaint. For example, since a headache cannot be seen, the PRN medication reason would be charted as “complains of a headache.” • Chart facts, not opinions. • Write neatly and legibly. • If you make a mistake, draw one line through it and initial to the side and date. • Never erase something that has already been charted. • Never use “white out.” • Make sure you date and time each entry. Med Book MAR - - - Every time a medication has been given to a resident, the individual administering the medication must initial in the appropriate slot (day and time) on the MAR. This is done for each medication at each dose given throughout the day. It is vital that the MAR be initialed only AFTER the medication has successfully been administered to the resident. If the medication was not given, the appropriate reason must be given using the number code at the top of the MAR sheet. If the number code used is “7” for “Other,” please specify the reason (i.e. missed med; dropped med and had to use replacement dose; etc.) in the space provided at the bottom left corner of the MAR with the date and your initials. These instances should also be documented in detail in the resident’s chart. If there is a vital sign which must be measured before each dose of a specific medication, document it below your initials. PRN Worksheet - Dose given (especially if the order gives a choice of two doses) - Date and Time administered - Reason for medication (include measured vital signs when applicable; i.e. temperature if resident has a fever) - Initials of individual administering the medication - Any information on its effectiveness (Documented in the resident’s chart; i.e. whether the single Tylenol improved their headache) 14 | P a g e Narcotic/Targeted Drug Count Sheet - Narcotics and Targeted Drugs are medications that have the potential to be used inappropriately or diverted (i.e. stolen and sold) due to their abuse potential. For legal reasons, additional measures must be taken to account for each pill and quantity. Thus, it is vital to maintain a valid count sheet for each of these medications. If the counts are incorrect or pills are missing, the EOL administrator must be notified. - It is the responsibility of the Care Aide to keep a running tally of each prn narcotic (i.e. hydromorphone; codeine; T #3’s; morphine) or Targeted medication (i.e. lorazepam; temazepam) for every resident. - Each time the pharmacy sends a new quantity of one of these medications, the entire quantity must be counted by the receiving Care Aide and added to the number of any medication remaining from the previous sheet. - Every time a dose is given, the date, time, and quantity used must be documented on this sheet. As well, the remaining quantity must be counted and documented on this sheet along with a signature. - Any sheets from previous medication quantities must be returned to the pharmacy upon receipt of a new sheet/quantity. - Any sheets from discontinued medications must be returned to the pharmacy along with any remaining medication. A final count of the medication must be done and signed for before returning the sheet/medication to the pharmacy. - Any incident where a dose had to be replaced due to wastage (i.e. dropped on floor or spit out by resident) must also be recorded on this sheet. Medication Changes Any new or change to a medication order must be indicated on the MAR or PRN Worksheet. Usually, the pharmacy will send a new MAR with the newly ordered medication. However, if there is ever any doubt, call the pharmacy. Any medication order on a MAR should include a prescription number, the name of the medication (may include both the generic and brand name), any special instructions, and the dosage regimen (what dose; how many times per day; at what time of day). If any of these components are missing or confusing, call the pharmacy for clarification. A medication that has been discontinued is generally indicated on a MAR by highlighting its row in yellow. This is only to be done via direct orders from a doctor and contact with the pharmacy. The pharmacy will send a new, updated MAR sheet at next delivery. If this does not happen, contact the pharmacy again. 15 | P a g e If the dose of a medication has been changed or a medication has been discontinued, it may be necessary to return the current dose or leftover medication to the pharmacy. When this occurs, it should be documented in the resident’s chart notes and PRN Worksheet as appropriate. If the medication included a Narcotic/Targeted Medication Count Sheet, it must be returned along with the leftover medication. Individual Resident Chart Notes Whenever blood work has been ordered, the Care Aide must document when the blood sample has actually been drawn. This keeps the other healthcare providers (pharmacists; Dr; NP) informed of the status of lab work and when to expect the results. West Wing and North Wing Progress Notes The resident’s chart notes located in the appropriate “West” and “North” wing binders provide a useful location for documenting a wide variety of information. Ideally, nearly every interaction with a resident should be documented. At the very least, every significant interaction or observation must be documented. A significant interaction or observation may include one or more of the following: Resident experienced a fall Resident required a prn medication (including how well the medication worked) Resident was the victim of a medication error (i.e. meds missed, wrong medication) Resident displayed new, improving, or worsening symptoms (i.e. swollen ankles, increased shortness of breath or pain, wound healing well, loose bowel movement, nausea/vomiting, light-headedness, confusion, agitation, aggression etc.) Resident was incontinent of urine or feces Resident refused/dropped/hid a medication Resident was hospitalized (include the reason, location, and approximate length of stay if available/known) Ultimately, if anything new, unusual, or out-of-the-ordinary occurs with a resident, it should be documented here. When in doubt, document. You never know when a past detail or event may prove useful for future diagnoses or medication changes. Cheat Sheets: Any specific resident information that has been recorded on a Cheat Sheet should also be noted within their Progress Notes. This ensures that the information regarding the resident and any special instructions/observations is maintained even after the cheat sheet has been shredded for privacy reasons. This is vital as simply shredding and losing the information recorded on a Cheat Sheet may have serious consequences if it has not also been documented elsewhere. Remember, ‘if it was not documented, it was not done.’ For this reason, it is critical to not lose this information for the resident’s safety and your own liability. 16 | P a g e Administering Medications by Various Routes As a Care Aide, you may be required to administer a medication by any of the following routes: Oral = swallowed by mouth Sublingual = dissolved under the tongue Topical = applied to the skin Transdermal = absorbed through skin through application of a patch Eye = drops or ointments applied to the eye Ear = drops placed in the ear Nose = drops or spray in the nose Inhalant = taken in through mouth or nose by breathing in or inhaling Rectal = inserted in the rectum Vaginal = inserted in the vagina Care Aides are not allowed to administer any injectable medications. Such medications are therefore administered at EOL in the following ways: • Insulin injection: the Care Aide may dial up the unit dose in the needle, but the resident must be able to administer the injection themselves • Vitamin B12 injection: a home care nurse will administer the medication as scheduled ORAL MEDICATIONS Oral medications are those medications that are taken by mouth. 1. When pouring tablets/capsules use the lid of the container to pour the medication, then drop the medication into a medicine cup. Do not handle medications with your bare fingers. Use round nosed tweezers if necessary to move or touch medications. 2. For residents who have difficulty in swallowing medications, the following techniques may be helpful to gain cooperation, as well as assist the resident to take all medications: • Have the resident in a sitting position for easier swallowing. Removing dentures first may also be helpful. • Offer tablets/capsules one at a time. If necessary, place medication in the resident’s mouth toward the back of the tongue. • Offer a drink of liquid after each medication. Use a straw if necessary. • Allow the resident to rest a short time after each medication is taken. • Allow enough time for the resident to swallow each medication. • Tablets or capsules may be easier to swallow if given in a teaspoon of jelly or applesauce, if permitted on the resident’s diet. Be sure to tell the resident that there is medication in the jelly or applesauce. Do not trick the resident with disguising the medications. Check with pharmacy before mixing a medication into any other food (particularly heated food). 17 | P a g e A resident may request his/her medication to be crushed. Do not crush enteric coated tablets or open capsules without first contacting the pharmacy. • If the resident has continued difficulty taking oral medications, report this to the attending physician/nurse practitioner. Many medications are available in another form and can be switched to an easier-to-swallow form. 3. Remain with the resident to be certain all oral medications have been swallowed. This also ensures that the medication is taken on time. In some instances, checking the resident’s mouth may be necessary to verify the resident has swallowed the medication. 4. Troches or lozenges are not to be swallowed. Instruct the residents to allow the medication to dissolve in the mouth. Drinking liquids should be avoided until the medication has completely dissolved. These medications should be given last, after other oral medications. • SUBLINGUAL TABLETS These are medications that are placed under the tongue. 1. Instruct resident to place tablet under the tongue in the front part of the mouth. If several medications are being given, give the sublingual tablet last. 2. Advise the resident not to swallow until the tablet is entirely dissolved. 3. For nitroglycerin tablets/spray: Instruct the resident to sit down upon the first indication of chest pain. Instruct resident to place tablet or spray one spray under the tongue. (Note: Nitrosprays must first be primed by spraying twice to the side to ensure nozzle is clear) Advise the resident to relax for 15-20 minutes after taking the medication to prevent dizziness or fainting. Headaches are a side effect of the medication and should last no longer than 20 minutes. If headaches persist, notify the physician. Follow written instructions from pharmacy on the administration of an additional tablet/spray. Contact the pharmacy if instructions are unclear. If chest pain persists, call 911 for immediate assistance. Stay with the resident for reassurance and to calm anxiety. Tightly close the medication container and store in a cool, dry place. The container may be kept in a pocket or purse for easy access to the resident if the resident can safely administer the medication. ORAL LIQUIDS These are medications that are poured, measured and swallowed. 1. Check to see that the cap of the bottle is on securely. 2. Read instructions to determine if contents are to be shaken (as with a suspension). A rotating wrist movement will ensure a more thorough mixture. 3. Remove the cap and place it with the open side up. 4. Hold the bottle with the label toward the palm of the hand to avoid soiling the label. 5. Locate the marking on the medication cup for the amount to medication to be poured. 18 | P a g e 6. Pour the medication at eye level, on a flat surface. Take care to not pour more than is needed. If too much is poured, the excess must be discarded, not returned to the bottle. 7. Clean the lip of the bottle, if necessary, with a moist paper towel before recapping TOPICAL MEDICATIONS These are medications that are applied to the skin. Ointments, Creams, Lotions, Liniments, Aerosols, Gargles, Mouthwashes 1. Gloves should be worn whenever coming into contact with medication or a resident’s skin. 2. Directions for application of the mediation should be on the label of the medication’s container and in the MAR. 3. Ointments and creams are applied directly to the skin or placed on a dressing that is then applied to the skin. Do not cover skin with any dressing unless instructed to by the physician/nurse practitioner or pharmacy. 4. An applicator or tongue blade may be used to remove ointments from a jar or container. 5. Aerosols are sprayed onto the skin. This is advantageous when skin is irritated or burned as it does not require touching the skin. 6. Gargles are solutions that are bubbled in the throat by keeping the solution in the upper throat, tilting the head back and exhaling air to create bubbling. Check directions with gargles to know whether the medication should be diluted prior to administration. 7. Mouthwashes/rinses are solutions or suspensions that can be bubbled in the throat like a gargle, but are also swished in the mouth in order to coat the entire mouth with the medication. These are then either spit out or swallowed as directed. Transdermal Patches: Medication is absorbed through the skin 1. A transdermal skin patch is impregnated with medication which, when applied to the skin, releases a continuous and controlled dosage over a specified time period. 2. Gloves should be worn to apply/remove transdermal patches. 3. Remove the old patch, if present, and discard appropriately. 4. Wash resident’s skin with soap and water and let dry (both new site and removal site). 5. Rotate application sites to avoid skin irritation. The new location should not be hairy (cut hair with scissors if necessary; do not shave the area) and must be intact (no scratches or cuts). Appropriate application sites may vary between different patches. See package insert that came with the patch or call the pharmacy if unsure where to apply the patch. (Note: no patch should ever be placed on a woman’s chest/breast). 6. Peel backing off the patch, press on skin and apply pressure to assure skin adherence. 7. Include the site of application with documentation. 19 | P a g e EYE DROPS/OINTMENTS 1. Instruct the resident about the procedure. Assist the resident to sit or lie down with head tilted back. Wash hands and apply gloves. 2. Cleanse the eye(s) with a clean tissue, clean and wet washcloth or cotton ball. Always cleanse from the inside of the eye, near the nose, to the outside. Use a clean tissue or cotton ball for each wipe. 3. Remove cover of container, place lid with open side up. 4. Instruct resident to look upward toward the top of his/her head: EYE OINTMENT: Retract lower lid. (Make a pocket.) During administration, approach the eye from out of resident’s field of vision (from the side of the eye). Being careful to avoid contact with the eye, apply the ointment in a thin ribbon, into the lower lid pocket (~2cm long). EYE DROPS: Retract lower lid. (Make a pocket.) It may be necessary to separate the eyelids. Shake dropper if necessary (indicated on the label). During administration, approach the eye from out of resident’s field of vision (from the side of the eye). Being careful to avoid contact with the eye, apply one eye drop gently to the center of pocket of the lower lid. Do not allow the drop to fall more than one inch before it contacts the eye. 5. Following application, instruct resident to look downward and then close eye(s) for a short time. May also gently pinch the corner of the eye near the nose to prevent the medication from draining down the tear duct at this time. 6. Wipe the excess ointment/drops with a clean tissue/cotton balls. 7. If multiple eye drops are to be administered, wait at least three to five minutes between drops. 8. Wash hands again and complete appropriate documentation. 20 | P a g e EAR DROPS - wash hands, apply gloves. 1. Position the resident: • If lying in bed, have bed flat and turn head to opposite side. • If sitting up, tilt head sideways until ear is as horizontal as possible. 2. Clean external ear canal with a clean tissue or cotton ball. 3. Warm medication by holding the dropper in your hand for a few moments. 4. Hold ear lobe in such a manner to allow visualization of the ear canal (may need to gently tug upper ear up and back). 5. Shake dropper if necessary (indicated on the label) and instill ordered number of drops without touching dropper to the resident’s ear. 6. When instilling eardrops into both ears, place a cotton ball in the outer portion of the first ear before turning the head to instill drops into the other ear. 7. Instruct resident to lay quietly a short time (~5 minutes) to allow the medication to reach the eardrum. NOSE DROPS/SPRAYS - wash hands, apply gloves. 1. Instruct the resident to first blow nose gently 2. For nose drops, instruct the resident to lie down with his/her head tilted back over a pillow. For nasal sprays, it is best for the resident to sit up with head tilted slightly forward. 3. Wash hands. 4. Avoid touching the dropper or spray nozzle to the resident’s nose. NOSE DROPS: Place the nose dropper just inside the nostril, and instill the correct number of drops. Instruct the resident to remain with head back for a short time. NASAL SPRAYS: Instruct the resident to sniff on the count of three as you squeeze the nasal spray. This will help to coordinate the resident’s sniffing with the application of the medication. (If it is the first time using the nasal spray bottle, or it has not been used for a week, it must first be 21 | P a g e primed by spraying twice to the side ensure the nozzle is clear) Tip: Close one nostril while spray is applied to the other nostril. INHALANTS These medications are inhaled by the resident using a dispenser commonly referred to as an inhaler. Metered-Dose Inhaler (MDI) or “puffer” (i.e. Ventolin, Flovent) 1. The resident should be in a sitting position. Wash hands and apply gloves. 2. Read instructions on the inhaler to determine if the medication is to be shaken. 3. Grasp the medication dispenser and remove the mouthpiece. 4. If the medication has never been used before, or has not been used for >2weeks, prime the inhaler by dispensing a couple puffs down to the side to ensure the nozzle is clear. 5. Instruct the resident to exhale and then place the inhaler’s mouthpiece into the resident’s mouth between the teeth. If a spacer is used, attach the inhaler (mouthpiece removed) to the spacer and place the spacer’s mouthpiece into the mouth between the teeth. 6. Instruct the resident, on the count of three, to breathe in steadily and deeply as you dispense the medication, then hold his/her breath for 10 seconds, if possible, before exhaling. Make sure the resident has already started to inhale as you dispense the medication. (If using the spacer, have the resident breathe normally and calmly while you dispense the medication. Wait until resident has taken 5-6 breaths before removing the device. Resident is allowed to exhale into the device and does not need to hold his/her breath when using a spacer). 7. If administering multiple inhalations, always administer only one puff at a time and wait at least one minute between administrations (or until resident catches his/her breath) and always administer the bronchodilator (blue inhaler or white inhaler with green cap) first. 8. Wipe off the mouthpiece or spacer before replacing the mouthpiece cover. 9. Instruct the resident to rinse mouth out with water if they have used a corticosteroid inhaler (orange or purple inhaler). 10. Cleaning: remove canister and cap and wipe with tissue. Rinse plastic casing in running water and air dry. Replace canister and cap. Wash inhaler once weekly. Spacer: wash in warm water with soap and let air dry. Wash once monthly. 11. Empty Inhaler: these inhalers typically do not have a dose indicator. Instead, it is important to keep track of the number of administrations used. When in doubt, it is often practical to order a refill inhaler from the pharmacy each month if it is being given more than once per day. Do NOT place inhaler in water to check if it is empty. Discard old inhaler canisters into the Med Disposal container. 22 | P a g e Turbuhaler (i.e. Symbicort) 1. The resident should be in a sitting position. Wash hands and apply gloves. 2. Do NOT shake. Twist cover and remove. 3. Holding the turbuhaler upright by the red grip, load one dose by first turning the turbuhaler one way as far as it will go, and then back the other way. At some point in this process you should hear a click. Be careful not to tip the turbuhaler over onto its side or else the medication may spill out. 4. Instruct the resident to exhale away from the turbuhaler and then place the mouthpiece into the resident’s mouth between his/her teeth. 5. Intruct the resident to inhale as forcefully and deeply as they can, then to hold his/her breath for up to 10 seconds (if possible) and finally exhale slowly away from the turbuhaler. If necessary, the resident may inhale again to ensure they received the entire dose. Note: the resident may not be able to feel any medication when inhaling. 6. If more than one dose is needed, allow resident to catch his/her breath and then repeat the process. 7. Once finished, replace the cover and instruct resident to rinse mouth out with water (when using Symbicort). 8. Cleaning: using a dry tissue, wipe out the cover and mouth piece at least once per week. Do not use any water to clean as it may affect the proper functioning of the turbuhaler. 9. Empty turbuhaler: the turbuhaler has a dose indicater that keeps track of how many doses there are left. Once the zero (“0”) on the red background reaches the middle of the window, the turbuhaler is empty and should be discarded in the meds disposal container. Diskhaler (i.e. Advair) 1. The resident should be in a sitting position. Wash hands and apply gloves. 2. Do NOT shake. Open the inhaler by placing your thumb on the thumbgrip and sliding away from you until it snaps into place, revealing the mouthpiece and lever. 3. Load a dose by holding the diskus in a level, horizontal position with the mouthpiece towards you and sliding the lever away from you as far as it will go until it clicks. Be careful to not tip the diskus over or the medication will spill out. 4. Instruct the resident to exhale away from the diskhaler and then place the mouthpiece into the resident’s mouth between his/her teeth. 5. Intruct the resident to inhale as forcefully and deeply as they can, then to hold his/her breath for up to 10 seconds (if possible) and finally exhale slowly away from the diskhaler. If necessary, the resident may inhale again to ensure they received the entire dose. Note: the resident may not be able to feel any medication when inhaling. 23 | P a g e 6. If more than one dose is needed, allow resident to catch his/her breath and then repeat the process. 7. Once finished, slide the cover back over the mouthpiece and lever. 8. Instruct resident to rinse mouth out with water (when using Advair or Flovent). 9. Cleaning: wipe the mouthpiece and thumbgrip once weekly with a dry tissue. 10. Empty Inhaler: the diskhaler includes a dose indicator near the thumbgrip. Once the red zero (“0”) appears in the window, the inhaler is empty and should be discarded in the Med Disposal container. Handihaler (i.e. Spiriva) 1. The resident should be in a sitting position. Wash hands and apply gloves. 2. Open the lid of the inhaler by pressing the green button and pulling it back. Then grasp the mouthpiece ridge and pull it open as well to expose the empty chamber. 3. Remove a single capsule (one dose) from the blister-pack by tearing along the perforated edges and peeling back the foil. Do not use a capsule that has been exposed to the air/light for more than 10 minutes as the medication might be too degraded to work. 4. Place the whole capsule into the inhaler’s chamber. Do not let the resident swallow the capsule. 5. Close the mouthpiece and wipe it down with a tissue. 6. Holding the inhaler upright, press the green button to punch holes in the capsule. 7. Instruct the resident to exhale away from the handihaler and then place the mouthpiece into the resident’s mouth between his/her teeth. 8. Instruct the resident to inhale as deeply as they can. You should be able to hear a rattling sound as the capsule vibrates. Have the resident hold his/her breath for a few seconds (up to 10 if possible) and then exhale slowly away from the inhaler. The resident must inhale a second time to ensure they received the entire dose. Note: the resident may not be able to feel any medication when inhaling. 9. If more than one dose is needed, allow resident to catch his/her breath and then repeat the process. 10. Once finished, remove and discard all pieces of the punctured capsule from the chamber into the Med Disposal container and close both the mouthpiece and lid. 24 | P a g e 11. Cleaning: rinse empty inhaler under running warm water and allow to air dry for 24 hours once weekly NEBULIZER 1. Assemble the equipment as per directions on the machine and check to ensure it is clean. 2. Wash hands and put on disposable gloves. 3. Assist resident to a sitting position. 4. Plug in the nebulizer and add medication to the nebulizer medication administration compartment. 5. Have resident place nozzle in his/her mouth and use lips to form a seal so the medication cannot escape (if using a mask, resident can hold the mask over mouth and nose, or you can attach it to the resident’s face using a head strap). 6. Turn on the nebulizer and instruct the resident to breathe deeply as it helps the medication to work better. 7. Continue until all the medication has been given, usually ~10-15 minutes. 8. Help resident remove nozzle or face mask. Clean face with a damp cloth if a face mask was used. 9. Instruct resident to rinse out mouth (if using Pulmicort nebules). 10. Clean and put away the nebulizer equipment as specified on the machine or in its manual. RECTAL SUPPOSITORIES 1. Provide privacy for the resident. 2. Gloves are worn for the administration of suppositories. 3. Assist the resident to lie down, preferably on the left side. (The colon is on the left side of the body and the suppository will enter the lower GI tract easier). It may be more comfortable if the resident slightly bends his/her right leg as shown in picture. 4. Remove protective covering of suppositories and place in a medicine cup. 5. Obtain lubricant for suppositories to apply before insertion. 6. Visualize the anal opening, lubricate and insert the suppository approximately 3 inches. The suppository should be inserted beyond the internal sphincter muscle of the rectum to prevent the suppository from being expelled. 7. Instruct the resident to retain the suppository for as long as possible. 25 | P a g e 8. Dispose of gloves and wash hands thoroughly. VAGINAL CREAMS/SUPPOSITORIES 1. Provide privacy for the resident. 2. Wash hands and put on disposable gloves. 3. Instruct the resident to lie on her back in a frog leg position (legs separated and knees bent). Vaginal suppositories: Insert 2-3 inches into the vaginal orifice. Body temperature will melt the suppository to aid in the absorption of the medication. Vaginal cream: To insert, grasp the barrel of the applicator. Place the thumb on the plunger. Pointing the applicator slightly downward, insert the applicator into the vagina as far as it will comfortably go. Push the plunger with the thumb as the applicator is slowly removed from the vagina. 4. Instruct the resident to remain lying down for 15-30 minutes for absorption of the medication. Vaginal creams/suppositories are best administered at bedtime. 26 | P a g e Medication Administration Errors Medication errors are serious incidences that may have the potential to harm a resident. Due to the significance of such events, any occurrence of a medication error must be promptly identified and dealt with, including proper documentation and notification of the pharmacy/hospital to ensure the safety of the resident by assessing the risk of harm and, if necessary, establishing monitoring parameters to ensure that any late-onset adverse effects are noticed. For instance, if a resident was given the wrong dose of insulin, the pharmacy may require the Care Aide to measure the resident’s blood sugars regularly to monitor the insulin effects. Documentation is crucial to confirm exactly what occurred (what happened; why did it happen; how did it affect the resident), what was done to ensure the resident’s safety, and what was done try prevent such an event from happening again in the future. Proper documentation involves a detailed explanation in the resident’s Progress Notes and filling out the appropriate form (see Appendix L in this manual). A medication error must be documented and the pharmacy contacted if any of the following conditions occur: 1. The wrong medication is administered to a resident. Example: Mrs. Kent is given amoxicillin instead of tetracycline 2. The medication is given to the wrong resident. Example: Kay Blevins is given Benadryl 50 mg that should have been given to Sally Turner. 3. The wrong dosage is given Example: Mr. Sams is given tetracycline 500 mg, but the doctor's order calls for tetracycline 250 mg. 4. Medication is given to the resident at the wrong time or not given at all Example: Mrs. Tyson was supposed to receive synthroid 125mcg at breakfast, but it was not administered until 10:00 a.m., two (2) hours after her meal. 5. Wrong route of administration Example: Doctor's order states that Ms. Tussing is to receive one lorazepam tablet sublingually (under her tongue), but the tablet is swallowed with fruit juice 6. Medication is not available Example: Mr. Bohrer was supposed to receive risperidone 1mg at 9 a.m., but the medication was not sent by the pharmacy 7. Wrong form of medication is administered 27 | P a g e Example: Wellbutrin ER 200 mg (extended release) once daily is ordered for Mr. Anderson. Wellbutrin 200 mg was administered. Medication Disposal Whenever a medication has expired, been discontinued or contaminated, it must be disposed of appropriately. Contamination refers to dropping a pill on the floor or a resident spits out the medication and refuses to take it. Medications that have simply been discontinued (or stopped due to a dose change) can be left in the pill cards the pharmacy sent and returned to the pharmacy. Proper communication with the pharmacy is required if the pill card needs to be fixed (i.e. discontinued medication has to be removed or replaced with the new dose) and sent back to EOL to ensure the resident continues to receive medications on time. Any medications that were associated with a Narcotic/Targeted Substance Count Sheet must have the sheet (including a final pill count) returned with the excess medication. When sending back a pill card to the pharmacy to be fixed, the doses for the rest of the day, as well as up to and including the lunch dose for the following day must be removed and stored in separate labeled vials for each dosing time. This ensures that the resident continues to receive his/her medication even though the pharmacy has his/her pill card. If it is nearly the weekend (i.e. Friday afternoon), arrange for someone to pick up the new pill cards from the pharmacy in Leader or else remove an appropriate amount of doses from the old pill card before sending it back to ensure the resident has enough doses to carry over until Monday afternoon. When a medication has been contaminated, the pill must be disposed of in the labeled “Med Disposal” sharps container located within the Med Room. The resident may then be given a replacement dose from his/her stock of medications (unless the resident has refused to take it). This incident should be documented in the MAR and Progress Notes. The pharmacy should also be faxed to let them know that they will need to send another dose to make up for the contaminated medication. 28 | P a g e Appendix A Commonly Administered Medications The following is a list of some of the more common medications administered to EOL residents along with the most common uses and expected/possible side effects. This list is not meant to be all-encompassing and you should still contact the pharmacy and/or physician/nurse practitioner if you have any questions regarding medications. Note: GI upset generally refers to abdominal pain and gas, but it may also include nausea and diarrhea. Antibiotics/Antifungals Drug Type Name of Drug Macrobid (nitrofurantoin) -urinary tract infection Septra (sulfamethoxazole + trimethoprim) Amoxi/Clav (amoxicillin + clavunate) Ciprofloxacin -urinary tract infection -various infections Moxifloxacin -urinary tract infection -pneumonia -various infections -urinary tract infection -pneumonia -other infections -pneumonia Cephalexin -various infections Doxycycline -pneumonia -various infections -various infections -pneumonia -various infections -various infections Erythromycin Biaxin (clarithromycin) Zithromax (azithromycin) Clindamycin Metronidazole 29 | P a g e Common Purpose/Use -various infections -various infections Common Side Effects/Comments -headache -nausea, GI upset -orange urine -GI upset, nausea, diarrhea -Avoid in Sulfa-allergy -GI upset, nausea, diarrhea -Avoid in Penicillin-allergy -headache -GI upset, nausea -Do not give with dairy or iron -nausea, diarrhea, dizziness, headache -Do not give with dairy or iron -GI upset, nausea, diarrhea -Caution with Penicillin-allergy (watch for reaction) -GI upset, sun sensitivity (burn easier) -Do not give with dairy or iron -GI upset, nausea, diarrhea -GI upset, nausea, diarrhea -GI upset, nausea, diarrhea -GI upset -risk of severe diarrhea -GI upset -DO NOT MIX WITH ALCOHOL! Respiratory Tract Drugs (Inhalers/Nebules) Fluconazole Ventolin (salbutamol) AntiAnxiet y Anti-Psychotics Atrovent (ipratropium) 30 | P a g e -yeast infections -bronchodilator (opens airways) -asthma, COPD -pneumonia -bronchodilator -COPD Advair (salmeterol + fluticasone) -asthma -COPD Symbicort (formeterol + budesonide) -asthma -COPD Flovent (fluticasone) -asthma Spiriva (tiotropium) Singulair (montelukast) Risperidone -COPD -asthma -agitation, aggression -mood disorders Quetiapine -agitation, aggression -mood disorders Olanzapine -agitation, aggression -mood disorders Ativan (lorazepam) -anxiety -agitation -sleep problems Atarax -anxiety, allergies, -GI upset -blue puffer (MDI) -heart palpitations, nervousness, tremor, ↑ pulse -green and white puffer (MDI) -dry mouth, metallic taste -do not get in eyes!! -purple diskhaler or puffer (MDI) -thrush (Rinse out mouth after use!) -dry mouth, hoarseness, voice change -heart palpitations, nervousness, tremor, ↑ pulse -red and white turbuhaler -dry mouth, hoarseness, voice change - thrush (Rinse out mouth after use!) -heart palpitations, nervousness, tremor, ↑ pulse -orange puffer (MDI) -dry mouth, hoarseness, voice change - oral thrush (Rinse out mouth after use!) -Handihaler capsules -dry mouth, headache -oral capsules -headache, dizziness -insomnia, headache, dizziness (esp. upon standing) -dry mouth, constipation -weight gain (worsens diabetes, htn, cholesterol) -High doses: tremor, muscle spasms -drowsiness, dizziness (esp. upon standing) -dry mouth, constipation -weight gain (worsens diabetes, hypertension, cholesterol) -drowsiness, dizziness (esp. upon standing), dry mouth, constipation -weight gain (worsens diabetes, htn, cholesterol) -drowsiness -↑ risk of falls, dizziness -↓ concentration -avoid alcohol -drowsiness (hydroxyzine) Clonazepam Narcotic Pain Killers Hydromorphone Morphine Codeine (i.e. Tylenol #3) Fentanyl Non-Narcotic Pain Killers Tylenol (acetaminophen) Advil/Motrim (ibuprofen) Aleve (naproxen) Celebrex (celecoxib) Antidepressan ts Arthrotec (diclofenac + misoprostal) Gabapentin 31 | P a g e Lyrica (pregabalin) Tridural (tramadol) Citalopram Sertraline Fluoxetine Amitriptyline Nortriptyline Venlafaxine nausea, pain -anxiety -agitation -dry mouth -drowsiness -↑ risk of falls, dizziness -↓ concentration (avoid alcohol) -pain -best tolerated narcotic -nausea, constipation -avoid alcohol -pain -nausea, constipation -may cause itching -avoid alcohol -pain -worst narcotic for side effects -nausea, constipation -avoid alcohol -chronic long term pain -transdermal patch -nausea, constipation -avoid alcohol -chronic pain (i.e. -generally very well tolerated joints) -MAX 3.2-4g/day or risk liver -sore muscles, headache toxicity! -fever -pain -nausea, GI upset -inflammation -risk of ulcer with regular use -pain -nausea, GI upset -inflammation -risk of ulcer with regular use -pain -nausea, GI upset -much less risk of ulcer with regular use -pain, inflammation -nausea, GI upset, diarrhea -↓ risk of ulcer -less risk of ulcer with regular use -nerve pain -anti-seizure -nerve pain -pain -depression, anxiety -depression, anxiety -depression, anxiety -depression -nerve pain -sleep problems -depression, anxiety -nerve pain -depression -sedation, dizziness -sedation, dizziness, headache -weight gain, swollen ankles -nausea, constipation -sedation, dizziness, headache -nausea, sleep disturbance, dry mouth -nausea, diarrhea, dry mouth -nausea, insomnia -dry mouth, constipation, blurred vision, drowsiness -light-headedness (esp. upon standing) -dry mouth, constipation, blurred vision, drowsiness -nausea, sleep disturbance, dizziness, -anxiety -↓ bad cholesterol (LDL) -post-heart attack dry mouth -muscle soreness -mild GI upset, headache -avoid any grapefruit juice! -↓ bad cholesterol (LDL) -post-heart attack -↓ triglycerides, ↑ HDL (good cholesterol), ↓ LDL (bad cholesterol) -prevents absorption of cholesterol from diet (↓LDL) -muscle soreness -mild GI upset, headache -lowers cholesterol (LDL) -seizures -bloating, gas, constipation Valproic acid -seizures, mood stabilizer -nausea, headache, drowsiness, tremor, hair loss Carbamazapine -seizures, mood stabilizer -rash, low sodium levels (serious), nausea -hypertension -↓ potassium and sodium levels -may worsen gout and diabetes -dizziness, light-headedness -edema (swollen ankles) -heart failure -hypertension -heart failure -low potassium -hypertension -low potassium -↓ potassium and sodium levels -dizziness, light-headedness -hypertension -↓ potassium and sodium levels -may worsen gout and diabetes -dizziness, light-headedness Atorvastatin Anti-Lipids Rosuvastatin Fenofibrate Ezetimibe Cholestyramine Anti-Seizure Phenytoin Diuretics (↑ Urination) Hydrochlorothiazide (HCTZ) Furosemide Spironolactone Triamterene Indapamide 32 | P a g e -nausea, GI upset -muscle soreness -back pain, joint pain, diarrhea, fatigue, dizziness, headache, abdominal pain -excess gum growth -Signs of toxicity: drowsiness, dizziness, vision disturbances -rash (serious) -↑ potassium levels -dizziness, light-headedness -nausea -usually combined with HCTZ -↑ potassium levels -dizziness, light-headedness Anti-Hypertensives (BP lowering meds) Ramipril Perindopril Enalapril -HTN, HF, post-MI -kidney protection Candesartan -HTN, HF, post-MI -kidney protection Irbesartan -HTN, HF, post-MI -kidney protection Nifedipine -hypertension Amlodipine -hypertension Aspirin (ASA) Plavix (clopidogrel) Heart Drugs warfarin 33 | P a g e -hypertension (HTN) -heart failure (HF) -Post-MI (heart attack) -kidney protection -HTN, HF, post-MI -kidney protection -heart attack and stroke prevention -blood thinner -heart attack and stroke prevention -blood thinner -blood thinner -A. fib, DVT, and PE treatment and prevention -dry cough, dizziness -↑ potassium level -rare: swelling throat/mouth (serious) -dry cough, dizziness -↑ potassium level -rare: swelling throat/mouth (serious) -dry cough, dizziness -↑ potassium level -rare: swelling of face and throat (serious) -↑ potassium level -rare: swelling of face and throat (serious) -↑ potassium level -rare: swelling of face and throat (serious) -may cause swollen ankles -headache -may cause swollen ankles -headache -stomach ulcer -bleeds (i.e. excess bruising, blood in stool, vomiting blood, etc.) -bleeds (i.e. excess bruising, blood in stool, vomiting blood, etc.) Digoxin -arrhythmias (A. fib) -heart failure Diltiazem -arrhythmias -chest pain (angina) -bleeds (i.e. excess bruising, blood in stool, vomiting blood, etc.) -ideal INR range: 2-3 (too low = may not be working; too high = ↑ bleeding risk) -Signs of toxicity: nausea, vomiting, too slow or too fast pulse, dizziness, confusion, vision disturbances -headache, fluid retention, swollen ankles, dizziness, some constipation Verapamil -arrhythmias -chest pain (angina) -constipation, headache, dizziness -overgrowth of gums, swollen ankles Nitroglycerin -chest pain (angina) Metoprolol -heart disease (heart -light-headedness, dizziness -headache (esp. nitrospray & tabs) -dizziness, fatigue, low blood pressure failure, post-heart attack) -atrial fibrillation (A. fib) -chest pain (angina) Anti-Diabetics Atenolol -heart disease (heart failure, post-heart attack) -atrial fibrillation (A. fib) -chest pain (angina) -dizziness, fatigue, low blood pressure Metformin -Type 2 Diabetes -diarrhea, GI upset -↓ vitamin B12 levels Gliclazide -Type 2 Diabetes -weight gain -hypoglycemia (low blood sugar): sweating, headache, weakness, drowsiness, hunger Glyburide -Type 2 Diabetes -weight gain -hypoglycemia (low blood sugar): sweating, headache, weakness, drowsiness, hunger -Type 1 & 2 Diabetes -various types of insulin available -weight gain -Signs of low blood sugar: sweating, headache, weakness, drowsiness, hunger -hypothyroidism (low thyroid) -Signs of toxicity: diarrhea, heart palpitations, weight loss, ↑ appetite, dry skin, anxiety, worsening heart conditions -osteoporosis -uncommon: headache, heart burn, nausea -osteoporosis -uncommon: headache, heart burn, nausea Insulin AntiOsteoporo sis Thyroid Synthroid/Eltroxin (levothyroxine) 34 | P a g e Fosavance (alendronate + vitamin D) Fosamax (alendronate) Actonel (risedronate) -osteoporosis -GERD (heart burn, indigestion, ↓ stomach acid, ulcer) Nexium -GERD (heart burn, (esomeprazole) indigestion, ↓ stomach acid, ulcer) Rabeprazole -GERD (heart burn, indigestion, ↓ stomach acid) Pantoprazole -GERD (heart burn, indigestion, ↓ stomach acid) Ranitidine -GERD (heart burn, ↓ stomach acid) Tums (calcium -heart burn, indigestion carbonate) -↓ stomach acid Maalox (aluminum + -heart burn, indigestion magnesium) -↓ stomach acid Senekot S -constipation (sennosides) Ducolax (bisacodyl) -constipation Laxatives Anti-Ulcer and Heartburn Omeprazole Lax-a-Day (PEG 3350) Lactulose Oti Ophthalmic (Eye) c Drugs (Ea r) Dr ugs Colace (docusate) Xalatan (latanoprost) Travatan (travoprost) Lumigan (bimatoprost) Combigan (timolol + bromidine) Cosopt (timolol + dorzalamide) Polysporin eye drops (gramicidin + polymyxin B) Polysporin ear drops Ciprodex 35 | P a g e -constipation (prevents and treats) -constipation (prevents and treats) -stool softener -wide angle glaucoma -uncommon: headache, heart burn, nausea -headache, GI upset, nausea -headache, GI upset, nausea -headache, GI upset, nausea -headache, GI upset, nausea -diarrhea, constipation, headache, confusion -constipation -constipation, diarrhea -diarrhea -abdominal cramps -diarrhea -abdominal cramps -very well tolerated -wide angle glaucoma -wide angle glaucoma -unpleasant taste (can put in juice) -diarrhea, GI upset, nausea -likely does not work at all -mild stinging, red eyes -requires refrigeration -mild stinging, red eyes -mild stinging, red eyes -wide angle glaucoma -stinging, red eyes -wide angle glaucoma -stinging, blurred vision, red eyes -unpleasant taste -mild stinging, irritation -eye infection (mainly pink eye) -ear infections (swimmers’ ear) -ear infections -mild stinging, irritation -mild stinging, irritation Nasal Drugs (ciprofloxacin + dexamethasone) Cerumol Nasonex (mometasone) -ear wax build-up -chronically stuffed nose (allergic rhinitis) -stinging and irritation -irritation, stinging -nosebleeds (check technique!) -bad taste (rinse mouth after dose) -yeast infections -athletes foot -yeast infections -athletes foot -rash, itching -psoriasis -irritation, stinging (uncommon) -monitor for bleeds if also on warfarin -irritation, stinging (uncommon) Betamethasone -rash, itching -psoriasis -irritation, stinging (uncommon) -With use >3wk: delayed wound healing, skin thinning Elocom (mometasone) -rash, itching -psoriasis -irritation, stinging (uncommon) -With use >3wk: delayed wound healing, skin thinning -sore joints (arthritis) -irritation, stinging -urge incontinence (cannot delay urination once they feel the urge) -urge incontinence -dry mouth -constipation -dizziness -less dry mouth than oxybutynin -constipation Aricept (donepezil) -alzheimers Reminyl (galantamine) -alzheimers -headache -nausea, diarrhea -fatigue, sleep disturbance (uncommon) -nausea, diarrhea, ↓ appetite -dizziness, headache Prostat e Drugs Alzheimer’s Drugs Urine Incontinence Topical Drugs (Creams/ Ointments) Miconazole 36 | P a g e Canesten (clotrimazole) Hydrocortisone Voltaren (Diclofenac) Oxybutynin Detrol LA (tolteridine) Proscar (finasteride) -↓ size of prostate -Treat prostate symptoms (i.e. painful/difficulty urinating) -irritation, stinging (uncommon) -With use >3wk: delayed wound healing, skin thinning -sexual dysfunction Avodart (dutasteride) Alfuzosin Flomax (tamsulosin) Zopiclone Clonidine Kayexalate Other Slow K Benadryl (diphenhydramine) Gravol (dimenhydrinate) Immodium (loperamide) Prednisone 37 | P a g e -↓ size of prostate -Treat prostate symptoms (i.e. painful/difficulty urinating) -Treat prostate symptoms (i.e. painful/difficulty urinating) -Treat prostate symptoms (i.e. painful/difficulty urinating) -sleep problems -various indications (i.e. pain, hypertension) -High potassium (lowers potassium) -Low potassium (supplements potassium) -allergies -sexual dysfunction -nausea -drowsiness -diarrhea (loose bowel movement) -various conditions -constipation - dizziness, light-headedness (uncommon) -headache -may have even less dizziness and light-headedness -headache -drowsiness, bitter/metallic taste -drowsiness, dizziness, headache, low BP, dry mouth, may cause itching -constipation -nausea, heartburn (uncommon) -drowsiness -short term: GI upset, mood changes -long term: bone loss, skin thinning, delayed wound healing, worsened HTN and diabetes, glaucoma, cataracts Appendix B Common Medical Abbreviations Dosing Frequency ac – before meals pc – after meals cc – with meals bid – twice a day tid – three times a day qid – four times a day HS – at bedtime AM – in the morning q – every qd – every day (may see OD for once daily) qh – every hour q6h – every 6 hours q4-6h – every four or six hours qod – every other day prn – as needed Administration Route po – by mouth (orally) pr – by rectum (rectally) pv – by vagina (vaginally) Inh – inhale SL – sublingual (under the tongue) otic – ear ophthalmic – eye Measurement mL – milliliter gm(or g) – gram mg – milligram mcg (or ug) – microgram kg – kilogram tsp – teaspoon (1 tsp = 5mL) tbsp – tablespoon (1 tbsp = 15mL) oz – ounce (1 oz = 30g or mL) meq – milliequivalent gtt(s) – drop(s) 38 | P a g e Dosage Form tab – tablet cap – capsule EC – enteric coated ungt – ointment supp – suppository soln – solution susp. – suspension Miscellaneous x – times (i.e. 2x/wk = 2 times per week) D/C – discontinue (may mean ‘discharge’) x/12 – ‘x’ months (i.e. 3/12 = 3 months) x/52 – ‘x’ weeks (i.e. 2/52 = 2 weeks) x/7 – ‘x’ days (i.e. 10/7 = 7 days) mos – month(s) wk – week(s) BP – blood pressure P – pulse (also HR – heart rate) RR – respiratory rate BG – blood glucose (also BS – blood sugar) T – temperature BM – bowel movement HTN – hypertension (high BP) MI – Myocardial Infarction (‘Heart Attack’) BTP – breakthrough pain bpm – beats per minute GI – gastrointestinal (refers to stomach, small intestine, and colon) Appendix C Measuring Vital Signs Unless otherwise stated, each resident must have his/her blood pressure, pulse, and temperature checked on a monthly basis. These measurements are to be documented in the green Vital Signs Binder. All residents should have his/her weights done every three (3) months unless they are designated as “non-weight bearing.” The weights are to be documented in the green Vital Signs Binder. Some medications may require measurement of vital signs before administration. The MAR will specify what vital sign measurement, if any, is required before medication administration. Some of these medications may include: Digoxin: Check pulse Morphine: Check respirations Acetaminophen: Check temperature (if it is being given PRN for fever) Common medication related symptoms that require measurement of vital signs and the need to notify the Dr/NP via the communication notebook: Dizziness: Check blood pressure Swelling of Ankles: Check pulse and blood pressure Chest Pain: Check pulse, blood pressure, respiration Vital Signs for Adults Aged >65 Normal Temperature: • Oral: 36.1 – 37.2oC Written as: T 37 (oral) or Oral Temp 37 • Infrared Thermometer (Thermoflash): 35.8 – 37.5oC Written as: T 37.5 or Temp 37.5 Note: Any temperature over 37.5 is considered a fever when using Thermoflash according to its User Manual. • Any temperature above 37.5oC should be managed using the standing prn order for acetaminophen (unless 4gm already received within the last 24h) and recorded in the resident’s Progress Notes and noted in the Dr/NP Communication Notebook. Normal Pulse Range: • 60 to 90 beats per minute Written as: P 88 • Any pulse outside this range should be recorded in the resident’s Progress Notes and the Dr/NP Communication Notebook. • Hold Digoxin if: pulse is under 60 or over 100 and immediately contact the NP/Dr 39 | P a g e Normal Respiration Rate: • 12 to 20 breaths per minute Written as: R 18 • Any respiration rate outside this range should be recorded in the resident’s Progress Notes and noted in the Dr/NP Communication Notebook. Blood Pressure: • Please see Appendix D for details regarding normal blood pressure values and monitoring frequency. A. Measuring Temperature Body temperature measures the balance between heat produced and lost by the body. In a healthy individual, body temperature is usually consistent. Each resident at EOL should have his/her temperature measured using the no-contact Thermoflash infrared thermometer for consistency. However, in the event that this method of measuring temperature is not available or functional, for whatever reason, the oral method of temperature should be used. Thermoflash – Infrared No-Contact Thermometer 1. Wash hands. 2. Instruct resident to sit down. 3. Brush hair to the side of the resident’s face and remove any head coverings/accessories that are blocking his/her forehead. 4. Holding the Thermoflash by the handle, aim the device at the resident’s forehead (the screen should be facing you) slightly to the right of center. 5. Bring the thermometer to a distance of about 5cm (2 inches) from the resident’s head and press the thermometer’s measurement button. 6. The temperature should be immediately displayed in the screen facing you. Document this reading in the Progress Notes and wherever else appropriate (i.e. Vital Signs Binder; PRN Worksheet for acetaminophen administration; etc.). Oral Electronic Thermometer 1. Wash hands and put on disposable gloves. 2. Remove cap from thermometer and clean the mouth piece with warm water and detergent. 3. Instruct the resident to sit down, open mouth, and raise tongue. 4. Press the button on the thermometer to turn it on and place the probe of the mouthpiece at the base of the resident’s tongue on either side. 5. Instruct resident to lower tongue and gently close mouth without biting down on the thermometer. 40 | P a g e 6. Instruct the resident to hold the thermometer in place with his/her hand. Assist as needed. 7. Once the thermometer beeps, gently remove it from the resident’s mouth and record the reading in the Progress Notes and elsewhere as appropriate (i.e. Vital Signs Binder; PRN Worksheet for administering acetaminophen; etc). Ensure to specify that the oral route was used. 8. Clean the thermometer using warm water and detergent. After replacing the cap, return the thermometer to its proper place. 9. Note: Ensure that the resident has not eaten or drank a warm or cold beverage or food within the previous 20 minutes as this may affect the oral temperature measurement. B. Measuring Pulse A pulse measurement refers to the number of times the heart beats in one minute. Many factors may raise a resident’s pulse, such as being upset, having recently eaten, or recent walking or moving around. The presence of these factors must be taken into account when measuring a resident’s pulse. Ideally, a pulse measurement should reflect his/her “resting heart rate.” This requires the resident to sit down, relax, and rest for at least 5 minutes before measuring the pulse to ensure an accurate read. At EOL, a resident’s pulse is normally measured by the machine at the same time as his/her blood pressure. However, if the blood pressure machine is unavailable, the steps for manually taking a pulse measurement have been included below. Manual Pulse Measurement 1. Wash hands and put on disposable gloves. Ensure you have some sort of time device (i.e. a watch). 2. Instruct the patient to sit or lie down and relax for 5 minutes (if they have not been doing so already). 3. Locate the resident’s pulse. For untrained individuals, it is often easiest to locate the pulse near the throat as opposed to the wrist. Resident’s wrist: using three fingers (not your thumb) gently touch on the thumb side on the inside of the resident’s wrist. Resident’s throat: using two fingers (not your thumb) gently press down along the left side of the resident’s throat near the base of the jaw. 4. Document if the pulse beats feel irregular or unsteady. 5. Count the number of beats for 30 seconds and multiply that number by two (2) to get the resident’s pulse value (If the heart rate felt abnormal or irregular, count for the full 60 seconds instead). 6. Document the value in the resident’s Progress Notes and wherever else as appropriate (i.e. MAR, Vital Signs Binder, etc.). 41 | P a g e C. Measuring Blood Pressure. Blood pressure values are used to assess the effectiveness of medications, the control of medical conditions, and the presence of possible side effects. A resident’s blood pressure can be affected by his/her mood (i.e. if they are agitated), recent activity (i.e. walking down the hallway), pain, medications, or even the need to use the washroom. These factors must be taken into account when measuring a resident’s blood pressure. At EOL, a resident’s blood pressure is measured by a blood pressure machine. This machine also measures the resident’s pulse. 1. Wash hands and put on disposable gloves. 2. Ensure that the resident does not need to use the washroom. 3. Instruct the resident to sit down and relax for 5 minutes (if they have not been doing so already). 4. Instruct the resident to sit with his/her legs uncrossed and feet planted comfortably on the floor. 5. Roll up the resident’s sleeve and/or remove any sweaters or constrictive clothing if possible. 6. Place blood pressure cuff snugly on resident’s upper arm. The tubing extending from the cuff should be pointing downward and its point of connection to the cuff should be lined up with the artery that runs along the inside of the elbow. The cuff should be located about one inch (1-2 finger widths) above the crook of the elbow. 7. Instruct resident to rest arm palm up on a table or desk so that the arm is about level with his/her chest. 8. Press the start button on the machine and instruct the resident to not speak during the measurement (This implies that you should not be asking questions at this time). 9. Once the machine beeps, the measurement is complete and the cuff may be removed from the resident’s arm. 10. Document the resident’s blood pressure value and arm used in his/her Progress Notes and wherever else as appropriate (i.e. Vital Signs Binder). Make sure to include whether the patient appeared unusually unwell or agitated during the measurement. 42 | P a g e D. Measuring Respiration Rate Respiration rate refers to the number of breaths taken in one minute. Each breath consists of one inhale and one exhale. The respiratory rate may be increased by fever, anxiety, and trouble breathing due to heart and lung disease. The rate may decrease due to toxicity of certain medications, specifically narcotic pain killers such as morphine or hydromorphone. Residents may unknowingly change his/her breathing rate if they are aware that you are counting it. Therefore, it is standard practice to pretend that you are measuring the pulse while you actually count breaths. 1. Wash hand and put on disposable gloves. 2. Instruct patient to sit down and place your fingers along the inside of the wrist as if you were measuring his/her pulse (You may wish to normally assess the resident’s respiratory rate after actually checking the pulse by merely leaving your hand on neck after the initial 60 seconds). 3. Start counting the resident’s respirations when the chest rises. Each rise and fall of the chest is one (1) respiration or breath. 4. Count the breaths for 30 seconds and multiply by two (2) to get the respiration rate value. 5. Document this value in the resident’s Progress Notes and wherever else as appropriate (i.e. MAR; Vital Signs Binder; PRN Worksheet for hydromorphone; etc.). Make sure to include notes regarding any abnormalities present with the resident’s breathing (i.e. he/she appeared to have difficulty breathing; breath was shallow; breathing time was irregular; etc.). 43 | P a g e Appendix D Blood Pressure Monitoring Protocol By Kristjana Gudmundson, BSP and Sara Blott, BSP Last Updated: December 2011 Long Term Care: o Care staff shall obtain blood pressure and pulse monthly. Vital signs shall be obtained more frequently if signs and symptoms indicate the need for increased monitoring. o Each resident will be classified by a category according to his/her blood pressure monitoring needs. Definition of Hypertension: o Sustained, elevated arterial blood pressure with three readings, taken on three separate occasions that are greater than 140/90mmHg. Guidelines for Blood Pressure Screening: If resident is being assessed by physician/nurse practitioner, please take a blood pressure reading that morning. If resident is started on antihypertensives or they have a dose change, they automatically become a level C for two weeks and then reassess. If blood pressure reading is >160mmHg, take another reading within 10 minutes to ensure accuracy. If it remains high, proceed to contact a health care provider and categorize them as a level C. If blood pressure reading is >200mmHg, take another reading within 10 minutes to ensure accuracy. If it remains high, proceed to call 911 immediately and categorize them as a level E. If blood pressure reading is <100mmHg, take another reading in 10 minutes to ensure accuracy. If it remains low, categorize the patient as level C and monitor them for signs of hypotension (i.e. dizziness, light-headed upon standing, increased falls or near-falls, etc.). Category: A) Normal Blood Pressure: Monitor one time per month. B) Hypertension: Monitor one time per week. C) Hypertension with readings >160mmHg: Monitor three times per week after notifying a health care provider. D) Hypertension with readings >180mmHg: Monitor one time daily and contact a health care provider immediately. E) Hypertension with readings >200mmHg: Monitor three times daily after assessed by a health care provider and the resident is stable. 44 | P a g e Category: A B C D E Monitoring: 1 time per month 1 time per week 3 times per week 1 time daily 3 times daily Arm used for monitoring blood pressure: (CIRCLE ONE) RIGHT LEFT (RA) (LA) **Patients on Digoxin Therapy** Pulse < 60 BPM or >100 BPM – Take another reading within 10 minutes to ensure accuracy. If reading is the same - Call attending Practioner immediately to report reading. Chart Indicating Blood Pressure Stages and Monitoring Plans: Category: Low Blood Pressure Normal Prehypertension Hypertension: Stage 1 (Mild) Stage 2 (Moderate) Systolic (mmHg): <100 Diastolic (mmHg): <50 <120 120-139 Systolic (mmHg): 140-159 160-179 <80 80-90 Diastolic (mmHg): 90-99 100-108 Action: Monitor three times daily for one week if they are symptomatic (dizzy, lightheaded, falls), otherwise continue with their category protocol. Continue to monitor once monthly. Continue to monitor once monthly. Action: Monitor one time per week. Monitor three times per week. Refer to ER if Symptomatic. Stage 3 (Severe) >180 >110 Call 911 and monitor one-three times daily thereafter. Started on New Monitor three times per week for 2 Medications weeks. Table adapted from the American Heart Association recommendations See bottom of next page for questions to ask to determine if a resident is “symptomatic” • • • • • Blood Pressure Monitoring Guidelines: Check reason for BP screening appointment (routine check or Dr/NP request, for example). Calibrate your manometer on a regular schedule, usually annually. Clients should be seated comfortably for a few minutes with legs uncrossed and forearm supported at the level of the heart. Client should have refrained from smoking or drinking caffeine for 30 minutes before BP is taken. An appropriate cuff (bladder within the cuff should encircle at least 80% of the upper arm) is to be used for all readings. 45 | P a g e • • • • • • • • Arm circumference 22-32cm = normal cuff Arm circumference 33-42cm = large cuff Palpate brachial artery. The cuff should be applied to bare skin, but may be attached over a thin shirt sleeve. Center the bladder of the cuff over the brachial artery and wrap smoothly and snuggly around arm. The lower edge of the cuff should be 2-3cm above the antecubital fossa (circles the elbow joint) and should be closely attached so that it is impossible to insert a finger between the cuff and skin. Both the systolic blood pressure (SBP) and diastolic blood pressure (DBP) should be recorded. The first appearance of sound (phase 1 Korotkoff sound) is used to define SBP. The disappearance of sound (phase 5 Korotkoff sound) is used to define DBP. A person’s blood pressure may vary by as much as 20mm Hg in each arm. Always record the arm that was used when recording blood pressure. Example: 130/78 LA (Left Arm). It may be best to use the non-dominant arm. How to Measure Blood Pressure Accurately: A) Electronic Machine: • Ensure that the air inflation tube from the cuff is connected to the air jack on the left side of the monitor. • Press top button marked 0/1 to switch on. • Wait until “0” is onscreen and heart symbol is on upper right hand side. • Press lower “start” button. • Cuff will slowly inflate to around 150mmHg then begin to deflate. • Wait until cuff fully deflated. • When measurement is completed the monitor will sound and any remaining air will be expelled from the cuff. • BP reading will be visible on screen. st • Record 1 reading including which arm was used for the measurement. nd • Allow patient to rest for 1 minute, and then take 2 reading. rd • Compare readings and if not agreeing to within 10-15mmHg take 3 reading. • To terminate measurement (for example if the patient is unable to tolerate the discomfort) press the on/off (0/1) button. The cuff will then deflate. B) Manual BP Machine: • Check that the needle on gauge is at 0mmHg. • Find pulse at brachial artery (towards the inside of the elbow). • Apply stethoscope over pulse. • Inflate cuff to around 140mmHg (above the systolic pressure), pulse should not be audible. • Allow mercury/dial to fall at a rate of around 22mmHg per second. • Note level at which pulse is first audible (Korotkoff sound 1= Systolic Blood Pressure). • Note level at which pulse becomes inaudible NOT muffled (Korotkoff V= Diastolic Blood Pressure). • Record both to within 2mmHg including which arm was used for the measurement. 46 | P a g e Recording o Record data along with which arm the blood pressure reading was taken from. o Check level against category/ action chart and arrange follow up as described. o If in doubt about any reading or appropriate action, contact Physician/Nurse Practitioner in first instance for advice. Signs and Symptoms to Question about during routine blood pressure monitoring: Do you have headaches? Do you experience dizziness or light-headedness? Do you experience blurred vision or spots before your eyes? Do you have nosebleeds? Do you experience chest pain? Do you have shortness of breath? Resources: - American Heart Association: www.americanheart.org - WebMD: www.webmd.com - type hypertension in the search box 47 | P a g e Appendix E Importance of Potassium: Why is Potassium so Important? BY ASHLEY BOTTERILL PHARMACY INTERN FEBRUARY 2012 POTASSIUM (K+) - An electrolyte essential for proper functioning of all cells, tissues, and organs - Has an important role in skeletal and smooth muscle contraction - Crucial for the proper functioning of the heart - Normal serum concentrations: 3.5 to 5.0 mmol/L HYPOKALEMIA (LOW K+) Mild: 3.1 – 3.5 mmol/L Moderate: 2.5-3.0mmol/L Severe: <2.5mmol/L Causes: • Medications (i.e. diuretics, laxatives) • Excessive vomiting or diarrhea • Low magnesium (causes elimination of K+) Appearance: o Mild: often asymptomatic o Moderate: cramping, weakness, muscle aches o Severe: Heart problems such as ECG changes and arrhythmias HYPERKALEMIA (HIGH K+) Mild: 5.1-5.9mmol/L Moderate: 6.0-7.0mmol/L Severe: >7mmol/L Causes: 1. Increased potassium intake (i.e. Potassium supplements, Potassium sparing drugs) 2. Decreased elimination of potassium (i.e. Kidney Dysfunction: The kidneys are responsible for excreting 80% of the daily K+ intake) (i.e. Endocrine disorders) Appearance: o Asymptomatic, or possibly complaints of heart palpitations 48 | P a g e o ECG changes POTASSIUM AND DIGOXIN High K+: May decrease the levels of digoxin, making it less effective Low K+: May increase the levels of digoxin and put the patient at risk of digoxin toxicity (i.e. Nausea, vomiting, visual disturbances, & confusion) IN SUMMARY, If lab results indicate potassium levels above or below the normal range of 3.5 – 5mmol/L please be sure to notify the Nurse Practitioner or one of the physicians. 49 | P a g e Appendix F Fall Prevention and Management A fall is an unintended event which results in the resident coming to rest on the floor or other lower level, not due to an intentional movement or outside factors such as stroke, fainting, or seizure. Falls are serious occurrences in a care home due to the risk of injury (i.e. fractured hip) that may result in decreased quality of life, hospitalization, or worse. The Following Factors may Increase a Resident’s Risk of a Fall: History of previous falls Impaired eyesight Impaired mobility/general weakness Need to use the washroom often (especially if at night) Certain medications (i.e. sleeping pills, some pain killers, some blood pressure meds) Confusion/disorientation Dizziness/light-headedness (especially upon standing) Depression Poor judgement (i.e. not confused, just do not recognize his/her limits) Fall Prevention Tips: • Instruct the resident to request assistance as needed. • Instruct the resident to wear non-skid footwear. • Provide an appropriate armchair with wheels locked at the resident’s bedside. • Ensure that the pathway to the restroom is free of obstacles and properly lighted. • Ensure the hallways are clear of obstacles. • Place assistive devices such as walkers and canes within a resident’s reach. • Evaluate chair and bed height. 50 | P a g e • • • • Observe environment for potentially unsafe conditions (i.e. liquid spill on floor). Ensure hallways are well lit, handrails are secure, and tables and chairs are sturdy. Consider peak effect for prescribed medications that affect level of consciousness, balance, and washroom use when planning resident care (i.e. sleeping medications may make the resident more likely to fall if they get up to use the washroom during the night). Communicate the resident’s “at risk” status during shift report and with other staff as appropriate. • Inform and educate residents and /or family members regarding a plan of care to prevent falls. Protocol for Managing a Resident who has Fallen Residents experiencing a fall with: • • No loss of consciousness No injuries exceeding minor cuts and bruises • Loss of consciousness or more than minor injuries, call 9-1-1. A. No Head Trauma 1. 2. 3. 4. 5. 6. B. Determine vital signs to include sitting/standing blood pressure (manual cuff) and pulse. If diabetic, check blood sugars Determine circumstances leading to the fall and correct any modifiable factors (i.e. wet floor). For the 48 hours following the fall: a. Obtain vital signs every 8 hours b. Observe for possible injuries not evident at the time of the fall (i.e. new limp or change in ease of mobility, new complaints of pain/soreness/stiffness, requires more assistance to be mobile or to get out of a chair/bed, etc.) c. Mental status changes (i.e. confusion, disorientation, etc.) All falls must be reported to the nurse practitioner/doctor via the communication notebook. If resident appears injured or has abnormal vitals, contact the NP/Dr or hospital for further instructions. Minor Head Trauma 1. Follow the same protocol as outlined above. In addition, contact the Dr/NP or hospital immediately for further instructions. If resident is bleeding excessively due to a cut in his/her head or has lost consciousness, call 9-1-1. 2. Alert attending physician for all falls with head trauma in residents receiving warfarin or dabigatran (Pradaxa). Additional Measures: • Complete incident report (see Appendix L in this manual). Documentation must include: - Date/time of fall 51 | P a g e - • • • • Description of fall (including witnessed observations and the resident’s description, if possible) – where did it happen? What was the resident trying to do? Was it caused by any obvious factors (i.e. wet floor)? Any medications received in the 30 minutes prior to the fall Vital signs (temperature, pulse, standing and sitting blood pressure, respiration rate, blood sugar if diabetic) Any injuries How the resident was managed Who was contacted (i.e. Dr/NP/hospital/pharmacy) and what was the result Document details in the resident’s Progress Notes Review fall prevention interventions Communicate to all shifts that patient has fallen and is at risk to fall again Family members/guardians should be notified that a fall has occurred 52 | P a g e Appendix G Signs of a Heart Attack If a resident is having a heart attack, he/she may display a combination of the following: • Chest discomfort (uncomfortable chest pressure, squeezing, fullness or pain, burning or heaviness) • Discomfort in other areas of the upper body (neck, jaw, shoulder, arms, back) • Shortness of breath • Sweating • Nausea • Light-headedness If a resident is suddenly displaying any of these signs, you must: 1. Advise them to sit down and rest for 5 minutes to see if the chest pain and other symptoms resolve. If the symptoms do not alleviate after 5 minutes, or worsen, call 9-1-1. 53 | P a g e 2. Give a dose of sublingual nitrogen spray/tablets if there is an order and follow the 3. instructions on the medication. If the symptoms do not alleviate after 3 doses, or worsen at any time, call 9-1-1. If the symptoms resolve with rest, document the occurrence and phone the hospital for further instruction. Pictures courtesy of: The Canadian Heart & Stroke Foundation Appendix H Signs of a Stroke The sudden onset of: If any resident suddenly develops any of these signs, immediately call 9-1-1! 54 | P a g e Picture Courtesy of: The Canadian Heart & Stroke Foundation 55 | P a g e Appendix I Signs of an Allergic Reaction A severe allergic reaction often involves the sudden onset of a combination of the following: Itching and swelling of the lips, tongue mouth, or throat Shortness of breath, wheezing, difficulty breathing Loss of consciousness, fainting Hives or itchy rash covering large part of the body (i.e. the torso) Nausea, abdominal cramps, vomiting, diarrhea Itching/sense of tightness in the throat, hoarseness, and hacking or repetitive cough If a resident appears to be experiencing an allergic reaction and he/she has a swollen throat, mouth, lips, or tongue, difficulty breathing or swallowing, call 9-1-1. For all other symptoms suggestive of an allergic reaction, contact the physician, NP, or hospital for further instructions on how to manage the resident. If the reaction occurred the same day as starting a new medication (i.e. an antibiotic for a UTI), hold further doses and contact the pharmacy or hospital for further instructions. 56 | P a g e Appendix J Importance of Hand Washing Residents at EOL are often at an increased risk of complications and hospitalization from contracting an illness (i.e. the flu) due to his/her age, compromised immune system, and medical conditions. For this reason, it is vital that all Care Aides take every precaution available to prevent and reduce the spread of infection. Studies have shown hand washing to be one of the most effective (and easiest) means to prevent the spread of infection. Therefore, frequent and proper hand washing is essential. This practice not only protects the residents, but it also protects the Care Aide from contracting an illness from a resident. Always wash hands: • After using the restroom for whatever reason • After coming into to contact with your own or another’s bodily fluid or substance (i.e. saliva, blood, urine, etc.) • Before and after administering medications • Before and after preparing food • Before and after touching a resident Proper Hand Washing Technique 1. Roll up sleeves and turn on faucet. 2. Wet wrists and hands thoroughly. 3. Dispense soap into palm. 4. Lather hands by rubbing them together for 20 seconds (the time it takes to sing “Happy Birthday” twice). Make sure to clean backs of hands, between fingers, beneath rings/watches, and underneath fingernails. 5. Rinse hands. 6. Dry hands with paper towel and use paper towel to shut off faucet. Hand Sanitizers 1. Alcohol hand sanitizers are an excellent way to disinfect your hands when you cannot get to a sink to wash your hands. However, sanitizers should not be used to clean hands that are “obviously dirty.” To properly use hand sanitizer, dispense some onto one palm and rub all over each hand until it evaporates. Make sure to include backs of hands, between fingers, beneath rings/watches, and underneath fingernails. Additional Tip to Prevent the Spread of Infection: always cover mouth and nose when coughing or sneezing with either a tissue or the crook of your arm. 57 | P a g e 58 | P a g e References West Virginia Department of Health and Human Resources; Provider Manual for Medication Administration by Unlicensed Personnel: RN Orientation Curriculum – Book 1. http://www.wvdhhr.org/ohflac/amap/resources/amap_rn_curriculum_book_1.pdf United States Department of Veteran Affairs; Fall Prevention and Management; Fall Policy (May 2004) Program: www.patientsafety.gov/SafetyTopics/fallstoolkit/ Thermoflash User Manual: http://www.thermoflash.com/images/files/Thermoflash%20LX-26%20English.pdf Canadian Heart & Stroke Foundation Official Website: http://www.heartandstroke.com/site/c.ikIQLcMWJtE/b.2796497/k.BF8B/Home.htm Canadian Pharmacists Association (2011); Therapeutic Choices: Sixth Edition Lexi-Comp Online (2012) Pictures courtesy of: • http://us.gsk.com/products/assets/us_advair_instructions.pdf • http://my.clevelandclinic.org/PublishingImages/HIC/mdi-spacer.gif • http://images.rxlist.com/images/rxlist/xopenex4.gif • http://images.ddccdn.com/drp/images/73/06000753.jpg • http://www.astrazeneca.ca/documents/ProductPortfolio/SYMBICORT_CIL_en.pdf • http://www.spiriva.com/assets/pdf/SPIRIVA_HandiHaler_Instructions.pdf • http://rcgp-innovait.oxfordjournals.org/content/5/3/137/F5.small.gif • http://www.healthxchange.com.sg/healthyliving/SpecialFocus/PublishingImages/eyeointment.jpg • http://4.bp.blogspot.com/_CoK2NCkJdTk/TTPiLLkqoYI/AAAAAAAAApA/ZgAlTv63J So/s320/eardropadult.PNG • http://www.meditrax.com.au/wp-content/uploads/wpsc/product_images/8-COPD-1.jpg 59 | P a g e