1
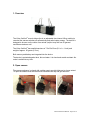
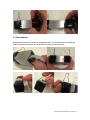
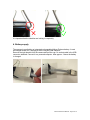
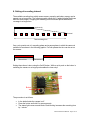
Video CatCam® User Manual
Revision: 30. May 2009
Check for updates on: www.mr-lee-catcam.de
Mr. Lee CatCam and CatCam are registered trademarks of Juergen Perthold.
Index
Index..............................................................................................................1
Change History ..............................................................................................2
1. Overview....................................................................................................3
2. Open camera .............................................................................................3
3. Close camera.............................................................................................4
4. Battery supply ............................................................................................5
5. Activate camera .........................................................................................6
6. Setting of recording interval .......................................................................7
7. Adjust time stamp ......................................................................................8
8. Collar Attachment ......................................................................................9
9. Video Storage and Download ....................................................................9
10. Support and Help...................................................................................10
Video CatCam User Manual - Page 1 of 10
Change History
We try to keep this manual up-to-date. Therefore changes and additions are made. You
may want to check from time to time for updates so that you have the most recent issue
available.
Revision Date
April 28th, 2009
Changes
Initial revision
May 30th, 2009
Additions to shackles and interval setting.
Video CatCam User Manual - Page 2 of 10
1. Overview
The Video CatCam® records video clips in an adjustable time interval. When nothing is
recorded the camera switches off automatically and safes battery energy. The device is
designed to be worn on the collar of an animal (cat) but may find use for general
surveillance tasks as well.
The Video CatCam® has small dimensions of 7.5x2.5x2.5cm (2.9 x 1 x 1 inch) and
weight of approx. 65 grams (2.3 oz).
Both memory and battery are integrated into the device.
The device is protected against dust, dirt and water. It is shock and scratch resistant. No
noise is emitted at any time.
2. Open camera
The camera enclosure is closed with a rubber cap to provide tightness to a large extent.
To open the shackle must be removed first and then the cap can get removed.
Video CatCam User Manual - Page 3 of 10
3. Close camera
Basically the enclosure is closed in the opposite way. The shackle must go through the
holes in the rubber cap and into the drilled holes of the metal enclosure.
Video CatCam User Manual - Page 4 of 10
It is important that the shackles are locking in completely.
4. Battery supply
The camera is supplied by an integrated rechargeable Lithium-Polymer battery. It must
be charged before use. Charging is done using the USB interface.
Remove the right shackle from the camera and pull the cap. On a short cable is the USB
connector attached. Connect it to a powered computer. After approx. 3 hours the battery
is charged.
Video CatCam User Manual - Page 5 of 10
5. Activate camera
After the battery is charged the camera can be activated. Press shortly on the button in
the enclosure. The status light comes on. Since the button is very small a toothpick or
similar can be helpful.
As long as the device is active the status light blinks shortly every few seconds.
Press again on the button to switch the camera off. This may take some time depending
on the record state. The status light will remain on until the camera is shut down, you do
not need to press more than one time on the button.
If you have programmed recording interval time the setting will not get lost by switching
the camera off.
Video CatCam User Manual - Page 6 of 10
6. Setting of recording interval
The available recording time which means memory capacity and battery energy can be
spread over a longer time. The following graphic shows this. If added together both bars
have the same length. Chopping the recording time into smaller pieces extends the
coverage to a longer time.
continuously
Interval
Total recording time
One cycle consists out of a recording phase and a pause phase in which the camera is
switched off as shown in the following graphic. For both phases the time can be set on
the camera.
Record time
Pause time
…..
Setting these times is done using the On/Off button. While a quick push on the button is
switching the camera on a longer push enables the time setup.
Light
Button
The procedure is as follows:
•
•
•
In the default state the camera is off
Press the button and hold it for some seconds.
The status light comes on and blinks. Each blinking increases the recording time
by 1 minute.
Video CatCam User Manual - Page 7 of 10
•
•
•
When the desired recording time is reached release the button.
Press the button again to set the pause time, each blinking increases the pause
time by 1 minute.
When the button is released the settings will be stored and the camera switches
into the recording mode.
If you want a continuous recording without interrupts use the same procedure as before.
Release the button right after the first blinking of the status light. It doesn’t matter if you
do this at setting of recording time or pause time. In both cases the result is that the
interval mode is switched off. A fast blinking of the status light is acknowledging this.
7. Adjust time stamp
The video picture is overlaid with the recording time. This time can be adjusted.
Procedure:
1.
2.
3.
4.
5.
6.
Open a text editor (e.g. Start -> Run -> notepad.exe)
Enter the recent date and time, format: 2009-04-24 11:22:00
Save the file as userconfig.txt
Connect the camera to the computer
Copy the file into the root directory of the camera.
Remove the camera from the computer (after you stopped the device with device
manager)
7. Switch the camera on
8. The time from the file will be used as the camera time. The example sets the
date and time to 24. April 2009, 11:22:00 o’clock. The file userconfig.txt
disappears.
Since the camera has no internal clock circuit the time must be set prior to each new
recording session.
Video CatCam User Manual - Page 8 of 10
8. Collar Attachment
The collar is fed through both shackles then the collar with the camera is put on the
animal. The lens points away from the body.
Safety note: Please consider that a collar on a neck of a cat is a potential safety risk.
Because a cat wanders and crawls more or less in any place and can catch or trap itself
with the collar on an object such as gate rods or tree branches. This may lead to dead of
your pet. In the USA are collars common which provide a safety release if a certain
amount of force is applied. Everything mounted to the collar will be lost in such a case.
Please decide what is more important: The life of your pet or the device on the collar.
9. Video Storage and Download
The video recordings are stored in AVI format. The coding is done in H.263 sub format.
To replay the matching codec must be installed on the computer. We recommend using
the free VLC player which has this codec already integrated. VLC is working with
different operation systems.
To download the recordings open the camera as described before and connect the cable
to the USB interface. The computer should recognize the camera as an additional drive.
If this not the case try to switch the camera on before connecting it to the computer.
Now you can copy and erase files like on a regular hard disk.
Note: Prior to disconnecting the camera from the computer make sure you stopped it
with the device manager. Otherwise the file system of the camera may be screwed up.
Video CatCam User Manual - Page 9 of 10
10. Support and Help
You can get in contact with the technical support by sending a mail to
[email protected]
If your CatCam got damaged or you want to update to newer software contact also the
technical support.
Video CatCam User Manual - Page 10 of 10