1
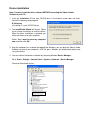
USB 2.0 Video & Audio Grabber
English
User Manual
LINDY No. 42886
www.lindy.com
© LINDY ELECTRONICS LIMITED & LINDY-ELEKTRONIK GMBH - FIRST EDITION (February 2008)
Introduction
Thank you for purchasing the LINDY USB 2.0 Video & Audio Grabber. The USB 2.0 Video &
Audio Grabber allows you to connect your camcorder or VCR to your computer to transfer audio
and full motion video for storage, backup, copying and editing. With the supplied Ulead
VideoStudio 10 application you’ll be able to create professional looking results which you can
copy to CD or DVD, or e-mail to family and friends.
Features
•
•
•
•
•
•
•
•
•
•
High speed USB 2.0 support for superior performance
Easy Plug & Play installation
Snapshot image capture function
Powered by the USB bus – no external power supply required
Motion capture: up to 25fps @ 720 x 576 (PAL), 30fps@ 720 x 480 (NTSC)
Supports MPEG 1, MPEG 2 and MPEG 4 encoding formats
Left & Right RCA audio input
Composite video & S-Video inputs
NTSC & PAL support
Overall length: 260mm (approx.)
Minimum System Requirements
•
•
•
•
•
USB 2.0 equipped computer
Pentium III CPU (or equivalent), 800 MHz or above
256MB RAM
Windows Vista, Windows XP (SP1) or Windows 2000 (SP3)
CD or DVD drive
Package Contents
•
•
•
LINDY USB 2.0 Video & Audio Grabber
Driver and Ulead software application CD
This manual
Product Information
USB 2.0 connector: Connects directly to a USB 2.0 port on your computer. This product is not
designed for use with the USB 1.1 interface nor should you connect it to a non-powered USB
2.0 hub
Audio inputs: Connects to the left & right audio outputs from your external device (e.g. VCR)
Composite video input: Connects to the Composite video output from your device
S-Video input: Connects to the S-Video output from your external device
Device Installation
Note: You must install the driver software BEFORE connecting the Video & Audio
Grabber to your PC!
1. Insert the Installation CD into your CD/DVD drive. If the Autorun screen does not show,
launch the following setup program:
E:\Setup.exe
(Assuming ‘E’ is your CD/DVD drive)
2. The InstallShield Wizard will launch. Follow
the on-screen instructions to install the driver.
When the driver installation is complete you
will be asked to restart your computer.
Select: Yes, I want to restart my computer
now, and then click OK.
3. After the computer has restarted and booted into Windows, you can plug the Video & Audio
Grabber into one of your computer’s USB 2.0 ports. Windows will automatically detect and
set up the device.
4. You can confirm the correct installation by launching Windows Device Manager:
Go to: Start > Settings > Control Panel > System > Hardware > Device Manager
Check for the outlined entries –
Installation Troubleshooting
The Video Grabber is not detected by my PC!
•
Ensure any USB 2.0 settings are enabled in your PC’s BIOS
•
Make sure your system has the latest USB 2.0 host drivers installed
•
For Windows XP, please upgrade to SP1 or above; for Windows 2000, upgrade to SP3
or above
There is no display in the preview window!
•
Check that the device connected to the USB grabber is correctly switched on; ensure
that the cable connections are correctly seated
•
Depending on the connected device, check that the Video Input option is correctly set to
either Composite or S-Video
•
Make sure your system has the latest USB 2.0 host drivers installed
•
For Windows XP, please upgrade to SP1 or above; for Windows 2000, upgrade to SP3
or above
Why is the display resolution always 320 x 240 in preview mode?
•
Check that the video grabber is not plugged into a USB 1.1 port
•
Make sure your system has the latest USB 2.0 host drivers installed
The system shows: ‘High speed device plugged into Full speed USB port’!
•
Check that the video grabber is not plugged into a USB 1.1 port
•
Make sure your system has the latest USB 2.0 host drivers installed
Why do I get unstable video during preview and recording?
•
If you are using an Ultra DMA hard disk, please update the IDE ATA/ATAPI controller
driver to the latest version
How can I get a minimum number of dropped frames during video capture?
The best recording performance depends on the specification of your PC, but you can also try
some of the steps below to improve performance...
•
Try lowering the resolution format you record
•
Enable hard disk drive DMA; go to: My Computer > Control Panel > System >
Hardware > Device Manager > Disk Drives to setup
•
Keep a larger amount of free space on the hard disk
•
Use a hard drive with a rotation speed higher than 7200rpm
•
Disable power management settings in the PC’s BIOS
•
Avoid running other applications at the same time as using the video grabber
•
Defrag your hard disk
I can preview video but when recording, the system hangs or crashes!
•
Please install DirectX 9.0 or above
•
Your display driver may be incompatible with direct draw; please update the VGA driver
•
Try shutting down any unnecessary programs
•
Lower the hardware acceleration, go to: My Computer > Control Panel > Display >
Settings > Advanced > Performance to adjust
Ulead Software Quick Guide
For a full instruction manual on how to use this software, please refer to the Installation
and Application CD included with this product.
Ulead® VideoStudio® 10 SE is a video editing and DVD authoring software that lets anyone do
more with video. Use wizards to create exciting slideshows and videos automatically or choose
from a complete array of easy-to-use tools to take your videos further. Share your movies
everywhere, from iPods to the latest high-definition home theatre systems.
System Requirements
Microsoft® Windows® 2000, Vista, XP Home Edition, Professional, Media Centre Edition
and Professional x64 Edition
•
Intel® Pentium® 4 or higher
•
256MB of RAM (512MB or above for editing)
•
1 GB or more of available hard drive space for program installation
•
Windows-compatible display with at least 1024x768 resolution
•
VGA display card setting: 24-Bit true color or above is recommended
•
Windows compatible sound card
•
CD-ROM, CD-R/RW or DVD-R/RW
Real-time features perform best with at least:
•
Pentium 4, 2.0 GHz CPU
•
512MB of RAM
•
7200 rpm IDE hard drive
•
In the DV-to-DVD Wizard, if you plan to capture and burn an hour of DV tape, it is
recommended that you have at least 20GB of available hard drive space
Installing Ulead VideoStudio and drivers
To install Ulead VideoStudio and the necessary drivers, insert the CD in your CD-ROM drive
and simply follow the on-screen installation instructions.
What are these drivers?
•
QuickTime 7.03: The video format from Apple for creating and playing back movie files
such as MOV and QT file formats. You should install QuickTime 7.03 or above to be able
to use the Auto Music function (i.e., SmartSound QuickTracks®) in Ulead VideoStudio.
•
SmartSound Quicktracks: This is a plug-in from SmartSound® that is integrated into
Ulead VideoStudio. It gives you a library of quality soundtracks that you can add as
background music to your movie projects.
•
RealPlayer 10.5: This is a software player from RealNetworks for playing Real Video and
Real Audio files from the Internet. It is recommended that you install this driver unless
you have a later version.
•
Intel Indeo 5.2: This is the codec for creating or playing .AVI files in QuickTime. You
should install Intel Indeo 5.2 or above to be able to use the style templates in the Ulead
VideoStudio Movie Wizard.
•
Acrobat Reader 7.07: This is Adobe's Acrobat Reader and is used for viewing the Ulead
VideoStudio's electronic manual. It is recommended that you install it unless you have a
later version.
•
Microsoft DirectX: A driver from Microsoft that improves playback performance of video
files. You should install this driver. It will be installed automatically when you are installing
Ulead VideoStudio.
Microsoft Windows Media Format: A set of drivers from Microsoft that allows you to
create WMV and other streaming media files. They will be installed automatically when
you are installing Ulead VideoStudio.
•
Macromedia Flash Player 7: This is a software player that allows you to play back flash
animation files (SWF). VideoStudio comes with plenty of flash animation files that you
can use for your video.
Note: If you have a previous version of Ulead VideoStudio installed in your system, it is
recommended that you uninstall it only after installing Ulead VideoStudio SE. During
installation, the Setup Wizard will auto-detect your capture device plug-in and specially
supported codecs (such as MPEG-4, 3GP, DivX) from the previous VideoStudio version and
integrate it onto VideoStudio SE.
However, if you installed Ulead VideoStudio 10 then you uninstalled the older version, program
files and fonts that are used by both versions will also be deleted. To install them back to
VideoStudio 10, double-click Add or Remove Programs in the Control Panel, select Ulead
VideoStudio SE, click Change/Remove, then click Repair.
•
Registering your copy of Ulead VideoStudio
Do not forget to register your copy of Ulead VideoStudio. You can do this in the registration
window when you launch the program or by simply filling out the registration card and mailing it
in. It is important to register your copy as it allows you to receive technical support and
important product update information. You will also be getting the opportunity to win prizes as
well as taking advantage of special promotions and discounts on other Ulead Systems'
software.
Program-related information
•
•
•
•
•
•
•
Capture board requirements:
When acquiring video from an analogue source, make sure that the analogue capture
card you are using supports RGB or YUV capture.
Startup Screen:
When rendering title text against a pure background colour clip, the text may appear
blurry. This is due to certain types of compression. For better results, try using the
Video1, RLE, or no compression options.
DV-to-DVD Wizard:
a. If you plan to capture and burn an hour of DV tape, select all the scenes before you go
to the next step and make sure that you have 20GB of available hard drive space. The
whole process will take approximately 5 hours to complete.
b. When scanning the DV tape using maximum speed, the detected scenes will vary
every time you scan the tape. The scenes that are detected will depend on the type of
DV camcorder used.
Capture Step:
To check MPEG capture settings, click the Options button in the Options Panel and
select Video and Audio Capture Property Settings. In the dialog box that opens, click the
Capture tab. To view more MPEG settings, click Advanced.
Effect Step:
Before applying the Album Flip transition effect to your clips, make sure that your system
is updated with the latest display card driver.
Title Step:
1GB RAM is required if you want to insert more than 500 subtitles.
Audio Step:
Some VST audio plug-ins when applied to audio clips will make the clip silent. This
•
happens in multithreaded applications such as VideoStudio. Please contact the VST
plug-in vendor to inquire about this problem.
Share Step:
a. To create an MPEG video file or DVD/VCD/SVCD-ready MPEG file:
•
Click the Create Video File button and select one of the movie templates from
the pop-up menu, or select Same as Project Settings or Same as First Video
Clip to output an MPEG file according to the project settings or the properties
of the first clip in the Video Track.
Or,
•
Click the Create Video File button and select Custom. Select MPEG files from
the Save as type box, then click the Options button to specify the properties for
the video file.
b. The Movie Screen Saver option in Export only supports the WMV file format.
Software Troubleshooting
•
•
•
•
•
•
•
•
•
If you experience difficulty getting started with Ulead VideoStudio, use the online help or
check the manual for information.
When rendering a title text against a pure background colour clip, the text may appear
blurry. This is due to certain types of compression. For better results, try using the
Video1, RLE, or no compression options.
The Video Greeting Card does not support QuickTime files.
If you want to share and play your video on other machines, make sure you use a
common codec, such as Cinepak, Indeo or MPEG. If you use a hardware codec, such as
MJPEG, you may be unable to view the video unless the other machine has the same
card on board.
You may experience some problems when playing QuickTime files. Such as, the
playback may not be smooth or the Stop button in the Navigator bar cannot switch back
to the Start button after playing. In such cases, please change to safe mode in the
QuickTime Video Settings. (You can do this by clicking the Control Panel: QuickTime
icon.)
Some camcorders (specifically some Panasonic models) have a small problem that
prevents them from recording movies from your computer. If this is a problem,
VideoStudio can be made to pause for a short time before transmitting the video to the
camcorder. Find the msdevctl.ini file in the main program folder (in All Users.WINNT),
open this file in Notepad and modify the following line where 1 second = 1000: [MainSec]
RecordDelay=1000.
Frame sizes supported by the Hitachi DVD Camcorder include:
352 x 480 (NTSC)
704 x 480 (NTSC)
352 x 576 (PAL)
704 x 576 (PAL)
To avoid the problem of having not enough hard drive space when you capture or burn a
disc, make sure that the folders that are assigned as the working folders for capturing
and burning have plenty of free space. You can check this in the Preferences in the
Video Editor and in the Advanced Settings dialog box in the DV-to-DVD Wizard.
In DV-to-DVD Wizard, If you have more than one burner installed in your computer or the
default drive is not a burner, specify the burner you want to use in the Advanced Settings
dialog box.
CE Certification
This equipment complies with the requirements relating to electromagnetic compatibility, EN55022/EN55024 class B for
IEC/EN61000-4-2/3 the essential protection requirement of Council Directive 89/336/EEC on the approximation of the laws of
the Member States relating to electromagnetic compatibility.
WEEE (Waste of Electrical and Electronic Equipment),
Recycling of Electronic Products
United Kingdom
In 2006 the European Union introduced regulations (WEEE) for the collection and recycling of all waste electrical and electronic
equipment. It is no longer allowable to simply throw away electrical and electronic equipment. Instead, these products must
enter the recycling process.
Each individual EU member state has implemented the WEEE regulations into national law in slightly different ways. Please
follow your national law when you want to dispose of any electrical or electronic products. More details can be obtained from
your national WEEE recycling agency.
Germany
Die Europäische Union hat mit der WEEE Direktive umfassende Regelungen für die Verschrottung und das Recycling von
Elektro- und Elektronikprodukten geschaffen. Diese wurden von der Bundesregierung im Elektro- und Elektronikgerätegesetz –
ElektroG in deutsches Recht umgesetzt. Dieses Gesetz verbietet vom 24.März 2006 an das Entsorgen von entsprechenden,
auch alten, Elektro- und Elektronikgeräten über die Hausmülltonne! Diese Geräte müssen den lokalen Sammelsystemen bzw.
örtlichen Sammelstellen zugeführt werden! Dort werden sie kostenlos entgegen genommen. Die Kosten für den weiteren
Recyclingprozess übernimmt die Gesamtheit der Gerätehersteller.
France
En 2006, l'union Européenne a introduit la nouvelle réglementation (DEEE) pour le recyclage de tout équipement électrique et
électronique.
Chaque Etat membre de l’ Union Européenne a mis en application la nouvelle réglementation DEEE de manières légèrement
différentes. Veuillez suivre le décret d’application correspondant à l’élimination des déchets électriques ou électroniques de
votre pays.
Italy
Nel 2006 l’unione europea ha introdotto regolamentazioni (WEEE) per la raccolta e il riciclo di apparecchi elettrici ed elettronici.
Non è più consentito semplicemente gettare queste apparecchiature, devono essere riciclate. Ogni stato membro dell’ EU ha
tramutato le direttive WEEE in leggi statali in varie misure. Fare riferimento alle leggi del proprio Stato quando si dispone di un
apparecchio elettrico o elettronico.
Per ulteriori dettagli fare riferimento alla direttiva WEEE sul riciclaggio del proprio Stato.
LINDY No 42886
1st Edition, February 2008
www.lindy.com