1
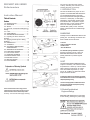
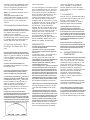
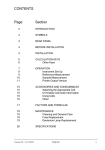
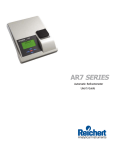
Reichert AR6 SERIES
Automatic Refractometer
REICHERT AR6 SERIES
Refractometers
the prism and well after each sample,
routinely calibrating the instrument, and
replacing the lamp as necessary.
1.0 INTRODUCTION
Instruction Manual
TableofContents
Section
Page
1.0 INTRODUCTION ..................................3
2.0 UNPACKING ..........................................3
3.0 SETUP ....................................................3
3.1 Electrical Considerations/Equipment
Ratings ...........................................................3
3.2 Fuses .....................................................4
4.0 COMPONENTS ....................................4
5.0 OPERATING INSTRUCTIONS ..........4
5.1 Preparing the Prism Surface for
Samples .........................................................8
5.2 Applying the Sample and Taking
Readings ........................................................8
6.0 DIAGNOSTICS ......................................8
7.0 CHANNELS ...........................................8
8.0 AUTOMATIC TEMPERATURE
COMPENSATION ..................................8
9.0 WATER BATH ATTACHMENT ..............9
10.0 CARE AND CLEANING .......................9
10.1 Care of Prism Surface ........................9
11.0 LAMP REPLACEMENT .......................9
12.0 RS232C SERIAL PORT ......................9
13.0 PRINTER OUTPUT ..............................9
14.0 SPECIFICATIONS ..............................10
15.0 ACCESSORIES ..................................10
This manual describes the proper use and
operation of the REICHERT AR6 Refractometer. The REICHERT AR6 is an automatic,
bench-top refractometer with digital readout It
measures % solids (Brix), % solids (Brix) –
temperature compensated, refractive index
and refractive index –temperature compensated (Sucrose). It can be used for applications in the medical, pharmaceutical,
industrial fluids, quality control, chemicals,
plastics, petrochemicals and food/beverage
industries.
2.0UNPACKING
Carefully remove the REICHERT AR6 from the
packing box. The following accessories have
been included with the instrument
•Powercord
•Dustcover-catalogNo.1310500-43
•Instructionmanual
•13K41330calibrationoil
Donotdiscardthepackingmaterials.Ifforanyreasonit
becomes necessary to store or ship your
REICHERT AR6 Refractometer use the
packing materials for protection against
damage.
3.0SET
The REICHERT MODEL AR6Refractometer
requires no assembly. The instrument should
be positioned on a bench top. Care should be
taken to place the instrument in an environment with a stable temperature (i.e.: away
from an air conditioner or water bath exhaust
draft) and minimal vibration.
Asasafetyprecautionthepowercordhasbeengroundedto
thechassisoftheinstrument.Neveruseanadapterthatmay
interrupttheprotectivegrounding.
Theinstrumentisequippedwithaventilationentranceinthe
baseandanexhaustfanattherear,keeptheseopenings
freeofdebrisorobstruction.
Pleasenotethatarefractometerisahigh-precision
opticalinstrument.Itisabsolutelynecessarytoproperly
maintaintherefractometertoobtainthebestpossible
accuracy. This includes thoroughly cleaning
3.1ElectricalConsiderations/
EquipmentRatings
REICHERT AR6 Refractometer incorporates
an auto-sensing, switching AC power supply.
IMPORTANTBeforeattemptingtosetupandoperatethe
3
REICHERT AR6 allow the instrument to reach
a room temperature of at /east 15°C (59°F).
Attach power cord to the electric receptacle on
the rear panel of the REICHERT AR6 (see
Figure 1). Turn the instrument on by activating
the On/Off switch located on the rear panel.
NOTE:Theinstrumentshouldbeallowedtowarmupfor15
minutesbeforeoperating.
RangeofEnvironmentalConditions:
• Indooruseonly
• Temperatures10°C-45°C
• Maxrelativehumidity-80%fortemperaturesupto
31°Cdecreasinglinearlyto50%
(relativehumidityat40°C)
• InstallationcategoryII(overvoltagecategory)
• Pollutiondegree2
• Altitudeupto2,000meters
3.2Fuses
For additional safety, all REICHERT AR6
Refracto-meters use two line fuses, both
accessible from the rear panel. Replace
with 0.5 amp. Time lag (T or Blue).
4.0COMPONENTS
5. Sample Well - The sample well is made
of stainless steel. In the center of the
sample well is a sapphire prism surface
upon which samples are placed for
measurement. It is important that the
sample covers the prism surface for an
accurate reading.
ControlKeys/Functions
1. INITIATE Key - Press this key to initiate
the REICHERT AR6 prior to calibrating with
water. Remember that the instrument
should have reached room temperature
before it is initiated.
2. SETUP Key - Press this key to access the Set Up
screen for options (Screen 2).
3. MODE Key
•Refractiveindex(nD)
•TemperaturecompensatednDassucrose
(Brix)inChannel1
•%Solidsassucrose(Brix)-Channel1
•Temperaturecompensated%Solidsassucrose(Brix)
inChannel1
4. READKey-Presstoobtainreadingsofasample.
RefertoFigures2and3tolocatethecomponents
describedbelow.
5. CALIBRATE Key- Press to calibrate the
REICHERT AR6.
1. InstrumentDisplay-Theinstrumentdisplayis
positioned on the top panel of the
REICHERT AR6. It digitally displays
measurement values, error messages and
operator instructions.
5.0OPERATINGINSTRUCTIONS
2. Controls -The controls positioned to the right of the
instrument display are used to operate the
REICHERT AR6. All five controls are softtouch, membrane keys. They are labeled:
INITIATE; MODE; CALIBRATE; READ and
SETUP. These controls will be used to take
measurements of test samples. The
READ, MODE, INITIATE and CALIBRATE
keys can also serve a dual function. In the
SET UP screen (see section 5.0 OPERATING INSTRUCTIONS) these keys are used
to move a cursor. The direction of movement is indicated by the arrow near the key.
3.WaterBathAttachmentPorts-Two
inlet/outlet ports located on the left side of the
REICHERT AR6 permit attachment of an
optional water bath.
4.SampleWellCover-Thecircular,hingedsamplewell
coverislocatedinthemiddleoftherefractometer’s
horizontaltoppanel.Itisimportantthatthesamplewell
coverbeclosedwhenameasurementisbeingtakento
eliminateorminimizestraylightandevaporationeffects.
Keepingthecoverclosedwhentheinstrumentisnotin
usewillpreventdamageandcontaminationtothesample
wellandtheprismsurface.
4
1.StartUp
Plugintheinstrument.Makesurethesamplewellis
cleananddryandthecoverisinthedownposition.Turn
theinstrument“on”.Theswitchislocatedontherear
panel(seeFig.1).
Iftheinstrumentdoesnotpowerup,checkforlooseor
blownfuses.Fusesarelocatedontherearpanel.
The REICHERT AR6 will prompt you
through preliminary initialization and
calibration steps. Additionally, a Set Up
screen is available to access and change
operating parameters.
2.SetUp
WhentheinstrumentisfirstturnedontheReichertLogo
andModelnumberwillappear(Screen1).Alsoshownis
thesoftwareversion(e.g.:12.6).Thisscreeninstructs
theuserto“AllowtoWarmUpandPressInitiate”.Under
normalcircumstanceswiththeinstrumentatroom
temperaturea15minutewarmupissufficientbefore
pressingthe“Initiate”button.Pressing“Initiate”continues
theinstrumentoperationsequence.Pressingthe
“SETUP”buttonaccessestheSetUpscreen.Oncethe
instrument’sparametersaresetcorrectlytheSetUp
screencanbebypassed.Thisscreencanalsobe
bypassedifyouchoosetousethedefaultparameters.
Press“SETUP”toaccesstheSetUpscreen(Screen2).
This is the AR6 Set Up screen. Use the
right/left arrow keys to select the set up
parameter you wish to change. Use the up/
down arrows to make the changes. The
following is a brief description of the
parameters and available options:
Baud Rate
Default 19,200 bps
SetsthebaudrateoftheRS232Cserialport.Options
are1200,2400,4800,9600and19200bps.
Calibrate Routine
DefaultSetting:1point
Selects 1 point 2, 3, 4 or 5 point calibration. The default
calibration is a 1 point water, or low refractive index
standardcalibration.Upto5pointsmaybeselected.
ContactReichertforadditionalcertifiedcalibrationliquids.
Temp Disp
DefaultSetting:ON
ON-Instrumentscreencontinuallyshowsactualprism
temperature.OFF-Temperatureisnotdisplayed
continually,butshownonlywhenREADorCALIBRATE
ispressed.
Channel
DefaultSetting:Channel1(Sucrose)
Options1-15.Channel1isthedefault“Brix”or
InternationalCommissionforUniformMethodsofSugar
Analysissucrosescale.Channels2-15areuser
programmablechannels.Fordirectionsandan
explanationofthenecessityofcustomchannel
generation,pleaserequesttheTechnicalBulletin:
“CustomChannelGenerationfortheAutomatic
RefractometerLine”.Besuretonotifytherepresentative
thatyourinstrumentutilizessoftwareversion12.6.
InChannel1therefractiveindexreadingisconvertedto
%Solidsassucrose(Brix)whenreadingsaretakenin
the%Solidsor%Solids-TC(temperaturecompensatedto20°C)modes.Intherefractiveindex–TCMode
thereadingistemperaturecompensatedtoa20°C
readingbasedonthetemperaturecoefficientofsucrose.
Scans
DefaultSetting:128
Setsthenumberoftimesthelineararrayisscannedto
takeareading.Optionsare8,16,32,64,128,256.This
numberrepresentsthenumberoftimestherefractometer
actuallyanalyzesthesampleeverytimea“read”is
performed.Thehigherthenumberofscans,themore
precisetheresultwillbe.Ahighernumberofscanswill
requirelongertoaccomplish.Typically256scanswilltake
approximately14seconds,whereas8scanswilltake4
seconds.Anytimethenumberofscansischanged,the
instrumentmustbere-initiatedandre-calibrated.
READ or CALIBRATE buttons when this
option is used.
Interval Timer
Default Setting: Off
Thisoptionallowstheinstrumenttotakereadingsat
definableintervals.TheintervalissetinHH:MM:SS
formatOnceactivatedanddefined,theinstrumentwill
continuallytakereadingsuntilalock-outerroroccurs
such as a lack of sample, or until SETUP is pressed and
theoptionisdisabled.Theintervaltimerwillbeginits
countdowntothenextreadingoncethecurrentreadingis
finishedandtheresultisdisplayed.Thisfeatureis
mutually exclusive of the Delay Timer and
Auto
Equilibrationfeature.
AutoEquilibration
DefaultSetting:Off
Autoequilibrationisafeaturewhichwillautomatically
detectwhenthesampleandprismhavereacheda
thermal equilibrium state. Thermal
equilibrium is essential for accurate
measurement of refractive index (and thus
% solids). This feature may be set from 1 to 10. This
translatesintostabilityoftemperaturein0.01degree
increments.Ahighernumberrepresentsalooser
tolerance,alowernumberrepresentsatightertolerance.
Whenthisfeatureisactivatedanda“READ”isinitiated,
theinstrumentwillbeginmonitoringthetemperature.A
graphwillbedisplayedofthedynamicwelltemperature.
Oncethetemperaturestabilizes,theinstrumentwill
automaticallytakethereading.
SampleIndexing
DefaultSetting:Off
Samplereadingscanbeeasilylabeledandnumbered.To
activate, select the “on” setting and press “set up”. A
displaywillfeatureasectiontoenterthedesiredlabel
(alphabetic,numeric,and/orsymbols),asectiontodefine
readingincrements,andaninstructionsection.Oncethe
labellingschemeisset,followtheinstructionstoseea
preview of the first ten readings. In this screen you will be
offeredoptionstoseethenext10labels,re-definethe
labeling,orexitandbeginreadings.
CalibrationTolerance
DefaultSetting:1
Themostcommoncauseofcalibrationdifficultiesisthe
conditionoftheprism.Arefractometerisahigh-precision
opticalinstrumentThoroughlycleantheprismwithsoap
andwateroralcohol,followedbyarinsewithdistilled
water. Wipe dry with a soft tissue or cloth. If you are still
havingdifficulty,increasethevalueofthecalibration
tolerance.Thiswill“loosenup”theinstrument’stolerance
for the calibration standard. It is important to verify that
thevaluesofthecalibrationstandardsareequivalentto
thoseprogrammedintotheinstrumentBeawarethat
everysolutionhasauniquerefractiveindexand
DelayTimer
DefaultSetting:0seconds
Sets a delay timer from the time the “READ” or
“CALIBRATE”buttonsarepusheduntiltheactual
readingistaken.Thisparametercanbesetfrom15
secondsto4minutesin15secondintervals.A
countdowntimerisdisplayedonscreenafterpushingthe
5
temperature coefficient at a specific
reference temperature. Also, note that
increasing the magnitude of the calibration
tolerance can decrease the accuracy of the
instrument This option should be the last
choice for calibration difficulty. The calibration tolerance can be set from 1 (representing the most stringent standards, the factory
standards used for calibrating with distilled,
deionized water and NIST certified calibration solutions) to 50 (the loosest standard).
InvertDisplay
DefaultSetting:Off
Thedisplayscreenmaybedisplayedineitheradark
background with light lettering or a light
background with dark lettering. Instrument
performance is not affected by this feature.
Language
DefaultSetting:English
ScreenscanbedisplayedinEnglish,Spanish,French,or
German.Notethatthecustomchannelnamesandunit
definitionswillappearasenteredinthecustomchannel
program.
Time and Date
The Reichert AR6 can track the clock time in
either standard 12 hour am/pm time or
military time. The AR6 is Year 2000
complient. The date may be set in Month/
Day/Year format
DisplayTime
DefaultSetting:Off
Activating this function will display the exact time each
readingistaken.Thistimewillremainuntilanother
readingistaken.
RestoreDefaults
DefaultSetting:Off
This allows the user to restore all settings to the factory
defaultswhenSETUPispressedagain.Thisdoesnot
erasecustomchannelsorcalibrationhistory.
CalibrationHistory
DefaultSetting:Off
Switchingthissettingto“on”willdisplaytheprevious512
calibrations.Someparametersextendbeyondtheright
handportionofthedisplay.Toseethese,simplypress
theMODEbuttonuntiltheparameterdesiredisvisible.
Thecalibrationhistorymaybedownloadedtoacomputer
throughtheserialportbyuseofastandardcommunicationsprogramandenteringthecommand“calhis”.
Precision
DefaultSetting:On
ON-Instrumentreadsrefractiveindextothe5thdecimal
place(0.00001)and%Solidstothe2nddecimalplace
(0.01). OFF - Instrument reads refractive
index to the 4th decimal (0.0001) and %
Solids to the 1st decimal (0.1) place.
Password
DefaultSetting:Off
Passwordprotectioncanbeusedtosecureoptionsonce
theyaresetTurningpasswordONandpressingSETUP
displaysthe“EnterNewPassword’screen(seeScreen
3).Usethearrowkeystoentera3digitnumericalpassword.Entering000cancelsthesettingandturnsthe
passwordprotectionoff.PressSETUPtoexitthe“Enter
NewPassword’screen.Asecondscreenconfirmingyour
choiceofpasswordwillappear.PressSETUPtocancel
orREADtoacceptthenewpassword.Onceapassword
isenteredtheinstrumentwillprompttheuserforthe
password each time the Set Up screen is
accessed.
Sound
DefaultSetting:Off
ON-Chimesoundswhenkeyispressedorareadingor
calibrationisdisplayed.OFF-Soundisturnedoff.
Oncealloperationalparametershavebeensetusingthe
Set Up screen press SETUP to return to the start
screen (Screen 1).
3. Calibration and Sample Reading
NOTE:Theseinstructionsassumethesamplewellis
cleananddrypriortostarting.Thesamplewellshould
alsobecompletelycleanedbetweensamples.Cleanwith
distilledwater,soapywater,methanolorisopropylalcohol.
Dry with a soft cloth.
Theseinstructionsassumetheonepointcalibration
(default)waschoseninsetup.
See“MultipointCalibration”forinstructionsforthe
multipointcalibration.
FromthestartscreenpressINITIATE.Theinstrument
screenwillblankandthewords“InitiatingPleaseWait’
willappear.Duringtheinitiatingsequencethelamp
brightnessissettoanoptimumlevel.Whenthe
instrumenthasfinishedinitiatingthe“Initialization
Complete”screen(screen4)willappear.
Followtheonscreeninstructionstoadddistilledwaterto
thesamplewell,allowthetemperaturetoequilibrateand
pressCALIBRATE.
Theinstrumentwilldisplayarefractiveindexreading
between1.33400(prismtemperatureof10°C)and
1.33059(prismtemperatureof40°C).Atypicalreading
wouldbe1.33299atareferencetemperatureof20°C
(seescreen5).PresstheSETUPkeytoexitthisscreen.
At this time the MODE key can be used to display the
readinginanyofthe4instrumentmodes:
IndexThenon-temperaturecompensatedrefractiveindex
reading.
Index-TC:Thetemperaturecompensatedrefractiveindex
reading.Fordistilledwaterthisvalueshouldbe1.33299
±0.00002.
6
% Solids: The non-temperature compensated
% Solids scale (% Sucrose or Brix).
% Solids-TC: The temperature compensated
%Solidsscale.Thisreadingshouldbe0.0(t.02)for
distilledwater.
Select the mode in which you want to read
samples. The AR6 is now ready to read
samples.
Cleantheprismsurfaceandsamplewellwithdistilled
water,dilutedsoapywateroralcoholbeforeapplyinga
sample.Wipecleanwithasoftcloth,rinsewithdistilled
waterandwipedrybetweensamples.
CAUTION:Theprismsurfaceandsamplewellmustbe
thoroughly cleaned after each sample is
removed. Any residue can affect the
accuracy of the readings. Avoid using
scented tissue, tissue with lotion, cotton or
any other material which may leave a
residue on the prism surface when cleaning
it.
Placethesampleontheprismusingapipetteor
applicator.Makesuretheentireprismsurfaceiscovered.
Closethecover,allowthesampletocometotemperature equilibrium and press READ. The AR6
will display the reading in the chosen mode
(see Screen 6).
TemperatureEffectsonMeasurements
Measurementstakenusingrefractometryarevery
sensitivetosubtlechangesintemperature.Takethisinto
consideration when using the AR6 refractometer. Samples with a significantly different
temperature from the prism will take a
longer time to equilibrate.
NOTE. If a water bath circulator is attached
to the AR6 there may be a difference
between the temperatures displayed on the
refractometer and that measured in the
circulator due to heat loss through the
tubing and heat gain from the instrument
The temperature indicated on the AR6
should be used if temperature corrections
are required.
4.MultipointCalibration
The AR6 may be calibrated with up to 4
standards plus water. If necessary, the
water point may be changed to a low
refractive index standard. Once changed,
the low refractive index standard will
become the default value for the first point
of all calibrations. In routine use, a single
point (water) or a 2 point calibration (water
and a refractive index standard at the high
end of the scale) will provide the required
accuracy. A refractive index standard oil (part
#13K41330, nD = 1.51416 25°C, temperature coefficient = -0.000412) is included
with the instrument. The 3, 4, and 5 point
calibrations allow the user to precisely
calibrate the instrument to standards near
the refractive index range where measurements are being made. To obtain certified
standards, contact Reichert Microsystems
Inc.
PresstheSETUPkey(screen7).Usetherightarrowto
position the cursor at the calibrate routine
position. Use the up arrow to change the
calibrate routine to 2, 3, 4 or 5 point. You
may also want to set the timer for 15 or 30
seconds to ensure your calibration
standards reach thermal equilibrium with
the prism. Press SETUP again. Screen 8
will appear.
CleantheprismandpressINITIATE.Whenthe
initializationiscompletethewaterpointscreen(9)will
appear.Atthispoint,youcanchoosebetweendoinga%
solidsoranindexcalibration(pressingMODEwilltoggle
this).Placeyourdistilledwatersampleontheprism,
allowittoreachthermalequilibrium(unlessyousetthe
timer)andpressCALIBRATE.Ifyouareusingalow
refractiveindexstandardforthispoint,pressSETUP
and follow the on-screen instructions to
enter the refractive index, temperature
coefficient, and reference temperature of
your standard. The AR6 will take readings
until it achieves three consecutive identical
readings, or fails to do so in ten tries. A
failure will prompt you to clean the prism,
re-initialize the unit, and then reapply the
sample (the same holds true for all
calibration points). A successful calibration
will bring up screen 10. At this time,
pressing MODE will bring up screen 11.
This unit has the capability to calibrate with 1, 2, 3, 4 or 5
points.Naturally,themorepointsyouuse,themore
accurateyourreadingswillbe.Thecalibrationstandards
are NOT mutually exclusive; in other words,
the points used in a 3 point calibration will
all be contained in a 5 point calibration. The
following chart should clarify this:
Usetheup&downarrowkeystoadjusttheindex(or%
Solids)ofyourcalibrationstandard.Holdingthekeydown
willcausethenumberstochangefaster.Whenitis
correct,pressMODEanddothesameforthe
temperaturecoefficientandthenthedatumtemperature
ofthestandard(screens12and13).Youcancontinueto
pressMODEtoreturntoindexadjustment,etc.When
youhavethenumberscorrect,applythesample,allowto
7
equilibrate, and press CALIBRATE (screen
14). A successful calibration will bring up
screen 15. Repeat the procedure for the
rest of your calibration standards.
NOTE: The calibration standards must be
sequential.
Inotherwords,theindexofwateris<std#1
<std#2<std#3<std#4. TheAR6 will not sort
the standards if you scramble their order,
and the accuracy of your readings will
diminish.
5.1PreparingthePrismSurfaceforSamples
Becausearefractometerisanopticalinstrument,itis
criticaltothoroughlycleanthesamplemeasurementarea.
Any residue could result in erroneous
readings or error messages.
Clean the prism surface and sample well
with diluted soapy water or alcohol followed
by a distilled water rinse before applying a
sample. Wipe clean with a soft cloth.
5.2 Applying the Sample, Taking
Readings, and Shadowline Display
Placethesampleontheprismsurfaceusingapipetor
applicator.Makesuretheentireprismsurfaceiscovered
(Figure 4). Optimum readings are obtained
if enough sample is placed in the well to
cover a millimeter or two of the walls of the
sample well.
ClosethecoverandpresstheREADkey.The
REICHERT AR6 will display the reading in
the selected mode.
Ifyouchangemodesbeforetakinganewreading,the
instrumentwillusedatafromthecurrentreadingto
produceanewdisplayinthenewlyselectedmode.
Forexample,ifyouwantareadinginnD,fol-lowedby%
Solidsusingonemeasurementofthesample,operate
the REICHERT AR6 in the nD mode. Then
press the MODE key until % Solids or %
Solids-TC registers on the display. A %
Solids reading will automatically be
displayed. If the READ key is pressed, the
AR6 will take an entirely new measurement.
Inaddition,theinstrumentnowhastheabilityto
graphicallydisplaytheshadowlineviatheLinearScanned
Arrayoutput.Thisallowstheuserto“seewhatthe
refractometersees”.Thisfeaturemaybeoperatedafter
anyreadingbypressingthe“CALIBRATE”and“MODE”
keyssimultaneously.Therefractometerwillthengenerate
anddisplayagraphoftheLinearScannedArrayOutput.
8
See example below.
Two lines will appear. The rainbow shaped
line is the Reference Scan. The line which
begins near the bottom of the screen and
moves upward to intersect the Reference
Scan is the Sample Reference Scan. Also
shown will be the “CCN”. This is the
Crossing Cell Number which is the exact
cell on the array which the edge of the
shadowline falls on. At this point, a box will
be displayed. This box may be repositioned
anywhere on the screen. Pressing “SET
UP” will zoom in on this boxed area.
Pressing “SET UP” again will return to the
full graph view. The X and Y values are also
displayed. These are simply the location of
the box on the screen. The line for the
reference scan may be toggled on and off
by pressing “READ” and “INITIATE”
simultaneously in the full graph display. To
exit the shadowline display, press “CALIBRATE” and “MODE” simultaneously.
6.0DIAGNOSTICS
Thefollowingscreensdescribepotentialerrorsthatcan
occurwhenoperatingtheAR60O:
“HighSample”screen-Thesamplehasarefractive
indexexceedingthe1.52000operatingrangelimit(see
Screen 16).
“Low Sample” screen - The sample has a
refractive index below the 1.32000
operating range limit (see Screen 18).
“WaterCalibration”screen-Thisscreenwillbedisplayed
whentheREADkeyispressedbeforeawater
calibration.Cleantheprism,calibratewithwaterand
rereadthesample(seeScreen19).
“LampisnotAligned”screen-Thisscreenmayappearif
asamplehasbeenleftontheprism.Thoroughlyclean
anddrytheprismsurface.Ifthemessagepersists,the
lampmayneedre-alignment.Notethedirectiontomove
thelampandre-centerthelamp.Alignmentisdonewith
theinstrumentrunning.Useametalscrewdrivertomove
thelampduetoit’shightemperature.Exercisecareto
avoidbreakingthelamp.Weareyeprotectionincasethe
lampshatters.Followtheonscreeninstructiontoinitiate
and recalibrate the AR6 (see Screen 20).
“ReplaceLamp”screen-ThelampisburnedoutReplace
the lamp following instructions in section
11.0 LAMP REPLACEMENT (see screen
21).
“CouldNotTakeProperReading”screen-Thisscreen
willbedisplayedifthelampintensityhaschangedsince
theinitializationprocedure.Thiscanbecausedbynormal
agingofthelamporlargelinevoltagefluctuations.Check
tobesurethelampisilluminated,turntheAR60Ooff
andbackon,followtheonscreeninstructiontoinitiate
andcalibrateinstrument(seeScreen22).Ifthecondition
persists change the lamp. If it continues
with a new lamp a line voltage conditioner
may be required. Alternately, the AR60O
could be plugged into a separate line
source, preferably a source without
electrical appliances which have large
current draws (e.g.: motors, compressors,
heaters, etc.).
7.0 CHANNELS
Channel one (1) on the REICHERT AR6 is
pre-programmed at the factory with the %
Sucrose or «Brix» scale per the
International Commission for Uniform
Methods of Sugar Analysis (ICUMSA).
Upto14additionalcustomchannelsmaybe
programmedusingyourownrefractiveindex/
temperature/%Solidsdata.Accesstothechannelsis
fromtheSETUPscreen.Customchannelsmayalso
includedefinitionsforunitsofmeasuresuchasspecific
gravity,%protein,g/ml,etc.Theunitofmeasurelabels
arecompletelydefinableandupto20characterscanbe
used.Resultsmaybedisplayedinasmanydecimal
placesasdesired.
Tolearnmoreaboutcustomchannelprogamming,
request«CustomChannelGenerationfortheAutomatic
RefractometerLine»fromaReichertrepresentative.Be
suretoinformtherepresentativethatyouareusing
softwareversion12.6.
8.0 AUTOMATICTEMPERATURE
COMPENSATION
AutomaticTemperatureCompensationcorrectsreadings
taken over a range of temperatures (e.g.:
10°C – 40°C in channel 1) to a reference
temperature reading (usually 20°C). This
can be used in lieu of controlling the
temperature of the prism and sample with
an external water bath. Temperature
correction or control is necessary because
refractive index varies inversely with
temperature. A typical temperature
coefficient for an aqueous solution is 0.00021°C. For an organic liquid it is
typically -0.0004/°C.
However,itisalwaysnecessarytoallowyoursample
temperature to equilibrate so that the AR6
can properly correct for temperature.
Theautomatictemperaturecompensationmodesin
channel1arebasedonthetemperaturecoefficients
(nD1°C)ofsucrosepertheICUMSAscales.Whentaking
readingsinthenD–TC(refractiveindex–Temperature
Compensated) mode these coefficients
may not be valid depending on the solution.
9.0 WATER BATH
ATTACHMENT
There may be testing applications that
require that the prism assembly
temperature be maintained above or below
ambient temperature. Commercial water
circulators with heating, cooling or
combined capabilities are generally
available from instrument supply dealers.
Check with your Reichert customer service
representative for a suggested list of
suppliers.
If a water bath attachment is used, care
should be taken to avoid exposing the
prism assembly to thermal shock. The
ambient prism temperature should be
raised and lowered by gradually increasing
or decreasing the temperature of the
circulating water. The REICHERT AR600’s
automatic temperature compensation
feature is designed to provide precise
measurements in the 104-454C
temperature range (Channel 1).
Connections between the instrument and
the circulator should be 1/4" (.635cm)
flexible tubing. Observe the operating
instructions of the water bath manufacturer.
10.0 CARE AND CLEANING
The REICHERT AR6 is a precision optical
instrument designed for years of troublefree operation. The interior components are
protected from dust, spills and other
damage. The stainless steel refractive
prism assembly is sealed with corrosionresistant epoxy.
Theuseofstrongsolventssuchas
N,N-DimethylformamideorN,N-Nimethylacetamide,
cresols,phenolsandothertaracidsshouldbeavoided.
Tetrahydrofuranorsomelacquerthinnersandtheir
componentscanalsodeterioratetheprismsealovera
long period of time, or when applied at
elevated temperatures.
Allnon-opticalcomponentscanbecleanedwithsoapand
waterormethanol.Avoidusingallotherharshsolventsor
acetone-basedproductswhencleaning.
10.1CareofPrismSurface
Theprismsurfaceshouldbecleanedimmediatelyafter
use.Thesampleshouldbewipedoffwithadrytissue,
followedbyathoroughcleaningwithsoapandwateror
methanolandthendistilledwater.
Thesapphireprismisveryhardandhasexcel-lent
scratchandstainingresistance.Strongacidsorbases,
however,shouldnotbemeasuredwiththisinstrument,
norusedascleaningagents.
Warm water is recommended for removing
sugar residues and methanol for oil based
samples, followed by a water cleaning.
Use only diluted neutral detergents to clean
the prism. Do not use any metal or sharp
pointed objects to clean or pry loose the
prism seal or residue on the sample well.
11.0 LAMP REPLACEMENT
WARNING: Unplug the instrument power
cord before attempting to replace the
illuminator lamp.
Remove the old lamp and replace it with
Catalog No. 13105040. The contacts of the
bulb must be cleaned with a soft emery
cloth before replace-ment Be sure that no
fingerprints are left on the surface of the
replacement bulb
12.0 RS232C
The REICHERT AR6 refractometer includes
a serial communications port accessible
from the rear panel. The port has a DB 9pin female connector. Output data is
comma delimited in standard ASCII code
and consists of the channel number (e.g.:
CH1), the channel identifier (e.g.: Brix for
channel 1), the mode (e.g.: % Solids-TC20
for a percent solids scale temperature
compensated to 20 degrees centigrade),
the actual reading (e.g.:10.62) and the
actual measured sample temperature (e.g.:
22.62C). This port will support custom
channel programming using standard
communication Software. Do not use a
“Null Modem” cable.
Communications settings are: 8 Data Bits,
No Parity, 1 Stop Bit Flow Control Xon/Xoff,
Baud Rate settings are described in
section 5.2.
The AR6 is capable of being controlled from
a computer through the serial port interface
by using any standard communications
program such as «Terminal» or
«Hyperterminal». Reading output through
the serial port may be formatted to retrieve
virtually any data, in any order desired. To
format the serial string output, type the
letters «help sf’. Brief instructions will
appear. To set the serial format, type the
letters «sf’ followed by the letters for the
output options desired. The default setting
is GFA. Numerous additional commands
are available through the serial port. Ask a
Reichert representative for a complete list
of commands.
13.0PRINTEROUTPUT
The REICHERT AR6 refractometer is
compatible with an external printer. The
parameters included in the parallel port
data output string correspond to the serial
port data output string. To select
parameters for output, set the serial port
output format as in Section 12.0. The output
is available at the DB-25P type connector
located on the rear panel of the REICHERT
AR6 (Figure 1).
Communication is by a 7-bit, parallel bus
inter-face with synchronous operation.
Contact your Reichert customer service
representative for more information about
connecting a printer to your REICHERT AR6
refractometer.
9
14.0 SPECIFICATIONS
Models
AR60
AR600
Illumination
10 Watt Tungsten Halogen with 589nm
bandpass filter
Display
5 1/4" X 3" (134mm x 76mm) graphical LCD
Range
Channel 1: Dissolved Solids: 0 to 90%
Solids (as sucrose per ICUMSA)
RefractiveIndex:1.32000to1.52000nD(nD-Sodium
D-LineRefractiveIndex)
Readability
AR60:
AR600:
Precision*
AR60:
AR600:
0.1% Solids 0.0001nD
0.01% Solids0.00001nD
±0.1 %Solids±0.0001nD
±0.01 %Solids±0.00001nD
Refractive Index Standard Oils ±0.00002
Typical clear samples, % Solids
Temperature Compensated, as sucrose
±0.02%
TemperatureCompensationRange
10°—45°CperICUMSAtables,Channel1.User
Definable,Channels2-15
TemperatureCompensationAccuracy±0.1°C
SampleTypes
Transparent,TranslucentorOpaque
Dimensions
111/4‘W x 16"L x 61/4"H (28.5cm x 40.6cm x
15.9cm)
NetWeight16lbs.(7.3kg)
SampleTemperatureControl
Heat(cool)exchangersurroundingprismpermits
temperaturecontrolbyanexternalwaterbathcirculator
from10°C-60°C.
PrismAssembly
StainlessSteel,syntheticSapphiresealedwithsolventresistantepoxy.
Data Output
25pinparallelport9pinRS232C
Baud Rate
1200 to 19,200 user settable
10
Calibration
1 point
Water or low index standard
2-5 point
Water or low index standard and
Refractive Index or Brix standard
Channels
Channel 1: ICUMSA Brix scale
Channels 2-15: User programmable
Sample Scans
8-256 user settable
Read Countdown Timer
0-4 min. adjustable in 15 second
intervals
Password
3 digit user settable numeric
password
* The precision and accuracy of
Refractive Index measurements is
dependent on operator skill, the
laboratory environment, temperature
control, the accuracy of calibration
standards, chemical stability of the
sample, viscosity of the sample and
concentration of the sample. A
product demonstration is suggested
to validate the true precision and
accuracy of these instruments in your
laboratory.
15.0 ACCESSORIES
Catalog No. 13106100
Flow cell with temperature control.
The flow cell allows samples to be
pumped to the prism surface.
Typically a peristaltic pump with a flow
rate of approximately 10-15 ml./min is
used. Use of the flow cell generally
increases instrument precision and
eliminates errors due to an unclean
prism surface. Use of the flow cell
also allows the user to pretemperature equilibrate extremely hot
or cold samples. Ports are provided
for circulation of a controlled
temperature fluid.
Catalog No. 13106200
Funnel Flow Cell with temperature
control. This offers the same benefits
as the flow cell, but eliminates the
need for a pumping device.
13106200 includes the flow cell,
funnel, funnel attachment, and tubing.
Catalog No. 13106300
Sample press with temperature
control. The sample press creates an
enclosed sample volume by
contacting the top of sample and the
prism well. It is useful for decreasing
equilibration times of very viscous or
hot or cold samples.
11
Reichert Analytical Instruments
Reichert, Inc.
3374 Walden Ave.
Depew, NY 14043
USA
Toll Free: 888-849-8955
Phone: 716-686-4500
Fax: 716-686-4555
email: [email protected]
www.reichert.com
Reichert GmbH
Hubertusstrasse 4
D-82229 Seefeld
Germany
Tel: +49-8152-993530
ISO-9001 Certified
©2003 Reichert, Inc. Depew NY, USA 10600-100 Rev. H