1
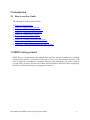
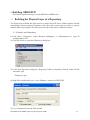
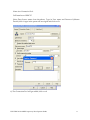
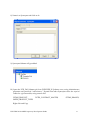
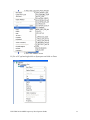
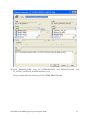
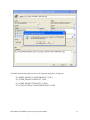
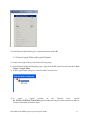
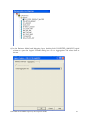
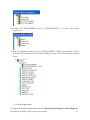
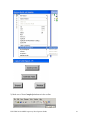
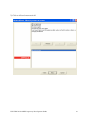
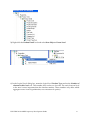
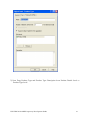
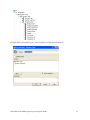
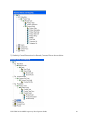
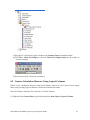
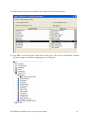
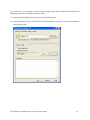
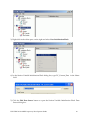
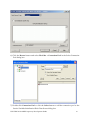
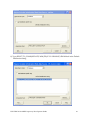
Oracle FLEXCUBE Investor Servicing® OBIEE Repository Development Guide Release 12.0 April 2012 Oracle Part Number E51528-01 Contents 1 Preface.................................................................................................................................................................3 Audience ......................................................................................................................................................... 3 Related documents ..........................................................................................................................................3 Conventions .....................................................................................................................................................3 2 Introduction ....................................................................................................................................................... 4 2.1 How to use this Guide .....................................................................................................................................4 3 OBIEE Getting started ......................................................................................................................................4 3.1 Component Integration Model ........................................................................................................................ 5 4 OBIEE environment setup ............................................................................................................................... 6 4.1 Create an ODBC Data Source ......................................................................................................................... 6 5 Building OBIEE RPD ...................................................................................................................................... 10 5.1 Building the Physical Layer of a Repository ................................................................................................. 10 5.1.1 Create a new Repository ...................................................................................................................... 10 5.2 Building the Business Model and Mapping Layer of a Repository ............................................................... 20 5.2.1 Create new business model .................................................................................................................. 20 5.2.2 Create Logical Tables and Logical Columns ........................................................................................ 21 5.2.3 Create Logical Joins ............................................................................................................................ 24 5.2.4 Rename Business Model Objects ......................................................................................................... 27 5.3 Build Dimension Hierarchies ........................................................................................................................ 35 5.4 Building the Presentation Layer of a Repository ........................................................................................... 41 5.4.1 Build Presentation layer: ..................................................................................................................... 41 5.4.2 Check consistency ................................................................................................................................ 42 6 Enable Query Logging .................................................................................................................................... 43 7 Modify NQSConfig.ini ................................................................................................................................... 45 8 Creating Calculation Measures ..................................................................................................................... 46 8.1 Create a New Measure .................................................................................................................................. 48 8.2 Create a Calculation Measure Using Logical Columns ................................................................................. 49 8.3 Create a Calculation Measure Using Physical Columns ............................................................................... 53 9 Organizing the Presentation Layer ............................................................................................................... 59 10 Using Initialization Blocks and Variables .................................................................................................... 64 10.1 Create an Initialization Block for Session Variables ................................................................................ 65 11 Resources .......................................................................................................................................................... 72 1.1 1.2 1.3 FCIS-FD07-03-01-OBIEE repository Development Guide 2 1 Preface This OBIEE repository development document describes steps to develop the FLEXCUBE IS OBIEE RPD (Meta data) file. 1.1 Audience The OBIEE repository development guide is intended for the FLEXCUBE Application Developers/users who are authorized to perform the following tasks: Develop the new RPD file for a given module Enhance the existing RPD file To Use this manual, you need conceptual and working knowledge of the below: Proficiency FLEXCUBE IS Development overview Resources FCIS-FD01-01-01-Development Overview Guide Report development introduction FCIS-FD07-01-01-Report Getting started 1.2 Related documents For more information on Reports development, see these resources: FCIS-FD01-01-01-Development Overview Guide FCIS-FD07-01-01-Report Getting started 1.3 Conventions The following text conventions are used in this document: Convention Meaning Boldface Boldface type indicates graphical user interface elements (for example, menus and menu items, buttons, tabs, dialog controls), including options that you select. Italic italic type indicates book titles, emphasis, or placeholder variables for which you supply particular values. Monospace Monospace type indicates language and syntax elements, directory and file names, URLs, text that appears on the screen, or text that you enter. FCIS-FD07-03-01-OBIEE repository Development Guide 3 2 Introduction 2.1 How to use this Guide The information in this guide includes: Chapter 2,’’Introduction’’ Chapter 3,’’OBIEE Getting started’’ Chapter 4,’’OBIEE environment setup’’ Chapter 5,’’OBIEE RPD development’’ Chapter 6,’’ Enable Query logging’’ Chapter 7,’’ Modify NQSConfig.ini’’ Chapter 8,’’ Creating Calculation Measures ‘’ Chapter 9,’’Organizing the Presentation Layer’’ Chapter 10,” Using Initialization Blocks and Variables” 3 OBIEE Getting started OBIEE Plus is a comprehensive BI platform that provides the best foundation for building enterprise BI solutions. It includes a full range of easy-to-use and intuitive end-user tools such as Interactive Dashboards, advanced reporting and publishing, full ad-hoc analysis over the Web, proactive detection and alerts, mobile analytics, Microsoft Office integration, Web Services and business process integration, and more. FCIS-FD07-03-01-OBIEE repository Development Guide 4 3.1 Component Integration Model The below diagram depicts FLEXCUBE IS report architecture. BI Administrators External Applications and Portals Business Users HTML, SOAP over HTTP/HTTPS FLEXCUBE Web Server SAW Bridge (J2EE/ISAPI) Web Browser (IIS, Tomcat, Web sphere) TCP/IP (SSL) XML, HTML, XLS, PDF, TXT over HTTP/HTTPS JavaScript For Usability & Interactivity Web Browser JavaScript For Usability & Interactivity Oracle BI Web SOAP Web Services, XML and URL Interface Oracle Interactive Dashboards Oracle Answers TCP/IP (SSL) Oracle BI Administration Oracle Delivers Server FCUBS Application Server Oracle BI Server OBIEE ODBC over TCP/IP (SSL) FCUBS Database Oracle BI Server is the place, where the metadata repository is put, that is connected FLEXCUBE OLTP database, and serves for the requests coming from different sources for generating reports. BI Administrators are the users of BI Administration Tool who creates and edits the repository. The Administration Tool is a Windows application that allows the Oracle BI Administrator to create and edit repositories. Oracle BI Web is the place where all the presentation services related items like Answers, Dashboards, Filters and other related files will be kept. Web servers will be responding to the requests coming in to generate reports using Oracle BI Web. Users of it can be the any FCIS business users or any external applications or portals, if integrated. FCIS-FD07-03-01-OBIEE repository Development Guide 5 Business Users of FCIS Application can also be the users for Oracle BI presentation services. FCIS Application Server is where the FCIS application resides. FCIS database is the underlying OLTP system used for both FCIS application and BI reports. Both FCIS Application & Oracle BI Web are accessible by business users through web browsers. 4 OBIEE environment setup This section explains the OBIEE server environment setup required for RPD development. 4.1 Create an ODBC Data Source An ODBC data source is needed to import schema information about a data source into an Oracle BI Server repository. To create an ODBC data source, perform the following steps: 1. Click Start > Control Panel > Administrative Tools > Data Sources (ODBC) to open ODBC Data Source Administrator. FCIS-FD07-03-01-OBIEE repository Development Guide 6 2. Click on System DSN tab and click Add. 3. The Create New Data Source dialog box opens. In Create New Data Source dialog box, select Oracle driver. FCIS-FD07-03-01-OBIEE repository Development Guide 7 4. Click Finish to open the Oracle ODBC Driver Configuration dialog box. 5. In Oracle ODBC Driver Configuration dialog box, enter a Data Source Name, select appropriate TNS Service Name from the drop down list, and enter schema name as the User ID. 6. Click Test Connection to open Oracle ODBC Driver Connect dialog box. 7. In Oracle ODBC Driver Connect dialog box, enter the schema password and click OK. FCIS-FD07-03-01-OBIEE repository Development Guide 8 8. You should see a "Testing Connection" message indicating the connection is successful. 9. Click OK to close the Testing Connection message. 10. Click OK to close the Oracle ODBC Driver Configuration dialog box. 11. Verify that the DSN created is added in the ODBC Data Source Administrator and click OK to close the ODBC Data Source Administrator. FCIS-FD07-03-01-OBIEE repository Development Guide 9 5 Building OBIEE RPD This section explains the steps to create RPD file in OBIEE server. 5.1 Building the Physical Layer of a Repository The Physical layer defines the data sources to which Oracle BI Server submits queries and the relationships between physical databases and other data sources that are used to process multiple data source queries. The data sources can be of the same or different varieties. 5.1.1 Create a new Repository 1) Click Start-> Programs-> Oracle Business Intelligence -> Administration to open BI Administration Tool. 2) Click File->New to open New Repository dialog box. 3) In the New Repository dialog box, Repository folder is selected by default. Name the file <module>.rpd. Example: pc.rpd 4) Right Click on physical Layer -> New Database , name it as FLEXCUBE 5) Go to Connection Pools tab, Click on add FCIS-FD07-03-01-OBIEE repository Development Guide 10 Name it as Connection Pool. Call Interface as ODBC3.5 Select Data Source name from dropdown, Type in User name and Password (Schema Details) click ok type in the password once again and click on Ok. 6) The Connection Pool will get added, click on ok. FCIS-FD07-03-01-OBIEE repository Development Guide 11 7) Right Click on FlexCube Database -> New Object -> Physical Schema. FCIS-FD07-03-01-OBIEE repository Development Guide 12 8) Name it as Synonyms and click on ok. 9) Synonyms Schema will get added. 10) Open the FCIS_Full_Schema.rpd from FLEXCUBE IS Software area, using Administrator username and password “administrator”. Expand FlexCube->Synonyms select the required Tables for a given module, using control click. CSTMS_PRODUCT, SMTBS_PRODUCT_TYPES PCTBS_CONTRACT_MASTER, STTMS_BRANCH, Right click and Copy FCIS-FD07-03-01-OBIEE repository Development Guide 13 11) Go to PC.rpd and right click on Synonyms and click on Paste FCIS-FD07-03-01-OBIEE repository Development Guide 14 12) Right click on the table -> new object -> alias as shown 13) Name it as <Module Code_Synonym name> ex PC_CSTMS_PRODUCT and click on ok. 14) Create alias for all the synonyms. FCIS-FD07-03-01-OBIEE repository Development Guide 15 15) Create a physical display folder by right clicking on FlexCube -> New Object -> Physical Display Folder , name it as PC 16) Copy entire alias from Synonyms Physical Schema to Physical Display Folder. FCIS-FD07-03-01-OBIEE repository Development Guide 16 17) Right click on physical display folder -> Physical Diagram-> Selected Objects only, 18) Click on New Foreign key 19) First Click on PC_STTMS_BRANCH and Click on PC_PCTBS_CONTRACT_MASTER. FCIS-FD07-03-01-OBIEE repository Development Guide 17 20) Click BRANCH_CODE from PC_STTMS_BRANCH PC_PCTBS_CONTRACT_MASTER and click on ok. and BRANCH_CODE from Click yes when asked for create a key in PC_STTMS_BRANCH table. FCIS-FD07-03-01-OBIEE repository Development Guide 18 21) Similarly Join other tables as shown in diagram using New foreign key PC_SMTBS_PRODUCT_TYPES.PRODUCT_TYPE = PC_CSTMS_PRODUCT.PRODUCT_TYPE PC_CSTMS_PRODUCT.PRODUCT_CODE = PC_PCTBS_CONTRACT_MASTER.PRODUCT_CODE FCIS-FD07-03-01-OBIEE repository Development Guide 19 5.2 Building the Business Model and Mapping Layer of a Repository The Business Model and Mapping layer of the Administration Tool defines the business, or logical, model of the data and specifies the mappings between the business model and the Physical layer schemas. This is where the physical schemas are simplified to form the basis for the user’s view of the data. The Business Model and Mapping layer of the Administration Tool can contain one or more business model objects. A business model object contains the business model definitions and the mappings from logical to physical tables for the business model. The main purpose of the business model is to capture how users think about their business using their own vocabulary. The business model simplifies the physical schema and maps the user’s business vocabulary to physical sources. Most of the vocabulary translates into logical columns in the business model. Collections of logical columns form logical tables. Each logical column (and hence each logical table) can have one or more physical objects as sources. There are two main categories of logical tables: fact and dimension. Logical fact tables contain the measures by which an organization gauges its business operations and performance. Logical dimension tables contain the data used to qualify the facts. 5.2.1 Create new business model 1) In Business Model and Mapping layer, right-click the white space and select New Business Model. FCIS-FD07-03-01-OBIEE repository Development Guide 20 2) In the Business Model dialog box, name the business model PC. 5.2.2 Create Logical Tables and Logical Columns To create a new logical table, perform the following steps: 1) In the Business Model and Mapping layer, right-click the PC business model and select New Object > Logical Table. 2) In the Logical Table dialog box, name the table Contract Facts. 3) To create a logical column In the Physical layer, expand PC_PCTBS_CONTRACT_MASTER physical table and drag the entire measures column to Contract Facts table in business layer. FCIS-FD07-03-01-OBIEE repository Development Guide 21 4) In the Business Model and Mapping layer, double-click COLLECTED_AMOUNT logical column to open the Logical Column dialog box. Go to Aggregation Tab select Sum as shown. FCIS-FD07-03-01-OBIEE repository Development Guide 22 5) Repeat the step no 4 for all the amount columns. 6) Drag PC_PCTMS_CONTRACT_MASTER table from Physical layer, Right Click and rename it as Contract Dim, delete all the measure columns from it. 7) Drag the PC_CSTMS_PRODUCT and PC_STTMS_BRANCH table from Physical layer to business layer. FCIS-FD07-03-01-OBIEE repository Development Guide 23 8) Rename PC_CSTMS_PRODUCT and PC_STTMS_BRANCH as Product and Branch respectively. 9) Drag the Required columns from PC_SMTBS_PRODCT_TYPES from Physical layer to Product Table in Business layer. Thereby creating one more LTS in Product table as shown below. 5.2.3 Create Logical Joins 1) Right-click the PC business model and select Business Model Diagram > Whole Diagram. FCIS-FD07-03-01-OBIEE repository Development Guide 24 2) Make use of New Complex Join button in the toolbar. FCIS-FD07-03-01-OBIEE repository Development Guide 25 3) First click on Contract Dim then Click on Contract Facts. Click on ok 4) Similarly join the Branch and Product logical table with Contract facts as shown FCIS-FD07-03-01-OBIEE repository Development Guide 26 5) Notice that the color of the table icons for the dimension tables has changed to white in the business model. In a business model, a yellow icon indicates a fact table and a white icon indicates a dimension table. Defining the join relationships determined which tables are the logical dimension tables and which is the logical fact table. A fact table is always on the many side of a logical join. You now have a logical star schema consisting of one logical fact table, Contract Facts, and 3 logical dimension tables: Contract Dim, Branch, and Product. 5.2.4 Rename Business Model Objects 1) To use the Rename Wizard to rename the objects in the business model, Click tools-> Utilities. FCIS-FD07-03-01-OBIEE repository Development Guide 27 2) In Utilities dialog box, click Rename Wizard and then Execute 3) In Rename Wizard, click on Business Model and Mapping tab and select the PC business model. Click on Add Hierarchy. FCIS-FD07-03-01-OBIEE repository Development Guide 28 4) Click on Next, Select all Next. FCIS-FD07-03-01-OBIEE repository Development Guide 29 5) Click on All text lowercase Add FCIS-FD07-03-01-OBIEE repository Development Guide 30 6) Click on Change specified Text in Find type _(Underscore) and in Replace with give Space .click on Add FCIS-FD07-03-01-OBIEE repository Development Guide 31 7) Click on First letter of each word capital and Add .Click on Next. FCIS-FD07-03-01-OBIEE repository Development Guide 32 8) Click Finish and verify logical tables and logical columns in the Business Model and Mapping layer are changed as expected. FCIS-FD07-03-01-OBIEE repository Development Guide 33 9) Expand Branch table, select the columns which are not required for reporting, right click on them and delete. FCIS-FD07-03-01-OBIEE repository Development Guide 34 10) Similarly delete unnecessary columns from all the logical tables. 5.3 Build Dimension Hierarchies Dimension hierarchies introduce formal hierarchies into a business model, allowing Oracle BI Server to calculate useful measures and allowing users to drill down to more detail. In a business model, a dimension hierarchy represents a hierarchical organization of logical columns belonging to a single logical dimension table. Common dimension hierarchies used in a business model are time periods, products, customers, suppliers, and so forth. Dimension hierarchies are created in the Business Model and Mapping layer and end users do not see them in end user tools such as Oracle BI Answers or Interactive Dashboards. In each dimension hierarchy, you organize dimension attributes into hierarchical levels. These levels represent the organizational rules and reporting needs required by your business. They provide the structure that Oracle BI Server uses to drill into and across dimensions to get more detailed views of the data. Dimension hierarchy levels are used to perform aggregate navigation, FCIS-FD07-03-01-OBIEE repository Development Guide 35 configure level-based measure calculations, and determine what attributes appear when Oracle BI users drill down in their data requests. To build the Product dimension hierarchy in the Pc business model, perform the following steps: 1) Right-click the Product logical table and select Create Dimension. 2) Right-click the ProductDim object, which was created by the action in the previous step, and select Expand All. FCIS-FD07-03-01-OBIEE repository Development Guide 36 3) Right-click the Product Detail level and select New Object > Parent Level 4) In the Logical Level dialog box, name the logical level Product Type and set the Number of elements at this level to 3. This number does not have to be exact. The ratio from one level to the next is more important than the absolute number. These numbers only affect which aggregate source is used (optimization, not correctness of queries). FCIS-FD07-03-01-OBIEE repository Development Guide 37 5) Now Drag Product Type and Product Type Description from Product Details Level to Product Type Level. FCIS-FD07-03-01-OBIEE repository Development Guide 38 6) Right Click on Product Type-> New Logical Level Key and Click on ok. FCIS-FD07-03-01-OBIEE repository Development Guide 39 7) Similarly Create Dimensions for Branch, Contract Dim as shown below FCIS-FD07-03-01-OBIEE repository Development Guide 40 5.4 Building the Presentation Layer of a Repository The Presentation layer is built after the Physical layer and Business Model and Mapping layer and adds a level of abstraction over the Business Model and Mapping layer. It is the view of the data seen by end users in client tools and applications, such as Oracle BI Answers. The Presentation layer provides a means to further simplify or customize the Business Model and Mapping layer for end users. For example, you can organize columns into catalogs and folders. Simplifying the view of the data for users makes it easier to craft queries based on users business needs because you can expose only the data that is meaningful to the users, organize the data in a way that aligns with the way users think about the data, and rename data as necessary for the set of users. You typically create Presentation layer objects by dragging objects from the Business Model and Mapping layer. Corresponding objects are automatically created in the Presentation layer. Presentation layer objects can then be renamed and reorganized. 5.4.1 Build Presentation layer: 1) Drag the Pc business model from Business Model and Mapping layer to the Presentation layer to create Pc catalog in the Presentation layer. 2) Expand the Pc catalog in the Presentation layer. Notice that the tables and columns in the Presentation layer exactly match the tables and columns in the Business Model and Mapping layer. 3) Save the Repository. Click No when asked for Consistence Check. Run a Consistency Check Consistency check is a utility in the Administration Tool that checks if a repository has met certain requirements. Repositories and the business models within them must pass the consistency check before you can make business models available for queries. When a FCIS-FD07-03-01-OBIEE repository Development Guide 41 repository or business model is inconsistent, a detailed message alerts you to the nature of the inconsistency. The Consistency Check Manager displays three types of messages: Error messages indicate errors that need to be fixed to make the repository consistent. Warning messages indicate conditions that may or may not be errors, depending upon the intent of the Oracle BI Server administrator. For example, if the Administrator user has an empty password this should be addressed, but is not a requirement for a consistent repository. Best Practices messages provide information about conditions but do not indicate an inconsistency. For example, if there are physical tables with no keys defined, a best practice message is displayed. Defining keys for physical tables is best practice, but is not a requirement for a consistent repository. 5.4.2 Check consistency 1) Select File > Check Global Consistency. FCIS-FD07-03-01-OBIEE repository Development Guide 42 2) You should receive a message indicating that the repository is consistent and asking if you want to make it available for queries. 3) Click Yes to make the Pc business model available for queries. The Consistency Check Manager displays. 4) If the Consistency Check Manager displays any Error messages, edit the repository to correct the inconsistencies and run the consistency check again. If you see only Warning and Best Practices messages, you can ignore the messages for now and click Close. 6 Enable Query Logging To enable query logging for the Administrator user, perform the following steps: 1) Select Manage > Security. 2) In the Security Manager, select Users in the left pane. The Administrator user appears in the right pane. FCIS-FD07-03-01-OBIEE repository Development Guide 43 3) In the right pane, double-click Administrator. The User dialog box opens. Verify that the User tab is selected. In the Password field, type Administrator and then confirm in the Confirm Password field. In the Logging level field, set the value to 2. To test the repository, you need to generate some queries, retrieve the results, and examine the query log. You log query activity at the individual user level. Logging is intended for testing, debugging, and technical support. In production mode, logging is normally disabled because query logging can impact performance by producing very large log files. 4) Click OK to close the User dialog box. 5) Click Action > Close to close the Security Manager. 6) Save the repository. FCIS-FD07-03-01-OBIEE repository Development Guide 44 7 Modify NQSConfig.ini In this step, you update the Repository and Cache sections of the initialization file, NQSConfig.ini. An entry in the Repository section of the initialization file instructs Oracle BI Server to load a specific repository into memory upon startup. If Oracle BI Server detects a syntax error while loading the repository, it logs the error to the server log file (...\\OracleBI\server\Log\NQServer.log). You also disable caching. Caching is typically not used during development, except to test the cache. 1) Navigate to ...\OracleBI\server\Config\ and open NQSConfig.INI with a text editor, such as Notepad. Locate the [ REPOSITORY ] section and change the entry to Star = PC.rpd, DEFAULT; In the [CACHE] section, immediately below the [ REPOSITORY ] section, change the ENABLE parameter from YES to NO. 2) Save the changes and close NQSConfig.INI. Start Oracle BI Services 1) Select Start > Control Panel > Administrative Tools > Services. 2) Start/Restart the Oracle BI Server service. Verify that the Oracle BI Presentation Server and Oracle BI Java Host services are started. If they are not started, start them. It is not necessary to start the Oracle BI Scheduler or Oracle BI Cluster Controller services. The services can be started in any order. FCIS-FD07-03-01-OBIEE repository Development Guide 45 8 Creating Calculation Measures Oracle BI Server has a calculation engine to perform a multitude of calculations. There are different methods for creating calculation measures in the Administration Tool. You can use existing logical columns as objects in a formula, use physical columns as objects in a formula, or use the Calculation Wizard to automate the process. You use physical columns for calculations that require and aggregation rule to be applied after the calculation. You use logical columns for calculation formulas that require an aggregation rule that is applied before the calculation. You can also build calculation measures in Answers. The advantage from building calculation measures in the repository is that the measures are built once and can be made available to all users. The advantage of defining a logical column formula based on existing logical columns is that you only have to define it once. When you create formulas based on physical columns, you have to map for each physical source it could be derived from. To create calculation measures, you perform the following steps: 1) Click Start > Programs > Oracle Business Intelligence > Administration to open the Administration Tool. 2) Click File > Open > Online 3) In the Open Online Analytics Web dialog box, type Administrator in the Password field and click Open. FCIS-FD07-03-01-OBIEE repository Development Guide 46 4) The PC repository opens in online mode. Up to this point, all the changes you have made to the repository have been in offline mode. Now that you have a consistent repository and Oracle BI Server is running and using the repository, you can make changes to the metadata in online mode. In offline mode the relationship between the Administration Tool and the repository is like the relationship between any Windows application and a file. An application, the Administration Tool in this case, opens a file for editing, makes changes to its in-memory copy, and tells the OS to save the changed file. In online mode, the relationship is different. Oracle BI Server has already opened the repository file and the operating system has put a write-lock on the file. In this mode, Oracle BI Server can act as an agent of the Administration Tool. When the Administration Tool tells it to, Oracle BI Server sends the Administration Tool a copy of its in-memory repository. Then it listens for messages from the Administration Tool about changes, makes those changes to its in-memory copy, and, when told by the Administration Tool, tells the OS to save the changed file. When you start the Administration Tool in online mode, you pick an Oracle BI ODBC DSN that points to the repository you want to edit (i.e., the repository that is the default repository in the DSN). The Administration Tool then communicates changes to Oracle BI Server and Oracle BI Server makes the corresponding changes to its in-memory copy. FCIS-FD07-03-01-OBIEE repository Development Guide 47 Typically, you develop a repository in offline mode and use online mode for minor updates and changes. 8.1 Create a New Measure To add a new measure to the Contract Facts table, perform the following steps: 1) In the Physical layer, navigate to PC_CSTMS_PRODUCT > PRODUCT_CODE 2) Drag PRODUCT_CODE from the Physical layer to the Pc Pctbs Contract Master logical table source for the Contract Facts logical table. PRODUCT_CODE appears as a logical column in the Contract Facts logical table. Rename it as No of Products and Set the aggregation rule for the No of Products logical column to COUNT. FCIS-FD07-03-01-OBIEE repository Development Guide 48 3) Drag the No of Products logical column to the Contract Facts presentation folder. 4) Click File > Check In Changes or click the Check In Changes button on the toolbar to check in changes. 5) Save the repository. Check for consistency 8.2 Create a Calculation Measure Using Logical Columns Define a new calculation measure named Net Balance Amount in the Contract Facts logical table, using existing logical columns to define the calculation formula. Here Net Balance Amount is Txn Amount- Collected Amount 1) Right-click the Contract Facts logical table and select New Object > Logical Column FCIS-FD07-03-01-OBIEE repository Development Guide 49 2) In the Logical Column dialog box, name the logical column Net Balance Amount and check Use existing logical columns as the source. Click the Expression Builder button (three dots) to open the Expression builder. FCIS-FD07-03-01-OBIEE repository Development Guide 50 3) In the left pane, click Logical Tables. Select Contract Facts in the middle pane, Txn Amt in the right pane, and click Insert. The txn Amt column is added to the formula. Click the minus sign operator to add it to the formula. Double-click Collected Amount in the right pane to add it to the formula. Click on OK. FCIS-FD07-03-01-OBIEE repository Development Guide 51 4) Click OK to close the Expression Builder. Notice that the formula appears in the Logical Column dialog box 5) Click OK to close the Logical Column dialog box. The Net Balance Amount logical column appears in the business model FCIS-FD07-03-01-OBIEE repository Development Guide 52 6) Drag the Net Balance Amount logical column to the Sales Facts table in the Presentation layer. 7) Save the Repository. 8.3 Create a Calculation Measure Using Physical Columns Define a new calculation measure named Net balance Amount Physical in the Contract Facts logical table, using physical columns to define the calculation formula. To create a calculation measure using physical columns, perform the following steps. 1) Right-click the Contract Facts logical table and select New Object > Logical Column. 2) In the Logical Column dialog box, name the logical column Net Balance Amount Physical. FCIS-FD07-03-01-OBIEE repository Development Guide 53 3) Click the Aggregation tab. Set the default aggregation rule to SUM. 4) Click OK to close the Logical Column dialog box. Net Balance Amount Physical is added to the business model. FCIS-FD07-03-01-OBIEE repository Development Guide 54 5) Expand Contract Facts > Sources and double-click the Pc Pctbs Contract Master logical table source. The Logical Table Source dialog box opens FCIS-FD07-03-01-OBIEE repository Development Guide 55 6) Click the Column Mapping tab, Click the Expression Builder button for the Net Balance Amount Physical logical column FCIS-FD07-03-01-OBIEE repository Development Guide 56 7) In the Expression Builder, select Physical Tables > PC_PCTBS_CONTRACT_MASTER >TXN_AMT and then click the Insert button to add the column to the formula. Click the minus sign operator to add it to the formula. COLLECTED_AMOUNT and then click the Insert button to add the column to the formula. Click Ok. FCIS-FD07-03-01-OBIEE repository Development Guide 57 8) Notice that the expression is added in the Logical Table Source dialog box. 9) Click OK to close the Logical Table Source dialog box. The icon for Net Balance Amount Physical changes to indicate an aggregation rule is applied. FCIS-FD07-03-01-OBIEE repository Development Guide 58 10) Drag Net Balance Amount Physical to Contract Facts in the Presentation layer. Save the Repository. 9 Organizing the Presentation Layer The Presentation layer is built after the Physical layer and Business Model and Mapping layer and adds a level of abstraction over the Business Model and Mapping layer. It is the view of the data seen by end users in client tools and applications, such as Oracle BI Answers. The Presentation layer provides a means to further simplify or customize the Business Model and Mapping layer for end users. For example, you can organize columns into catalogs and folders. Simplifying the view of the data for users makes it easier to craft queries based on users business needs because you can expose only the data that is meaningful to the users, organize the data in a way that aligns with the way users think about the data, and rename data as necessary for the set of users. You typically create Presentation layer objects by dragging objects from the Business Model and Mapping layer. Corresponding objects are automatically created in the Presentation layer. You also can manually create catalogs and folders based on the needs of your users. Presentation catalogs allow you to show different views of a business model to different sets of users. Presentation catalogs have to be populated with content from a single business model. They cannot span business models. However, multiple presentation catalogs can refer to the same business model. Presentation catalogs contain presentation tables. You can use the Presentation Tables tab in the Presentation Catalog properties dialog box to reorder, sort, or delete Presentation layer tables. You can also use this tab to access the Presentation Table dialog box, where you can create and edit tables. Changes to the Presentation layer do not impact corresponding objects in the Business Model and Mapping layer. Use presentation tables to organize columns into categories that make sense to the user community. Presentation tables appear as folders in the Oracle BI user interface. Presentation tables contain presentation columns. A presentation table can contain columns from one or more logical tables. The names and object properties of the presentation tables are independent of the logical table properties. Presentation tables contain presentation columns. Use the Columns tab in the Presentation Table properties dialog box to reorder, sort, or delete Presentation layer columns. You can also use this tab to access the Presentation Column dialog box, where you can create and edit columns. Presentation columns define the columns used to build queries in the Oracle BI user interface, such as Oracle BI Answers. The presentation column names are, by default, identical to the logical column names in the Business Model layer. To provide a convenient organization for FCIS-FD07-03-01-OBIEE repository Development Guide 59 your end users, you can drag a column from a single logical table in the Business Model and Mapping layer onto multiple presentation tables. To organize the Presentation layer, perform the following steps: 1) In the Presentation layer, double-click the Pc presentation catalog to open the Presentation Catalog dialog box FCIS-FD07-03-01-OBIEE repository Development Guide 60 2) Click the Presentation Tables tab 3) To create a new presentation Table, click the Add button to open the Presentation Table dialog box FCIS-FD07-03-01-OBIEE repository Development Guide 61 4) Click the General tab and name the presentation table as Product Type. In the Description field, type -> Product Type attributes. Adding -> in the description nests the table under the table above it. The description displays as a tool tip in Answers. Click on Ok. FCIS-FD07-03-01-OBIEE repository Development Guide 62 5) Similarly add another table as Product Details with description as Product Attribute 6) Rearrange the Tables using Up and Down Buttons as shown below .Click on ok. FCIS-FD07-03-01-OBIEE repository Development Guide 63 7) Now Cut Product Type and Product Type Description Columns from Product Table and paste it in Product Type Table. Cut the remaining column from Product table and paste it in Product Details Table. 10 Using Initialization Blocks and Variables You can use variables in a repository to streamline administrative tasks and modify metadata content dynamically to adjust to a changing data environment. A variable has a single value at any point in time. Variables can be used instead of literals or constants in the Expression Builder in the Administration Tool. Oracle BI Server substitutes the value of a variable for the variable itself in the metadata. You use the Variable Manager to define variables and initialization blocks. There are two classes of variables: repository variables and session variables. A repository variable has a single value at any point in time. There are two types of repository variables: static and dynamic. Static repository variables have values that are constant and does not change while Oracle BI Server is running. Dynamic repository variables have values that are refreshed by data returned from queries in initialization blocks. Repository variables are represented by a question mark icon in the Variable Manager. Session variables are created and assigned a value when each user logs on. There are two types of session variables: system and nonsystem. System variables have reserved names and are used for specific purposes by Oracle BI Server, such as authenticating users. Non-system variables are application-specific variables created by an Administrator. System and nonsystem variables are represented by a question mark icon in the Variable Manager. FCIS-FD07-03-01-OBIEE repository Development Guide 64 Initialization blocks are used to initialize dynamic repository variables, system session variables, and nonsystem session variables. 10.1 Create an Initialization Block for Session Variables Session variables are like dynamic repository variables in that they obtain their values from initialization blocks. Unlike dynamic repository variables, however, the initialization of session variables is not scheduled. When a user begins a session, Oracle BI Server creates new instances of session variables and initializes them. Unlike a repository variable, there are as many instances of a session variable as there are active sessions on Oracle BI Server. Each instance of a session variable could be initialized to a different value. A session is an instance of a user running the client application. The session starts when the application is started and ends when the application is exited. To create an initialization block for session variables, perform the following steps: 1) Click Manage > Variables to open the Variable Manager. 2) Click Session > Initialization Blocks. FCIS-FD07-03-01-OBIEE repository Development Guide 65 3) Right-click in the white space on the right and select New Initialization Block. 4) In the Session Variable Initialization Block dialog box, type PC_Current_Date in the Name field. 5) Click the Edit Data Source button to open the Session Variable Initialization Block Data Source dialog box. FCIS-FD07-03-01-OBIEE repository Development Guide 66 6) Click the Browse button and select FlexCube > Connection Pool in the Select Connection Pool dialog box.. 7) Double-click Connection Pool or click the Select button to add the connection pool to the Session Variable Initialization Block Data Source dialog box. FCIS-FD07-03-01-OBIEE repository Development Guide 67 8) Type SELECT TO_CHAR(SYSDATE, 'MM/DD/YYYY HH:MI:SS') FROM dual in the Default Initilization String. FCIS-FD07-03-01-OBIEE repository Development Guide 68 9) Click Edit Data Target to open the Session Variable Initialization Block Variable Target dialog box. 10) Click New to open the Session Variable dialog box. FCIS-FD07-03-01-OBIEE repository Development Guide 69 11) In the Name field, type PC_CurrentDate. FCIS-FD07-03-01-OBIEE repository Development Guide 70 12) Click OK to close the Session Variable dialog box. 13) The PC_CurrentDate variable is added to the Session Variable Initialization Block Variable Target dialog box. 14) Click OK to close the Session Variable Initialization Block dialog box. The PC_Current_Date initialization block is visible in the Security Manager. 15) Click Action > Close to close the Variable Manager. 16) Save the repository. FCIS-FD07-03-01-OBIEE repository Development Guide 71 11Resources For more information on building a repository you can go through Oracle Documentation: Oracle by Example at http://www.oracle.com/technology/obe/obe_bi/bi_ee_1013/bi_admin/biadmin.html FCIS-FD07-03-01-OBIEE repository Development Guide 72 FCIS-FD07-03-01-OBIEE repository Development Guide April 2012 12.0 Oracle Corporation World Headquarters 500 Oracle Parkway Redwood Shores, CA 94065 U.S.A. Worldwide Inquiries: Phone: +1.650.506.7000 Fax: +1.650.506.7200 www.oracle.com/ financial_services/ Copyright © 2012 Oracle Financial Services Software Limited. All rights reserved. No part of this work may be reproduced, stored in a retrieval system, adopted or transmitted in any form or by any means, electronic, mechanical, photographic, graphic, optic recording or otherwise, translated in any language or computer language, without the prior written permission of Oracle Financial Services Software Limited. Due care has been taken to make this document FCIS-FD07-03-01-OBIEE repository Development Guide and accompanying software package as accurate as possible. However, Oracle Financial Services Software Limited makes no representation or warranties with respect to the contents hereof and shall not be responsible for any loss or damage caused to the user by the direct or indirect use of this FCIS-FD07-03-01-OBIEE repository Development Guide and the accompanying Software System. Furthermore, Oracle Financial Services Software Limited reserves the right to alter, modify or otherwise change in any manner the content hereof, without obligation of Oracle Financial Services Software Limited to notify any person of such revision or changes. All company and product names are trademarks of the respective companies with which they are associated. FCIS-FD07-03-01-OBIEE repository Development Guide 73