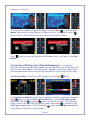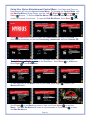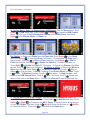
1
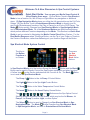
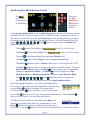
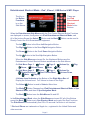
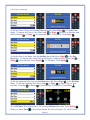
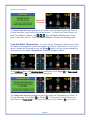
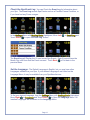
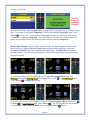
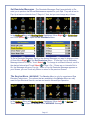
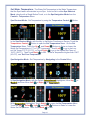
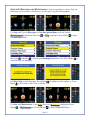
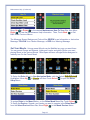
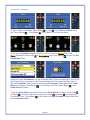
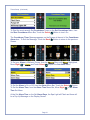
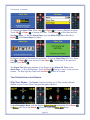
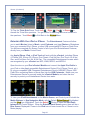
Newport Controls, LLC
2201 Alton Parkway
Irvine, CA 92606
Revision Date: 03.27.2012
[email protected]
Page 1 of 29
949-442-4260
© 2012 Newport Controls, LLC. All Rights Reserved.
www.newportcontrols.com
7908-0003
Revision: C
Table Of Contents
Quick Start Guide . . . . . . . . . . . . . . . . . . . . . . . . . . . . . . . . . . . . . . . . . . . . Page 3
Spa Shortcut Mode System Control . . . . . . . . . . . . . . . . . . . . . . . Page 3
Spa Navigation Mode System Control . . . . . . . . . . . . . . . . . . . . . Page 4
iPod Entertainment Shortcut Mode System Control . . . . . . . . . . Page 5
Setting Up Your Spa Control System . . . . . . . . . . . . . . . . . . . . . . . . . . . . Page 6
Set The Heating Mode . . . . . . . . . . . . . . . . . . . . . . . . . . . . . . . . . . . Page 6
Set The Filter Cycles . . . . . . . . . . . . . . . . . . . . . . . . . . . . . . . . . . . . Page 7
Set Over Temperature . . . . . . . . . . . . . . . . . . . . . . . . . . . . . . . . . . . Page 8
Set Time And Date . . . . . . . . . . . . . . . . . . . . . . . . . . . . . . . . . . . . . . Page 9
Check Spa Information . . . . . . . . . . . . . . . . . . . . . . . . . . . . . . . . . . Page 11
Set Fahrenheit Or Celsius . . . . . . . . . . . . . . . . . . . . . . . . . . . . . . . Page 11
Lock The Control Panel . . . . . . . . . . . . . . . . . . . . . . . . . . . . . . . . . Page 11
Lock The Water Temperature . . . . . . . . . . . . . . . . . . . . . . . . . . . . . Page 12
Check The Event Log . . . . . . . . . . . . . . . . . . . . . . . . . . . . . . . . . . . Page 13
Set The Language . . . . . . . . . . . . . . . . . . . . . . . . . . . . . . . . . . . . . . Page 13
Invert The Screen . . . . . . . . . . . . . . . . . . . . . . . . . . . . . . . . . . . . . . Page 14
Set Reminder Messages . . . . . . . . . . . . . . . . . . . . . . . . . . . . . . . . . Page 15
The Service Menu . . . . . . . . . . . . . . . . . . . . . . . . . . . . . . . . . . . . . . Page 15
Set Water Temperature . . . . . . . . . . . . . . . . . . . . . . . . . . . . . . . . . . Page 16
Help With Messages And Maintenance . . . . . . . . . . . . . . . . . . . . . Page 17
Set Your Moods . . . . . . . . . . . . . . . . . . . . . . . . . . . . . . . . . . . . . . . . Page 18
Set Your Wellness Timers . . . . . . . . . . . . . . . . . . . . . . . . . . . . . . . . Page 19
Your Entertainment and Games . . . . . . . . . . . . . . . . . . . . . . . . . . . . . . . . Page 22
Play Your Games. . . . . . . . . . . . . . . . . . . . . . . . . . . . . . . . . . . . . . . Page 22
Entertain with your iPod or iPhone. . . . . . . . . . . . . . . . . . . . . . . . Page 23
Control Your LED Spa Light (Optional Equipment). . . . . . . . . . . Page 25
Using Your Nyrius Entertainment Menu . . . . . . . . . . . . . . . . . . . . Page 26
IMPORTANT SAFETY INSTRUCTIONS. . . . . . . . . . . . . . . . . . . . . . . . . . . Page 29
Page 2
Welcome To A New Dimension In Spa Control Systems.
Quick Start Guide - You can use your Merlin Smart Control &
Video Display three ways: (1) One Button Touch in Spa Shortcut
Mode to turn a function On, like a Pump or Light without any navigation or additional
steps. (2) Spa Navigation Mode where you utilize the full opportunities on the Full Color
Screen. (3) One Button Touch in Entertainment Shortcut Mode to directly turn On
and Control Entertainment functions, like Play or Pause for an iPod or DVD Player. The
Mode
Button quickly Changes from Spa Shortcut Mode, to Spa Navigation Mode,
and to Entertainment Mode. All of the Numbered Buttons are Multifunction Buttons,
which perform different Functions depending on the Mode. This Section is a Quick Start
Guide to get you started in Navigating the Merlin Control Panel Menu System. For the
Best Button Response when Touching a Button, use the Tip of your Finger or Thumb in
the Center of the Button, rather than flattening out your thumb or finger on the Button.
Spa Shortcut Mode System Control
The Key to
the Button
Functions is
on Screen.
These are
the Spa
Shortcut
Mode Active
Buttons.
In Spa Shortcut Mode, all of the buttons Except the Select
Button and the Back
Button can be used to Directly Control the Spa System equipment and other functions.
A Yellow Icon
on the Screen indicates that the Function is On. The Back
Button
is not used in the Spa Shortcut Mode.
The Pump 1
Button is the Jet Pump 1 Control Button.
The Light
Button is the Spa Light Control Button.
The Temp
Button is the Water Temperature Control Button.
The Invert
Button is the Invert Display Screen Button.
The
,
,
,
,
,
,
, and
Buttons are the Spa Option Control
Shortcut Buttons as defined on the Screen, which may be the Air Blower, Jet
Pump 2, Jet Pump 3, another Light, or other Option.
The Select
Button is used to Change from Spa Shortcut Mode to Spa
Navigation Mode. The Mode
Button Changes from Spa Shortcut Mode
to Spa Navigation Mode, and then to Entertainment Shortcut Mode.
Page 3
Spa Navigation Mode System Control
The iPod *
Icon on the
Home Screen
is Highlighted.
These are
the Spa
Navigation
Mode Active
Navigation
Buttons.
In the Spa Navigation Mode, all of the Main Functions at the Top of the Screen can be
Scrolled either Up or Down to access all of the Main Functions, rotating like a Wheel. In
the Center of the Screen, all of the Icon Functions can be Scrolled either Left or Right
g like a Wheel. All of the Buttons Except the
to access all of the Icon Functions, rotating
Option
,
,
,
,
,
,
, and
Buttons can be used to Navigate and
Select from the Menu System.
The Up
The Down
The Left
The Right
The Select
Button Scrolls Up from Entertainment at the Top of the Screen.
Button Scrolls Down from Entertainment at the Top of the Screen.
Button Moves Left to the next Icon Function Left.
Button Moves Right to the next Icon Function Right.
Button is used to Select a Menu Item, or turn an item On or Off.
The Back
Button is used to go back one level in the Menu System. From the
Spa Navigation Mode Screen, the Back
Button is also used to immediately
Change to Spa Shortcut Mode. The Mode
Button Changes from Spa
Navigation Mode, to Entertainment Mode, and then to Spa Shortcut Mode.
The
,
,
,
,
,
,
, and
Buttons continue to operate as
the Spa Option Control Shortcut Buttons in the Spa Navigation Mode.
When Navigating the Menus, if the Yellow Highlighted Menu
Bar you are on has an Arrow at the Right End of the Menu Bar,
use the Right
Button to Navigate to the Next Menu,
and use the Back
Button to Return to the Previous Menu.
Use the Up
Button to Scroll Up to the next Menu Bar Above, or use the Down
Button to Scroll Down to the next Menu Bar Below.
If the Blue Area at the Bottom of the Menu says More and
has Arrows pointing Down and/or Up, as indicated, use the
Down
Button to Scroll from the Bottom Menu Bar to the
Next Menu, or the Up
Button to Scroll from the Top Menu Bar to the Previous Menu.
Page 4
Entertainment Shortcut Mode - iPod*, iPhone*, USB Device & MP3 Player
The Key to
the Button
Functions
is on the
Side Menus.
These are
the iPod
Entertainment
Shortcut
Mode Active
Buttons.
When the Entertainment Side Menus with the iPod Control Shortcut Button Functions
are displayed on screen, the System is in iPod Entertainment Shortcut Mode, and
All of the buttons Except the Select
Button and the Back
Button can be used to
Directly Control the iPod Entertainment equipment.
The Left
Button is the Move Left Navigation Button.
The Right
Button is the Move Right Navigation Button.
The Down
Button is the Scroll Down Navigation Button.
The Up
Button is the Scroll Up Navigation Button.
When the Side Menus are turned On, the Numbered Buttons are the
Entertainment Control Shortcut Buttons as defined on the Side Menus.
On Side Menu Page
g 1:
Power,
Pause,
Volume Down,
Page 2,
Volume Up,
Mute,
Stop.
On Side Menu Page 2:
Power,
Page 1,
Rewind/Previous,
Fast Forward/Next,
Mute,
Display.
Play,
Volume Up,
Volume Down,
A Volume Level Indicator at the Bottom of the Right Menu Bar will
Display the Volume Level. Full Volume is shown to the Right.
The Select
Button is used to Select a Menu Item.
The Mode
Button Changes from iPod Entertainment Shortcut Mode to Spa
Shortcut Mode, and then to Spa Navigation Mode.
The Back
Button turns the Side Menus On and Off.
In the Entertainment Mode, when the Side Menus are turned Off, all of the Buttons
except the Back
Button are in Spa Shortcut Mode and control the Spa Functions.
The Side Menus will automatically turn Off in 30 seconds if a Button is not touched.
* iPod and iPhone are trademarks of Apple Inc., registered in the United States and
other countries.
Page 5
Setting Up Your Spa Control System
This Section of the Merlin Control Panel User’s Manual provides more Detailed Instructions for properly Setting Up and Configuring your Spa Control System. All of the
initial Spa Control System Options and Settings, like Time and Date, Filter Cycles, Heating Mode, and Language, are located in the Settings Menu. In case of Power Failure,
all of your Options and Settings will be remembered by the Control System.
In Spa Navigation Mode, with the Default Entertainment Highlighted, Move Down
to Settings
Settings, and Touch the Select
Button to open a Settings Menu.
Set the Heating Mode - The Heating Mode determines when the Heater will heat
and how the Water Temperature will be maintained. There’s a Description of the Heating Mode in each Heating Mode Menu.
In the Settings Menu with Heating Mode Highlighted, Touch Select
to open the
Heating Mode Menu. The Default Heating Mode is the Standard Mode. To change
g
Heating Modes, from the Heating Mode Menu Bar, Move Down
and Right
to
the Heating Mode Set Menu.
To change to this Heating Mode, Touch Select
Page 6
, or to Exit back, Touch Back
.
Set the Filter Cycles - The Filter Cycles determine when the Filter Pump will turn
On to Filter the Water. The Default is two 2 hour Filter Cycles every day of the week, 12
hours apart. You can Set up to four Filter Cycles on any days of the week, and with any
Start Time and End Time you want.
The Filter Cycle Days and Time also determine when the Heating will take place in the
Economy and Vacation Heating Modes. In these Modes, the Heater will only operate
during the Filter Cycle Filtration times, and will not operate between Filter Cycles.
In the Settings Menu with Heating Mode Highlighted, Move Left
and Touch Select
to open the Set Filter Cycles Menu.
to Filter Cycles
By Default, Filter Cycle 1 is On and Preset. To Change the Days and Time for Filter
Cycle 1 or to Set or Modify other Filter Cycles, scroll to the Filter Cycle, then Move
Right
to the Filter Cycles Set Menu. To turn On (Enable)) or turn Off (Disable) a
Filter Cycle, with Filter Cycle 1 Highlighted
Highlighted, Touch Select
. If the Filter Cycle is Set
to Off, the System ignores the Days and Times Set, and the Filter Cycle is Disabled.
To Set the Days for the Filter Timer to Operate, from the Days To Filter Menu Bar,
Move Right
to the Days To Filter Menu. By
y Default, all days are turned On. To
turn a day Off or On, Move Left
or Right
to that day and Touch Select
.
Touch Back
to Exit back to the previous Menu.
Page 7
Filter Cycles (Continued)
To Set the Filter Timer Start Time, from the Start Time Menu Bar, Move Right
to the
Start Time Menu. To change the Filter Timer Start Time, Move Left
or Right
to
Hours or Minutes, and then Touch Up
or Down
to change the Time. Touch
Back
to Exit back to the previous Menu.
To Set the Filter Timer End Time, from the End Menu Bar, Move Right
to the End
Time Menu. To change the Filter Timer End Time, Move Left
or Right
to Hours
or Minutes, and then Touch Up
or Down
to change the Time. Touch Back
to Exit back to the previous Menu.
Set Over Temperature - If you want a temporary Water Set Temperature higher
than 104ºF (40.0°C), you Must Set it in the Over Temp Menu. Underwriters Laboratory
requires this type of Control because the Consumer Product Safety Commission has
determined that soaking in Water Temperatures above 104ºF (40.0°C) can sometimes
be Dangerous.
To Increase the Water Set Temperature to 105ºF (40.5°C) or 106ºF (41.0°C), From the
Settings Menu with Heating Mode Highlighted, Move Right
to Over Temp and
Touch Select
to open the Over Temp Menu.
Page 8
Over Temp (Continued)
You must confirm your intention to temporarily Set a Water Temperature higher than
104°F (40.0°C). Touch Select
to continue to the Over Temp Menu to raise the
Water Temperature above 104ºF (40.0°C). Scroll to the desired Water Set Temperature
and Touch Select
to Set that Water Temperature.
Touch Select
again to verify your selected Set Temperature. Touch Select
again
to clear the last Warning Message, and your Over Temp selection will be recorded to
the Event Log. The Water will be Heated to the selected Set Temperature one time. You
will have to come back to the Over Temp Menu to raise it above 104ºF (40.0°C) again.
Set Time and Date - Once you Set the Current Time of Day, Day of the Week, and
Calendar Date, it will be maintained in System Memory, and it should not have to be Set
again except for Daylight Savings Time changes. The Calendar Date is only used for
the Event Log which is in the Service Menu and Settings Menu. Only the Time of Day
and Day of the Week are used for Setting Filter Cycles and other Timers. You also have
a choice of regular 12 Hour Time Display with AM and PM, or 24 Hour Military Time.
In the Settings Menu with Heating Mode Highlighted, Move Left
and Touch Select
to open the Set Time & Date Menu.
Page 9
to Set Time/Date
Time & Date (Continued)
To Set the Time of Day, from the Set Time Menu Bar, Move Right
to the Set Time
Menu. To change the Time of Day, Move Left
or Right
to Hours or Minutes, and
then Touch Up
or Down
to change the Time. To Exit back, Touch Back
.
To Set the Day of the Week, from the Set Day Menu Bar, Move Right
to the Set
Day Menu. To change the Current Day of the Week to a different Day, Move Left
or
Right
to that day and Touch Select
. To Exit back, Touch Back
.
To Set the Calendar Date, from the Set Date Menu Bar, Move Right
to the Set Date
Menu. To Set the Calendar Date, Move Left
or Right
to Month, Day, or Year,
and then Touch Up
or Down
to Set the Date. To Exit back, Touch Back
.
To turn 24 Hour Time Display On or Off, from the 24 Hour Menu Bar, Touch Select
.
When you Move Back
to the Home Screen, the Time will read 1:00 - 24:00 Hours.
Page 10
Check the Spa Information - You can find out Information about your Spa or Spa
Manufacturer on the Information Menu.
to Information
In the Settings Menu with Heating Mode Highlighted, Move Right
and Touch Select
to open the Information Menu. The Information Menu will have
different Information or Instructions, depending on the Brand of the Spa.
Set Fahrenheit or Celsius - Your Water Temperature can be Set to display in
either Degrees Fahrenheit or Degrees Celsius. The Default is Degrees Fahrenheit.
To toggle back and forth between ºF and ºC Temperature display, from the Settings
Menu with Heating Mode Highlighted, Move Left
to °F/°C and Touch Select
to
change from °F to ° C or from °C to °F.
Lock the Control Panel - You can Lock the Control Panel so that none of the
Panel Buttons operate. When the Panel is Locked, the only User Input the System will
recognise is the Unlock Code Sequence.
In the Settings Menu with Heating Mode Highlighted, Move Right
and Touch Select
to Lock the Control Panel.
Page 11
to Panel Lock
Panel Lock (Continued)
Wait a few
Seconds.
The Panel Lock Message appears on the Screen for a few seconds after the Panel is
Locked, and then it goes back to the Home Screen. To Unlock the Control Panel, you
Must Touch Select - Select - Up
after the Panel Lock Message Closes
back to the Home Screen. Touch a Shortcut Button to Display the Message again.
Lock the Water Temperature - You can Lock the Temperature Adjustment so that
the Water Set Temperature cannot be changed. When the Temperature is Locked, you
cannot change the Temperature with the Temp
Button, and you cannot change the
Temperature on the Water Temperature Screen in Navigation Mode.
In the Settings Menu with Heating Mode Highlighted, Move Right
and Touch Select
to Lock the Water Temperature.
to Temp Lock
The Temp Lock Message appears on the Screen after the Temperature is Locked. To
Exit the Message, Touch Back
or Select
. To Unlock the Control Panel, you
Must Return to Temp Lock on the Home Screen, and Touch Select
to turn it Off.
Page 12
Check the Spa Event Log - You can Check the Event Log for Information about
your Spa. The Event Log records Spa Events such as a Possible Freeze Condition, or
if you have had any Power outages.
In the Settings Menu with Heating Mode Highlighted, Move Left
Touch Select
to open the Event Log Screen.
to Event Log and
The Event Log will Display the 12 most recent Spa Events. Each Event will have the
Month, Day, and Hour that the Event occurred. Touch Back
to Exit back to the
previous Menu.
Set the Language - The Default Language is English, but you may have other
Languages available on your Spa. If your desired Language is not Listed on the
Language Menu, it may be available from your Spa Manufacturer.
To Set your desired Language, from the Settings Menu with Heating Mode Highlighted,
Move Right
to Language and Touch Select
to Open the Language Menu. All
Installed Languages will be shown on the Language Menu.
Page 13
Language (Continued)
Turn the
Power Off
and Back
On again.
Scroll down through the Language Menu to see which Languages are available on your
Spa. To change to a different Language, Scroll to the desired Language, then Touch
Select
to turn it On. There will be a Message that tells you a Restart is Required
to change to a different Language. Turn the Power to the Spa Off and then back On
again, and the Spa System will start up again with the selected Language.
Invert the Screen - When the Screen is Inverted, the Spa Navigation Buttons are
also Inverted, so that the Up and Down Buttons are switched with each other and
the Left and Right Buttons are switched with each other. The Back Button does not
change position. The Screen and Navigation Buttons are Uninverted the same way as
they are Inverted.
To Invert the Screen and Navigation Buttons in Spa Navigation Mode; from the
Settings Menu with Heating Mode Highlighted, Move Left
to Invert Screen and
Touch Select
to Invert the Screen.
To Uninvert the Screen and Navigation Buttons in Spa Navigation Mode; Move Left
or Right
to Invert Screen and Touch Select
. The Screen can also be Inverted
or Uninverted in Spa Shortcut Mode by Touching the Invert
Button.
Page 14
Set Reminder Messages - The Reminder Messages Pop-Up periodically to Remind you to perform the Normal Maintenance required for your Spa. They are all set to
Pop-Up at various intervals from 7 Days to 1 Year, but you can change any of them.
In the Settings Menu with Heating Mode Highlighted, Move Right
and Touch Select
to Open the Set Reminders Menu.
to Reminders
To Set a Reminder Message, Scroll to the desired Message you want to change or turn
off, then Move Right
to the Set Reminders Menu. To turn the Pop-Up Reminder
Message interval Off or On, Touch Select
. To change to a different interval, scroll to
the desired interval and Touch Select
to turn it On. If there are no intervals Set to
On, the Message will never Pop-Up. When a Pop-Up Reminder Message appears on
your Screen, you can Touch any Button to return to the previous Screen.
The Service Menu - WARNING! The Service Menu is only for experienced Spa
Electrical Technicians. The options that are available in the Service Menu are only
used for Spa Electrical Service, and are not used in Normal Spa Operation.
In the Settings Menu with Heating Mode Highlighted, Move Left
Touch Select
to Open the Service Menu WARNING Message.
Page 15
to Service and
Set Water Temperature - The Water Set Temperature is the Water Temperature
that the Spa Heater will maintain in your Spa. It can be Set in either Spa Shortcut
Mode, directly with a Single Button Touch, or in the Spa Navigation Mode from the
Control > Temperature Menu.
Spa Shortcut Mode - Set Temperature by using the Temperature Control
Button.
In the Spa Shortcut Mode, with the Key to the Button Functions on Screen, Touch the
p the Set Temperature Menu. On the Set
Temperature Control
Button to open
Temperature Menu, Touch the Up
and Down
Buttons to Raise or Lower the
Water Set Temperature in 1°F or 0.5°C increments. Touch Left
to go to the Lowest Set Temp of 70°F (21.0°C), or Touch Right
to go to the Highest Set Temp of
104°F (40.0°C). Then Touch Back
to Exit. To Set a Temperature higher than 104ºF
(40.0°C), see “Set Over Temperature”.
Spa Navigation Mode - Set Temperature by Navigating to the Control Menu.
In Spa Navigation Mode, with the Default Entertainment Highlighted, Move Up
Control and then Move Left
Control,
or Right
to Temperature .
to
With Temperature Highlighted,
g
Touch Select
to open the Set Temperature Menu.
Touch the Up
, Down
, Left
, and Right
Buttons to Raise or Lower the
Water Set Temperature. Then Touch Back
to Exit.
Page 16
Help with Messages and Maintenance - Help is available for various Pop-Up
Messages you may see on the Screen, and for day to day Spa Maintenance.
For Help with Pop-Up Messages, in Spa Navigation Mode, with the Default
Entertainment Highlighted, Move Up
to Help
Help, and then Touch Select
to open
the Messages Menu.
Move Up
or Down
to the desired Messages Menu Bar, then Move Right
View that Pop-Up Message.
For More Help on that Message, Move Right
Back
to Exit Back to the Previous Menus.
for additional information, or Touch
For Help with Maintenance, in the Help Menu with Messages Highlighted, Move
Right
to Maintenance and Touch Select
to open the How To Menu.
Page 17
to
Maintenance Help (Continued)
Move Up
or Down
to the desired Maintenance How To Menu Bar, then Move
Right
to View that Maintenance Help information. Then, Touch Back
to Exit
Back to the Previous Menus.
The Message Screen Background Color will be GREEN for an Information or Instruction
Message, YELLOW for a Caution Message, or RED for a Warning Message.
Set Your Moods - Unique preset Moods can be Modified any way you want them.
You can preset Pumps and Speeds, Lights and Levels, and which Device you want
playing Music in the Various Moods. Most Spas will have a Single Button assigned to
Instantly turn On the Preset Mood.
To Setup the Relax Mood, in Spa Navigation Mode, with the Default Entertainment
Highlighted, Move Up
to Moods
Moods, and then Touch Select
to open the Relax
Setup Menu.
To assign Relax to the Mood Button, on the Relax Mood Menu Bar, Touch Select
.
To Setup the Devices, Speeds, and Levels you want to operate in the Relax Mood,
from the Select Devices Menu Bar, Move Right
to the Mood Devices Menu.
Page 18
Moods Setup (Continued)
Scroll through the list of available Mood Devices, and turn them On or Off, set the
Pump and Blower Speeds, set the Spa
p Light Level, and set the Music Player for the
Relax Mood by Touching the Select
Button as required for each Device. Touch the
Back
Button to go back to the previous Menu.
To Set the Duration of the Mood before it turns Off, on the Set Time Duration Menu
Bar, Move Right
to the Set Time Duration Menu. To Set or Change the Time
Duration, Move Left
or Right
to Hours or Minutes, and then Touch Up
or
Down
to change the Time. Touch Back
to go back to previous Menus.
Set Your Wellness Timers - The Timers Feature has three different functions.
There’s a Timer that starts at 0:00:00 and counts up, three Countdown Timers that
count down to 0:00, and an Alarm that Flashes the Spa Light at the Set time.
To Set your Timer in Wellness Timers, in Spa
p Navigation Mode, with the Default
Entertainment Highlighted, Move Down
to Timers
Timers, and Touch the Select
Button to open the Timer Menu.
Page 19
Timers Setup (Continued)
To Start or Reset the Timer, Move Right
or Left
to the Start and Reset Icons,
and Touch Select
. Touch Back
to Exit Back to the Previous Menu.
To Set your Countdown Timer in Wellness Timers, from the Timers Menu with
Timer Highlighted, Move Left
to Countdown and Touch Select
to open the Set
Countdown Menu.
At the end of the Countdown, you can Flash an Alarm (Flash the Spa Light), turn Off all
the Pumps that are running, or turn Off everything that is On except the Spa Light. To
Set the Countdown Time, from any of the three Countdown Timer Menu Bars, Flash
Alarm for example, Scroll Down
to Flash Alarm, and then Move Right
to the
Flash Alarm Set Menu.
To Set the Flash Alarm Countdown Time in the Flash Alarm Set Menu, Move Left
or Right
to Hours or Minutes, and then Touch Up
or Down
to change the
Countdown Time. Touch Back
to Exit Back to the Set Countdown Menu and Start
the Countdown Timer.
Page 20
Timers Setup (Continued)
To Start the most recently Set Countdown Timer, on the Set Countdown Menu, from
the Start Countdown Menu Bar, Touch the Select
Button to turn it On.
The Countdown Timer Message appears on the Screen at the end of the Countdown
Alarm time. To Exit the Message, Touch the Back
Button to return to the previous
Screen.
To Set your Alarm in Wellness Timers, from the Timers Menu with Timer Highlighted,
Move Right
to Alarm and Touch Select
to open the Set Alarm Menu.
To Set the Alarm to On or Off, from the Alarm Menu Bar, Touch the Select
Button.
To Set the Alarm Time, from the Alarm Time Menu Bar, Move Right
to the Alarm
Time Set Menu.
At the Set Alarm Time on the Set Alarm Days, the Spa Light will Flash and there will
be a Pop-Up Message on the Display Screen.
Page 21
Timers Setup (Continued)
To Change the Alarm Time, Move Left
or Right
to Hours or Minutes, and then
Touch Up
or Down
to change the Time. Touch Back
to Exit Back and Set
the Alarm Days. To Set the Alarm Days, from the Alarm Days Menu Bar, Move
Right
to the Alarm Days Set Menu.
y of the week are turned On. To turn an Alarm Day Off or On, Move
By Default, all days
Left
or Right
to that day and Touch Select
. To Exit back to the previous
Menus, Touch Back
.
The Alarm Time Message appears on the Screen at the Alarm Set Time on the
Alarm Days. To Exit the Message, Touch the Back
Button to return to the previous
Screen. The Spa Light will Flash until the Back
Button is Touched.
Your Entertainment and Games
Play Your Games - The Games Feature will allow you to Play several different
Games on your Control Panel using the Navigation Buttons.
In Spa Navigation Mode, with the Default Entertainment Highlighted, Move Down
to Games
Games, and Touch the Select
Button to open the Trivia Quiz Game.
Page 22
Games (Continued)
To Play the Trivia Quiz Game, Touch Left
, Right
, Up
, or Down
to
Answer the Trivia Quiz questions. You get Points for selecting the correct answers to
the questions. Touch Back
to Exit Back to the Games Menu.
Entertain With Your iPod or iPhone - The Entertainment Feature will allow
you to watch Movies, listen to Music, watch Podcasts, and view Photos or Slideshows
from your connected iPod, iPhone, or other USB connected MP3 Player or Flash Drive.
You will have complete On Screen Control of all of your iPod Entertainment Features,
directly from your Merlin Control Panel.
Any Apple iPhone, iPod, or iPod Touch will work with the eControl, including iPhone
4, iPhone 3GS, iPhone 3G, iPhone, iPod Classic, iPod 5th Gen, iPod Touch 1st & 2nd
Gen, and iPod Nano 3rd, 4th, & 5th Gen. The compatible Entertainment formats which
are recognized by your eControl are MP3, WMA, MPEG, and MPEG4.
Open the door on your iPod eControl Module and connect the Apple iPod Cable to
your iPod or other Apple compatible Entertainment Device (iPod, iPhone, iTouch, etc.).
Or, plug a compatible USB Connected Entertainment Device (USB MP3 Player, USB
Flash Drive containing Music or Movie files) into the USB Connector. Make sure your
Entertainment Device is securely inside the eControl Module, and close the door
securely to protect your Entertainment Device from water.
To View your iPod Entertainment on the Merlin Screen, and Control your iPod with the
Merlin Buttons, in Spa Navigation Mode, with the Default Entertainment Highlighted
and the iPod Icon Highlighted, Touch the Select
Button to open the iPod Entertainment and Control Screen. When the Entertainment Screen opens, there will be a
Blue Screen Displayed if Power to the iPod has not been turned On or if there is not a
Movie playing.
Page 23
Entertainment (Continued)
The 2
Button is used to Open the iPod Control Menu and turn On the iPod.
When the iPod Entertainment Screen opens, there will be a Menu Bar on each side
of the Merlin Screen that indicates the Entertainment Shortcut Mode functions of the
Numbered Control Panel Buttons. The other buttons can be used to Navigate the On
Screen Menus, Left
, Right
, Up
, Down
, and Select
. The iPod
Vii
t all of your iPod Entertainment.
Entertainment Screen can be used to View
or Listen to
g
To Navigate
the On Screen iPod Menu, with the Side Menus on the Screen, use the
Left
, Right
, Up
, Down
, and Select
Buttons. To Exit the Side
Menus and Entertainment Control, Touch Back
, or wait 30 seconds for auto exit.
When the Side Menus are not on the screen, the Buttons are in Spa Shortcut Mode,
and all of the Buttons can be used to operate the Spa Functions, like Jets, Light, etc.
To open the Side Menus and return the Buttons to Entertainment Shortcut Mode
Control, Touch Back
, and then Touch Back
again to close the Side Menus.
Note: For Detailed Instructions on Playing and Controlling your Entertainment, see
Using Your Nyrius Entertainment Control Menu on Page 26.
Page 24
Entertainment (Continued)
To Control the iPod while the Movie is playing, First touch Back
to open the Side
Menus, then use the Shortcut Buttons to Control the iPod. For example, touch 9
,
which is Stop, to Stop the Movie and return to the On Screen iPod Menu.
The 3
Menus.
Button is used to go back and forth between Page 1 and Page 2 of the Side
Control Your LED Spa Light (Optional Equipment) - If you have an
Optional LED Spa Light that is Controllable, then you can select from five different LED
Light Colors or three different LED Light Shows. Whatever Light Color or Light Show
you have selected last will be turned On the next time you turn On the LED Spa Light.
Spa Shortcut Mode - Turn On the LED Light by using the Light
Button.
p Shortcut Mode, with the Key to the Button Functions on Screen, Touch the
In the Spa
Light
Button to open
p the LED Light
g Control Menu. On the LED Light Control
Menu, Touch the Up
and Down
Buttons to Scroll to one of the Five LED Light
Colors or one of the three LED Light Shows, then Touch Select
to Change to that
LED Light Control Option. Then Touch Back
to Exit the LED Light Control Menu,
or the Menu will Auto Exit in a few seconds.
Page 25
Using Your Nyrius Entertainment Control Menu - You Select and Play your
Entertainment by Using the Nyrius Control Menu. To Navigate the Control Menu, with
the Side Bar Menus on the Screen, use the Left
, Right
, Up , Down , and
Select
Buttons. To Exit the Side Bar Menus and Control Mode, Touch Back
,
or wait 30 seconds for auto exit. To open the Side Bar Menus, Touch Back
again.
The 2
Power Button is used to Open the Control Menu and turn On the iPod. If
your iPod is connected, you will see Connecting...please wait, and then Connect OK.
1) To Play Video from your iPod, from the Home Menu, Select iPod Mode then
Touch Select
or Right
to enter the iPod Menu. Scroll Down
to Video and
Move Right
to the Video Menu.
To View and Play all the Movie Titles on your iPod, Move Right
Movies>All Menu.
2 times to the
Scroll Down
to the Movie you want to View, and Touch Select
to start the
Movie. The Side Bar Menus will close in a few seconds, or Touch Back
to close
the Side Bar Menus.
Page 26
iPod Control Menu (Continued)
2) To Play Music from your iPod, from the Home Menu, select iPod Mode then
Touch Select
or Right
to enter the iPod Menu. Scroll to Music, then Move
Right
to the Music Menu.
To Select your Music by Artist, Scroll Down
to Artists, and Move Right
to the
Music Artists Menu. Then Scroll Down
and select an Artist. Now Move Right
to View a List of Music by that Artist. Scroll Down
to the Song you want to Play
and Touch Select
.
3) To View Photos from y
your iPod, from the Home Menu, Select iPod Mode then
Touch Select
or Right
to enter the iPod Menu. Scroll Down
to Photos/
Camera Videos and Touch 3
Page 2 to go to Page 2 of the Side Bar Menu.
Touch 9
Display to turn On Photo Display Mode. You Control your Photos from
your iPod. In the Home menu of your iPod, select Photos > Photo Library to select a
Photo, then Touch Select
to View the Photo. To start a Slideshow, Touch Select
again. Touch Left
to Exit.
Page 27
iPod Control Menu (Continued)
4) To Play Music, Video, or Photos from a USB Device, from the Home Menu, Scroll
Down
to USB Mode then Touch Select
or Right
to open the USB Control
Menu. Scroll
S
to one of the Entertainment Folders on the USB Device, then Move
Right
to the Photos, Music, or Video List.
For Photos, to Select your Photo from the Photo List, Scroll Down
to the Photo
and Touch Select
to View that Photo Full Screen. To manipulate the Photo that’s
being viewed, Touch Up
to Flip the Photo Vertically, Touch Down
to Flip the
Photo Horizontally, Touch Left
to Rotate the Photo 90° Counter-Clockwise, or
Touch Right
to Rotate the Photo 90° Clockwise. To Play all the Photos in the Photo List, Touch 5
Play for a Slideshow. For Music or Video, to Select yyour Music or
Video from the List, Scroll Down
to the Music or Video and Touch 5
Play or
Select
to Play the Item. To Pause Playback of the Photos, Music, or Video, Touch
6
Pause. To Resume Playback, Touch 5
Play again. To Stop Playback,
and
y
return to the USB Control Menu, Touch 9
Stop. You must Touch 2
Power two
times to Exit back to the Home Menu. This will turn eControl Power Off and back On.
5) To Play Music from an MP3 Player , Plug the eControl Headphone Cable into
your MP3 Player. From the Home Menu, Scroll Down
to AUX IN Mode then Touch
Select
or Right
to Connect to the MP3 Player. Turn the Volume all the way Up
on your MP3 Player, and then Touch 4
Vol Up to Raise the Volume or 7
Vol Dn
to Lower the Volume. Touch Left
to Exit back to the Home Menu.
Page 28
SAVE THESE INSTRUCTIONS
WARNING – Risk of Accidental Drowning. Extreme caution must be exercised to
prevent unauthorized access by children. To avoid accidents, ensure that children
cannot use a spa or hot tub unless they are closely supervised at all times.
DANGER – To reduce the risk of drowning from hair and body entrapment, install
a suction fitting(s) with a marked flow rate that equals or exceeds the flow rate marked
on the equipment assembly.
DANGER – To reduce the risk of injury, do not remove the suction fittings. Never
operate a spa or hot tub if the suction fittings are broken or missing. Never replace a
suction fitting with one rated less than the flow rate marked on the equipment
assembly.
DANGER – Risk of Electric Shock. Do not permit any electric appliance, such as
a light, telephone, radio, or television, within 5 feet (1.5 m) of a spa or hot tub.
WARNING – Risk of Electric Shock. Install at least 5 feet (1.5 m) from the
inside wall of spa or hot tub using nonmetallic plumbing.
WARNING – To reduce the risk of injury:
The water in a spa should never exceed 40°C (104°F). Water temperatures between
38°C (100°F) and 40°C (104°F) are considered safe for a healthy adult. Lower water
temperatures are recommended for young children and when spa use exceeds 10
minutes.
Since excessive water temperatures have a high potential for causing fetal damage
during the early months of pregnancy, pregnant or possibly pregnant women should
limit spa water temperatures to 38°C (100°F).
Before entering a spa or hot tub, the user should measure the water temperature since
the tolerance of water temperature-regulating devices varies.
The use of alcohol, drugs, or medication before or during spa or hot tub use may lead
to unconsciousness with the possibility of drowning.
Obese persons and persons with a history of heart disease, low or high blood
pressure, circulatory system problems, or diabetes should consult a physician before
using a spa.
Persons using medication should consult a physician before using a spa or hot tub
since some medication may induce drowsiness while other medication may affect heart
rate, blood pressure, and circulation.
SAVE THESE INSTRUCTIONS
Page 29