1
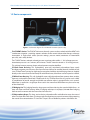
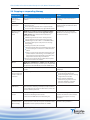
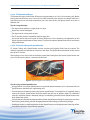
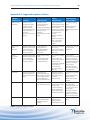
Clinical Guidance
for the Innovative Therapies
Wound Treatment Systems
Clinical Guidance for the Innovative Therapies Inc. (ITI) Wound Treatment Systems
1
CAUTION: This guidance is not intended as a guarantee of results, outcome, or performance
of the Innovative Therapies Inc. (ITI) Wound Treatment Systems. These recommendations
are intended to help clinicians establish patient-specific treatment protocols. As with any
application, please consult the patient’s treating physician about individual conditions and
treatment, and follow all applicable instructions for use and labeling for product use and
operation.
Always consult sections of this guidance along with the applicable instructions for use,
labeling, and safety information for the Innovative Therapies Inc. (ITI) Wound Treatment
System before placing any Innovative Therapies Inc. (ITI) System on a patient.
Clinical Guidance for the Innovative Therapies Inc. (ITI) Wound Treatment Systems
2
Table of Contents
1. Introduction . . . . . . . . . . . . . . . . . . . . . . . . . . . . . . . . . . . . . . . . . . . . . . . . . . . . . . . . . . . . . . . . . . . . . . . . . . . . . . . . . . . . . . . . . . . . . . . 4
1.1. The Innovative Therapies Inc. (ITI) Wound Treatment Systems . . . . . . . . . . . . . . . . . . . . . . . . . . . . . . . . . . . . . . . . . . . . . . . 4
1.2. Device components . . . . . . . . . . . . . . . . . . . . . . . . . . . . . . . . . . . . . . . . . . . . . . . . . . . . . . . . . . . . . . . . . . . . . . . . . . . . . . . . . . . . . . . 5
2. Patient Selection . . . . . . . . . . . . . . . . . . . . . . . . . . . . . . . . . . . . . . . . . . . . . . . . . . . . . . . . . . . . . . . . . . . . . . . . . . . . . . . . . . . . . . . . . . .
2.1 Indications. . . . . . . . . . . . . . . . . . . . . . . . . . . . . . . . . . . . . . . . . . . . . . . . . . . . . . . . . . . . . . . . . . . . . . . . . . . . . . . . . . . . . . . . . . . . . . . . . .
2.2 Contraindications . . . . . . . . . . . . . . . . . . . . . . . . . . . . . . . . . . . . . . . . . . . . . . . . . . . . . . . . . . . . . . . . . . . . . . . . . . . . . . . . . . . . . . . . . . .
2.3 Precautions . . . . . . . . . . . . . . . . . . . . . . . . . . . . . . . . . . . . . . . . . . . . . . . . . . . . . . . . . . . . . . . . . . . . . . . . . . . . . . . . . . . . . . . . . . . . . . . . .
2.4 Stopping or suspending therapy . . . . . . . . . . . . . . . . . . . . . . . . . . . . . . . . . . . . . . . . . . . . . . . . . . . . . . . . . . . . . . . . . . . . . . . . . . . .
6
6
7
7
8
3. Procedure Outline . . . . . . . . . . . . . . . . . . . . . . . . . . . . . . . . . . . . . . . . . . . . . . . . . . . . . . . . . . . . . . . . . . . . . . . . . . . . . . . . . . . . . . . . . . 9
3.1 Comprehensive plan of care . . . . . . . . . . . . . . . . . . . . . . . . . . . . . . . . . . . . . . . . . . . . . . . . . . . . . . . . . . . . . . . . . . . . . . . . . . . . . . . . 9
3.2 Prescription / order . . . . . . . . . . . . . . . . . . . . . . . . . . . . . . . . . . . . . . . . . . . . . . . . . . . . . . . . . . . . . . . . . . . . . . . . . . . . . . . . . . . . . . . . 10
3.3 Preparation. . . . . . . . . . . . . . . . . . . . . . . . . . . . . . . . . . . . . . . . . . . . . . . . . . . . . . . . . . . . . . . . . . . . . . . . . . . . . . . . . . . . . . . . . . . . . . . . 10
3.3.1. Wound bed. . . . . . . . . . . . . . . . . . . . . . . . . . . . . . . . . . . . . . . . . . . . . . . . . . . . . . . . . . . . . . . . . . . . . . . . . . . . . . . . . . . . . . . . . . . . 10
3.3.2. Periwound skin . . . . . . . . . . . . . . . . . . . . . . . . . . . . . . . . . . . . . . . . . . . . . . . . . . . . . . . . . . . . . . . . . . . . . . . . . . . . . . . . . . . . . . . 11
3.4 Dressings. . . . . . . . . . . . . . . . . . . . . . . . . . . . . . . . . . . . . . . . . . . . . . . . . . . . . . . . . . . . . . . . . . . . . . . . . . . . . . . . . . . . . . . . . . . . . . . . . . 12
3.4.1. Dressing procedure outline . . . . . . . . . . . . . . . . . . . . . . . . . . . . . . . . . . . . . . . . . . . . . . . . . . . . . . . . . . . . . . . . . . . . . . . . . . . . 12
3.4.2. Dressing removal . . . . . . . . . . . . . . . . . . . . . . . . . . . . . . . . . . . . . . . . . . . . . . . . . . . . . . . . . . . . . . . . . . . . . . . . . . . . . . . . . . . . . . 13
3.4.3. Typical dressings and applications . . . . . . . . . . . . . . . . . . . . . . . . . . . . . . . . . . . . . . . . . . . . . . . . . . . . . . . . . . . . . . . . . . . . . 14
3.4.3.1. ITI White Foam Dressing . . . . . . . . . . . . . . . . . . . . . . . . . . . . . . . . . . . . . . . . . . . . . . . . . . . . . . . . . . . . . . . . . . . . . . . . . . . 14
3.4.3.2. Other Wound contact layers . . . . . . . . . . . . . . . . . . . . . . . . . . . . . . . . . . . . . . . . . . . . . . . . . . . . . . . . . . . . . . . . . . . . . . . 14
3.4.3.3. ITI Black Foam Dressing . . . . . . . . . . . . . . . . . . . . . . . . . . . . . . . . . . . . . . . . . . . . . . . . . . . . . . . . . . . . . . . . . . . . . . . . . . . . 15
3.4.3.4. ITI Polyurethane Drape . . . . . . . . . . . . . . . . . . . . . . . . . . . . . . . . . . . . . . . . . . . . . . . . . . . . . . . . . . . . . . . . . . . . . . . . . . . . 16
3.4.3.5. ITI Suction Tubing with SpeedConnect . . . . . . . . . . . . . . . . . . . . . . . . . . . . . . . . . . . . . . . . . . . . . . . . . . . . . . . . . . . . . 16
3.4.3.6. ITI Irrigation Tubing with SpeedConnect . . . . . . . . . . . . . . . . . . . . . . . . . . . . . . . . . . . . . . . . . . . . . . . . . . . . . . . . . . . 17
3.4.4. Special dressing considerations . . . . . . . . . . . . . . . . . . . . . . . . . . . . . . . . . . . . . . . . . . . . . . . . . . . . . . . . . . . . . . . . . . . . . . . . 17
3.4.4.1. ITI Bridging Set . . . . . . . . . . . . . . . . . . . . . . . . . . . . . . . . . . . . . . . . . . . . . . . . . . . . . . . . . . . . . . . . . . . . . . . . . . . . . . . . . . . . 17
3.4.4.2. Mushroom dressings . . . . . . . . . . . . . . . . . . . . . . . . . . . . . . . . . . . . . . . . . . . . . . . . . . . . . . . . . . . . . . . . . . . . . . . . . . . . . . 18
3.4.4.3. Irregularly shaped wounds. . . . . . . . . . . . . . . . . . . . . . . . . . . . . . . . . . . . . . . . . . . . . . . . . . . . . . . . . . . . . . . . . . . . . . . . . 19
3.4.4.4. Dressing two wounds. . . . . . . . . . . . . . . . . . . . . . . . . . . . . . . . . . . . . . . . . . . . . . . . . . . . . . . . . . . . . . . . . . . . . . . . . . . . . . 19
3.4.4.5. Securing a tight seal . . . . . . . . . . . . . . . . . . . . . . . . . . . . . . . . . . . . . . . . . . . . . . . . . . . . . . . . . . . . . . . . . . . . . . . . . . . . . . . 20
3.5 Evaluation during treatment . . . . . . . . . . . . . . . . . . . . . . . . . . . . . . . . . . . . . . . . . . . . . . . . . . . . . . . . . . . . . . . . . . . . . . . . . . . . . . . 20
3.5.1. Elements to document . . . . . . . . . . . . . . . . . . . . . . . . . . . . . . . . . . . . . . . . . . . . . . . . . . . . . . . . . . . . . . . . . . . . . . . . . . . . . . . . 20
3.5.2. Factors delaying healing . . . . . . . . . . . . . . . . . . . . . . . . . . . . . . . . . . . . . . . . . . . . . . . . . . . . . . . . . . . . . . . . . . . . . . . . . . . . . . . 21
4. ITI Wound Treatment Systems Quick Reference Guide . . . . . . . . . . . . . . . . . . . . . . . . . . . . . . . . . . . . . . . . . . . . . . . . . . . 21
4.1 Therapy Unit Instructions . . . . . . . . . . . . . . . . . . . . . . . . . . . . . . . . . . . . . . . . . . . . . . . . . . . . . . . . . . . . . . . . . . . . . . . . . . . . . . . . . . 21
4.2 Changing the Canister . . . . . . . . . . . . . . . . . . . . . . . . . . . . . . . . . . . . . . . . . . . . . . . . . . . . . . . . . . . . . . . . . . . . . . . . . . . . . . . . . . . . . 23
4.3 Daily and weekly ITI device maintenance . . . . . . . . . . . . . . . . . . . . . . . . . . . . . . . . . . . . . . . . . . . . . . . . . . . . . . . . . . . . . . . . . . 23
Clinical Guidance for the Innovative Therapies Inc. (ITI) Wound Treatment Systems
3
5. Using an ITI Wound Treatment system in a Sterile Field . . . . . . . . . . . . . . . . . . . . . . . . . . . . . . . . . . . . . . . . . . . . . . . . . . 24
5.1 Sterile dressings / aseptic canister . . . . . . . . . . . . . . . . . . . . . . . . . . . . . . . . . . . . . . . . . . . . . . . . . . . . . . . . . . . . . . . . . . . . . . . . . 24
5.2 Testing a seal in the operating room . . . . . . . . . . . . . . . . . . . . . . . . . . . . . . . . . . . . . . . . . . . . . . . . . . . . . . . . . . . . . . . . . . . . . . . 24
6. Patient Education . . . . . . . . . . . . . . . . . . . . . . . . . . . . . . . . . . . . . . . . . . . . . . . . . . . . . . . . . . . . . . . . . . . . . . . . . . . . . . . . . . . . . . . . . 25
Appendices
Appendix A. Pressure / mode guidelines . . . . . . . . . . . . . . . . . . . . . . . . . . . . . . . . . . . . . . . . . . . . . . . . . . . . . . . . . . . . . . . . . . . .
Appendix A.1. Pressure / mode by wound type . . . . . . . . . . . . . . . . . . . . . . . . . . . . . . . . . . . . . . . . . . . . . . . . . . . . . . . . . . . . .
Appendix A.2. Pressure /mode by wound condition . . . . . . . . . . . . . . . . . . . . . . . . . . . . . . . . . . . . . . . . . . . . . . . . . . . . . . . .
Appendix B. Irrigation Guidelines . . . . . . . . . . . . . . . . . . . . . . . . . . . . . . . . . . . . . . . . . . . . . . . . . . . . . . . . . . . . . . . . . . . . . . . . . . .
26
26
28
29
Appendix B.1. NPWT with simultaneous irrigation. . . . . . . . . . . . . . . . . . . . . . . . . . . . . . . . . . . . . . . . . . . . . . . . . . . . . . . . . . 29
Appendix B.2. Suggested irrigation solutions. . . . . . . . . . . . . . . . . . . . . . . . . . . . . . . . . . . . . . . . . . . . . . . . . . . . . . . . . . . . . . . 29
Appendix B.3. Intermittent irrigation . . . . . . . . . . . . . . . . . . . . . . . . . . . . . . . . . . . . . . . . . . . . . . . . . . . . . . . . . . . . . . . . . . . . . . . 31
Figures
Figure 1. A schematic diagram of an ITI Wound Treatment Systems setup . . . . . . . . . . . . . . . . . . . . . . . . . . . . . . . . . . . . . . . 5
Figure 2. Typical irrigation and suction ports set-up. . . . . . . . . . . . . . . . . . . . . . . . . . . . . . . . . . . . . . . . . . . . . . . . . . . . . . . . . . . . 16
Figure 3. Bridging two wounds . . . . . . . . . . . . . . . . . . . . . . . . . . . . . . . . . . . . . . . . . . . . . . . . . . . . . . . . . . . . . . . . . . . . . . . . . . . . . . . . 18
Figure 4. Example of mushroom dressing. . . . . . . . . . . . . . . . . . . . . . . . . . . . . . . . . . . . . . . . . . . . . . . . . . . . . . . . . . . . . . . . . . . . . . 18
Figure 5. Using a bridge to connect 2 wounds . . . . . . . . . . . . . . . . . . . . . . . . . . . . . . . . . . . . . . . . . . . . . . . . . . . . . . . . . . . . . . . . . 19
Figure 6. Connecting 2 wounds using the ITI Y-Connector . . . . . . . . . . . . . . . . . . . . . . . . . . . . . . . . . . . . . . . . . . . . . . . . . . . . . 19
Tables
Table 1. Stopping or suspending therapy . . . . . . . . . . . . . . . . . . . . . . . . . . . . . . . . . . . . . . . . . . . . . . . . . . . . . . . . . . . . . . . . . . . . . . . 8
Table 2. Pressure / mode by wound type . . . . . . . . . . . . . . . . . . . . . . . . . . . . . . . . . . . . . . . . . . . . . . . . . . . . . . . . . . . . . . . . . . . . . . 26
Table 3. Pressure / mode by wound condition . . . . . . . . . . . . . . . . . . . . . . . . . . . . . . . . . . . . . . . . . . . . . . . . . . . . . . . . . . . . . . . . . 28
Table 4. Suggested irrigation solutions . . . . . . . . . . . . . . . . . . . . . . . . . . . . . . . . . . . . . . . . . . . . . . . . . . . . . . . . . . . . . . . . . . . . . . . . 30
Clinical Guidance for the Innovative Therapies Inc. (ITI) Wound Treatment Systems
4
1. Introduction
1.1 The Innovative Therapies Inc. (ITI) Wound Treatment Systems
The Innovative Therapies Inc. (ITI) Wound Treatment Systems promote wound healing by removing
infectious materials, exudate, and components associated with chronic wound fluid. Our proprietary
negative pressure wound therapy (NPWT) system delivers negative pressure and simultaneous irrigation
using patented foam dressings and accessories. The ITI Wound Treatment Systems are suitable for acute
care, long-term care, nursing home or home care settings, and are eligible for reimbursement under
most coverage policies, Medicare, and state mandates.
Clinical Guidance for the Innovative Therapies Inc. (ITI) Wound Treatment Systems
5
1.2 Device components
Figure 1. A schematic diagram of an ITI Wound Treatment System setup
The ITI NPWT devices: The ITI NPWT devices are the only systems on the market that deliver NPWT with
simultaneous irrigation—providing aqueous solutions to the wound without tube changes or therapy
interruption. A single touch selects pressure settings, pressure mode (continuous or intermittent
pressure), and a safety lockout.
The ITI NPWT devices maintain selected pressure at canister outlet within +/- 10% of target pressure.
Intermittent pressure is on 5 minutes, off 2 minutes. The “off” interval maintains a -25 mmHg pressure.
This minimal vacuum preserves drape seal and prevents exudate backflow.
ITI Black Foam Dressing: This hydrophobic, open-cell, reticulated polyurethane foam evenly
distributes negative pressure across the wound base and allows for exudate removal. Available in four
sizes, ITI Black Foam Dressing has high tensile strength and exhibits minimal fraying when cut. Applied
directly to the wound bed and to loosely fill undermined areas, black foam can be layered as needed.
ITI White Foam Dressing: This soft, hydrophilic, open-cell polyurethane foam protects bone, tendon,
ligaments, and painful wound beds. Flexible wet or dry, ITI White Foam Dressing can be cut or rolled.
Its combination of tensile strength and pliable construction makes it appropriate for use in tunnels.
White foam is applied in a single layer when used in the wound bed. Black foam may be used on top
of the white foam.
ITI Bridging Set: This bridging foam has larger pores and lower density than standard black foam—to
keep cells open and fluid moving. When a bridging technique is employed, do not allow bridging
foam to come in contact with the wound bed or intact skin.
ITI Polyurethane Drape: This clear, semi-occlusive polyurethane film with adhesive covers the wound
after it has been filled with foam. The drape seals the negative pressure environment while protecting
the wound from contamination. ITI SensiSkin™ Drape is also available for patients with friable skin.
Clinical Guidance for the Innovative Therapies Inc. (ITI) Wound Treatment Systems
6
ITI Suction Tubing with SpeedConnect™: This 2.4 m (8 ft) tube with an adhesive connector end
adheres around a hole cut in the drape, delivering negative pressure to the wound. The distal end
directly connects to the ITI NPWT device canister, removing exudate.
ITI Irrigation Tubing with SpeedConnect™: This custom 2.4 m (8 ft) tube is applied to the drape with
the same technique as the Suction SpeedConnect. It delivers aqueous fluids—removed, along with
exudate, by the Suction SpeedConnect. The distal end’s Luer lock connector accommodates a wide
range of commercial tubings. This tube is often called the Irrigation SpeedConnect. Irrigation may also
be applied using the ITI Irrigation Delivery Set. The Irrigation Delivery Set is an integrated system. The
irrigation SpeedConnect is melded with the tubing and irrigant container. This eliminates the need to
connect tubings.
ITI Canister: Available in various volumes depending on the specific device used, the ITI canister
collects exudate and irrigation solution. Its built-in filter prevents overflows. The 300 cc and 500 cc
canisters are available with an isolyzer pack to solidify fluid. The 300 cc and 500 cc canisters are also
available without an isolyzer pack. The ITI device monitors canister volume. Audible and visual alarms
occur when the canister is 90% full. While the alarms continue, therapy is provided. The device will stop
operating when the canister is 100% full. The filter size and structure provide a dual barrier against
fluids and microorganisms entering the ITI device.
ITI Y-Connector: Joins two ITI Suction Tubing with SpeedConnects to a single ITI device canister. Use
when employing a single ITI NPWT device for large wounds or two wounds.
2. Patient Selection
2.1 Indications
The ITI Wound Treatment System is indicated for patients who would benefit from vacuum-assisted drainage
and controlled delivery of topical wound treatment solutions and suspensions over the wound bed.
The system comprises a dressing and a powered suction pump that is designed to help promote wound
healing. The system is intended for use on patients who would benefit from a suction device—including
patients who would benefit from vacuum assisted drainage and removal of infectious materials or other
fluids from wounds under the influence of continuous and/or intermittent suction pressure.
ITI NPWT Wound Treatment Systems are intended for patients with:
Chronic, acute, traumatic, subacute, and dehisced wounds.
Diabetic ulcers and pressure ulcers.
Flaps and grafts.
Clinical Guidance for the Innovative Therapies Inc. (ITI) Wound Treatment Systems
7
2.2 Contraindications
ITI NPWT Wound Treatment Systems are contraindicated for patients with:
Malignancy in the wound.
Untreated osteomyelitis.
Non-enteric or unexplored fistulas.
Necrotic tissue with eschar present.
Infants or other patients with low fluid volume.
DO NOT place the ITI Dressing over exposed blood vessels or organs.
DO NOT use with irrigation if irrigation fluid temperature could cause an adverse reaction, such as a
change in the patient’s core body temperature. It is not recommended to deliver fluids to the thoracic
cavity.
The ITI Dressings are also contraindicated for hydrogen peroxide and solutions which are alcohol- based
or contain alcohol.
2.3 Precautions
NPWT precautions
Use with extreme caution for:
Patients with active bleeding, difficult wound hemostasis, or who are on anticoagulants.
Weakened, irradiated, or sutured blood vessels or organs.
Wounds with enteric fistula.
Unstable thoracic wounds.
Deep sternal wounds with unstable sternum.
DO NOT place a dressing over exposed blood vessels or organs.
When placing a dressing in close proximity to blood vessels, tendons, nerves, or organs, ensure that
they are adequately protected with overlying fascia, tissue, or other protective barriers.
Bone fragments or sharp edges could puncture a dressing barrier, vessel, or organ
The ITI Wound Treatment System does not require sterile canisters. Each individually packaged ITI
canister is aseptic (free of pathogenic microorganisms). Keep in mind that protocol requires ITI
canisters to remain outside the sterile field.
It is not recommended to use enzymatic debridement ointments as they may clog the foam dressing.
Clinical Guidance for the Innovative Therapies Inc. (ITI) Wound Treatment Systems
2.4 Stopping or suspending therapy
Circumstance
Action
Notes
Suspected or
confirmed wound
infection
Discontinue device and dressing, evaluate, and treat the
infection
Therapy can resume when infection is
resolving.
Patient reports
excessive pain
Consider the following interventions, as appropriate:
Decrease pressure
Prior to dressing, irrigate with saline or topical anesthetic
Cover wound base with white foam, topped with black foam
Check for exposed nerves. If exposed
nerves are found, discontinue the device
and dressing.
Hyperbaric oxygen
(HBO) therapy
session
NEVER allow a negative pressure wound therapy (NPWT)
device—whether on or off—inside a hyperbaric oxygen
(HBO) chamber. Device must be disconnected prior to
placement in the HBO.
Small electrical arcs associated with a
NPWT device and dressing components
could be a fire hazard.
If HBO therapy will exceed 2 hours—dressing must be
removed. Apply moist saline gauze dressing in its place.
If HBO therapy is less than 2 hours—consult HBO chamber
manufacturer with respect to the presence of a dressing
during therapy.
If dressings are allowed, ITI recommends:
Discontinue therapy. Disconnect the tubing from the canister.
Secure the tubing in a manner that is comfortable to the
patient.
If there is concern about electrostatic discharge due to the
synthetic materials of the dressing, cover the tubing and
dressing with a towel moistened with normal saline—this
will prevent electrostatic charge accumulation.
Reconnect and restart the ITI device ONLY after the patient
has been removed from the chamber.
MRI scan
NEVER allow an NPWT device—whether on or off—inside an
MRI suite. The foam dressing can remain in place, clamped. When
the patient has exited the MRI suite, restart the ITI NPWT device.
X-ray scan, CT scan
The dressing can be left in place and the device can continue to
operate.
Undebrided eschar or
slough covering more
than 25% of the total
wound base
Delay placing the device until wound is debrided.
Cardioversion
(defibrillation)
If the dressing is in the area where equipment or pads are to be
placed, remove it. If dressing is left in place, clamp and remove
suction tubing from the canister. In either instance, remove the
ITI device from the patient area.
Patient shower or
tub bath
1. Clamp the tubing.
2. Disconnect the tubing from the canister.
3. Remove the ITI NPWT device from the bathing area.
Autonomic
dysreflexia related to
spinal cord injury
If a patient experiences autonomic dysreflexia (sudden elevation
in blood pressure or heart rate in response to stimulation of the
sympathetic nervous system) discontinue use of NPWT.
Table 1. Stopping or suspending therapy
ITI black foam and white foam are not
radiopaque.
Excessive slough can clog foam pores,
decreasing therapy effectiveness
Continuous irrigation assists in removing
slough from the wound base
Use of enzymatic debridement
ointments may clog foam pores and
impact the distribution of negative
pressure across the wound base
The ITI device is designed to not cause an
electrical shock when in contact in water.
However, these steps are a necessary
precaution.
Discontinuing use of NPWT helps
minimize sensory stimulation.
8
Clinical Guidance for the Innovative Therapies Inc. (ITI) Wound Treatment Systems
9
3. Procedure Outline
Specific application of NPWT with ITI Wound Treatment Systems varies with each patient and wound.
All wounds require close monitoring between dressing changes. An ITI clinical representative can
provide assistance with specific clinical questions.
1) Become familiar with the specific ITI device’s User’s Manual and these clinical guides.
2) Develop a comprehensive, individual plan of care—including NPWT using the ITI Wound Treatment
System, along with nutritional support, tissue load management, skin protection, and patient
education.
3) Obtain prescription / order.
4) Prepare the wound bed.
5) Apply dressing components.
6) Begin treatment with NPWT using the ITI Wound Treatment system, selecting therapy options conforming
to the individual plan of care.
7) Educate the patient on use of the ITI Wound Treatment System.
8) Document all subsequent dressing changes and wound status, the number of foam pieces placed in,
and removed from, the wound.
Wounds should progress steadily under NPWT with the ITI Wound Treatment System. If the wound is not
progressing after two weeks of therapy, reevaluate treatment options.
3.1 Comprehensive plan of care
A comprehensive evaluation of both patient and wound is essential to determine whether NPWT with
irrigation is indicated. Even if the wound meets all criteria listed in Section 2. Patient Selection, the
clinician must carefully consider whether the device is appropriate.
Patient evaluation should include:
Health history, including any co-morbidities.
Current medications.
Nutritional assessment.
Strategies for offloading weight-bearing surfaces.
Caregiver support (for outpatient and home care patients).
Clinical Guidance for the Innovative Therapies Inc. (ITI) Wound Treatment Systems
10
Wound assessment should include:
Wound type and location.
Wound history.
Length, width, depth, tunnels, undermining.
Wound base tissue type.
Exudate color, odor, and quantity.
Condition of periwound skin.
Response to previous treatments.
3.2 Prescription / order
Before therapy begins, the appropriate ITI NPWT Wound Treatment System must be specified in a signed
prescription or order from a qualified clinician. The order should include:
Wound type and location.
Pressure setting (according to settings on device used).
Pressure mode (continuous or intermittent pressure).
Note: The ITI device maintains selected pressure at the canister outlet within +/- 10% of target pressure.
For intermittent pressure, the “off” interval maintains a -25 mmHg pressure. A minimal vacuum preserves
drape seal and prevents exudate backflow.
Type of irrigation solution and rate.
Type of dressings and change frequency.
Wound cleansing procedure.
Any special treatment for periwound skin.
Duration of therapy.
3.3 Preparation
3.3.1. Wound bed
Thorough wound bed preparation is essential before beginning therapy. In addition, at every dressing
change the wound must be thoroughly cleansed and inspected, as follows:
1. Debride non-viable and loose necrotic tissue. Remove any slough and eschar obliterating the wound
base. These tissue types prevent the foam dressing from contacting the wound base, inhibiting fluid
movement. Treatment can proceed if there is scattered slough in the wound base.
Note: Continuous irrigation assists in removing scattered slough from the wound base. Use of enzymatic
debridement ointments may clog foam pores and impact the distribution of negative pressure across
the wound base.
Clinical Guidance for the Innovative Therapies Inc. (ITI) Wound Treatment Systems
11
2. Thoroughly cleanse the wound and all tunnels/undermining. Flush a generous amount of irrigation
solution across the surface and any dead space (irregular contours, undermining, or tunnels) to
remove surface bacteria and debris.
Note: The individual plan of care should specify a wound cleansing procedure. Syringes, catheters, and
other cleansing devices can be effective.
Continuous irrigation therapy does not substitute for wound cleansing at dressing changes.
3.3.2. Periwound skin
Periwound skin must be assessed at the onset of therapy and at each dressing change. Skin protection
should be specified in the individual plan of care.
The ITI Polyurethane Drape’s adhesive helps prevent maceration. The ITI SensiSkin Drape for Sensitive
Skin provides additional periwound protection. Consider its use as part of the suggested interventions
below.
Suggested interventions for periwound skin conditions
Thin, fragile skin: Apply skin barrier wipe, beginning at the wound edge and working out to coat all
skin covered by drape.
Denuded skin:
If the skin is not weeping substantially, use a non-sting skin barrier wipe over denuded areas and
the intact periwound skin. Cover with drape as usual. If denudement does not resolve quickly,
consider using the ITI SensiSkin Drape for Sensitive Skin.
If significant weeping jeopardizes obtaining a seal with the drape, apply the non-sting skin barrier
as above and a hydrocolloid over the weeping areas.
Skin tears:
For small skin tears in which the surrounding skin is stable: Treat with a non-sting skin barrier and
drape as usual.
For larger or draining skin tears: Cover with appropriate wound dressings (such as hydrocolloids,
adhesive foams) and drape as usual.
To prevent future skin tears: Carefully remove the drape at each dressing change.
Candidiasis (skin yeast rash): Typically presenting as a macular/papular rash that may itch,
candidiasis can usually be treated with a topical antifungal product without a therapy disruption:
1. Sprinkle the skin with an appropriate antifungal powder and spread with gloved finger over and
beyond the rash.
2. Seal with skin barrier wipe or spray.
3. Repeat at each dressing change until rash is resolved for at least 72 hours.
Note: If Candida is present on the periwound skin, consider whether fungus might also be in the
wound base. If fungus in the wound base is suspected, consider irrigating with an appropriate
antimicrobial or antifungal product. See Appendix B. Irrigation.
Clinical Guidance for the Innovative Therapies Inc. (ITI) Wound Treatment Systems
12
Moist skin related to perspiration: If heavy perspiration causes the drape to dislodge:
Sometimes a skin barrier wipe is sufficient.
If the problem persists, sprinkle ostomy powder over the skin and spread with a gloved finger. Seal
with a skin barrier by patting with wipe or lightly applying spray.
If additional adhesive is needed, apply a thin coating of medical adhesive onto the skin.
Maceration:
Treat using the same interventions described above for moist skin.
Consider using ITI SensiSkin Drape. With a higher moisture vapor transfer rate, MVTR, than standard
drapes, this drape may prevent maceration of the skin.
If the maceration is severe, or does not resolve quickly, consider these steps:
1. Place therapy on hold for 48 hours to give the skin time to recover its integrity.
2. During this therapy holiday, apply appropriate moist wound dressings.
3. When therapy is resumed, consider changing the dressing application and/or pressure settings.
Adhesive non-acceptance: If the drape does not adhere, apply a light coating of medical adhesive to
the skin before draping.
Adhesive sensitivity (allergy):
If a patient reports previous sensitivity to adhesives, a patch test is advised:
1. Place three small—approximately 2 sq cm (0.3 sq in)—drapes on intact skin well away from
the wound and surrounding skin.
2. Every 24 hours remove one piece.
3. If a rash occurs, it is likely that the patient is sensitive to the adhesive.
If mild symptoms occur during the patch test or during therapy, consider using the ITI SensiSkin
Drape. A steroid spray can be prescribed to reduce itching.
If symptoms are severe, discontinue the use of the adhesive drape and, call an ITI clinical
consultant for assistance in planning alternative cover dressings.
3.4 Dressings
Because of the complex nature of wounds, clinician judgment is essential for each case. Routine dressing
changes should occur every 48 to 72 hours. Dressing changes for infected wounds should be
accomplished more frequently than 48 to 72 hours. Always replace with sterile disposables from
unopened packages. Follow established protocols regarding clean vs. sterile technique. Consult your ITI
clinical representative for assistance with specific clinical questions.
3.4.1. Dressing procedure outline
1. Carefully remove any previously applied dressing.
2. Carefully inspect—visually and manually—to ensure complete foam removal. Consult prior
documentation for number of pieces inserted.
Clinical Guidance for the Innovative Therapies Inc. (ITI) Wound Treatment Systems
13
3. Thoroughly cleanse wound.
4. Apply wound contact layer if indicated. (If a topical silver dressing is prescribed, apply the silver wound
contact layer over the wound bed—with black foam layered on top).
5. Fill wound with appropriate foam type, documenting number of pieces. Do not pack the dressing
tightly into the wound space. Foam should very lightly contact the wound edges, but not exert
pressure on the wound edges (which may slow wound edge contraction).
6. Cover with drape. As the drape’s adhesive is activated by pressure and body temperature, when
applying the drape, press firmly with gloved hands to ensure a seal.
7. Cut a nickel-sized hole in the drape to apply the SpeedConnects.
8. Apply SpeedConnects: one for NPWT, and one for irrigation.
9. Select therapy settings (pressure and mode) and begin therapy.
10. Change dressings every 48 to 72 hours (more frequently for infected wounds).
3.4.2. Dressing removal
Careful dressing removal prevents damage to the wound and surrounding skin.
To facilitate release, gently stretch and lift drape, while using a gloved index finger to hold down intact
skin.
Always make sure that all components have been removed from the wound. After removing the dressing:
Carefully observe the visible wound base.
Gently sweep undermined or tunneled areas with a gloved finger, if possible, to manually check
for complete foam removal.
Consult prior documentation and then count pieces of foam to be certain all previously inserted
pieces have been removed.
Tips: If the drape does not release easily, or if the skin is very fragile, try one of the following:
Apply a warm wet cloth to the skin as the drape is gently lifted.
Use a medical adhesive remover. After applying this product, wash and rinse the skin thoroughly to
remove any residue that might prevent the new drape from adhering.
If the skin is extremely fragile, carefully cut away the drape only over the open wound to enable the
dressing change, and layer a new drape over the old drape. By the next dressing change, the old drape
should more readily release from the skin.
Consider pre-medication, irrigating with a topical anesthetic before removing the dressing, or
applying a wound contact layer.
Clinical Guidance for the Innovative Therapies Inc. (ITI) Wound Treatment Systems
14
3.4.3. Typical dressings and applications
3.4.3.1. ITI White Foam Dressing
ITI White Foam Dressing is non-occlusive, hydrophilic, malleable, and provides tensile strength. The ITI
white foam is soft and pliable wet or dry. Supporting fluid movement, white foam helps keep the
wound interface moist.
When to consider using white foam
To loosely fill tunnels or tracts (first, ensure a fistula is not present).
To assuage painful wounds.
To treat wounds with fragile granulation tissue.
To protect exposed bone, tendons, or ligaments.
To treat flaps and grafts, when using black foam layer on top.
Tips when using white foam
Do not layer white foam as multiple layers may cause pooling of fluid. Wound contact layer is usually
unnecessary under white foam.
Can be used with irrigation.
Does not require an increased pressure setting.
Loosely fill all dead space within wounds to prevent granulation forming a seroma or abscess.
White foam is easily cut into strips for small spaces. Keep in mind that thin strips inherently provide less
tensile strength. As needed, wrap thin strips in a wound contact layer before placing them in a tunnel.
Roll to fill a larger tunnel or space.
When filling tunnels or undermined spaces, always leave a significant portion of the foam visible in the
wound base—so it is found during dressing removal. Because cutting white foam decreases tensile
strength, after cutting the foam pull both ends simultaneously to check for adequate tensile strength.
Layering of black foam over the white foam is recommended. The black foam enables NPWT to evenly
transport fluid collected by the white foam.
Always document the number of pieces of white foam used in the wound.
3.4.3.2. Other Wound contact layers
Also known as a wound non-adherent layer, the wound contact layer is a non-adhesive, non-occlusive
mesh that protects vulnerable structures, fragile granulation tissue, grafts, or suture lines. There are
several brands of wound contact layers on the market, each with distinct characteristics. In some cases,
a wound contact layer can be used in place of white foam. In granular wound bases, a wound contact
layer under black foam may slow the rate of granulation tissue formation.
Antimicrobial impregnated wound contact layers are available. If a topical silver dressing is prescribed,
apply the silver wound contact layer over the wound bed—with black foam layered on top.
Always document the inclusion of wound contact layers.
Clinical Guidance for the Innovative Therapies Inc. (ITI) Wound Treatment Systems
15
When to consider using a wound contact layer
If white foam is unavailable, use a wound contact layer to protect exposed bone, tendon, ligaments,
fascia, or tunnels.
As a covering over closed incision lines (sutured or stapled) before foam is applied.
As a wick to loosely fill small tunnels.
In the base of painful wounds or wounds with fragile granulation tissue.
To treat flaps and grafts, using black foam layered on top.
To reduce wound base bioburden, apply a silver-impregnated wound contact layer.
3.4.3.3. ITI Black Foam Dressing
ITI Black Foam Dressing is hydrophobic. Designed to conform to wound surfaces, black foam evenly
distributes negative pressure over the wound base, removing exudate and irrigation fluids.
When to consider using black foam
Directly to the wound bed when no structures are visible.
Over white foam or wound contact layer applied to the base of a wound.
To loosely fill undermined areas.
Over closed suture lines (apply wound contact layer first).
Over grafts and flaps (apply a white foam layer first).
Tips for using black foam
Never place black foam on intact skin or wound edges.
Cut black foam slightly smaller than wound.
Black foam can be cut to fit odd-shaped wounds. DO NOT use black foam in tunnels. Black foam may
be used in undermining. To ensure complete removal of black foam in extensive undermining,
consider wrapping it in a wound contact layer.
DO NOT cut black foam while holding it directly over the wound.
Loosely fill all parts of the wound with appropriate foam, but DO NOT pack or tightly fill, which would
decrease the rate of granulation. The goal is to enable negative pressure to slightly collapse wound
edges around the foam.
Extend black foam slightly higher than skin level. This prevents negative pressure from pulling the
dressing down in a convex shape.
There is no need to thin black foam in shallow wounds.
Black foam may be layered in deep wounds.
Black foam has sufficient tensile strength for undermining. When filling undermined spaces, always leave
a significant portion of the foam visible in the wound base—so it is found during dressing removal.
Loosely fill all dead space within wounds to prevent granulation from forming a seroma or abscess.
Always document the number of pieces of black foam used in the wound.
Clinical Guidance for the Innovative Therapies Inc. (ITI) Wound Treatment Systems
16
3.4.3.4. ITI Polyurethane Drape
ITI Polyurethane Drape should cover all foam plus approximately 4 cm (1.6 in) of surrounding skin. Before
placing the SpeedConnect, cut a 2.0 cm (0.8 in) nickel-sized hole in the drape. As the drape’s adhesive is
activated by pressure and body temperature, press the drape firmly with gloved hands to ensure an
effective seal.
Tips for using the drape
The drape can be applied as a single piece or in strips.
Drape strips can be overlapped.
The drape can be used to patch air leaks.
The ITI SensiSkin Drape is available for fragile or aging skin.
Use of skin barrier wipe on skin prior to placing drape may assist in obtaining seal. Application of skin
barrier wipe around perimeter of drape once it is in place can enhance adherence to the skin and reduce
lifting of the drape.
3.4.3.5. ITI Suction Tubing with SpeedConnect
ITI Suction Tubing with SpeedConnect removes exudate and irrigation fluids from the wound. The
adhesive connector end attaches to a hole cut in the drape. The flexible blue end attaches to the suction
port of the ITI canister.
After cutting a 2.0 cm (0.8 in) hole in the drape, remove the backing from the Suction SpeedConnect and
press it firmly onto the drape—centered over the hole.
Exudate
Irrigation Solution
Figure 2. Typical irrigation and suction ports set-up.
Tips for using Suction SpeedConnect
In large wounds, two suction SpeedConnects may provide optimal treatment. Use a Y-connector with two
SpeedConnects and attach to a single therapy unit.
Consider the best location for placing the Suction SpeedConnect. For example, for an irregularly shaped
wound, the Suction SpeedConnect could be placed over the area of greatest depth. For abdominal
wounds in which the patient is frequently sitting or is ambulatory, place the Suction SpeedConnect in the
lower third of the wound.
Consider the best direction for placement of the Suction SpeedConnect tubing. To prevent pressure ulcers
from forming under tubing, consider changing direction of the tubing at each dressing change.
If additional surface is needed to place the Suction SpeedConnect, use a bridge to increase dressing surface.
Some fluid in the tube is normal during operation.
Clinical Guidance for the Innovative Therapies Inc. (ITI) Wound Treatment Systems
17
Tips for optimal drainage
Place the ITI device at or below wound level.
During dressing changes look for fluid pooling in the wound bed. Pooling is caused by thick exudate, fibrin
or serosanguinous fluid clogging the white foam, black foam, or ITI Suction Tubing with SpeedConnect.
This can be resolved by the use of simultaneous irrigation.
Consider, if medically advised, setting the ITI NPWT device to intermittent mode. Fluctuating pressure
changes help move fluids out of the tubing.
3.4.3.6. ITI Irrigation Tubing with SpeedConnect and ITI Irrigation Delivery Set
ITI Irrigation Tubing with SpeedConnect delivers irrigation solution to the wound. The tubing’s adhesive
connector end attaches to the drape in the same manner as the Suction SpeedConnect. The distal end’s
Luer lock connector accommodates a wide range of commercial tubing sets. When applying NPWT with
irrigation to small wounds, the two SpeedConnects can be placed close to each other.
The ITI Irrigation Delivery Set is an integrated system. The irrigation SpeedConnect is melded with the
tubing and irrigant container. This eliminates the need to connect tubings. Instructions for set up and
irrigation delivery are on the irrigant container.
See Appendix B. Irrigation.
3.4.4. Special dressing considerations
3.4.4.1. ITI Bridging Set
Bridging foam has larger pores and lower density than standard black foam. This keeps cells open and
fluid moving. The bridging foam’s size is optimized for maximum flow.
When to consider bridging
To increase dressing surface area in a very small wound.
To dress multiple small wounds: Bridge one wound to another.
To locate the SpeedConnect away from a bony prominence that the patient is unable to offload—such as
the sacrum or heel—or contours, or uneven skin surfaces.
If needed, employ two bridges: One for suction and the other for irrigation.
Tips for bridging
The ITI Bridging Set is designed for optimal fluid movement.
Bridge foam should never touch intact skin. Always drape the skin before placing a foam bridge over it.
Bridge foam should never directly contact the wound base.
Bridge foam must directly contact the foam that is covering or filling the wound. This maintains negative
pressure.
When bridging wounds from the sacral area to a lateral aspect, avoid placing the bridge over the iliac crest
or other bones. If the patient lies on lateral bones, the bridge can be obstructed, blocking suction to the
wound, which can dislodge the dressing.
Clinical Guidance for the Innovative Therapies Inc. (ITI) Wound Treatment Systems
18
DO NOT increase pressure in an effort to move more fluid across the bridge. Increased pressure does
not fix chronic blockage. Consider, if medically advised, setting a lower pressure or setting to
intermittent mode.
Avoid using a bridge narrower than 3.5 cm (1.4 in). For extremities, DO NOT construct a bridge to create a
circumferential dressing. This could create a tourniquet effect that can constrict blood flow.
Figure 3. Bridging two wounds.
3.4.4.2. Mushroom dressings
A mushroom dressing may be appropriate for deep, small wounds. If these wounds are dressed
conventionally, negative pressure may overcollapse the foam, impeding the removal of fluid. The
mushroom dressing’s larger foam surface reduces the risk of foam collapse.
1. Fill the wound as usual.
2. Drape the periwound skin circumferentially, extending approximately 4 cm (1.6 in) from the wound
opening.
3. Cut a piece of ITI Black Foam Dressing, extending approximately 2.5 cm (1 in) from the wound opening
(this looks like a mushroom cap).
4. Lay the black foam over the filled wound and complete dressing as usual.
5. Thin the width of the ITI Black Foam as necessary.
Figure 4. Example of mushroom dressing.
Clinical Guidance for the Innovative Therapies Inc. (ITI) Wound Treatment Systems
19
3.4.4.3. Irregularly shaped wounds
To more easily conform black foam dressing to a wound with a very irregular shape, cut to shape.
3.4.4.4. Dressing two wounds
To apply therapy to two wounds using a single ITI Wound Treatment System device, either:
Use a bridge to connect both wounds to a single Suction SpeedConnect, or
Dress each wound separately with its own Suction SpeedConnect and Y-connect both SpeedConnects
to the canister. Replace the ITI Y-Connector at each dressing change.
Figure 5. Using a bridge to connect 2 wounds.
Figure 6. Connecting 2 wounds using the ITI Y-Connector.
Clinical Guidance for the Innovative Therapies Inc. (ITI) Wound Treatment Systems
20
3.4.4.5. Securing a tight seal
Sometimes a wound’s location makes it hard to achieve an air-tight drape seal. Consider using one of the
products listed below. Also see 3.4.2. Periwound skin.
Protective Skin Barrier wipes or sprays: Use on skin before placing drape. Use of skin barrier wipes or
sprays on skin prior to placing drape may assist in obtaining a seal. Application of skin barrier wipes or
sprays around the perimeter of the drape once it is in place, can enhance adherence to the skin and
reduce snagging or lifting of the drape.
A border or “picture frame” placed around the drape edge with 1 in tape is useful to prevent drape from
snagging on bedding/clothing or rolling up in friction prone areas. In large wounds, it is useful to hold
drape edges down, thereby preventing several micro-leaks that together can trigger the leak alarm.
Ostomy Paste: Use as “caulk” to seal leaks:
Before draping the leak-prone area: Place a bead or line of paste on the skin.
If a leak occurs after the drape is placed: Remove the plunger from a syringe, fill the syringe with
paste, and replace the plunger. Then, placing the hub of the syringe into the leak, discharge paste
from the syringe to fill the leaky area.
Ostomy paste strips or cohesive seals: Shape these materials to fill creases or difficult-to-seal areas.
For best results, lay the material on intact skin before applying the drape. Mold by hand after applying
the drape.
Hydrocolloid strips: Cut hydrocolloid dressings into strips and layer to fill creases or uneven skin. For
best results, lay hydrocolloid directly on dry skin before applying the drape.
3.5 Evaluation during treatment
The patient, wound, and NPWT device must be carefully monitored during therapy. Frequent observation
is essential even when patients have been receiving therapy for a long time.
At each dressing change, carefully evaluate and document the wound and surrounding skin. Perform a
complete wound assessment at least every 7 days. The rate of healing varies with wound type and
patient co-morbidities.
3.5.1. Elements to document
Number of pieces removed of each type of foam.
Wound contact layer removed, if applicable.
Wound base appearance.
Periwound skin condition.
Amount and color of exudate.
Odor, if present after cleansing.
How wound was cleansed.
Number of pieces applied of each type of foam.
Pressure setting and mode.
Irrigation solution used and application rate.
Dressing pulled down and stable.
Reported pain with related interventions.
Patient education for the wound and The ITI Wound Treatment System.
Clinical Guidance for the Innovative Therapies Inc. (ITI) Wound Treatment Systems
21
3.5.2. Factors delaying healing
If a wound fails to progress, or if negative progress is noted, consider these possible factors:
Internal factors include: Infection, biofilm formation, inadequate nutrition, anemia, dehydration, and
vascular insufficiency.
Wound colonization can run the spectrum from scattered free-floating colonies, to colonies that form
biofilms, to frank infection. NPWT with continuous irrigation helps keep bacterial load reduced. See
Appendix B. Irrigation.
If a topical silver dressing is prescribed, apply the silver wound contact layer over the wound bed—with
black foam layered on top. Keep in mind that although topical silver products decrease bacterial load,
they do not replace the need to thoroughly debride and cleanse the wound at each dressing change.
External factors include: Pressure over the wound, trauma, and therapy turned off for prolonged periods.
If, after correcting these factors, wound healing still does not progress, consider discontinuing NPWT
therapy and implementing another dressing/therapy regimen.
4. Device Quick Reference Guide
Please refer to the appropriate ITI Wound Treatment System device User’s Manuals for detailed operating
instructions and safety tips. IMPORTANT: As with any prescription medical device, failure to follow product
instructions or changing settings and performing therapy applications without the express direction
and/or supervision of a trained clinical caregiver, may lead to improper product performance and the
potential for serious or fatal injury.
4.1 Therapy Unit Instructions
1. Ensure that an ITI Fluid Collection Canister is properly placed in the receptacle of the Therapy Unit.
Note: Always use a new canister with a new patient.
2. Inspect the adhesive tubing connectors to ensure that they are properly connected to the ITI Foam
Dressing and that the connections are well sealed.
3. Connect the distal end of the SpeedConnect tubing with the blue tapered connector to the suction port
of the Canister. Gently twist and push the connector on just enough to secure and seal it. Also, ensure that
the clamp on the SpeedConnect tube is open.
Clinical Guidance for the Innovative Therapies Inc. (ITI) Wound Treatment Systems
22
4. Attach or slide the canister into place making sure the 2 device ports are properly lined up and/or
connected. (Refer to the User’s Manual for the specific device you are using for complete instructions).
5. Plug the Therapy Unit’s A.C. Adapter into a suitable 120 VAC, 60 Hz, outlet. Insert the power plug into the
Power Jack on the side of the Therapy Unit. The green “power” light on the unit indicates that the unit is
receiving power. The amber light below the green “power” light indicates that the battery is charging.
6. Press the ON button to begin therapy. Set the device to desired pressure. Select the desired mode,
either continuous or intermittent. Refer to the appropriate ITI NPWT device’s User Manual for
instructions on how to set intermittent mode.
The unit will remember the mode setting when the power is turned OFF and ON.
During intermittent mode operation, the unit will provide therapeutic (set) pressure for 5 minutes (on
phase) and approximately -25 mmHg for 2 minutes (off phase). By maintaining this lower pressure
during the “off” phase of the cycle, the dressing seal is never compromised. This method of applying
intermittent pressure also increases patient comfort.
7. Set pressure lockout if desired. Consult user’s manual for device specific lockout instructions.
8. Dressing should collapse, indicating the presence of a vacuum. If you are using irrigation, once target
pressure is achieved, turn the irrigation fluid supply on and adjust flow rate for desired therapy.
9. Carefully check dressing for an adequate seal. If air leak(s) is present, repair with additional ITI Semipermeable drape material as needed.
10. The therapy unit should be operated at least 22 out of every 24 hours to prevent possible infection.
Clinical Guidance for the Innovative Therapies Inc. (ITI) Wound Treatment Systems
23
4.2 Replace the ITI Canister
1. Close the clamp on the suction tubing.
2. Turn the device off.
3. If using irrigation, clamp the roller clamp on the fluid delivery tubing.
4. Remove tubing connector from top of ITI Canister. Place canister cap onto canister.
5. Read volume in canister and document, press canister release button and withdraw canister from the unit.
6. Dispose of the canister according to local, state, and federal regulations as well as institutional protocols.
7. Place a new ITI canister into the ITI device making sure the 2 ports on the canister are properly lined up and
connected to the appropriate openings on the device. Attach the distal end of the SpeedConnect tubing
to the suction tubing port.
8. Turn the device on and open the tubing clamp. Ensure that pressure and mode are correct.
9. If using irrigation, unclamp the roller clamp on the fluid delivery tubing and resume irrigation at the
ordered flow rate.
4.3 Daily and weekly ITI NPWT device maintenance
Daily: Visually inspect the device. Check to ensure the device is functioning properly. Check for any sign of
contamination.
If the unit is not functioning properly, refer to the appropriate User’s Manual Operating
Instructions / Alarm Troubleshooting guide, or contact ITI to have the unit serviced.
If the device appears contaminated or dirty, follow the Weekly instructions below.
Weekly: Wipe the ITI device with either a diluted solution of 5 ml bleach in 1 liter of warm water
(approximately 1 teaspoon bleach in 1 quart water) or a mild disinfectant. Use a coarse cloth and wring out
any excess solution until the cloth is damp and not dripping. Other cleaning fluids are not recommended,
as they can damage the finish of the enclosure.
Follow standard safety precautions when cleaning the unit.
Cleaning solutions that are recommended include bleach and water, Clorox Wipes, Dispatch, Sani Cloths,
CaviWipes, Viraguard®, OxyFect™ H, CLINI-TECH®, 3M™ Quat Disinfectant and any mild hospital-grade
disinfectant.
Inspect the AC adapter for damage and/or unusual wear. Replace damaged or worn power supply
immediately. AC adapters are available from ITI. Do not substitute with other vendors’ adapters—this could
cause serious electrical damage.
Clinical Guidance for the Innovative Therapies Inc. (ITI) Wound Treatment Systems
24
5. Using an ITI Wound Treatment system in a Sterile Field
5.1 Sterile dressings / aseptic canister
Dressings
All ITI dressings are packaged sterile and are latex-free. ITI employs ethylene oxide (EtO) sterilization for
our foam and drape products. This avoids radioactivity issues associated with sterilization by gamma
irradiation and its associated waste materials.
Canisters
The ITI Wound Treatment System does not require sterile canisters. Each individually packaged canister
is aseptic.
Aseptic canisters are acceptable because the sterile ITI Suction Tubing with SpeedConnect, linking the ITI
device to the canister, is 2.4 m (8 ft) long and does not connect in-line or mid-line. The separation
between canister and wound eliminates the need for sterilized canisters.
Protocol requires canisters to remain outside the sterile field.
5.2 Testing a seal in the operating room
To test a seal in the operating room, follow these steps:
1. In the OR, apply negative pressure wound dressing.
2. Attach the ITI Suction Tubing with SpeedConnect to low wall suction.
3. After the seal is confirmed, clamp and cover the end of the tubing with a drape or place it inside a sterile
glove.
4. After the patient is transported to a post-operative area, attach the ITI Suction Tubing with SpeedConnect
to the ITI device. Open the clamp, turn the device on and proceed with setting pressure and mode.
Clinical Guidance for the Innovative Therapies Inc. (ITI) Wound Treatment Systems
25
6. Patient Education
For the full set of ITI clinical resources, go to the Innovative Therapies Inc. website www.itimedical.com or
contact your ITI representative.
For at-home use, the FDA mandates that patients and their caregivers be instructed on how to safely
operate a device—and how to get help if needed. Patients must demonstrate—and the clinician must
document—satisfactory competence.
Use The Innovative Therapies patient education guides for home use of ITI NPWT. ITI recommends that
one copy be kept in the medical record and one copy be given to the patient and/or caregiver.
The teaching plan includes:
How to plug the therapy unit in and know that it is charging.
How to turn the therapy unit off and on.
How to read and troubleshoot the alarms.
How to change the canister.
How to reseal a leak in the drape.
Actions to take if a dressing must be removed.
How to monitor for excessive bleeding.
Emergency action plan.
How to reorder supplies.
Who to call if help is needed or to answer questions.
Also provide the patient and caregiver with the appropriate instruction guide for using the ITI Wound
Treatment System at home. This guide supplements (but does not replace) one-on-one patient
education.
Clinical Guidance for the Innovative Therapies Inc. (ITI) Wound Treatment Systems
26
Appendix A. Pressure / Mode Guidelines
The ITI Wound Treatment Systems are indicated for patients with chronic, acute, traumatic, subacute, and
dehisced wounds, diabetic ulcers, pressure ulcers, flaps and grafts.
Note: This guidance was developed based on manufacturer’s knowledge of performance of dressing
components in certain wound types. As with any application, please consult the patient’s treating
physician about individual conditions and treatments, and follow all applicable instructions for use and
labeling for product use and operations.
Appendix A.1. Pressure / mode by wound type
Wound Type
Suggested Foam
Suggested Pressure/Mode
Notes
Acute Wounds
Traumatic injuries
Black foam
Pressure: -120/125mmHg
Mode: Continuous
Irrigation provides continuous cleansing
and decreases pain.
Consider intermittent mode once
exudate volume decreases.
Closed incisions for
patients at risk for
wound dehiscence
Black foam
Pressure: -120/125mmHg
Mode: Continuous
Skin and muscle flap
incisions are included
in this category
Place a 4 cm (1.6 in) drape border around
the incision—directly adjacent to sutures
or staples.
Apply wound contact layer over suture
line, extending approximately 1 cm (0.4 in)
beyond that line. Cover with black foam,
drape, and apply SpeedConnect as usual.
Therapy is generally discontinued after 1
week.
Skin grafts
Typically: Black foam
Pressure: -70/75 to -120/125 mmHg
For some cases, the
clinician can choose
white foam.
Mode: Continuous
Apply wound contact layer or white foam
over graft. Then apply black foam.
Therapy is generally discontinued after 1
week.
For bioengineered skin products, check
with the manufacturer for specific
guidance prior to using negative pressure.
Surgically debrided
wounds
Typically: Black foam
Pressure: -120/125 mmHg
If structures exposed:
Single layer white foam
with black foam on top.
Mode: Continuous until exudate
decreases, then intermittent
If hemostasis is achieved in the OR, the
device can be placed at that time.
After placing the device, frequently
monitor the dressing and exudate to
detect any bleeding.
Clinical Guidance for the Innovative Therapies Inc. (ITI) Wound Treatment Systems
27
Appendix A.1. Pressure / mode by wound type (continued)
Wound Type
Suggested Foam
Suggested Pressure/Mode
Notes
Chronic Wounds
Pressure ulcers
Lower extremity
ulcers, such as
venous leg ulcers
Typically: Black foam
Pressure: -120/125 mmHg
If structures exposed:
Single layer white
foam with black foam
on top.
Mode: Intermittent
Black foam
Pressure: -120/125 mmHg
Mode: Continuous.
Consider switching to intermittent
when exudate decreases.
Irrigation helps stalled wounds begin
normal healing progression.
In some cases, edema management is
required. If compression wraps are used,
they should overlie the dressing, but must
not overlie the SpeedConnect.
Select appropriate topical irrigation
solution.
Lower extremity
ulcers due to arterial
disease
Lower extremity
diabetic ulcers
Dehisced surgical
wounds
Typically: Black foam
Pressure: -120/125 mmHg
If structures exposed
or pain occurs:
Single layer of white
foam with black foam
on top.
If wound pain occurs, decrease
pressure to to lower setting.
Mode: Intermittent.
Typically: Black foam
Pressure: -120/125 mmHg
If structures exposed:
Single layer of white
foam with black foam
on top.
Mode: Continuous.
Black foam
Consider switching to intermittent
when exudate decreases.
Pressure: Consider lower pressures 70/-75 mmHg until wound bed is
fully granular, then increase if
appropriate.
Mode: Continuous.
Consider switching to intermittent
mode when exudate decreases.
In cases when wounds are dry and prone
to infection, irrigation helps promote
granulation and remove infectious
materials.
Patients with bone exposed or close to
wound surface should be evaluated for
osteomyelitis.
If periwound skin is particularly vulnerable,
take preemptive measures to protect skin
from moisture.
If bowel is close to wound surface, delay
therapy due to the risk of fistula
development.
The following dressing technique may
assist in wound closure:
1. Completely fill the depth (ensure foam is
in contact with wound base) and
underfill the width.
2. Pull wound edges towards each other,
and apply drape in strips to hold traction
while negative pressure is applied.
When therapy begins, select appropriate
topical irrigation solution.
Caution: It is not recommended to
deliver fluids to the thoracic cavity.
Explored
enterocutaneous
fistulas within
chronic abdominal
wounds
White foam over fistula
opening with black
foam on top
Table 2. Pressure / mode by wound type.
Pressure: -120/125mmHg or
-150 mmHg.
Irrigation thins the effluent, preventing
foam from becoming clogged.
Mode: Continuous.
Consider placing the SpeedConnect in the
area of the fistula opening.
If neither fascia nor solid granulation
covers the wound base, delay therapy to
avoid creating other fistulas.
Clinical Guidance for the Innovative Therapies Inc. (ITI) Wound Treatment Systems
28
Appendix A.2. Pressure /mode by wound condition
Wound Type
Suggested Pressure / Mode
Notes
Large volume of
exudate
Increase pressure and/or intermittent
mode.
Although increased pressure may help fluid movement,
pressure that is too high may overcollapse the foam, causing
fluid to pool in the wound.
By setting intermittent mode, the foam intermittently contracts
and relaxes in the wound, enhancing flow.
Thick exudate
Intermittent mode.
Irrigation thins the exudate and cleanses the foam.
Multiple wounds
Increase pressure.
Do not use one ITI NPWT device on more than two wounds.
Painful wound
Decrease pressure.
A single layer of white foam or wound contact layer with black
foam on top may decrease pain.
Wound granulation is
slow or stagnant
Intermittent setting.
Irrigate with an appropriate topical solution.
Consider silver wound contact layer.
Consider patient co-morbidities.
Black foam overcollapse
Decrease pressure and/or switch to
intermittent mode.
Table 3. Pressure / mode by wound condition.
Consider a thicker piece of foam, mushroom technique for small
wounds or bridging.
Clinical Guidance for the Innovative Therapies Inc. (ITI) Wound Treatment Systems
29
Appendix B. Irrigation Guidelines
Appendix B.1. NPWT with simultaneous irrigation
The ITI Wound Treatment System provides NPWT with simultaneous irrigation—delivering aqueous
solutions over the wound bed. Irrigation cleanses all areas in contact with foam: the wound base and any
tunnels or undermined areas. By keeping the wound base moist, irrigation promotes wound healing. In
addition, by cleansing the foam itself, irrigation helps maintain uniform pressure.
Irrigation is applied through the ITI Irrigation Tubing with SpeedConnect or the ITI Irrigation Delivery Set,
placed in the same manner as the ITI Suction Tubing with SpeedConnect. The two SpeedConnects can be
in close proximity for small wounds, or at some distance from each other for large wounds.
Typically, continuous irrigation is applied at a rate of 25 to 30 cc/hr. For intermittent irrigation procedures,
see Appendix B.3. Intermittent irrigation.
Clinicians should carefully investigate indications, contraindications, and usage guidelines before
prescribing any solution. This document is intended to provide general information about topical
irrigation solutions used with wounds. It is not intended to be used as a guideline for prescribing the
solutions.
Tips for using irrigation with ambulatory patients
Tape together the suction and irrigation tubes.
As needed, shorten irrigation tubing as follows:
1. Cut tubing with sanitized scissors.
2. Remove the Luer lock connector and cap from the severed tubing end.
3. Insert the Luer lock connector and cap into the working shortened tube.
30
Clinical Guidance for the Innovative Therapies Inc. (ITI) Wound Treatment Systems
Appendix B.2. Suggested irrigation solutions
Irrigation
Solution Type
Category
Characteristics
Mafenide acetate
Antibacterial agent.
(Sulfamylon)
Useful for many gramnegative and grampositive organisms,
including Pseudomonas
and certain strains of
anaerobes.
Commonly used to
prevent and treat burn
wound infections.
Activity not altered by the
presence of blood, serum,
leukocytes, or pH
variability.
Does not reduce fungal
growth.
Can penetrate non-viable
tissue.
Clinical
Considerations
Administration
Considerations
Systemically absorbed.
5% solution is typically
used.
Patients sensitive to other
sulfonamides, furosemide,
thiazide diuretics,
sulfonylureas, or carbonic
anhydrase inhibitors may
be sensitive to this
product.
Administer within 24
hours of mixing.
Deliver using 0.22 micron
filter.
Monitor for metabolic
acidosis.
Metabolites excreted via
urine—use caution in
renal-compromised
patients.
Oxychlorosene
sodium
(Clorpactin)
Sodium
hypochlorite
(Dakins)
Antiseptic/ antimicrobial.
Effective against bacteria,
yeast, fungi, viruses,
spores, and antibioticresistant organisms.
Antiseptic/antimicrobial.
Effective against bacteria,
yeast, fungi, viruses,
spores, and antibioticresistant organisms.
Stable derivative of
hypochlorous acid.
Non-toxic, non-allergenic
when used at
recommended strength.
Only effective when in
contact with viable
wound base.
Stable for 5 days at room
temperature.
Breaks down non-viable
tissue.
In vivo toxicity is debated,
unclear.
Is a weak hypochlorite
solution buffered with
sodium bicarbonate.
No data indicate that
solution is toxic or causes
allergic reactions.
Produced both commercially
and by patients at
clinician direction.
May cause irritation to
intact skin.
Silver nitrate
Antiseptic/antimicrobial.
Effective against broad
spectrum of bacteria and
fungi.
Infrequently used;
generally selected in full
thickness burns in patients
who are allergic to other
topical antimicrobials.
Application is painless.
Hypoallergenic, but can
pull electrolytes from
base tissue.
Anesthetic agent.
May be helpful in reducing
pain with dressing change.
Wound irrigation solution.
Does not impact
microorganism viability.
Useful for wound bed
flushing.
Table 4. Suggested irrigation solutions.
Integrity and potency may
be affected by exposure to
light, heat, and loosely
sealed container.
May cause irritation to
intact skin, especially at
stronger dilutions.
0.5% solution is generally
used.
Powder must be mixed
with sterile water.
Mixed solution is lightsensitive.
Patients may experience
allergic reaction, toxicity,
and other drugassociated side effects.
Irrigation dilution should
be individualized—
generally ranges from 25
cc 1% lidocaine to 250 cc
normal saline.
Monitor cardiovascular
status carefully during
and after administration.
Sodium chloride
0.05% solution is
generally used for wound
irrigation or dressings.
Stains intact skin.
Does not penetrate eschar.
Lidocaine
0.4% solution is generally
used for wound
disinfection.
Discard unused fluid
within 72 hours of
opening container.
Hypoallergenic, non-toxic.
Generally not used for
continuous irrigation—
rather as local anesthetic
prior to dressing change.
0.9% solution is generally
used.
31
Clinical Guidance for the Innovative Therapies Inc. (ITI) Wound Treatment Systems
Appendix B.3. Intermittent irrigation
This section addresses intermittent irrigation.
For some care settings—such as outpatient or home care—payors may not compensate for the extra
canisters required for collecting irrigation fluids, or may not pay for fluids and setups not used for IV
administration. In those settings, intermittent irrigation may provide a solution.
The prescribing clinician specifies the volume and frequency of intermittent irrigation.
1. Pour the prescribed amount of irrigation solution into a clean, sterile (or sanitized), disposable container.
2. Remove the cap from the end of the Irrigation SpeedConnect.
3. Place the Irrigation SpeedConnect into the container. The irrigation solution will be pulled through the
tubing and into the dressing. Alternatively, a syringe may be used to draw the fluid and deliver it via the
SpeedConnect. The syringe may be refilled to deliver the amount of irrigation solution prescribed.
4. Replace the cap on the end of the irrigation SpeedConnect.
5. Repeat 2 to 3 times daily or as prescribed.
Innovative Therapies Inc.
12 Meem Avenue, Suite C, Gaithersburg, MD 20877
• tel: 866-ITI-NPWT (484-6798) • fax: 301-987-1133 • e-mail: [email protected]
www.itimedical.com
Svedman and SVED are registered trademarks of Innovative Therapies Inc.
Innovative Therapies Inc. owns, uses, or has applied for the following trademark(s) or service mark(s): Svedman, SVED, SensiSkin, SpeedConnect, “Outcomes
Focused Wound Therapy”. All other trademarks are trademarks of their respective owners or holders. © 2011 Innovative Therapies Inc.
Please refer to the Innovative Therapies product manual for indications, contraindications, precautions and safety information. Always consult a physician and
product instructions for use prior to application.
Caution: Federal law restricts these devices to sale by or on the order of a physician.
260 4/13 Rev B 24-9000