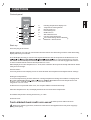
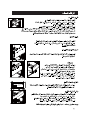
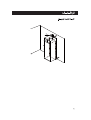
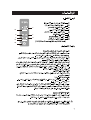
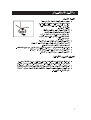
1
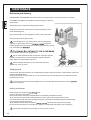
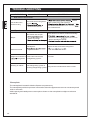
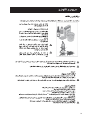
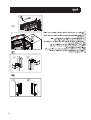
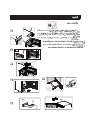
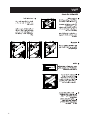
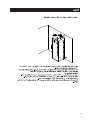
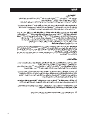
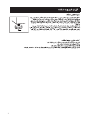
FROST FREE VERTICAL FREEZER Installation Instructions and User Guide ELEMENTS Thanks for purchasing a Haier Product Please read these instructions carefully before using this appliance. The instructions contain important information which will help you get the best out of the appliance and ensure safe and proper installation, use and maintenance. Keep this manual in a convenient place so you can always refer to it for the safe and proper use of the appliance. If you sell the appliance, give it away, or leave it behind when you move house, make sure you also pass on this manual so that the new owner can become familiar with the appliance and safety warnings. INDEX Safety Warnings.............................................................................................................. 3 Before Use ...................................................................................................................... 6 Functions ..........................................................................................................................8 Maintenance ............................................................................... .................................. 13 Trouble-Shooting ...................................................................... .................................... 14 After-Sale Service ...................................................................................................... ... 16 CAUTIONS Legend Attention Caution Prohibit Disposal The presence of this symbol on the product, accessories or materials that goes with this information indicates that at the end of its useful life the product or its electronic accessories (ex. charger, headset, USB cable) should not be disposed with other household waste. To prevent possible damage to the environment or human health from uncontrolled waste disposal, please separate these items from other types of waste and recycle them. This will promote the sustainable reuse of material resources. Household users should contact either the retailer where they purchased the product or the relevant ow they can take this item for safe recycling and safe disposal. local authorities t Business users should contact their supplier and check the conditions of the purchase. This product and its electronic accessories should not be mixed with other commercial waste. Þ»º±®» «-»› This appliance use AC power supply. Please connect the appliance to normal voltage. In case of volt start up, the temperature controller or the compressor may be damaged or has abnormal noises. At this time,please add proper stabilizer. Three pin power point must be used In any event, please ensure the socket is connected with ground wire and make no change on power otherwise it ma cord and plug. The power cord plug shall be at After the appliance is installed, the plug shall be easily accessible so that it can be detached in case of accidents. Do not damage the power cord. Do not pull the power cord to disconnect the plug. Please hold the plug to detach it directly from the socket. The body of the appliance shall not press on the power cord and do NOT stamp on the power cord. When the power cord is damaged: When the power cord is damaged or the plug is worn, do not use. The worn or damaged power cord el. If a longer power cord is needed, the cross-sectional area of the added power cord shall not be less than 0.75 mm². Keep ventilation openings, in the appliance enclosure or in the built-in structure, clear of obstruction. This appliance is not intended for use by persons (including children) with reduced physical,sensory or mental capabilities, or lack of experience and knowledge, unless they have been given supervision or instruction concerning use of the appliance by a person responsible for their safety. 3 CAUTIONS CAUTIONS t r v . DO NO . / r tt e e r t v e t t t r r t v ( t t t Ne t ezer. Ne t e t P t t t v ezer v r Keep r e r t v v r ever M the ezer t r r . r t t r. r t r r t r r e r t n ezer r r Be r t r T e t r t ther pr T r r t r t t r ezer t ezer. t t The ezer. e . . 4 CAUTIONS Freezing and storage of fresh food Food shall be stored with a space in between, to allow cool air to circulate around food items. Food shall be st y y. Food shall be sealed before stored in the freezer to avoid water loss and smell taint. The outside of the packing must be dry to avoid bags sticking together. Packing materials should be odor-free, airtight, non poisonous and non-toxic. We suggest to identify food information as follows: Name of food Weight of portion Quantity (number of pieces) Freezing date See the diagram inside the freezer for common food storage time limit(in months): 1 2 3 Casseroles,ice cream, sausages, bread Fish, shrimp, lamb, meat cuts Vegetables, fruits, poultry, beef Food should be fresh, mature and of good quality. Fresh vegetables and fruits must be frozen, if possible, immediately after harvest to maintain the most nutrients, structure, texture, color and taste. fore freezing. In case of meat and game, it is preferable to hang f Hot food should be cooled down to room temperature prior to placing it in the freezer. Only take the required amount of food from the freezer. Defrosted food cannot be re-frozen rst cooked. Avoid placing fresh food directly in contact with deep frozen food. Deep frozen food could defrost and may become inedible. To freeze very well, insert fast freezing function (see functions chapter) 2 hours before storing fresh food. Do not load excessive quantities of fresh food in the freezer. Please refer to the freezing capacity of the freezer. 5 BEFORE USE Description Ô×Ü LID ICE ×ÝÛMAKER ÓßÕÛÎ (option) ø±°¬·±²÷ ÜÎßÉÛÎ DRAWER PIZZAÞÑÈ BOX Ð×ÆÆß ÚÎÑÆÛÒóÚÑÑÜ FROZEN-FOOD ÝßÔÛÒÜßÎ CALENDAR ÍËÐÛÎSTORE ÍÌÑÎÛ SUPER ÍÓßÔÔDRAWER Ü ÎßÉÛÎ SMALL ßÜÖËÍÌ ÚÛÛÌ ADJUSTABLE FEET ø¬®¿-°±®¬ ¹®·°-feet ¿¬ º®±²¬ô ½¿-¬±®¿¬ ¾¿½µ÷ (Adjustable at the¬®¿-°±®¬ front, with casters at the back Drawers can be removed to increase freezer storage space. R600a REFRIGERANT This app iance contains a sma q antity b t ammab e, non-synthetic R600a refrigerant: Upon opening and insta ing yo r prod ct, check that the t bing of the refrigerant circ it is not damaged d ring transportation. Leaking refrigerant may ca se eye in ries or ignite. The room for insta ing app iance refrigerant. The amo nt of refrigerant in the app iance can be fo nd on the rating p ate the back of the nit. Keep venti ation openings in the app iance enc os re or in the b i t-in str ct re c ear of obstr ction. Do not damage the refrigeration circ it. If yo r are ns re of the refrigerant type check the rating p ate on the back of the nit. 6 BEFORE USE Environment materials must be used. Never use the foam packing material as counterclockwise to increase or decrease the height of the freezer. Do not place the freezer under direct sunlight or in a lated place and a space of at least 100mm must be kept above and around the freezer. Never place the freezer in a damp area or location where it may be splashed with water. Clean and dry any water splashes and stains with soft cloth immediately to prevent rust. Do not place the freezer where the temperature is too low (under 5 ). Do not keep freezer outside. Preparation prior to use Remove all package parts, the f Place the freezer in location (please refer to Placing Environment). s. Clean the inside and outside of the freezer before use (please refer to Defrosting and Cleaning) After the appliance has been leveled and cleaned, let it remain idle for at least 6h before switching it on so as to ensure its normal running. 7 FUNCTIONS Controls panel NO FROST Ý ßî Ü Ú ßí Temp.Set Eco S.Frz. Alarm Child lock Func.Set Û Ù C A2 D E G F A3 A4 ßì Freezing temperature display icon Temperature setting button Eco function icon Fast freezing icon Child lock icon Alarm indicator icon Function selection button eco/ fast freezing/ alarm/child lock OK button / Power button OK/ 5S Start-up Insert the plug in the socket Display will show you code “dF” and it means that the freezer is in defrosting condition. After defrosting , display will show you code HH. The LED display showing "F" and acoustic signal will indicate that the temperature inside freezer is not e alarm, press the A3 button to choose the “Alarm” function then press the A4 button to disbable this function. The warning light will continue to show until the freezer reaches the temperature of -12°C. When display shows the temperature of -12°C, alarm condition will stop automatically and freezer will be ready for food storage. Freezer Status: Touch any button on the display screen to check whether the temperature and adjust freezer settings. Setting the temperature: To set the temperature, push the A2 button . During temperature setting two numbers on display show onwill decrease the temperature in the range from –14°C to –26°C. If OK button is not pressed within 5 sec, the set point will be stored automatically. After the temperature is set, the display will show the current freezer temperature. The default temperature setting from factory is -18°C. Power function: n and the power will be turned on. Before any cleaning operation, make sure to disconnect the appliance from the power supply by pulling out the plug. 8 FUNCTIONS Freezer functions FAST FREEZING: Press the A3 button to choose the “S.FRZ” function, then press the A4 button, toactivate fast freeze function. The "E" light icon switches on to indicate that the function is on, and activation of the function . The icon will remain lit until the function is disabled. For fast freezing a small amount of food, this function is recommended to be activated 2 hours before inserting food; if you have a large amount of food to freeze at one time, it is recommended that the function be activated 24 hours before inserting food. Function will stop automatically after 24 hours or manually. Power consumption will increase when this function is on. FUNCTION ECO When the screen is unlocked, press the A3 button to choose the “ECO” function, then press the A4 button.You can activate the "ECO" function when the temperature is within the range of -18°C and -14 . If the temperature has been set at -19 or lower, it will be set automatically at -18 when the ECO function is on. If this function is activated, led “D”icon will be on until the function is disabled. A4 button to disable the function. ECO function and Fast Freezing function can not be used simultaneously. Child Lock When the screen is unlocked, press the A3 button to select the Child Lock function and then press the A4 button, the function will be enabled. Unlock: Touch any button on the screen, thedisplay screen button, the screen will be unlocked. A4 for 5 sec. Alarm signals TEMPERATURE ALARM: if temperature inside freezer is over -8°C, an intermittent buzzer and the After the screen is unlocked, press the A3 button to choose the “Alarm” function, press the A4 button colder than -12°C. DOOR ALARM: buzzer. The alarm condition will stop by closing the door or by pressing button to select Alarm function and pressing the OK button, alarm condition will restart after 60 seconds if door is still open. alarm. FAULT ALARM: of freezer, but there is no danger for temporary food preservation. For both faulty conditions you must call after sales service as soon as possible. 9 FUNCTIONS The appliance can be installed into a row of kitchen units. To match the appliance to the height of the row of the units, a suitable stack cabinet can be added. When inserting the appliance into a ro can be installed directly ne t to the kitchen unit. The appliance door projects relative to the front of the kitchen unit by can be opened and closed perfectly as a result. Important notice for enclosed installations At the back of the stack cabinet, there has t throughout the width of the stack cabinet. The ventilation space under the ceiling has t The larger the ventilation space, the more energy-saving the appliance is in operation. If the appliance is installed with the hinges ne t to a wall, the distance between appliance and wall has t This corresponds to the projection of the handle when the door is open. ÚËÒÝÌ×ÑÒÍ Ë-» ·²º±®³¿¬·±² ïò Ô×Ü ÑÐÛÒ×Ò٠̱ ±°»² «°°»® ´·¼-ô ´·º¬ ¬¸»³ -´·¹¸¬´§ ¿²¼ ¬«®² ·²-·¼» ±«¬ò Ñ°»² ¬¸» ´·¼ ¬± °«¬ ¬¸» º±±¼ ·²¬± ¬¸» ¼®¿©»®ò Ý´±-» ¬¸» ´·¼ ¬± ¿ª±·¼ ½±²¬¿½¬ ©·¬¸ ¬¸» ¼±±®ò ̸» ´·¼ ½¿² ¾» ®»³±ª»¼ ¬± ·²½®»¿-» -¬±®¿¹» -°¿½»ò ÒÑÌÛæ Ì©± ´¿§»®- ·² ¬¸» «°°»® ¿®» º«®²·-¸»¼ ©·¬¸ ´·¼-ô ¾«¬ ²± º±±¼ °´¿½»³»²¬ ·- ¿´´±©»¼ ·² ¬¸» º®±²¬ °¿®¬ ±º ¬¸» ¹´¿-- °´¿¬»å ±® ±¬¸»®©·-» ´·¼- ³¿§ º¿·´ ¬± ¾» ½´±-»¼ô ¿²¼ ·º -±ô °´»¿-» ½¸»½µ ¬¸» º±±¼ ·¬»³-ô ¿¼¶«-¬ ¬¸»·® ´±½¿¬·±²-ô ¿²¼ ¬¸»² ®»ó½´±-» ¬¸» ´·¼-ò É¿®²·²¹æ ½¸»½µ ·º ¬¸» ´·¼- ¿®» ½´±-»¼ ¾»º±®» -¸«¬¬·²¹ ¬¸» ¼±±®ô ¿²¼ ¾» -«®» ¬± -¸«¬ ¬¸» ¼±±® ¿º¬»® ¬¸» ´·¼- ¿®» °®±°»®´§ ½´±-»¼ -± ¬¸¿¬ ²± -¯«»»¦·²¹ ±² ¬¸» ´·¼- ³¿§ ±½½«®ò îò ÎÛÓÑÊ×ÒÙ ÜÎßÉÛÎÍ Ð«´´ ¬¸» ¼®¿©»®- ±«¬ º«´´§ô ¬¸»² ´·º¬ ¬¸»³ «° -´·¹¸¬´§ ·² ±®¼»® ¬± ®»³±ª»ò Ü®¿©»®- ø»¨½»°¬ ¬¸» ¾±¬¬±³ ¼®¿©»®÷ ½¿² ¾» ®»³±ª»¼ ·² ±®¼»® ¬± ±¾¬¿·² ·²½®»¿-»¼ -¬±®¿¹» -°¿½»ò Í´·¼»- ¿ª¿·´¿¾´» º±® -±³» ³±¼»´-ò íò ÍËÐÛÎ ÍÌÑÎÛ ÜÎßÉÛΠЫ´´ -«°»® -¬±®» ¼®¿©»® ±«¬ º«´´§ò Ô·º¬ ¿²¼ °«´´ ·¬ ±«¬ ±º ¬»´»-½±°·½ ¹«·¼»-ò ÒÑÌÛæ ͱ³» ³±¼»´- ±º ¬¸» ´¿®¹» ¼®¿©»® ¿®» -»¬ ©·¬¸ -´·¼» -¬®«½¬«®»ò Ю±°»® ©¿§ ±º ¼®¿©»® ®»³±ª·²¹æ ¼®¿©»® «° «²¬·´ ·¬ ·- ¾´±½µ»¼ô ¬¸»² ·¬ ½¿² ¾» ¬¿µ»² ±«¬ »¿-·´§å ¾«¬ ·º -± º¿·´»¼ ô °«-¸ ·¬ ¬± ¬¸» »²¼ ¿²¼ ®»°»¿¬ ¬¸» -¬»°- ¿¹¿·²ò ìò ×ÝÛ ÝËÞÛÍ ÐÎÑÜËÝÌ×ÑÒ Í±³» ³±¼»´- ¿®» »¯«·°°»¼ ©·¬¸ ¿² ·½» -§-¬»³ ·²½´«¼·²¹ ·½» ½«¾» ¬®¿§- ©·¬¸ ®»³±ª¿´ ¼»ª·½» ¿²¼ ·½» ¾·²ò ëò λ³±ª» ·½» ¬®¿§¿¬»®Î » ¬®¿§- ±² ·¬- -«°°±®¬ò É¿·¬ º±® ¿ º»© ¸±«®- º±® ¬¸» ·½» ¬± ¾» ®»¿¼§ô ¬¸»² ¬«®² ¬¸» µ²±¾- ¬± »¨¬®¿½¬ ¬¸» ·½» ½«¾»-ò ̸» ·½» ½«¾»- ©·´´ º¿´´ ¼·®»½¬´§ ·²¬± ¬¸» ·½» ½±²¬¿·²»®ò êò Þ±¨»- ±² ¬¸» ¼±±® ³¿§ ½±²¬¿·² ¿ °¿½µ»¼ Ð×ÆÆß ©·¬¸ ¿ ¬¸·½µ²»-- ±º ´»-- ¬¸¿² íð³³ ±® ±¬¸»® ¬¸·² °¿½µ¿¹»¼ º±±¼ò ïï ÚËÒÝÌ×ÑÒÍ Ü±±® ®»ª»®-·¾·´·¬§æ ¼·-³¿²¬´·²¹ ¼±±® º®±³ ¬¸» ®·¹¸¬ Disconnect power and empty the appliance before you start the ïÝ ï ïÞ ïß î í îß ï ßò Ñ°»² ¬¸» ¼±±® Þò Ы-¸ ¼±©²©¿®¼ ¬± ®»³±ª» ¬¸» ¬©± -³¿´´ ½±ª»®- ®»-°»½¬·ª»´§ ±² ¬¸» ´»º¬ ¿²¼ ®·¹¸¬ Ýò Ю§ ¬¸» º®±²¬ ½±ª»® ±«¬©¿®¼ î ßò Ë-» ¿ -½®»©¼®·ª»® ¬± ®»³±ª» ¬¸» -³¿´´ ½±ª»® ±² ¬¸» ®·¹¸¬ ±º ¬¸» ¼±±® ¾±¼§ Þò Ë-» ¿ -½®»©¼®·ª»® ¬± °®§ ·²©¿®¼ ¬± ®»³±ª» ¬¸» ¼»½±®¿¬·ª» -¬®·°- í ßò Ë-» ¿ ½®±--¸»¿¼ -½®»©¼®·ª»® ´±±-»² ¬¸» ¸·²¹» -½®»©-ô λ³±ª» ¬¸» «°°»® ¸·²¹» ÝßËÌ×ÑÒ Í«°°±®¬ ¬¸» ¼±±® ¿- §±« ®»³±ª» ¬¸» ¼±±®ô ¬¿µ» ½¿®» ²±¬ ¬± ¼¿³¿¹» ¬¸» »´»½¬®·½¿´ ©·®·²¹ ½±²²»½¬·²¹ ¬¸» ¼±±® ¬± ¬¸» ³¿·² ¾±¼§ ±º ¬¸» º®»»¦»®ò Þò Ü·-½±²²»½¬ ¬¸» ©·®·²¹ ¬»®³·²¿´ ì ß Ó±ª» ¬¸» ¼±±® ¾±¼§ «°©¿®¼ ¬± ®»³±ª» ¬¸» ¼±±® ¾±¼§ Þò Ë-» ¿ ½®±--¸»¿¼ -½®»©¼®·ª»® ¬± ®»³±ª» ¬¸» ´±©»® ¸·²¹» ë ßò Ë-» ©®»²½¸»- ±® °´·»®- ¬± ®»³±ª» ¬¸» ¸·²¹» -¸¿º¬ ¬¸» ¸·²¹» ´»º¬ ¸±´»ò Þò Ë-» ¿ ½®±--¸»¿¼ -½®»©¼®·ª»® ¬± ®»³±ª» ¬¸» -½®»©- ±² ¬¸» ´»º¬ ±º ¬¸» ½¿¾·²»¬ ¾±¼§ô ¿²¼ ³±«²¬ ¬¸» -½®»©-ô ±² ¬¸» ®·¹¸¬ -·¼» ±º ¬¸» ½¿¾·²»¬ò Ó±«²¬ ¬¸» ´±©»® ¸·²¹» ±² ¬¸» ´»º¬ -·¼»ò îÞ íß íÞ ê ®·¹¸¬ ±º ¬¸» ¼±±® ¾±¼§ò Þò λ³±ª» ¬¸» «°°»® ¸·²¹» -¸¿º »ª»®-»´§ ±² ¬¸» ¸·²¹»ò Ó±ª» ¬¸» -½®»© °´«¹ ¬± ¬¸» ´»º¬ -·¼» ¿²¼ °´«¹ ¬¸» -½®»© ¸±´»ò ë ì ìß ëß ìÞ êß êÞ ê 12 ÚËÒÝÌ×ÑÒÍ éß é ßò ݱ²²»½¬ ¬¸» »´»½¬®·½¿´ ©·®·²¹ ·² ¬¸» ¼±±® ¼»½±®¿¬·ª» -¬®·° ¬± ¬¸» ¬»®³·²¿´ ·² ¬¸» ¸·²¹»ò Ý¿®»º«´´§ °«¬ ¬¸» »´»½¬®·½¿´ ©·®·²¹ ·²¬± ¬¸» ¼»½±®¿¬·ª» -¬®·° ½±ª»®ò Þò Ú·¨ ¬¸» ¼»½±®¿¬·ª» -¬®·° ¿²¼ ·¬- -³¿´´ ½±ª»® ±² ¬¸» ®·¹¸¬ -·¼»ò Ýò Ý´±-» ¬¸» ½¿¾·²»¬ «°°»® º®±²¬ ½±ª»®ò ײ-»®¬ ¬¸» ´»º¬ ¿²¼ ®·¹¸¬ -³¿´´ ½±ª»®- ·²¬± ¬¸» ¹®±±ª»ò è Ü·®»½¬·±² º±® ¸¿²¼´» ®»°´¿½»³»²¬æ ¿½½±®¼·²¹ é éÞ éÝ èòï èòï ß ¬¸» ¸¿²¼´» «°°»® ½±ª»®ò λ³±ª» ¬¸» ¬©± -½®»©- ¿²¼ ¬¸»² ®»³±ª» ¬¸» ¸¿²¼´»ò Þ ¬¸» -½®»© °´«¹ ±² ¬¸» ®·¹¸¬ ±º ¬¸» ¼±±® ¾±¼§ò Ó±ª» ¬¸» -½®»© °´«¹ ¬± ¬¸» ´»º¬ -·¼» ¿²¼ °´«¹ ¬¸» -½®»© ¸±´»ò Ú·¨ ¬¸» ¸¿²¼´» ±² ¬¸» ®·¹¸¬ -·¼» ¿²¼ ¸¿ª» ·¬ ½±ª»®»¼ò èòî ïí Ñ®¼·²¿®§ ¸¿²¼´»æ ¬¸» ¸¿²¼´» «°°»® ½±ª»®ò λ³±ª» ¬¸» ¬©± -½®»©- ¿²¼ ¬¸»² ®»³±ª» ¬¸» ¸¿²¼´»ò èòî ß ß--·-¬ ¸¿²¼´»æ Þ ¬¸» -½®»© °´«¹ ±² ¬¸» ®·¹¸¬ ±º ¬¸» ¼±±® ¾±¼§ò Ó±ª» ¬¸» -½®»© °´«¹ ¬± ¬¸» ´»º¬ -·¼» ¿²¼ °´«¹ ¬¸» -½®»© ¸±´»ò Ýò Ú·¨ ¬¸» ¸¿²¼´» ±² ¬¸» ®·¹¸¬ -·¼» ¿²¼ ¸¿ª» ·¬ ½±ª»®»¼ò MAINTENACE Defrosting and cleaning DEFROSTING THE FREEZER: The freezer defrosts automatically. No manual operation is needed. CLEANING: The appliance should be cleaned regularly to prevent food odours. Unplug the power cord before cleaning the freezer. Clean the freezer with a soft cloth or sponge with warm water (with mild detergent). Dry water droplets on the refrigerator surface with a dry cloth. Always keep the door gasket clean. The refrigerator is very heavy. When you are moving it for r. Keep the cleaning or repair, take care not t freezer upright during moving. Do not move the freezer by rocking r. it to avoid damage t to the cabinet and electrical components. Do not clean with hard brush, wire brush, detergent powder, gasoline, amyl acetate, acetone and similar organic solutions, warm water or acid or alkaline solutions. When cleaning the display screen and other electrical appliances, use a dry cloth. Stopping use If the freezer will not be used for an extended period, please unplug the power cord and clean it with the method described above. Keep the freezer door open when not in use to prevent any food remaining in the compartment from producing bad odors. To ensure the service life of the appliance, it is recommended that the freezer not be t unless it is necessary. Moving the freezer Detach the power plug and t ower. Remove all food in the freezer. Secure the drawers and other movable parts in the freezer with adhesive tape. Close the door and secure with adhesive tape so that it will not be opened when moving. Do not tilt the freezer more than 45 degrees (angle to vertical) to avoid damaging the refrigerating system when moving the freezer. r. Never move the freezer forcefully Wrap the feet of the freezer to avoid scr Do not move the freezer by its handle, lid or pipes to avoid property damage or personal injury. Never place the freezer horizontally on its side, front or back. 14 TROUBLE-SHOOTING Before calling for service, please read the following troubleshoo rst. This can save both your time and money. The table contains common problems except those caused by defects in workmanship or material of the refrigerator. PROBLEMS CAUSES SOLUTIONS Freezer operation The compressor does not work Product is in defrosting cycle. Freezer is not plugged into a power outlet. Product is turned OFF. freezer. damaged. Turn on the power when they are OK. again. The indoor or outdoor temperature is high. po time. The freezer runs frequently or runs for too long period for a period of frequently or for a long period at one time. not tightly closed. too low. worn, cracked or mismatched. longer. totally cool down. start frequently. Please do not open the door too frequently. and there is no food or container jarring the door. freezer temperature is obtained. It takes 24 hours for freezer temperature. gap of door gasket can cause a longer running time of freezer in order to maintain desired temperature. Too high temperature The door is opened too frequently or for too long Too high temperature each time. inside product Warm air will enter the refrigerator whenever the door is opened. Try to open the door as less frequently as possible. Ensure the freezer is located on level ground and that there is no food or container preventing the door from closing fully. Water / moisture / frost on outside surface of the freezer Damp climate. Moisture accumulates on the freezer’s outside surface tightly. This causes condensation of cold air in the freezer and the warm air outside it. This is normal in damp climate. The moisture will decrease when the humidity drops. containers reach out of the door; close the door tightly. 15 TROUBLE-SHOOTING PROBLEMS CAUSES SOLUTIONS Bad odors in the freezer The inside of the freezer is dirty The inside of the refrigerator needs cleaning. stored in the freezer. Clean the internal of the refrigerator. (Please refer to Defrosting and Cleaning) out deteriorated food or food of strong odor out of the freezer. If you hear The freezer door is open. Beeps freezer is too high. The freezer is not located on a level place. Abnormal sound the food is stored f rst time. You can silence the alarm manually. Adjust the feet to level the refrigerator. object around it. Slight sound similar to This is the sound of the owing water refrigerating system. Heating of cabinet Close the door or silence the alarm manually. Normal. The refrigerating system is This prevents condensation and is normal. working refrigerating system. Nameplate The nameplate is located inside the freezer compartment glued low down on the left side. The nameplate provides important information about the appliance and must not be tampered with or removed. Valid capacity and rated power consumption shown on the nameplate is subject to relevant standards. 16 ïê . . . . . 12 8 . . . . . . . 24 . . . . . . . . . . . . . . . . . . . . ). " . ïë " . . . . : : . . . . . . . . . . . . . . . . 45 . . . . ïì .7 . .8 . . .9 .10 .11 . : . . (1 : (2 . . . (1 : . (2 . ïí .1 ïÝ ï ( ). .2 . .3 ïÞ . .4 . . ïß . î í îß .6 îÞ íß íÞ ë ì ìß ëß ìÞ êß ê .5 . êÞ . . . . . . . . . . . . . 30 . ) . ïï ( 30 ïð . A4 . S.FRZ : A3 E . E 2 . 24 . 24 ECO : A3 . ECO A4 -19 -18 . -14 -18 ECO . D . ECO A4 ECO A3 ECO . 30 A4 Child Lock : A3 . . . A3 A2 A4 A4 A3 . 5 : . HH " A4 . F " A3 -12 : 30 . . 7 60 . F : F4 . F . . ç Ed NO FROST C A2 D E G F A3 A4 Ý ßî Ü Ú ßí Temp.Set Eco S.Frz. Alarm Child lock Û Ù Func.Set ßì ( / / / ) / OK/ 5S . dF . " A4 . -1 . HH " A3 . -1 . ( ) . A2 A2 . . 5 . . - " A4 " A3 . . A4 5 . A4 5 . è . . . . . (5 . ) . . . . . é 6 . ×ÝÛ ÓßÕÛÎ (option) ø±°¬·±²÷ ÜÎßÉÛÎ ( Ð×ÆÆß ÞÑÈ ) ÍÓßÔÔDRAWER Ü ÎßÉÛÎ SMALL ßÜÖËÍÌ ÚÛÛÌ ADJUSTABLE FEET . ê . . . . . . . PIZZA BOX .1 .2 .3 . . . . . . . 2 . . . 24 . . ë . . . . . . . 5 . . 10 . . . . . . ì ÝßËÌ×ÑÒÍ . . . . . . . . . . . . mm²0.75 . . . . í 3 .................................................................................................................. 7 ............................................................................................................ 9 ..................................................................................................................... 12 ................................................................................................................ 14 .............................................................................................................. 16 .............................................................................................................. . é éß éÞ éÝ è èòï èòî èòî ß èòï Þ ß Þ ï ïÝ ï î ïÞ í ïß î îß îÞ ì ë í íß íÞ ê ì ë ìß ëß ìÞ êß êÞ min. 300cm 2 NO FROST Ý ßî Ü Ú ßí Temp.Set Eco S.Frz. Alarm Child lock Func.Set ßì OK/ 5S Û Ù