1
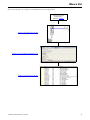
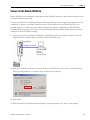
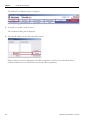
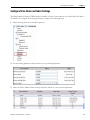
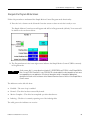
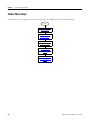
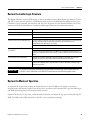
Simple Motion Control
via EtherNet/IP with Kinetix 300 Drives
Connected Components Building Block
Quick Start
Important User Information
Solid state equipment has operational characteristics differing from those of electromechanical equipment. Safety Guidelines
for the Application, Installation and Maintenance of Solid State Controls (publication SGI-1.1 available from your local Rockwell
Automation sales office or online at http://www.rockwellautomation.com/literature/) describes some important differences
between solid state equipment and hard-wired electromechanical devices. Because of this difference, and also because of the
wide variety of uses for solid state equipment, all persons responsible for applying this equipment must satisfy themselves that
each intended application of this equipment is acceptable.
In no event will Rockwell Automation, Inc. be responsible or liable for indirect or consequential damages resulting from the use
or application of this equipment.
The examples and diagrams in this manual are included solely for illustrative purposes. Because of the many variables and
requirements associated with any particular installation, Rockwell Automation, Inc. cannot assume responsibility or liability for
actual use based on the examples and diagrams.
No patent liability is assumed by Rockwell Automation, Inc. with respect to use of information, circuits, equipment, or software
described in this manual.
Reproduction of the contents of this manual, in whole or in part, without written permission of Rockwell Automation, Inc., is
prohibited.
Throughout this manual, when necessary, we use notes to make you aware of safety considerations.
WARNING
Identifies information about practices or circumstances that can cause an explosion in a hazardous environment,
which may lead to personal injury or death, property damage, or economic loss.
IMPORTANT
Identifies information that is critical for successful application and understanding of the product.
ATTENTION
Identifies information about practices or circumstances that can lead to personal injury or death, property damage,
or economic loss. Attentions help you identify a hazard, avoid a hazard, and recognize the consequence
SHOCK HAZARD
Labels may be on or inside the equipment, for example, a drive or motor, to alert people that dangerous voltage may
be present.
BURN HAZARD
Labels may be on or inside the equipment, for example, a drive or motor, to alert people that surfaces may reach
dangerous temperatures.
Rockwell Automation, Rockwell Software, Allen-Bradley, Kinetix, MicroLogix, PanelView, RSLogix 500, and TechConnect are either trademarks or registered trademarks of Rockwell Automation, Inc.
Trademarks not belonging to Rockwell Automation are property of their respective companies.
Table of Contents
Where to Start
...................................................................5
Preface
Introduction. . . . . . . . . . . . . . . . . . . . . . . . . . . . . . . . . . . . . . . . . . . . . . . . . . . . . . . 7
Conventions Used in This Manual . . . . . . . . . . . . . . . . . . . . . . . . . . . . . . . . . . 8
Additional Resources . . . . . . . . . . . . . . . . . . . . . . . . . . . . . . . . . . . . . . . . . . . . . . . 9
Kinetix 300 Drive Integration
Introduction. . . . . . . . . . . . . . . . . . . . . . . . . . . . . . . . . . . . . . . . . . . . . . . . . . . . .
Before You Begin. . . . . . . . . . . . . . . . . . . . . . . . . . . . . . . . . . . . . . . . . . . . . . . . .
What You Need . . . . . . . . . . . . . . . . . . . . . . . . . . . . . . . . . . . . . . . . . . . . . . . . .
Follow These Steps . . . . . . . . . . . . . . . . . . . . . . . . . . . . . . . . . . . . . . . . . . . . . . .
Connect to the Kinetix 300 Drive . . . . . . . . . . . . . . . . . . . . . . . . . . . . . . . . .
Reset the Drive to Factory Settings . . . . . . . . . . . . . . . . . . . . . . . . . . . . . . . .
Drive Commissioning . . . . . . . . . . . . . . . . . . . . . . . . . . . . . . . . . . . . . . . . . . . .
Configure Drive Home and Index Settings . . . . . . . . . . . . . . . . . . . . . . . . .
Configure the Drive Operating Mode. . . . . . . . . . . . . . . . . . . . . . . . . . . . . .
Additional Resources . . . . . . . . . . . . . . . . . . . . . . . . . . . . . . . . . . . . . . . . . . . . .
11
11
12
12
13
15
16
17
19
19
System Validation and
Application Tips
Introduction. . . . . . . . . . . . . . . . . . . . . . . . . . . . . . . . . . . . . . . . . . . . . . . . . . . . .
Before You Begin. . . . . . . . . . . . . . . . . . . . . . . . . . . . . . . . . . . . . . . . . . . . . . . . .
What You Need . . . . . . . . . . . . . . . . . . . . . . . . . . . . . . . . . . . . . . . . . . . . . . . . .
Follow These Steps . . . . . . . . . . . . . . . . . . . . . . . . . . . . . . . . . . . . . . . . . . . . . . .
Multiple Drive Considerations . . . . . . . . . . . . . . . . . . . . . . . . . . . . . . . . . . . .
Messaging IP Address Change . . . . . . . . . . . . . . . . . . . . . . . . . . . . . . . . . . . . .
Configure Controller-to-drive Communication . . . . . . . . . . . . . . . . . . . .
Configure PVc Terminal-to-controller Communication. . . . . . . . . . . . .
Understanding the Network Overview Screen Functionality. . . . . . . . .
Test the Simple Motion Control Functionality . . . . . . . . . . . . . . . . . . . . .
Additional Resources . . . . . . . . . . . . . . . . . . . . . . . . . . . . . . . . . . . . . . . . . . . . .
21
21
21
22
22
23
25
27
29
30
39
Control Program Integration
Introduction. . . . . . . . . . . . . . . . . . . . . . . . . . . . . . . . . . . . . . . . . . . . . . . . . . . . .
Before You Begin. . . . . . . . . . . . . . . . . . . . . . . . . . . . . . . . . . . . . . . . . . . . . . . . .
What You Need . . . . . . . . . . . . . . . . . . . . . . . . . . . . . . . . . . . . . . . . . . . . . . . . .
Follow These Steps . . . . . . . . . . . . . . . . . . . . . . . . . . . . . . . . . . . . . . . . . . . . . . .
Review the Ladder Logic Structure . . . . . . . . . . . . . . . . . . . . . . . . . . . . . . . .
Review the Modes of Operation . . . . . . . . . . . . . . . . . . . . . . . . . . . . . . . . . . .
Review the Program Mode Commands . . . . . . . . . . . . . . . . . . . . . . . . . . . .
Axis User Program Ladder Logic (optional) . . . . . . . . . . . . . . . . . . . . . . . .
Customize the Machine-control Ladder Logic . . . . . . . . . . . . . . . . . . . . . .
Additional Resources . . . . . . . . . . . . . . . . . . . . . . . . . . . . . . . . . . . . . . . . . . . . .
Rockwell Automation Support . . . . . . . . . . . . . . . . . . . . . . . . . . . . . . . . . . . .
Installation Assistance . . . . . . . . . . . . . . . . . . . . . . . . . . . . . . . . . . . . . . . .
New Product Satisfaction Return . . . . . . . . . . . . . . . . . . . . . . . . . . . . . .
41
41
41
42
43
43
44
46
48
49
52
52
52
Rockwell Automation Publication CC-QS018A-EN-P - June 2010
3
Notes:
4
Rockwell Automation Publication CC-QS018A-EN-P - June 2010
Where to Start
Follow the path below to complete your Simple Motion Control application.
Connected Components
Building Blocks,
publication CC-QS001
Chapter 1 Kinetix 300 Drive Integration
Chapter 2 System Validation and Application Tips
Chapter 3 Control Program Integration
5Publication CC-QS018A-EN-P - June 2010
5
Where to Start
Notes:
6
Publication CC-QS018A-EN-P - June 2010
Preface
Introduction
This quick start is designed to provide a way to implement a connected
component for simple motion control.
IMPORTANT
IMPORTANT
The Simple Motion Control Connected Component Building
Block (CCBB) uses predefined configurations in the Kinetix 300
drive and the MicroLogix 1400 controller to create a functional
connected-component solution. Altering or failing to correctly
configure the settings and parameters explained in Chapter
1…Chapter 3 or failure to use the pre-configured RSLogix 500
files provided with the Simple Motion Control Building Block
may result in unexpected behavior and potentially unexpected
motion. If you want to alter the Simple Motion Control
Connected Component configurations or application code,
consult the user manuals for each related product to
understand the ramifications of your desired changes.
Use this Quick Start in conjunction with the Connected
Components Building Blocks Quick Start, publication CC-QS001.
Refer to Additional Resources on page 9 for a listing of other
related documents.
To assist in the design and installation of your system, application files and
other information are provided on the Connected Component Building
Blocks Overview CD, publication CC-QR001. The CD provides bills of
materials (BOM), CAD drawings for panel layout and wiring, control
programs, Human Machine Interface (HMI) screens, and more. With these
tools and the built-in best-practices design, the system designer is free to focus
on the design of their machine control and not on design overhead tasks.
The beginning of each chapter contains the following information. Read these
sections carefully before beginning work in each chapter:
• Before You Begin - This section lists the steps that must be completed
and decisions that must be made before starting that chapter. The
chapters in this quick start do not have to be completed in the order in
which they appear, but this section defines the minimum amount of
preparation required before completing the current chapter.
• What You Need - This section lists the tools that are required to
complete the steps in the current chapter. This includes, but is not
limited to, hardware and software.
• Follow These Steps - This illustrates the steps in the current chapter
and identifies which steps are required to complete the examples.
Publication CC-QS018A-EN-P - June 2010
7
Preface
Conventions Used in This
Manual
8
This manual uses the following conventions.
Convention
Meaning
Example
Check or uncheck
To activate or deactivate a checkbox.
Check Disable Keying.
Click
Click the left mouse button once while the cursor is positioned
on object or selection.
Click Browse.
Double-click
Click the left mouse button twice in quick succession while the
cursor is positioned on object or selection.
Double-click the application icon.
Expand
Click the + to the left of a given item /folder to show its
contents.
Expand 1768 Bus under I/O Configuration.
Right-click
Click the right mouse button once while the cursor is positioned
on object or selection.
Right-click the 1768 Bus icon.
Select
Using the mouse to highlight a specific option.
Select the New Module folder.
Enter
What you type.
Enter your choice.
Press
Pressing a specific key on the keyboard.
Press Enter.
>
Use this symbol to indicate the sub-menu name.
Choose File>Menu>Options.
Publication CC-QS018A-EN-P - June 2010
Preface
Additional Resources
Resource
Description
Connected Components Building Blocks Quick Start, Provides information about how to select products and gain access to panel and
publication CC-QS001
wiring information.
Connected Component Building Blocks Overview
CD, publication CC-QR001
Provides files for the Connected Component Building Blocks.
MicroLogix 1400 Programmable Controllers User
Manual, publication 1766-UM001
Provides information about using the MicroLogix 1400 programmable controller.
MicroLogix 1400 Programmable Controllers
Installation Instructions, publication 1766-IN001
Provides information about using the MicroLogix 1400 programmable controller.
MicroLogix 1400 Programmable Controllers
Instruction Set Reference Manual, publication
1766-RM001
Provides information about using the MicroLogix 1400 programmable controller
RSLogix 500 instruction set.
PanelView Component Operator Terminals User
Manual, publication 2711C-UM001
Provides information about using the PanelView Component HMI terminals.
Kinetix 300 EtherNet/IP Indexing Servo Drives User
Manual, publication 2097-UM001
Provides information about using the Kinetix 300 drive.
http://www.ab.com
Provides access to the Allen-Bradley website.
http://www.rockwellautomation.com/
knowledgebase
Provides access to self-service support.
http://www.rockwellautomation.com/components/
connected
Provides access to the Connected Components website.
Publication CC-QS018A-EN-P - June 2010
9
Preface
Notes:
10
Publication CC-QS018A-EN-P - June 2010
Chapter
1
Kinetix 300 Drive Integration
Introduction
In this chapter, you configure the Kinetix 300 drive parameters as necessary for the MicroLogix 1400
controller to communicate and control the drive. Configuration is done by using your personal computer
connected to the drive.
The Kinetix 300 drive communicates with the MicroLogix 1400 controller via an EtherNet/IP connection.
Each Kinetix 300 drive must have a unique IP address and needs to be configured with MotionView
OnBoard software contained within the drive. This chapter provides step-by-step instructions for
configuring required settings, whether you are using the 1-axis, 2-axis, or 3-axis Simple Motion Control
Connected Component Building Block (CCBB) solution.
This chapter also specifies the minimum number of parameters that need to be changed from the factory
default settings for the Kinetix 300 drive to be controlled by the MicroLogix 1400 controller. For your
machine application, there may also be other drive parameters that need to be adjusted. Consult the drive
documentation for information on all other drive parameters.
IMPORTANT
The Kinetix 300 drive, the personal computer, the MicroLogix 1400 controller, and the PV component must
all be configured to operate on the same EtherNet network. All devices will require configuring to enable
EtherNet communication between them. Consult the devices documentation for information on configuring
EtherNet communications.
Before You Begin
•
Review the Connected Components Building Blocks Quick Start, publication CC-QS001.
•
Apply power to your drive.
Publication CC-QS018A-EN-P - June 2010
11
Chapter 1
Kinetix 300 Drive Integration
What You Need
•
Personal computer with EtherNet connection
•
Kinetix 300 drive(s)
•
EtherNet switch
•
MicroLogix 1400 controller
•
RSLogix 500 software
•
Java-enabled web browser
•
Connected Components Building Blocks Overview CD, publication CC-QR001
Follow These Steps
Follow these steps to configure each of your Kinetix 300 drives.
Start
Connect to the Kinetix 300
Drive, page 13
Reset the Drive to Factory
Settings, page 15
Drive Commissioning, page 16
Configure Drive Home and
Index Settings, page 17
Configure the Drive Operating
Mode, page 19
12
Publication CC-QS018A-EN-P - June 2010
Kinetix 300 Drive Integration
Chapter 1
Connect to the Kinetix 300 Drive
Kinetix 300 drives are configured by using MotionView OnBoard software, a web-based configuration tool
contained within the drive itself.
To access the MotionView OnBoard software, the Kinetix 300 drive and your personal computer must be
configured to operate on the same EtherNet network. The IP addresses of the Kinetix 300 drive, the
personal computer, or both drive and personal computer may require configuring to enable EtherNet
communication between the two devices. Consult the Kinetix 300 user manual for information on how to
configure the drives IP address settting.
1. Connect your personal computer’s EtherNet communication port to the Kinetix 300 drive’s 10/100
Mbps EtherNet communication port with a standard EtherNet cable.
Kinetix 300 drive
EtherNet communication
Personal computer
running
MotionView
OnBoard software
2. Run a Java-enabled web browser and enter the drive’s IP address into the browser. A File Download
dialog box will prompt you to Open or Save the MotionView.jnlp file.
3. Click Open.
4. Read the Hazard of Unexpected Motor Starting warning and answer, Yes, I have to the prompt.
Publication CC-QS018A-EN-P - June 2010
13
Chapter 1
Kinetix 300 Drive Integration
The MotionView OnBoard screen is displayed.
5. To attach to your drive, click Connect.
The Connection dialog box is displayed.
6. Enter the IP address for the drive and click Connect.
When connected, the drive will appear in the Drive Organizer on the left side of the MotionView
OnBoard window and you will be able to browse the drive’s parameters.
14
Publication CC-QS018A-EN-P - June 2010
Kinetix 300 Drive Integration
Chapter 1
Reset the Drive to Factory Settings
To be sure that the Kinetix 300 drive is at a known starting point, you must reset the drive to its factory
settings.
To reset the Kinetix 300 drive to factory settings, perform the following steps.
1. Click on the Restore Defaults button.
2. At the confirmation dialog box, click Yes.
The dialog box below will display if successful.
Publication CC-QS018A-EN-P - June 2010
15
Chapter 1
Kinetix 300 Drive Integration
Drive Commissioning
For the Kinetix 300 drive to operate properly, the following items must be configured for your setup.
Consult the Kinetix 300 Drive User Manual, publication 2097-UM001, for additional information on
configuration parameters.
Motor
Motor window displays motor information and lets you change the motor.
•
Allen-Bradley motors and actuators with intelligent feedback devices will automatically be populated
into the motor configuration.
•
For Allen-Bradley motors and actuators with incremental encoders, click Change Motor and choose
the device from the provided list.
User Units
Set the units your system will be using under the General tab.
EtherNet Communication
The EtherNet window displays the IP address configuration, which is where you can manually set the drive
IP address.
Digital and Analog I/O
Configure any additional I/O you will be using.
Auto-tune
Auto-tune the drive/motor system. The drive will need to be in Auto Tune mode (General tab). The
Dynamics tab contains the auto-tuning interface and gain values.
16
Publication CC-QS018A-EN-P - June 2010
Kinetix 300 Drive Integration
Chapter 1
Configure Drive Home and Index Settings
The Simple Motion Control CCBB includes the ability to home an axis and run any of the Kinetix 300 drive’s
32 indexes. To configure the homing parameters, complete the following steps.
1. Select Homing from the Controller Organizer.
2. Set the homing parameter values based on your system requirements.
3. Select the Home Method from the drop-down list, based on your system requirements.
Publication CC-QS018A-EN-P - June 2010
17
Chapter 1
Kinetix 300 Drive Integration
To configure the Indexing parameters, complete the following steps.
1. Select the Indexing tab from the Controller Organizer.
2. Verify the AutoStart Index is set to Disable.
3. Expand the Indexes and configure as required for your application.
Below is an example of a configured index (00) that will transition to the next index (01) on completion.
The Simple Motion Control CCBB can configure any index from the HMI, but it is preferred that you
configure indexes within MotionView and make adjustments from the HMI.
18
Publication CC-QS018A-EN-P - June 2010
Kinetix 300 Drive Integration
Chapter 1
Configure the Drive Operating Mode
Kinetix 300 drives can be configured to run in a variety of operational modes. The Simple Motion Control
CCBB requires the Kinetix 300 drives to be set to Indexing mode.
To configure the Kinetix 300 Drive Mode parameter, perform the following steps.
1. Select General from the Controller Organizer.
2. Set the Drive Mode to Indexing from the drop-down list.
IMPORTANT
Repeat the steps in this chapter for each Kinetix 300 drive in your application that will use the Kinetix
300 Control Building Block.
Additional Resources
Refer to page 9 for a listing of product and information resources.
Publication CC-QS018A-EN-P - June 2010
19
Chapter 1
Kinetix 300 Drive Integration
Notes:
20
Publication CC-QS018A-EN-P - June 2010
Chapter
2
System Validation and Application Tips
Introduction
In this chapter, you confirm that communication is occurring as intended between the MicroLogix 1400
controller and the Kinetix 300 drives, as well as between the MicroLogix 1400 controller and the PanelView
terminal.
The operation of the sample screens for Simple Motion Control Program mode and Operator mode is
described as well.
Before You Begin
•
Verify that you have completed all of the steps in Chapter 1.
•
Verify that all of the devices are connected per the Simple Motion Control CAD wiring diagram.
•
Verify that the MicroLogix 1400 controller, Kinetix 300 drive, and PanelView Component terminal have
power applied to them.
•
Review the Connected Components Building Blocks Quick Start, publication CC-QS001, verifying that
you have completed all of the steps in Chapter 3 of that quick start.
What You Need
•
Personal computer with Internet Explorer or Firefox web browser
•
PanelView Component terminal
•
Kinetix 300 drives
•
MicroLogix 1400 controller
•
Previously loaded software
•
EtherNet switch so that you can connect your personal computer to both the MicroLogix 1400
controller and PanelView terminal over an isolated EtherNet network
•
Connected Component Building Blocks Overview CD, publication CC-QR001
21Publication CC-QS018A-EN-P - June 2010
21
Chapter 2
System Validation and Application Tips
Follow These Steps
Follow these steps to verify that communication is occurring between your devices.
Start
Messaging IP Address
Change, page 23
Configure Controller-todrive Communication,
page 25
Configure PVc Terminalto-controller
Communication, page 27
Test the Simple Motion
Control Functionality,
page 30
Multiple Drive Considerations
The Kinetix 300 Control Building Block supports one-axis, two-axis, and three-axis configurations. When
completing Chapter 3 of the Connected Components Building Blocks Quick Start, publication CC-QS001,
be sure to use the correct RSLogix Control and PanelView Component HMI Programs for your particular
application. Additionally, Chapter 1 of this document should be completed for each of your Kinetix 300
drives.
IMPORTANT
22
The RSLogix Control and PanelView Component HMI Programs must be the same version (one-axis, twoaxis, or three-axis) for the Simple Motion Control Building Block to function correctly.
Publication CC-QS018A-EN-P - June 2010
System Validation and Application Tips
Chapter 2
Messaging IP Address Change
The MicroLogix 1400 controller communicates to the Kinetix 300 drive via EtherNet IP. Information is read
from and written to the Kinetix 300 drive by using MicroLogix CIP Generic (MSG) instruction. Explicit
messaging lets DINT, REAL, and String data pass back and forth, to and from the drive.
Each message instruction is configured with a drive’s IP address so it knows with which drive to
communicate. Depending on the IP address you configured your Kinetix 300 drive(s) with, you may have to
modify the IP address parameter of the various Message (MSG) instructions used in the controller program
to match those of each drive.
A controller program routine has been created to help streamline the process of changing the IP address
parameter of the Message (MSG) instructions used throughout the Simple Motion Control via EtherNet/IP
CCBB. The default IP addresses of the three Kinetix 300 drives are as follows:
•
Axis 1 = 192.168.1.5
•
Axis 2 = 192.168.1.6
•
Axis 3 = 192.168.1.7
If your system setup requires you to modify the default IP address, perform the following steps to complete
the IP address change for the Kinetix 300 drive. You must use the MotionView OnBoard configuration
software to modify the IP address for the Kinetix 300 drive.
1. In the MotionView OnBoard configuration software, select Ethernet from the Controller Organizer.
2. Make the necessary changes to the IP address configuration.
3. You will need to cycle power to the drive for the new settings to take effect
Consult the Kinetix 300 drive user manual, 2097-UM001, for additional information.
Publication CC-QS018A-EN-P - June 2010
23
Chapter 2
System Validation and Application Tips
Now that the drive IP address has been changed, you must adjust the controller program to modify the IP
address parameter in the message instructions to communicate with the Kinetix 300 drive. To modify the
drive(s) IP address in the controller program, complete the following steps.
1. Open the Simple Motion Control controller program you will be using.
2. Open Data File ST199 and change the string value to match the IP address of your drive.
You have the choice of one, two, or three-axis configurations in this building block. The string address
ST199:0 corresponds to Axis 1, ST199:1 to Axis 2, and ST199:2 to Axis 3.
When you run the program code, the message instructions will be updated when the power-up routine is
executed. For additional information, see Review the Program Mode Commands in Chapter 3 and the rung
comments in the controller program.
24
Publication CC-QS018A-EN-P - June 2010
System Validation and Application Tips
Chapter 2
Configure Controller-to-drive Communication
Once you have the correct RSLogix control program downloaded to the MicroLogix 1400 controller, you are
ready to validate the controller-to-drive communication. Perform the following steps to complete this
validation for each Kinetix 300 drive.
1. Make sure that the MicroLogix 1400 controller is in RUN mode by verifying that the RUN status
indicator next to the LCD screen is ON (solid green).
If not, you can change the controller to RUN mode by using either the programming software or the
Mode Switch function of the MicroLogix 1400 LCD display.
The Kinetix 300 Control ladder logic should now be constantly communicating with the drive via
Message (MSG) instructions.
IMPORTANT
It is critical the Kinetix 300 drive is communicating to the MicroLogix 1400 controller when the controller is
put in RUN mode to ensure that the POWER UP routine executes and initializes program values.
2. Make sure that the Kinetix 300 drive is ready and communicating by verifying that the Kinetix 300 drive
front panel display is scrolling the drive’s IP address, shows ‘diS’ (for disabled), and the ‘E’ status
indicator is flashing green to indicate communication activity.
Drive is faulted (solid)
Communication is
happening (flashing)
Do not worry if the Kinetix 300 drive is faulted (status indicator ‘D’ is solid red); we can clear the fault
from the HMI once communication to the PVc is established.
TIP
Publication CC-QS018A-EN-P - June 2010
If the drive is faulted, the fault should be E91 (user watchdog has timed out). The watchdog
function in the drive is set up in the controller POWER UP routine, which causes the drive to
fault when communication to the controller is lost.
25
Chapter 2
System Validation and Application Tips
3. Examine the MicroLogix 1400 data files to make sure that the Kinetix 300 drive and MicroLogix 1400
controller are communicating correctly via explicit messaging.
a. Expand the Custom Data Monitors section located in the Project tree in RSLogix 500 software and
double-click CDM 0 - AX1 INPUT ASSBLY as shown below.
b. Verify that the Drive Status is as expected by examining some of the data bits.
IMPORTANT
This next step is not be possible for all applications.
c. If possible, verify that the Axis Actual Velocity and Actual Position signals are functioning as
expected by manually turning your motor and watching the values change.
TIP
Explicit message instructions may not be configured with the correct drive IP address if drive status data is
not correctly representing a Kinetix 300 drive and values are not updating. See Messaging IP Address
Change in this chapter for more information on correctly configuring the message instructions.
4. Perform steps 2 and 3 for each Kinetix 300 drive in your system.
Review the correct Kinetix 300 drive front-panel display in step 2 and the correct Axis Input Assembly
data monitor in step 3 for the specific drive you are verifying.
26
Publication CC-QS018A-EN-P - June 2010
System Validation and Application Tips
Chapter 2
Configure PVc Terminal-to-controller Communication
The PanelView Component (PVc) terminal communicates with the MicroLogix 1400 controller over an
EtherNet network. The PVc application reads from and writes to the data table of the MicroLogix 1400
controller. When the PVc application writes to the MicroLogix 1400 controller, the controller program
detects the value change and interacts with the Kinetix 300 drive appropriately via explicit messaging. Since
the controller program is continually updating status data from the Kinetix 300 drives into its data table via
explicit messaging, the PVc application is monitoring the latest drive status data.
The sample Simple Motion Control CCBB programs for the controller and PVc terminal assumes the static
IP address for the MicroLogix 1400 controller is 192.168.1.2.
If you are using a different IP address for the controller, you must modify the MicroLogix 1400 IP address in
the PVc application.
Follow this procedure if you need to modify the MicroLogix 1400 IP address in the PVc application.
1. Connect to the PVc terminal with your Internet Explorer or Firefox web browser by entering the
terminal IP address in the web browser location bar and pressing Enter.
2. Select the application name in the PVc dashboard screen and then click Edit.
The PVc Edit dialog box is displayed.
Publication CC-QS018A-EN-P - June 2010
27
Chapter 2
System Validation and Application Tips
3. From the Edit dialog box, click on the Communication tab.
4. Change the Address field (populated automatically with the static IP address 198.168.1.2) by typing
your correct IP address.
5. Once you have added the correct IP address, click on the Screens tab.
Save
Validate
6. Click on the Validate icon so the new IP address is recognized and validated.
7. Once it is validated, click on the Save icon to save your entered information.
28
Publication CC-QS018A-EN-P - June 2010
System Validation and Application Tips
Chapter 2
8. From the Application Dashboard screen, click Run to run the PVc Kinetix 300 Control application.
Understanding the Network Overview Screen Functionality
Since you have already verified that communication
between the MicroLogix 1400 controller and the
Kinetix 300 drive is working, each axis in your
application (one-axis, two-axis, or three-axis depending
on your configuration) should display as being
“Disabled” or “Faulted” on the Network Overview
screen once the PVc application is running.
“Disabled” indicates that the drive is responding when
the MicroLogix 1400 controller attempts to
communicate with it via explicit messaging, and
indicates that the drive is not enabled but is ready and
not faulted.
If you get a yellow banner message like the one at right,
then the PVc application cannot communicate with the
MicroLogix 1400 controller over the EtherNet network
at the configured IP address.
Publication CC-QS018A-EN-P - June 2010
29
Chapter 2
System Validation and Application Tips
If these cases, use RSLogix programming software and your web browser to verify that the MicroLogix 1400
controller’s IP address configured for channel 1 matches the one in the PVc application. If your personal
computer can communicate with both devices over the EtherNet network, then the PVc terminal should be
able to communicate with the MicroLogix 1400 controller over the EtherNet network.
Once the PVc terminal is successfully communicating with the MicroLogix 1400 controller, you may observe
a drive status other than Disabled. The other possibilities are:
•
Disabled – The drive is ready but not enabled.
•
Enabled – The drive is enabled.
•
Faulted – The drive is faulted.
•
No Comms – The EtherNet communication connection has been broken.
You can now review the status of each axis in your system from the Network Overview screen.
TIP
Pressing the
On this screen, Axis x is a text object that is tied to AX1_DESCRIPTION, tag ST199:0, in the RSLogix 500
file. This axis description can be changed to give the axis a name that is more appropriate to your
application. Once the axis description string is changed, the updated axis description will show on the axis
buttons in the Network Overview screen as well as in the Simple Motion Control screen.
button in the top-right corner will return you to the Network Overview screen.
Test the Simple Motion Control Functionality
Now that the PVc terminal is successfully communicating with the MicroLogix 1400 controller, you are ready
to navigate the screens and then test the Simple Motion Control functionality, first in Operator mode and
then in Program mode.
30
Publication CC-QS018A-EN-P - June 2010
System Validation and Application Tips
Chapter 2
Navigate the Program Mode Screen
Follow this procedure to understand the Simple Motion Control Program mode functionality.
1. Press the Axis x button on the Network Overview screen to select an axis that is ready to test.
The Simple Motion Control screen will appear and will be in Program mode (default). Your screen will
be similar to the one shown below.
2. The Program button in the lower-right corner indicates the Simple Motion Control CCBB is currently
in Program mode.
TIP
On this screen, Axis 1 is a text object that is tied to K1_DESCRIPTION, tag ST199:24, in the RSLogix 500 file
(Axis 2 is tag ST199:125 and Axis 3 is tag ST199:26). This axis description can be changed for an axis name
more appropriate to your application. Once the axis description string is changed, the updated axis
description will show on the axis buttons in the Network Overview screen as well as in the Simple Motion
Control screens.
The indicators on the left side show:
•
Enabled – The servo loop is enabled.
•
Homed – The drive has been successfully homed.
•
Motion Complete – The drive has completed a position-based move.
•
Indexing – The drive is currently operating out of the indexing table.
The solid green color indicates on or active.
Publication CC-QS018A-EN-P - June 2010
31
Chapter 2
System Validation and Application Tips
The numeric displays in the middle show:
•
Current Index (0-31) – when drive is indexing, displays the currently executing index.
•
Actual Position (User Units) – current position of the motor.
•
Actual Velocity (User Units/sec) – current velocity of the motor.
The control buttons show:
•
Starting Index (0-31) – defines the first index the drive should execute on Start command transition. This
value can be changed by the user at anytime, but will not take effect until the next Start command
transition.
•
Index Setup – takes you to the Index Setup screen where the user can edit parameters for any of the 32
drive indexes.
•
Start – the drive will begin executing the index defined by the Starting Index setting when this button is
pressed.
•
Stop – the drive will abort the executing index and decel to zero velocity when this button is pressed. The
drive will remain enabled.
Pressing the
32
button in the top-right corner will return you to the Network Overview screen.
Publication CC-QS018A-EN-P - June 2010
System Validation and Application Tips
Chapter 2
Navigate the Index Setup Screen
Follow this procedure to understand the Index Setup functionality.
1. Press the Index Setup button on the Program mode screen to edit any of the 32 indexes for the selected
axis.
The Index Setup screen is displayed.
The Index Setup screen displays the currently-selected index parameters in two different columns.
•
Current Values – for the selected index, the parameter values are read back from the drive and displayed
in this column. The values are read; on transition to the Index Setup screen, after selecting a new index or
after the Apply (New Values) button is pressed.
•
New Values – for the selected index, allows you to edit the parameters associated with that index. Each
value can be changed as needed. To write the new values to the drive, press the Apply button.
The control buttons show:
•
Up/down – allow you to scroll through the selectable items for three of the index parameters. The
parameters are Index Type, Move Type and Next Action.
•
Apply – for the selected index, writes the parameter in the New Values column to the selected drive.
IMPORTANT
Pressing the
When the parameter values for the selected drive are read back from the drive, they are not only displayed
in the Current Values column, but are also copied to the New Values column. This allows for minimal input
when making minor adjustments to an index’s parameters.
button in the top-right corner will return you to the Program mode screen.
Publication CC-QS018A-EN-P - June 2010
33
Chapter 2
System Validation and Application Tips
Navigate the Operator Mode Screen
Follow this procedure to understand the Simple Motion Control Operator mode functionality.
1. To manually control the drive, press Program to change the Simple Motion Control screen to Operator
mode.
The Simple Motion Control screen will be displayed and will be in Operator mode.
2. The Operator button in the lower-right corner indicates the Simple Motion Control CCBB is currently
in Operator mode. The Enable, Disable, Home, and Jog buttons have become visible, and a Jog
Velocity setpoint numeric entry button is displayed (Jog Vel. SP [UU/esc]).
The indicators on the left side show:
•
Enabled – The servo loop is enabled.
•
Homed – The drive has been successfully homed.
•
Motion Complete – The drive has completed a position-based move.
•
Homing – The drive is currently executing the homing method.
The solid green color indicates on or active.
The numeric displays in the middle show:
•
Jog Vel. SP (User Units/sec) – enter the velocity at which you want to jog the motor. Enter a positive
value for forward direction and a negative value for reverse direction.
•
Actual Position (User Units) – current position of the motor.
•
Actual Velocity (User Units/sec) – current velocity of the motor.
34
Publication CC-QS018A-EN-P - June 2010
System Validation and Application Tips
Chapter 2
The control buttons show:
•
Enable and Disable – enable or disable the drive’s servo loops depending on the current state. If the drive
is disabled, the Enable button is active and the Disable button is inactive (grayed out). If the drive is
enabled, the Disable button is active and the Enable button is inactive.
•
Jog – active when the drive is enabled and inactive when the drive is disabled. When pressed, the
controller program sends a jog command to the drive at the speed currently entered in the Jog Velocity
Setpoint numeric entry. The Jog button is a momentary button and therefore the jog will stop executing
when the button is released.
•
Home – active when the drive is enabled and inactive when the drive is disabled. When pressed, the
controller program sends a home command to the drive and the drive will execute the homing method
that was set in the MotionView configuration.
•
Stop – lets you terminate homing if homing is active.
TIP
Pressing the
The drive must be enabled to jog or home the axis.
button in the top-right corner will return you to the Network Overview screen.
Publication CC-QS018A-EN-P - June 2010
35
Chapter 2
System Validation and Application Tips
Test the Operator Mode Functionality
Follow this procedure to test your axis by using the Simple Motion Control Operator mode functionality.
1. Verify that the motor is disconnected from the load (open shaft) and it is safe to turn the motor.
2. Navigate to the Operator Mode screen.
3. Enable the Kinetix 300 drive by pressing Enable.
The Kinetix 300 drive should now be enabled and maintaining position. The Enabled status indicator
should be green, and the Jog and Home buttons should now be active. As a check, the ‘A’ status light on
the front panel display should also be on and the scrolling display should show the IP address and the
word ‘run’.
If not, then go back to the beginning of this chapter and verify the MicroLogix 1400 controller
communication to this drive.
4. Click the Jog Velocity SP button and enter a valid jog speed.
IMPORTANT
Verify that the speed you choose is safe for your setup.
5. Press and hold the Jog button.
You should see the motor accelerate and rotate at the set velocity. Verify that the actually position value
is also changing.
6. Release Jog.
The drive should decelerate back to stop.
7. Enter a negative value for the Jog Velocity SP and repeat steps 5 and 6, verifying that the motor spins in
the opposite direction.
8. Unplug the motor feedback cable and verify that an Axis Fault E7 is displayed.
36
Publication CC-QS018A-EN-P - June 2010
System Validation and Application Tips
Chapter 2
Notice that the Kinetix 300 drive is now disabled, and the screen indicators and screen buttons have
responded appropriately. Your screen will be similar to the one shown.
Note that two new buttons have appeared on the screen. The Clear Fault button will clear the Kinetix
300 drive fault as long as the fault condition is no longer present. The long white button flashing ‘Drive
Fault: Ex’ provides more diagnostic information for the displayed fault condition when it is pressed.
9. Press the long white button that is flashing to see more diagnostic information.
As shown here, the fault is displayed along with a fault description and possible solutions (following the
-> symbol).
IMPORTANT
The fault code should also be scrolling across the Kinetix 300 drive front-panel display. If the fault code
displayed does not match the HMI or the HMI display not fault code, then the fault is not recognized or is
unlisted. Contact Rockwell Tech Support for assistance.
Publication CC-QS018A-EN-P - June 2010
37
Chapter 2
System Validation and Application Tips
10. Reconnect the motor feedback cable and press Clear Fault.
After doing so, the fault clears, as indicated by the fault display button disappearing, along with the
Clear Fault button.
11. Enable the drive again.
12. Press the Home button to start the homing method you configured in MotionView.
TIP
If your configured homing method uses a home switch, then homing may not work if the motor is not
connected to the system.
You have now completed testing the Simple Motion Control Operator mode functionality.
Pressing the
button in the top-right corner will return you to the previous screen.
Test the Program Mode Functionality
Follow this procedure to test your axis by using the Simple Motion Control Program mode functionality.
1. Press the Operator button to return to Program mode.
2. Verify the motor is disconnected from the load (open shaft) and it is safe to turn the motor.
3. Press the Index Setup button to prompt the Axis screen shown below.
4. Enter values for Index 0 similar to those shown above. Make any necessary changes for your system.
38
Publication CC-QS018A-EN-P - June 2010
System Validation and Application Tips
Chapter 2
5. Press Apply when you have finished entering index parameters.
Pressing the
button in the top-right corner will return you to the previous screen.
6. Press the Starting Index numeric entry button and enter ‘0’ for the starting index.
7. Press the Start button to execute Index 0.
Verify the motor rotates 20 user units at the set speed and then stops. You will also notice the Index
Setup and Start buttons are no longer visible. They are hidden while the drive is executing an index
profile move.
You can also press the Stop button at any time an index profile is executing. The Indexing status
indicator will be solid green while the drive is running an index profile.
TIP
When the index profile is complete or the Stop button is pressed, the axis will decelerate to a stop but will
not disable. To disable the drive, you would need to switch to Operator Mode and then disable the drive.
You have now completed testing all the Simple Motion Control Program mode functionality.
IMPORTANT
Be sure to complete the Test the Operator Mode Functionality and Test the Program Mode Functionality
sections for all Kinetix 300 drives in your system.
Additional Resources
Refer to page 9 for a listing of product and information resources.
Publication CC-QS018A-EN-P - June 2010
39
Chapter 2
40
System Validation and Application Tips
Publication CC-QS018A-EN-P - June 2010
]Chapter
3
Control Program Integration
Introduction
In this chapter, you will explore the Simple Motion Control ladder logic structure, the modes of operation,
and the program commands. You will learn that there are hooks for the various commands that let you create
your own Axis User Program routine for axis control, as well as use the Machine Control Program routine
for simultaneous control of all your axes.
Before You Begin
Verify the following:
•
You have completed all steps in Chapter 1 and Chapter 2.
•
All of the devices are connected per the Simple Motion Control CAD wiring diagram.
•
The MicroLogix 1400 controller, Kinetix 300 drive, and PanelView terminal have power applied to them.
•
The MicroLogix 1400 controller, Kinetix 300 drive, and PanelView terminal are all properly configured
and communicating correctly as explained in Chapter 2.
What You Need
•
PanelView Component terminal
•
Kinetix 300 drives
•
MicroLogix 1400 controller
•
Previously loaded software
•
Standalone EtherNet switch so that you can connect your personal computer to both the MicroLogix
1400 controller and PanelView terminal over an isolated EtherNet network
41Publication CC-QS018A-EN-P - June 2010
41
Chapter 3
Control Program Integration
Follow These Steps
Follow these steps to integrate your control program into the Simple Motion Control ladder logic.
Start
Review the Ladder Logic
Structure, page 43
Review the Modes of
Operation, page 43
Review the Program Mode
Commands, page 44
Axis User Program
Ladder Logic (optional),
page 46
Customize the Machinecontrol Ladder Logic,
page 48
42
Publication CC-QS018A-EN-P - June 2010
Control Program Integration
Chapter 3
Review the Ladder Logic Structure
The Simple Motion Control CCBB consists of four core ladder routines (Main, Power-up, Machine Control,
and STI Control) that are specific to CCBB functionality as well as an additional four ladder routines (Axis
Calculation, Axis Command, Axis Monitor, and Axis User Program) for each Kinetix 300 drive axis. These
routines are briefly described below. Consult the ladder logic comments for further information.
Routine
Description
Main Routine (Main)
Calls all other routines.
Power-up Routine (POWER UP)
Clears Axis Command, Axis Data, and Axis Status values and sets program constant values.
Use this to set initial program values for all axes.
Machine Control Routine (MCHN CNTRL)
Use this routine to control all of the axes in the system at the same time. This control can be
done by using the Broadcast command functionality or by controlling each axis
independently with separate Axis commands.
Executes the custom user machine-control code.
Message Instruction IP Address
(IP CONVERT)
Called by the POWER UP routine.
AX1 Command Routine (AX# CMD)
Executes the commands requested in Operator mode by using the HMI and in Program
mode by using the Axis User Program routine or the Machine Control routine.
AX1 Monitor Routine (AX# MNTR)
Monitors the axis status as well as the HMI status. The axis status is used throughout the
CCBB for axis and drive control. The HMI Status is used for HMI screen control by using
visibility functionality.
IMPORTANT
Converts a string value representing an IP address into an equivalent integer value. This
value is then copied to the message instructions used to communicate with the Kinetix 300
drives.
It is critical that the Kinetix 300 drives be communicating to the MicroLogix 1400 controller when the
controller is put in RUN mode so the POWER UP routine executes and initializes program values.
Review the Modes of Operation
As explained in the previous chapter, the Simple Motion Control CCBB has two modes of operation,
Program mode and Operator mode. Each mode has its own Status and Command PLC tags and ladder logic,
and HMI interlocking keeps each mode mutually exclusive.
Operator mode lets you jog, home, enable/disable, clear faults, and adjust the jog speed, strictly through the
HMI. The HMI sends HMI commands to the PLC and it responds accordingly.
Publication CC-QS018A-EN-P - June 2010
43
Chapter 3
Control Program Integration
In Program mode, you interact with the axis via the HMI or optional PLC application code. The HMI can be
used to configure indexes, set the starting index, and start or stop an index. Other Program mode interaction
can be done via an optional PLC Axis User Program routine or Machine Control routine by using the
Program mode commands that are explained in the next section.
IMPORTANT
An optional Axis User Program routine is not provided in this Simple Motion Control via EtherNet/IP CCBB.
It is discussed here as another way to control the Simple Motion Control program besides through the HMI.
An Axis User Program would need to be created by the user.
Review the Program Mode Commands
There are two types of Simple Motion Control Program mode commands: Axis commands and Broadcast
commands. Axis commands are executed on a particular axis and each axis has its own control tags, status
tags, routine, and so forth. Broadcast commands are executed on all of the axes in the Simple Motion Control
CCBB and can be implemented by using the Machine Control Program.
IMPORTANT
Axis commands can be executed via an optional Axis User Program routine, and affect only that particular
axis. Broadcast commands are executed in the Machine Control routine and affect all of the axes in the
Simple Motion Control CCBB. This provides the flexibility to independently control an axis or to consolidate
machine control code when possible.
Program mode commands provide pre-defined, basic motion-control functionality and can be executed as an
Axis command or a Broadcast command and the functionality remains the same. The only difference is
whether the function is executed on one axis (Axis command) or all axes (Broadcast command). Program
mode commands include the following:
•
Disable
•
Enable
•
Stop
•
Start
•
Fault Reset
•
Home
•
Write Index
All Program mode commands are one-time instructions.
44
Publication CC-QS018A-EN-P - June 2010
Control Program Integration
Chapter 3
The commands are briefly explained in the table below. For further detail on each command, consult the
ladder logic comments.
Table 1 Commands
Command
Description
Disable Command
One-time command that turns OFF the Kinetix 300 drive’s enable and software enable. This
disables the axis.
• K#_CMD_PRG_DSBL
• BDCST_CMD_DSBL
Enable Command
• K#_CMD_PRG_ENBL
One-time command that turns ON the Kinetix 300 drive’s enable and software enable. This
enables the axis.
• BDCST_CMD_ENBL
Stop Command
• K#_CMD_PRG_STOP
One-time command that stops the axis and clears the necessary Axis Command data.
The Stop command will be executed automatically if the axis is not ready or not enabled.
• BDCST_CMD_STOP
Start Command
• K#_CMD_PRG_START
One-time command that starts the axis indexing (or could be used to start an optional Axis User
Program) if it is not already in process.
• BDCST_CMD_START
Fault Reset Command
One-time command that clears the Kineitx 300 drive’s fault via software. This resets the axis.
• K#_CMD_PRG_RESET
• BDCST_CMD_START
Home Command
One-time command that starts the homing sequence configured in the Kinetix 300 drive.
• K#_CMD_PRG_HOME
• BDCST_CMD_PROG_FWD
Write Index Command
One-time command that writes index parameters to the Kinetix 300's Index Assembly object.
• K#_CMD_PRG_WRT_IDX
• BDCST_CMD_PROG_REV
Publication CC-QS018A-EN-P - June 2010
45
Chapter 3
Control Program Integration
Axis User Program Ladder Logic (optional)
The Simple Motion Control via EtherNet/IP CCBB does not include an Axis User Program. An Axis User
Program could be added as a routine in the controller program, and with some small modifications could be
executed by the HMI Start command, the Axis Start command, or the Broadcast Start command.
An example of when you might use an Axis User Program would be when the axis needs to move to a
predefined position before executing the starting index. You could have that happen in a user program,
triggered by the Start command.
Any of the Simple Motion Control Program mode commands can be executed in an optional Axis User
Program by using the Axis commands as shown below.
46
Publication CC-QS018A-EN-P - June 2010
Control Program Integration
Chapter 3
The Axis User Program can be structured as desired, but a state machine (sequencer) is strongly
recommended for more complicated motion control. In general, state machines provide an easier approach
to motion control programming and troubleshooting because of their step-by-step nature. A sample state
machine program is available in the CCBB common folder.
IMPORTANT
TIP
If you want to use a state machine, use the K#_CMD_PROG_SEQ as your state machine value in the Axis
User Program. This value is cleared (set to zero) when the Axis Stop command is executed or when the axis
is in Operator mode. Verify that the initial state of your state machine is when AX#_CMD_PROG_SEQ=0
and then your state machine will execute every time the Axis Start command is executed.
Be sure to initialize or set the Axis command parameters before you execute each Axis command. This will
help make sure that each command is always executed using the expected parameters.
Now that you know how to integrate your individual axes into the Simple Motion Control CCBB and control
them individually, you will explore how to control all the axes simultaneously.
Publication CC-QS018A-EN-P - June 2010
47
Chapter 3
Control Program Integration
Customize the Machine-control Ladder Logic
The optional Axis User Program could control each axis independently while in Program mode, while the
Machine Control routine is used to control all of the axes simultaneously while in Program mode.
Unlike an Axis User Program, there is not a ‘start’ command. Instead, the Machine Control routine will
always be scanned when the MACHINE_ENB_USR_CTRL I/O (I:0/0) is set, which can be removed if not
needed or it can be tied to an input or other conditions as needed.
The Machine Control routine can use any of the Program mode commands, including the Axis commands
and the Broadcast commands as shown below. This means that you can control axes independently, in groups
or sections, or simultaneously.
48
Publication CC-QS018A-EN-P - June 2010
Control Program Integration
Chapter 3
Although the Machine Control routine can be structured as desired, it contains sample ladder logic for
Machine Clear Faults, Machine Start, and Machine Stop operations.
Table 2 Ladder Logic Examples
Example
Description
Machine Clear Faults Example
The Machine Clear Fault example in the Machine Control routine uses the Broadcast command
functionality to clear all of the axis faults at the same time. It executes when the
MACHINE_CLEAR_FAULTS bit is set (I:0/1). This bit can be used as needed to control when the
machine faults are cleared. The Axis command functionality could also be used to clear each axis fault
individually, providing the ability to customize your machine's clear fault process.
Machine Start Example
The Machine Start example in the Machine Control routine uses the Axis command functionality to
clear each axis fault (if faulted) and start each Axis User Program. It executes when the
MACHINE_START bit is set (I:0/2). This bit can be used as needed to control when the entire machine
is started. Additionally, by using the Axis commands, you can control the Machine Start process and
start optional Axis User Programs simultaneously, one at a time, or based upon some other predefined
condition. The Broadcast command functionality could also be used to start all of the Axis User
Programs at the same time.
Machine Stop Example
The Machine Stop example in the Machine Control routine uses the Broadcast command functionality
to stop all of the axes simultaneously. It executes when the MACHINE_STOP bit is set (I:0/3). This bit
can be used as needed to control when the machine is stopped. The Axis command functionality could
also be used to stop each axis individually, providing the ability to customize your machine's stopping
process.
Change the operation of the Machine Control to reflect your application needs. If simultaneous control is
needed, consider using Broadcast commands. If individual or step-by-step control is needed, consider using
Axis commands and controlling each axis individually.
TIP
Be sure to initialize or set the Axis command parameters before you execute each Axis command to ensure
each command is always executed with the expected parameters.
Additional Resources
Refer to page 9 for a listing of product and information resources.
Publication CC-QS018A-EN-P - June 2010
49
Chapter 3
Control Program Integration
Notes:
50
Publication CC-QS018A-EN-P - June 2010
Rockwell Automation
Support
Rockwell Automation provides technical information on the Web to assist you in
using its products. At http://www.rockwellautomation.com/support, you can find
technical manuals, a knowledge base of FAQs, technical and application notes, sample
code and links to software service packs, and a MySupport feature that you can
customize to make the best use of these tools.
For an additional level of technical phone support for installation, configuration, and
troubleshooting, we offer TechConnect Support programs. For more information,
contact your local distributor or Rockwell Automation representative, or visit
http://www.rockwellautomation.com/support.
Installation Assistance
If you experience a problem with a hardware module within the first 24 hours of
installation, please review the information that’s contained in this manual. You can
also contact a special Customer Support number for initial help in getting your module
up and running.
United States
1.440.646.3434
Monday – Friday, 8 a.m. – 5 p.m. EST
Outside United
States
Please contact your local Rockwell Automation representative for any
technical support issues.
New Product Satisfaction Return
Rockwell tests all of its products to ensure that they are fully operational when shipped
from the manufacturing facility. However, if your product is not functioning, it may
need to be returned.
United States
Contact your distributor. You must provide a Customer Support case
number (see phone number above to obtain one) to your distributor in
order to complete the return process.
Outside United
States
Please contact your local Rockwell Automation representative for
return procedure.
Publication CC-QS018A-EN-P - June 2010
Copyright © 2010 Rockwell Automation, Inc. All rights reserved. Printed in the U.S.A.