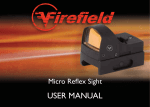
1
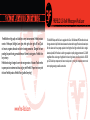
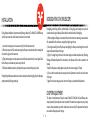
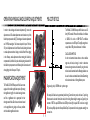
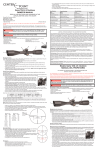
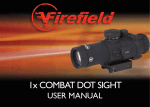
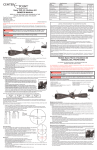
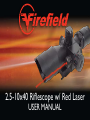
2.5-10x40 Riflescope w/ Red Laser
USER MANUAL
FIREFIELD 2.5-10x40 Riflescope w/ Red Laser
Firefield delivers high quality and durability to every intense moment. Firefield products
consist of riflescopes, flashlights, laser sights, reflex sights, bore sights, AK and Quad
rail mounts, magazines, binoculars and other shooting accessories. Designed for heart
pounding, fast paced hunting, personal defense, or Xtreme shooting sports - Firefield is the
key to victory.
Firefield technology is designed to serve the next generation of shooters. Transform fear
to power, panic to excitement and chaos to glory with Firefield. Prepare for victory with
the latest Firefield products. Firefield-Victory Justifies Everything!
www.fire-field.com
The Firefield Riflescope with Red Laser is equipped with a Green / Red Illuminated Mil Dot reticle that is used
for range estimation to help find the distance between the shooter and the target. Precision multi-coated optics
offer the clearest view for easy target acquisition in both bright and low light conditions. A built in windage /
elevation adjustable, 5mW red laser is used for target acquisition in rapidly changing environments.A 2.5-10x40
magnification offers a wide range of magnification for close or long distance shots. Also included is a 100-500
yard .223 bullet drop compensator; the shooter can adjust zero by moving the compensation turret to the
correct yardage ensuring successful accurate shots.
DIAGRAM
Technical Specifications:
Reticle type
Mil-dot IR
Reticle color
Green / red
Magnification
2.5-10x
Objective lens diameter
40mm
Exit pupil diameter
Eye relief
Field of view (ft @100yd)
Diopter adjustment
MOA adjustment (one click)
13.3-4.4mm
69-50mm
34.86-11.53
3 to -3
1/4
Battery type (reticle/laser)
CR2032/ 2x AG13
Battery life
80-150hr (reticle)
5hr (laser)
Lens coating
Multi-coated
Waterproof
yes
Shockproof
yes
Dimensions
Weight
1) Objective Lens
2) Windage / Elevation Adjustments
3) .223 Bullet-Drop Compensator
4) Magnification Ring
5) Diopter Adjustment
6) Red Laser on/off Switch
7) Reticle Illumination Adjustment
8) Red Laser Windage/Elevation Adjustments
9) Weaver Mount
10) Mil-Dot Reticle
215mm x 88mm x
80mm
26.4oz
Features:
•
•
•
•
•
•
2.5-10x magnification
Green / red illuminator mil-dot reticle
Bullet drop compensator
Built-in red laser
Multi-coated optics
Waterproof, shockproof
3
2
4
5
6
7
9
10
1
2
1
8
BORESIGHTING THE RIFLESCOPE
INSTALLATION
Boresighting and test firing should be performed safely on a firing range. Laser boresights are a quick and
accurate method to sight in riflescopes. Below is listed the traditional method of boresighting.
1) When mounting the riflescope on a bolt action rifle, remove the bolt; or when mounting to a semi automatic
rifle, disassemble the rifle until there is a straight line of sight through the bore.
2) Use a target at least 20 yards to 50 yards away when sighting in the riflescope. Look through the bore of the
weapon and locate the bullseye of the target.
3) Sight in the target through the bore and then make windage and elevation adjustments (see “Operating
Windage and Elevation Adjustments” for instructions) to the riflescope until the reticle is centered on the
bullseye.
To verify the riflescope is accurately sighted in, always fire a three-shot test group at 100 yards.
4) If you are still not centered, make the necessary amount of adjustments to move the reticle to the center
of the target.
5) Again fire a three-shot test group, and use the center of the group to determine final adjustments.
During riflescope installation it is important to strictly follow gun safety rules.The Firefield 2.5-10x40 Riflescope
with Red Laser comes with a built in weaver mount base. In order to install:
1) Loosen the mounting screws on the weaver mount (9) with a flat head screw driver.
2) Mount the scope on the rifle’s weaver base assuring the riflescope is mounted evenly and the mounting bolt
is located in the groove of the weaver base.
3) Tighten the mounting screws on the weaver mount with a flat head screw driver. Do not over tighten. Check
that the riflescope is mounted evenly and securely on the rifle.
4) Finalize the installation procedure by checking that the scope is mounted with proper eye relief.
Warning: Having the riflescope mounted too close to the rear can injure the shooter during firing. Ensure the riflescope is
properly mounted before firing to prevent injury.
DIOPTER ADJUSTMENT
The diopter is the measurement of the eye’s curvature. Firefield 2.5-10x40 with Red Laser Riflescope has a
diopter adjustment (5) that helps attain a clear sharp reticle. If the reticle does not appear clear, crisp, or sharp,
rotate the diopter adjustment ring until the reticle becomes clear and sharp. The adjustment should stay the
same unless the riflescope’s operator changes.
3
4
OPERATING WINDAGE AND ELEVATION ADJUSTMENTS
MIL-DOT RETICLE
In order to make windage and elevation adjustments (2), remove the
adjustment covers.The elevation adjustment cover is located on top of the
bullet drop compensation dial (3).The windage and elevation adjustments
are 1/4 MOA, meaning that 1 click moves the point of impact 1/4 inch at
100 yards. Adjustments can be both felt and heard, allowing the shooter
to make adjustments without looking at the dials. Note: When sighting
in the riflescope, make adjustments without rotating the bullet drop
compensation dial, hold the dial in place while adjusting the elevation. For
the bullet drop compensator to work effectively, the dial must be set to 1
when sighting in the riflescope at 100 yards.
The Firefield 2.5-10x40 Riflescope with Red Laser uses a US
Army Mil Dot reticle. Mil stands for millradian. A millradian
is 1/6283.2th of a circle or 3.438 MOA. The millradian
represents one unit at 1000 yards.To simplify, a target that is
one yard tall at 1000 yards would measure 1 milradian.
1.3
0.2
0.8
1.3
MAGNIFICATION ADJUSTMENT
The Firefield 2.5-10x40 Riflescope with Red Laser comes
equipped with variable magnification options. By rotating
the magnification ring (4) to the desired setting, shooters
can find a magnification that is appropriate for their
shooting scenario. Note: Do not loosen the screw located
on the magnification ring, doing so will cause problems
with the variable magnification function.
0.9
1.8
CALCULATION METHOD
In order to determine distance there are three variables:
target size, mils read, and range. In order to determine
distance, the target size must be known. By using the reticle,
mils read can be determined and the following calculation can
be used to derive an estimated distance. Note: Determining
mils read must be made at 10x magnification power.
Target size (in yards) x 1000/Mils read = yards to target
5
6
For example, a full size deer is approximately six feet long. Convert feet into yards, so the deer is 2 yards long.
Now measure the deer with the mil-dot reticle; it is 4 mils long. Next, multiply the target size (2 yards) by the
constant of 1000. This equals 2000. Now divide 2000 by mils read (4), this equals 500. So the deer is roughly
500 yards away. Finally adjust the riflescope’s Bullet Drop Compensator dial to the appropriate setting for an
accurate shot.
BULLET DROP COMPENSATOR
OPERATING THE SIDE-MOUNTED LASER
The bullet drop compensation dial (3) allows for quick adjustments of the reticle for shooting targets at specific
distances. This compensator was designed for a .223 caliber 55 grain bullet. The bullet drop compensation dial
has distances of 1 (100yds), 2 (200yds), 3 (300yds), 4 (400yds) and 5 (500yds) marked directly on the dial. By
using the mil-dot reticle to determine the distance, the bullet drop compensation dial is adjusted to that distance
to acquire an accurate shot. Note:To work effectively, the dial must be set to 1 when sighting in the riflescope
at 100 yards.
The built-in 5mW red laser is used for target acquisition in close range, rapidly changing environments.
The laser has built-in windage and elevation adjustments (8) that allow the laser to be accurately
sighted in with your rifle. To operate the laser:
1) Located the red laser on/off switch (6).
2) Push the button located on the back of the switch to turn the laser on.
3) Push the button again to turn the laser off.
OPERATING THE ILLUMINATED RETICLE
Warning: Never point the laser designator directly at, or into someone’s eye.This may cause damage to
the eye, or blindness. Avoid looking directly into the laser. Avoid shining the laser into mirrors or other
reflective surfaces.
The Firefield 2.5-10x40 Riflescope with Red Laser features an illuminated
reticle. Illuminating the reticle improves visual distinction between the
target and the reticle in low / poor lighting conditions. The reticle can
be used in the following states: black (off), red or green. Red and green
illumination consists of five levels of brightness. In order to illuminate the
reticle:
1) Rotate the reticle illumination adjustment (7) located on the left side
of the riflescope
2) Turn the adjustment dial to the desired brightness level until the reticle
stands out against the target.
Note: Settings 1-3 are intended for use in low lighting conditions. Settings 4 and
5 are intended for use in bright conditions.
Note: Due to visual restrictions of 5mW red laser
at greater distances in daylight, the most effective
application is for close range/CQB scenarios.
Shooters should evaluate the recurrent firing
range in their scenarios and sight the laser to their
firearm’s point of impact at the range.
7
8
MAINTENANCE
REPLACING THE BATTERY
Proper maintenance of the riflescope is recommended to ensure longevity. It is recommended that when the
riflescope becomes dirty that it is wiped down with a dry or slightly damp cloth. Blow dirt and debris off all
optics and then clean lenses with a lens cleaning cloth. No further maintenance is required.
ILLUMINATED RETICLE
If the reticle appears dim or fails to illuminate, the battery needs to be replaced. The Firefield 2.5-10x40
Riflescope with Red Laser uses a CR2032 to illuminate its reticle. 3 volt CR2032 batteries can be purchased at
stores where batteries are sold or online. In order to replace the battery:
1) Remove the battery cap located on the reticle illumination adjustment (7) with a flat head screw driver.
Rotate the cap counterclockwise until it is removed. It might be necessary to hold the illumination adjustment
in place to prevent it from rotating.
2) Remove the old battery and insert a new battery with positive (+) side up.
4) Replace the battery cap. Use a flat head screw driver, rotate the cap clockwise until it is attached. It might be
necessary to hold the illumination adjustment in place to prevent it from rotating.
5) Check that the reticle illumination is now functioning properly.
WARNING
Never allow children to use or handle this product. The Firefield riflescopes are nitrogen purged and o-ring
sealed unless otherwise noted. DO NOT disassemble the riflescope for any reason as this will void the warranty
and could be hazardous. Any internal work should be handled by the manufacturer. Any tampering with the
purge screw will void the warranty. CAUTION: Use of controls or adjustments or performance of procedures
other than those specified herein may result in hazardous radiation exposure.
TROUBLESHOOTING
Never ship back a riflescope without getting proper authorization beforehand. Doing so could result in losing the
riflescope due to a multitude of reasons. If problems occur with your riflescope:
1) Check the firearm’s mount and verify that it is securely attached to the rifle. If there is any shifting, retighten the
mounting system.
2) When test firing a rifle, check the point of impact relative to windage and elevation adjustments.
3) Be sure to use factory-loaded ammunition of the same bullet type, weight, and preferably lot number when
sighting.
5mW RED LASER
If the laser appears dim or fails to operate, the battery needs to be replaced. The Riflescope with Red Laser
uses 2 AG13 (LR44) batteries.These button cell batteries can be purchased in stores where batteries are sold
or online. In order to replace the battery:
1) Grip the laser on/off switch (6) and rotate the on/off switch counterclockwise until it is removed.
2) Remove the old batteries and insert a new battery with positive (+) side up on both batteries.
3) Replace the on/ off switch and rotate clockwise until it is attached. Check to make sure laser is functioning.
FIREFIELD WARRANTY
9
10
Please visit www.fire-field.com for warranty details and information.
To view this manual in other languages visit www.fire-field.com
LASER RADIATION: AVOID DIRECT EYE EXPOSURE
CLASS IIIA LASER PRODUCT
Max Output: <5mW Wavelength: 532nm
This product complies with 21 CFR chapter 1. subchapter J
LASER RADIATION:
Do not stare into beam or view
directly with optical instruments
Max Output: 5mW
Wavelength: 532nm
625-660nm
Product distributed by Sellmark
2201 Heritage Parkway
Mansfield,TX 76063
LASER RADIATION
AVOID EXPOSURE TO BEAM
CLASS 3R LASER PRODUCT
www.fire-field.com