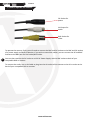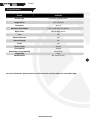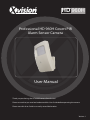
1
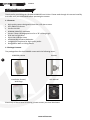
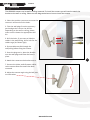
HD 960H
Professional HD 960H Covert PIR
Alarm Sensor Camera
User Manual
Thank you purchasing the XC960PIR camera from Xvision.
Please ensure that you read and understand this User Guide before operating the camera.
Please store this User Guide in an easily accessible location.
Version 1
HD 960H
XC960PIR
Contents
1. Product Overview ..................................................................................
4
1.2 Package Contents ..........................................................................
4
2. Installation ............................................................................................
3. How to Operate the Camera ..................................................................
5
4. Specifications ........................................................................................
7
2
www.xvision.com
6
HD 960H
XC960PIR
Safety Precautions
1. Do not install the equipment in an environment with too much moisture, dust or smoke dust as this
may result in fire or electric shock.
2. In the unlikely event that the equipment should malfunction and emit an abnormal smell or smoke,
please immediately stop it, shut off the power and contact your supplier.
3. Please do not place this equipment near a heat source to avoid risk of fire.
4. Please do not store, install and use this product in danger areas with inflammable or explosive
substances.
5. Please make sure the power is turned off when installing the product.
6. Please ensure that you install the camera in an area with good ventilation.
7. When installing the camera, please make sure that it does not face any objects giving out strong lights
as this will damage the CCD of the camera.
3
www.xvision.com
HD 960H
XC960PIR
ProductOverview
Overview
1.1.Product
Thank you for purchasing the HD 960H XC960PIR from Xvision. Please read through this manual carefully
and make sure you understand before operating the camera.
1.1 Features
•
•
•
•
•
•
•
•
•
•
High quality camera designed to look like a PIR alarm sensor
Sony 960H CCD Sensor
Xvision X1K DSP
HD960H (960x576) resolution
Xvision 3.6mm HD Megapixel Lens for a 78° viewing angle
0.01 low lux light level
Up to 10m IR Night Vision
Automatic Digital Noise Reduction
Integrated microphone for high quality audio
Designed for Wall or Ceiling Mount
1.2 Package Contents
The packaged box for the XC960PIR comes with the following items:
XC960PIR Camera
Bracket
Installation Screws/
Wall Plugs
User Manual
4
Should any of these items be missing, please contact your local distributor.
www.xvision.com
HD 960H
XC960PIR
Installation
1.2.Product
Overview
The XC960PIR camera can be wall or ceiling mounted. To install the camera you will need to attach the
bracket to the wall or ceiling. Please see the diagram below on how to install the camera.
1. Select the position you want to mount the
camera in and mark out the holes.
2. Take the wall plugs from the accessory
pack and get the correct size drill bit.
Depending on the wall or ceiling, please
make sure to choose the appropriate drill
bit.
3. Drill the holes. If you want to hide the
cables in the wall/ceiling, drill a hole for the
cables to go (As shown right).
4. Ensure cables are fed through the
wall/ceiling before fixing the camera.
5. Once the plugs are in, place the bracket
over the wall plugs and screw the base in
place.
5
6. Attach the camera to the bracket secure.
7. Connect the video, audio & power cables
to the camera after the camera has been
mounted.
8. Adjust the camera angle using the ball joint
on the bracket.
www.xvision.com
HD 960H
XC960PIR
How to Operate
the Camera
1.3.Product
Overview
DC Socket for
power
AV Output for
Audio
BNC Socket for
video
To operate the camera, firstly you will need to connect the BNC and DC sockets to the BNC and DC sockets
of a power supply and DVR or Monitor. If you wish to extend the cables, you can connect the DC and BNC
Sockets to the BNC/DC of a PNP cable/RG59 cable.
6
You can then connect the DC socket to a 12V DC Power Supply and the BNC socket to back of your
compatible DVR or monitor.
To connect the audio, use an AV Cable to plug into the AV socket of the camera to the AV in socket at the
back of your compatible DVR or monitor.
www.xvision.com
XC960PIR
HD 960H
Specifications
1.4.Product
Overview
Model
XC960PIR
Picture Type
Day/Night (B/W & Colour)
Image Sensor
1/3” Sony CCD
Resolution
700 TVL
Minimum Illumination
0.01 Lux (IR Off) 0 Lux (IR On)
Night Vision
10m IR Night Vision
Lens
78°
Motion Detection
No
Mirrored Image
No
Audio
Yes
Power Supply
Consumption
Dimensions in mm (WxHxD)
Weight (Kg)
Weatherproof
DC 12V
240mA
60x103x60
0.10
No, Internal Only
7
For more information, please contact our technical team. Contact details are on the back page.
www.xvision.com
Manufactured exclusively for:
HD 960H
www.xvision.com
TECHNICAL SUPPORT
For technical support, please contact your local distributor.
Alternatively, call 0871 222 1430.
LIMITED WARRANTY
This product is supplied with a 12 month warranty. The warranty excludes products
that have been misused (including accidental damage) and damage caused by
normal wear and tear. In the unlikely event that you encounter a problem with this
product, it should be returned to the place of purchase.
Xvision UK, Unit 2 Valley Point, Beddington Farm Road, Croydon, Surrey CR0 4WP
www.xvision.com