1
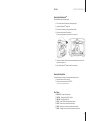
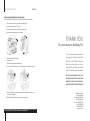
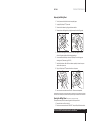
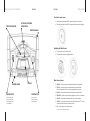
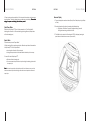
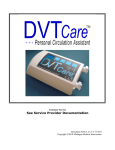
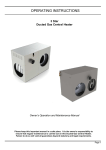
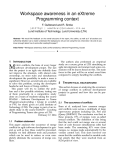
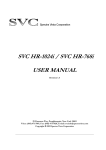
SKIP-AWAY PRO
TM
User’s Manual
Covers getting to know your machine,
repairing an optical disc, maintenance,
menus, displays, & warranty coverage.
FOR SUPPORT INFORMATION
www
.v
enmill.com
www.v
.venmill.com
or
508-278-0091
866-864-0210
TOLL FREE
FOR NON-NORTH AMERICAN SERVICE
PLEASE CALL YOUR REGIONAL DISTRIBUTOR
If uncertain please contact [email protected]
SAM.PNV4000.111507.2
SKIP-AWAY PRO 1 Year Limited Warranty
TM
WARRANTY: VenMill Industries, Inc. (“VenMill”) warrants its SKIPAWAY Pro™ product against defects in materials and workmanship
under normal use for a period beginning on the date of retail purchase
(the “Purchase Date”) by the original end-user purchaser (the
“Purchaser”) and ending on or upon the first to occur of (i) the first
anniversary of the Purchase Date or (ii) one hundred (100) hours of
product operation as measured by the product’s internal usage
tracking system (“Warranty Period”). If a product defect arises and
a valid warranty claim is received by VenMill within the Warranty
Period, at its option, VenMill will either (1) repair the defect at no
charge, using new or refurbished replacement parts, (2) exchange
the product with a new or refurbished functionally equivalent product,
or (3) refund the purchase price of the product. A replacement
product or part assumes the remaining warranty of the original
product. When a defective product or part is exchanged, or a refund
of the purchase price is given, the applicable defective product or
part will become VenMill’s property and returned to VenMill at
VenMill’s request.
WARRANT Y EX
CL
USIONS AND LIMIT
ATIONS: This Limited
EXCL
CLUSIONS
LIMITA
Warranty applies only to SKIP-AWAY Pro™ units manufactured by or
for VenMill that can be identified by the “VenMill” trademark, trade
name, or logo affixed to them, and the unit lot number.
This Limited Warranty does not apply: (a) to damage caused by failure
to follow care and usage instructions supplied with the product or
improper maintenance; (b) to damage caused by accident, abuse,
misuse, neglect, flood, fire, lightning, earthquake, or other external
or natural causes (such as electrical fluctuations or power failure);
(c) to damage caused by operating the product outside the permitted
or intended uses described by VenMill; (d) to damage caused by
service, repair, or product modifications performed by anyone not
authorized by VenMill; (e) to damage sustained during shipment;
(f) to a product or part that has been modified to significantly alter
functionality or capability; (g) to consumable parts, unless damage
has occurred due to a defect in materials or workmanship; (h) to a
product with a defaced or removed VenMill lot number; (i) to a
product used for commercial purposes or other non-personal
purposes (such as in a video store, library, pawn shop, hotel, or office);
or (j) to a product offered for rental.
No VenMill reseller, agent, or employee is authorized to make any
modification, extension, or addition to this warranty.
TO THE EXTENT PERMITTED BY LAW, THIS WARRANTY AND REMEDIES
SET FORTH ABOVE ARE EXCLUSIVE AND IN LIEU OF ALL OTHER
WARRANTIES, REMEDIES AND CONDITIONS, WHETHER ORAL OR
WRITTEN, STATUTORY, EXPRESS OR IMPLIED. AS PERMITTED BY
APPLICABLE LAW, VENMILL SPECIFICALLY DISCLAIMS ANY AND ALL
STATUTORY OR IMPLIED WARRANTIES, INCLUDING, WITHOUT
LIMITATION, WARRANTIES OF MERCHANTABILITY, FITNESS FOR A
PARTICULAR PURPOSE AND WARRANTIES AGAINST HIDDEN OR
LATENT DEFECTS. IF VENMILL CANNOT LAWFULLY DISCLAIM
STATUTORY OR IMPLIED WARRANTIES, THEN TO THE EXTENT
PERMITTED BY LAW, ALL SUCH WARRANTIES SHALL BE LIMITED IN
DURATION TO THE DURATION OF THIS EXPRESS WARRANTY AND TO
REPAIR OR REPLACEMENT SERVICE AS DETERMINED BY VENMILL IN
ITS SOLE DISCRETION.
16
SECTION 7
EXCEPT AS PROVIDED IN THIS WARRANTY AND TO THE EXTENT
PERMITTED BY LAW, VENMILL IS NOT RESPONSIBLE FOR DIRECT,
SPECIAL, INCIDENTAL OR CONSEQUENTIAL DAMAGES RESULTING
FROM ANY BREACH OF WARRANTY OR CONDITION, OR UNDER ANY
OTHER LEGAL THEORY, OR ANY INDIRECT OR CONSEQUENTIAL LOSS
OR DAMAGE HOWSOEVER CAUSED INCLUDING THE REPLACEMENT
OF EQUIPMENT AND PROPERTY. THE FOREGOING LIMITATION SHALL
NOT APPLY TO DEATH OR PERSONAL INJURY CLAIMS.
FOR PURCHASERS WHO ARE COVERED BY CONSUMER PROTECTION
LAWS OR REGULATIONS IN THEIR COUNTRY OF PURCHASE OR, IF
DIFFERENT, THEIR COUNTRY OF RESIDENCE, THE BENEFITS
CONFERRED BY THIS WARRANTY ARE IN ADDITION TO ALL RIGHTS
AND REMEDIES CONVEYED BY SUCH CONSUMER PROTECTION LAWS
AND REGULATIONS. Some countries, states and provinces do not
allow the exclusion or limitation of incidental or consequential
damages or exclusions or limitations on the duration of implied
warranties or conditions, so the above limitations or exclusions may
not apply to the Purchaser. This warranty gives the Purchaser specific
legal rights, and the Purchaser may also have other rights that vary
by country, state or province. This Limited Warranty is governed by
and construed under the laws of the country in which the product
purchase took place.
OBT
AINING W
ARRANT
Y SER
VICE
OBTAINING
WARRANT
ARRANTY
SERVICE
VICE: To obtain warranty service
for the SKIP-AWAY Pro™ product, the Purchaser needs to contact
regional distributor, or if in North America, VenMill customer service
during the Warranty Period either by phone at 800.928.0090 or 866864-0210 or by email to [email protected]. In order for VenMill
to process a warranty claim, the Purchaser will need to provide to
VenMill a copy of the dated sales receipt for the product, the
Purchaser’s name and address, the product lot number and a
description of the problem. If the Purchaser’s claim appears to meet
the criteria for warranty service, the Purchaser will be given a return
material authorization number (RMA). Upon the issuance of the
RMA to the Purchaser, the Purchaser should bring or ship the product
prepaid in the original container, with any associated accessories, to
VenMill at the following address:
VenMill Industries, Inc.
RMA Number: (insert your RMA number here—see above)
660 Douglas Street
Uxbridge, MA 01569
or to such other address as a VenMill customer service representative
may provide to the Purchaser.
It is recommended that the Purchaser insure any product shipped to
VenMill.
SAVE ALL PACKING MATERIALS. FAILURE TO USE PACKAGING
DESIGNED FOR THIS UNIT MAY CAUSE DAMAGE TO THE UNIT AND
WILL VOID WARRANTY.
FAILURE TO USE CONSUMABLES DESIGNED FOR THIS UNIT
WILL CAUSE DAMAGE TO BOTH UNIT AND DISC THEREBY
VOIDING YOUR WARRANTY. FOR AUTHORIZED DISTRIBUTORS
VISIT WWW.VENMILL.COM.
VenMill Industries, Inc.
© 2007 VenMill Industries, Inc. All rights reserved.
Under the copyright laws, this manual may not be
copied, in whole or in part, without the written
consent of VenMill.
Every effort has been made to ensure that the
information in this manual is accurate. VenMill
is not responsible for printing or clerical errors.
VenMill Industries
660 Douglas Street
Uxbridge, MA 01569 U.S.A
508-278-0091
www.venmill.com
VenMill, Skip-Away, Elite 60 & OptoClear names and
designs are trademarks of VenMill Industries, Inc.
Artwork and Design © 2007 VenMill Industries, Inc.
All Rights Reserved.
The maximum amount of repairs per cartridge may
vary based on cleaning cycle usage. Blu-ray discs can
only be maintained, not repaired, due to the nature of
the disc. A disc adapter is required for 3 inch disc
repair or cleaning. (contact your Authorized distributor
found on our website.) See www.venmill.com for more
information.
CAUTION: Units and consumables are designed for
use in specific regions. Your warranty will be voided
if you purchase the equipment and/or consumables
outside of your designated region. Purchase only
through Authorized distributors found on our website
at www.venmill.com. If uncertain please contact
[email protected]
Note: Discs can be repaired an unlimited amount
of times. However, never run a disc two times
consecutively without letting the disc cool to room
temperature after each repair cycle.
Specifications may change or vary.
This machine is an appliance and
does make noise.
Standard Maintenance
SECTION 6
Cleaning the Skip-Away ProTM
Recommended with every cartridge change.
1 Turn off power and wait for the shutter to completely open.
2 Unplug the Skip-Away ProTM power cord.
3 Remove the front drawer by pulling on the drawer handle.
4 Remove any lint contained in the machine.
You may use compressed air, a gentle vacuum, or your hand.
P
5 Install the front drawer. Note: Push front drawer completely into machine or your
machine will not power on.
6 Plug in the Skip-Away ProTM power cord and turn on the power.
Cleaning the Drive Wheel
This may be necessary if the Disc is not turning properly during the cycle.
1 Ensure that there is no Disc in the Unit.
2 Enter the menu screen and select “CLN DRV”.*
* This process may take several minutes.
Error Codes
1
2
3
4
5
6
7
WHEEL CHG – Change the buffing wheel
CART CHG – Change the OptoClearTM cartridge
CART LOW – Cartridge is below 10%
E0001 – Shutter not closed, contact technical support
E0002 – Shutter not open, contact technical support
E0003 – Buffing motor not centered, contact technical support
E0004 – Lift wedge not in home position, contact technical support
15
Standard Maintenance
SECTION 6
Replacing the Buffing Wheel Cleaning Brush
It is recommended that you change the brush when the buffing wheel is replaced.
1 Turn off power and wait for the shutter to completely open.
2 Unplug the Skip-Away ProTM power cord.
3 Remove the front drawer by pulling on the drawer handle.
4 Remove the buffing wheel out of the machine.
THANK YOU
P
P
For purchasing the Skip-Away Pro
TM
P
This unit is intended to clean/repair the
following discs: CD-Roms, Music CDs,
5 Remove the brush by sliding it out.
Data CDs, DVDs, HD-DVDs, Computer
Discs, Game Discs, Books on disc, all
6 Insert new brush.
7 Reinstall buffing wheel with label facing you.
8 It is now recommended that you clean your Skip-Away ProTM. (Please see pg. 15)
N
O
9 Install the front drawer. Note: Push front drawer completely into machine or your
machine will not power on.
10 Plug in the Skip-Away ProTM power cord and turn on the power.
FAILURE TO USE CONSUMABLES DESIGNED FOR THIS UNIT WILL CAUSE DAMAGE TO BOTH UNIT AND DISC, THEREBY
VOIDING YOUR WARRANTY. FOR AUTHORIZED DISTRIBUTORS VISIT WWW.VENMILL.COM.
14
recordable CDs and DVDs, double-sided
discs, & 3 Inch Discs (only with adapter).
SAVE ALL PACKING MATERIALS. FAILURE TO USE
PACKAGING DESIGNED FOR THIS UNIT MAY CAUSE
DAMAGE TO THE UNIT AND WILL VOID WARRANTY.
FOR MORE INFO CONTACT [email protected].
VenMill Industries, Inc
660 Douglas Street
Uxbridge, MA 01569 USA
USA 800-928-0090
N. Ameri. 866-864-0210
Intl. 508-278-0091
Fax 508-278-0005
www.venmill.com
Standard Maintenance
SECTION 6
Replacing the Buffing Wheel
1 Turn off power and wait for the shutter to completely open.
2 Unplug the Skip-Away ProTM power cord.
3 Remove the front drawer by pulling on the drawer handle.
4 Remove the worn buffing wheel by pulling them away from the buffing motor.
5 Install the new buffing wheel. Ensure that it is fully seated against the back
of the buffing motor spindle with label facing towards you.
6 It is now recommended that you clean your Skip-Away ProTM and change your
cleaning brush. (Please see pgs 14 & 15.)
7 Install the front drawer. Note: Push front drawer completely into machine or your
machine will not power on.
8 Plug in the Skip-Away ProTM power cord and turn on the power.
9 Enter the menu screen and choose “WHL RPL”. Resume normal operation.
The maximum amount of repairs may vary based on cleaning cycle usage. Blu-ray discs can only be maintained, not repaired, due
to the nature of the disc. A disc adapter is required for 3 inch disc repair or cleaning. See www.venmill.com for more information.
Cleaning the Buffing Wheel
This process may take several minutes.
This may be necessary if the Discs are coming out with a film or poor finish.
1 Ensure that there is no Disc in the Unit
2 Enter the menu screen and select “CLN WHL”. Then push Repair Button to activate.
FAILURE TO USE CONSUMABLES DESIGNED FOR THIS UNIT WILL CAUSE DAMAGE TO BOTH UNIT AND DISC, THEREBY
VOIDING YOUR WARRANTY. FOR AUTHORIZED DISTRIBUTORS VISIT WWW.VENMILL.COM.
13
Standard Maintenance
Contents
SECTION 6
Replacing the OptoClearTM Cartridge
Caution: never point empty or replacement cartridge nozzle at your face.
1 Turn off the power by pressing the power button and wait for the shutter to
completely open.
2 Unscrew the spray nozzle counterclockwise and lift out the empty cartridge.
READ BEFORE OPERATING EQUIPMENT
SECTION 1
Getting to Know Your Machine ............................................................................. 6
SECTION 2
Onscreen Displays ................................................................................................. 7
SECTION 3
Quick Start ............................................................................................................. 8
SECTION 4
Operation Modes ................................................................................................ 1 0
SECTION 5
3 NOTE
NOTE: Do not remove or tamper with safety caution label or chip on cartridge.
Insert the new replacement cartridge into the Skip-Away ProTM.
4 Tighten the spray nozzle by turning clockwise.
Menu Screen ....................................................................................................... 1 1
SECTION 6
Standard Maintenance ....................................................................................... 1 2
5 Remove safety caution label on new replacement cartridge.
6 Turn on the power.
Replacing the OptoClearTM Cartridge ................................................ 1 2
Replacing the Buffing Wheel ............................................................. 1 3
Cleaning the Buffing Wheel ............................................................... 1 3
Replacing the Buffing Wheel Cleaning Brush ................................... 1 4
Cleaning the Skip-Away ProTM ......................................................................................................... 1 5
Cleaning the Drive Wheel .................................................................. 1 5
The maximum amount of repairs per cartridge may vary based on cleaning cycle usage. Blu-ray discs can only be maintained, not repaired,
due to the nature of the disc. A disc adapter is required for 3 inch disc repair or cleaning. See www.venmill.com for more information.
CA
UTION
CAUTION
UTION: MAY BE HARMFUL IF SWALLOWED. EYE IRRITANT. CONTAINS: Isopropanol alcohol &
conditioning agent (catonic) PRECAUTIONS: Avoid ingestion. Keep away from eyes. Contents under
pressure. Temperature is not to exceed 120°F (49°C). Flammable. Keep away from flame. FIRST
AID: If eye contact occurs, rinse with tap water for 5-10 minutes. If irritation persists, seek medical care.
If swallowed, drink full glass of water; get prompt medical attention. Dispose of cartridge properly.
FAILURE TO USE CONSUMABLES DESIGNED FOR THIS UNIT WILL CAUSE DAMAGE TO BOTH UNIT AND DISC, THEREBY
VOIDING YOUR WARRANTY. FOR AUTHORIZED DISTRIBUTORS VISIT WWW.VENMILL.COM.
12
Error Codes ........................................................................................ 1 5
SECTION 7
Skip-Away ProTM 1 Year Limited Warranty .......................................................... 1 6
Getting to Know Your Machine
SECTION 1
SECTION 5
Menu Screen
To enter the menu screen
PROTECTIVE SHUTTER
OPTOCLEAR CARTRIDGE
SPRAY NOZZLE
a
Press the power button when “MENU” appears during the start-up routine
b
Press the power button when “MENU” appears while the machine is sitting idle.
CARRYING HANDLE
Navigating the Menu Screen
a
The repair button scrolls through choices
b
The power button selects the highlighted option.
Menu Screen choices
DRAWER HANDLE
DISPLAY
1 CLN WHL – use this to perform an extended cleaning of the buffing wheel.*
2 CLN DRV – use this to perform an extended cleaning of the drive wheel.*
This may be necessary if the Disc is not spinning properly during a cycle.
REPAIR BUTTON
POWER BUTTON
Blue = Repair mode
Green = Clean mode
Red Flashing = Error
(Scroll Button)
Green = Power
Orange = Standby
(Select Button)
3 WHL RPL – use this to indicate that the buffing wheel has been replaced.
4 LANGUAGE – use this to select the display language of your choice. (if available)
5 HOUR OP – use this option to display the total hours of cycle operation
6 CHK SYS – use this option to test the functions of your Skip-Away ProTM. This may
be used to determine where a failure has occurred.
7 Exit – use this option to exit the menu screen.
* This process may take several minutes.
6
11
Operation Modes
SECTION 4
SECTION 2
Onscreen Display
If 5 repair cycles are performed within a 10 minute period the machine could commence a
short cool-down. This will be indicated by a count-down timer on the display. Please do no
nott
unplug the power cord during this cool-down period.
Onscreen Display
1
The top line displays the machine’s status (Ready or Error Code) and cycle type (Repair
or Clean).
Quick Clean Mode
2
Machine information will scroll on the second and third display lines:
a Total Repairs, Total Cleans, Percent of Cartridge remaining, Percent of
Buffing wheel remaining, and the Menu Select.
3
The Middle line is the active line. When the word “MENU” is displayed, pressing the
power button will select the menu screen. (See section 5)
By default, the Skip-Away ProTM when it is first powered on is in “Quick Clean Mode”.
Inserting a disc will result in a 15 second cleaning cycle being performed. (Repair button
will be illuminated green)
Repair Mode
There are two ways to enter “Repair Mode”.
1. Before inserting a Disc, press the repair button. When the repair button illuminates blue
the Skip-Away ProTM will be in “Repair Mode”.
a
b
Inserting a disc will result in a 3 minute repair.
As long as the repair button is illluminated the last selected cycle is in memory.
2. Insert a Disc into the Skip-Away ProTM.
a
b
Machine will start a cleaning cycle.
You can now press the repair button at any time during the cleaning cycle to switch
to a repair cycle.
No
Notte: Discs can be repaired an unlimited amount of times. However, never run a disc
two times consecutively without letting the disc cool to room temperature after each
repair cycle.
10
7
Quick Start
SECTION 3
1 Plug in the Skip-Away ProTM power cord.
Quick Start
SECTION 3
5 Press the Repair Button.
WARNING!
Plug directly into outlet.
Do not use Extension Cords.
a
When the repair button is pressed, it
will illuminate blue indicating a 3 minute
repair is selected.
b
By default the Skip-Away ProTM when it is first
powered ON is in “Quick Clean Mode”.
Inserting a disc will result in a 15 second
cleaning cycle being performed. (Repair
button will be illuminated green) For Repair
Cycle see section 4.
Note: Discs can be repaired an unlimited
amount of times. However, never run a disc
two times consecutively without letting the
disc cool to room temperature after each
repair cycle.
2 Press the power button. The shutter will open completely.
6 Insert the Disc.
a
a
b
c
3 Select the language you want for
your display. (1st time use only, if available)
c
a
Use the repair button to scroll through languages.
b
Use the power button to select the highlighted language.
4 Remove the Disc installed
during shipping. (1st time use only)
O O
8
The Disc should be inserted straight in. It should be properly seated between
the entrance wheels. Note: 3 inch discs require the optional 3 inch adapter sold
separately.
b After the disc is inserted, make
sure that your hands do not
obstruct the shutter from closing.
a
Manually pull the disc straight
out of the machine.
N
Pressing the power button at any
time will end the cycle.
LABEL
7 Remove the cleaned Disc.
a
Handle the disc only
by the edges or center ring.
SIDE
9