1
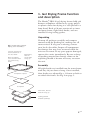
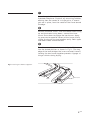
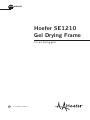
user manual
Hoefer SE1210
Gel Drying Frame
For air drying gels
um SE1210-IM/Rev.H0/08-12
Page finder
1. Gel Drying Frame function and description...........1
Unpacking.........................................................1
Assembly...........................................................1
2. Instructions.......................................................2
Prepare the gel for drying....................................2
3. Gel Drying Stack Assembly..................................4
4. Drying Gels........................................................6
Air Drying..........................................................6
After Gels are Dry...............................................6
5. Care and maintenance........................................7
Cleaning............................................................7
Changing the Gasket...........................................7
6. Troubleshooting..................................................8
7. Ordering information...........................................9
• pi
1. Gel Drying Frame function
and description
The Hoefer® SE1210 gel drying frames hold gels
between cellophane and/or heavy gauge polyester plastic sheets for drying in a rack placed in a
fume hood. Each gel frame consists of an inner
and outer frame, eight black knobs, and one
installed O-ring sealing gasket.
Unpacking
Fig 1. Frame parts and gel
drying stack assembly.
Screw all 8 knobs into
the threaded holes in
the outer frame.
When assembling,
orient the frame with
the screws facing
down.
Outer frame,
with the
Hoefer label
facing up.
Unwrap all packages carefully and compare
contents with the packing list, making sure all
items arrived. If any part is missing, contact
your local sales office. Inspect all components
for damage that may have occurred while the
unit was in transit. If any part appears damaged,
contact the carrier immediately. Be sure to keep
all packing material for damage claims or for
repacking should it become necessary to return
the unit.
Assembly
Cellophane or plastic
All eight knobs are installed into the outer frame
until they fit just short of snug. Once installed,
these knobs are adjusted by a 1/4-turn to lock or
to unlock the frame. See Fig 2 on page 5.
Gel
Cellophane
Inner frame, with the
word UP facing up.
Loading platform
(ordered separately)
• p1
2. Instructions
Note: This drying method is
NOT recommended for:
•A
garose gels, which are generally too thick.
•P
olyacrylamide gels attached
to treated polyester film.
Listed below are recommended procedures to
ensure optimum drying results for gels of different thicknesses and acrylamide concentrations.
Thin gels (0.75 mm or less) are recommended
for best results.
Prepare the gel for drying
Thin gels (Gel thickness < 0.75 mm or
gel > 0.75 mm and acrylamide ≤ 10% T)
1
Fix and stain the gels according to your preferred
protocol.
2
Final soak solution.
Coomassie™ Blue. The final destaining solution should
consist of 7% acetic acid, 5% methanol, and 0.5 – 2%
glycerol. (Glycerol maintains the flexibility of the gel,
making it less likely to crack.) Equilibrate the gel in
this solution for a minimum of 2 hours, but preferably
overnight. After destaining, rinse the gel with distilled
water for 1– 2 minutes to remove excess acetic acid.
Silver stain. Add 0.5 – 2% glycerol to the final
water rinse.
Fluorography. Follow the manufacturer’s instructions
or your preferred protocol.
3
Load the gel onto the drying frame as described on
page 4.
• p2
Thick gels (Gel thickness > 0.75 mm and
acrylamide > 10% T)
1
Fix, stain and destain the gel according to your
preferred protocol. Use a final destaining solution of
7% acetic acid and 5% methanol.
2
Note: Unless gel cracking is
a recurring problem, prevent
gels from becoming tacky
by using ≤ 2% glycerol gel
soaking solution.
Final soak solution.
Note: If you soak gels in
a solution of ethanol and
glycerol you can dry the gels
after the preserve step is
completed.
Silver stain. Soak gels in 30% ethanol, 5% glycerol for
at least 30 min prior to drying.
Coomassie Blue. After the final destain, soak the gel in
a solution of 35% ethanol and 0.5 – 2% glycerol for
1– 2 hours. (Ethanol dehydrates the gel, which minimizes cracking during drying. Do not place the gel in
the ethanol solution longer than 2 hours, as ethanol
will begin destaining the gel.)
Fluorography. Follow the manufacturer’s instructions or
your preferred protocol.
3
Load the gel onto the drying frame as described on
page 4.
• p3
3. Gel Drying Stack Assembly
1
Select the drying sheets. You need one sheet of
porous cellophane for the bottom and one sheet of
either porous cellophane or polyester for the top:
Cellophane. Use for fluorography, thick gels, or to
preserve a gel. (Cellophane does not quench the
signal of fluor-treated gels.)
Polyester. Use for contact autoradiography for gels
≤ 1 mm. (The polyester peels off once the gel is dried.
Place the uncovered side against the X-ray film.)
2
Fully hydrate cellophane sheets in distilled water.
This will take several minutes. (Polyester sheets do
not require hydration).
3
Unlock the frame knobs and gently pop the inner
frame out of the outer frame. Position the inner frame
so that the side labeled UP faces up. If using the
loading platform (ordered separately), see Fig 1 on
page 1 for the platform and inner frame positions.
4
Place a fully hydrated sheet of cellophane over the
inner frame (on the loading platform, if available).
Pour 5 –10 ml of distilled water on the sheet.
5
Assemble the drying stack.
6
Important! Remove all bubbles
from the gel. Push them carefully toward the edge of the gel
with gloved finger.
• p4
Place the gel(s) on the cellophane.
Once all the bubbles are removed, pour 5 –10 ml of
distilled water on the gel as well as around the edges.
7
Cover the gel with a sheet of polyester or fully
hydrated cellophane. Displace any remaining bubbles,
working from the center of a single gel or, if several
gels are in place, from the center of the frame toward
the edge.
8
Position the outer frame—with the Hoefer label facing
up and the knobs facing down—around the inner
frame. Press down to engage the two frames. Applying pressure to opposite corners of the frame usually
causes the frames to snap together easily. Both upper
and lower sheets should be taut.
9
Turn the assembly over to turn each knob 1/4-turn
into the locked position as shown in Fig 2. (The long
edge of the knob bridges the inner and outer frames.)
Locking the two frames together prevents slippage as
the gel shrinks during drying.
Fig 2. Locking the frames together.
Open
Closed
• p5
4. Drying Gels
Air Drying
Place the frames in a suitable rack, preferably
in an operating fume hood. If gels positioned
vertically are found to slide toward the bottom,
reposition them and dry them horizontally. Slipping can be prevented by carefully blotting off
excess water before clamping the frame closed.
After Gels are Dry
1
Remove the gels from the frames.
Cellophane. Trim excess wrapping, if desired.
Polyester. For contact autoradiography, peel plastic off
before exposing the gel to X-ray film.
2
Rinse frames thoroughly with water and then distilled
water after each use.
• p6
5. Care and maintenance
Cleaning
Important! Never autoclave or
heat any component of the
frame above 55 °C.
Clean the frame regularly with mild soap and
water, rinse thoroughly with water and distilled
water, and allow to air dry. Never use abrasive
detergents. Do not expose the frame to solutions
or vapors of aromatic or halogenated hydrocarbons, ketones, esters, alcohols (over 30%), or
concentrated acids (over 25%).
Changing the Gasket
If the gasket on the inner frame becomes
inflexible or no longer holds the gel stack tautly,
remove it and install a new gasket, stretching
it slightly around three sides and then rolling it
into place on the fourth.
• p7
6. Troubleshooting
problem
solution
Gel or cellophane cracks All gelsHandle the gel and cellophane with care. Fully
hydrate the cellophane with distilled water just before
use and avoid stretching it during assembly.
If the cellophane is drying too quickly, instead of
hydrating it in distilled water, soak it in the same
glycerol solution used for the gel.
Always remove all air bubbles before drying.
G
radient gels or gels ≥ 0.75 mm thick with acrylamide ≥ 10% T
Dehydrate the gel in 30% ethanol and 2% glycerol
before drying. If gels still crack, increase the percentage
of glycerol up to 5%. Note: With a higher percentage
of glycerol, a longer drying period is required. The gels
may also be flexible and feel tacky when dry.
Fluor-treated gel
Use cellophane instead of polyester.
Use a thinner gel (≤ 0.75 mm).
Gel dries too slowly or not at all
Gel dries unevenly
Rotate each frame 180° (front-to-back) every
half hour.
Check the gel or stack
Reduce the amount of glycerol to 0.5 – 2%.
Check that you are not using two sheets of polyester.
At least one sheet must be cellophane.
Gel turns cloudy or white
G
els ≥ 0.75 mm thick with acrylamide ≥ 10% T
Reduce the percentage of ethanol to 30%.
o not soak the gel for more than 2 hours in the ethaD
nol/glycerol dehydration solution.
After Coomasie Blue staining, be sure to use final
destain of 7% acetic acid and 5% methanol before
soaking in 35% ethanol/glycerol solution.
• p8
7. Ordering information
product
quantity
code no.
Replacement Parts: 20 cm × 20 cm frames and platform.
Cellophane sheets, 33 cm × 33 cm
50
SE1202
Mylar sheets, 33 cm × 33 cm
25
SE1204
1
SE1210
Gel drying frame, 20 cm × 20 cm. Includes inner
and outer frames, 8 black knobs and one O-ring
sealing gasket. (Order loading platform separately)
O-ring sealing gasket, 20 cm × 20 cm frame
1
SE1212
10
SE1213
Gel loading platform, 20 cm × 20 cm
1
SE1214
Outer gel drying frame and 8 knobs, 20 cm × 20 cm
1
SE1215
Inner gel drying frame, 20 cm × 20 cm, and one O-ring sealing gasket
1
SE1216
Knobs, black
Replacement Parts: 21 cm × 26 cm frames and platform.
Cellophane sheets, 33 cm × 38 cm
50
SE1202-L
Mylar sheets, 33 cm × 38 cm
25
SE1204-L
1
SE1210-L
Gel drying frame, 21 cm × 26 cm. Includes inner
and outer frames, 8 black knobs and one O-ring
sealing gasket. (Order loading platform separately)
O-ring sealing gasket, 21 cm × 26 cm frame
Knobs, black
1
10
SE1212-L
SE1213
Gel loading platform, 21 cm × 26 cm
1
SE1214-L
Outer gel drying frame and 8 knobs, 21 cm × 26 cm
1
SE1215-L
Inner gel drying frame, 21 cm × 26 cm, and one O-ring sealing gasket
1
SE1216-L
• p9
Hoefer, Inc.
84 October Hill Road
Holliston, MA 01746
Toll Free: 1-800-227-4750
Phone: 1-508-893-8999
Fax: 1-508-893-0176
E-mail: [email protected]
Web: www.hoeferinc.com
Hoefer is a registered trademark
of Hoefer, Inc.
Coomassie is a trademark of
ICI plc.
© 2012 Hoefer, Inc. —
All rights reserved.
Printed in the USA.