1
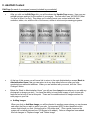
Cline Communications Website User Manual
Revised 7/17/2010
Welcome to the Cline Communications user manual. It is intended to guide you through the easy steps that
will help you add, edit, or delete any items that you have designed in each of your website pages (screens).
This user manual is not intended to take the place of personalized training on your website, but to
supplement the training and provide a reference for future application. Since there are many custom
changes to websites, this user manual only discusses the basic options available to most sites.
This user manual will guide you through the steps to:
1.
2.
3.
4.
5.
6.
7.
Check you website Email.
Check your website statistics.
Backup your website database.
Set your website profile.
Add or edit any of your page (screen) names.
Set the order that you want your pages (screens) to appear.
Edit the content of your website pages.
The administration area can be accessed by go to the admindata folder on your website. This can be
accomplished by typing in “/admindata” after your domain name in the browser address window. There is
also a hidden link to the administration area in the upper left corner of your website. When you go to the
administration area, you will be prompted for a username and password. This will be supplied to you when
your site is purchased and developed by Cline Communications.
The administration area of your website is broken up into three sections. The top section is where you will
change the overall layout of your site (i.e., the navigation menus, page names, etc); the bottom left section is
where you can add/edit content on your pages, including images. The bottom right section is where you
maintain data for the custom modules included with your site.
over all layout
add/edit content
custom modules
I. Over all Layout
If prompted to re-login, use the same login that you used for the administration area.
Check Email
We recommend that you use a third party email client such as Microsoft Outlook or Outlook Express,
however if you choose to use web based email, the following instructions will guide you through using web
based email.
1. After you click on the Check Email link, you will be prompted to provide our email login. Use your full
email address for the username and your email password.
2. You will then be directed to the CP cPanel Mail Management screen. There you will select either
the Horde or Squirrel Mail email option. We recommend the Horde option, as Squirrel Mail has
been known to have problems.
Web Stats
1. After you click on the Web Stats link, you will be directed to your Usage Statistics screen for your
website. These statistics will provide you with useful and important information to help you decide
how to manage your website. This site is kept current in “real time” access mode, and at the top left
of the screen it includes the Summary Period for the last 12 months, and the date and time that it
was generated (in Pacific Time).
2. From here you will be able to view your Usage Summary graph details, which include the number of
Pages/Files/Hits, the number of Visits/Sites, and the size (Kbytes) of the ...
3. You will also be able to view the data graph, Summary by Month, which lists the number of Hits,
Files, Pages, and Visits for your Daily Average. In addition, it lists the number of the Hits, Files,
Pages, and Visits, and lists the Sites and Kbytes (size) for your Monthly Totals.
Back up Database
1. After you click on the Back up Database link, you will be prompted to save the backup file. The
backup file is a small text files containing a back up of the text content of your site which is contained
in a database specific to your website.
Set Site Profile
1.
After you click on the Set Site Profile link, you will be shown the Profile Administration screen.
This screen allows you to add, edit, or delete your profile information in each data box. This
information will appear on the contact us page. These are:
• Name: (of your Home Page. This will display on the title bar of the browser window.)
• Address:
• From Email: (this is the Email address that you have set up to send server generated
emails. This is used if you have a shopping cart or order form setup on your site).
• Phone:
• Fax:
• Cell:
• Contact to Email: (this is the Email address where you will receive all comments or
questions submitted to your website from the contact us page. This Email address will also
receive the notifications of any message posted to your message boards. You may enter
more than one email address, separated by a comma, in this box so that multiple people
can receive the comments or questions.)
2.
This Profile Administration screen then lists a number of boxes on the bottom section of the
screen, which you can “check” or “uncheck”. These are the custom modules provided by Cline
Communications that have been initially assigned to your website. This gives you the flexibility to
decide what your website profile will include on the “left” side panel of your website pages
(screens). The initial titles are as follows:
• Include Contact Us
• Include Download Area
• Include Events Calendar
• Include Links
• Include Message Boards
• Include Photo Gallery
• Include Staff
• Include News
3.
When you check any of these boxes then the title of that box will appear on the “left” side panel of
your website pages (screens).
4.
When you have updated your profile and/or selected which custom modules you want to include,
click the Save Changes button located at the bottom to save your changes/selections. (Note: You
will be able to add or edit the name of each page or change the order of each page in how you
want them to appear from the next administration links seen below).
Add / Edit Page Names
1.
After you click on the Add / Edit Page Names link, you will be shown the Add / Edit / Delete
Page screen. This screen shows you which order you currently have set for each of your website
pages (screens), and the titles of each of your website pages (screens).
2.
From here you can decide to either:
• Add a new page.
• Edit an existing page.
• Delete an existing page. (Note: you cannot delete a custom module page.)
3.
When you click on the Add New Page link, you will be shown the next screen with two data
boxes. They are the Page Order box, and the Page Name box. From this screen you can add a
new page, and list the order number of where you want it to appear on the “left” side panel of your
website pages (screens). Then you can click the Save Changes button. (Please Note: We
recommend that you list your page numbers in a consecutive sequence of 10’s [e.g. 10, 20, 30,
etc.], which will give you the flexibility to insert a newly designed page [e.g. 7, 15, 23, etc.] or to
reset the order of your entire website at a future time).
4.
After clicking the Save Changes button you will immediately be brought back to the Add / Edit /
Delete Page screen, where you will now see your new page that you added, and where it is
placed in the order that you chose.
5.
When you click on the Edit link you will be shown the next screen with the same two data boxes.
However, they will indicate the Page Order, and the Page Name that were previously chosen.
From this screen you can edit the order number or change the name of the page. Then you can
click the Save Changes button.
6.
When you click on the Delete link you will be shown the next screen, which will include this
statement … “You have chosen to DELETE the following page”. It will also list the name of the
page that you chose to delete. Then you can click the Confirm button to approve this action.
Set Page Order
1.
After you click on the Set Page Order link, you will be shown the Page Administration screen
and the current order and names of all your website pages (screens). It will also show you a
number data boxes assembled in five (5) columns.
2.
Within each data box it will show you the following information for each of your pages:
• Order
• Effect
• Print
• Menu
3.
The Order column lists the numbers which define the order of the pages in the navigation menus.
4.
The Effect column lists the type of effect placed on the menu item. This allows you the flexibility
to decide if you want a certain page to become a sub-tier page (screen) to the page listed just
before it in order. Or if you want a page to be used as a non-linking heading. The following
options are available:
• Normal – Menu item is listed normally as a link
• Indent – Menu item is indented to reflect a sub-tier effect.
• Heading – Menu item is listed as a non-linking heading
• Normal-X – Menu item is listed normally with any indented item below hidden. Once clicked
on the hidden menu items expand under the Normal-X item.
• Heading-X – Menu item is the same as the Normal-X item only the item does not link.
5.
The Print column also lists either a “No” or a “Yes” in each data box. This allows you the flexibility
to decide if you want a certain page (when you change the data box to a “Yes”) to have an
additional link located on this page in the upper left section titled “Printer Friendly Version”, which
when clicked will immediately show the web browser a printer friendly screen that they can print
(no top or background image, no navigation menu and the text will wrap to fit printer margins.)
6.
The Menu column lists three (3) choices in each data box. They are, Top, Side, Off. (Can be top,
bottom, and off depending on the website layout.) This allows you the flexibility to decide if you
want certain page titles listed either on the “Top” or “Side” navigation menus of your website
pages (screens). You can even decide not to show a certain page by selecting “Off” in the data
box. When you choose the “Off” option and then click the Save Changes button the page title is
no longer listed on your navigation menus, but it remains listed on this Page Administration
screen. Menu items are listed in the order identified with top, then side, then off.
7.
The Name column lists the tiles of each of your website pages (screens). The Name cannot be
changed from this screen, but can be changed from the Add/Edit Page Names described above.
II. Add/Edit Content
Edit Page [for each of your pages (screens) included in your website]
•
After you click on the Edit Page link, you will be shown the Update Page screen. Here you can
add/edit pictures and text for the content of your pages. The text editor uses WYSIWYG (What
You See Is What You Get). This allows you to easily format your content with bold, italic,
underline, tables, etc, with the click of the mouse, similar to most word processing programs.
•
At the top of this screen you will see a link to return to the main Administration screen (Back to
Administration Home) that you can return to at any time either before or after you have
completed your edits and additions. When you are satisfied with your work, click the “Save
Changes” button.
•
Below the “Back to Administration Home” you will see three Image boxes where you can add any
photograph or image you wish. You have the ability to insert three images of your choice with
captions and a body of text at this point. There are four additional sets of images and text for
each page on your site.
a. Adding images
When you click on Add New Image you will be directed to another screen where you can browse
and select the file you wish to add to your site. An important NOTE is also identified on this
screen that informs you that: “photos must be 150 pixels wide”. (This a guide; however the
system will not allow pictures over 150 Kbytes to be added.) Once an image has been added
this link changes to “Replace Image” and “Delete Image”
If only one image is added (out of the three available positions) the image will be sized to the size
of the original image uploaded. Learn to optimize your images so that they fit how you want
them.
•
If a single image is used in the left image box, the text body will wrap around the right side
of the image.
•
Conversely if a single image is used in the right image box, the text body will wrap around
the left side of the image.
•
If a single image is used in the center image box, the text will be placed below the image.
•
If multiple images are used (two or three out of three available spots) the images will resize
to fit alongside each other with the text body placed below the images.
b. using the text editor
The text editor uses WYSIWYG and is very user friendly. (Note: It is important to save all text
changes before leaving the page you are editing. This includes adding images, which leave
the page to upload the image.) The WYSIWYG options available with the text editor are
described below:
Toggles the screen to show the HTML source code.
Saves all text changes in all text boxes on the page.
Cuts selected text and places it on the clipboard for future pasting.
Copies selected text and places it on the clipboard for future pasting.
Paste text from clipboard to screen where cursor is located
Paste text, as plain text, from clipboard to screen where cursor is located
Paste text, as word format, from clipboard to screen where cursor is located
Performs spell check of text. Must be installed (from prompt). Only works with Internet
Explorer.
Un-do the previous operation
Re-do the previous operation
Find text
Replace text
Select all text
Clear formats
Bold selected text
Italic selected text
Underline selected text
Strikeout selected text
Subscript selected text
Superscript selected text
Insert a numbered list
Insert a bullet list
Out dent a paragraph
Indent a paragraph
Block quotes a paragraph
Left justify selected text
Center selected text
Right Justify selected text
Full justify selected text
Insert a pre formatted style for selected text
Insert a pre formatted heading for selected text
Change font for selected text
Change text size for selected text
Change color for selected text
Change background color for selected text
Insert a hyperlink
Remove a hyperlink
Insert a table
Insert a horizontal line
Toggle text box to full screen
Show document blocks/sections
III. Custom Modules
If the following custom modules are not listed on your administration screen, then you need to go into the
“Site Profile” screen and include them. See “Site Profile” in Section I.
Manage Calendar
When you click on the Manage Calendar link you will be directed to a new screen where you can
edit/add calendar events. Events are listed by date. You can edit an existing event or add a new event.
Events are displayed in a dynamic calendar for the public to view. Each event can be hidden by
selecting the display to “No” on the edit screen. Dates must be entered in “YYYY-MM-DD” format. Web
links can be added to the event, however the full web address should be used (i.e., http//www….)
Manage Links
When you click on the Manage Links link you will be directed to a new screen where you can edit/add
links to other sites. The initial screen displays a list of existing links. From here you can add a new link,
edit an existing link, delete and existing link, or add/edit a link category. The links will be displayed for
the public from the links page. Links can be added to the bottom of the side navigation menu by
selecting Yes for “Nav Menu” option. Links can be grouped into categories. Categories can be
added/edited from the main links page. (Note: Categories must be added before a link can be assigned
to them.)
Manage Photos
When you click on the Manage Photos link you will be directed to a new screen where you can edit/add
photos to your photo gallery. The initial screen displays a list of existing photos for an individual photo
category. From here you can add a new photo, edit an existing photo, delete and existing photo, or
add/edit a photo category. The photos will be displayed for the public from the photo gallery page in a
slideshow format. Photos must be grouped into categories. Categories can be added/edited from the
initial Photo page. (Note: Categories must be added before a Photo can be assigned to them.)
When adding a new photo, enter the information you wish associated with the photo first. Once this
information is saved a record for the photo is created. After the record has been created an option to
upload the photo will appear.
Manage Staff
When you click on the Manage Staff link you will be directed to a new screen where you can edit/add
staff photos and BIO information. The initial screen displays a list of existing staff members and
identifies which category they are assigned to. From here you can add a new photo, edit an existing
photo, delete and existing photo, edit the staff information, or add/edit a photo category. The photos will
be displayed for the public from the staff page organized by category, three to a row. When a staff
member’s photo is clicked on, the photo will enlarge to the original image size and will display the staff
members BIO wrapped to the right of the image. Staff members must be grouped into categories.
Categories can be added/edited from the initial Staff Member page. (Note: Categories must be added
before a staff member photo can be assigned to them.)
When adding a new staff member, enter the information you wish associated with the member first.
Once this information is saved a record for the member is created. After the record has been created an
option to upload the member’s photo will appear.
Manage Message Boards
When you click on the Manage Message Boards link you will be directed to a new screen add, edit or
delete messages. Messages can be added by the public to your website, if this custom module is
included. Once a message is submitted to your site, you will receive an email message that someone
has submitted an item to your message boards. At that point you can edit the message, turn off the
message, or delete the message all together. If derogatory message become a problem, contact Cline
Communications for options on the ability to pre-screen messages before they display on your site.
Manage Downloads
When you click on the Manage Downloads link you will be directed to a new screen where you can
upload files to your site for the public to download. The initial screen displays a list of existing download
items for each category. From this screen you can choose to add, edit, or delete a download item.
When adding a new item, an upload screen will appear allowing you to browse to find your file. File
uploads are limited to 2 Mbytes. If larger files are needed, contact Cline Communications to change this
limit; however it is not generally a good idea to place large files on your site, as this takes up allocated
space for your website and takes a long time for your audience to download. File names should be kept
short and sweet. The title will let the user know what the file is, so the filename does not need to be as
descriptive. Avoid spaces and special characters in your filenames. Not everyone’s computer can
handle them.
Once the file has been uploaded, you need to fill out the information for your download file. You can
enter a title, description, date, and assign it to a category. You can also choose not to display the file to
the public. This option can be used to store files on your site and link to them from within the pages on
your site.
For an existing download item you can replace the file with a future revision. The public will see your
information (title, files name, files size, and description) along with the ability to download your file.
Download items must be grouped into categories. Categories can be added/edited from the main
download page. (Note: Categories must be added before a download item can be assigned to them.)
Manage News
When you click on the Manage News link you will be directed to a new screen add, edit or delete News
items. New News items can be added from the initial news screen or existing items can be edited or
deleted. When adding a new News item, enter the date, title, and descriptive text for your News item.
The public will see a listing (date and title) of your news items ordered by date (newest to oldest). When
the public clicks on a news item, the item will expand to display the descriptive text.
IV.
Other Tips/Tricks
•
When uploading files it is a good general practice to optimize your photos. While new digital
cameras take fantastic high definition photos, these are too large for the web. Most images for
your web site should be reduced to about 4-500 pixels wide and should have a files size around
40-50 Kbytes. In addition limit the amount of pictures on any one page. Too many pictures, just
like too large of pictures, will make your page load slowly and take too long to display. If your
pages take too long to display for the public, they will lose interest and click to another site.
•
You can use the custom modules for other purposes. For example, the News page can be used
to display meeting minutes.
•
Do not put too much text and images on the custom module pages. This will push the information
you are trying to emphasize down below the viewable screen.
•
Know your audience. Not everyone is using a new high speed computer with high resolution
display.
•
Stay away from dark background with light colored text. This is hard to read and doesn’t always
print properly.
•
Files can be added to the download area and linked to from within your pages. For example,
meeting agendas can be added to the download area, and linked to from within the calendar
where the meeting is listed.
V. Customization
Cline Communications also has the ability to offer you limited customization to the screens that you
have designed for each of your website pages. Other custom modules not discussed here include, pass
word login areas, shopping carts, and order forms and can be added to your existing site for an
additional charge. In addition, other specialty pages can be developed per your requirements and
integrated into your existing site. Please contact us to ask us about these or any other features you
require.