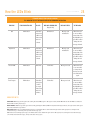
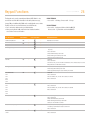
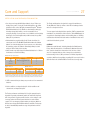
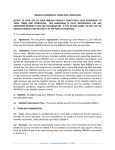
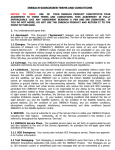
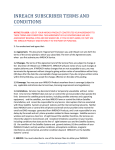
1
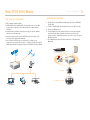
USER MANUAL
powered by spot functionality
GPS security system
1 0 0 % s a t e lli t e t e ch n olog y
SPOT HUG USER MANUAL
Table of Contents
2
Welcome ..............................................................3
Key Terminology ...................................................4
How HUG works ...................................................5
Getting Started ...................................................6
Initial System Setup/Test ...................................12
Installation of Tracker and Keypad ....................15
Using SPOT HUG ................................................18
How the LEDs Blink ............................................23
Keypad Functions ..............................................26
Care, Support and Specifications ......................27
Warranty and FCC/IC Notice ..............................29
GPS security system
100% satellite technology
WELCOME
SPO T H U G U SER MANUAL
SPOT HUG is a low-cost, easy to install satellite-based
GPS asset monitoring, security and messaging system.
It provides the asset owner with peace of mind when
they are away from their asset via state-of-the-art asset
tracking and sensor monitoring functionalities. When on
the boat and in range of the Tracker, HUG also provides
the owner with the ability to send messages and request
help in an emergency. HUG works via satellite and
provides coverage around the world in places where
cellular coverage and VHF radio is lacking.
HUG uses GPS technology and Globalstar’s Simplex
satellite network to relay location information and
messages to the end users and 3rd party service
providers. HUG utilizes an onboard GPS chip to
determine a highly accurate GPS location of the asset
and sends the location information to Globalstar
satellites. The satellites transmit the message to
various Gateway Appliqués around the world and a
global network routes the message to the appropriate
network. The location and the message are delivered
via email and text message according to the profile
information provided by the customer during
registration at findmeSPOT.com.
Sensor Alert monitoring notifications are delivered
to contact information in the customer’s profile.
Emergency notifications are sent to the GEOS IERCC and
Unauthorized Movement notifications are delivered to
the Asset Monitoring Center. GEOS will coordinate with
the local authority to begin a search and rescue effort or
a theft recovery effort (where available).
3
SPOT HUG (HUG) is comprised of three (3) hardware
components to provide an indispensible asset protection
security system.
The core Tracker unit contains the satellite
transmitter unit, an internal GPS chip set,
wireless transceiver at 2.4 GHz and a vibration
sensor chip.
• The Tracker can be powered by batteries
(4 AA Energizer Lithium (L91) batteries
included) or line power.
The Keypad wirelessly connects to the Tracker
for arming/disarming the unit when the Key
FOB is not present and additional settings
management.
A keychain size Key FOB permits the user
to remotely transmit various messages to
the Tracker device within a range of 60 feet
and acts as a beacon for the Tracker to
automatically verify authorized/un-authorized
movement of the property.
Key Terminology SPO T H U G U SER MANUAL
Unauthorized Movement
If the asset moves more than 500 meters without the user’s authority and
the key FOB is not present, unauthorized movement is detected and an
alert is sent to a third party Asset Monitoring Center.
Daily Status
Daily Status Message that includes Tracker ESN, power source status,
Unauthorized Movement status, Vibration sensitivity, Tracker battery
status, Sensor Alert status, GPS location, date and time and a link to
Google Maps to see where your boat is located.
Sensor Alert
Notification from SPOT HUG wired connections for monitoring various
additional accessory sensors on board the vessel. There are 4 (2 open
and 2 closed) external contacts for sensor monitoring.
Sensor Alert Bundle
Provides 50 event messages for a bundled price for alarms delivered
through the “dry contacts”. A la carte “events“ will be charged on a per
event basis.
SPOT HUG Basic Service
Includes: Unauthorized Movement monitoring, Daily Status message and
SPOT functionality of Check-in/OK, Help and SOS.
The Asset Monitoring Center
The service SPOT uses for monitoring Unauthorized Movement.
Tracker
Unit that contains the GPS chip and satellite transmitter for sending
messages from the SPOT HUG.
Tracker mounting bracket
Holds the Tracker. This is the equipment that will be attached to the boat.
Key FOB
Wireless remote device that automatically Arms/Disarms SPOT HUG and
can be used to activate SPOT functions of SOS, Help, Check-In/OK and
Track Progress.
Keypad
The Keypad is mounted on the boat to control the SPOT HUG functionality
in addition to or when the FOB is not present. Can also be used to
activate SPOT functions of SOS, Help, Check-In/OK and Track Progress.
Keypad mounting bracket
Holds the Keypad. This is the equipment that will be attached to the boat.
SOS
SOS alerts the GEOS International Emergency Rescue Coordination Center
(IERCC) of your GPS location in a critical emergency.
4
Help
Help sends a request for assistance to your designated contacts for nonlife-threatening emergencies.
Check-in/OK
Check-in/OK sends a pre-defined message with your GPS location to your
designated contacts.
Track Progress
Track Progress automatically updates your location on Google Maps™
allowing your contacts to track a virtual breadcrumb trail of your progress
in near real-time.
Predefined Message
A predefined Message is a message that has been created and saved
in the user’s account and can be sent with a variety of message modes.
These messages are included with the Basic Service.
GEOS Search & Rescue Insurance
GEOS provide the SOS/911 monitoring included in your Basic Service.
You can upgrade to the GEOS Member Benefit for reimbursement of up
to $100K in Search and Rescue (SAR) expenses - even coordinating a
private SAR contractor if needed to get you to safety.
SPOT Assist Maritime
SPOT Assist Maritime provides satellite-based notification to third party
professional service providers to help ensure your safety on the water - at
the push of a button.
SPOT Link
To link a SPOT Assist Maritime Membership, we require a linkage fee to
link the SPOT device to that service. This linkage fee allows the service
provider access to receive direct location-based messages from your
HELP button.
Message Priority
The message modes in the SPOT HUG system are assigned to different
priorities and some message modes will override others. Message modes
are classified as Critical, Urgent and Casual.
• Critical – SOS and Unauthorized Movement
In general, Casual modes will be overridden by Urgent modes; which in
turn will be overridden by Critical modes except when stated otherwise.
• Urgent – Help and Sensor Alert
• Casual – Check-in/OK, Track Progress, Daily Status and Power
Source Switching
How SPOT HUG Works
SPO T H U G U SER MANUAL
5
SPOT SATELLITE Technology
Unauthorized Movement
1. GPS satellites provide signals.
2. SPOT HUG Tracker’s onboard GPS chip determines the asset’s GPS
location and sends the location information to communication
satellites.
3. Communication satellites relay your message to specific satellite
antennas around the world.
4. Satellite antennas and a global network route your location and
message to the appropriate network.
5. Your location and messages are delivered according to your
instructions via email, text message, or emergency notification to the
GEOS International Emergency Response Coordination Center (IERCC).
1. Tracker detects boat vibrations waking up GPS in the SPOT HUG
Tracker unit.
2. Tracker’s onboard GPS chip determines the asset’s GPS location.
3. Checks for FOB presence.
4. If no Key FOB is present and the Tracker has not been manually
disarmed via the Keypad and the boat moves more than 500
meters from the original GPS position, an alert is sent to the Asset
Monitoring Center.
5. Asset Monitoring Center will notify authorities of Unauthorized
Movement.
Sensor Alert
Asset Monitoring Center
Getting Started
SPO T H U G U SER MANUAL
Please read through the user guide to familiarize yourself with the SPOT
HUG contents, system set-up and usage.
HUG can be installed by the individual user or by a qualified marine
electronics installer.
Service activation is required to begin using any of the HUG features.
Visit findmeSPOT.com to activate or follow the procedures in
the Service Activation section within this user guide.
6
Package Contents
• One (1) Tracker
• One (1) Tracker mounting bracket
• One (1) Keypad (pre-paired with Tracker)
• One (1) Keypad mounting bracket
• Two (2) FOBs (pre-paired with Tracker)
• One (1) Adhesive tape for testing Tracker pre-installation
• One (1) Cable assembly (Line power cord - 18 gauge, 6 ft long;
Pair of Sensor Alert wires – 20 gauge, 6 ft long)
• Eight (8) #6 - 3/8” stainless steel screws for plastic/fiberglass and
sheet metal for Tracker and Keypad mounting brackets.
• One (1) 18” USB cable
• Four (4) AA lithium batteries for Tracker
• Four (4) CR2032 coin cell lithium batteries (2 for Keypad and 1 for
each FOB)
• One (1) Quick Start Guide
• One (1) Quick Reference Guide (for Keypad)
What Tools You’ll Need for Installation
• Power drill
• Drill bits to fit #6 screws
• #1 screwdriver to remove and reattach battery compartments on
Keypad and Tracker
• #2 Philips head screwdriver for mounting brackets
• Cable crimper (Note: All wires will have marine grade butt connectors
size 22g-18g attached for easy crimping and attachment of accessory
wires. Also, this provides built in protection for unused wires.)
• Wire cutter
• Socket wrench to remove bolts on 12V or 24V batteries
Getting Started
SPO T H U G U SER MANUAL
component overview
A
TRACKER
A
Tracker Mounting Bracket
B
Tracker LEDs
C
SOS Button
D
This Side Up Logo
E
Line Power/Sensor Alert Port
B
c
d
e
7
Getting Started
SPO T H U G U SER MANUAL
component overview
key fob
A
key fob battery status led
B
gps led
C
tracker range led
D
track progress button/led
E
sos led
f
sos button
g
help button
h
help led
i
check-in/ok button/led
b
A
c
i
d
h
e
g
f
8
Getting Started
SPO T H U G U SER MANUAL
component overview
a
keypad
A
1-0: 10 alpha numeric keys
B
gps led
C
tracker battery power led
D
message sending led
E
tracking button/led
f
sos led
g
sos button
h
help button
i
help led
j
check-in/ok button/led
k
kaypad battery power led
l
tracker range led
b
l
c
k
d
j
e
i
f
h
g
9
Getting Started
SPO T H U G U SER MANUAL
10
Installing the batteries
Installing the batteries on the Key FOB
• Access the battery compartment by removing the 4 screws on the
back plate of the FOB. Insert coin cell battery.
• Replace FOB cover and screw tightly for secure waterproofness.
• Repeat for second FOB.
Installing the batteries on the Keypad
• Remove Keypad back plate cover using a small screwdriver to loosen
the six screws.
• Insert the coin cell batteries into the Keypad.
• Replace the Keypad cover and screw all 6 screws tightly to ensure
waterproofness.
Installing the batteries on the Tracker
• Loosen screws of the back plate of the Tracker and insert four AA
Energizer Ultimate Lithium (L91) batteries. The batteries can be
used if line power not connected or as a back-up if line power becomes
unavailable. If battery mode is chosen, periodically check for the low
battery indicator and replace batteries when required. See Care and
Support section for battery life.
• The ESN (Electronic Serial Number) and Authentication code are
printed in the battery compartment of the Tracker. Write down the ESN
and Authentication code for use during the online activation process.
Carefully seat the O-ring into place before replacing the cover. Tighten
screws with a screwdriver. It is important to tighten the cover to keep
the Tracker waterproof. Do not over tighten or you may damage
the plastic.
Service Activation
What you need to Activate Your Account Online
- Personal information
- Emergency contact information
- SMS (Text) and e-mail contacts for messaging.
Note: Customers activating service in North America will need to
know the cellular service carrier of each contact that are entered
in Message Profiles (E.g. ATT, Verizon, Rogers, etc.).
- Credit card information
- Tracker ESN and Authentication code. These numbers are found inside
of the Tracker battery compartment.
- Details of property to be monitored
ACTIVATION
1. Visit findmeSPOT.com and click on “Activate Your SPOT”.
2. Choose set up New Account or sign in to your existing account to add
HUG to your list of devices.
3. For New customers you will need to create an account. Complete the
required fields and then click “Next”.
4. Complete the “About You” section and click “Next”.
5. Select services, HUG Basic Service and additional services such as
Sensor Alert Bundle and Track Progress.
6. Enter your Emergency contact info, including the Name, Country and
Phone number for your Primary and Secondary Emergency Contacts.
Please note that these contacts must be different from those provided
in the previous Billing information section.
7. You will also need to enter contact information if an Unauthorized
Movement situation occurs as the Asset Monitoring Center will need to
validate the alert. This could be yourself and an additional contact.
8. Payment will then be requested.
My SPOT Devices
1. Once you have activated your HUG unit, you can come back at any
time and edit your device settings on the My SPOT Devices tab.
Choose the HUG unit and click on View/Edit under Contact Details.
Complete this section to ensure that contact information is accurate.
2. When entering contact information, add your own email or phone
number to Check-in/OK contact list for use in the system test.
This can be changed at a later time.
3. Be sure to complete the fields describing your boat in the Additional
Information section to assist authorities in recovery efforts.
4. If Sensor Alerts are to be used to monitor additional boat equipment,
click the Sensor Alert Tab. You will need to assign a sensor from the
drop down list and add contacts who will receive the Sensor Alerts.
Purchase Sensor Alerts
To monitor additional onboard statuses, such as high water, low battery,
cabin door, motor theft or power status, purchase the Sensor Alert Bundle
at findmeSPOT.com. (Note: Sensor Alerts can be purchased on an a la
Carte basis also.)
Getting Started
SPO T H U G U SER MANUAL
11
Keeping Your Contacts in Touch
ADDITIONAL SERVICES
Up to 10 contacts can be added for receipt of your Check-in/OK, and
Help messages, and you can update these at any time on the website by
logging in to your account. You can specify any combination of text/SMS
messages or email for the contacts.
At findmeSPOT.com you can also purchase additional service options
either at activation or anytime you go back to the site.
Unauthorized Movement messages will be sent to the Asset Monitoring
Center. Contacts you designate will be called and notified of the
situation.
SOS messages will go to the GEOS International Emergency Rescue
Coordination Center. In the event of an SOS message, GEOS will attempt
to contact your primary and secondary emergency contacts. These
contacts are required in order to activate your account. You can change
these at any time under the SOS section at findmeSPOT.com.
Current SPOT HUG map coverage can be found at findmeSPOT.com.
The Tracker’s satellite message transmission is independent of mobile
phone or other land-based radio coverage.
Sensor Alert Bundle
Provides 50 event messages for a bundled price for alarms delivered
through the “dry contacts”. A la Carte “events” will be charged on a per
event basis.
Track Progress
Track Progress automatically updates your location on Google Maps™
allowing your contacts to track a virtual breadcrumb trail of your
progress in near real-time.
GEOS Search & Rescue Insurance
GEOS provide the SOS/911 monitoring included in your Basic Service.
You can upgrade to the GEOS Member Benefit for reimbursement of up
to $100K in Search and Rescue (SAR) expenses - even coordinating a
private SAR contractor if needed to get you to safety.
SPOT Assist for Maritime
SPOT Assist Maritime provides satellite-based notification to third party
professional service providers to help ensure your safety on the water at the push of a button.
Initial System Setup/Test
SPO T H U G U SER MANUAL
12
Tracker System Setup
Before installing the Tracker and mounting the Keypad in their permanent
locations, it is necessary to ensure all components are working properly.
You must have activated your SPOT HUG account to perform the system
setup/test. The Tracker comes from the factory paired with the Keypad
and 2 Key FOBs.
1. Set up all three units (Tracker, Keypad, and FOB) together in a
clear line of sight to the sky. Ensure the Tracker unit is facing up.
2. For the system test, the Tracker, Keypad and FOBs should be close
together in order to view the blinking lights and synchronization of
the devices.
3. Install batteries in each unit. When the batteries have been installed,
the Tracker will perform a self-test of the GPS receiver and satellite
transmitter and will check battery power. The On/Off LED will blink
green if the Tracker passes the self-test.
4. Next, the Keypad LEDs will blink red in a pattern to indicate that a
PIN (Personal Identification Number) must be setup. See page 6 for full
instructions. Note the PIN for future reference.
5. Press Check-in/OK on the Keypad for 3 seconds until you hear an
audio beep. The Tracker will blink its GPS LED for up to 4 minutes while
it acquires a GPS fix.
6. If a GPS signal cannot be acquired, the GPS LED on the Tracker
will blink red. Move to a better location where the view to the sky
is unobstructed.
7. If the GPS LED stops blinking before a good location is found, remove
and re-install batteries and repeat the test.
8. Check that a Check-in/OK message is received at the end of the setup.
9. If all three LEDs blink red, the self-test failed. Please call Customer
Care at 1-866-OK1-SPOT (1-866-651-7768).
Initial System Setup/Test
SPO T H U G U SER MANUAL
13
Keypad System Setup
System Test and Setting PIN
After installing the coin size Lithium batteries, the Keypad will perform
a self-test. The self test checks for battery level, and the presence of
the Tracker and Key FOB. When the presence of the FOB and Tracker are
confirmed, the Keypad then performs a system check to identify if it is
correctly paired to the Tracker.
1. The Keypad will check for presence of the Tracker. If the Tracker is
present the Tracker Range LED blinks green every 3 seconds for the
first minute. If the Tracker is NOT present the Tracker Range LED blinks
red and the Keypad should be moved closer to the Tracker.
Battery Self Test
1. Make sure the Keypad, Tracker and FOB are within close proximity
(3 ft/1.5 m)
2. Install batteries. If Keypad battery level is low, the Keypad battery LED
will blink red. Batteries should be replaced immediately.
2. When using the Keypad for the first time, you must change the default
PIN. The default PIN for your Keypad is the last 4 digits of your “Auth”
code, located in the Tracker battery compartment. This PIN is required
to de-activate alarms, and program Tracker messages.
3. To set the PIN, you will need the last 4 digits of the Tracker Auth Code,
located in the Tracker battery compartment. With at least 1 FOB in
range, press the number 4 on the Keypad, and then Check-in/OK. Enter
the last 4 digits of the Auth Code and then press Check-in/OK again.
Choose a personal PIN that you can remember. Enter the new Personal
PIN number, followed by pressing Check-in/OK. Repeat once more to
confirm that the new PIN was entered correctly by pressing the new
PIN number and then Check-in/OK. There will be audio visual feedback
to confirm positive acceptance. Refer to quick reference card or the
Keypad Functions section. After the PIN is entered correctly the second
time, the new PIN goes into effect. Write down the new PIN code
and store in a safe place. A PIN reset cannot be performed when there
is no Key FOB present. The Tracker will broadcast the PIN notification
messages to all FOBs for the next five (5) minutes; it is imperative
for all FOBs that need to be paired be within range of the Tracker
during the broadcast period. Any FOB not present during the PIN
change will become unpaired and will need to be re-paired in order to
function.
NOTE: The Keypad can be used to administer the SPOT HUG settings.
There are 3 settings for vibration sensitivity on the Tracker: low (1),
medium (2), and high (3). Low is considered ideal for less than a 30
ft boat. High, for a large 30 ft or greater boat. If in doubt on vibration
sensitivity settings for your boat, set it to medium.
To change the vibration sensitivity setting on the Tracker, press the
number 12 on the Keypad, and then Check-in/OK. Press 1 = low,
2 = medium or 3 = high. Follow by pressing Check-in/OK.
Initial System Setup/Test
SPO T H U G U SER MANUAL
14
Key FOB System Setup
Send a Test Check-in/OK Message
The Key FOB device system test is similar to the Keypad.
SPOT HUG recommends testing the Check-in/OK during the initial
system set-up, on occasion and before every trip to ensure messages
are sent and delivered properly. Before sending your first Check-in/OK
message, synchronization of the Keypad and Key FOB devices with
the Tracker are required. Follow directions in the FOB and Keypad System
Test sections.
1. When batteries are inserted, the FOB performs a self test to check
battery level and presence of the Tracker.
2. If the FOB successfully establishes a connection to the Tracker, the
Tracker Range LED blinks green for 1 minute.
3. If the Tracker is not present the FOB Tracker Range LED blinks
red every 3 seconds for 1 minute. You must move closer to the Tracker
unit to establish a connection.
If the FOB is lost/stolen or you will need to deactivate the remaining FOBs
for security reasons. Perform the following steps:
1. Bring remaining FOBs into range of the Tracker (within 60 ft).
2. Change PIN on Keypad. This will deactivate the lost/stolen FOB and
reset the pairing on the remaining FOB.
3. If all FOBs are lost/stolen, enter PIN on Keypad and turn off “arm”
state OR remove power from Tracker.
4. Order replacement FOBs from findmeSPOT.com
For first time set-up, the Test Check-in/OK Message is to be completed
after passing the self-test.
1. For the initial Test Message, ensure the Tracker unit has a clear view of
the sky and with the arrow logo pointing upward.
2. To send a message, press the Check-in/OK button on the FOB
or the Keypad. The GPS indicator LED on the FOB and Keypad blink
green as the Tracker acquires a GPS fix.
3. Once the Tracker acquires your GPS location, the Message Sending
LED and GPS LED on the Keypad will blink green in unison for ~15
seconds to notify you that your message is being transmitted with GPS
location. The GPS LED on the FOB will blink green for 15 seconds.
The Message Sending LED on the Keypad will continue to blink green
over the remainder of the 20-minute message cycle and for one (1)
hour after the end of the message cycle. The Check-in/OK function LED
will turn off once the message cycle is complete.
4. If the GPS LED blinks red, the Tracker does not have a clear view of the
GPS satellites and you must move to an area with a clearer view of the
sky for proper operation. Once you move to an area with clearer view of
the sky, repeat steps 1 through 4.
5. Verify that the message was received in the email or SMS account(s)
that were set up during activation in your Check-in/OK contact list.
You can also view your messages in your account at findmeSPOT.com.
Installation
SPO T H U G U SER MANUAL
15
///////////////////////////////////////////////////////////
SOS
Installation of Tracker
Fiberglass
///////////////////////////////////////////////////////////
SOS
Once all three units are operational and provisioned after verifying the
Check-in/OK messages have been delivered correctly, they can be placed
in their desired permanent locations. For permanent installations, ensure
the appropriate connectors (screws…etc.) are used to avoid any damage
to the vessel.
///////////////////////////////////////////////////////////
SOS
‡
‡
Mount Inside Vessel
Mounting Surface
Although it is recommended to install the tracker in a concealed location,///////////////////////////////////////////////////////////
1. Line power should be able to reach the Tracker with the included power
it should also be located in SOS
a place where the user can push the SOS
cable (6 ft/1.8m). Use the double-sided adhesive tape for temporary
button if required. Consider placement of the Tracker where the pitch
mounting of the Tracker during the testing phase. Simply place the
and roll of the vessel is at a minimum.
///////////////////////////////////////////////////////////
tape on the bottom of the Tracker mounting bracket and stick
it to your
installation surface.
SOS
))))))))))))))
))))))))))))
///////////////////////////////////////////////////////////
SOS
‡
2. Test the unit to ensure it can receive GPS signals and transmit
messages from the selected location by pressing the Check-in/OK
button so that the Check-in/OK message is sent to the desired chosen
location, such as an SMS to your mobile phone.
SOS
SOS
‡
NOTE: Since SPOT HUG is a theft prevention device and needs
to be hidden from plain sight, it is important to note that the
HUG Tracker unit be installed under an RF transparent material
(e.g. fiberglass, wood, plastic less than 3 inches thick) and
with the antenna facing up to the sky (logo side). The arrow
logo on the side of the Tracker must be mounted in a position
where the arrow is facing up in order to receive GPS signals
and send satellite messages with optimal efficiency. The
Tracker should be installed away from any satellite interference
mediums, such as metallic objects and other transmitters such
as Wi-Fi or other RF devices. HUG devices should be at least 12
inches away from other GPS and electronic devices.
3. Remove the Tracker mounting bracket,
included, and mark the four holes with
a pencil before drilling the holes into
///////////////////////////////////////////////////////////
the surface. Carefully align the mounting
bracket where the holes are marked and
use a screwdriver to fasten the four///////////////////////////////////////////////////////
screws onto the surface. As an option
to using screws, tie wraps can be used
in the four corner holes on the Tracker.
Be sure that the Tracker is mounted
securely and the satellite arrow logo
remains pointing to the sky at all times.
4. Slide the Tracker unit into the Tracker mounting bracket.
5. Attach optional line power to a 12 V or 24 V battery.
Installation
SPO T H U G U SER MANUAL
16
Installation of Tracker with Sensor Alerts
Each SPOT HUG Tracker comes with four (4) Sensor Alert inputs. These
Sensor Alert wires can be attached to sensor devices in order to monitor
high water, battery level, door opening/closing, and other equipment
that the user chooses. Sensor devices are not included with HUG but
are available as accessories at marine electronics dealers and
findmeSPOT.com. An additional fee is required to receive alert
messages from any monitored equipment.
1. Ensure the monitored device is within the voltage range of:
9.7-37.0 volts.
2. Remove appropriate fuses in the device to be monitored to avoid
potential damage to equipment and electrical shock.
3. If using Sensor Alerts, place the Tracker where the weatherproof Sensor
Alert wires can be easily accessible. Follow the sensor manufacturer’s
wire length and application specifications.
4. Attach the Sensor Alert wire to the appropriate contact and seal the
cable opening with the provided o-ring to prevent water intrusion.
To accommodate as many sensors as possible, HUG can operate with
accessories that require “OPEN” or “CLOSED” circuits.
contact type
description and use
OPEN Sensor Alert 1
Orange and
Orange/White wires,
and Sensor Alert 3,
Violet and Violet/White
wires (wires with
white are grounds)
An OPEN contact doesn’t have electrical voltage
passing through until a relay circuit is made.
When the Tracker senses an electrical voltage,
the OPEN Sensor Alert is activated, and the
notification to the contacts commences. Below
are application examples:
• High Water monitoring
• Low battery voltage
CLOSED: Sensor
Alert 2 Green and
Green/White wires,
and Sensor Alert 4,
Blue and Blue/White
(wires with white are
grounds)
A CLOSED contact requires a steady minimum
voltage passing to the sensor so that if the
circuit is broken, the notification to the contacts
commences. There will be a 30 second delay
before sending the CLOSED contact message.
Here are some examples of applications where
this can be used:
• Cabin door monitoring. When door opens, the
circuit is broken.
• Anti-motor theft
• Power Monitoring. When power to cabin is off,
the circuits break.
Installation
SPO T H U G U SER MANUAL
17
Installation of Keypad
The Keypad is the device required to activate the Key FOB during the
initial setup phase. For security, the user is required to change the
factory default PIN before use (A step covered previously in the Keypad
System/Test section).
‡
1. Locate a place where the Keypad can be mounted inside the cabin.
The Keypad needs to be within 60 feet/18 meters of the Tracker.
Tracker Range can be checked with a quick press of the Check-in/OK
button on the Keypad. If the Tracker Range LED blinks green the
Keypad is within range of the Tracker. It is recommended the Keypad
unit be placed in a sheltered environment from weather elements or
extreme temperatures.
2. Remove the Keypad mounting bracket and mark the four holes with
a pencil before drilling the holes into the surface. Carefully align the
mounting plate where the holes are marked and use a screwdriver to
fasten the four screws onto the surface.
3. If using double-sided adhesive mounting tape, remove the double
adhesive protective paper and place the adhesive pad in the center of
the back mounting plate. Clean the surface of the area where the
Keypad is going to be mounted. Firmly press the Keypad mounting
bracket with the adhesive pad to the area.
4. After the Keypad mounting bracket is secured in place, attach the
Keypad by sliding the back into the cleat of the mounting bracket.
Using SPOT HUG
SPO T H U G U SER MANUAL
18
SPOT HUG Alert Notifications
Sensor Alert Notifications
Arming and Disarming HUG for Unauthorized Movement
THE SPOT HUG will be automatically armed once the Key FOB has left
the Tracker range (60 ft/18m). HUG will be automatically disarmed and
remain disarmed when a paired FOB comes into and stays within Tracker
range. The Tracker frequently checks for the presence of the paired FOB
to ensure security.
If a Sensor Alert is activated by the external device (i.e. high water alarm,
cabin door alarm, low battery voltage, etc.), a message containing the
GPS position and Sensor Alert name is transmitted via satellite.
• If the FOB is present the Sensor Alerts will automatically be turned off.
• Sensor Alert notifications are sent every 5 minutes for 1 hour.
Messages are then included with the Daily status message. Configure
your designated recipients at findmeSPOT.com to receive Sensor Alert
messages via e-mail or SOS.
• Disarming the Sensor Alerts can also be completed via the Keypad.
• The first Sensor Alert message will be sent within 1 minute regardless
of GPS acquisition.
• If the Alarm condition transition back to Normal state, the Sensor Alert
message will be sent for a total of 5 times before a Senor Alert Cancel
message is sent.
Without the FOB present, to arm the Tracker, press the number “01” on
the keypad and then press Check-in/OK. Enter the PIN number and press
Check-in/OK. If successful, there will be one solid beep and 1 solid green
blink on the Check-in/OK LED. If unsuccessful, there will be 3 beeps, with
3 green blinks on the Check-in/OK LED.
Without the FOB present, to disarm the Tracker, press the number “00” on
the keypad and then press Check-in/OK. Enter the PIN number and press
Check-in/OK. If successful, there will be one solid beep and 1 solid green
blink on the Check-in/OK LED. If unsuccessful, there will be 3 beeps, with
3 green blinks on the Check-in/OK LED.
Unauthorized Movement Alert Notification (Sends Message)
When there is Unauthorized Movement of the boat, beyond 1640 feet/500
meters of the original location with no FOB in range of the Tracker or
no PIN entry on the keypad to disarm the alarms, the process to send
a satellite message noting Unauthorized Movement begins. The GPS
receiver acquires the GPS position then transmits an Unauthorized
Movement alert message via satellite to the Asset Monitoring Center.
The alert messages will be sent in 5-minute intervals until the asset
stops moving. Once the asset has stopped moving the transmission
intervals will decrease to every 30 minutes to conserve batteries and
once per day if no GPS fix can be found after 4 consecutive attempts.
If a correctly paired FOB becomes present or the user deactivates the
alarm on the Keypad, the Tracker will send a cancel Unauthorized
Movement message. The Tracker will then continue to look for the
presence of a FOB and monitor accordingly.
When the Tracker is in the process of sending the Sensor Alert messages
the Tracker over rides the Check-in/OK or Track Progress button press.
The Tracker only responds to the pressing of the SOS or Help buttons. In
addition, the Sensor Alert message overrides the Daily Status message
transmission.
Using SPOT HUG
SPO T H U G U SER MANUAL
19
Daily Status Message
types of messages activated by user (fob and keypad)
A daily status notification message is sent to the user and selected
recipients based on the user profile on findmeSPOT.com.
function
- Alert emergency responders to your GPS location.
Daily Status message includes:
• Tracker ESN, power source status, Unauthorized Movement status,
Tracker battery status, Sensor Alert status, GPS location, date and time
and a link to Google Maps to see where your boat is located.
• The message will be sent every 24 hours.
• Messages are stored in the user’s account for a minimum of 30 days
and in the Shared Pages for at least 7 days.
NOTE: Key FOB must be paired with and within range of Tracker
to use SPOT functionality. Keypad may also be used.
OVERVIEW
- SOS is considered a critical message type and overrides
all other messages. When SOS is pressed, it overrides
Check-in/OK, Help and Track Progress.
NOTE: To be used in emergency situations. You may be
liable for the cost of your rescue.
help/SPOT Assist
- Request help from your friends and family at your GPS
location, or ask for help from professional assistance
organizations instead of friends and family.
- If GPS cannot be determined when Help button is
pressed, the device will continue to look for a GPS
location and send when it gets a GPS fix.
- Help is considered an urgent mode. When Help is
pressed, it overrides Check-in/OK, and Track Progress.
- Let contacts know where you are and that you’re okay
with a preprogrammed message.
check-in/ok
- Check-in/OK is a casual message mode. If a GPS
location is not found, this message is not sent.
- Automatically send and save your location and allow
contacts to track your progress using Google Maps.™
track progress
- Once engaged, sent every 10 minutes for 24 hours or
until canceled. With each message SPOT will included
your GPS location for 2 previous track positions for a
seamlessly reliable breadcrumb trail.
- Track Progress is a casual message mode. If a GPS
location is not found, this message is not sent, but it
will try again at the next scheduled interval.
Using SPOT HUG
SOS (FOB/Keypad/Tracker)
NOTE: To be used in emergency situations. You may be liable for the
cost of your rescue.
For life-threatening or other critical situations, alert the GEOS
International Emergency Rescue Coordination Center (IERCC). GEOS
notifies the appropriate emergency responders based on your location
and personal information – which may include the Coast Guard, local
police, highway patrol, your country’s embassy or consulate, other
emergency response centers, or search & rescue teams.
Message Cycle
HUG sends your emergency profile information and current GPS location
to GEOS every 5 minutes until canceled or the Tracker batteries run
out. If SPOT HUG cannot get a GPS signal, it will still attempt to send
your message – without a GPS location. There is no test mode. If you
activate the SOS function, the GEOS International Emergency Response
Coordination Center will treat it as a real emergency.
Using the SOS Function
Press and hold the SOS button until it blinks green. The GPS LED will
blink green when HUG sees the GPS satellites and while obtaining your
GPS location.
Once your GPS location is obtained, HUG sends your message and GPS
location. The GPS LED and Message Sending LED, Keypad only, will both
blink green for approximately 15 seconds. The Message Sending LED on
the Keypad continues to blink green until the next scheduled message to
notify you that your most recent message was transmitted.
If no GPS signal is found, the GPS LED will blink red. Move the vessel to
an area with a clearer view of the sky.
The first message will be sent within (1) minute after activation with or
without your GPS location. For all subsequent messages, HUG will keep
looking for your GPS location for up to 4 minutes. If no GPS location is
found in 4 minutes, HUG sends your message without GPS location.
The GPS LED blinks red and the Message Sending LED blinks green
for approximately 15 seconds. The Message Sending LED will continue
blinking green until the next scheduled message.
To Cancel
Press and hold the button on the device that was used to initiate the SOS
until it blinks red. Let HUG work until the SOS button stops blinking red.
The Message Sending LED on the Keypad will blink green indicating it
has sent the Cancel message.
How HUG Prioritizes SOS
SOS messages are the top priority for HUG. When you select Help/
SPOT Assist or SOS, you will disable Check-in/OK, and Track Progress
functions.
SPO T H U G U SER MANUAL
20
Help/SPOT Assist (FOB/Keypad)
For non-life threatening situations, ask for help from friends and family
or professional assistance providers using SPOT Assist. Your contacts
will receive SMS/text or email messages with your GPS coordinates. Email
messages also include a link to view your location using Google Maps™.
SPOT Assist service partners will receive your SPOT Assist message and
current GPS location.
Message Cycle
HUG will send your message and current GPS location every 5 minutes for
an hour for redundancy and overall reliability. If HUG cannot get a GPS
signal, it will still attempt to send your message– without a GPS location.
Using the Help Function
Press and hold the Help button on the Key FOB or Keypad until the
function button blinks green. The GPS LED will blink green when HUG
sees the GPS satellites and continue for up to 4 minutes while obtaining
your GPS location.
Once your GPS location is obtained, HUG will send your message with
GPS location. The GPS LED and Message Sending LED on the Keypad
will both blink green and the GPS LED will blink green on the FOB for
approximately 15 seconds. The Message Sending LED on the Keypad
continues to blink green until the next scheduled message or until one
(1) hour after the end of the message cycle to notify you that your most
recent message was transmitted.
If no GPS signal is found, the GPS LED will blink red. Move the vessel to
an area with a clearer view of the sky. HUG will keep looking for your GPS
location for up to 4 minutes.
If no GPS location is found in 4 minutes, HUG sends your message
without GPS location. The GPS LED blinks red on the FOB and Keypad
and the Message Sending LED, Keypad only, blinks green together for
approximately 15 seconds. The Message Sending LED will continue
blinking until the next scheduled message or until one (1) hour after the
end of the message cycle.
The Message Sending LED on the Keypad continues to blink for one (1)
hour after the end of the Help/SPOT Assist message cycle to give you
additional time to verify the status of your most recent message.
To Cancel
Press and hold the Help button until it blinks red. Let HUG work until the
Help button stops blinking red. The Message Sending LED on the Keypad
will blink green indicating it has sent the Cancel message.
How Hug Prioritizes Help
Help/SPOT Assist messages are a priority for HUG. When you select Help/
SPOT Assist or SOS, you will disable Check-in/OK, and Track Progress
functions. You will be able to activate Combined Help and SOS mode. If
you have signed up for SPOT Assist, SPOT Assist will not be available, but
Help messages will still be transmitted to designated friends & family.
Using SPOT HUG
SPO T H U G U SER MANUAL
21
Check-in/OK (FOB/Keypad)
Let your contacts know where you are and how you’re doing; or mark a
single waypoint to review later. Your contacts will receive SMS/text or
email messages with your GPS coordinates. Email messages also include
a link to view your location using Google MapsTM.
Message Cycle for Check-in/OK
The Tracker will send your message and GPS location to the SPOT HUG
network three times over 20 minutes for maximum reliability (only one
email or SMS/text message will actually be sent to your contacts).
If HUG cannot get a GPS signal, it will not send your Check-in/OK.
Using the Check-in/OK Function
Press and hold the Check-in/OK on the Key FOB or Keypad until the button
blinks green. The GPS LED on the FOB or Keypad will blink green when
HUG sees the GPS satellites and continue while obtaining your
GPS location.
Once your GPS location is obtained, HUG sends your message and GPS
location. The GPS LED and Message Sending LED, Keypad only, will both
blink green for approximately 15 seconds. The Message Sending LED on
the Keypad continues to blink green after it transmits the most recent
message and for one (1) hour after the end of the message cycle. Let HUG
work until the end of the message cycle when the Check-in/OK Message
LED stops blinking.
If no GPS signal is found, the GPS LED will blink red. Move the vessel to
an area with a clearer view of the sky. HUG will keep looking for your GPS
location for up to 15 minutes.
If no GPS location is found in 15 minutes, HUG does not send your
message. To try again, simply press and hold the function button. The
Message Sending LED on the Keypad will blink red for one (1) hour after
completion of the message cycle to notify you that your message was not
transmitted.
The Message Sending LED on the Keypad continues to blink for one (1)
hour after the end of the message cycle to give you additional time to
verify the status of your Check-in/OK. In a hurry? You can dismiss the LED
by activating any other function.
To Cancel
All Check-in/OK messages are sent providing a GPS location is found.
How Hug Prioritizes Check-in/OK
Check-in/OK are the lowest priority HUG messages – if you press the
Help, Track Progress, or SOS buttons while in Check-in/OK Message
mode, HUG will cancel any unsent Check-in/OK Message and begin
sending Help/SPOT Assist, Track Progress or SOS messages.
Quick Check
You can send a Check-in/OK while you’re in Tracking. If Tracking is active,
it will be suspended long enough to send the Check-in/OK, then resume
once the Check-in/OK cycle is complete. This lets you easily update your
contacts of your whereabouts while in Tracking. For example, if you’d
like to send an “okay” message at the start of a trip to let your friends
know to follow your whereabouts on SPOT Adventures or findmeSPOT.com,
simply start Track Progress, and then press “Check-in/OK”. HUG will
send a Check-in/OK message then continue tracking.
Using SPOT HUG
SPO T H U G U SER MANUAL
22
Track Progress
Send your location to allow contacts to track your progress in near realtime using Google Maps™ or SPOT Adventures, giving them a virtual
breadcrumb trail of your remote travel. Also automatically mark your
waypoints to review later. Your contacts can see your progress on the web
links that you create in your SPOT HUG account. Additional service fees
may apply. See account information at findmeSPOT.com to learn more.
How HUG Prioritizes Track Progress Messages
Help and SOS are prioritized over Track Progress – if you press the Help
or SOS buttons while tracking, HUG will cancel any unsent messages
and begin sending Help SPOT Assist or SOS messages. Track Progress is
prioritized over Check-in/OK. If you are in Check-in/OK mode and press
Track Progress, it will start tracking and cancel your unsent Check-in/OK.
Message Cycle
Track Progress messages are sent every 10 minutes for 24 hours or until
canceled. You can re-engage Track Progress at any time to restart the
cycle. With each message, HUG will include your GPS location for the 2
previous track positions for a seamlessly reliable breadcrumb trail. If
HUG cannot get a GPS signal, it will not send your message, but will try
again at the next scheduled interval.
Quick Check
You can send a Check-in/OK while you’re in Tracking. If Tracking is active,
it will be suspended long enough to send the Check-in/OK, then resume
once the Check-in/OK cycle is complete. This lets you easily update your
contacts of your whereabouts while in tracking. For example, if you’d
like to send an “okay” message at the start of a trip to let your friends
know to follow your whereabouts on findmeSPOT.com, simply start Track
Progress, and then press Check-in/OK. HUG will send a Check-in/OK
message then continue tracking.
Using the Track Progress Function
Press and hold the Track Progress button on the Key FOB or Keypad until
it blinks green. The GPS LED will blink green when HUG sees the GPS
satellites and while obtaining your GPS location.
Once your GPS location is obtained, HUG will send your waypoint. The
GPS LED and Message Sending LED, Keypad only, will both blink green
for approximately 15 seconds. The Message Sending, Keypad only, LED
continues to blink green until the next scheduled message or until one
(1) hour after the end of the message cycle to notify you that your most
recent message was transmitted.
If no GPS signal is found, the GPS LED will blink red. Move the vessel to
an area with a clearer view of the sky. HUG will keep looking for your GPS
location for up to 4 minutes.
If no GPS location is found in 4 minutes, HUG will not send this particular
waypoint. Both the GPS LED and the Message Sending LED, Keypad only,
will blink red for approximately 15 seconds. HUG will rest for up to 6
minutes and try again at the time of the next scheduled message. The
Message Sending LED will continue blinking until the next scheduled
message or until one (1) hour after the end of the message cycle.
The Message Sending LED continues to blink for one (1) hour after the
end of the Track Progress message cycle to give you additional time to
verify the status of your most recent message.
To Cancel
Press and hold the button on the device that was used to initiate the
Track Progress until it blinks red.
How the LEDs Blink
SPO T H U G U SER MANUAL
By Function for Tracker, key FOB/Keypad
LED
LED ActivityGreen
Power When connected to line power
Solid
When using batteries only
Blinking
If GPS or satellite transmitter self-test fail
If battery power is low
GPS
GPS fix
Blinking
No GPS fix
If GPS or satellite transmitter self-test fail
SOS
When SOS is sent
Blinking
If GPS or satellite transmitter self-test fail
Red
Power/GPS/SOS
all blink red
Blinking
Blinking
Power/GPS/SOS
all blink red
Power/GPS/SOS
all blink red
If Tracker finds your GPS location (Keypad and Key FOB)
Function
Message Function LED
GPS LED
Check-in/OK
Track Progress
Help/SPOT Assist
SOS Emergency
Function LED blinks
green until the message
cycle is completed or
canceled
GPS LED
blinks green
Messages Sending LED
(Keypad only)
Message Status
Blinks green after
transmitting the most
recent message as
appropriate for each
function and for one (1)
hour after the message
cycle ends
Message and location
transmitted to the
satellites
Important Notes
1. The blinking green LED within each function button lets you know you have successfully engaged that function.
2. After you engage the function, HUG looks for a GPS signal and location as indicated.
3. Once the GPS location is obtained, HUG sends your message and the GPS and Message Sending LEDs blink green together
for 15 seconds, indicating a successful GPS fix and starting the message sending cycle.
23
How the LEDs Blink
SPO T H U G U SER MANUAL
24
If Tracker doesn’t find your GPS location.
It is important to test the Tracker unit before permanent installation.
Function
Function button LED
GPS LED
Messages Sending LED
(Keypad only)
Message Status
to try again
SOS
Blinks Green
Blinks Red.
Tracker looks
for GPS for 4
minutes then
rests for 1
minute.
Blinks Green
Message Sent
without GPS
Move the vessel
to an area with a
clearer view of the
sky. HUG will try to
get a GPS location
during the next
message interval.
Help/Assist
Blinks Green
Blinks Red.
Tracker looks
for GPS for 4
minutes then
rests for 1
minute.
Blinks Green
Message Sent
without GPS
Move the vessel
to an area with a
clearer view of the
sky. HUG will try to
get a GPS location
during the next
message interval.
Check-in/OK
Blinks Green
Blinks Red
Blinks Red
Message not sent
Move the vessel
to an area with
a clearer view of
the sky. Press the
selected function
again.
Track Progress
Blinks Green
Blinks Red.
Tracker looks
for GPS
for every 4
minutes then
rests for 6
minutes.
Blinks Red
Message not sent
Move the vessel
to an area with a
clearer view of the
sky. HUG will try to
get a GPS location
during the next
message interval.
Important Notes
Check-in/OK: HUG must get a GPS signal before sending Check-in/OK Message. If no GPS signal is found, the GPS LED blinks red and SPOT HUG de-activates the
function without sending any messages.
Track Progress: HUG must get a GPS signal before sending your waypoint. However, HUG will stay in the Track Progress function, and again look for a GPS signal
at the next scheduled message interval.
Help/SPOT Assist: Tracker sends Help/SPOT Assist messages even without a GPS location. Tracker will again look for a GPS signal prior to sending the next
scheduled message (~4-5 minutes), and repeat the entire message cycle.
SOS: Tracker sends SOS Emergency messages even without a GPS location. Tracker will again look for a GPS signal prior to sending the next scheduled message
(~4-5 minutes after the first message), and repeat the entire message cycle.
How the LEDs Blink
SPO T H U G U SER MANUAL
By Status for key FOB, Keypad and Tracker
STATUS LED
Green
Red
Tracker Range
Fob/Keypad TR LED blinks
green if FOB is within 60 ft
Fob/Keypad TR LED
Blinks red when out
of range
Tracker Power Status (ON/OFF on the Tracker)
Solid green when it is line
powered; Slow blink green
when battery powered.
Blinks red when batteries
are running low.
Tracker Power Status (Battery icon on Keypad)
Blinks red when batteries
are running low.
FOB/Keypad Power Status
Battery LED blinks red
when low battery
FOB/Keypad… Check-in/OK and Help cannot be activated while
canceling Unauthorized Movement or Sensor Alert
Check-in/OK or Help
LED will blink red for 3
seconds.
Important Notes
1. A quick press of Check-in/OK on the FOB or Keypad will be required to confirm Tracker Range and Message status.
2. SPOT HUG recommends when low battery indicator comes on, it is best to replace batteries immediately. When on a trip,
always have a spare set of batteries for the FOB/Keypad and the Tracker.
3. If unsure if batteries are brand new, do not place them into any of the three HUG devices.
4. All LED activities on Keypad/FOB time out after 1 min.
25
Keypad Functions
SPO T H U G U SER MANUAL
The Keypad can be used to manually arm/disarm SPOT HUG. It is also
used to turn on/off the GPS information in the daily status message,
change PIN, pair additional Key FOBs and to enable/disable sensor alerts.
Finally it can also be used to initiate and cancel SPOT modes.
• Press and release button unless specified otherwise
• After pressing Check-in/Ok, audio and visual feedback confirms
successful or unsuccessful entries
Audio feedback
• Successful – solid beep; Unsuccessful – 3 beeps
KEY PAD FUNCTION
ADDITIONAL DIRECTIONS
ENTER NUMBERS
Theft Recovery Mode Off
00
Theft Recovery Mode On
01
Daily Status Off
02
Daily Status On
03
PIN Change (or setup)
04
PRESS CHECK-IN/OK
+
+
+
+
+
+
+
+
+
+
26
Visual feedback
• Successful – single green blink on Check-in/OK LED;
Unsuccessful – 3 green blinks on Check-in/OK LED
Enter PIN press Check-in/OK
Enter PIN press Check-in/OK
Enter PIN press Check-in/OK
Enter PIN press Check-in/OK
1. Enter PIN (or enter default PIN, which is the last 4 digits of Authorization code, for initial
setup only)
2. Press Check-in/OK
3. Enter new PIN followed by Check-in/OK
4. Enter new PIN again followed by Check-in/OK
5. Quick Press Check-in/OK on each FOB
Pair FOBs
05
+
+
1. Enter PIN
2. Press Check-in/OK
3. One FOB at a time, press Check-in/OK and Track Buttons on Fob simultaneously for 3 seconds
4. Repeat #7 & 8 for all FOBs within 5 minutes.
Pair Keypad with Tracker
06
+
+
1. Enter Default PIN followed by Check-in/OK
2. Enter existing PIN followed by Check-in/OK
3. Enter 8 digit ESN (excluding the dash) followed by Check-in/OK
Sensor Alert Enable
07
+
+
1. Enter PIN
1: #1
2. Press Check-in/OK
2: #2
3. Press the number (1-4, 9 for all) of the contact to be enabled
3: #3
4. Press Check-in/OK
4: #4
9: All
Sensor Alert Disable
08
+
+
1. Enter PIN
1: #1
2. Press Check-in/OK
2: #2
3. Press the number (1-4, 9 for all) of the contact to be disabled
3: #3
4. Press Check-in/OK
4: #4
9: All
PIN Reset
09
+
+
1. Enter Last 4 digits of Authorization code
2. Press Check-in/OK
3. Enter new PIN followed by Check-in/OK
4. Enter new PIN again followed by Check-in/OK
5. Quick press Check-in/OK on each FOB
Vibration Sensitivity Setting
12
+
+
1. Press (1 = low, 2 = medium, 3 = high)
Low setting is recommended for boats less than 30 ft.
2. Press Check-in/OK
Cancel SPOT Modes Activated
on FOB
19
+
+
1. Enter PIN
2. Press Check-in/OK
Care and Support
SPO T H U G U SER MANUAL
27
Battery Life and usage for Tracker, Keypad and key FOB
• Use only non-rechargeable AA Lithium batteries in your Tracker as a
backup to line power. If using the Tracker with batteries only, follow
guidelines in this section. We highly recommend EnergizerTM Ultimate
8x AA Lithium batteries (L91). Alkaline or other battery technologies,
including rechargeable varieties, are not recommended. In an
emergency situation, if you only have access to Alkaline or other battery
technologies, the Tracker might work, but will not meet the specified
battery life or performance.
• Lithium batteries properly installed in the Tracker should last for
several years stored. The On/Off LED will blink red when the Lithium
batteries are low on battery power. If you are unsure as to the battery
life remaining, replace the batteries immediately. Always test and
verify your Tracker device before any trip.
• Under normal usage fully charged recommended batteries in a Tracker
should meet or exceed the following:
Tracker: 4 AA Energizer Ultimate Lithium
spot mode
theft recovery mode
battery life (days)
None
None
None
No Vibration
Vibration, Armed, No Unauthorized Boat Movement
Vibration, Armed, Unauthorized Boat Movement
336
19
13
SOS or Help
Track Progress
Check-In/OK
Off
Off
Off
12
19
110
Keypad: 2 CR2032 cells
Key FOB: 1 CR2032 cells
# of button presses Per Day
battery life
# of button presses Per Day
battery life
0
5
6 years
2-1/2 years
0
5
1-1/2 years
1 year
10
1-1/2 years
10
240 Days
SPOT performance and battery life may be degraded in operating environments where the SPOT GPS chip must take a
longer time to acquire your GPS location, such as trying to send a message indoors or under extreme canopies. Colder
conditions can impact battery life. Under normal usage a full battery charge should meet or exceed these amounts.
1. SPOT recommends that you always carry an extra set of recommended
batteries.
2. Colder conditions can impact battery life. Colder conditions and
extreme heat can impact battery life.
The Tracker performance and battery life (if not line powered) may be
degraded in operating environments where the Tracker GPS chip must
take a longer time to acquire your GPS location, such as trying to send
a message under non-RF transparent structures or under extreme
canopies. If in an emergency situation where you only have alkaline or
different non-rechargeable AA lithium batteries available, Tracker may
be able to intermittently transmit messages but performance will be
degraded.
The Tracker and Keypad are designed to be rugged for maritime use.
The Key FOB unit is made to survive a short fall and submerged under
water for a short period of time.
To ensure proper low battery indicator operation, SPOT recommends that
new batteries are installed for all three devices (Tracker/FOB/Keypad) on
a regular basis. Removing batteries and reinstalling them, or installing
used batteries will shorten the total number of notifications that can be
sent before the batteries go dead.
Coverage
HUG works around the world, including virtually all of North America,
Europe, Australia and portions of South America, Northern Africa and
Asia, as well as hundreds or thousands of miles off-shore of these
areas. It is important that you check coverage for your destination
before traveling. In Russia, GPS performance is limited (degraded) in
accordance with Russian regulations regarding GPS accuracy for devices
utilized in Russia. Go to findmeSPOT.com for the latest coverage map.
Care and Support
SPO T H U G U SER MANUAL
28
OPERATING CONDITIONS AND CLIMATE
SMS information
For safety, keep the following in mind regarding the care and usage of
each of the three HUG components:
Additional charges may apply in some regions. Standard text messaging
charges from your mobile phone provider may also apply.
Tracker
• 12/24 VDC line power input.
• Waterproof to IPX7 standard (depth of 1 meter up to 30 minutes
• Operating temperatures: -22°F to +185°F (-30°C to 85°C)
• Operating altitude: -328 ft to 21,320 ft (-100m to 6,500m)
• Humidity and Salt Fog rated.
• Vibration compliant Per SAE JI455, Random, 20 Hz to 2000 Hz,
0.04g2/Hz, one hour per axis
• Visit findmeSPOT.com for the latest information on certification to OSHA
Intrinsically Safe to Class I, Division 1, Group A-D standards.
TROUBLESHOOTING
Keypad and Key FOB
• Operating temperatures: -8°F to +140°F (-20°C to 60°C).
Coin cells are rated from -20C to 60C.
• Humidity and Salt Fog rated
• Waterproof to IPX7 standard (depth of 1 meter up to 30 minutes.
• Able to withstand a drop on all six sides from 1 meter onto a
concrete surface
• FOB and Keypad is vibration compliant Per SAE JI455, Random,
20 Hz to 2000 Hz, 0.04g2/Hz, one hour per axis
The FOB/Keypad/Tracker components each perform a self-diagnostic test
each time batteries are installed. SPOT recommends that you send and
verify a Check-in/OK message before each trip. This also allows you to
evaluate your entire messaging system, from the operational condition of
the HUG to the readiness of those on your contact list.
WEB BROWSER REQUIREMENTS
For optimal performance, you must have a compatible web browser to
access your SPOT user account at findmeSPOT.com. The following are
compatible web browsers:
• FireFox 3
• Internet Explorer 7 & 8
• Safari 3 & 4
It is possible that other browsers such as Chrome 2.0 and Opera 9/10.0
will also work to access the findmeSPOT.com website and your user
account, but compatibility is not assured. Check the FAQ section of the
findmeSPOT.com website or contact HUG Customer Care for the most
recent list of compatible browsers.
LEARN MORE
The SPOT website is updated regularly with training videos and answers
to Frequently Asked Questions (FAQs).
FOR ADDITIONAL QUESTIONS OR SUPPORT
Visit findmeSPOT.comor call:
• North American Customers: 1-866-OK1-SPOT (1-866-651-7768).
• European Customers: Tel: +353 12 909 505
Care and Support
SPO T H U G U SER MANUAL
29
LIMITED WARRANTY
FCC/IC NOTICE
Spot LLC warrants that your SPOT HUG will be free from defects in
materials and workmanship under normal use for a period of 12 months
(24 months for European customers) from the date of original purchase
from Spot LLC or an authorized reseller with receipt. For full details
regarding the Limited Warranty and warranty claim procedures, visit
findmeSPOT.com.
This equipment has been tested and found to comply with the limits
for a class B digital device, pursuant to Part 15 of the FCC rules. These
limits are designed to provide reasonable protection against harmful
interference in a residential installation. This equipment generates, uses,
and can radiate radio frequency energy and, if not installed and used
in accordance with the instructions, may cause harmful interference to
radio communications. However, there is no guarantee that interference
will not occur in a particular installation. If this equipment does cause
harmful interference to radio or television reception, which can be
determined by turning the equipment off and on, the user is encouraged
to try to correct the interference by one or more of the following measures:
• Reorient or relocate the receiving antenna.
• Increase the separation between the equipment and the receiver.
• Connect the equipment into an outlet on a circuit different from that to
which the receiver is connected.
• Consult the dealer or an experienced radio/TV technician for help.
EXCEPT AS PROVIDED ABOVE, THE PRODUCT IS SOLD “AS IS” WITHOUT
ANY EXPRESS OR IMPLIED WARRANTIES FOR THE PRODUCT WHATSOEVER,
INCLUDING, WITHOUT LIMITATION, ANY IMPLIED WARRANTIES
REGARDING THE CONDITION, DESIGN, SPECIFICATIONS, WORKMANSHIP,
MERCHANTABILITY OR FITNESS FOR A PARTICULAR PURPOSE OF THE
PRODUCT, OR ANY WARRANTIES THAT THE PRODUCT IS FREE FROM
LATENT DEFECTS OR DEFICIENCIES, OR THAT THE PRODUCT IS FREE
FROM INFRINGEMENT OF ANY PATENT, TRADEMARK, COPYRIGHT OR
PROPRIETARY RIGHT OF ANY THIRD PARTY AND SUCH WARRANTIES ARE
HEREBY EXPRESSLY DISCLAIMED.
THIS LIMITED WARRANTY PROVIDES THE SOLE AND EXCLUSIVE REMEDY
FOR ANY DEFECTS IN THE PRODUCT. IN NO EVENT SHALL WE BE LIABLE
FOR ANY INDIRECT, CONSEQUENTIAL, SPECIAL, INCIDENTAL OR PUNITIVE
DAMAGES, WHETHER IN CONTRACT, TORT, NEGLIGENCE, STRICT LIABILITY
OR OTHERWISE. OUR LIABILITY IS LIMITED TO THE AMOUNT YOU PAID
FOR THE PRODUCT THAT IS THE SUBJECT OF A CLAIM. THE APPLICABILITY
OF THE ABOVE LIMITATIONS AND EXCLUSIONS MAY VARY FROM STATE TO
STATE, OR COUNTRY TO COUNTRY.
ANY MODIFICATION TO EITHER THE TRACKER, FOB, OR KEYPAD IS
PROHIBITED AND WILL VOID YOUR WARRANTY. THE OPENING OF THE
UNITS AND USE OF THE COMPONENTS FOR PURPOSES NOT OTHERWISE
AUTHORIZED BY HUG IS PROHIBITED AND WILL VOID YOUR WARRANTY. IT
IS NOT TO BE USED IN AIRPLANES OR ANY OTHER AVIATION APPLICATION.
This device automatically adjusts its transmission frequency
according to its location and is compliant with international regulatory
requirements.
This Class B digital apparatus complies with Canadian ICES-003.
FCC RF Radiation Exposure Statement
This equipment complies with FCC RF radiation exposure limits set forth
for an uncontrolled environment. This equipment should be installed and
operated with a minimum distance of 20 cm between the radiator and
your body.
Warning Statements
WARNING! Danger of explosion if battery is incorrectly replaced. Replace
only with the same or equivalent type recommended. Dispose of used
batteries according to the manufacturer’s instructions.
WARNING! Do not damage the rechargeable Lithium-ion battery. A
damaged battery can cause an explosion or fire, and can result in
personal injury and/or property damage.
SPOT images/material copyright ©2010, Spot LLC, 300 Holiday Square Blvd., Covington, Louisiana 70433. All rights reserved.
Visit us online at findmeSPOT.com Made in China. SPOT LLC (findmeSPOT.com is not affiliated with Spot Image (www.spotimage.com).