1
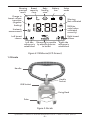
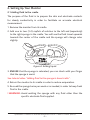
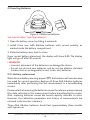
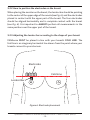
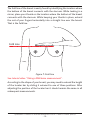
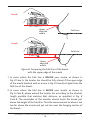
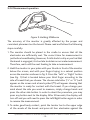
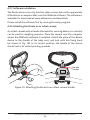
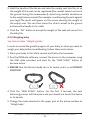
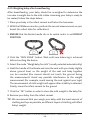
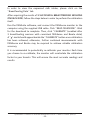
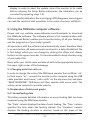
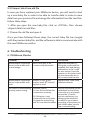
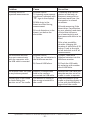
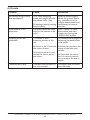
USER MANUAL
Thank you for choosing MilkSense - the world’s first breastfeeding monitor.
MilkSense is not a medical device but should be used as an aid to
breastfeeding, as it can offer insight and reassurance about the amount of
breastmilk that you are producing and the amount of breastmilk that your
baby is consuming. Much like adults consume different amounts of food
and liquids in 24 hours, babies consume different amounts of milk with
each feeding in a 24 hour day.
All results obtained from the device should not be used exclusively in
making important decisions about your baby’s health and development.
It is important that you continue with regular follow-up visits with
your healthcare professional to ensure that your baby is growing and
developing properly. Whether or not you are breastfeeding exclusively,
you should pay attention to the following: average number of feedings
per day; number of wet diapers and bowel movements per day; amount of
time sleeping between feedings; does your baby appear lethargic versus
active and alert; does your baby have an overall healthy appearance;
weight gain, and overall growth and development, etc. These topics
should be discussed regularly with your healthcare professional, as
MilkSense cannot substitute the advice of a healthcare professional.
However, the data collected by MilkSense can help you and your health
care professional understand and better evaluate any breastfeeding
production and/or consumption issues, as well as develop better strategies
in your breastfeeding efforts.
We hope you enjoy using MilkSense and that it reduces any concerns
you may have about breastfeeding. Our hope is that it helps support and
encourages your breastfeeding experience!
For
additional
information,
please
consult
our
website:
www.milksense.com, or call 1-844-411-MILK (1-844-411-6455). Our
Customer Care Team is standing by 24/7 to help you with any questions
or concerns you may have.
Questions? Contact us at www.milksense.com or 1-844-411-MILK (6455)
-2-
Table of contents
Safety precautions - MilkSense ............................................................................................. 04
Safety precautions - Electrode solution .............................................................................. 05
Safety precautions - Bscale ................................................................................................... 06
1. Know your unit .................................................................................................................... 07
1.1 MilkSense ..................................................................................................................... 07
1.2 Bscale ............................................................................................................................ 08
2. Setting up your monitor ..................................................................................................... 09
2.1 Adding fluid to the cradle ......................................................................................... 09
2.2 Inserting batteries ....................................................................................................... 10
2.2.1 Battery replacement ......................................................................................... 10
3. Taking a breast measurement ........................................................................................... 11
3.1 What does MilkSense measure? ............................................................................... 11
3.2 Taking a breast measurement ................................................................................... 11
3.2.1 Correct body posture during measurement .................................................. 11
3.2.2 How to position the electrodes on the breast ............................................ 12
3.2.3 Adjusting the locator bar according to the shape of your breast ............ 12
3.2.4 Measurement operation ................................................................................... 15
3.2.5 Measuring both breasts .................................................................................... 17
3.2.6 The result (or previous result) button .......................................................... 17
3.2.7 The capacity button ......................................................................................... 17
3.2.8 Empty display and clear function .................................................................. 18
3.2.9 Time indicator .................................................................................................... 18
3.2.10 Twin breastfeeding ......................................................................................... 18
4. Calibration ............................................................................................................................ 19
4.1 What calibration means ............................................................................................ 19
4.2 Automatic calibration using the Bscale ................................................................. 19
4.2.1 Software installation ........................................................................................ 20
4.2.2 Attaching the Bscale to an infant carseat ................................................... 20
4.2.3 Weighing empty carseat .................................................................................. 21
4.2.4 Weighing baby ................................................................................................... 22
4.2.5 Weighing baby after breastfeeding ................................................................ 24
4.3 Manual calibration ..................................................................................................... 26
5. Using the MilkSuite computer software ........................................................................... 27
5.1 Changing units from ml to oz .................................................................................. 27
5.2 Explanation of tables and graphs ............................................................................ 27
5.2.1 Breastfeeding data ............................................................................................ 27
5.2.2 Consumption ...................................................................................................... 28
5.2.3 Last 24 hours ..................................................................................................... 28
5.2.4 Productivity ........................................................................................................ 28
5.2.5 Capacity .............................................................................................................. 28
5.2.6 Baby’s weight ..................................................................................................... 28
5.3 Advanced options ....................................................................................................... 29
5.3.1 Enter verified milk values ................................................................................ 29
5.3.2 Remove false records ....................................................................................... 29
5.3.3 Import data from old file ................................................................................. 30
6. Troubleshooting ................................................................................................................... 30
6.1 MilkSense monitor ...................................................................................................... 30
6.2 Bscale ............................................................................................................................ 32
7. Warranty ............................................................................................................................... 33
8. Parts list ................................................................................................................................ 34
8.1 Replaceable parts ....................................................................................................... 34
8.2 Ordering parts ............................................................................................................. 34
8.3 Changing the sponge in the cradle .......................................................................... 34
9. Technical data ...................................................................................................................... 35
9.1 MilkSense ..................................................................................................................... 35
9.2 Bscale ........................................................................................................................... 36
Questions? Contact us at www.milksense.com or 1-844-411-MILK (6455)
-3-
Safety Precautions - MilkSense
! WARNING: N
ever use MilkSense in combination with any other medical
electronic devices or aids such as:
• Implanted artificial cardiac pacemakers.
• Electronic life support systems.
• Electrocardiogram equipment.
! WARNING: MilkSense may cause these devices to malfunction.
! WARNING: ENSURE that your baby is in a secure place while handling
the MilkSense monitor.
! WARNING:
• MilkSense is NOT a substitute for medical advice or for additional
supervision/advice. Be sure to undergo routine checkups with your
healthcare professional. Weigh your baby at least once every month
on a professional scale to record weight changes with your healthcare
professional.
• Avoid relying on MilkSense alone for any important decision about
your baby’s care.
• Do not stop breastfeeding if the monitor shows no reading.
• Pay attention to signs of behavioral changes exhibited by your baby
and not just to the readings registered by the monitor. Inadequate
breastfeeding poses the immediate risk of dehydration of your baby.
Seek immediate medical help if any behavioral changes are seen in
your baby. Be aware that improper use of the monitor may show false
readings of milk availability/consumption. Refer to the instructions for
proper calibration of the monitor.
• Not for use with children under 4.4lbs / 2kg.
• Not for use with colostrum.
• The monitor is not suitable for premature babies.
• Keep the monitor and its accessories out of the reach of children. The
monitor and its accessories contain small parts that present a choking
hazard.
Questions? Contact us at www.milksense.com or 1-844-411-MILK (6455)
-4-
• If the electrode solution should accidently get in your eyes or your
baby’s eyes, immediately rinse with plenty of clean water.
• Do not ingest the electrode solution. Store it in a safe place and out of
reach of children.
• Avoid touching the electrodes when the monitor is connected to the
computer with the USB cable.
• Remove batteries from the monitor when it will not be in use for a long
period of time to prevent battery spill inside the monitor.
CAUTION:
• Avoid wetting the sponges with any fluid other than the specific fluid
supplied.
• The monitor is not suitable for monitoring other parts of the body, only
the breast.
• Do not disassemble, repair, or remodel the monitor.
• For reasons of hygiene, avoid sharing the monitor with others.
Safety Precautions - Electrode Solution
! WARNING: Please DO NOT use this device if you have an allergy to any
of the following ingredients (found in electrode solution): Water 79.45%,
Ethanol 20%, Sodium Chloride 0.5%, Potassium Sorbate 0.05%.
CAUTION: FLAMMABLE!
• Keep away from heat, sparks or open flame.
• Store at room temperature.
•K
EEP OUT OF THE REACH OF CHILDREN.
•F
OR EXTERNAL USE ONLY. Avoid contact with eyes: If this occurs,
rinse thoroughly with water.
• Discontinue use if rash or irritation occurs.
Questions? Contact us at www.milksense.com or 1-844-411-MILK (6455)
-5-
Safety Precautions - Bscale
! WARNING:
• The Bscale must be disconnected from the infant carseat when the
seat is being used in the car, or while in motion.
• Do not use the Bscale if it is damaged in any way.
• The Bscale is not a substitute for medical advice or for additional
supervision/advice. Be sure to undergo routine checkups with your
healthcare professional. Weigh your baby at least once every month
on a professional scale to record weight changes with your healthcare
professional.
•C
HOKING HAZARD: the device contains small parts.
• Maximum weight of baby + carseat should be less than 20kg / 44lbs.
• Avoid unnecessary movements that may put your baby at risk.
Questions? Contact us at www.milksense.com or 1-844-411-MILK (6455)
-6-
1. Know Your Unit
1.1 MilkSense
Battery
Compartment
Right Button
Left Button
USB Socket
Capacity Button
Result Button
Green LED
Pressure Indicator
Setup Button
Electrode
Adjustable Locator Bar
Sponge
Figure 1: MilkSense (Monitor and Cradle)
Questions? Contact us at www.milksense.com or 1-844-411-MILK (6455)
-7-
Showing
previous
result
Breast
capacity
view
Baby
feeding
view
Battery
low
Setup
mode
Change in
breast volume
is positive
(negative
feeding)
Warning:
Not calibrated
Unsteady
measurement
Milliliter
units (when
calibrated
correctly)
Left breast
chosen
Right breast
chosen
Left side Measuring is possible
reference is by attaching device
established
to breast
Right side
reference is
established
Figure 2: MilkSense (LCD Screen)
1.2 Bscale
Handle
Handle
Socket
USB Socket
Fixing Band
Palm
Figure 3: Bscale
Questions? Contact us at www.milksense.com or 1-844-411-MILK (6455)
-8-
2. Setting Up Your Monitor
2.1 Adding fluid to the cradle
The purpose of the fluid is to prepare the skin and electrode contacts
for steady conductivity in order to facilitate an accurate electrical
measurement.
1. Remove the monitor from its cradle.
2. Add one to two (1-2) capfuls of solution to the left and (separately)
to the right sponge in the cradle. You will see the fluid travel upwards
towards the center of the cradle and the sponge will change color
slightly.
Figure 4: Adding liquid
3. E
NSURE that the sponge is saturated; you can check with your finger
that the sponge is moist.
See tutorial video “Adding fluid to the sponge in base/cradle”.
4. Return the monitor to its cradle in order to reduce evaporation.
5. Re-soak the sponge twice per week or as needed, in order to keep fresh
fluid in the cradle.
! WARNING: Avoid wetting the sponge with any fluid other than the
specific electrode fluid supplied.
Questions? Contact us at www.milksense.com or 1-844-411-MILK (6455)
-9-
2.2 Inserting Batteries
Figure 5: MilkSense batteries
See tutorial video “Inserting batteries”.
1. Open the battery cover by sliding it outwards.
2. Install three new AAA Alkaline batteries with correct polarity, as
marked inside the battery compartment.
3. Slide the battery cover back to close.
Upon correct battery placement, the display will show 0:00. The display
light will go off after 30 seconds.
! WARNING: • Incorrect placement of the batteries can damage the device.
• Do not mix old and new batteries, and do not mix alkaline, standard
(carbon-zinc) or rechargeable (ni-cad, ni-mh, etc.) batteries.
2.2.1 Battery replacement
When the low battery warning appears (j), the batteries will soon become
too weak for correct operation. Replace all three AAA Alkaline batteries
immediately after performing the last measurement in a breastfeeding
session.
Please note that removing the batteries causes the reference measurement
(the data collected in the measurement before breastfeeding) to expire.
Also, replacing batteries causes the breast capacity indicator to reset.
However, the calibration parameters and history of measurements are
retained in the monitor’s memory.
Three AAA Alkaline batteries should last approximately three months
with typical use.
Questions? Contact us at www.milksense.com or 1-844-411-MILK (6455)
- 10 -
3. Taking a Breast Measurement
3.1 What does MilkSense measure?
The MilkSense monitor measures changes in the alveoli in order to
determine the amount of milk your baby receives from the breast.
The measurement applies a very low current and cannot affect your
body or your breastmilk. Similar currents are formed by radio waves
which already exist in the air around us and the rates are well below
recommended exposure limits.
3.2 Taking a breast measurement
The monitor should be placed on the breast for 10 seconds before
breastfeeding and for another 10 seconds after breastfeeding to acquire
the result. The accuracy of the measurement will depend on consistent
usage as described below.
3.2.1 Correct body posture during measurement
The posture of your body greatly influences the accuracy of the
measurement. Please follow these instructions carefully:
1. Remove breast from clothing.
2. Sit upright, preferably without
a support for your back.
Sit
upright
3. The arm on the side of the
breast you are measuring
should be limp, so that the
pectoral muscle of the breast
Hold with
is relaxed.
opposite
4. Hold the monitor with the
opposite hand to the breast
side that you are measuring.
hand
Questions? Contact us at www.milksense.com or 1-844-411-MILK (6455)
- 11 -
Limp
arm
3.2.2 How to position the electrodes on the breast
When placing the monitor on the breast, the locator bar should be pointing
to the center of the upper edge of the areola (see Fig. 6), and the electrodes
placed in contact with the upper part of the breast. The four electrodes
should be aligned horizontally and in complete contact with the breast
(see Fig. 6). It is important to ALWAYS perform all measurements in the
same position over the upper part of the breast.
3.2.3 Adjusting the locator bar according to the shape of your breast
MilkSense MUST be placed in-line with your breast’s FOLD LINE. The
fold line is an imaginary horizontal line drawn from the point where your
breasts connect to your sternum.
Electrodes
Fold Line
Locator Bar
Figure 6: Electrode placement
Questions? Contact us at www.milksense.com or 1-844-411-MILK (6455)
- 12 -
The fold line of the breast is easily found by identifying the location where
the bottom of the breast connects with the sternum. While looking in a
mirror, place your thumb on the location where the bottom of the breast
connects with the sternum. While keeping your thumb in place, extend
the rest of your fingers horizontally into a straight line over the breast.
That is the fold line.
Fold Line
Figure 7: Fold line
See tutorial video “Taking a MilkSense measurement”.
According to the shape of your breast, you may need to extend the length
of the locator bar by sliding it outward to one of three positions. After
adjusting the position of the locator bar it should remain the same in all
subsequent measurements.
Questions? Contact us at www.milksense.com or 1-844-411-MILK (6455)
- 13 -
Case A
Upper
edge the
areola
Fold Line
Case B
Fold Line
Upper
edge the
areola
Figure 8: Comparing the fold line of the breast
with the upper edge of the areola
1. In cases where the fold line is BELOW your areola, as shown in
Fig. 8 Case A, the locator bar should be fully closed if the upper edge
of the areola (marked with an arrow in Fig. 8 Case A) is higher than the
fold line of the breast.
2. In cases where the fold line is ABOVE your areola, as shown in
Fig. 8 Case B, please extend the locator bar according to the shortest
length possible that matches that distance, as specified in Fig. 8
Case B. The electrodes of the monitor should touch the breast just
above the height of the fold line. Thus the measurement location is not
too far above the areola and yet not too near the hanging section of
the breast.
Questions? Contact us at www.milksense.com or 1-844-411-MILK (6455)
- 14 -
3.2.4 Measurement operation Figure 9: Holding MilkSense
The accuracy of the monitor is greatly affected by the proper and
consistent placement on the breast. Please read and follow the following
steps carefully.
1. The monitor should be placed in the cradle to ensure that all the
electrodes are sufficiently wet. The correct time for measurement is
just before breastfeeding. However, if milk starts to drip or you feel that
the breast is engorged, it is too late to obtain an accurate measurement.
Therefore, wait until the next feeding to take a measurement.
2. Hold the monitor in your palm with your thumb in front of the monitor
below the screen, and with your fingers laying in a natural position
across the monitor as shown in Fig. 9. Press the “Left” or “Right” button
(see Fig. 1) that is located below your third finger according to the
side of breast that you choose. The chosen side letter (“L” or “R”) will
appear on the screen and a hand symbol (d) will appear showing that
the monitor is ready for contact with the breast. If you change your
mind about the side you want to measure, simply change hands and
press the other side button. In order to abort the procedure, you may
press any button next to the display. After 30 seconds, the display will
turn off and you will need to press the Left/Right button again in order
to resume the measurement.
3. To make good body contact, point the locator bar to the upper edge
of the areola of the breast and press all four electrodes against the
Questions? Contact us at www.milksense.com or 1-844-411-MILK (6455)
- 15 -
skin as described in 3.2.3. Apply gentle pressure, just enough to turn on
the green pressure indicator light that will initiate the measurement.
Maintain the same amount of applied pressure until the end of the
measurement.
4. Once the monitor is attached to the body with sufficient pressure, a
green light will appear on the LED pressure indicator, the display will
show the letters “SnS” for two seconds, and a 10 second countdown
is shown until the end of the measurement (a clicking sound serves for
audible notice). A chirp sound signals the end of the measurement.
5. Remove the monitor from the breast and observe the output. The letters
“REF” mean that the current state of the breast has been recorded as
reference (valid for one hour), and the time is considered the beginning
of breastfeeding for the chosen side of breast. Return the monitor to its
cradle and start breastfeeding freely.
6. Approximately 1-4 minutes after completing breastfeeding (and after
the breast has stopped dripping), re-measure the breast exactly as
in the reference measurement (repeat steps 2-4). At the end of the
measurement, the monitor will show the calculated amount of milk
that your baby has consumed. Note that until calibration is established,
this amount is in arbitrary units, and should not be considered accurate
(see Section 4 - Calibration).
NOTE:
• Keep the MilkSense monitor in its cradle when not in use. This ensures
that the electrodes are ready for the next use and prevents fluid
evaporation.
•E
NSURE that the sponges are moist; if needed, add electrode solution
to the cradle.
• If the duration of the breastfeeding is likely to exceed 1 hour, then
an interim measurement should be taken or else the reference
measurement will become obsolete. In order to take an interim
measurement, you will need to reset the monitor by pressing both the
Setup Button (h) and the Result Button (a) simultaneously. When you
have completed breastfeeding, please take a final measurement and
Questions? Contact us at www.milksense.com or 1-844-411-MILK (6455)
- 16 -
observe the quantity of milk consumed. Repeated measurements show
the state of the breast compared to the initial reference measurement
of that same breast.
• The monitor senses the volume of alveoli in the breast, whereas the
milk in the ducts is not taken into account. Normally the milk ducts only
fill after the start of breastfeeding, and empty during breastfeeding.
Thus, this process will not affect accuracy.
• Measure as close as possible to the start and end of breastfeeding
(wait 1-4 minutes after the end of breastfeeding), except in the case of
measuring both breasts, which is described below.
3.2.5 Measuring both breasts
If you intend to breastfeed from both sides during a feeding (expecting
to take less than 1 hour combined), it is recommended to measure both
sides BEFORE and AFTER the entire session. After measuring one side,
return the monitor to its cradle for several seconds (to fully moisten the
electrodes) and then measure the other side. The lower part of the display
shows the chosen side (L/R) and the reference status (the small mark “ref”
appears after the initial measurement of each side). The milk result refers
only to the chosen side. Results of the other side can be viewed by pressing
the Left/Right Button and then on the relevant inquiry button beside the
display (Press: Result Button (a) to show fed milk; Capacity Button (l)
to show level; Setup Button (h) to show time since last measurement).
3.2.6 The Result (or Previous Result) Button
The Result/Previous Result Button (a) shows the feeding amount currently
measured or previously measured. When the display is off or in time
mode, one click on the Result Button will show the current result of milk.
Clicking once more on the button will show the previous measurement
result (for two seconds).
3.2.7 The Capacity Button
The Capacity Button (l) shows the estimated amount of milk in the
breast by simply comparing the current measurement result with
all previous measurement results since the time the batteries were
inserted. In order to start assessing the breast afresh, you may remove
Questions? Contact us at www.milksense.com or 1-844-411-MILK (6455)
- 17 -
and reinsert the batteries. The results are measured for each breast
separately. Correct capacity results also depends on proper calibration
(see Section 4 - Calibration).
NOTE: This function assumes that in at least one previous measurement
the breast was empty, and that the composition of the breast tissue
has not changed since then. If not enough previous measurements
are available, then the empty result mark is shown (“---”).
3.2.8 Empty display and clear function
When the display shows the sign “---” it means there is no fresh reference
value for one of the breasts. In such a situation, the measurement that
comes first is interpreted as a reference measurement for the chosen
breast side. The reference value expires after one hour.
In the event that you wish to perform a new reference measurement
sooner than one hour, you can click the Setup Button (h) together with
the Result Button (a). The two buttons pressed simultaneously act as a
reset button (only for the reference value).
3.2.9 Time indicator
Immediately after the monitor is removed from the cradle, the display
shows the length of time, in hours and minutes, which has passed since the
last measurement and which side of breast was measured. After choosing
the side of breast, it is possible to view the time that has elapsed since
the last measurement by pressing the Setup Button (h) and immediately
releasing it.
3.2.10 Twin breastfeeding
If two babies are being fed, it is possible to mark the feedings of one of
the babies. To do so, when starting the measurement, double click the left
or right measurement button, either before or after feeding. After double
clicking the button, a colon sign (:) will appear beside the letter “L” or “R”
on the display of the monitor. The mark is cancelled by clicking the Result
Button (a) once. After downloading the data from the monitor to your
computer, the lines on the computer screen that refer the second twin
feeding (marked with a double click) will appear with a “twin (:)” sign.
Questions? Contact us at www.milksense.com or 1-844-411-MILK (6455)
- 18 -
4. Calibration
It is necessary to calibrate the MilkSense monitor to your individual
biology to improve the accuracy of the readings. Every woman is unique
according to the size and shape of her breasts, depth of alveoli, BMI, etc.
Please follow the instructions carefully. The calibration can be performed
either after automatic data collection or after manual entry, as described
below.
4.1 What calibration means
Using the MilkSense monitor on the breast prior to calibration is like having
an accurate gauge without scales. The initial results of the measurements
are not scaled properly before you perform the calibration. In order to
determine the settings specific to your biology, it is necessary to first
compare the measurements taken by the monitor with a verified method
that can indicate how much milk is expressed from the breast. With this
information, the system identifies your calibration factor and modifies the
settings accordingly. After proper calibration, the monitor only requires
measurement before and after breastfeeding in order to find the changes
in milk content of the breast.
4.2 Automatic calibration using the Bscale
The recommended way to collect the data required for calibration is by
using the Bscale, a USB weighing device for a baby in an infant carseat.
The main purpose of the Bscale is to weigh your baby before and after
breastfeeding, and thus provide verified input of the quantity of milk that
is consumed from the breast. The Bscale attaches to the handle of an
infant carseat (the combination is safe at home only) and connects to a
computer. It is recommended to repeat the procedure at least 3 times for
each breast to achieve calibration (total 6 feedings).
Before you begin, please visit www.milksense.com/downloads
to download and install the required MilkSense software.
Questions? Contact us at www.milksense.com or 1-844-411-MILK (6455)
- 19 -
4.2.1 Software installation
The Bscale device can only function when connected via the appropriate
USB cable to a computer that runs the MilkSuite software. The software is
available for download at www.milksense.com/downloads.
Please install the software first by running the setup program.
4.2.2 Attaching the Bscale to an infant carseat
An infant carseat with a handle (intended for securing babies in a vehicle)
can be used for weighing purposes. Place the carseat near the computer
where the MilkSuite software is installed. Attach the palm of the Bscale
device to the handle of the baby seat, and lock with the fixing band
(as shown in Fig. 10). In its correct position, the handle of the device
should rest in its socket pointing upwards.
Handle
Socket
Figure 10. Attaching the Bscale to an infant carseat handle
Questions? Contact us at www.milksense.com or 1-844-411-MILK (6455)
- 20 -
4.2.3 Weighing empty carseat
See tutorial video “Weighing empty carseat”.
Whenever you run the MilkSuite software, a baby file is automatically
opened and is ready to record every weight measurement. The weighing
of the empty infant carseat needs to be done only once for each baby file,
and needs to be repeated only if the weight of the baby seat is changed.
For first time use, the empty seat needs to be weighed.
! WARNING: Please ensure that the MilkSense monitor is NOT connected
to the computer during breast measurements.
! WARNING: Please ensure that the cable is not near your baby’s face or
neck, and is out of baby’s reach.
1. Run the MilkSuite software, connect the device to the computer using
the USB cable provided, and wait for the “RUN SCALE” button to
become active.
2. E
NSURE that the Bscale handle sits in its socket and is in an UPRIGHT
POSITION.
3. Click the “RUN SCALE” button. For the first 3 seconds, the zero
balancing process will take place and you should not touch the device
or its handle.
4. Change the mode selected in the upper part of the active window to
“Weigh empty seat”.
Questions? Contact us at www.milksense.com or 1-844-411-MILK (6455)
- 21 -
5. Hold the handle of the Bscale and raise the empty seat into the air so
the weight of the seat can be registered (the carseat should not touch
the ground during the measurement). Avoid any possible interference
to the weight measurement (for example, avoid leaning the seat against
your legs).The result will appear on the screen showing the weight of
the empty seat. You can then lower the infant carseat to the ground
and leave the handle in its cradle.
6. Click the “OK” button to accept the weight of the seat and record it in
the baby file.
4.2.4 Weighing baby
See tutorial video “Weighing baby”.
In order to record the growth progress of your baby, or when you want to
weigh your baby before breastfeeding, follow these instructions:
1. Place your baby in the infant carseat and fasten the harnesses.
2. Run the MilkSuite software, connect the device to the computer using
the USB cable provided, and wait for the “RUN SCALE” button to
become active.
3. E
NSURE that the Bscale handle sits in its socket and is in an UPRIGHT
POSITION.
4. Click the “RUN SCALE” button. For the first 3 seconds, the zero
balancing process will take place and you should not touch the device
or its handle.
5. Change the mode selected in the upper part of the active window to
“Weigh baby”.
Questions? Contact us at www.milksense.com or 1-844-411-MILK (6455)
- 22 -
6. Hold the handle of the Bscale and raise
the seat with your baby slightly above
ground level, so the weight of the seat
and baby together can be recorded (the
carseat should not touch the ground during
the measurement). Avoid any possible
interference to the weight measurement
(for example, avoid leaning the seat
against your legs). After the baby’s weight
is displayed (as soon as stability is sensed), you can lower the infant
carseat to the ground. Please return the handle to its socket.
7. Click the “OK” button in order to store the weight of the baby in the
baby file.
8. You can now take a reference measurement and then breastfeed your
baby.
TIP: We recommend that you weigh your baby with the least amount of
clothing and toys as possible, as different layers of clothing will affect
baby’s weight.
To view a graph of your baby’s weight gain over time, click the
“Baby’s Weight” tab.
Questions? Contact us at www.milksense.com or 1-844-411-MILK (6455)
- 23 -
4.2.5 Weighing baby after breastfeeding
After breastfeeding, your baby should be re-weighed to determine the
increase in weight due to the milk intake. Assuming your baby is ready to
be seated, follow the steps below:
1. Place your baby in the infant carseat and fasten the harnesses.
2. With the MilkSense monitor, perform the second measurement on your
breast (to collect data for calibration).
3. E
NSURE that the Bscale handle sits in its socket and is in an UPRIGHT
POSITION.
4. Click the “RUN SCALE” button. Wait until zero balancing is achieved
before touching the device.
5. Select the mode “Weigh baby for milk” (usually selected automatically).
6. Hold the handle of the Bscale and raise the seat with your baby slightly
above ground level, so the weight of the seat and baby together
can be recorded (the carseat should not touch the ground during
the measurement). Avoid any possible interference to the weight
measurement (for example, avoid leaning the seat against your legs).
The measurement of milk weight will appear after stability is obtained.
Finally, lower the infant carseat to the ground.
7. Click the “OK” button in order to store the milk weight in the baby file.
8. Remove your baby from the infant carseat.
TIP: We recommend that you weigh your baby with the least amount of
clothing and toys as possible, as different layers of clothing will affect
baby’s weight.
Questions? Contact us at www.milksense.com or 1-844-411-MILK (6455)
- 24 -
In order to view the expressed milk intake, please click on the
“Breastfeeding Data” tab.
After acquiring the results of 3 SUCCESSFUL BREASTFEEDING SESSIONS
ON EACH SIDE, follow the steps below in order to perform the calibration
itself:
Run the MilkSuite software, and connect the MilkSense monitor to the
computer using the supplied USB cable. Click “READ MILKSENSE”. Wait
for the download to complete. Then, click “CALIBRATE” (enabled after
3 breastfeeding sessions with consistent MilkSense and Bscale data).
A “ ” mark should appear beside the “CALIBRATE” button once calibration
has been achieved; otherwise, further combined measurements with
MilkSense and Bscale may be required to achieve reliable calibration
accuracy.
It is recommended to periodically re-calibrate your monitor. Each time
you choose to re-calibrate, the monitor will recalculate the calibration
factor to your breasts. This will ensure the most accurate readings and
results.
Questions? Contact us at www.milksense.com or 1-844-411-MILK (6455)
- 25 -
4.3 Manual calibration
In case you do not have access to a computer, you may calibrate your
monitor manually by using the Setup Button (h) on the MilkSense
monitor. You will need to know the amount of milk that was expressed/
consumed from the breast, preferably by weighing your baby before and
after feeding. Using a breastmilk pump is not recommended, since in
most cases, at the time chosen for pumping the breast is not in a normal
state, often suffering from engorgement or mechanical stress. Manual
calibration is only possible within one hour after the milk measurement
is acquired, and may be successful only if the amount of milk expressed
is sufficient (1.7oz / 50ml or more) and accurately verified. The manual
calibration calculates only one calibration factor for both sides, which is
suitable in most cases (accuracy may be impaired if the two breasts are
not similar; only automatic calibration handles all cases).
Follow these steps for manual calibration:
1. Press and hold the Setup Button (h) for 4 seconds to enter the setup/
calibration mode, and keep the button pressed. If after 4 seconds an
error message appears, it indicates there is no appropriate value of
measurement to refer to.
In this mode, the calibration factors for the two breast sides can be
modified as one. The change is effective for all subsequent measurements
until you modify the setup again.
2. The last feeding amount that was measured appears on the display
and you can change this value to reach the amount you consider to be
correct. Changing the number (that should correspond to the volume of
milk consumed during the last feeding) is done in steps by pressing on
the Left (-) or Right (+) Buttons while still pressing the Setup Button (h).
In case a change in units is desired (change between fluid ounce “oz” to
milliliter “ml”, or vice versa) then press the Capacity Button (l) for one
second while keeping the Setup Button (h) pressed.
3. When the Setup Button (h) is released, the calibration factor is updated.
Release the button when the correct amount of fed milk appears on the
Questions? Contact us at www.milksense.com or 1-844-411-MILK (6455)
- 26 -
display. In order to abort the update, return the monitor to its cradle
before releasing the Setup Button (otherwise, the calibration can be
corrected by repeating steps 1-3).
fter successful calibration the warning sign (f) disappears, meaning you
A
can read the results of milk quantities in true units of ounces/ milliliters.
5. Using the MilkSuite computer software
Please visit our website www.milksense.com/downloads to download
the MilkSuite software. The software allows a full communication with
MilkSense and Bscale, enables you to see the history of all your feedings,
and the progression of your baby’s growth.
All operations with the software are automatically saved, therefore there
is no save button. All measurements are stored in a baby file (default file
is first baby), which you can change by clicking the <File> and <New>
buttons on the upper menu bar. It is recommended to keep a backup copy
of your baby’s file.
Next, enter your child’s name and date of birth in the appropriate boxes in
the upper right corner of the homepage.
5.1 Changing units from ml to oz
In order to change the units of the MilkSense monitor from milliliter “ml”
to fluid ounce “oz”, connect the monitor to the computer using the USB
cable provided, and choose “units: oz/lb” on the top menu bar, and press
“READ MILKSENSE”. MilkSense will then operate with ounce units. The
action can be reversed in a similar manner.
5.2 Explanation of tables and graphs
5.2.1 Breastfeeding data
This table presents detailed information on every feeding that has been
measured using the MilkSense monitor.
The “Date” column displays the date of each feeding. The “Time” column
specifies the time when the feeding started. The “Duration” column
displays the feeding duration in minutes, based on the times of the
Questions? Contact us at www.milksense.com or 1-844-411-MILK (6455)
- 27 -
measurements with MilkSense. The “Capacity” column indicates, in a
percentage, how much the breast was filled with milk before the relevant
feeding. The“Milk Fed” column displays the amount of milk consumed in
the units chosen, either milliliters or ounces. The Total value refers to the
sum of measured feeding in one day. The “Notes” column will indicate
when a feeding was marked for a twin feeding and which feedings were
also weighed using the Bscale.
5.2.2 Consumption
This chart will show you the average amount of milk consumed per feeding
on a particular day. You can choose the time period that you want to learn
more about by clicking in the date boxes on the chart.
5.2.3 Last 24 hours
This chart will display for you the actual amounts of milk that your baby
consumed throughout the past twenty-four hours.
5.2.4 Productivity
This chart will provide you with a clear comparison of how your right
breast produces milk compared with your left breast. This is not a daily
value but rather an average taken from all readings with the MilkSense
monitor. This is displayed as a percentage, and takes all feedings into
consideration.
5.2.5 Capacity
This chart displays the average potential amount of milk available to your
baby, and is displayed in three hour increments for the past twenty-four
hours.
Please note that 0% means that there is an absence of data and not
absence of breastfeeding capability. The more readings taken with
MilkSense at different times of the day will help establish a more accurate
calculation of your milk potential.
5.2.6 Baby’s weight
This graph will show you your child’s growth over time. The weights will
be displayed in units of pounds or grams, depending on your choice of
units. The points on the graph indicate the average result from each day.
Questions? Contact us at www.milksense.com or 1-844-411-MILK (6455)
- 28 -
5.3 Advanced options
5.3.1 Enter verified milk values
Here you can enter the results from weighing your baby using a third
party high quality baby scale that cannot connect with the software (a
scale other than the Bscale). You can find the weight of the milk that was
fed by weighing your baby before and after breastfeeding. In addition, you
should measure with MilkSense on the breast before and after feeding. If
the scale is indeed accurate, then it is recommended to fill in the results
as follows:
1. Connect MilkSense to your computer using the USB cable provided and
download the latest feeding data from your monitor.
2. Click on <TOOLS>, then click on <Enter verified milk values>.
3. Choose the time of the MilkSense measurement from the MilkSense
data list.
4. Type the verified milk value and press <Update>.
The information is now stored in the baby file and will be used to decide
on your best calibration settings when activating the <CALIBRATE> button
on the homepage.
5.3.2 Remove false records
If you believe that a false measurement with MilkSense or weight with
the Bscale has been recorded, then there is the possibility to remove these
results. The MilkSense memory will not be modified; however, once you
download the data to a specific baby file you can remove the false records.
The steps are as follows:
1. Find the time of measurement and the side of breast.
2. Click on <TOOLS>, then click on <Remove false records>.
3. Search the record you wish to remove, and fill in its number shown in
the first column, then press <delete>.
Questions? Contact us at www.milksense.com or 1-844-411-MILK (6455)
- 29 -
5.3.3 Import data from old file
In case you have replaced your MilkSense device, you will need to start
up a new baby file in order to be able to transfer data. In order to view
data from your previous file and merge the information from the two files,
follow these steps:
1. After you open the new baby file, click on <TOOLS>, then choose
<Import data from old file>.
2. Choose the old file and open it.
Once you have followed these steps, the current baby file has merged
with the previous baby file, and the software is able to communicate with
the new MilkSense monitor.
6. Troubleshooting
6.1 MilkSense Monitor
Problem
Cause
Correction
Measurement countdown
aborts in the middle with
error message.
Skin is not wet, or no
contact with electrodes.
Wet the electrodes by
filling the cradle with the
supplied fluid and placing
the monitor in the cradle
for one minute. Press the
monitor on the breast until
all four electrodes are in
full contact with the skin.
Measurement countdown
aborts in the middle with
reset.
Battery is low. A low
battery mark (j ) should
appear as well.
Replace with 3 new AAA
Alkaline batteries.
The result of breastfeeding
quantity seems wrong.
Possible causes:
1) User did not follow the
instructions correctly.
First try to perform correct
calibration and to follow
instructions as accurately
as possible. If results
2) Calibration is not
are not satisfactory, try
successful due to location
changing the electrode
of glandular tissue being
location on your breast
too far from the electrodes. according to the place you
feel fullest when you are
late in breastfeeding.
Questions? Contact us at www.milksense.com or 1-844-411-MILK (6455)
- 30 -
Problem
Cause
Correction
Unsteady results in
repeated measurements.
Possible causes:
1) Unsteady measurement
conditions (indicated with
"g" sign on the display).
1) Measure with correct
posture of the body, at
the exact same point on
the breast each time. Use
the monitor in relaxed
conditions.
2) Milk ducts in the
breast are filled during
measurement.
3) Local distortions in the
breast, just below the
electrodes.
2) Avoid measuring if the
breast drips. Pay attention
to your emotions and state
of mind that influence
your breast activity and
that cause milk ducts to be
filled.
3) As a last possibility,
consider changing the
location of electrodes 0.39
inches (1 cm) to the right
or left and stick to it in all
measurements.
The MilkSense monitor
does not communicate
with the computer with
the USB cable connected.
Possible causes:
1) There are no batteries in
the MilkSense monitor.
1) Insert 3 new AAA
Alkaline batteries into the
MilkSense monitor.
2) General USB failure.
2) Check the USB cable
by replacing with another
micro-USB cable.
The monitor does not react
to any buttons pressed.
Monitor is locked when
held in the cradle or
connected via USB cable.
Remove the USB cable and
take the monitor out of its
cradle in order to operate.
Display light is not turned
on when taking the
monitor out of the cradle.
The monitor is resting in
the wrong orientation in
the cradle.
Place the monitor in the
cradle so that the display is
in line with the MilkSense
logo side of the cradle.
Questions? Contact us at www.milksense.com or 1-844-411-MILK (6455)
- 31 -
6.2 Bscale
Problem
Cause
Correction
No reading (weight result
does not appear).
1) In “Baby Weighing”
mode, the weight must be
more than 4.4lbs / 2kg.
Hold the Bscale slightly
above the ground. Avoid
any interference to the
weight measurement and
hold steady for several
seconds.
2) Readings require holding
Bscale steady.
Scale window is not
responsive.
The scale passed the time
limit for the balance to be
valid.
Click “Cancel” or close
the window, and start
it again by clicking the
“RUN SCALE” button.
Weighing results not
repeatable.
1) Problem in zero
balancing at start of the
run.
1) Validate that during zero
balancing the handle rests
in its cradle.
2) Device is not in line with
the center of mass.
2) Attach the device to the
center of the baby seat
handle.
3) Excessive twist or load
moved the sensor out of
the center.
Communication fault.
USB cable disconnected or
not fully inserted.
3) Check that the sensor
bar is in correct position
or try to move the arm to
center.
Disconnect and reconnect
the USB cable;.
Questions? Contact us at www.milksense.com or 1-844-411-MILK (6455)
- 32 -
7. Warranty
1-Year limited warranty
This is a single user product. Use by more than one person may present a
health risk and performance questions and voids the warranty.
This product is warranted by WeCare, Inc. to the original retail purchaser
to be free from defects in material and workmanship for the period of
one (1) year from the date of purchase. In the event of a defect, WeCare
will repair or, at WeCare’s option, replace this product, without charge
for such replacement, parts or labor. Purchaser shall bear all expense for
returning this product to WeCare. This warranty does not apply to any
product used commercially or which has been subjected to misuse, abuse
or alteration.
ANY AND ALL IMPLIED WARRANTIES, INCLUDING THE WARRANTY OF
MERCHANTABILITY, ARE LIMITED TO A DURATION OF 90 DAYS FROM
DATE OF PURCHASE. SOME STATES DO NOT ALLOW LIMITATIONS ON
HOW LONG AN IMPLIED WARRANTY LASTS, SO THE ABOVE LIMITATIONS
MAY NOT APPLY TO YOU.
THIS WARRANTY GIVES YOU SPECIFIC LEGAL RIGHTS AND YOU MAY
ALSO HAVE OTHER RIGHTS WHICH VARY FROM STATE TO STATE.
Before you make a claim under this warranty, it may save time and expense
to call WeCare Customer Care (toll free) at 1-844-411-MILK (6455). You
may also call this number for additional information concerning this
warranty. If you wish to make a claim under this warranty, you must return
this product to WeCare with a return authorization number received from
WeCare Customer Care, prepaid, together with your dated bill of sale
or other proof of purchase and a brief statement of the problem to the
following address:
WeCare, Inc. – ATTENTION: Returns & Service
2450 Cohen Street, Montreal, Quebec, H4R 2N6, Canada
Call first for an authorization number. Returns are NOT
accepted without an authorization number.
Questions? Contact us at www.milksense.com or 1-844-411-MILK (6455)
- 33 -
8. Parts List
8.1 Replaceable parts
MilkSense Monitor: 120610
Bscale: 082510
MilkSense Cradle: 120611
MilkSense Sponges: 120612
Electrode Solution 150ml: 011144
Micro-USB Cable: 111377
8.2 Ordering parts
In the US and
you need, you
1-844-411-MILK
distributor. Visit
distributors.
Canada, if your retailer does not carry the parts
can place a credit card order by phone by calling
(6455). In other countries, please contact your local
www.milksense.com for a list of worldwide MilkSense
8.3 Changing the sponge in the cradle
1. To change a sponge, remove all 5 screws from the bottom of the cradle.
2. Gently separate the 2 pieces that form the cradle (separate blue upper
portion from white bottom portion).
3. Remove the old sponge and replace it with a new one.
4. Put both parts of the cradle back together, and replace the 5 screws.
Questions? Contact us at www.milksense.com or 1-844-411-MILK (6455)
- 34 -
9. Technical Data
9.1 MilkSense - Model MS001-1
Package contents: MilkSense monitor and cradle, Bscale, 2x bottles
of electrode solution, 2x replacement sponges, micro-USB Cable, user
manual(s).
Technical description: The MilkSense monitor measures changes in
the milk alveoli in order to determine the amount of milk the baby
receives from the breast, by tracing changes in tetra-wire capacitance
and resistance of the tissue before and after breastfeeding. The monitor
transmits 40 KHz and 20 KHz signals to the breast tissue at an electric
current of about 0.5 mA and measures the response signals via electrodes
contact over the skin. The measurement is sensitive to the average
volume of milk alveoli in the breast.
Power supply: 3 Alkaline AAA batteries.
Rated supply voltage: 4.5 Vdc - Internally powered equipment.
Display of milk intake by baby: 0 to 19.9 oz. (0 to 999 ml).
Display of breastmilk content: 0 to 99.9 oz. (0 to 1999 ml).
Battery life: Approximately 3 months.
Service: Electrode solution should be poured onto sponges every
2-3 days. Sponges should be replaced by the user every 3 months.
Sponges and electrode solution are available at www.milksense.com or
1-844-411-MILK (6455).
Memory size: Up to 1500 measurements (exceeding this number
overrides older data).
Operating temperature/humidity: 59°F to 86°F (+15°C to +30°C),
30% to 65% RH.
Storage temperature/humidity: 39.2°F to 104°F (+4°C to +40°C),
10% to 95% RH.
Weight: Approximately 1.1 lbs (0.5 kg).
External dimensions: 5.91 x 3.94 x 3.53 in (15 x 10 x 9 cm).
Questions? Contact us at www.milksense.com or 1-844-411-MILK (6455)
- 35 -
Method of cleaning: Clean plastic parts with alcohol and clean
the electrodes with boiling water. The electrode solution supports
sterilization of the parts during use.
Ingredients of the electrode solution: Water 79.45%, Ethanol 20%,
Sodium Chloride 0.5%, Potassium Sorbate 0.05%.
= Applied Part Type BF
= Avoid disposing to general waste (environment protection):
Electrodes and metallic parts are made of stainless steel that
should be recycled after use in order to protect the environment.
9.2 Bscale model BS001-1
Technical Description: USB operated hanging scale, designed to weigh
baby before and after breastfeeding by lifting the baby in an infant
carseat.
Maximum load: 44 lbs (20 kg).
Rated supply voltage: 5 Vdc sourced from USB cable.
Operating Temperature/Humidity: 59°F to 86°F (+15°C to +30°C),
30% to 65% RH.
Storage Temperature/Humidity: 39.2°F to 104°F (+4°C to +40°C),
10% to 95% RH.
Weight: Approximately 0.2 lbs (0.1 kg).
External Dimensions: 7.9 x 5.9 x 2.8 in (20 x 15 x 7 cm).
= Applied part type BF
= Avoid disposing to general waste (environment protection):
metallic parts should be recycled after use in order to protect the
environment.
Questions? Contact us at www.milksense.com or 1-844-411-MILK (6455)
- 36 -
Contact Us:
WeCare™ Inc.
2450 Cohen Street
Montreal, Quebec
H4R 2N6 Canada
1-844-411-MILK (6455)
www.milksense.com
MS001-E04-1501