1
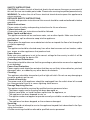
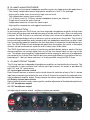
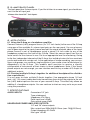
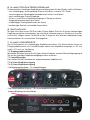
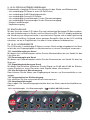
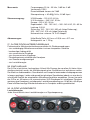
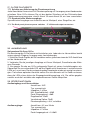
Q-Series
Q-AMP – Q-DI – Q-Pre
Operating Manual
english
SAFETY INSTRUCTIONS
CAUTION: To reduce the risk of electrical shock, do not remove the cover or rear panel of
this unit. No user serviceable parts inside. Please refer servicing to qualified personnel only.
WARNING: To reduce the risk of fire or electrical shock do not expose this appliance to
rain or moisture.
DETAILED SAFETY INSTRUCTIONS
All safety and operation instructions of this manual should be read and adhered to before
operation.
Retain Instructions:
Please retain all safety and operating instructions for future reference.
Follow instructions:
All operation and user instructions should be followed.
Water, liquid and Moisture:
The appliance should not be used near water, rain or other liquids. Make sure that no liquid can leak, spill or otherwise seep into the appliance.
Ventilation:
Please place the appliance so no obstacles interfere or impede the flow of air through the
ventilation openings.
Heat:
The appliance should be situated away from other heat sources such as heaters, radiators, ovens, or other appliances that produce heat.
Power Source:
Make sure your appliance is set to the correct voltage for the country in which it will be
use before switching the device ON.
Grounding and Polarization:
Precautions should be taken so that the grounding or polarization means of an appliance
is not defeated.
Power-Cord Protection:
Power supply cords should be routed so that they are not likely to be walked on, pinched,
damaged, worn, or rubbed by any other device or obstacle.
Cleaning:
The appliance should be cleaned only with a light soft cloth. Do not use any damaging or
corrosive products on the unit.
Periods of inactivity:
The power cord of the appliance should be unplugged from the outlet when left unused
for a long period of time or in case a lightning storm occurs.
Damage Requiring Service:
The appliance should be serviced by qualified service personnel when:
- The power supply cord or the plug has been damaged; or
- Objects have fallen, or liquid has been spilled into the appliance; or
- The appliance has been exposed to rain; or
- The appliance does not appear to operate normally or exhibits a marked change in performance; or
- The appliance has been dropped, or the enclosure damaged.
Servicing:
The user should not attempt to service the appliance beyond that is described in the Operating Instructions.
All other servicing should be referred to qualified service personnel.
FOREWORD
Dear Customer,
Thank you very much for expressing your confidence in SM Pro Audio products by purchasing this unit. The Q-Series have been designed to be used as standard tools for
home/pro studios, P.A. rental companies, Schools and in many other situations where
audio products would be used. With much experience in the audio industry over a long
period of time, and along with valuable suggestions from our customers, our engineers
have developed a product series we know you will be satisfied with. We guarantee you
uncompromising quality as well as excellent technical and audio properties at an extremely affordable price.
Regards,
SM ProAudio
INSTALLATION
Your SM ProAudio Q-Series unit was carefully packed in the factory and the packaging
was designed to protect the unit from rough handling. Nevertheless, we recommend that
you carefully examine the packaging and its contents for any signs of physical damage,
which may have occurred in transit.
If the unit is damaged, please do not return it to us, but notify your dealer and the shipping
company immediately, otherwise claims for damage or replacement may not be granted.
Shipping claims must be made by the consignee.
Rack Mounting
The SM ProAudio Q-Series unit fits into HALF a standard 19" rack unit of space. Be sure
that there is enough air space around the unit for cooling. As to avoid overheating, please
do not place the units on high temperature devices such as power amplifiers.
Mains voltage
The units come with a 17V AC power supply adaptor. Before you connect your unit to the
mains, please make sure that your local voltage matches the voltage required by the unit!
1. THE DESIGN CONCEPT
High quality components and design
The philosophy behind SM Pro Audio products guarantees a no-compromise circuit design and employs the best choice of components.
2. Q-AMP Main Features
Professional, multi-purpose headphone amplifier system for stage and studio applications.
· Four totally independent stereo high-power amplifiers in Half 1 RU package
· High quality audio even at extremely high volume levels
· Two independent stereo input sections
· 1/4” (6.5mm) and 1/8” (3.5mm) stereo headphone outputs per channel
· Output level control for each channel
· Independent selection of input for each output
· High-quality components and rugged constructionˇ
3. INTRODUCTION
In purchasing the new SM Q-Amp, you have acquired a headphone amplifier of high class
that meets all the demands and requirements of studio and live work. Due to its extensive
functions the SM Q-Amp is an extremely efficient and universal headphone amplifier. It
has been designed above all as a reference unit for musicians in the studio. The unit features switching possibilities and a sound quality few headphone amplifiers can offer. Apart
from its extremely powerful amplifiers the unit also offers an ingenious line distribution system. The SM HP4Value finds widespread application throughout the world, in home/pro
studios, sound reinforcement systems and in many other audio fields.
The SM Q-Amp features a variety of monitoring and distribution options: each of the four
stereo amplifiers can accept signal from any of the two stereo inputs on the rear of the
unit. This allows two completely independent monitor signals to each set of headphones
connected to the Q-Amp! Ever had the drummer wanting a different mix feed from the keyboard player? I bet you have and now it is finally possible using the SM Q-Amp.
4. Q-Amp FRONT panel
The Q-Amp has four independent headphone amplifiers or line distribution channels. The
unit provides 2 rotary controls and 2 stereo jacks per channel. An output is provided for
both 1/8” and 1/4” connections.
4.1 Input signal selector switch
Each channel features a selector switch which allows for selection of any of the 2 x stereo
input source signals connected to the rear of the Q-Amp to be routed to the selected channels headphone amplifier output. Simply choose the source signal desired for that channel.
4.2 Rotary volume pot controls
Each channel features a rotary volume pot for variable adjustment of the desired output level.
4.3 1/4’’ headphone output
4.4 1/8’’ headphone output
4.1 Input signal selector switch 4.2 Rotary volume pot controls
4.3 1/4’’ headphone output 4.4 1/8’’ headphone output
5. Q-Amp Back panel
The back panel has 2 stereo inputs. If you like to listen to a mono signal, you should connect it to the left input jack.
2 Stereo Line Level 1/4” Jack inputs
6. APPLICATION
6.1 Using the Q-Amp as a headphone amplifier
Connect a stereo (L&R) program source (2 x 1/4” Inch Jacks) to the rear of the Q-Amp
using one of the available 2 x stereo input pairs on the rear panel. You can also connect a Mono signal to the input channel and split the signal into both sides of the headphone.Connect a set of headphones using a stereo 1/4 Inch cable to any of the
headphone outputs on the front of the Q-Amp. Select the source signal from the selector switch for the channel in use. Set to an appropriate level for monitoring. Owing
to the four independent channels of the Q-Amp, four individual mixes for four musicians
can be achieved with a single unit. In the application of studio recording, you can configure sub-groups, aux sends or single outputs of your audio mixer to feed signal independently to the Q-Amp. This enables each musician to receive a specific
configuration of instruments of their choice in there headphones. Note: If four headphone outputs are not enough, you can interface and link any number of Q-Amp’s for
additional outputs.
6.2 Chaining multiple Q-Amp’s together for additional headphone/line distribution requirements.
It is very easy to chain multiple Q-Amp’s together. Use appropriate stereo 1/4 Inch
jack > to Y (2 x mono) cables and make connections from one of the outputs to the stereo (L&R) audio inputs on the rear of your second Q-Amp. This effectively allows an
addition 3 x headphone outputs. You can continue to chain as many units as you want
using this procedure.
7. SPECIFICATIONS
AUDIO INPUTS:
Connectors 1/4" jack
Type unbalanced
Impedance 47k Ohms
Peak input level +25dB
Gain control range 40dB
HEADPHONE POWER AMPLIFIER OUTPUTS:
1/4” and 1/8” stereo outputs
Max. output level 300mW@32 Ohms (max 1W@32 Ohms)
Output impedance 22 Ohms
Max. gain +20 dB
DIST, FREQ, S/N RATIO & CROSSTALK:
Frequency response 20Hz~20kHz, 0dB~-2B
Distortion 0.02%
S/N Ratio better than 80dB
Crosstalk rejection >72dB@1kHz;-20dBinput
POWER SUPPLY:
Mains voltages USA/Canada ~ 120 V AC, 60 Hz
U.K./Australia ~ 240 V AC, 50 Hz
Europe ~ 230 V AC, 50 Hz
General export model ~ 100-120 V AC, ~ 200-240 V AC, 50-60 Hz
Power consumption 6.5VA
Fuse 100-120 V AC: 630 mA (slow-blow)
200-240 V AC: 315 mA (slow-blow)
Mains connection Using External Power Supply 16Vac
PHYSICAL:
Dimension 1 3/4" (44.5 mm) *8" (230.6 mm) * 8 1/2" (217 mm)
Net weight approx. 3.15 kg
8. Q-DI Main Features
Professional, multi-purpose DI Box/Line mixer for stage and studio applications.
· Four totally independent DI Box units in 1/2 RU package
· Independent 20dB PAD switch per channel
· Independent earth (Ground) lift switch per channel
· Independent rotary volume control per channel for line mixer output
· Independent rotary pan control per channel for line mixer output
· Master Volume
· Headphone output
9. INTRODUCTION
In purchasing the new Q-DI, you have acquired a multi-channel DI Box/line mixer of high
class that meets all the demands and requirements of studio and live work. Due to its extensive functions the Q-DI is an extremely efficient and universal piece of equipment. The
unit features high quality multi-channel unbalanced to balanced line conversion, in addition to providing an extremely useful built in line mixer all in a single unit rack-mount chassis. The Q-DI finds widespread application throughout the world, in home/pro studios,
sound reinforcement systems and in many other audio fields.
The Q-DI features 4 independent DI Boxes! That's right! 4 independent DI (direct injection)
unbalanced to balanced line converters. This is fantastic news for many uses in the studio
or onthe road in live PA applications.
In addition, the Q-DI also functions as multi-channel stereo line mixer. This is an ingeniousfeature which will many musicians will find incredibly useful in live situations. Just think!
You can plug all your keyboards, samplers & modules into just one rack unit on stage and
supply independent XLR balanced outputs to the stage box for the front of house engineer. AND set your own independent mix for stage monitoring..cool! In Addition you have
your own Headphone output on the unit.
10. Q-DI front panel
The Q-DI has 4 independent direct injection unbalanced to balanced line converters in additionto a built in 4 channel line mixer. The unit provides 2 rotary controls (Volume & Pan)
and 2 switches per channel (Earth lift & 20dB PAD).
10.1 Rotary volume controls for each channel to line mixer stereo output
Use these variable controls to set the level of each channel signal level sent to the stereo
master output section.
10.2 Rotary pan controls for each channel to line mixer stereo output
Use these variable controls to set the pan of each channel signal level sent to the stereo
master output section
10.3 Four independent 20 dB/40 dB PAD switches
Use these switches to PAD each input channel signal level by 20dB or 40dB. Use this only
if you have an extremely high input signal strength.
10.4 Four independent earth lift switches
Use these switches to lift the earth in the input signal of the current channel.
10.5 Unbalanced (TS) audio input jack
Connect your unbalanced line signals here.
10.6 Master volume control
This sets the overall output volume of the stereo mixer and the headphone amp.
10.1 Rotary volume controls 10.2 Rotary pan controls 10.3 20 dB/40 dB PAD switches
10.4 Earth lift switches 10.5 Unbalanced audio input 10.6 Master volume control
11. Q-DI Back panel
11.1 Balanced XLR outputs
Balanced signal output to connect to a mixer, stage box, etc.
11.2 Unbalanced RCA MIX output
Your own independent mix for monitoring.
11.1 Balanced XLR outputs 11.2 Unbalanced RCA MIX output
12. APPLICATION
12.1 Using the SM DI4V as a DI Box (direct injection unit)
Connect the signal you would like to convert from unbalanced to balanced to the SM
DI4V via a 1/4 inch unbalanced jack to one of the channel inputs on the front panel of the
unit. Connect an XLR balanced cable to the corresponding channel output on the rear of
the SM DI4V and connect to your chosen destination.
If the input signal strength is too "hot" (high) you can depress the 20dB PAD switch to adjust to a ore appropriate level.
If there is an earth loop hum you can remove by depressing the earth lift switch.
12.2 Using the SM DI4V as a line mixer
You can mix volume & pan of all input signals to a single stereo pair of RCA connections
on the rear of the SM DI4V. This enables use of the unit as a fully functional line mixer.
This can be very handy for many applications both live and in the studio. Just connect the
RCA stereo master outputs on the rear to your chosen destination (eg. Monitor amplifier)
and adjust the individual volume and pan controls for each individual channel on the front
of the SM DI4V to suit your needs.
A master volume control is provided on the front panel in addition to the individual controls.
Adjust this as necessary. A Headphone output is also provided on the front of the unit.
13. SPECIFICATIONS
AUDIO INPUTS:
Connectors 1/4" jack
Type TRS balanced
Impedance 47k Ohms
Min Sensitivity -20dB
Peak input level +16dB
STEREO LINE MIXER OUTPUTS:
Connectors RCAPhono
Impedance 600Ohms
Max. output level +2dB (peak level +18.5 dB)
XLR BALANCED OUTPUTS:
Connectors XLR
Type balanced
Min. output impedance 600Ohms
Max. output level 0dB (peak level +18.5dB)
DIST, FREQ, S/N RATIO & CROSSTALK:
Frequency response 20Hz~20kHz, 0dB~-2B
Distortion 0.02%
S/N Ratio better than 74dB
Crosstalk rejection >80dB@1kHz;-20dB input
FUNCTION CONTROLS: Volume per channel variable
Pan per channel variable
POWER SUPPLY:
Mains voltages USA/Canada ~ 120 V AC, 60 Hz
U.K./Australia ~ 240 V AC, 50 Hz
Europe ~ 230 V AC, 50 Hz
General export model ~ 100-120 V AC, ~ 200-240 V AC, 50-60 Hz
Power consumption 11.5VA
Fuse 100-120 V AC: 630 mA (slow-blow)
200-220 V AC: 315 mA (slow-blow)
Mains connection Standard IEC receptacle
PHYSICAL:
Dimension 1 3/4" (44.5 mm) * 8" (230.6 mm) * 8 1/2" (217 mm)
Net weight approx. 1.75 kg
14. Q-Pre Main Features
Professional, multi-purpose multi-channel pre-amplifier system for studio applications
· Four totally independent pre-amplifiers in half 19” rack package
· High quality audio
· 4 x balanced inputs
· 4 x unbalanced outputs
· Phantom On/Off per 2 channels
· 4 x peak Light indicators
· Individual gain control on each channel
15. INTRODUCTION
In purchasing the new Q-Pre, you have acquired a multi-channel pre-amplifier of high
class that meets many of the demands of the home/pro studio.
The market size for digital audio interfaces and computer based digital editing has increased in a massive way. With systems available at very low prices, more and more
users are utilizing this technology. One of the main problems with many of these systems
is the input stage only consisting of unbalanced line inputs or very low (or no mic pre) gain
structure for the balanced input stage and the unavailability of Phantom power.
The Q-Pre comes to the rescue with 4 channels of balanced input, with a full range of gain
control from -20dB to +40dB and Phantom power for every channel. This half rack unit
can now solve many of the connectivity issues which are raised in a large range of situations, whether in the Studio, home, club installation or other live sound applications.
16. Q-PRE front panel
The Q-Pre has four independent pre-amplifiers channels. The unit provides variable rotary
gain controls, phantom power and peak indicator lights per channel.
The front panel rotary gain controls
Each channel features a rotary gain control for variable adjustment of the desired pre-amplifier level.
Rotary gain controls
17. Q-PRE Back panel
17.1 The Back panel phantom power switches
Each channel features a phantom power supply for enabling the supply of 48v through the
XLR input connector to power condenser microphones. Each Switch controls 2 channlels.
17.2 Balanced output connectors
Balanced signal outputs to connect to a mixer, stage box, etc.
17.1 The Back panel phantom power switches 17.2 Balanced output connectors
18. APPLICATION
Using the Q-Pre
It could not be simpler to use and operate the Q-Pre. Each of the four pre-amplifier channels has its own input and output and variable gain control. Three steps:
1. Simply connect a signal for processing to one of the XLR balanced inputs on the front of
the Q-Pre.
2. Make a connection from the corresponding channel output on the front of the Q-Pre to
your desired destination (Mixer, recorder, etc).
3. Adjust the variable gain control to the desired pre-amplified level. To ensure sure you
do not over pre-amplify your signal a peak clip indicator light has been provided on the
front panel of the Q-Pre for each channel. When illuminated, this light indicates that the
preamplifier is overloaded and that distortion will occur. Please turn down the variable
gain control for the currently selected channel until the peak clip light is no longer illuminated. Always trust your ears, the Peak LED is after the gain control so you could actually
distort the input with a very high level.
19. SPECIFICATIONS
AUDIO INPUTS & PRE AMPS:
Connectors XLR
Type balanced
Impedance 2k Ohms
Min Sensitivity -40dB
Peak input level +5dB
Gain control range 50dB
Peak amplification 74dB
Phantom power +48V, switchable
AUDIO OUTPUTS:
Connectors 1/4" jack
Type TRS balanced
Impedance -10dB 47K
Peak output level +18.5dB
DIST, FREQ, S/N RATIO & CROSSTALK:
Frequency response 20Hz~20kHz, 0dB~-2B
Distortion 0.02%
S/N Ratio better than 80dB
Crosstalk rejection >70dB@1kHz;-20dBinput
POWER SUPPLY:
Mains voltages USA/Canada ~ 120 V AC, 60 Hz
U.K./Australia ~ 240 V AC, 50 Hz
Europe ~ 230 V AC, 50 Hz
General export model ~ 100-120 V AC, ~ 200-240 V AC, 50-60 Hz
Power consumption 8.5VA
Fuse 100-120 V AC: 630 mA (slow-blow)
200-240 V AC: 315 mA (slow-blow)
Mains connection External power supply connector
PHYSICAL:
Dimension 1 3/4" (44.5 mm) *8" (230.6 mm) * 8 1/2" (217 mm)
Net weight approx. 3.4 kg
SM ProAudio is constantly striving to maintain the highest professional standards. As a
result of these efforts, modifications may be made from time to time to existing products
without prior notice. Specifications and appearance may differ from those listed or shown.
7. WARRANTY CARD
To be protected by this warranty, the buyer must complete and return the enclosed warranty card (signed/stamped by retail dealer) within 14 days of the date of purchase to SM
Pro Audio (see address below 3). Failure to return the card in due time (date as per postmark) will void any extended warranty claims.
7.1 WARRANTY
1. SM Pro Audio warrants the mechanical and electronic components of this product to
be free of defects in material and workmanship for a period of one (3) years from the original date of purchase, in accordance with the warranty regulations described below. If
any defects occur within the specified warranty period that are not caused by normal wear
or inappropriate use, SM Pro Audio shall, at its sole discretion, either repair or replace the
product.
2. If the warranty claim proves to be justified, the product will be returned freight prepaid
by SM Pro Audio within Australia. Outside of Australia, the product will be returned at the
buyer's expense.
3. Warranty claims other than those indicated above are expressly excluded.
7.2 RETURN AUTHORIZATION NUMBER
1. To obtain warranty service, the buyer must call SM Pro Audio during normal business
hours BEFORE returning the product. Please use the following telephone numbers:
Australia and Asia: Tel.: +61 3 9555 8081
North America: Tel.: 1 800 343 0353
Europe: Tel.: +49 2504 888 878 0
All inquiries must be accompanied by a description of the problem. SM Pro Audio will
then issue a return authorization number or by email to [email protected]
2. The product must be returned in its original shipping carton, together with the return authorization number, to the following addresses:
Australia and Asia:
SM Pro Audio
Service Department
W25, 26-28 Roberna St
Moorabbin
Australia
North America:
Kaysound
5 Coton Lane, Champlain,
New York, 12919
USA
Europe:
SM Pro Audio Europe / tt audio GmbH
Alfred-Krupp-Str. 5
48291 Telgte
Germany
7.3 WARRANTY REGULATIONS
1. Warranty services will be furnished only if the product is accompanied by an original retail
dealer's invoice. Any product deemed eligible for repair or replacement by SM Pro Audio
under the terms of this warranty will be repaired or replaced in the best possible manner.
2. If the product needs to be modified or adapted in order to comply with applicable technical or safety standards on a national or local level, in any country which is not the country for which the product was originally developed and manufactured, this
modification/adaptation shall not be considered a defect in materials or workmanship.
The warranty does not cover any such modification/adaptation, irrespective of whether it
was carried out properly or not. Under the terms of this warranty, SM Pro Audio shall not
be held responsible for any cost resulting from such a modification/adaptation.
3. Free inspections, maintenance/repair work and replacement of parts are expressly excluded from this warranty, in particular if caused by inappropriate use. Likewise, the warranty does not cover defects of expendable parts caused by normal wear of the product.
Expendable parts are typically pots, potentiometers, switches and similar components.
4. Damages/defects caused by the following conditions are not covered by this warranty:Misuse, neglect or failure to operate the unit in compliance with the instructions given in
the user or service manuals.
- Connection or operation of the unit in any way that does not comply with the technical
or safety regulations applicable in the country where the product is used.
- Damages/defects that are caused by any other condition beyond the control of SM
Pro Audio.
5. Any repair carried out by unauthorized personnel will void the warranty.
6. Products which do not meet the terms of this warranty will be repaired exclusively at
the buyer's expense. SM Pro Audio will inform the buyer of any such circumstance. If the
buyer fails to submit a written repair order within 4 weeks after notification, SM Pro Audio
will return the unit C.O.D. with a separate invoice for freight and packing. Such cost will
also be invoiced separately when the buyer has sent in a written repair order.
7.4 CLAIM FOR DAMAGES
Failure of SM Pro Audio to provide proper warranty service shall not entitle the buyer to
claim (consequential) damages. In no event shall the liability of SM Pro Audio exceed
the invoiced value of the product.
7.5 OTHER WARRANTY RIGHTS
This warranty does not exclude or limit the buyer's statutory rights provided by national
law, in particular, any such rights against the seller that arise from a legally effective purchase contract.
The information contained in this manual is subject to change without notice. No part of
this manual may be reproduced or transmitted in any form or by any means, electronic
or mechanical, including photocopying and recording of any kind, for any purpose, without
the express written permission of SM Pro Audio.
IPod and iPhone are trademarks of Apple INC, please note that SMPROAUDIO has no association
with Apple INC.
ALL RIGHTS RESERVED © 2009 SM Pro Audio
SM Pro Audio Service Department
W25, 26-28 Roberna St Moorabbin Melbourne, Victoria Australia 3189
Q-Serie
Q-AMP – Q-DI – Q-Pre
Bedienungsanleitung
Deutsch
Sicherheitshinweise
ACHTUNG: Bitte lesen Sie die nachstehenden Sicherheitshinweise sorgfältig durch, bevor
Sie das Gerät in Betrieb nehmen!
Geeigneter Aufstellungsort
Betreiben Sie das Gerät nur in geschlossenen Räumen.
Betreiben Sie das Gerät niemals in feuchter Umgebung wie z.B. Badezimmern,
Waschküchen oder Schwimmbecken.
Betreiben Sie das Gerät nicht in extrem staubigen oder schmutzigen Umgebungen.
Achten Sie auf ungehinderte Luftzufuhr zu allen Seiten des Gerätes.
Stellen Sie das Gerät nicht in unmittelbarer Umgebung von Wärmequellen wie z.B.
Heizkörpern oder Radiatoren auf.
Setzen Sie das Gerät keiner direkten Sonneneinstrahlung und starken Vibrationen aus.
Anschluss
Verwenden Sie ausschließlich das zum Lieferumfang gehörende Netzteil und/oder Kabel.
Installieren Sie auf keinen Fall ein anderes Netzteil.
Falls das mitgelieferte Netzteil nicht in Ihre Steckdose passt, sollten Sie einen qualifizierten Elektriker fragen.
Ziehen Sie den Netzstecker aus der Steckdose, wenn Sie das Gerät über einen längeren
Zeitraum nicht benutzen.
Fassen Sie den Netzstecker niemals mit nassen Händen an.
Ziehen Sie beim Ausstecken immer am Stecker und nicht am Kabel.
Betrieb
Stellen Sie keinerlei Behälter mit Flüssigkeiten auf dem Gerät ab.
Achten Sie beim Betrieb des Gerätes auf einen festen Stand.
Verwenden Sie eine stabile Unterlage oder ein geeignetes Einbau-Rack.
Stellen Sie sicher, dass keinerlei Gegenstände in das Geräteinnere gelangen. Sollte dies
dennoch geschehen, schalten Sie das Gerät aus und ziehen Sie den Netzstecker. Setzen
Sie sich anschließend mit einem qualifizierten Fachhändler in Verbindung.
Dieses Gerät kann sowohl alleine als auch in Verbindung mit Verstärkern, Lautsprechern
oder Kopfhörern Lautstärkepegel erzeugen, die zu irreparablen Gehörschäden führen.
Betreiben Sie es daher stets nur in angenehmer Lautstärke.
Pflege
Öffnen Sie das Gerät nicht.
Reparatur und Wartung darf nur von qualifiziertem Fachpersonal vorgenommen werden.
Es befinden sich keine vom Anwender zu wartenden Teile im Geräteinnern.
Verwenden Sie zur Reinigung des Gerätes ausschließlich ein trockenes, weiches Tuch
oder einen Pinsel.
Benutzen Sie keinen Alkohol, Lösungsmittel oder ähnliche Chemikalien. Sie beschädigen damit die Oberflächen.
Bestimmungsgemäße Verwendung
Dieses Gerät ist ausschließlich zu tontechnischen Zwecken bestimmt.
Weitergehende Verwendung ist nicht zulässig und schließt Gewährleistungsansprüche
gegenüber SM Pro Audio aus.
Vorwort
Sehr geehrte(r) Käufer/-in,
wir beglückwünschen Sie zum Kauf der SM Pro Audio Q-Serie. Wir garantieren Ihnen
eine hochwertige Verarbeitungsqualität in Verbindung mit exzellenten audiotechnischen
Eigenschaften zu einem unschlagbaren Preis-Leistungsverhältnis. Die Q-Serie wurde
von uns für Home- und Pro-Studios, PA-Firmen, Schulen und für viele weitere Anwendungsgebiete geschaffen. Basierend auf jahrelanger Erfahrung im Audiobereich und der
Vielzahl von Kundenwünschen haben unsere Ingenieure eine Produktserie entwickelt,
die Sie sicherlich zufrieden stellen wird. Wir sind wirklich sehr stolz Ihnen mit der QSerie eine Lösung zu bieten, die in diesem Preisbereich ihresgleichen sucht.
Ihr SM Pro Audio Team
1. Inbetriebnahme
Die SM Pro Audio Q-Serie wurde nach der Herstellung sorgfältig verpackt, um einen optimalen Schutz beim Versand zu gewährleisten. Trotzdem empfehlen wir Ihnen, nach
dem Auspacken alle enthaltenen Komponenten auf physische Schäden zu überprüfen,
die möglicherweise beim Transport passiert sein könnten.
Falls eine Komponente beschädigt ist, schicken Sie diese bitte nicht an uns zurück, sondern benachrichtigen Sie Ihren Händler und das Versandunternehmen, da ansonsten ein
Ersatz oder eine Reparatur nicht garantiert werden kann.
2. Positionierung
Die Q-Serie passt mit ihren 9,5’‘-Geräten in ein 19’‘-Zoll-Rack. Um Überhitzungen zu vermeiden, empfiehlt es sich, ihn nicht direkt über oder unter stark wärmeerzeugenden Geräten
(z.B. Endstufen) zu platzieren. Sorgen Sie daher für eine ausreichende Luftzufuhr.
3. Stromversorgung
Die Q-Serie wird jeweils mit einem 17-Volt-Netzteil verwendet. Beachten Sie bitte vor
dem erstmaligen Einschalten der Geräte, dass das Netzteil mit Ihrem lokalen Stromnetz
kompatibel ist. Eine Beschädigung, die auf eine falsche Spannung zurückzuführen ist,
kann nicht als Garantiefall gewertet werden.
4. Das Design-Konzept
Hochwertige Bauteile und Design
Die Philosophie hinter allen SM Pro Audio Produkten garantiert ein kompromissloses
Schaltkreis-Design und die Auswahl der hochwertigsten Bauteile.
5. Q-AMP Produktbeschreibung
Professionelles, vielseitiges Kopfhöhrerverstärkersystem für den Studio- und Live-Einsatz.
· vier unabhängige, leistungsfähige Stereo-Verstärker in einem 9,5’’-Gerät
· verzerrungsarme Wiedergabe besonders bei hohen Lautstärken
· zwei unabhängige Stereo-Eingänge
· 6,5-mm- und 3,5-mm-Kopfhörereingänge in Stereo pro Kanal
· Ausgangslautstärkeregler pro Kanal
· unabhängige Quellsignalauswahl pro Kanal
· hochwertige Bauteile und solide Konstruktion
6. Einführung
Mit dem Kauf des neuen SM Pro Audio Q-Amp haben Sie sich für einen hochwertigen
Kopfhörerverstärker entschieden, der sämtliche Anforderungen im Studio und Live-Bereich erfüllt. Wegen seiner Flexibilität ist der Q-Amp ein sehr effizient arbeitender Kopfhörerverstärker mit universellem Einsatzgebiet.
7. Q-Amp Vorderseite
Der Q-Amp besitzt vier unabhängige Kopfhörerverstärker. Pro Kanal stehen Ihnen ein
Eingangswahlschalter, ein Lautstärkeregler sowie zwei Kopfhörerausgänge (1x 6,3 mm
und 1x 3,5 mm) zur Verfügung.
7.1 Eingangswahlschalter
Mit diesem Schalter können Sie für jeden Kanal einstellen, welches Stereo-Eingangssignal
Sie an den jeweiligen Kopfhörerausgängen hören möchten.
7.2 Lautstärkeregler
Hier stellen Sie die Lautstärke der angeschlossenen Kopfhörer ein.
7.3 6,3-mm-Kopfhörereingang
7.4 3,5-mm-Kopfhörereingang
7.1 Eingangswahlschalter 7.2 Lautstärkeregler
7.3 6,3-mm-Kopfhörerausgang 7.4 3,5-mm-Kopfhörerausgang
2 Stereo-Eingänge (6,3-mm-Klinke)
8. Q-Amp Rückseite
Die Rückseite bietet Ihnen zwei Stereo-Eingänge. Falls Sie ein Monosignal an den QAmp anschließen möchten, benutzen Sie bitte jeweils die linke Eingangsbuchse.
9. Anwendung
9.1 Den Q-Amp richtig einsetzen
Schließen Sie ein Stereosignal an eine der beiden Eingangspaare auf der Rückseite
an. Sie können natürlich auch ein Monosignal abhören. Dazu benutzen Sie bitte den
jeweils linken Eingang, damit Sie das Monosignal nicht nur auf dem linken Kanal
hören. Anschließend stellen Sie den Eingangswahlschalter auf den jeweiligen Eingangskanal „A“ oder „B“. Nun drehen Sie den Lautstärkeregler langsam nach rechts
und stellen die Lautstärke so ein, bis es Ihnen gefällt. Da der Q-Amp vier Abhörkanäle
besitzt, können Sie vier Musiker mit unterschiedlichen Signalen versorgen. Im Studio
können Sie beispielsweise verschiedene Mixer-Ausgänge, Aux-Sends oder Subgruppen dazu verwenden den vier Musikern unterschiedliche Kopfhörermixes zur Verfügung zustellen. Sollten Ihnen vier Kopfhörerausgänge nicht reichen, können Sie
natürlich auch mehrere Q-Amps verlinken.
9.3 Mehrere Q-Amps verlinken
Das verlinken von mehreren Q-Amps ist wirklich einfach. Was Sie zusätzlich zu den
Q-Amps benötigen sind sog. Insert- oder auch Y-Kabel (6,3-mm-Stereoklinke auf 2x
6,3-mm-Monoklinke). Verbinden Sie dann einen der Kopfhörereingänge via Y-Kabel
mit einem der Stereo-Eingänge des nächsten Q-Amps. So erweiteren Sie Ihr Setup um
jeweils drei weitere Kopfhörereingänge.
10. SPEzifikationen
Audioeingänge::
6,3 mm Klinke
unsymmetrisch
Impedanz 47 kOhm
Peak Input Level +25dB
Verstärkungsbereich 40dB
Kopfhörerverstärkerausgänge:
6,3-mm- sowie 3,5-mm-Klinkenausgänge
Max. Ausgangslevel: 300 mW @ 32 Ohm (max. 1 W @ 32 Ohm)
Ausgangs-Impedanz: 22 Ohm
Max. Verstärkung +20 dB
Messwerte:
Frequenzgang: 20 Hz – 20 kHz, 0 dB bis -2 dB
Verzerrung: 0,02%
Rauschabstand: besser als 80 dB
Übersprechung: > 72 dB @ 1 kHz; -20 dB Eingangssignal
Stromversorgung:
Spannungsversorgung: USA/Kanada ~ 120 V AC, 60 Hz;
U.K./Australien ~ 240 V AC, 50 Hz; Europa ~ 230 V AC, 50
Hz; Exportmodell ~ 100-120 V AC, ~ 200-240 V AC, 50-60 Hz
Leistung: 11,5 VA
Sicherung: 100-120 V AC: 630 mA (träge Sicherung);
200-240 V AC: 315 mA (träge Sicherung)
externes 16-V-Netzteil
Abmessungen:
Höhe/Breite/Tiefe: 44,5 mm x 230,6 mm x 217 mm
Nettogewicht: 0,7 kg
11. Q-DI Produktbeschreibung
Professionelle, vielseitige DI Box mit Line-Mischer für den Studio- und Büheneinsatz.
· vier unabhängige DI Boxen in einer 9,5-Zoll-Einheit
· vier unabhängige 20dB-Dämpfungsschalter
· vier unabhängige Ground-Lift-Schalter
· vier unabhängige Lautstärkeregler für den Stereomixausgang
· vier unabhängige Panoramaregler für den Stereomixausgang
· Master-Laustärkeregler
· Kopfhörerausgang
12. Einführung
Mit dem Kauf der neuen Q-DI haben Sie eine hochwertige Mehrkanal-DI-Box erworben,
die viele Anforderungen im Studio- und Live-Bereich erfüllt. Die Q-DI erledigt problemlos
die Wandlung von unsymmetrische in symmetrische Signale und ist dabei gleichzeitig
ein Stereo-Line-Mixer. Aufgrund seiner geringen Baugröße lässt ich die Q-DI vielfältig
einsetzen, sei es im Projektstudio, live oder in vielen anderen Audiobereichen.
13. Q-DI Vorderseite
Die Q-DI besitzt 4 unabhängige DI Boxen in einem Gerät und der eingebaute Line Mixer
mischt die vier Eingangssignale zu Monitorzwecken zu einem Sterosignal zusammen.
13.1 Lautstärkeregler pro Kanal
Mit diesen vier Lautstärkereglern stellen Sie das Mischverhältnis der vier Kanäle für den
Line Mixer ein.
13.2 Panoramaregler pro Kanal
Mit diesen vier Panoramareglern stellen Sie das Panorama der vier Kanäle für den Line
Mixer ein.
13.3 Signalabschwächung pro Kanal
Mit diesen Pad-Schaltern schwächen Sie das Signal um 20 dB oder 40 dB ab. Bitte benutzen Sie dies nur, wenn Sie extrem laute Signale haben, die verzerren.
13.4 Vier Schalter zur Massetrennung
Damit können Sie die Masse vom Eingangssignal trennen, um Brummschleifen zu vermeiden.
13.5 Unsymmetrischer Klinkeneingang
Hier schließen Sie Ihre unsymmetrischen Instrumente an.
13.6 Hauptlautstärkeregler
Damit regeln Sie Gesamtausgangslautstärke des Line Mixers sowie des Kopfhörerverstärkers.
13.1 Lautstärkeregler 13.2 Panoramaregler 13.3 20 dB/40 dB PAD-Schalter
13.4 Massetrennung 13.5 Unsymmetrischer Eingang 13.6 Hauptlautstärkeregler
14. Q-DI Rückseite
14.1 Symmetrische XLR-Ausgänge
Symmetrische Ausgänge zum Anschluss an eine Stage Box, Mischpult, etc.
14.2 Unsymmetrischer Stereo-Line-Mixer-Ausgang
Der, von den XLR-Ausgängen unabhängige Monitormix Ihrer vier Kanäle.
14.1 Symmetrische XLR-Ausgänge 14.2 Unsymmetrischer Mix-Ausgang
15. Anwendung
15.1 Die Q-DI als DI-Box verwenden
Schließen Sie die unsymmetrische Signalquelle, die Sie in symmetrische Signale wandeln möchten, an den entsprechenden Eingang auf der Vorderseite der Q-DI an.
Schließen Sie an die XLR-Buchse auf der Rückseite das symmetrische Gerät mit einem
geeigneten Kabel an. Ist das Eingangssignal zu laut, können Sie es mit der 20dB/40dBPAD-Absenkung dämpfen. Eine Brummschleife lässt sich durch Betätigen des Erdungstasters unterbinden. Für eine zusätzliche Erdung befindet sich auf der
Geräterückseite eine Erdungsschraube.
12.2 Verwendung der Q-DI als Line-Mixer
Sie können alle Eingangssignale zusammenmischen und auf dem Stereo-Masterausgang
ausgeben. Dabei stehen Ihnen ein Lautstärkeregler sowie Panorama pro Kanal zur Verfügung. Schließen Sie den Stereo-Master-Ausgang an einen entsprechendes Gerät an (z.B.
Verstärker/Endstufe etc.) und regeln Sie die Lautstärke mit dem Hauptlautstärkeregler auf
der Vorderseite der Q-DI. Zusätzlich können Sie alle Signale auch über einen
angeschlossenen Kopfhörer abhören.
16. SPEzifikationen
Audioeingänge:
Art: 6,3-mm-Klinkenbuchsen
Typ: unsymmetrisch
Impedanz: 47 kOhm
Min. Empfindlichkeit: -20 dB
Peak Eingangslevel: +16 dB
Mixerausgänge:
Art: Cinch
Impedanz: 47 kOhm / -10 dB
Max. Ausgangslevel: +2 dB (Peak Level +18,5 dB)
Audioausgänge:
Art: XLR
Typ: symmetrisch
Min. Ausgangsimpeddanz: 600 Ohm
Max. Ausgangslevel: 0 dB (Peak Level +18,5 dB)
Messwerte:
Frequenzgang: 20 Hz - 20 kHz, 0 dB bis -2 dB
Verzerrung: 0,02%
Rauschabstand: besser als 74dB
Übersprechung: > 80 dB@1 kHz; -20 dB Input
Stromversorgung:
USA/Kanada ~ 120 V AC, 60 Hz
U.K./Australien ~ 240 V AC, 50 Hz
Europa ~ 230 V AC, 50 Hz
Exportmodell ~ 100 - 120 V AC, ~ 200 - 240 V AC, 50 - 60 Hz
Leistung: 5,5 VA
Sicherung: 100 - 120 V AC: 630 mA (träge Sicherung);
200 - 240 V AC: 315 mA (träge Sicherung)
Netzanschluss: externer 16 V AC Adapter
Abmessungen:
Höhe/Breite/Tiefe: 44,5 mm x 230,6 mm x 217 mm
Nettogewicht: ca. 1,75 kg
17. Q-Pre Produktbeschreibung
Professioneller Mehrkanalmikrofonvorverstärker für Studioanwendungen.
· vier unabhängige Mikrofonvorverstärker in einem kompakten Gehäuse
· hochwertige Audioqualität
· vier symmetrische Eingänge
· vier unsymmetrische Ausgänge
· Phantomspeisung schaltbar pro Kanalpaar
· vier Übersteuerungsanzeigen
· vier Lautstärkeregler
18. Einführung
Der Q-Pre ist ein kleiner, hochwertiger 4-Kanal-Mic-Preamp, der vor allem für kleine Heimstudios entwickelt wurde, die Mikrofonsignale ohne Qualitätsverlust aufnehmen wollen.
Der Markt an Audiowandlern, Soundkarten und Computer basierenden Audioprogrammen
ist enorm gestiegen. Leider wird gerade bei günstigen Soundkarten jedoch nur eine durchschnittliche Qualität der eingebauten Mikrofonvorverstärker angeboten. Genau hier setzt
der Q-Pre an: Mit seinen vier symmetrischen XLR-Eingängen mit schaltbarer Phantomspeisung (pro Kanalpaar) und separater Lautstärkeanpassung von -20 dB bis +40 dB pro
Kanal sind hochwertige Mikrofonaufnahmen im Computer endlich gewährleistet.
16. Q-PRE Vorderseite
Lautstärkeregler
Jeder Kanal besitzt einen Lautstärkeregler zur Signalanpassung.
17. Q-PRE Rückseite
17.1 Schalter zur Aktivierung der Phantomspeisung
Jeder Kanal bietet Ihnen eine 48-V-Phantomspeisung zur Versorgung einen Kondensatormikrofons. Beim Q-Pre können Sie mit den beiden Schaltern auf der Rückseite diese
Phantomspeisung paarweise, also für Kanal 1/2 sowie Kanal 3/4, ein- bzw. ausschalten.
17.2 Symmetrische Klinkenausgänge
Symmetrische Ausgänge zum Anschluss an ein Mischpult, einer Stage Box, etc.
17.1 The Back panel phantom power switches 17.2 Balanced output connectors
18. Anwendung
So benutzen Sie Ihren Q-Pre
Die Benutzung des Q-Pre könnte nicht einfacher sein. Jeder der vier Vorverstärker besitzt
seinen eigenen Eingang, Ausgang sowie Lautstärkeregler.
1. Schließen Sie die Signale, die Sie verstärken wollen, jeweils an einen der XLR-Anschlüsse
auf der Vorderseite an.
2. Verbinden Sie die jeweiligen Ausgänge mit Ihrem Mischpult, Soundkarte oder Mehrspur-Recorder.
3. Nun pegeln Sie das am Q-Pre anliegende Signal mit seinen Lautstärkereglern ein.
Überprüfen Sie nun anhand der LED, ob Ihre Signale nicht übersteuern. Leuchtet eine der
LEDs auf, so müssen Sie den entsprechenden Kanalregler wieder ein wenig herunterreglen. Trotz dieser optischen Kontrolle sollten Sie sich dennoch auf Ihr Gehör verlassen,
denn die LEDs sitzen hinter der Eingangslautstärkeregelung, d.h. Sie sollten gegebenenfalls auch die Lautstärke des angeschlossenen Geräts überprüfen.
19. SPEzIFIkATIONen
Audioeingänge und Vorverstärker:
Anschlüsse: XLR
Typ: symmetrisch
Impedanz: 2 kOhm
Min. Empfindlichkeit: -40dB
Peak Eingangslevel: +5dB
Regelbereich: 50dB
Verstärkung Spitze: 74dB
Phantomspeisung: +48 V, schaltbar
Audioausgänge:
Anschlüsse: 6,3 mm Klinke
Typ: symmetrisch
Impedanz: 47 kOhm
Peak Ausgangslevel: +18.5dB
Messwerte:
Frequenzgang: 20 Hz - 20kHz, 0 dB bis -2dB
Verzerrung: 0.02%
Rauschabstand: besser als 80 dB
Übersprechung: > 70 dB@1 kHz;-20dB Input
Stromversorgung:
USA/Kanada ~ 120 V AC, 60 Hz
U.K./Australien ~ 240 V AC, 50 Hz
Europa ~ 230 V AC, 50 Hz
Exportmodell ~ 100 - 120 V AC, ~ 200 - 240 V AC, 50 - 60 Hz
Leistung: 5,5 VA
Sicherung: 100 - 120 V AC: 630 mA (träge Sicherung);
200 - 240 V AC: 315 mA (träge Sicherung)
Netzanschluss: externer 16 V AC Adapter
Abmessungen:
Höhe/Breite/Tiefe: 44,5 mm x 230,6 mm x 217 mm
Nettogewicht: ca. 1,75 kg
SM Pro Audio ist stets bemüht, professionelle Ansprüche zu erfüllen. Aus diesem Grund
können sich Aussehen und/oder technische Spezifikationen unserer Produkte ohne Vorankündigung ändern. Wir bitten Sie dies zu berücksichtigen.
7. Garantie
7.1 Produktregistrierung
Um zukünftige Abwicklungen im Garantierfall zu erleichtern, bitten wir Sie innerhalb von
14 Tagen nach dem Erwerb Ihr SM Pro Audio Produkt zu registrieren. Bitte schicken Sie
dazu einfach einen formlosen Brief oder eine Postkarte mit Seriennummer und Produktname zu uns (Adresse siehe unten). Alternativ können Sie sich auch im Internet unter
www.smproaudio.de registrieren.
7.2 Garantie
- Für dieses Produkt übernimmt SM Pro Audio Europe eine Garantie von zwei Jahren
auf die mechanischen und elektronischen Bauteile in Anbetracht der hier genannten Bedingungen. Die Garantie gilt ab Rechnungs-/Belegdatum und bei erfolgreicher Registrierung. Treten innerhalb der Garantiezeit Mängel auf, die nicht auf die im Abschnitt
7.4 aufgeführten Ursachen zurückzuführen sind, wird SM Pro Audio Europe das Produkt
reparieren oder ersetzen.
- Im Falle eines gültigen Garantieanspruchs wird SM Pro Audio Europe das reparierte oder
ersetzte Produkt frachtfrei zurücksenden.
- Es gelten keine andere als die vorgenannten Garantieansprüche.
7.3 Reparaturnummer
- Für eine Garantiereparatur ist es erforderlich, eine Reparaturnummer von SM Pro Audio
Europe zu beantragen. Der Käufer oder ein autorisierter Fachhändler muss vor Einsendung einer Garantiereparatur SM Pro Audio Europe telefonisch benachrichtigen und
eine Reparaturnummer beantragen.
- Wird eine Reparaturnummer durch SM Pro Audio Europe vergeben, muss das Produkt
originalverpackt und mit einer detaillierten Fehlerbeschreibung versendet werden. Die
Reparaturnummer muss auf der Verpackung deutlich erkennbar sein. Ist eine von uns
vergebene Reparaturnummer nicht deutlich auf der Originalverpackung zu erkennen,
kann SM Pro Audio Europe die Annahme verweigern.
Garantiereparaturen müssen an folgende Adresse versendet werden:
SM Pro Audio Service
tt audio GmbH
SM Pro Audio Europe
Alfred-Krupp-Str. 5
48291 Telgte
Deutschland
Tel: +49 2504 88 88 78-0
Fax: +49 2504 88 88 78-7
7.4 Garantiebestimmungen
- Die Garantie gilt nur im Zusammenhang mit der Originalrechnung, dem Kassenbeleg
oder einer Bestätigung von SM Pro Audio Europe über die Garantiedauer. Bei
Garantiesendungen muss das Produkt in der Originalverpackung versendet werden. Ist
die Seriennummer des Produktes nicht vorhanden oder lesbar, kann kein
Garantieanspruch gewährleistet werden. In solchen Fällen wenden Sie sich an den
Händler, bei dem Sie das Produkt gekauft haben.
- SM Pro Audio Europe behält sich vor, Anpassungen oder Änderungen vorzunehmen, um
den nationalen oder örtlichen Sicherheitsanforderungen des Landes zu entsprechen.
Solche Modifikationen gelten nicht als Herstellungs- oder Materialfehler. Die Garantieleistung gewährleistet nicht die Vornahme solcher Modifikationen. Die Kosten für solche Veränderungen/ Modifikationen können von SM Pro Audio Europe nicht übernommen werden.
- Regelmäßige Kontrollen, Wartung und Reparatur oder Ersatz von Verschleißteilen wie
Potis, Schalter und ähnlichem sind nicht Bestandteil dieser Garantie.
- Folgende Schäden am Produkt sind nicht durch die Garantieleistung gewährleistet:
Falsche Bedienung oder Defekte durch fehlerhafte oder unsachgemäße Benutzung.
Den Gebrauch oder Anschluss des Produktes in einer Weise, die den technisch oder sicherheitstechnisch geltenden Bedingungen in dem Land, in dem das Produkt gekauft wurde,
nicht entsprechen.
Schäden, verursacht durch Sturm, Wasser, Feuer, Überspannung, höhere Gewalt, fehlerhaften Anschluss und das Stromnetz, unzureichende oder fehlerhafte Belüftung oder andere Gründe, auf die SM Pro Audio Europe keinen Einfluss hat.
- Wird die Reparatur von einer nicht autorisierten oder beauftragten Person durchgeführt,
übernimmt SM Pro Audio weder Kosten noch Haftung, es sei denn, die Reparatur ist
vorher mit SM Pro Audio Europe abgestimmt worden.
- Unterliegt das Produkt nach einer Überprüfung von SM Pro Audio Europe nicht den
Garantiebestimmungen, gehen die Kosten der anfallenden Reparatur- oder Überprüfungskosten zu Lasten des Käufers.
- Reparaturen außerhalb der Garantiezeit oder nicht genehmigter Garantie werden nur
gegen Kostenübernahme des Käufers repariert. SM Pro Audio Europe wird den Käufer
bei nicht genehmigtem Garantieanspruch informieren. Sollte der Käufer nach unserer Information nicht binnen 6 Wochen schriftlich antworten, wird SM Pro Audio Europe das
Gerät unrepariert zurücksenden. Die dadurch entstehenden Kosten werden separat
gestellt sind vom Käufer zu tragen.
7.5 Garantieübertragung
Diese Garantie gilt nur für den Erstkäufer und kann nicht übertragen werden. Die
Garantieleistung kann nicht durch Dritte, sondern nur durch SM Pro Audio Europe
gewährleistet werden.
7.6 Schadensersatzansprueche
Es können keine Schadensersatzansprüche geltend gemacht werden, welche durch
Schäden von SM Pro Audio Europe durch Garantiereparaturen verursacht werden. SM
Pro Audio Europe haftet in solchen Fällen höchstens mit dem Warenwert des Produktes.
7.7 Andere Garantieansprueche
Die in dem jeweiligen Land geltenden Rechte des Käufers, zum Beispiel Forderungen
gegenüber dem Verkäufer, wie im Kaufvertrag niedergelegt, werden von dieser
Garantieerklärung nicht berührt. SM Pro Audio Europe, Niederlassungen und Distributoren haften nicht für direkte oder indirekte Schäden oder Verluste, soweit nicht zwingende gesetzliche Bestimmungen dem entgegenstehen.
ALL RECHTE VORBEHALTEN © 2009 SM Pro Audio
SM Pro Audio Europe Service Department
Alfred-Krupp-Str. 5, 48291 Telgte, Deutschland