1
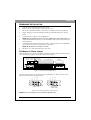
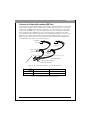
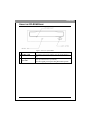
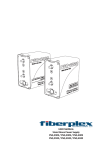
Distributed by:
www.Jameco.com ✦ 1-800-831-4242
The content and copyrights of the attached
material are the property of its owner.
Jameco Part Number 487411
FCC Compliance Statement
This equipment has been tested and found to comply with the limits for a Class B digital
device, pursuant to Part 15 of the FCC Rules. These limits are designed to provide reasonable
protection against harmful interference in a residential installation. This equipment generates,
uses and can radiate radio frequency energy and, if not installed or used in accordance with
the instructions, may cause harmful interference to radio communications. However, there is
no guarantee that interference will not occur in a television reception, which can be
determined by turning the equipment off and on, the user is encouraged to try and correct the
interference by one or more of the following measures: (1) Reorient or relocate the receiving
antenna. (2) Increase the separation between the equipment and the receiver. (3) Connect the
equipment into an outlet on a circuit different from that to which the receiver is connected. (4)
Consult the dealer or an experienced radio/TV technician for help.
FCC WARNING
Changes or modifications not expressly approved by the party responsible for compliance
could void the user's authority to operate the equipment.
Acknowledgment & Trademark
All contents are subject to change at any time without notice. No responsibility is assumed for
its use; nor for infringements of patents or other rights of third parties and no patent or license
is implied hereby.
All trademarks are the property of their respective owners.
Safety Notice
1.
2.
3.
4.
5.
Do not install or operate the product in high temperature, humidity or dusty environment.
Do not attempt to open the cover to repair the product yourself.
Never spill liquid of any kind on the product.
Always follow instructions on this manual under operating the product.
To prevent exposure to laser emanations(harmful to human eyes), do not attempt to
disassemble this unit.
6. Hold CD discs by their edges. Do not touch the surface of the discs.
7. The drive is designed to be incorporated into a computer-based system or unit which has an
enclosing cover. Using the drive alone or in any other configuration is prohibited.
Caution: Use of controls or adjustments or performance of procedures other than those
specified herein may result in hazardous radiation exposure.
WARNING
Do not use fragile disc, it may crack during high speed reading.
WARNHINWEIS
Verwenden Sie keine zerbrechlichen Disketten, da diese bei einer hohen
Drehgeschwindigkeit beim Lesen beschädigt werden können.
ADVERTENCIA
No use disco frágil, podría romperse durante la lectura de alta velocidad.
AVERTISSEMENT
N'utilisez pas de disque fragile, il pourrait se briser pendant la lecture à haute vitesse.
AVVISO
Non usare un disco fragile. Potrebbe spaccarsi durante la lettura ad alta velocità.
WAARSCHUWING
Gebruik geen breekbare disks, deze zouden gedurende het op hoge snelheid afspelen
kunnen barsten.
警告
請勿使用品質不良光碟片以免光碟機高速運轉讀取資料時而造成光碟片損毀。
ENGLISH
HARDWARE INSTALLATION
1.
2.
3.
4.
5.
6.
7.
8.
Turn off your PC and disconnect all power cords.
Refer to your PC user's manual to remove the PC cover.
Set up your CD-ROM to Master or Slave device according to the following section.
Find an empty bay, slide the CD-ROM into the bay and mount the drive by using 4
screws.
Connect the power cable to your CD-ROM drive.
NOTE: The pin definition of power connector should be the same as that in figure 1.
Connect the E-IDE cable (40 pin) to your CD-ROM according to the description in the
following section.
Connect the sound cable from the Analog Audio on the rear panel of your CD-ROM to
your sound card if you have a sound card in your system.
NOTE: The R channel is normally in red color.
Put the PC cover back and connect the power cords.
Set Master or Slave Jumper
There are three pairs of jumpers, MA(Master), SL(Slave) and CS(CSEL) on the rear panel of
your CD-ROM drive. Figure 1 shows the location of the jumper.
CABLE SELECT
SLAVE
MASTER
DIGITAL ANALOG
AUDIO AUDIO
DG
RGGL
C SM
S L A
POWER
HOST INTERFACE
39
40
1
2
+5
G
G +12
Figure 1: Rear panel of CD-ROM drive
The Master/Slave jumper can be used to set the CD-ROM drive to Master or Slave device.
Figure 2 is the illustration of jumper setting.
C
S
S
L
M
A
Master Device
C
S
S
L
M
A
Slave Device
(Default setting)
Figure 2: The setting of Master or Slave device.
NOTE: Do not use two jumpers to set MA and SL simultaneously.
ENGLISH
Connect to Primary/Secondary IDE Port
In most of the PC systems, the hard disk will be in Primary IDE port and Master device for the
PC to boot the operating system. CD-ROM drive should be set to Slave device if you need to
connect your CD-ROM to the same Primary IDE port. In some situations, you may need to
connect your CD-ROM drive to Secondary IDE port if the Primary IDE port is occupied. In
this configuration, the CD-ROM drive can be set to Master device if there is no any other
device in this Secondary IDE port. Otherwise, the CD-ROM drive should be set to Slave device
if Master device already exists. Figure 3 shows the setting and the connection of your CDROM to Primary IDE port or to Secondary IDE port. Table 1 illustrates the configuration of
your CD-ROM if you want to use Secondary IDE port.
CD-ROM
(Slave)
Device 1
(Slave)
Hard Disk
(Master)
Device 0
(Master)
PC Mother Board
Secondary IDE Port
Primary IDE Port
Figure 3: The connection of Primary or Secondary IDE Port.
Device
Mode
Device 0 (Master)
Device 1 (Slave)
One device
CD-ROM
None
Two devices
Hard disk or CD-ROM
CD-ROM
Table 1: The configuration of Secondary IDE Port.
ENGLISH
SOFTWARE INSTALLATION
There is a device driver diskette in your CD-ROM drive package. The device driver is needed
if your PC system is in DOS or Windows 3.1 or higher. Please follow the procedures listed
below if you need to install the device driver in your system. Usually the device driver is not
necessary if you run the Windows 95/98/2000/XP. Please refer the following procedures or the
user's guide of the operating system if the CD-ROM can't be recognized automatically.
DOS or Windows 3.x
1.
2.
3.
4.
5.
Power on your PC and insert the driver diskette into a floppy drive.
Type A:(a:) or B:(b:) where the driver diskette locates.
Type Install under DOS prompt and Press Enter key.
Follow the instruction on the screen.
After the installation, remove the driver diskette and reboot your system.
Windows 95/98/2000/XP
There is no need to install any CD-ROM device driver under Windows 95/98/2000/XP system.
Please follow steps below if your CD-ROM can't be recognized automatically.
1.
Start-up your PC, the system will detect the new CD-ROM drive and use the software
device driver automatically. If not, please proceed the next steps.
2.
Click on Control Panel icon under My Computer.
3.
Click on Add New Hardware icon and Click Next and Yes at the dialog boxes.
4.
Follow the instructions on the screen and let Windows 95/98/2000/XP search your new
hardware. It will find the CD-ROM drive and load the driver software to complete the
installation.
NOTE: Please read the README file on the driver diskette for any updates made after this
manual.
ENGLISH
USING THE CD-ROM DRIVE
Figure: Front view of CD-ROM
A Eject/Close Button
B On/Busy LED
Push button to eject/close the tray.
C Emergency
In case the Eject button isn’t working, insert a small stick or
paper clip into this hole to eject the tray.
Eject Hole
The On/Busy LED will be flashing while the CD-ROM disc is
busy.
Note: Turn off the power before doing this manual ejection.
P/N: 7819900081B