1
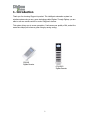
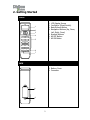
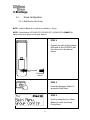
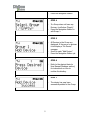
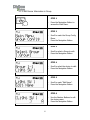
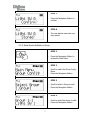
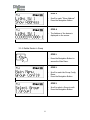
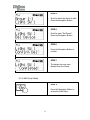
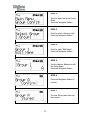
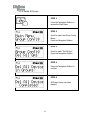
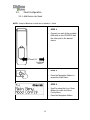
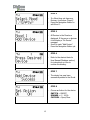
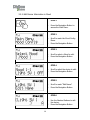
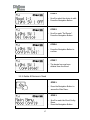
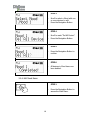
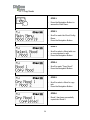
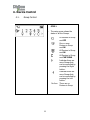
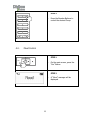
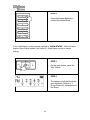
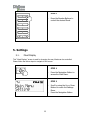
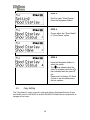
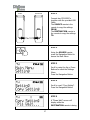
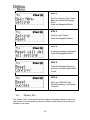
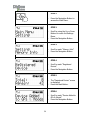
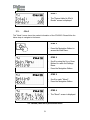
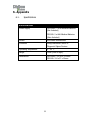
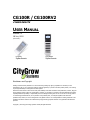
CG100R / CG100RV2
ZIGBEE REMOTE
USER MANUAL
VERSION 1.0
18 JULY, 2012
(PRELIMINARY)
CG100R
ZigBee Remote
CG100RV2
ZigBee Remote
Disclaimers and Copyright
Nothing contained in this publication is to be construed as granting any right, by implication or otherwise, for the
manufacture, sale, or use in connection with any method, apparatus, or product covered by letters patent, or as insuring
anyone against liability for infringement of letters patent.
Efforts have been made to ensure the accuracy and reliability of the data contained in this publication; however, Citygrow
Energy Systems Limited. makes no representation, warranty, or guarantee in connection with this publication and hereby
expressly disclaims any liability or responsibility for loss or damage resulting from its use or from the use of any product
or methodology described herein; for any violation of any federal, state, or municipal regulation with which this
publication may conflict; or for the infringement of any patent from the use of this publication. Nothing contained in this
publication should be viewed as an endorsement by Citygrow Energy Systems Limited. of any particular manufacturer’s
products.
Copyright © 2012 Citygrow Energy Systems Limited, All Rights Reserved
Table of Contents
1.
Introduction...................................................................................................... 1
2.
Getting Started ................................................................................................. 2
3.
Bindings ........................................................................................................... 4
3.1.
3.1.1.
Add Device into Group .......................................................................... 4
3.1.2.
Edit Device Information in Group ........................................................... 6
3.1.3.
Show Device Address in Group .............................................................. 7
3.1.4.
Delete Device in Group ......................................................................... 8
3.1.5.
Edit Group Name ................................................................................. 9
3.1.6.
Delete All Groups ............................................................................... 11
3.2.
4.
5.
6.
Group Configuration ................................................................................... 4
Mood Configuration .................................................................................. 12
3.2.1.
Add Device into Mood......................................................................... 12
3.2.2.
Edit Device Information in Mood.......................................................... 14
3.2.3.
Show Device Address in Mood ............................................................. 15
3.2.4.
Delete Device in Mood ........................................................................ 16
3.2.5.
Delete All Devices in Mood .................................................................. 17
3.2.6.
Edit Mood Name ................................................................................ 18
3.2.7.
Copy Moods....................................................................................... 20
3.2.8.
Delete All Moods ................................................................................ 21
Device Control ................................................................................................ 22
4.1.
Group Control .......................................................................................... 22
4.2.
Mood Control ........................................................................................... 23
Settings.......................................................................................................... 25
5.1.
Mood Display ........................................................................................... 25
5.2.
Copy Setting ............................................................................................ 26
5.3.
Reset....................................................................................................... 28
5.4.
Memory Info ............................................................................................ 29
5.5.
About ...................................................................................................... 31
Appendix ........................................................................................................ 32
6.1.
Specifications ........................................................................................... 32
1. Introduction
Thank you for choosing Citygrow’s product. This intelligent automation system is a
wireless system using a new, green technology called Zigbee. Through Zigbee, you are
able to use one remote control to control Citygrow’s devices.
This system brings you to a new generation. It enhances your quality of life, and at the
same time helps you to have a green living by saving energy.
CG100R
ZigBee Remote
CG100RV2
ZigBee Remote
1
2. Getting Started
FRONT
1.
2.
3.
4.
LCD Display Screen
Yes Button (Mood Switch)
Back/Refresh Button
Navigation Buttons (Up, Down,
Left, Right, Press)
5. Number Buttons
6. All OFF Button
7. All ON Button
1
WIRELESS REMOTE
2
3
YES
4
5
ALL
OFF
ALL
ON
6
7
BACK
8. Battery Cover
9. Connector
8
9
2
LCD DISPLAY ICON
Icon
Display
Indication
Processing
Processing request, busy
Key Up Enable/
Key Down Enable
Operation of navigation button up and
down is
enabled
Battery Level
Battery full
Battery half
Battery Low
Need to replace battery immediately
3
3. Bindings
3.1.
Group Configuration
3.1.1. Add Device into Group
NOTE: A total of 8 devices in total can be added to 1 Group.
NOTE: Curtain devices (CG100S2-CCP, CG110S2-CCP, CG400S2-CCP) CANNOT be
added in the same group as any other devices.
STEP 1
-
Connect one end of the provided
USB cable to the CG100RV2 and
the other end to the desired
device.
...
TO DESIRED
DEVICE
STEP 2
-
Press the Navigation Button to
access the Main Menu.
STEP 3
-
4
Scroll by using the Up or Down
Buttons to reach the Group
Config Menu.
-
Press the Navigation Button.
STEP 4
-
If a Group does not have any
Devices, it will show “Empty”.
Press the Navigation Button to
edit Group 1.
STEP 5
-
-
All Devices in the Group are
displayed. If there are no devices
it will display a “No Device”
message.
Scroll to reach “Add Device”.
Press the Navigation Button yet.
STEP 6
-
Refer to the desired device’s
User Manual (Bindings section)
for instructions on how to
confirm the binding.
STEP 7
-
5
The device has now been
successfully added to the Group.
3.1.2. Edit Device Information in Group
STEP 1
-
Press the Navigation Button to
access the Main Menu.
STEP 2
-
Scroll to reach the Group Config
Menu.
Press the Navigation Button.
STEP 3
-
Scroll to select a Group to edit.
Press the Navigation Button.
STEP 4
-
Scroll to select the device to edit.
Press the Navigation Button.
STEP 5
-
Scroll to reach “Edit Name”.
Press the Navigation Button.
STEP 6
-
6
Use the Number Buttons to edit
the device name.
Press the Navigation Button.
STEP 7
-
Press the Navigation Button to
confirm.
STEP 8
-
The new device name has now
been saved.
3.1.3. Show Device Address in Group
STEP 1
-
Press the Navigation Button to
access the Main Menu.
STEP 2
-
Scroll to reach the Group Config
Menu.
Press the Navigation Button.
STEP 3
-
Scroll to select a Group to edit.
Press the Navigation Button.
STEP 4
-
7
Scroll to select the device to edit.
Press the Navigation Button.
STEP 5
-
Scroll to reach “Show Address”.
Press the Navigation Button.
STEP 6
-
The Address of the device is
displayed on the screen.
3.1.4. Delete Device in Group
STEP 1
-
Press the Navigation Button to
access the Main Menu.
STEP 2
-
Scroll to reach the Group Config
Menu.
Press the Navigation Button.
STEP 3
-
8
Scroll to select a Group to edit.
Press the Navigation Button.
STEP 4
-
Scroll to select the device to edit.
Press the Navigation Button.
STEP 5
-
Scroll to reach “Del Device”.
Press the Navigation Button.
STEP 6
-
Press the Navigation Button to
confirm.
STEP 7
-
The device has now been
deleted from the Group.
3.1.5. Edit Group Name
STEP 1
-
9
Press the Navigation Button to
access the Main Menu.
STEP 2
-
Scroll to reach the Group Config
Menu.
Press the Navigation Button.
STEP 3
-
Scroll to select a Group to edit.
Press the Navigation Button.
STEP 4
-
Scroll to reach “Edit Name”.
Press the Navigation Button.
STEP 5
-
Use the Number Buttons to edit
the Group Name.
Press the Navigation Button.
STEP 6
-
Press the Navigation Button to
confirm.
STEP 7
-
10
The new Group name has now
been saved.
3.1.6. Delete All Groups
STEP 1
-
Press the Navigation Button to
access the Main Menu.
STEP 2
-
Scroll to reach the Group Config
Menu.
Press the Navigation Button.
STEP 3
-
Scroll to reach “Del All Gps”.
Press the Navigation Button.
STEP 4
-
Press the Navigation Button to
confirm.
STEP 5
-
11
All Groups have now been
deleted.
3.2.
Mood Configuration
3.2.1. Add Device into Mood
NOTE: A total of 8 devices in total can be added to 1 Mood.
STEP 1
-
Connect one end of the provided
USB cable to the CG100RV2 and
the other end to the desired
device.
...
TO DESIRED
DEVICE
STEP 2
-
Press the Navigation Button to
access the Main Menu.
STEP 3
-
12
Scroll by using the Up or Down
Buttons to reach the Mood
Config Menu.
Press the Navigation Button.
STEP 4
-
If a Mood does not have any
Devices, it will show “Empty”.
Press the Navigation Button to
edit Mood 1.
STEP 5
-
-
All Devices in the Mood are
displayed. If there are no devices
it will display a “No Device”
message.
Scroll to reach “Add Device”.
Press the Navigation Button yet.
STEP 6
-
Refer to the desired device’s
User Manual (Bindings section)
for instructions on how to
confirm the binding.
STEP 7
-
The device has now been
successfully added to the Mood.
STEP 8
-
13
Choose an Action for the device.
SWITCH = ON/OFF
DIMMER = 0 – 100%
CURTAIN = Open/Close
3.2.2. Edit Device Information in Mood
STEP 1
-
Press the Navigation Button to
access the Main Menu.
STEP 2
-
Scroll to reach the Mood Config
Menu.
Press the Navigation Button.
STEP 3
-
Scroll to select a Mood to edit.
Press the Navigation Button.
STEP 4
-
Scroll to select the device to edit.
Press the Navigation Button.
STEP 5
-
Scroll to reach “Edit Name”.
Press the Navigation Button.
STEP 6
-
14
Use the Number Buttons to edit
the device.
Press the Navigation Button.
STEP 7
-
Press the Navigation Button to
confirm.
STEP 8
-
The new device name has now
been saved.
3.2.3. Show Device Address in Mood
STEP 1
-
Press the Navigation Button to
access the Main Menu.
STEP 2
-
Scroll to reach the Mood Config
Menu.
Press the Navigation Button.
STEP 3
-
Scroll to select a Mood to edit.
Press the Navigation Button.
STEP 4
-
15
Scroll to select the device to edit.
Press the Navigation Button.
STEP 5
-
Scroll to reach “Show Address”.
Press the Navigation Button.
STEP 6
-
The Address of the device is
displayed on the screen.
3.2.4. Delete Device in Mood
STEP 1
-
Press the Navigation Button to
access the Main Menu.
STEP 2
-
Scroll to reach the Mood Config
Menu.
Press the Navigation Button.
STEP 3
-
16
Scroll to select a Mood to edit.
Press the Navigation Button.
STEP 4
-
Scroll to select the device to edit.
Press the Navigation Button.
STEP 5
-
Scroll to reach “Del Device”.
Press the Navigation Button.
STEP 6
-
Press the Navigation Button to
confirm.
STEP 7
-
The device has now been
deleted from the Mood.
3.2.5. Delete All Devices in Mood
STEP 1
-
Press the Navigation Button to
access the Main Menu.
STEP 2
-
17
Scroll to reach the Mood Config
Menu.
Press the Navigation Button.
STEP 3
-
Scroll to select a Mood with one
or more devices to edit.
Press the Navigation Button.
STEP 4
-
Scroll to reach “Del All Device”.
Press the Navigation Button.
STEP 5
-
Press the Navigation Button to
confirm.
STEP 6
-
All devices in Mood have now
been deleted.
3.2.6. Edit Mood Name
STEP 1
-
18
Press the Navigation Button to
access the Main Menu.
STEP 2
-
Scroll to reach the Mood Config
Menu.
Press the Navigation Button.
STEP 3
-
Scroll to select a Mood to edit.
Press the Navigation Button.
STEP 4
-
Scroll to reach “Edit Name”.
Press the Navigation Button.
STEP 5
-
Use the Number Buttons to edit
the Mood Name.
Press the Navigation Button.
STEP 6
-
Press the Navigation Button to
confirm.
STEP 7
-
19
The new Mood name has now
been saved.
3.2.7. Copy Moods
STEP 1
-
Press the Navigation Button to
access the Main Menu.
STEP 2
-
Scroll to reach the Mood Config
Menu.
Press the Navigation Button.
STEP 3
-
Scroll to select a Mood with one
or more devices to edit.
Press the Navigation Button.
STEP 4
-
Scroll to reach “Copy Mood”.
Press the Navigation Button.
STEP 5
-
Scroll to select a Mood to copy
into.
Press the Navigation Button.
STEP 6
-
20
Mood 1 has been successfully
copied into Mood 2.
3.2.8. Delete All Moods
STEP 1
-
Press the Navigation Button to
access the Main Menu.
STEP 2
-
Scroll to reach the Mood Config
Menu.
Press the Navigation Button.
STEP 3
-
Scroll to reach “Del All Moods”.
Press the Navigation Button.
STEP 4
-
Press the Navigation Button to
confirm.
STEP 5
-
21
All Moods have now been
deleted.
4. Device Control
4.1.
Group Control
STEP 1
-
The main screen shows the
status of all the Groups.
All Devices in Group
are OFF
One or more
Devices in Group
are ON
All Devices in Group
are ON
All Devices in Group
are CURTAINS
Indicates there are
more Groups that
can be controlled by
pressing the Right
button.
Indicates there are
more Groups that
can be controlled by
pressing the Left
button.
No Icon
22
There are no
Devices in Group
STEP 2
-
ALL
OFF
4.2.
Press the Number Buttons to
control the desired Group.
ALL
ON
Mood Control
STEP 1
YES
-
On the main screen, press the
“Yes” Button.
STEP 2
-
23
A “Mood” message will be
displayed.
STEP 3
-
ALL
OFF
Press the Number Buttons to
control the desired Mood.
ALL
ON
If the “Mood Display” setting has been changed to “SHOW STATUS”, follow the below
steps on Mood Control instead. (See Section 5.1 Mood Display on how to change
setting).
STEP 1
YES
-
On the main screen, press the
“Yes” Button.
STEP 2
-
24
The statuses of all the Moods are
now displayed. (Refer to 4.1
Group Control for explanations of
the Icons).
STEP 3
-
ALL
OFF
Press the Number Buttons to
control the desired Mood.
ALL
ON
5. Settings
5.1.
Mood Display
This “Mood Display” screen is used for changing the way Moods can be controlled.
Please follow the below steps to navigate to the screen.
STEP 1
-
Press the Navigation Button to
access the Main Menu.
STEP 2
-
25
Scroll by using the Up or Down
Buttons to reach the Settings
Menu.
Press the Navigation Button.
STEP 3
-
Scroll to reach “Mood Display”.
Press the Navigation Button.
STEP 4
-
Choose either the “Show Status”
or “Show Name” option.
STEP 5
-
-
5.2.
Press the Navigation Button to
select the option.
The
icon indicates that the
option is selected, while the
icon indicates that the option is
not.
Please refer to Section 4.2 Mood
Control to see the difference in
the two options.
Copy Setting
This “Copy Setting” screen is used for copying all settings (Registered Devices, Groups
and Moods) from one CG100RV2 to another CG100RV2. Please follow the steps below to
navigate to the screen.
26
SOURCE
STEP 1
DESTINATION
-
Connect two CG100RV2’s
together with the provided USB
Cable
The SOURCE remote is the
remote to copy the settings
FROM.
The DESTINATION remote is
the remote to copy the settings
TO.
STEP 2
-
Using the SOURCE remote,
press the Navigation Button to
access the Main Menu.
STEP 3
-
Scroll by using the Up or Down
Buttons to reach the Settings
Menu.
Press the Navigation Button.
STEP 4
-
Scroll to reach “Copy Setting”.
Press the Navigation Button.
STEP 5
-
27
A “Please Wait” screen will
display while the
DESTINATION remote is being
located.
STEP 6
-
If the DESTINATION remote
was found successfully, a
message asking for “Accept”
confirmation will be displayed on
the DESTINATION remote.
-
The SOURCE remote will
display an “Accept Setting
Please Wait” message.
STEP 7
-
5.3.
When the settings have finished
being copied, it will display
“Completed!”
Reset
This “Reset” screen is used for removing all previously registered devices from the
CG100RV2 as well as Groups and Moods. However, it will NOT reset the ID. Please
follow the steps below to navigate to the screen.
STEP 1
-
28
Press the Navigation Button to
access the Main Menu.
STEP 2
-
Scroll by using the Up or Down
Buttons to reach the Settings
Menu.
Press the Navigation Button.
STEP 3
-
Scroll to reach “Reset”.
Press the Navigation Button.
STEP 4
-
A warning message is displayed.
Press the Navigation Button.
STEP 5
-
Press the Navigation Button to
confirm or press the Back Button
to exit.
STEP 6
-
5.4.
When the CG100RV2 has
finished resetting, it will display
“Success”.
Memory Info
This “Memory Info” screen shows the total number of registered devices as well as the
total number of devices added to Groups and Moods. Please follow the steps below to
navigate to the screen.
29
STEP 1
-
Press the Navigation Button to
access the Main Menu.
STEP 2
-
Scroll by using the Up or Down
Buttons to reach the Settings
Menu.
Press the Navigation Button.
STEP 3
-
Scroll to reach “Memory Info”.
Press the Navigation Button.
STEP 4
-
Scroll to reach “Registered
Device”.
Press the Navigation Button.
STEP 5
-
The “Registered Device” screen
is displayed.
Press the Back Button.
STEP 6
-
30
Scroll to reach “Device Added to
GPs & Moods”.
Press the Navigation Button.
STEP 7
-
5.5.
The “Device Added to GPs &
Moods” screen is displayed.
About
This “About” screen shows the product information of the CG100RV2. Please follow the
below steps to navigate to the screen.
STEP 1
-
Press the Navigation Button to
access the Main Menu.
STEP 2
-
Scroll by using the Up or Down
Buttons to reach the Settings
Menu.
Press the Navigation Button.
STEP 3
-
Scroll to reach “About”.
Press the Navigation Button.
STEP 4
-
The “About” screen is displayed.
For CG100R, same as all procedures above
31
6. Appendix
6.1.
Specifications
SPECIFICATION
Power Supply
CG100RV2: 2 x AA Alkaline Batteries
(Not Included)
CG100R: 2 x AAA Alkaline Batteries
(Note Included)
Screen
Dot Matrix Monochrome
Functions
Group/Individual Control of
Citygrow’s Zigbee Devices
Operating Temperature
0 – 40 oC
Range
100m (Line of Sight)
Dimensions:
CG100RV2: 195 x 54 x 29mm
CG100R: 124 x 57 x 16mm
32