1
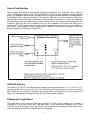
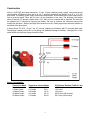
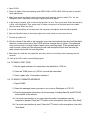
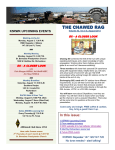
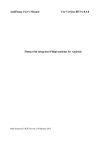
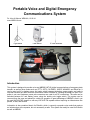
Portable Voice and Digital Emergency
Communications System
Dr. John A. Allocca, WB2LUA, 12/16/14
www.WB2LUA.com
Light Stand
CRM Mount
2./70cm Antenna
Case
Introduction
This system is designed to provide voice and NBEMS (MT-63) digital communications of emergency data
transfer, as well as other modes such as, RTTY, SSTV, CW PSK31, WSPR, WINMOR, and EchoLink. It
can be used on AC or battery power. An toggle switch between the battery, power supply, and radio is
required because the radio will draw current even when switched off, causing the battery to drain if AC
power is not used. Anderson power pole connectors are used for all DC connections. The radio can be
switched between AC and battery power using the double pole toggle switch. The system can be
removed from the case and placed on a table for operation. A great advantage of NBEMS is that it can
be used VHF/UHF/HF simplex or with any VHF/UHF FM repeater without requiring an infrastructure like
packet, D-Star, and Winlink.
Information is also contained herein for Echolink, which is currently a popular voice mode that requires
an infrastructure at the repeater, but not necessarily a radio. This system can easily be used for Echolink
as well as NBEMS.
Sound Card Interface
Several sound card interfaces were tested including the Rigblaster Plus, Rigblaster Nomic, Signalink
USB, and Rigblaster Plug and Play. The Rigblaster Plus was not chosen because it required external
power. The Rigblaster Nomic was not chosen because it required manually switching the radio between
the Rigblaster Nomic and the microphone. The Signalink USB was not chosen because it didn’t work
with this radio and computer and Tigertronics tech support was not available at the time. The Rigblaster
Plug and Play sound card interface was selected for this project. The interface draws power from the
computer’s USB port and uses a standard 6-pin mini DIN connection to the radios rear DATA port to
control the PTT and for audio input and outputs, leaving the radio microphone input for the microphone. It
also doesn’t require different jumper configurations. It literally took less than 2 minutes to install the
drivers and setup the Rigblaster Plug and Play.
UHF/VHF Antenna
The Diamond AZ507RSP Dual Band Mobile Antenna was selected because it is a 1/2 wave, 27.5”,
antenna that will easily fit into the 36” case. The Smith-Victor 10 foot light stand uses plastic connecting
parts, which are not conductive. Therefore only the top section will conduct and it will provide the 1/2
wave 19.6” ground plane counterpoise required for UHF/VHF mobile antennas.
Photographic Light Stand
The Smith-Victor 10 foot aluminum light stand extends to 10 feet high and weighs only 3 pounds. It
collapses to 32” and easily fits into a 36” light stand case. The top section has a diameter of 5/8”, which
is suitable for most mounting clamps. The case is wide enough to accommodate the #901 dipole mount,
while permanently mounted to the top section of the light stand.
!2
Construction
Mount a UHF/VHF dual band transceiver, 13 volt, 23 amp switching power supply, sound card sound
card interface, AC/Battery switch, and a 12 volt, 7 amp hour sealed gel cell battery, on a 16” x 11” x 3/4”
pine board. The battery, power supply, and sound card interface, are mounted with a Velcro strap so they
can be removed easily. Place the unit into a 6 inch briefcase or tool case. The briefcase unit weighs
about 22 pounds. To operate a digital mode, a PC, Mac or Linux computer will be required. The case can
be lightened by 5.7 pounds by removing the battery. Be sure to construct the Anderson power poles
exactly like the photo - Red on the Right with conductors on top. Plastic pipe clamps serve as handles on
each end of the pine board.
A Power Sonic PS-1270, 12 volt 7 ah, 5.7 pounds, sealed gel cell battery with F1 terminals was used.
Discharging a battery below 50% of its charge will probably damage the battery. Charging 50% of the
same battery will require a charge for half the time.
Power Consumption:
Transceiver Mode
Receive
5 Watts Output
10 Watts Output
20 Watts Output
50 Watts Output
Transceiver Current
0.27 amps
2.15 amps
2.86 amps
4.01 amps
7.42 amps
Watts
3.24
25.8
34.32
48.12
89.04
!3
50% Battery Runtime (7ah/2=3.5 ah)
12.95 hours
1.63 hours
1.23 hours
0.875 hours (59 minutes)
0.47 hours (28 minutes)
Narrow-Band Emergency Message System (EBEMS) MT-63 Operating Instructions
Narrow Band Emergency Messaging Software (NBEMS) is a system that allows amateur radio operators
to send and receive data using almost any computer (Windows, Mac, and Linux) and any analog radio
without requiring a dedicated digital infrastructure like packet, D-Star, etc. NBEMS works on VHF/UHF
FM and on HF. NBEMS software was developed by Dave Freese - W1HKJ, Stelios Bounanos - M0GLD,
Leigh Klotz - WA5ZNU, Stephane Fillod - F8CFE, John Douyere - VK2ETA, Joe Veldhuis - N8FQ, Chris
Sylvain - KB3CS, and Gary Robinson - WB8ROL. The three most common modes used are:
MT-63 2000L (long interleave) Digital Mode VHF/UHF FM
MT-63 1000L (long interleave) Digital Mode VHF/UHF FM
MT-63 1000L (long interleave) Mode HF USB
NBEMS Installation
Download FLDIGI and FLMGS from http://www.w1hkj.com/download.html for Windows, Linux, or MAC.
1. If using a Sound Card Interface, hook up all cables and test the microphone on FM.
2. Connect the RS232 connection from the rig to the computer.
3. Install Fldigi and Flmsg software.
4. Open Fldigi.
5. Click on Configure / Operator and enter your personal information or as much as you want to. Save.
6. Run Sound Card Calibration (CheckSR.exe) and write down the PPM values. Skip this step if using a
mac.
6a. Sound Card Calibration
1. Download and save CheckSR.exe. It provides the capability of analyzing your sound
card offsets and gives you the corrections in parts per million (ppm): http://www.pasitrep.com/checksr/CheckSR.exe
2. Open FLDIGI, go to configure, sound card, audio devices tab and make sure you have
the sound card you use for your interface properly selected from the capture and
playback drop down choices.
3. Under the audio settings tab, you should see a sample rate drop down box for capture
and playback. Under each drop down box, select the sample rate that has (native)
listed after it and write down this figure. Click save config, then click save. Close
FLDIGI.
4. Open CheckSR. From the drop down boxes for sound card settings, Input and Output,
choose the sound card you are using. Next, select the sample rate from the drop down
box in CheckSR for the sample rate that FLDIGI showed as "Native" then click start.
!4
5. Let the application run for about 5 minutes. You will notice that the numbers will
progressively stabilize. After about 5 minutes, click stop then write down the resulting
figures on input and output for the measurements in Hz and PPM. Keep this record.
6. Open FLDIGI, go to configure, defaults, sound card and click on the audio settings tab.
Enter the PPM figures for RX ppm (CheckSR ppm Input figure) and TX ppm
(CheckSR ppm Output figure). If you had a figure that resulted in a minus from
CheckSR, enter the PPM setting with the minus symbol followed directly by the figure
with no space. Then click save config, then close.
Some sound card softwares have a programmable filter on the mic/line input that can
characterize the digital signal as noise, and squash it after 2 seconds. Turned off this filter.
7. Click on Configure / Audio / Devices and select the sound card input and output fields and enter the
PPM values from the Sound Card Calibration. Enter the PPM figures for RX ppm (CheckSR ppm
Input figure) and TX ppm (CheckSR ppm Output figure). If you had a figure that resulted in a minus
from CheckSR, enter the PPM setting with the minus symbol followed directly by the figure with no
space. Save.
8. Click on Rig / Rig / Hardware PTT and set up Rig Control. The simplest rig control is to control the
push to talk. Set this type of control on the first configuration tab for rig control. Select this operation
by checking the "Use serial port PTT". Select the serial port from the list (fldigi will have searched for
available ports) or go to Start / Control Panel / System / Hardware / Device Manager / Ports (Com
and LPT) to find the com port used. Then specify whether the h/w uses RTS or DTR and whether a +
or - voltage is required to toggle PTT on. Then, press the Initialize button. Set the rig to a frequency
that is not used during testing. Save.
9. Click Configure /Misc / NBEMS, check: enable, open message folder, open with FLMSG, open in
browser, and press FLMSG button and select the executable file. Save.
10. Click Configure / Modems / MT-63 tab, check: 8 bit extended character (UTF-8) and Long Receive
Integration. Save.
11. Open FLMSG
12. Configure, Date and time. Select the format you want to use. Save.
13. Configure, Personal Data. This should already be in the program. If not, enter it. Save.
14. Configure Files Formatting. Check open folder when exporting, Callsign, Data-time, and Serial #.
Save.
15. From the Form menu, select Radiogram.
16. On the bottom of the window, select Base 64 and MT63-2L from the drop down lists.
NBEMS Operation
A hard wired sound card interface can be used. Alternately placing the computer’s microphone near the
radio’s speaker to receive and holding the radio’s microphone next to the computer speaker while
pressing the microphone’s PTT switch and pressing PTT on the computer to transmit.
Below are some basic instructions. More advanced instructions can be obtained by watching the
instructional videos.
!5
1. Open FLDIGI.
2. Under, Op Mode, select the operating mode MT63-2000L or MT63-1000L (PSK can also be used for
other applications)
3. Adjust your sound card master audio volume and sound recording volume to about 75%. You can
change this later if necessary according to signal reports from others.
4. In the frequency display, click on the last digit and set it to zero. Then, press enter. Enter the frequency
in KHz. on the keyboard. Then, press enter or Select a frequency from the drop down box located
after the words “Enter Xcvr Freq.”
5. If a sound card interface is not used, place the computer’s microphone near the radio’s speaker.
6. Open the Squelch button on the bottom right corner of the screen (no color seen in box).
7. Turn the rig squelch off.
8. Set the volume of the radio or the computer sound card microphone input level until the black
diamond, on the bottom part of the FLDIGI window, changes color to green. If the diamond
turns red, the level is too high. Adjust it again on an incoming signal. If the rear data jack is
used for audio, adjust only the computer sound card microphone input level because the
radio volume control will not have any effect.
9. When there is a solid line in the waterfall, point the cursor to it and click so that a message can be
received.
10. Click on the AFC button to track drifting signals.
11a. TO SEND A TEST TONE
1. Set the signal markers to be centered on the waterfall at 1,500 Hz.
2. Press the TUNE button (a 1,000 Hz. tone will be transmitted.
3. Press it again after 15 seconds to release it.
11b. TO SEND A FORMATED MESSAGE:
1. Open FLMSG
2. Select the message format you want to use, such as Radiogram or ICS-213.
3. Enter the appropriate information into the message, including Base 64 and MT63-2KL
at the bottom of the window.
4a. If a sound card interface is not used, place the radio’s microphone near the
computer’s speaker. Press the PTT switch on the microphone, then click “Auto Send.”
4b. If a sound card interface is used, Press the PTT switch on the microphone, then click
“Auto Send.”
!6
4c. If a sound card interface and rig control is used, click “Auto Send.”
11c. TO SEND AN UNFORMATED MESSAGE:
1a. If a sound card interface is not used, place the radio’s microphone near the
computer’s speaker. Press the PTT switch on the microphone, then click on the CQ
button (green button) or the TTX. To transmit a message that has been typed in, press
the PTT switch on the microphone, then click on the TTX button.
1b. If a sound card interface is used, click on the CQ button (green button) or the TTX. To
transmit a message that has been typed in, click on the TTX button.
1c. If a sound card interface and rig control is used, click on the CQ button (green button)
or the TTX button.
FLDI User Manual: http://www.w1hkj.com/FldigiHelp-3.22/operating_page.html
NBEMS Macros
1 .Open Flidigi
2. On the right, above the waterfall, next to the blue blank button is a #1. Left click this number until it
changes to “3” or “4”, whichever bank you want to use.
3. On the left side, there is a green blank macro button, right click a button and the macro editor will pop
up.
4. Copy the line from below. Paste this line into “macro text” box.
DE <MYCALL> ALL STATIONS THIS IS A MESSAGE FROM, Northport, New York [MT63-2KL 1500Hz]
DE <MYCALL> K <RX>
5. Enter a button name below into the “macro button label” box (such as TX-30s)
6. Click Apply and Close
7. Choose File, Macros, Save, and Save.
Test it the first time by left clicking it without a radio connected.
NBEMS Instructional Videos
http://www.youtube.com/watch?v=-1wZ7uIA-Qs
http://www.youtube.com/watch?v=SWZ2vKWSilE&list=PLBF8CFBA57CC6C2CC
http://www.youtube.com/watch?v=psP489NOkg0
http://www.youtube.com/watch?v=9Pw9XWnwukc
http://www.nyc-arecs.org/narrow.html
!7
Echolink
EchoLink makes it possible for amateur radio stations to connect to a repeater anywhere in the world via
the internet. The technology uses streaming audio. Echolink was developed by Jonathan Taylor, K1RFD,
in early 2002. Connections to be made between Echolink connected; stations, or from computer to
station, or from an iPhone to a station or repeater.
The first step is to register your callsign at www.echolink.org to be authenticated. Then, download the PC
software from www.echolink.org. Install the software in your computer or iPhone. A list of repeaters will
appear on the computer or iPhone screen. Software for the Mac is available from http://
echomac.sourceforge.net.
W1AW (ARRL) is also present on the list of active EchoLink stations. However, W1AW is listed as
"BUSY" since this connection is used for the conference server. Therefore, DO NOT connect to W1AW.
To listen, you must connect to W1AWBDCT (node 501433).
!8
The Apple Airport series router does not support port triggering. It will need to be configured manually to
forward to a Mac's IP address.
Step 1. On the mac, go to System Preferences / Network / Advanced / TCP/IP and find the IPv4 address.
On the PC, go to Control Panel / Network Connections. Double click on Network Connections. Click on
Support or Details and copy the IP Address. NOTE: each computer used, will have a different IPv4
address. Consequently, if computers are changed, the IPv4 address must be change in the router.
Only one IPv4 address can be used in the router. The iPhone appears to work with any
configuration.
Step 2. Open Airport Utility.
Step 3 . Go to the network tab, Select Port Mapping, click the + sign to add a port mapping and name it
EchoLink.
Step 4. Add Public UDP ports: 5198, 5199
Step 5. Add Private UDP Ports: 5198, 5199
Step 6. Add Public TCP Ports: 5200
Step 7. Add Private TCP Ports: 5200
Step 8. Change the Private IP Address to the IPv4 address found in Step 1.
!9
Parts List
as of 12/12/14
Kenwood TM-V71A UHF/VHF Transceiver - $365
Rigblaster Plug and Play Sound Card Interface - $99
Samlex SEC-1223 23 amp switching power supply - $115
Power Sonic PS-1270, 12 volt, 7 amp hour sealed acid battery - $24
Power Sonic PSC-12800A 12 volt, 0.8 amps, automatic batter charger - $36
Powerwerx 30 Amp Unassembled Red/Black Anderson Powerpoles, PP30-10, Set of 10, $10
Powewerx #14, 25 ft. Red/Black Zip Cord, $17
Smith-Victor, RS10, 10 ft. Aluminum Light Stand, Folds to: 32 in., Footprint: 47 in., Weight: 3.0 lbs. - $45
Davis & Sanford, DATC Tribag, 36”, Padded Tripod Case - $20
Diamond, C211, SO239 mount with RG8X extension cable for 16.5 feet total - $50
Diamond, CRM, Right Angle Bracket with U Bolts - $17
Diamond AZ507RSP Dualband w/ Spring Mobile 1/2 wave, Antenna, 27.5” - $47
Cable Xperts, CXP08XC50, 50 FT RG8X CABLE with PL259 plugs - $39
6” tool case - $20 from Home Depot
Reliance Best Power Peg Plastic Stakes-12 inch, www.campmor.com, Item Number: 21768, 6/$3.99
Tent Mallet, www.campmor.com, Item Number: 26006, $3.99
1/8" nylon cord for guying
!10