1
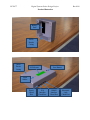
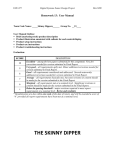
ECE 477 Digital Systems Senior Design Project Rev 8/09 Homework 13: User Manual Team Code Name: Home Enhancement Suite Group No. 10 User Manual Outline: Brief (marketing-style) product description Product illustration annotated with callouts for each control/display Product setup instructions Product use instructions Product troubleshooting instructions Evaluation: SCORE DESCRIPTION Excellent – among the best papers submitted for this assignment. Very few corrections needed for version submitted in Final Report. Very good – all requirements aptly met. Minor additions/corrections needed for 9 version submitted in Final Report. Good – all requirements considered and addressed. Several noteworthy 8 additions/corrections needed for version submitted in Final Report. Average – all requirements basically met, but some revisions in content should 7 be made for the version submitted in the Final Report. Marginal – all requirements met at a nominal level. Significant revisions in 6 content should be made for the version submitted in the Final Report. Below the passing threshold – major revisions required to meet report * requirements at a nominal level. Revise and resubmit. * Resubmissions are due within one week of the date of return, and will be awarded a score of “6” provided all report requirements have been met at a nominal level. 10 ECE 477 Digital Systems Senior Design Project Rev 8/09 Home Enhancement Suite User Manual T he Home Enhancement Suite is a modular home automation system. It can be set up to control a variety of household systems such as lighting, home entertainment, and home security. The Home Enhancement Suite uses Radio Frequency Identification (RFID) cards to identify which user is in a given room, and automatically sets the room to their preset settings. Each user has the ability to set up an individualized profile or have their settings linked to a general profile. Setup of the system is done via a web server and can be completed in just minutes. The system includes remote doorway sensors, eliminating the need for unsightly cables or expensive in-wall installation. These can be used to unlock a door to allow entry. When a user enters the house through a locked door they simply wave their RFID card in front of the reader, which can be left in your wallet, without the hassle of finding the right key. If the RFID card is recognized, the door will open and the user can enter. It’s just that simple! At the same time, the lights are turned on to the user’s preferred setting and the TV is turned on and tuned to the user’s preferred channel. You might like to watch the news after work, or if you return later in the evening, having the lights come on automatically keeps you from needing to fumble with difficult-to-use light switches. The system keeps track of who is in a room and uses the settings of the user with the highest priority, which is set through the web interface. If a user with a higher priority, like a parent, enters the room when a user with a lower priority, like a child, is already occupying the room, the settings will switch automatically to the parent’s settings. If the higher priority user then leaves the room, the settings will switch back to the user with the highest priority still in the room. ECE 477 Digital Systems Senior Design Project Rev 8/09 Product Illustration Battery Pack RFID Reader Casing Main Device Casing LCD Screen Save Button Light Sensor Power Chord Port X10 Interface Chord Port HDMI Interface Chord Port Electronic Lock Chord Port ECE 477 Digital Systems Senior Design Project Rev 8/09 Product Setup Instructions In the box: HDMI Cable Telephone Cable (2) Remote RFID Unit Ethernet Cable Power Cord Central Control Unit (CCU) (4) AA Battery Lamp Control Unit X10 Sending Unit (4) RFID Cards 1. Unpack the CCU and set it on a sturdy surface in a room with access to an Ethernet port. 2. To control lighting a. Attach one end of the provided telephone cord to the central control unit b. Attach the remaining end of the telephone cord to the X10 Sending Unit c. Plug the sending unit directly into a wall power outlet (don’t use surge protector) d. Plug the room’s main lamp into the Lamp Control Unit, and plug that into the wall Note: Lamp must be placed so that light is shed on the central control unit 3. To control a television, use the provided HDMI cable to connect the TV to the CCU 4. Use the provided Ethernet cable to connect the CCU to your home network 5. (Requires Professional Installation) Install electronic door lock to the requested door. 6. Put 2 AA batteries in each of the RFID readers and attach them with 3M™ double-sided tape to the main entry/exit point of the house, one on either side of the door. 7. Use the power cord to plug the CCU into a wall outlet, then switch the CCU on 8. On a computer access the Home Enhancement Suite settings at http://homesuite/. 9. Configure your individual settings and click the save button. 10. Repeat step 6 for all other ID’s desired. 11. Log off the web server and enjoy your newly automated room! ECE 477 Digital Systems Senior Design Project Rev 8/09 Product Use Instructions To get the most out of the Home Enhancement Suite, proper customization and usage is required. These steps will hopefully guide you through each step in customizing settings to your personal taste as well as the appropriate actions after a profile has been set up. 1. Ensure the Central Control Unit is properly installed and powered on. 2. Log on to the Home Enhancement Suite Web Interface, The default address is: http://homesuite/ (If the default address does not work properly, attempt to configure network settings to allow DHCP. If this is not possible a second solution is to create a static IP address for the device. More information on how to do this can be found at http://www.portforward.com ) 3. At the Welcome screen (Fig. 1), follow the link to user settings found on the left hand site of the screen. Figure 1: Welcome Screen 4. At the User Settings screen (Fig. 2), there will be five user profiles available for customization. Enter the one corresponding to your RFID card. The default credentials to enter your profile page are as follows: User: <the shown username> Password: password ECE 477 Digital Systems Senior Design Project Rev 8/09 Figure 2: User Settings Screen 5. At your Personal Profile screen (Fig. 3), you can adjust any of the settings available, as well as your username and password. To make the changed settings permanent, click the appropriate ‘Save’ button. Figure 3: Personal Profile Screen 6. After all the settings have been saved, swipe your RFID card at the nearest reader to activate the settings. 7. To manually adjust any settings without accessing the web interface, just press the ‘Save’ button on the CCU when your profile is the active one in the room, and those settings will be saved to your profile. ECE 477 Digital Systems Senior Design Project Rev 8/09 Troubleshooting Instructions The following is a list of potential problems and solutions. For any problem, first try unplugging the Home Enhancement Suite and plugging it back in. If you are not a certified electrician, do not attempt anything listed as work for a certified electrician (labeled CE). Before doing any troubleshooting on the Home Enhancement Suite, make sure the unit has been unplugged. Problem Power Light is off. No beeping noise when RFID is scanned. No confirmation displayed on LCD. LCD does not display welcome message or username. Light or TV does not turn on when RFID card is scanned. Potential Cause 1. Lack of power 2. Main board is damaged 1. Batteries are dead 2. RFID connection is unstable 3. Main board is damaged 1. LCD connection to main board unstable 2. LCD or main board is damaged 1. Port connections to main board unstable 2. Ports or main board damaged Light or TV is set to a wrong setting compared to user settings. 1. Ethernet connection is unstable 2. RFID connection to main board unstable 3. RFID or main board is damaged Light levels are adjusting inappropriately or not at all. 1. Light sensor in an area incapable of correct sensing. 2. Light sensor or main board is damaged 1. Ethernet connection is unstable 2. Network settings incorrect 3. Main board is damaged Web Page is inaccessible. Solution 1. Ensure power cord is undamaged and plugged in. 2. Call manufacturer for maintenance. 1a. Ensure working batteries are placed in RFID readers 1b. Restart device, testing both readers and main board RFID readers 2. Call manufacturer for maintenance. 1. Unplug from wall and check that the connection is secure between the LCD and PCB (CE). 2. Call manufacturer for maintenance. 1. Ensure all port connections are correct on both ends. 2. Restart device, testing with default settings. 3. Call manufacturer for maintenance. 1. Make sure settings are properly saved on the web interface. 2. Restart device, testing with default settings. 3. Unplug from wall and check the connection between the RFID, Ethernet, and PCB (CE). 4. Call manufacturer for maintenance. 1. Make sure light sensor is not blocked from receiving correct light level of the room. 2. Test by attempting maximum and minimum light levels in well lit room. 3. Call manufacturer for maintenance. 1. Ensure device is properly connected to switch or computer 2. Make sure network settings are properly configured to access. 3. If needed, create static IP address for device. 4. Call manufacturer for maintenance.