1
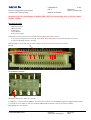
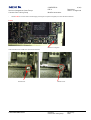
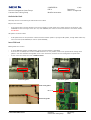
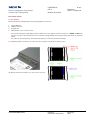
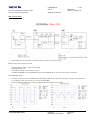
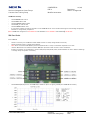
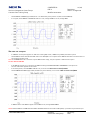
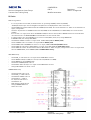
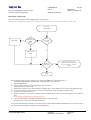
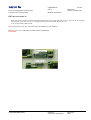
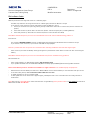
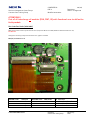
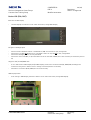
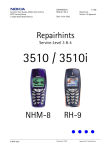
CONFIDENTIAL
RAE-2
Service & Competence Center Europe
Customer Care Training Group
© 2001 Nokia Mobile Phones
1 (30)
Repairhints
Version 1.0 Approved
Modified 02.07.2001
Checked by:
Customer Care Training Group
Approved by:
SCCE
CONFIDENTIAL
RAE-2
Service & Competence Center Europe
Customer Care Training Group
2 (30)
Repairhints
Version 1.0 Approved
Modified 02.07.2001
General
-How to use this document
Place the schematics behind this manual.
Now you are able to follow these specifictions with graphical layouts and it is easier for you to find the components and
measuring points.
-General handling
Special Note: Before starting repair, interchange all modules (PDA, CMT, UI) with functional modules to define the
faulty one. Check also the test equipment of proper functionality.
-Component characteristics
Some components contain important data.
Several described steps are only practicable if you are able to reflash/ realign the phone and/ or rewrite IMEI/ SIMlock in certain
cases. Please pay attention to separate notes.
Use only the 9110i PDA SW for 9110i communicator known by the special product codes. It is not allowed to flash 9110 PDA with
9110i SW.
-µBGA components and broken balls
Special attention to µBGA components.
All µBGA´s are replaceable and must be renewed after removing. Reflow by hot air fan is not allowed.
Check soldering points, remove oxidated solderings (broken balls) carefully by enclosing a few new solders before placing new
components. The only allowed way to change µBGA components is to use from NMP approved µBGA rework maschines (e.g.
ZEVAC/ OK International). Use only recommended Fluxtype and an appropriate amount of it.
When changing any µBGA on PDA, check the keypad side for dirt or remnants of flux after rework. Clean PCB carefully, do not use
any scratching or rubbing tools.
-Realign after repair
Characteristics of replacement parts are different.
To prevent additional faults after repair (RX quality, TX power etc.) it is necessary to retune phone values.
For tuning see Service Manual at Chapter Service SW and Tuning Instructions
© 2001 Nokia Mobile Phones
Checked by:
Customer Care Training Group
Approved by:
SCCE
CONFIDENTIAL
RAE-2
Service & Competence Center Europe
Customer Care Training Group
3 (30)
Repairhints
Version 1.0 Approved
Modified 02.07.2001
IMPORTANT:
This document is intended for use by authorized NOKIA service centers only.
The purpose of this document is to provide some further service information for NOKIA Communicator 9110/I.
It contains a lot of collected tips and hints to find failures and repair solutions easily.
It also will give support to the inexperienced technicians.
Saving process time and improving the repair quality is the aim of using this document.
We have built it up based on fault symptoms (listed in "Contents") followed by detailed description for further analysis.
It is to be used additionally to the service manual and other service information like Service Bulletins. For this
reason it doesn't contain any circuit descriptions or schematics.
All measurements are made by following equipment:
Nokia repair SW
: WinTesla 6.43
CMT DLL Version
: 00.00.18
PDA DLL Version
: 6.0
Nokia Module Jig
: MJS-4
Digital Multimeter
: Fluke 73
Oscilloscope
: Fluke PM 3380 B
Spectrum Analyser
: Advantest R3131C with an analogue probe
RF-Generator /
: Rohde & Schwarz CMU 200
GSM Tester
While every endeavour has been made to ensure the accuracy of this document, some errors may exist. If the reader finds any
errors, NOKIA should be notified in writing, using following procedure:
Please state:
Title of the Document + Issue Number/Date of publication.
Page(s) and/or Figure(s) in error.
Please send to:
Nokia GmbH
Service & Competence Center Europe
Meesmannstr.103
D-44807 Bochum / Germany
Email: [email protected]
Copyright © Nokia Mobile Phones.
This material, including documentation and any related computer programs is protected by copyright, controlled by Nokia Mobile
Phones. All rights are reserved. Copying, including reproducing, modifying, storing, adapting or translating, any or all of this
material requires the prior written consent of Nokia Mobile Phones. This material also contains confidential information, which
may not be disclosed to others without the prior written consent of Nokia Mobile Phones.
© 2001 Nokia Mobile Phones
Checked by:
Customer Care Training Group
Approved by:
SCCE
CONFIDENTIAL
RAE-2
Service & Competence Center Europe
Customer Care Training Group
4 (30)
Repairhints
Version 1.0 Approved
Modified 02.07.2001
Contents
Mechanical faults
5
CMT electrical faults
11
SIMcard faults
12
Not charging
14
Contact service
14
CMT SW update problems
15
CMT faults in RF part
16
RX faults
17
TX faults
19
PDA electrical faults
22
PDA LCD faults
24
CMT does not switch on (reed relay)
26
PDA software faults
27
User Interface faults
28
Broken LCD (PDA, CMT)
29
© 2001 Nokia Mobile Phones
Checked by:
Customer Care Training Group
Approved by:
SCCE
CONFIDENTIAL
RAE-2
Service & Competence Center Europe
Customer Care Training Group
5 (30)
Repairhints
Version 1.0 Approved
Modified 02.07.2001
Attention!!! At first interchange all moduls (PDA, CMT, UI) with working ones to find out, which
module is faulty.
Mechanical faults
-
CMT does not start
CMT shuts down
Keypad failed
“Insert SIMcard”
Flash empty or faulty
If CMT does not start, check current consumption when pressing the power on botton.
If the current consuption does not change, check X190, C106 and X160 for mechanical damage. (see pictures)
If these are damaged, change if necessary.
Note! The edge is curved when the connector is broken, check also for short circuits under connector.
(X190)
(X160) Battery connector
Mechanical damage from VBatt–Pin1 of X160
The VBatt pin is not as long as the GND pin. The phone may shut down or “Insert SIMcard” appears on CMT–Display if battery
is not fixed correct in chassis. In this case the BSI pin (Battery Size Indicator) is loosing connection to battery,
Change X160 (See also SB–29)
© 2001 Nokia Mobile Phones
Checked by:
Customer Care Training Group
Approved by:
SCCE
CONFIDENTIAL
RAE-2
Service & Competence Center Europe
Customer Care Training Group
-
6 (30)
Repairhints
Version 1.0 Approved
Modified 02.07.2001
Check C106 for cold or broken soldering by pressing the component slightly from the side with tweezers.
(C106)
Broken or cold joint
C106 is broken from old B-cover (see Pictures below)
Old B-cover
© 2001 Nokia Mobile Phones
New B-cover
Checked by:
Customer Care Training Group
Approved by:
SCCE
CONFIDENTIAL
RAE-2
Service & Competence Center Europe
Customer Care Training Group
7 (30)
Repairhints
Version 1.0 Approved
Modified 02.07.2001
Audio holder fault
Generally check for cold soldering at audio holder area on PDA.
Earpiece does not work
-
If the earpiece does not work, because of too short elastomer in audio holder assy, change the short one (6.8 mm, code
9780238) into the new longer version (7.1 mm, code 9780267). The reason for too short elastomer is the thicker chassis.
See SB-021
HF speaker connection failure
-
If HF speaker does not work, because of bad connection between speaker´s springs and HF speaker, change Audio holder assy
from old version (code 9467029) to new one (code 9467049),
Insert SIM card
Metal gasket short circuits
-
-
If “Insert SIMcard” appears on CMT–Display, check first which gasket is assembled.
If the old one is installed, short circuits on SIM-contact Pin´s 1-3 is possible, shown in the picture below. Change metal
gasket in this case. Otherwise change Back cover to the new Version, because the new metal gasket is implemented.
If there is the same fault, then refer to SIMcard faults
Old metal gasket
New metal gasket
New metal gasket
Pin 1-3
Old metal gasket
© 2001 Nokia Mobile Phones
Checked by:
Customer Care Training Group
Approved by:
SCCE
CONFIDENTIAL
RAE-2
Service & Competence Center Europe
Customer Care Training Group
8 (30)
Repairhints
Version 1.0 Approved
Modified 02.07.2001
Poor battery contact
See also SB-029
Following faults will probably happen when breaking battery connection:
1.
2.
3.
4.
"Insert SIMcard"
“SIMcard rejected”
Dropped calls
CMT switches off for a short moment
-
This mentioned symptoms will happen when the battery can move slightly and the connector pin´s BTEMP and BSI have
losing for a couple of milliseconds connection to battery. Change battery and install the battery pad shown in the picture
below.
The reason for changing battery: The battery pads getting corrosive and mechanical damage
-
Note! Breaking battery connection can cause “memory corruption” and “Does not charge" faults.
The battery pad fixes the battery, so it can not move any more
© 2001 Nokia Mobile Phones
Checked by:
Customer Care Training Group
Approved by:
SCCE
CONFIDENTIAL
RAE-2
Service & Competence Center Europe
Customer Care Training Group
9 (30)
Repairhints
Version 1.0 Approved
Modified 02.07.2001
Field strength is poor or dropping calls when lid is opened
If field strength indicator is poor or dropping calls when lid opened, the coaxial cable is broken. Change it by using the new
more resistable coaxial cable (code 9780269).
- Use always the new route shown in the following picture below, because of audio problems at MIC-Line.
See also SB-023
-
CORRECT DIRECTION OF THE CABLE
Cable routed between guidance
for better fixing use masking tape (code 7310079)
Cable routed behind the guidance rib
© 2001 Nokia Mobile Phones
Checked by:
Customer Care Training Group
Approved by:
SCCE
CONFIDENTIAL
RAE-2
Service & Competence Center Europe
Customer Care Training Group
10 (30)
Repairhints
Version 1.0 Approved
Modified 02.07.2001
Poor operating time
Further symptoms:
-
CMT flashing fails (no response)
Not charging
Current consumption too high
If there are one of these symptoms, the chassis gasket short-circuits the battery connector pins.
Cut the gasket at battery pins area with a knife.
Note! Do not scratch the chassis (beware of corrosion)
Burr in FBUS line
-
-
CMT flashing fails, cause of wake up during flashing. The Burr is connecting the FBUS_TX line to ground.
Check FBUS line on CMT (see picture), because the cutter at the production line sometimes cuts the FBUS line from CMT
board badly
Burr is connecting
the FBUS_TX line
to ground
© 2001 Nokia Mobile Phones
Checked by:
Customer Care Training Group
Approved by:
SCCE
CONFIDENTIAL
RAE-2
Service & Competence Center Europe
Customer Care Training Group
11 (30)
Repairhints
Version 1.0 Approved
Modified 02.07.2001
CMT electrical faults
-
Check voltage and all connections for broken soldering or short circuits (see picture)
Battery empty fault or power line faulty
-
Check the battery voltage = 3.6V at battery pack
Check VB=3.6V at J111
Check VBat line (X160, L103) for short circuits
Check BSI and BTEMP line to CCONT (X160, R122, D100, CCONT N110) for short circuits or broken connections
32.768 kHz B430 faulty
-
-
If battery is connected, check 32.768kHz squarewave (Vpp=2.82V) at J100 (See picture below). If no signal , check sleepclock
line for broken and/or short circuits from connectors X190, X830
Check 32.768kHz sinewave (Vpp=1.20V) from B430 at J435 on PDA (See picture below)
© 2001 Nokia Mobile Phones
Checked by:
Customer Care Training Group
Approved by:
SCCE
CONFIDENTIAL
RAE-2
Service & Competence Center Europe
Customer Care Training Group
12 (30)
Repairhints
Version 1.0 Approved
Modified 02.07.2001
CCONT N110 faulty
Check PWRONx=3V at J113
Check VBB=2.8V at J109
Check VCXOPWR=2.8V at J204
Check VREF_2=1.5V at J107
Check VCOBBA=2.8V at J110
If one off the voltages is missing, check Pin´s from CCONT N110 for cold or broken soldering and surrounding components.
Resolder or change faulty component.
(Note! CCONT has changed from old CCONT 2h code 4370391 to new CCONT 2I code 4370479) See SB-022
-
SIM Card faults
Insert SIMcard
-
-
-
Check if connector pins of SIM card reader X150 are bent or soiled, change X150 if necessary.
Check resistance at Pin 1-6 (Look picture below).
Note! Short–circuit the X160 (battery connector) between Pin 1 and 4, to unload the capacities for a short
moment. Now check the resistance between GND (Pin 4) and the other five Pin´s with a multimeter.
If broken connection or grounded Pin´s, check V104, R124, R125, R128, C127, C128 and N110 for cold or broken solderings
or change faulty component if necessary.
Check VSIM=3/5V (depend on used SIMCard) at X150 Pin 3/5. If no signal, probably the CCONT N110 is faulty
© 2001 Nokia Mobile Phones
Checked by:
Customer Care Training Group
Approved by:
SCCE
CONFIDENTIAL
RAE-2
Service & Competence Center Europe
Customer Care Training Group
-
13 (30)
Repairhints
Version 1.0 Approved
Modified 02.07.2001
Check SIMCLK=3.25MHz (Vpp=3.26V) at Pin 1 of X150 when phone powers on (with inserted SIMcard)
If no signal, check SIMCLK at CCONT N110 Pin 41. If ok, change CCONT. If not ok, change MAD.
SIM card not accepted
If “SIMcard not accepted” appears on LCD after entering PIN- Code, a SIMlock is probably activated in phone
Check SIMlock status with WinTesla SW under menu Quick/RF-info. Compare shown SIMlock data with the listed entries of
the respective product code.
Note! If the MSIN data field is closed to a special IMSI number range, only the operator is authorized to open it.
See also General SB-065
-
-
If all SIMlocks closed, try to reprogram the SIMlock setting with NOKIA SECURITY PASSWORD or send phone to
the next authorized regional service center.
If the fault persists, check VCOBBA=2.8V at J110, if not ok refer CMT electrical faults/CCONT
Check COBBACLK=13MHz (Vpp=3.47V) at J253 (see picture below), if not ok refer CMT electrical faults/MAD
-
If SIMlock data´s and SIMcard signals from CCONT are ok, change N250 COBBA
-
NOTE! Rewrite SIMlock and IMEI data with Nokia SECURITY Password and make a SW-update, if procedure is permitted to you.
© 2001 Nokia Mobile Phones
Checked by:
Customer Care Training Group
Approved by:
SCCE
CONFIDENTIAL
RAE-2
Service & Competence Center Europe
Customer Care Training Group
14 (30)
Repairhints
Version 1.0 Approved
Modified 02.07.2001
Not charging
-
First check with WinTesla-menu Tuning/Energy Management Calibration, which fault appears.
If charger voltage/Battery voltage out of limit, check R103=4.7kΩ
Ω and R104=47kΩ
Ω. If values not ok check VCHARG line
and components for shorts or breaks, change faulty one (N110, N120, R103, R104)
Check Pad 2 V_IN=50kΩ
Ω and Pad 3 Chrg_CTRL=32KΩ
Ω at CMT modul (X170)
If V_IN has low resistance (5kΩ), check C170 and R170
If V_IN has high resistance (MΩ), check F170
If CHRG_CTRL=0Ω, R172 is faulty
Check BSI–line from battery connector X160 to CCONT N110 Pin 62=10KΩ. If value is not ok check BSI line for shorts or
breaks and change faulty components (C160, R122, C160, D100, N100)
If the battery power indicater is scrolling continuously without charging or it overloads, check voltage at CHAPS N120 Pin 5
and 12. They must have the same voltage level as VB = 3.6V (depends on battery voltage). When different check N120 and
R131 for cold or broken soldering, change faulty component if necessary.
Check PWM 32Hz squarewave with ACP9–Charger and 1Hz with ACP7–Charger (when connected) at Pin 7 of CHAPS. If
there is no signal, change CCONT N110
Contact service
COBBA parallel
-
Check VCOBBA=2.8V at J110
Check COBBACLK=13MHz squarewave (Vpp=3.47V) at J253
Check VBB=2.8V at J109
If all values ok, change COBBA N250 (in some cases named in Service Manual D250) and rewrite SIMlock and IMEI data.
If the fault still persists, check MAD D200 (refer MAD faults)
NOTE! Rewrite SIMlock and IMEI data with use of NOKIA SECURITY PASSWORD and make a SW-update, if the procedure is
permitted to you.
PPM validity failed
-
-
Try to reflash CMT SW
If ppm-file fails when rewriting, caused by broken balls under flash, change FLASH D210
If the same fault will happen, change MAD D200
© 2001 Nokia Mobile Phones
Checked by:
Customer Care Training Group
Approved by:
SCCE
CONFIDENTIAL
RAE-2
Service & Competence Center Europe
Customer Care Training Group
15 (30)
Repairhints
Version 1.0 Approved
Modified 02.07.2001
CMT SW update problems
PDA or service battery fault
Check “Relink Mode” from PDA:
Open the lid. In the upper left corner 5 points and “Relink enable”appear on PDA–Display
If you can see the startup logo, check if service battery is switched in test mode (switch is located at the right side of service
battery)
If the service battery is switched to test mode, change PDA and try to reflash. If reflash works, PDA is faulty (refer to PDA
faults)
FLASH instruction when FLASH is empty or contains corrupt SW (CMT does not work)
-
Switch service battery to “Test Mode” (switch is located at the right side of service battery)
Connect the phone to FLA-7 using SCH-8 cable.
M2BUS and FBUS lights are shining yellow
Connect service battery with FLA-7 and other side with communicator. The FBUS light switches off
Open the lid and check if PDA is going to “Relink mode” (there must be 5 points and after a few seconds “Relink mode”
shown on PDA–Display). When PDA is in “Relink mode”, the FBUS light goes on again
Now try to flash the phone
NOTE! Do not push the power on button when the CMT is not working yet. If the power on button is pushed, the M2BUS/FBUS
turn lights off and the WinTesla flashprogram is now waiting for communication with CMT. The only possibility to flash the phone
is, when the M2BUS and FBUS lights are turned on.
FLASH D210 empty or faulty
-
If the current consumption is around 5mA, try to flash the phone.
If the fault information from prommer is: Algorithm file or alias ID don´t find, etc, change FLASH D210 and reflash again.
If the fault information from prommer is: External RAM failed, check Pin´s of SRAM (D220) for cold or broken solderings,
change D220 if necessary and reflash again.
If the phone does not work in both cases, change D200, cause of broken or cold soldering
Note! When changing D200 see also SB-020
New MAD 07 (code 4370611) and Jumper R151 assembled: J112=1.7V from CCONT Pin 59 V2V
- Old MAD 10 (code 4370421) and Jumper R152 assembled: J112=2.8V from CCONT Pin 55 VBB
Low standby time
SW bug
See SB-036
If sometimes poor operation time happens when CMT is off, a reason for this fault is a CMT SW bug. Make a CMT SW update
ver. 6.01 or newer
N500 faulty
-
-
Check current consumption when CMT is in sleep mode and lid is closed, no SIM card connected (current consumption
between 3.5mA–20mA)
If the current consumption is higher then 20mA (in most cases around 500mA and higher) lift L510. When current
consumption is now in limit, change N500 POWER AMPLIFIER with use of soldering machine (OK International, ZEVAC, etc.)
If low or no TX power refer also to CMT faults at RF part/ TX faults/ N500
© 2001 Nokia Mobile Phones
Checked by:
Customer Care Training Group
Approved by:
SCCE
CONFIDENTIAL
RAE-2
Service & Competence Center Europe
Customer Care Training Group
16 (30)
Repairhints
Version 1.0 Approved
Modified 02.07.2001
CMT faults at RF part
No service
-
Check with WinTesla RX and TX unit
Use RF–Generator for generating 947,MHz/ +Offset 67,708kHz/-40dbm, Ch:60 and open menu Testing/RSSI reading to check
“RX”
Use menu tuning/TX power for checking the different TX–power level and under next point TX I/Q the spectrum
Find out which part is faulty
No RX, no TX
-
Check RFCLK=13MHz (Vpp=830mV) sinewave at SUMMA N690 PIN15 for the right frequency 13MHz ±50Hz
-
Check AFC=1.3V (approximate value) at R547
If AFC=0V, check short circuit on AFC line, if ok change COBBA N250
Check 1018MHz/Ch:60 (G601), if G601 not working check power at Pin VCC=2.6V and VC=2,3V
If VCC=0V, check line (VSYN_1) to CCONT N110 at Pin 15(VR4)
Check VREF_2=1.5V at J107 and at one side of R136, change CCONT N110 when VREF_2=0V
If VC=4,5V at G601, check VREF_1=1,49V at the other side of R136 and Pin 41 of SUMMA (N690)
If only VREF_1=0V, R136 is cold or broken, change or resolder R136
MAD faults
-
Check RFCLK=13MHz at J219 and line between C213 and GND = 0Ω. If MΩ, check L511 for cold or broken soldering. If ok,
through hole connection is broken between L511 and C213, change CMT-PWB.
Check SLCLK=32.768kHz squarewave at J241
Check VBB=2.8V at J109
Check VCORE=1.7V (new MAD 07) and 2.8V(old MAD 10) at J112
Check PURX=2.8V at J240
Check VCXOPwr=2.8V at J204 (SleepX)
COBBA faults
-
-
Check VCOBBA=2.8V at J110
Check VBB=2.8V at J109
Check COBBACLK=13MHz at J253
Check VREF_2=1.5V at R251
Check phone in call mode with a simulator
Check errors (frequence, RX-Quality, TX-Power level)
© 2001 Nokia Mobile Phones
Checked by:
Customer Care Training Group
Approved by:
SCCE
CONFIDENTIAL
RAE-2
Service & Competence Center Europe
Customer Care Training Group
17 (30)
Repairhints
Version 1.0 Approved
Modified 02.07.2001
RX faults
RSSI tuning problem
-
If it is not possible to tune RSSI, use RF–Generator for generating 947MHz/ +Offset 67,708kHz/
-40dbm/CH=60 and open menu Testing/RF controls/Active unit “RX”/Operation mode “continuous”
Check 947MHz/ at Duplexer Z500 between In and Out (Out at L508). The normal attenuation is –5dbm. If the attenuation is
higher, change Z500.
Check the amplification of 947MHz between Pin 25 (LNAIN) and Pin 23(LNAOUT) from CRFU N600, the increase must be
+20dbm
IF Pin 23 low or no signal, check at Pin 26 LNAAGC=2.8V(Front End on=active). When LNAAGC=0V then check in WinTesla
menu RF-Controls if the Front End ON is activated. When not then activate them
If nothing happens yet, check PDATA0 line for shorts or breaks (R510, C516). If ok, change MAD D200
If LNAAGC=2.8V, then change CRFU N600
Check RFCLK=13MHz at C515. If no signal check 13 MHz G690 (refer to NO RX/ noTX)
Check 1018MHz at Pin 12 of CRFU. If no signal refer to NO RX/ noTX
Check 232MHz VHF at SUMMA Pin 8. If there is no signal, refer to TX faults/232MHz circuit
Check 71MHz IF at Pin 9/10 of CRFU N600. If no signal, check CRFU (refer to CRFU N600 faulty)
Check 13MHz IF at Z701. The attenuation between IN and OUT is –6dbm. If higher, change Z701 in case of no signal at Pin
30 from SUMMA N690, check SUMMA (refer to SUMMA N690 faulty)
CRFU N600 faulty
-
-
Check VREF_2=1.5V at Pin 16. If no signal check CCONT N110 and lines
Check LNAAGC=2.8V (Front END on is active) at Pin 26 (PDATA0 from MAD)
Check LNAOUT Pin 23=947MHz/CH:60
Check UHF 1018MHz/CH:60 at Pin 12
Check VRX=2.75V at Pin 6/17. If no signal check CCONT N110 and lines
Change CRFU N600 if all values in limit
SUMMA N690 faulty
-
Check VCP=4.6V at Pin 13, 22
Check VREF_1=1.49V at Pin 41
Check RFCLK=13MHz at Pin 15
Check VSYN_2 = 2.75V at
Pin 16,19 and 2.6V at Pin 9
Check RXC=1.2V
(AGC absolute=512)at Pin 36
Change SUMMA N690 if all
Values are in limit
© 2001 Nokia Mobile Phones
Checked by:
Customer Care Training Group
Approved by:
SCCE
CONFIDENTIAL
RAE-2
Service & Competence Center Europe
Customer Care Training Group
18 (30)
Repairhints
Version 1.0 Approved
Modified 02.07.2001
NO RX
RX-Fail
Set RF generator 947MHz ch: 60
RF-Level High output
Set Phone to RX continiuous mode
Check line between CCONT
N110 Pin25 and G690 Pin Vcc;
change CCONT if necessary
nOK
Check
Vcc=2,8V
at G690
Check 13MHz
RFCLK at J706
nOK
OK
Check AFC line, if OK
change COBBA N250
nOK
Check AFC
approximate
value =1,3V
at R547
OK
OK
Change G690
13MHz RFCLK
Check VSYN_1 line to
CCONT and R535 ;
change CCONT/R535
if necessary
nOK
Check
Vcc = 2,7V
at G601
nOK
Check 1018MHz
UHF at L509
nOK
OK
OK
OK
Check 71MHz IF
at Z650 in/out
Check 947MHz at N600
Pin25 and line between
X170 and N600
Check
13MHz IF at
Z701 in/out
nOK
If Vc=4,5 V ; Vref1= 0V
check R136 and N110 CCONT
change them if necessary
nOK
© 2001 Nokia Mobile Phones
Check
Vc=2,3V
at G601
Check 232MHz circuit
and surrounding
components
nOK
Check
232MHz VHF
at N690
Pin8
OK
OK
Change G601
Change Z701
Checked by:
Customer Care Training Group
Approved by:
SCCE
CONFIDENTIAL
RAE-2
Service & Competence Center Europe
Customer Care Training Group
19 (30)
Repairhints
Version 1.0 Approved
Modified 02.07.2001
TX faults
No TX
-
Check SW Tuning/TX-Power and/TX I/Q with WinTesla
If no TX, use WinTesla SW /Testing/ RF-conrtols/ TX-Burst mode power level 5/CH: 60
232MHz circuit
-
-
Check 232MHz at N690 SUMMA Pin 8. If no signal, check C581 for cold or broken soldering
Check VSYN_1=2.75V. When 0V, check line to CCONT for shorts or breaks. If ok, change CCONT N110
Check V660: Emitter=1.8V/Collector=2.5V/Base=1.2V. If the values are not ok, check the discrete components (see picture
below)
© 2001 Nokia Mobile Phones
Checked by:
Customer Care Training Group
Approved by:
SCCE
CONFIDENTIAL
RAE-2
Service & Competence Center Europe
Customer Care Training Group
20 (30)
Repairhints
Version 1.0 Approved
Modified 02.07.2001
Power Amplifier N500 faults
-
-
Check Vbatt =3.6V at Pin 1, 2, 4 and 6
Check 902MHz at Pin 8
Check also 902MHz at Pin 13 and put the power level from Base up to 5. The signal must be getting stronger. When you see
no diffrence between base level and power level 5, check with oscilloscope VPD on J708 (see picture base and power level 5
below) when turning power level up.
-
If the values do not change at J708, check C618, R622 and SUMMA N690 Pin 31, change faulty component if necessary.
If the values change but the signal is not getting stronger, tip very carefully with a non metallic item on top of N500.
If the Signal gets stronger cause of cold ground soldering under component, change N500.
Check VTX at Pin 16 (refer NO TX, VTX picture)
-
Check 902MHz at Z500 Duplexer Pin ANT, if the signal is ok, change X170 botton connector
-
© 2001 Nokia Mobile Phones
Checked by:
Customer Care Training Group
Approved by:
SCCE
CONFIDENTIAL
RAE-2
Service & Competence Center Europe
Customer Care Training Group
21 (30)
Repairhints
Version 1.0 Approved
Modified 02.07.2001
NO TX
TX-Fail
VBatt = 3,6V
902MHz ; ch : 60
TX power Level 5
Check VXO line between
CCONT Pin 25 and G690
PinVcc = 0R ; if ok change
CCONT N110
nOK
Check
Vcc=2,8V
at J704
nOK
Check
13MHz RFCLK
at J706
OK
Check 232MHz
at L512
nOK
Check at N690
PD1=2V/Pin12
Vref_1=1,49V/Pin41
nOK
change N690
OK
OK
Check Vc
between 0,5V-2,3V
at G690
Pin Vc
Check
VSYN_1 = 2,7V
at J702
Check AFC line for short
circuits, if ok change
N250 COBBA
nOK
nOK
OK
OK
OK
Check discrete components of
232MHz circuit especially C581
for cold or broken solderings,
change faulty component
Change G650
Check 1018MHz
UHF at N600 CRFU
Pin 12
nOK
Check VSYN_1 Line
between CCONT
/Pin15 and
R545 = 0 R
OK
Change
CCONT N110
Check G601
1018 MHz UHF
and components
OK
Check TX out line between
N600 Pin 30 and N500 RFIN
Pin8 for shorts or interruption
Check
902 MHz at
N500 Pin 8
nOK
OK
Check VBatt line for
interruption
nOK
Check
VBatt = 3,6V at
N500
Pin 1,2,4,6
nOK
Check
902MHz at
N500 Pin 13
OK
Check VPD = signals with
oscilloscope at N500 Pin 9,
if OK change N500
OK
Check 902MHz at Z500 Pin Ant;
if OK change X170
bottom connector
© 2001 Nokia Mobile Phones
Checked by:
Customer Care Training Group
Approved by:
SCCE
CONFIDENTIAL
RAE-2
Service & Competence Center Europe
Customer Care Training Group
22 (30)
Repairhints
Version 1.0 Approved
Modified 02.07.2001
ATTENTION!!!
First of all interchange all modules (PDA, CMT, UI) with functional ones to define the
faulty module
PDA (BS1, 0201484) electrical faults
PDA (BS1) does not start
(Note: If you do not have the possibility to JTAG (JTAG=Joint Test Action Group), send the PDA to the next authorized regional
service center. Everytime changing the XIP–FLASH´S (D441, D442), the JTAG is needed).
-
-
Connect service battery to communicator and listen to the HF speaker if you hear some POST BEEP Codes (Power on selftest)
3Beep=Memory failure in 1st 64kB of memory (connection between N400 and D441 faulty, in most cases change N400 cause
of broken soldering. Otherwise the D441 XIP flash has to be changed..But if you do not have the possibilty to JTAG, change
the PDA module and send the faulty one to next authorized regional service.
Note! For more information about POST BEEP Codes see in Service Manuel Chapter 7 Troubleshooting, POST BEEP Codes
Check current consumption when connecting service battery (see flowchart)
Check 32.768kHz (Vpp=1.20V) sinewave at J435 of B430
Check CPU core clock 1.47MHz (Vpp=1.5V) squarewave at J400
© 2001 Nokia Mobile Phones
Checked by:
Customer Care Training Group
Approved by:
SCCE
CONFIDENTIAL
RAE-2
Service & Competence Center Europe
Customer Care Training Group
23 (30)
Repairhints
Version 1.0 Approved
Modified 02.07.2001
PDA fail
Interchange all modules
PDA,CMT,UI with working
ones ,to find out which
module is faulty
Change DRAM
D443
nOK
170 mA - 180 mA
Connect service
battery
and check current
consumption
PDA LCD shows
slide contrast
Check PDA
Power Unit
50 mA
nOK
Vsys=2,8V
at E312
OK
OK
OK
PDA OK
Change B430
nOK
Check 32,768KHz
sinewave
(Vpp =1,20V)
at J435
OK
nOK
Change D441
XIP- FLASH
nOK
JTAG OK
OK
Check PLL
intermediate Voltage :
1,14V= Lid opened
2,8V, Lid closed
nOK
OK
Check Int. PLL
= 1,47 MHz
squarewave
at J 400
OK
nOK
JTAG OK
OK
Change N400
PDA OK
nOK
Change N400
JTAG OK
OK
Change D442
XIP-FLASH
nOK
Check discrete
components
of PLL for cold or
brocken soldering
JTAG OK
nOK
nOK
Change faulty
discrete
components
Change PDA
Module
OK
OK
PDA OK
(Note: If you do not have the possibility to JTAG (JTAG=Joint Test Action Group), send the PDA to the next authorized local service
center. Everytime changing the XIP–FLASH´S (D441, D442), the JTAG is needed).
© 2001 Nokia Mobile Phones
Checked by:
Customer Care Training Group
Approved by:
SCCE
CONFIDENTIAL
RAE-2
Service & Competence Center Europe
Customer Care Training Group
24 (30)
Repairhints
Version 1.0 Approved
Modified 02.07.2001
Relink mode
-
-
If “Relink enable” appears on PDA–Display after conncting the normal battery
Check resistance between E315 and E313. Good value =MΩ, bad value=kΩ and lower cause of electrical damage,
change N400.
If the communicator is connected to the service battery (battery switched in Test Mode) and does not switch in “Relink
mode”, also change N400
NOTE! Before changing parts, interchange all modules with working ones, to find out which module is really faulty
PDA LCD faults
PDA–Display vertical stripes
-
-
If you see vertical stripes on the PDA–Display and/or the PDA freezes after pressing buttons around the S-key
Change N400
© 2001 Nokia Mobile Phones
Checked by:
Customer Care Training Group
Approved by:
SCCE
CONFIDENTIAL
RAE-2
Service & Competence Center Europe
Customer Care Training Group
25 (30)
Repairhints
Version 1.0 Approved
Modified 02.07.2001
PDA–Display completly blue
After inserting the battery, the PDA–Display appears completly blue.
NOTE! Before changing parts, interchange all modules with working ones, to find out which module is really faulty.
PDA - LCD
completly blue
Change N400
nOK
Check
V28_1EN = 2,8V
atN450
Pin61
nOK
Check
V28_1=2,8V
at C475
OK
Change Phaser
N450
OK
Realign the
LCD Temp value
nOK
Check X800, Hinge Flex, and on
UI-Modul X700, C739, X730,PDA -LCD
for shorts, interruptions and broken
soldering
OK
PDA OK
-
After changing components you always have to realign LCD TEMP value. Follow the steps 1-9
Use WinTesla SW RAE2PD to tune the PDA – Display and follow the next steps
1. Start the RAE2PD SW
2. Speed : 115200; Com1 (or Com2 depending on your PC setup)
3. Choose RS protocol and press OK
4. Switch service battery in test mode (located at the right side of service battery) and connect it with PKD–4F dongle
5. Connect the phone to serial port com1 (or Com2 port depending of your PC setup) using DLR-2 cable
6. Connect service battery with 9110
7. Disconnect and then connect service battery with Fla–7 (When the lid is open, a small point appears in the upper left
edge.
(If the startup logo appears start again with step 7)
8. If the message “Target responding in testmode” appears on PC, press “OK”.
Otherwise press “cancel” and start again with step 7
At first open Peripherals/Test LCD Panel…/and choose Grey to show a GREY-SCALE on PDA-Display. Then choose the menu
and open I/O-Function/ Phaser Calibration to tune PDA-Display
© 2001 Nokia Mobile Phones
Checked by:
Customer Care Training Group
Approved by:
SCCE
CONFIDENTIAL
RAE-2
Service & Competence Center Europe
Customer Care Training Group
26 (30)
Repairhints
Version 1.0 Approved
Modified 02.07.2001
CMT does not switch on
-
When the power on button is pressed, the CMT–Display shows slight contrast but does not start, open the lid, use a magnet
and put them in the lower left corner of keyboard area and check if the PDA–Display turn off
If not, change S390 on PDA module
NOTE! Use always the new reed relay S390 (new code 5209005, old code 5309001)
New reed relay in use at HW 6000 from IMEI: 449211/70/655468/2)
See SB-035
© 2001 Nokia Mobile Phones
Checked by:
Customer Care Training Group
Approved by:
SCCE
CONFIDENTIAL
RAE-2
Service & Competence Center Europe
Customer Care Training Group
27 (30)
Repairhints
Version 1.0 Approved
Modified 02.07.2001
PDA software faults
PDA only shows the 9110 logo and freezes or is rebooting again
The PDA only shows the 9110 logo and freezes or reboots again, because the INI file is corrupt
If you have to rescue some files use PC-Suite before format the PDA as in step 3
1. First try to format the file system by pressing the key combination: Shift–Tab–< at same time (means: check the file
system)
2. If the fault remains try: Shift–Tab–> at same time (means: remove temporary files, including INI-files)
3. If the fault persists try: Shift–Tab–F at same time.(means: remove all data from PDA)
Note! More detailed discription you can find in User Manual 9110 under section Troubleshooting, problem 4
Internal Error
The message “INTERNAL ERROR” appears on PDA-Display after booting the SW because the user data are corrupt
If you have to rescue some files, try to use PC-Suite SW for Import/Export.
Note! It is possible that also corrupt files are rescued and after rewriting to PDA the same fault will happen again.
-
After rescue try to format the PDA by shortly pressing the key combination: Shift–Tab–F at same time after connecting the
battery.
Note! More detailed discription you can find in User Manual 9110 /section Troubleshooting, problem 4
XIP–Checksum fail
-
After inserting battery, on PDA–Display appears: XIP-Checksum failed
Try to update checksum with use of WinTesla SW/ Menu: Product/ Open/ RAE2PD/ I/O Functions/ Update Checksum
Note! Service Battery must be switched in Test Mode. For right connection refer to PDA–Display completly blue.
-
Now disconnect Service Battery and switch it in Normal Mode. Connect Service Battery to communicator and open the lid.
If the same fault persists, refer to Electrical faults: PDA does not start
If update checksum is ok, try to flash the PDA
If flash update fails or the same fault is appears again, probably the CPU or one of the XIP flash´s are faulty, because of
broken balls.
Note! Only use the 9110i PDA SW for 9110i communicator recognizable by special product codes. It is not allowed to flash 9110
PDA with 9110i SW. See SB-032
© 2001 Nokia Mobile Phones
Checked by:
Customer Care Training Group
Approved by:
SCCE
CONFIDENTIAL
RAE-2
Service & Competence Center Europe
Customer Care Training Group
28 (30)
Repairhints
Version 1.0 Approved
Modified 02.07.2001
ATTENTION!!!
First of all interchange all modules (PDA, CMT, UI) with functional ones to define the
faulty module
User Interface faults (0201483)
PDA reboots when lid was opened several times (only with HW version 3600,4000 and 4001 board Version 10)
See SB-017
Change the following components marked in the graphic and table
BS2 (UI) board Version 10.
Old NMP Code
1430691
2610007
2611707
Old Value
2R2
3µ3
3µ3
© 2001 Nokia Mobile Phones
NEW NMP code
1430690
2604079
2604054
NEW Value
0R0
220n
470n
CCT references
R736, R737, R738, R739, R740
C740, C741, C743, C744
C742
Checked by:
Customer Care Training Group
Approved by:
SCCE
CONFIDENTIAL
RAE-2
Service & Competence Center Europe
Customer Care Training Group
29 (30)
Repairhints
Version 1.0 Approved
Modified 02.07.2001
Broken LCD (PDA, CMT)
Blue areas in PDA–Display
-
The PDA–Display has a broken corner under metal frame, change PDA–Display
No lights on backlight panel
-
Check connection between L730 Pin 1 & N730 Pin 4 (0Ω). If connection is open, change L730
Check if there are 60V AC between Pin 6, 7 at N730. If there are only 30V AC or less, change N730
Check if the backlight panel is correctly assembled
Check if the two screws (M1, 6 x 5) at the bottom of UI are fixed with 10Ncm (this is also necessary to contact the panel to
UI)
Hinge flex and /or X700/X800 fault
-
If no or dark areas on PDA–Display and/or CMT–Display, check if Flex connector X700 (UI), X800 (PDA) and Hinge Flex
contacts are dirty, bent or broken. Clean or change connectors/contacts if necessary
Check also if connectors (X700, X800) are not closed correctly
CMT–Display broken
-
Lines missing in CMT–Display, because of broken corner under metal frame, change CMT-Display
© 2001 Nokia Mobile Phones
Checked by:
Customer Care Training Group
Approved by:
SCCE
CONFIDENTIAL
RAE-2
Service & Competence Center Europe
Customer Care Training Group
30 (30)
Repairhints
Version 1.0 Approved
Modified 02.07.2001
Change History
Originator
CC Training
Group
CC Training
Group
Status
Draft
Version
0.1
Date
03.03.2001
Comment
First version for the repair group
Approved
1.0
22.06.2001
First approved release
© 2001 Nokia Mobile Phones
Checked by:
Customer Care Training Group
Approved by:
SCCE